SEARCH FINESCALE.COM

Enter keywords or a search phrase below:

1/35 Dragon M2A1

6683 views
48 replies
1 rating 2 rating 3 rating 4 rating 5 rating
  • Member since
    February 2010
  • From: Maine
Posted by Stage_Left on Saturday, March 3, 2018 7:10 PM

Hi guys, I'm back. A leisurely build for sure, but more progress. Thanks for hangin' in there!

Gamera- thanks much; it's a solid kit but definitely not perfect. It wasn't you!

Joe- thank you as well. Cotman's, I think, is an 'economy' brand of Windsor & Newton, a well- known brand of artist oils and watercolors. I've had tubes of Cotman's watercolors for about 20 years and they still perform. Wilder is the company of Adam Wilder, a well-known modeler. His company makes all kinds of weathering products and the oils are one of his newer releases. They come out of the tube rather thin but I thought they worked rather well. I'm glad the results are noticable!

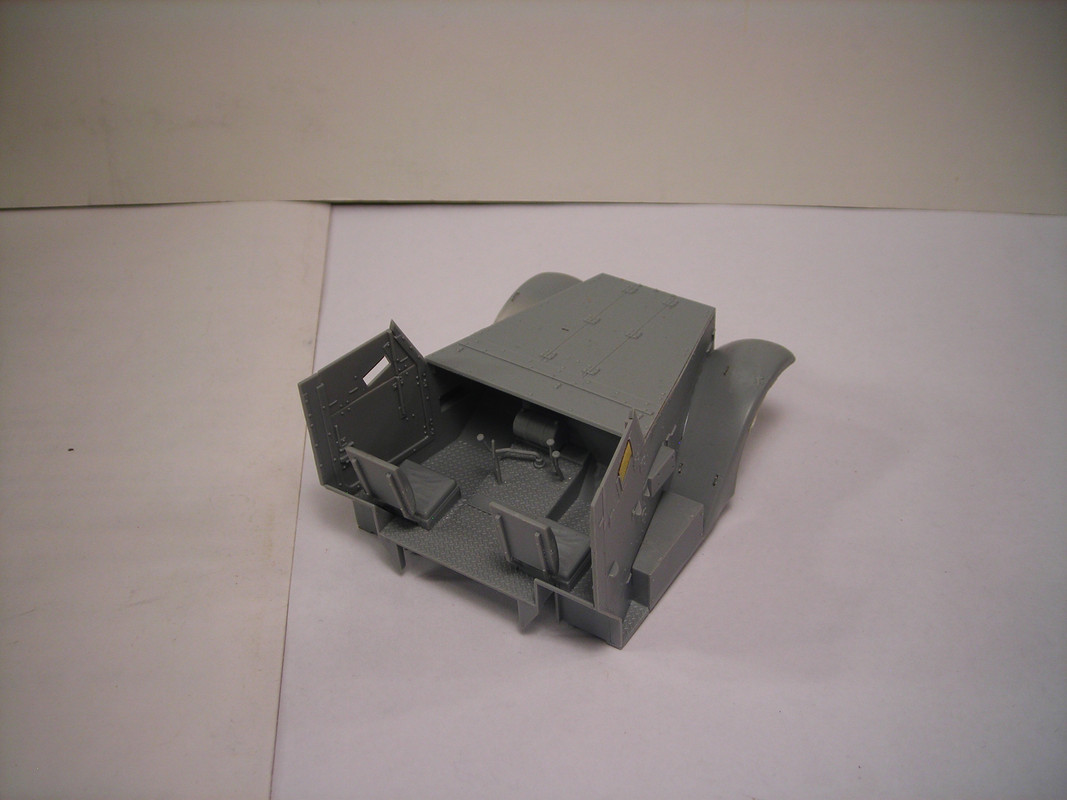
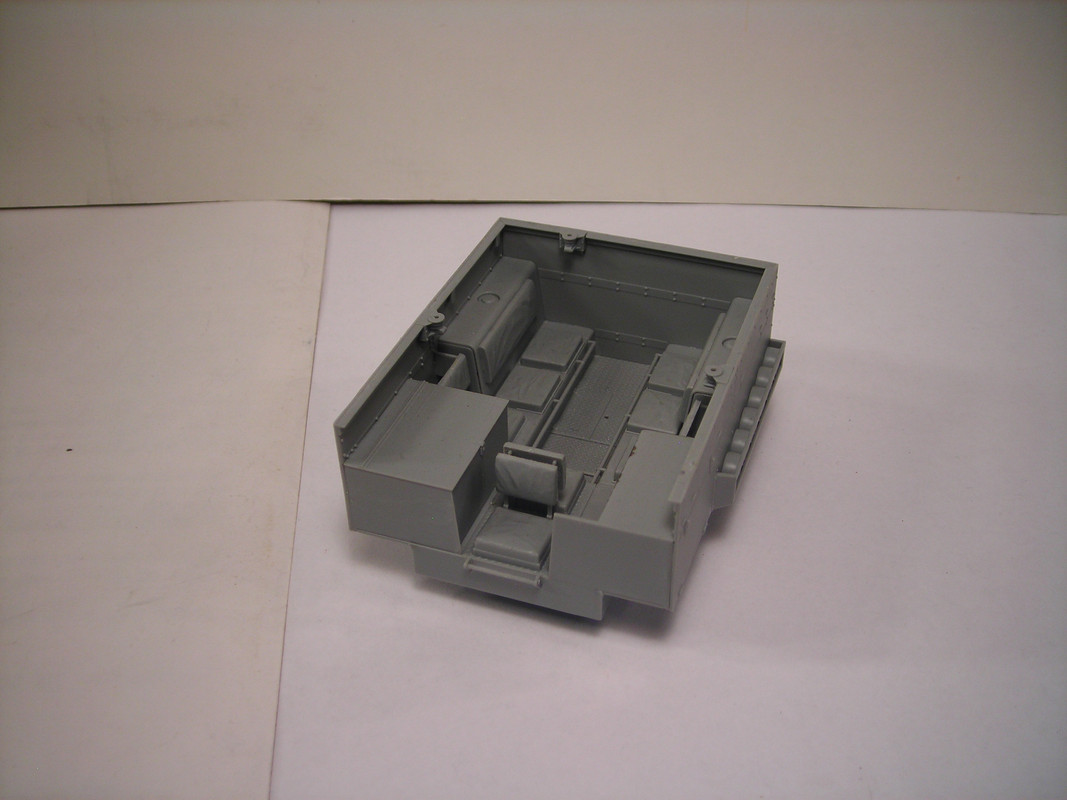
So.....cab and body are ready for paint; gap between hood top and sides filled with CA:


The engine grille received some special attention. There's an option to use a nose without a grille and insert photoetched grille slats, which I did on my previous build of this kit as an M2 and it worked to very nice effect:


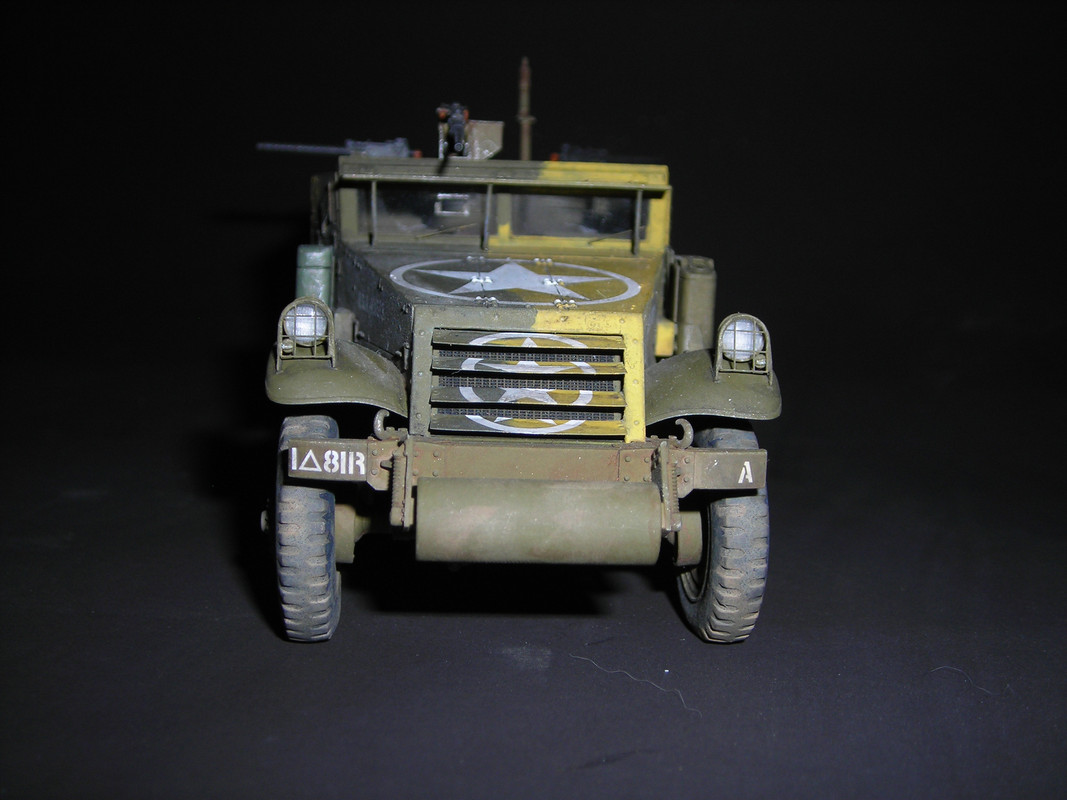
This time around I'm doing a vehicle operating in winter so the slats will be closed, and Dragon helps simplify the matter by giving you a molded nose with closed slats.


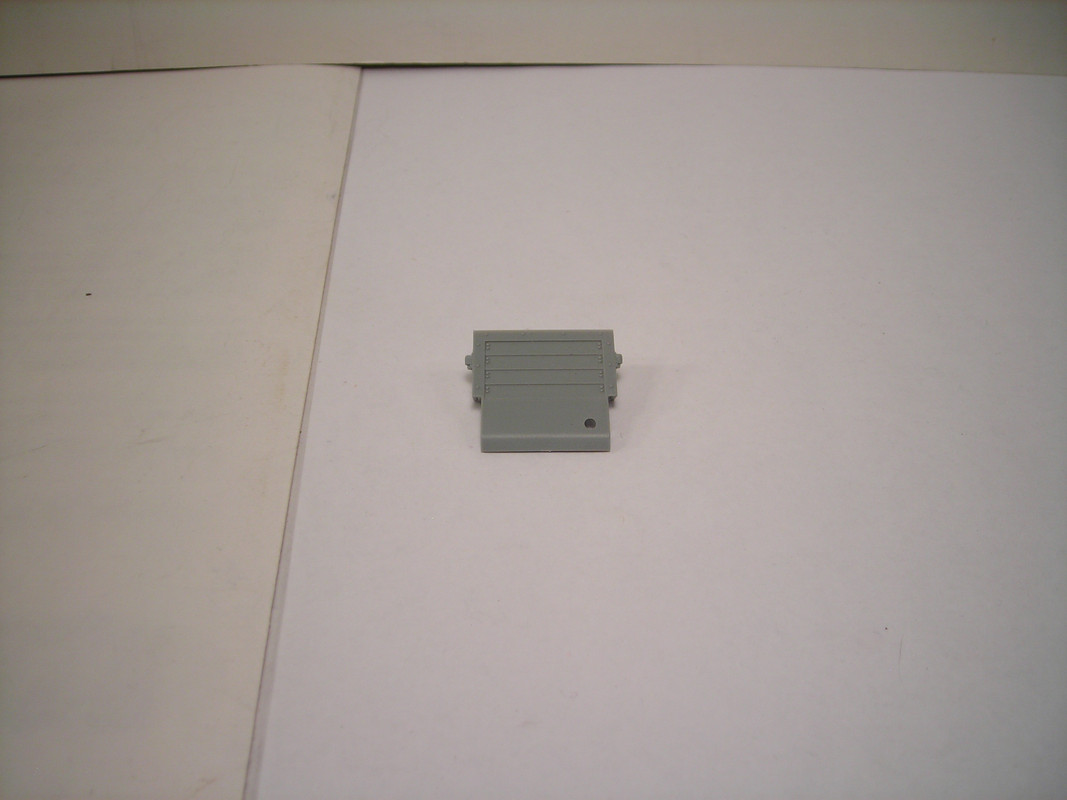
Because this was a combat vehicle, things like those slats probably didn't stay in excellent shape, so I proceeded accordingly:


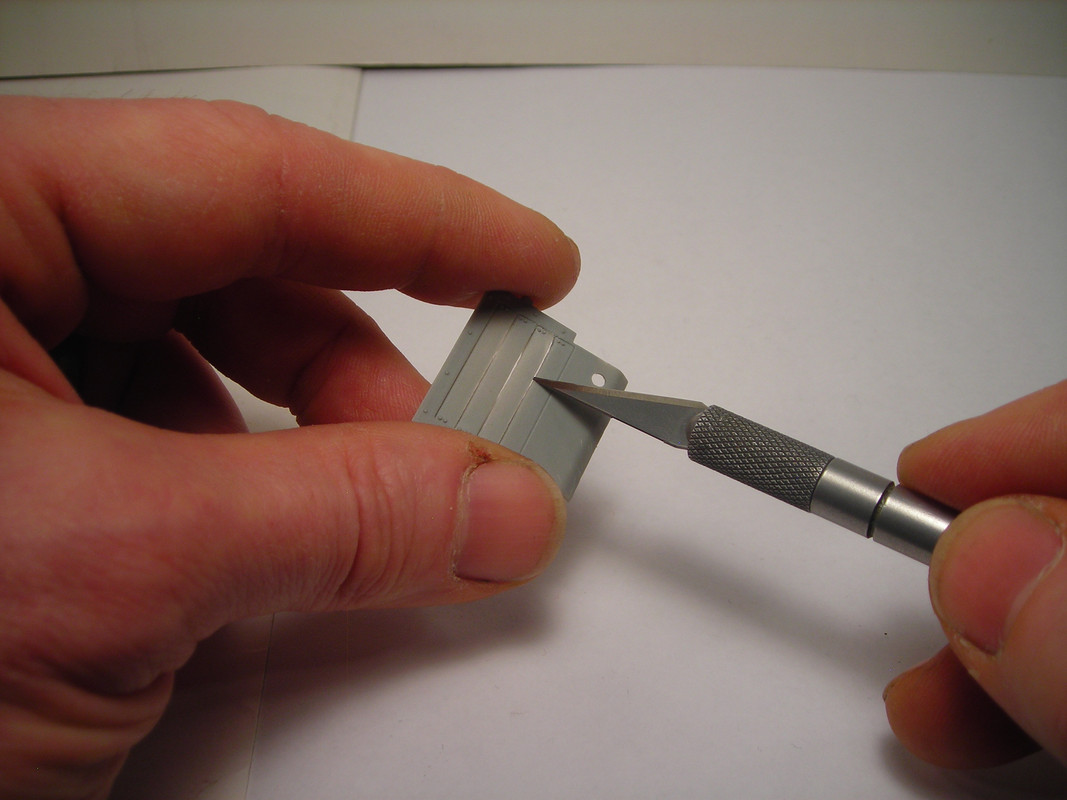
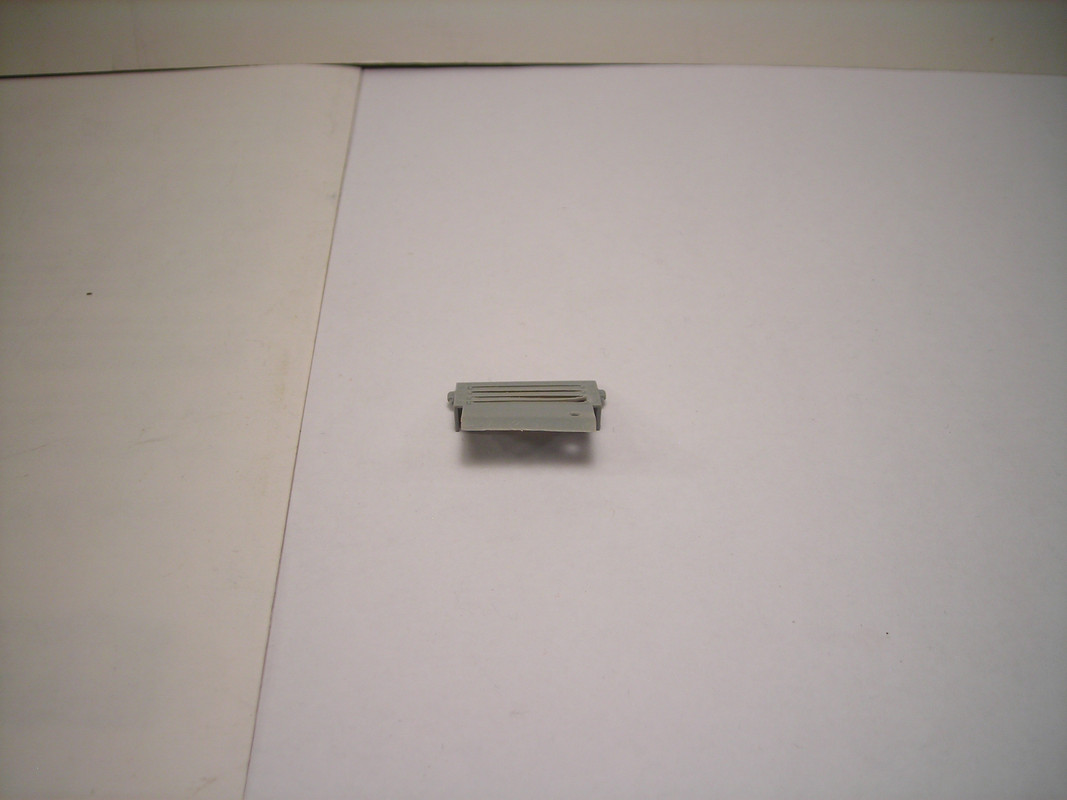
I thinned down the backside of this part with various needle files and cut open the bottom edges of the slats with the backside of the blade as shown above.

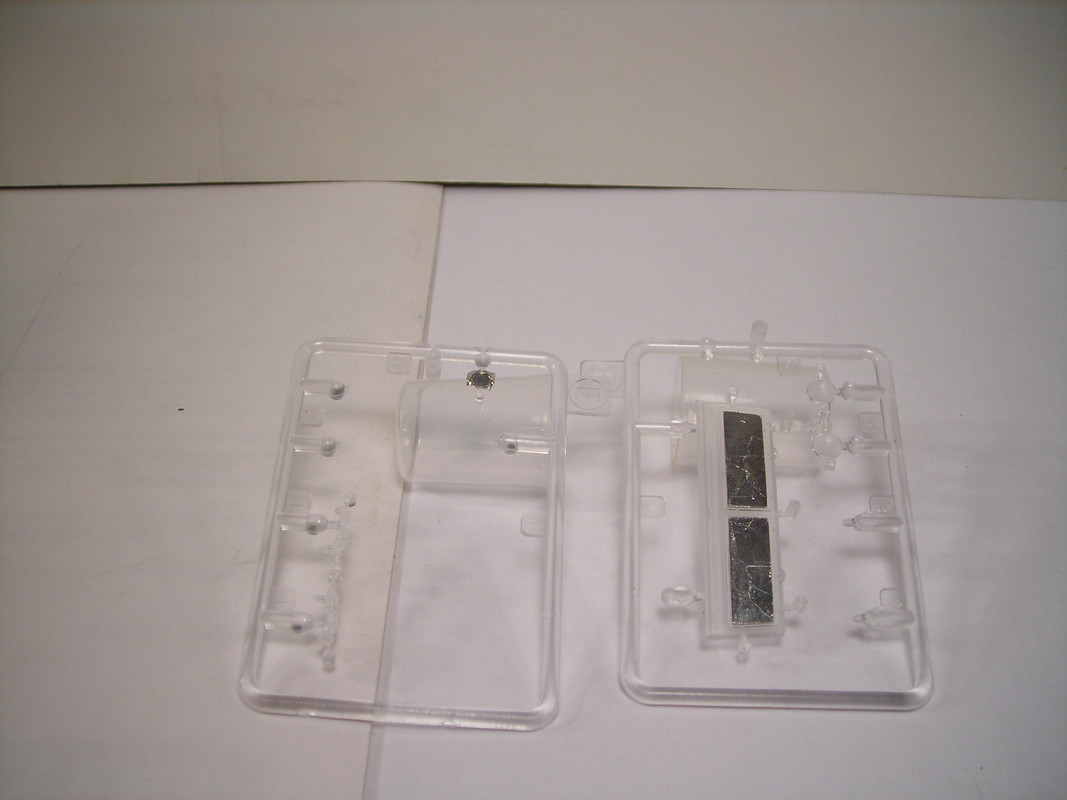
The windows in the windshield are masked with Bare Metal Foil and this part is ready for paint as well. Dragon molded the later style headlights and mounts for the M2A1 in clear plastic (parts E3 and E4), which I thought was an interesting choice. I don't really see the logic in this, since the headlights and mounts themselves needed to be painted anyway, and the lenses are separate parts. The clear plastic, in my view, make E3 and E4 harder to see and work with (insert facepalm as you see fit), but the turn indicators- mounted on top of the headlights- are molded as part of the same piece so I suppose this saves the builder from having to handle two very tiny parts while still retaining the clear aspect of the turn signal lense.

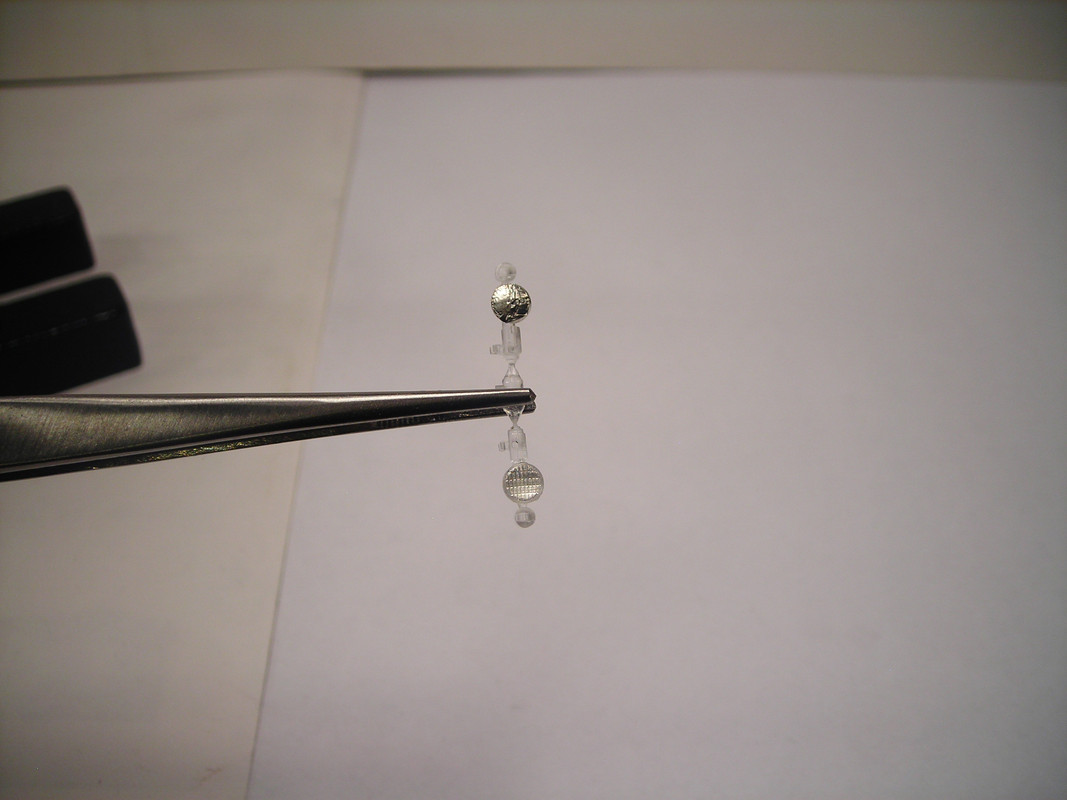
In any event, I applied two small squares of Bare Metal Foil (chrome) to the inside of the headlight lenses, then attached the lenses to the headlights with CA- very carefully! The slower-setting action of the CA gel allowed me a few extra seconds to align the lenses properly, and when that set I trimmed off the edges of the BMF that stuck out from the lenses. Below is the windshield and a lense with the BMF square attached:


And here are the two completed headlights with lenses. The top lense has been masked with BMF, the bottom not yet:


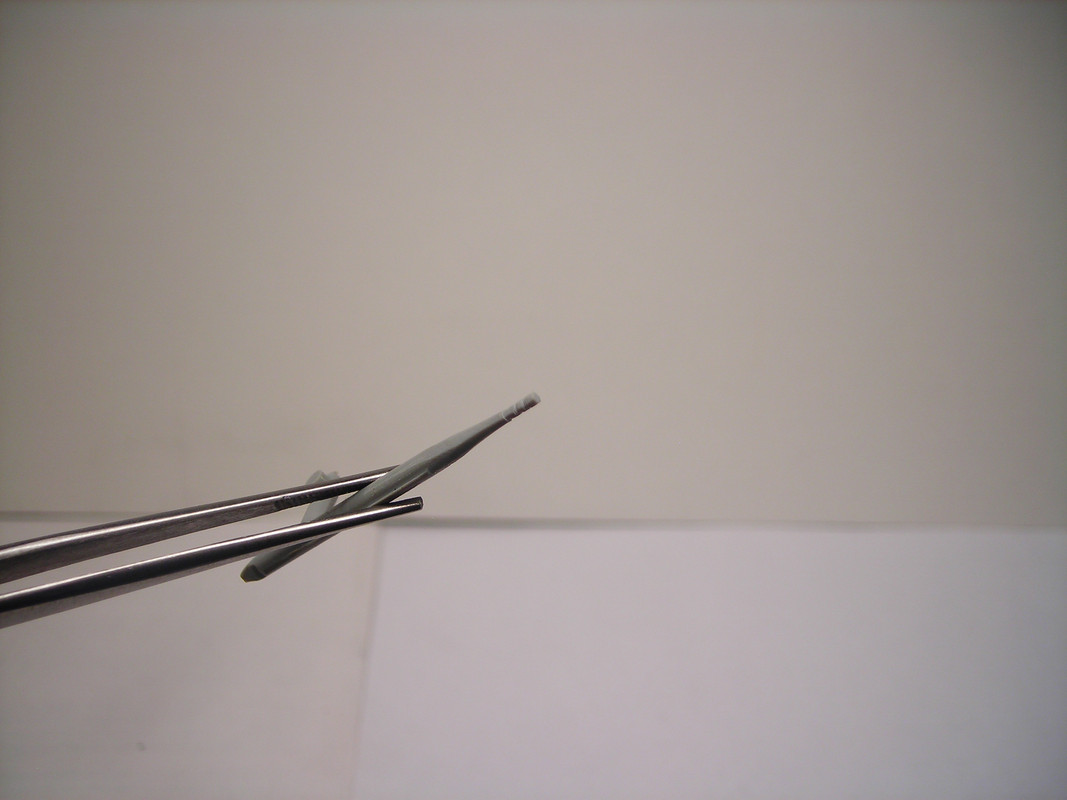
The M2A1 had a winch mounted on the front bumper, which of course employed a steel cable. At the end of the cable was a length of chain, to the end of which a hook was attached. Dragon's instructions would have you simply tie a knot in the string meant to represent the cable around one end of the chain, but this is just not how cable is attached to chain. A cable binder is required, so I made one out of sprue. I carefully scraped a hexagon shape with an xacto:


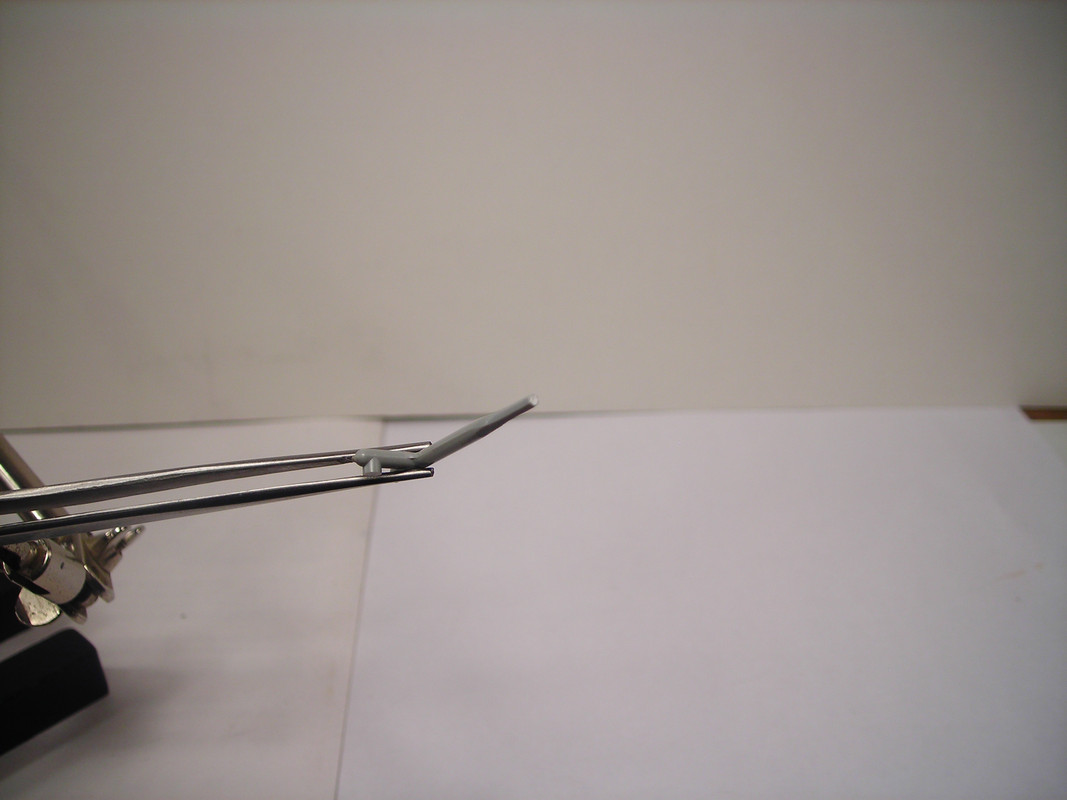
Then I filed grooves in the sides. The finished product:


That's what I've got for now; comments and critique welcome as always! Thanks guys!

Dave


  • Member since
    August 2009
  • From: MOAB, UTAH
Posted by JOE RIX on Sunday, March 4, 2018 2:11 PM

I'm excited to see some updates from you Dave. Well worth the wait. That is some really terrific progress. Superb attention to detail. Your skill at executing some of the work needed to correct and enhance that detail is really top notch. You're certainly causing me to mark up my instructions with plenty of notes. Keep it coming Bro.

Joe

"Not only do I not know what's going on, I wouldn't know what to do about it if I did". George Carlin

  • Member since
    November 2009
  • From: SW Virginia
Posted by Gamera on Friday, March 9, 2018 7:51 AM

Dave: Somehow I missed this when you first posted but nice work there! Looking forward to more updates. 

"I dream in fire but work in clay." -Arthur Machen


  • Member since
    January 2006
  • From: California
Posted by SprueOne on Saturday, March 10, 2018 4:04 PM

Dave, nice work on the details.


Anyone with a good car don't need to be justified - Hazel Motes


Iron Rails 2015 by Wayne Cassell Weekend Madness sprueone

  • Member since
    February 2010
  • From: Maine
Posted by Stage_Left on Tuesday, March 13, 2018 6:03 PM

Joe, Gamera, and Sprue- thanks very much as always!

Folks, welcome to Maine in March:


Thanks to my employer actually caring about the safety of their employees due to the 12-18 inches of snow predicted by tomorrow (Wednesday) midday, the facility is shut down for today. This allowed me some extra time on this build. Without ado: some nylon upholstery thread provided the winch cable, to which is attached the scratchbuilt cable binder, kit chain, and kit hook. The kit chain was comprised of circular rings, but that's not exactly the shape of chain links so I gently squeezed each link with a pair of tweezers to make each link oval. I simply cut the last link in the chain to open it and thread it through the eye on the hook. A tiny bit of CA closed up the link:


I had said the cab was ready for paint, but I spoke a bit too soon. The gap between the top and sides of the hood wasn't filled properly, so after sanding and filing the CA I applied some Mr. Surfacer 1000 with a toothpick. When that dried I gently removed excess with my exacto to get things up to snuff.

I then set about making some straps out of doubled tissue paper and diluted white glue for the fender tie-downs, to complete the look. In the middle of this I decided a tarp would enhance things, and that was provided by more diluted white glue and rolled tissue paper. The front strap represents a partial that has been torn, and a buckle was made for the one securing the tarp with very thin wire formed around a square file:


The right side of the cab will remain unchanged; the nose with grille was also added:


Paint coming very soon; thanks as always for looking in!

Dave

  • Member since
    July 2014
  • From: Rifle, CO. USA
Posted by M1GarandFan on Tuesday, March 13, 2018 6:39 PM

It's looking great so far. Can't wait to see the finished product!

Your first shot looks like Colorado in March, and April, and May.........and some years June.

My builds are all held up because I can't get it warm enough in the garage to paint. I got a hold of the Tasca/Asuka Browning M2 gun set and it's really nice compared to Tamiya's efforts so far. And, you get two complete guns in the kit, early and late style cradles.

  • Member since
    October 2004
  • From: Northern Virginia
Posted by ygmodeler4 on Tuesday, March 13, 2018 9:46 PM
Looking good so far. Wife and I drove up to Maine for our honeymoon first week of October, it was gorgeous, right as leaves were starting to change. We stayed along the coast and only as far as Acadia. Figured it got cold fairly soon after though.

-Josiah

  • Member since
    September 2006
  • From: Dripping Springs, TX, USA
Posted by RBaer on Tuesday, March 13, 2018 10:36 PM

Work on the cab is great, very good. The snow, not so good.

Apprentice rivet counter.

  • Member since
    November 2009
  • From: SW Virginia
Posted by Gamera on Wednesday, March 14, 2018 7:37 AM

Lol, another reason I live in the South, we ended up with about a foot of snow and there's nothing left now but a few patches here and there. 

Great job on the chain, big improvement. 

And I had some issues with the cab on mine too, I thought I just did a sloppy job on assemby. Hate to see you have the same problems but at least it does make me feel a little better about thinking I'd done a half-Censored job on mine! 

"I dream in fire but work in clay." -Arthur Machen


  • Member since
    February 2010
  • From: Maine
Posted by Stage_Left on Saturday, March 24, 2018 7:28 PM

M1Garand- thanks very much! Sorry your winters last until late spring...or longer Boo Hoo I'm fortunate that I can have my spray booth in the basement and that it doesn't get too chilly down there to throw paint. That Tasca/Asuka M2 set must really be something; I've got their M32B1 kit- wow!

Josiah- thanks! You and your wife chose a great time of year to visit Maine; the foliage is uaually pretty spectacular, and I think that the coast is always worth the trip. You got pretty much everything worth seeing if you went as far as Acadia, unless you wanted to see West Quaddy Head Lighthouse in Lubec (near Eastport), and it does turn chilly when November rolls around.

Thanks RBaer!

Gamera- thanks as always. My brother and his wife lived in Blacksburg for about 10 years, but moved to the Atlanta area in the mid-'90s. They're basically snow-free, and I'm left with.....well, you saw the evidence. As for the cab, it can definitely be a bit tricky. For the life of me I couldn't remember on the previous build if I glued the hood panel to the cab side panels before fitting to the floor pan, or as I did this time, fitting the side panels to the floor and hoping for the best with the hood. I don't remember any issues before, so maybe for me it was order of assembly.....but in any case, got it sorted now.

So yes, true believers, it's update time and the snow is indeed abating here in the North Country (except if you live in Boston, or Philly....but alas, you residents of the latter, you have a Lombardi Trophy to melt the snows of winter!!! Devil)

Anyway, we have paint! Or a preshade, at the least:


Model Master U.S. Army Helo Drab and Italian Dark Brown, sprayed at around 10 psi and thinned more than the 'recommended' amount of 50/50 or 'consistency of skim milk' or whatever it is. This allows me a little more control, and if the layers appear thin, that's what I was going for. I got the idea from Matt McDougall, who used to frequent here (DoogsATX) and runs his own modeling blog, Doogs' Models. You can read about it here.

So that's what happened today. Stay tuned, I see Olive Drab on the horizon! Thanks as always guys!

Dave

  • Member since
    July 2014
  • From: Rifle, CO. USA
Posted by M1GarandFan on Saturday, March 24, 2018 7:43 PM

Lookin' better all the time! 

  • Member since
    February 2010
  • From: Maine
Posted by Stage_Left on Sunday, April 1, 2018 1:35 PM

Thanks again M1Garand!

So....I wanted to give you all a look at the unpainted headlight/guard assembly. Quite fiddly, but it sure looks the part to me after I got it assembled:


And here with each affixed to the nose. Dragon provides the cylinder-shaped mounting bracket molded to the side of the nose, and at the bottom of that is a positive locator for the bottom of the headlight itself, on which is a tab in the shape of a 'c'. Very tiny and again quite fiddly, but in my view effective if you have the patience and the nerves Bang Head


And now we have.....olive drab!


Actually this color is MM Field Drab, a faded olive drab shade. I like it, but my apologies for not setting my camera parameters correctly; it looks too green in the pics. You can also see a couple paint goofs in that last pic, which will be dealt with. There's another light base coat to come. Oh- I did brush paint the inside of the guard around the MG ring straight olive drab, which is darker (of course) than the field drab to provide a hint of shadow.

Stay tuned, more paint to come! Thanks as always guys, and constructive critique always welcome!

Dave

  • Member since
    August 2009
  • From: MOAB, UTAH
Posted by JOE RIX on Tuesday, May 1, 2018 9:25 PM

Sheesh, I can't believe that I've lagged so long without acknowledging your progress. And terrific progress it is. Your approach to the paint job is quite effective and is looking great. I'm familiar with Doogs technique although I've yet to attempt it on anything I've built. You seem to have a firm grasp of it. You have done a fantastic job on the winch and headlights. Their excellent. Again, I'm keeping notes from your build to incorporate on mine. Very grateful for skills and techniques. I do hope you have some progress to share soon.

Joe 

"Not only do I not know what's going on, I wouldn't know what to do about it if I did". George Carlin

  • Member since
    November 2009
  • From: SW Virginia
Posted by Gamera on Wednesday, May 2, 2018 7:40 AM

It's always better with olive drab! Wink

"I dream in fire but work in clay." -Arthur Machen


  • Member since
    February 2010
  • From: Maine
Posted by Stage_Left on Wednesday, May 2, 2018 7:37 PM

Joe and Cliff- thanks as always for the encouragement! Oddly enough, I checked this thread earlier in the month and my pics had disappeared. I sent out a query in the Forum Feedback and Error Reporting forum, and thanks to a couple helpful replies I discovered that Postimage, my third party host, had either been hacked or failed to pay their web host. I checked Postimage and sure enough, the domain had been changed from dot com to dot cc.

So, last weekend I set about repairing this thread by editing each post and reloading the pics. Yes, a bit time consuming, but I feel I owe it to you kind folks who have been giving your time to check out my progress and respond. Rest assured, there will be a more reliable (fee involved) 3rd party host in my future. Fotki comes highly recommended.

Updates you say? Updates you will have! I got the instrument panel sorted. By that, I mean I bought the Archer Fine Transfers sheet for this kit. And a fine set of transfers it is! For those who aren't familiar with Archer, they specialize in dry transfers- you simply place the image over where you want it on the model and rub the sheet that the image is attached to. It's like waterslide decals in reverse: instead of the decal resting on top of the paper, the dry transfer is underneath. The dry transfer sits directly on the model and rubbing the paper on top releases the image to stick to the model.

It's a neat process....but having said all that, the process for the instrument and placard transfers is a bit different. They're very small, as you'd imagine, and they don't all sit on flat surfaces. So, Archer provides Wet Media Paper- basically, blank decal paper. You transfer the images to the paper as you would any other dry transfer, then cut whatever image you want out of the paper and treat it as a normal decal. This process worked like a charm! There's even a decal for the fire extinguisher next to the passenger side door:


I drybrushed a bit of MM US Army Helo Drab, put down a filter of Cotman's burnt umber watercolor, and chipped a bit around various edges with a sharpened pencil.

You can see in the pic below how the sheet came originally (on the instruction sheet, in blue). I cut the sheet between E and F, and again between H and J. I oriented the Wet Media Paper vertically and rubbed on the three sections going top to bottom (A-E, F-H, J-end of paper). The sheet is on the left with what I needed cut out. Archer generously gives you four of each image.


That's it for this time, thanks as always for looking and for your comments!


Dave

  • Member since
    August 2009
  • From: MOAB, UTAH
Posted by JOE RIX on Wednesday, May 2, 2018 11:20 PM

Wow! Those dry transfers look absolutely terrific. I will definitely have to pick up a set for my M2A1. Where did you find yours? That's a great tip on using decal film for the small transfers. 

I've been using Postimage since the great Photobucket debacle and have yet to encounter any issues. Of course I haven't checked on any of my past posts since. Glad you took the time to fix your pics as I consider them invaluable. To me, the loss of all the valuable posted pics was the most saddening result of the Photobucket racket.

"Not only do I not know what's going on, I wouldn't know what to do about it if I did". George Carlin

  • Member since
    November 2009
  • From: SW Virginia
Posted by Gamera on Thursday, May 3, 2018 7:32 AM

Sorry about you having to go though all that but thanks so much for getting the photos back for us. Nice work and you're making great progress. 

I used Archer transfers for my halftrack too and loved them. Messed up a few but there's enough for about four-five vehicles on the sheet so no big deal. 

"I dream in fire but work in clay." -Arthur Machen


  • Member since
    February 2010
  • From: Maine
Posted by Stage_Left on Thursday, May 3, 2018 8:17 PM

Joe and Cliff- thanks so much! Yeah, the 3rd party hosting thing, as I recently found, can be a pain.

I think I got my Archer set off ebay- seemed to be a no-fuss option. The little blank decal sheet is provided with the set. I'll have another update soon!

Dave

  • Member since
    November 2009
  • From: SW Virginia
Posted by Gamera on Friday, May 4, 2018 8:05 AM

Oh yeah, Ebay is a great place to find hobby stuff, I've found some great deals. But Archer is great to order directly from too, I picked up a half-dozen sheets of their dry transfers including the US halftrack decals you used plus US rank shoulder patches- both enlisted ranks and the division insignia and they put them all in a big mailing envelope and shipped them at a really good price. 

"I dream in fire but work in clay." -Arthur Machen


JOIN OUR COMMUNITY!

Our community is FREE to join. To participate you must either login or register for an account.

SEARCH FORUMS
FREE NEWSLETTER
By signing up you may also receive reader surveys and occasional special offers. We do not sell, rent or trade our email lists. View our Privacy Policy.