SEARCH FINESCALE.COM

Enter keywords or a search phrase below:

AFV Club 1/35th Sd.Kfz 251/4 Ausf C Completed page 3

11764 views
92 replies
1 rating 2 rating 3 rating 4 rating 5 rating
  • Member since
    December 2002
  • From: Bury St Edmunds, Suffolk, England
AFV Club 1/35th Sd.Kfz 251/4 Ausf C Completed page 3
Posted by Bish on Sunday, February 18, 2018 5:53 AM

My second build of the year is one from my rather large 251 collection and one i have been wanting to do for a while.

I will be building a vehicle from the 1t Pz Div in Greece in 1943. This Div was sent to Greece as a result of the British Operation_Mincemeat This lead to the Germans to believe the Allies would be landing in Greece when in fact they were going to invade Sicily and Italy.

Ashide form a couple of Eduard PE sets, i will be adding some Trumpeter figures. I only need 7 of these and have not yet decided on which 7 i will use.

I also have AFV clubs ammunition set for some extra ammo. The 251 kit comes with one sprue from this ammo set but no decals, so this ammo set gives me the decals as well.

I made a start on this on Tues. Our model club has started doing a build night once a month in addition to the normal club night. This weeks was the first time i have been to the build night and i was surprised how much i got done in 3 hours without any distractions of a TV or computer. Even though i took my PE, i decided i didn't want that pinging across the club room so while i would normally start on the interiour, i focused on getting the sides in place and the running gear started.

Then last night i was able to focus on this kit fully, after finishing off one of my shelf queens. I have concentrated on the drivers section, leaving out the drivers IP and seats to be added after painting.

And got the rear section of the floor fitted.

Next i will work backwards on the lower hull inside before then switching to the upper hull and then painting.

This is my 5th 251 and my 2nd AFV kit, the other being an Ausf D.I have noticed with both kits lots of thick pour stubs. These are not anywhere that would be seen but they have to be removed to allow parts to be fitted. But that being said, the AFV Club 251's are already my favorite of the 3 brands i have built. I did like how the lower sides were fitd on this, much better than Dragon. Its quite lucky fort me that the AFV club kits are my favorite. Our of the 26 251's in the stash, 15 are from AFV.

I am a Norfolk man and i glory in being so


On the bench: Airfix 1/72nd Harrier GR.3/Fujimi 1/72nd Ju 87D-3

  • Member since
    February 2014
  • From: Michigan
Posted by silentbob33 on Sunday, February 18, 2018 8:45 AM
This looks like an awesome project Bish! I will definitely be following along.

On my bench: Academy 1/35 UH-60L Black Hawk

  • Member since
    August 2009
  • From: MOAB, UTAH
Posted by JOE RIX on Sunday, February 18, 2018 8:57 AM

It this has all the looks of being a terrific build Bish. I'm really interested in following along on this one. I had yet to see an AFV Club 251 example so, I'm curious to see how it builds up. I have the newer Tamiya 251 and have eyed the Dragon's but, now I may have to consider the AFV Club per your evaluation. It appears that you are off to a grand start.

"Not only do I not know what's going on, I wouldn't know what to do about it if I did". George Carlin

  • Member since
    December 2002
  • From: Bury St Edmunds, Suffolk, England
Posted by Bish on Sunday, February 18, 2018 9:16 AM

Cheers guys, glad to have you along.

Joe, i read plenty of reviews a few years back and bsed on those, i decided to go for the AFV club kits where the same variants are built by different companies. So thats what i have done. I have got Dragon kits, but that was only where there was no AFV club option. I am a bit gutted as they have now announced a /9 Ausf D early and i have already built the Tamiya kit.

I'll try and give as much info on the build as i can and pint out any issues. But one plus for this is how the lower sides fit. On the Dragon Ausf C kit there are no locators, and if you don't get both sides exactly level, it can cause big problems when attaching the rear. I found that out on the Dragon /6. This AFV kit has excellent locators for the sides, though they need some cleaning out, you can't go wrong.

So it all boils down to what variant you want.

I am a Norfolk man and i glory in being so


On the bench: Airfix 1/72nd Harrier GR.3/Fujimi 1/72nd Ju 87D-3

  • Member since
    April 2015
Posted by Mopar Madness on Sunday, February 18, 2018 2:23 PM

What I wouldn’t give for 3 uninterrupted hours of modeling! Big Smile Nice choice of subject matter.  

Chad

God, Family, Models...

At the plate: 1/48 Airfix Bf109 & 1/35 Tamiya Famo

On deck: Who knows!

  • Member since
    December 2002
  • From: Bury St Edmunds, Suffolk, England
Posted by Bish on Sunday, February 18, 2018 2:25 PM

Thanks Chad. There were some interuptions, mainly looking at what other people were doing and picking up some ideas. But it gave me a good insite into what i can get done if i leave the computer off.

I am a Norfolk man and i glory in being so


On the bench: Airfix 1/72nd Harrier GR.3/Fujimi 1/72nd Ju 87D-3

  • Member since
    May 2009
  • From: Poland
Posted by Pawel on Sunday, February 18, 2018 4:01 PM

Hello Bish!

I'm almost done with my 1/72 251 collection, so I'd be glad to take a look at your 1/35 build. AFV Club is a very good company, most of the models I had contact with were very good. Looking forward to see more of your build, good luck with it and have a nice day

Paweł

All comments and critique welcomed. Thanks for your honest opinions!

www.vietnam.net.pl

  • Member since
    August 2012
  • From: Parker City, IN.
Posted by Rambo on Sunday, February 18, 2018 8:04 PM
I'll be watching closely I love half tracks and the 251 is my favorite of them. Also have a afv club that I picked up about a month ago so wanting to know how they go together over the dragon kits

Clint

  • Member since
    December 2002
  • From: Bury St Edmunds, Suffolk, England
Posted by Bish on Monday, February 19, 2018 2:08 AM

Thanks for looking in guys.

Pawel, i have indeed been following your 251 builds with great interest. The only AFV club kiuts i have are 251's, but from all the reviews and from what i have seen so far, they are certainly a good company to buy kits from and i am looking at other subjects of theres.

Chad, same here, which is why i have so many. I would like to do of them but i have narrowed it down to 63 versions and variants and i don't even have half that yet. So just trying to do as many as i can.

The Dragon and AFV kits are very similar in detail, but the AFV kits go together better. As i mentioned above, where the same variant has been done by both companies, i have gone for the AFV club. There is just the extra clean up on the AFV kits and most of them come with rubber band tracks, though this one has indy links.

I am a Norfolk man and i glory in being so


On the bench: Airfix 1/72nd Harrier GR.3/Fujimi 1/72nd Ju 87D-3

  • Member since
    November 2009
  • From: SW Virginia
Posted by Gamera on Monday, February 19, 2018 4:46 PM

Your usual top notch work Bish and I'm really looking forward to seeing those figures come together.

"I dream in fire but work in clay." -Arthur Machen


  • Member since
    December 2002
  • From: Bury St Edmunds, Suffolk, England
Posted by Bish on Tuesday, February 20, 2018 2:06 AM

Thanks G. I am looking forwardto startring on them and trying out some painting idea i picked up from one of the guys at the club last week.

I am a Norfolk man and i glory in being so


On the bench: Airfix 1/72nd Harrier GR.3/Fujimi 1/72nd Ju 87D-3

  • Member since
    November 2010
  • From: Florida-West Central
Posted by Eagle90 on Tuesday, February 20, 2018 5:27 AM

Wow!  Bish that is a great looking project.  Lots of extras to bring it to life.  Looking forward to learning more from you on this project.


  • Member since
    December 2002
  • From: Bury St Edmunds, Suffolk, England
Posted by Bish on Wednesday, February 21, 2018 5:17 AM

Cheers Bobby. I'll try to remember to get somedecent updates, though at times i get carried away and forget.

I am a Norfolk man and i glory in being so


On the bench: Airfix 1/72nd Harrier GR.3/Fujimi 1/72nd Ju 87D-3

  • Member since
    December 2002
  • From: Bury St Edmunds, Suffolk, England
Posted by Bish on Saturday, February 24, 2018 11:59 AM

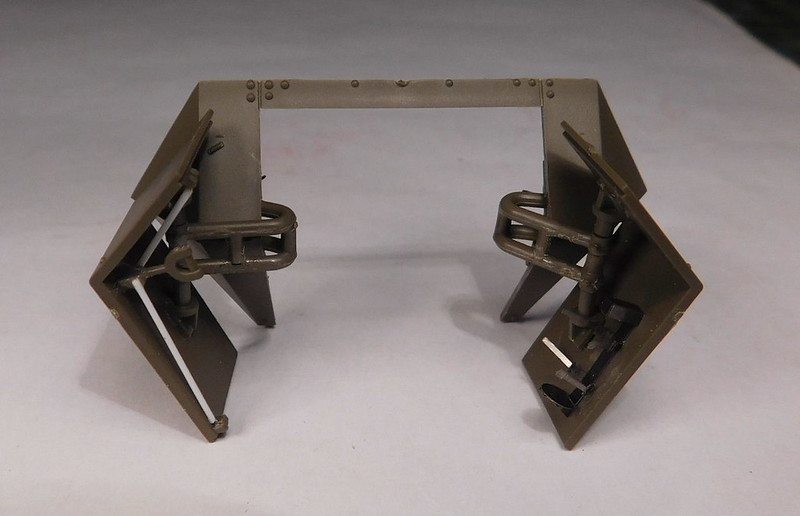
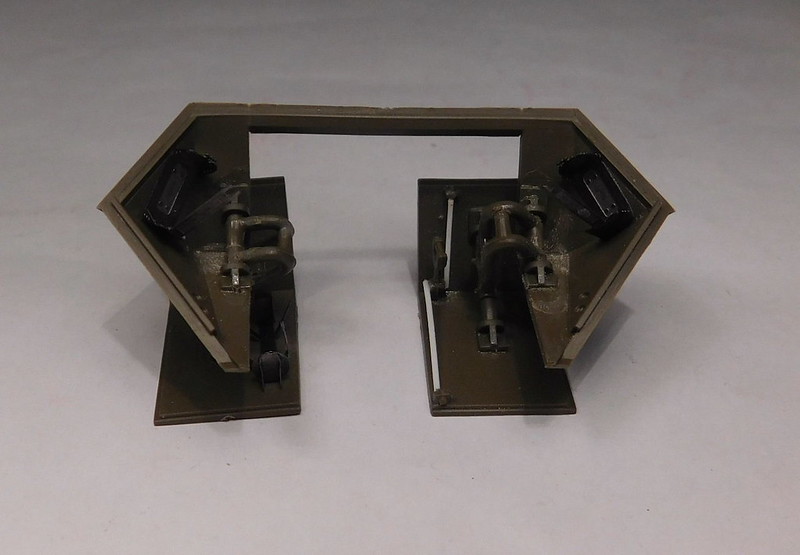
have the interiour completed and ready for painting. I had to make some alterations to the rear doors. The locking mechanisim on the left door is set in the closed position, and when i adjusted the handle so its set to open, the locking rods were to small. So i cut them away and used stryene rod in their place.
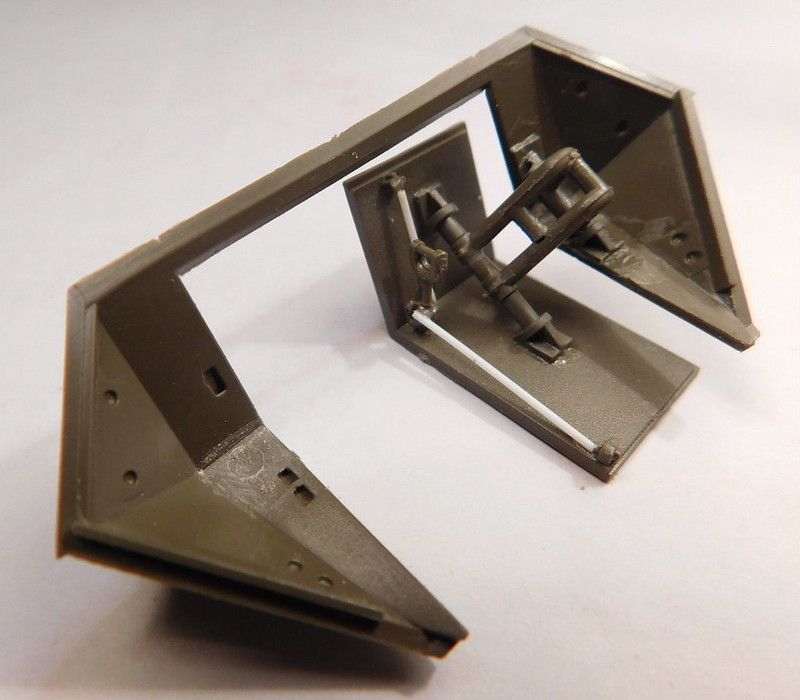
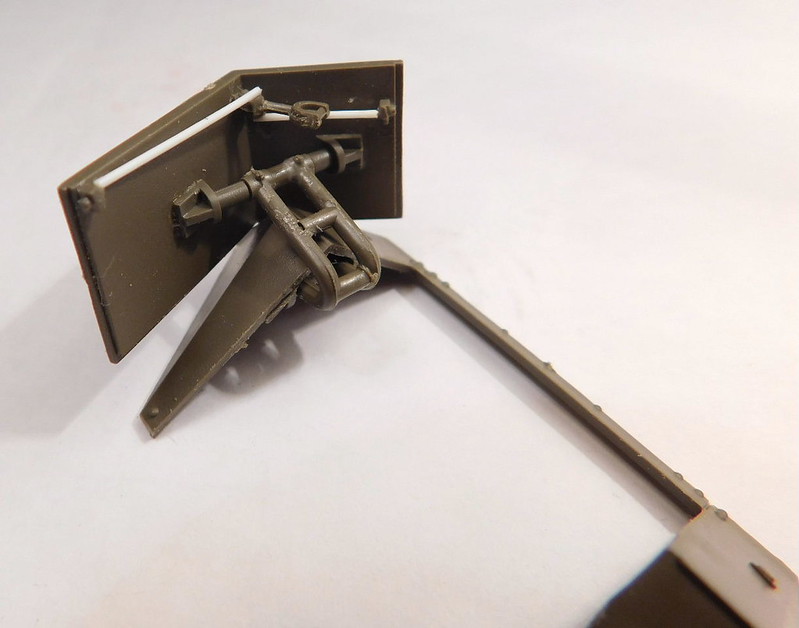
When i fit the door above, i realised the door would not move how it should it that it would not open fully. I noticed a piece sticking out that was jamming on the door. It had already been removed when i took those pics, but you can see it circled here on the hinge piece for the other door.
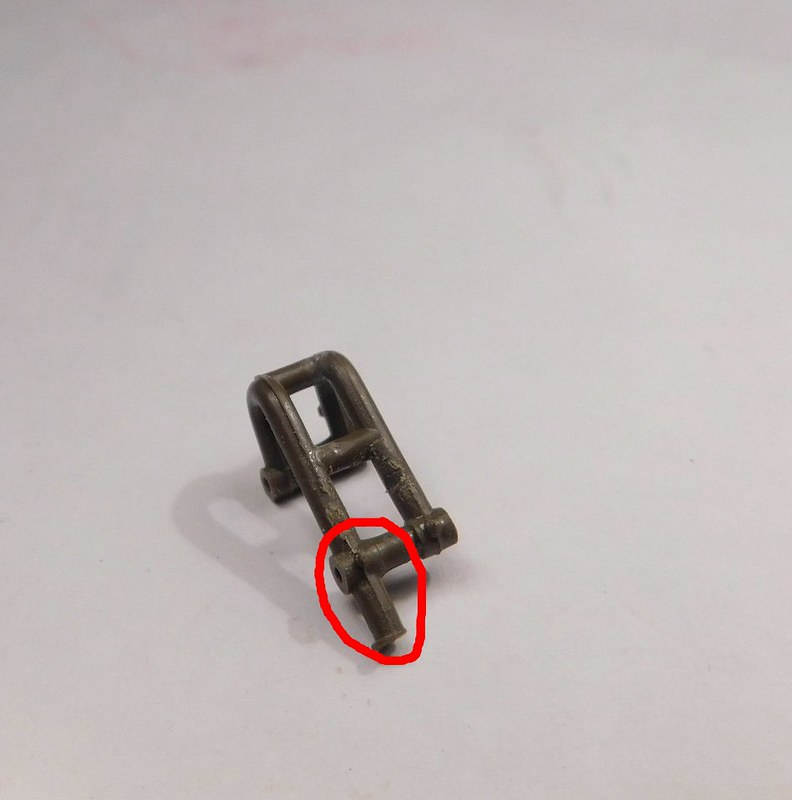
I checked the doors on the Dragon kit i had built a few years back as i knew they had full range of movement, and they did not have this. And i checked all the ;pics and none of those show anything like this. So i am not sure where AFV have got this design from. So i simply sniped them off. If you have the door closed, then you don't need to replace the locking rods and could get away with not sniping that piece off.

So with that done, both doors were fitted as well as PE brackets.
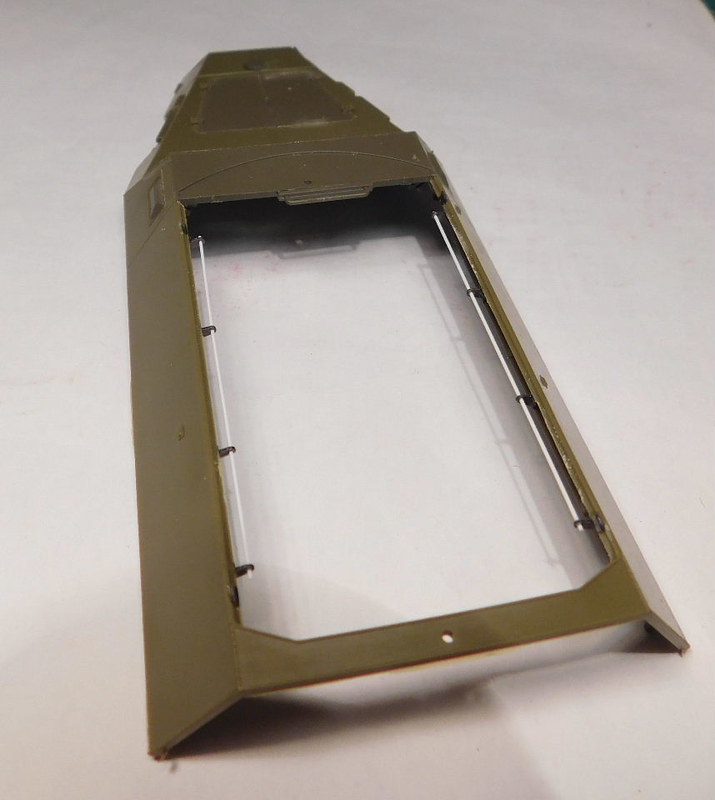
The upper work on the upper hull included replacing the kit hand rails which run along the top inside edge with PE and styrene rod. The Eduard PE said to use 0.5mm but i could not get this to fit so used 0.4.
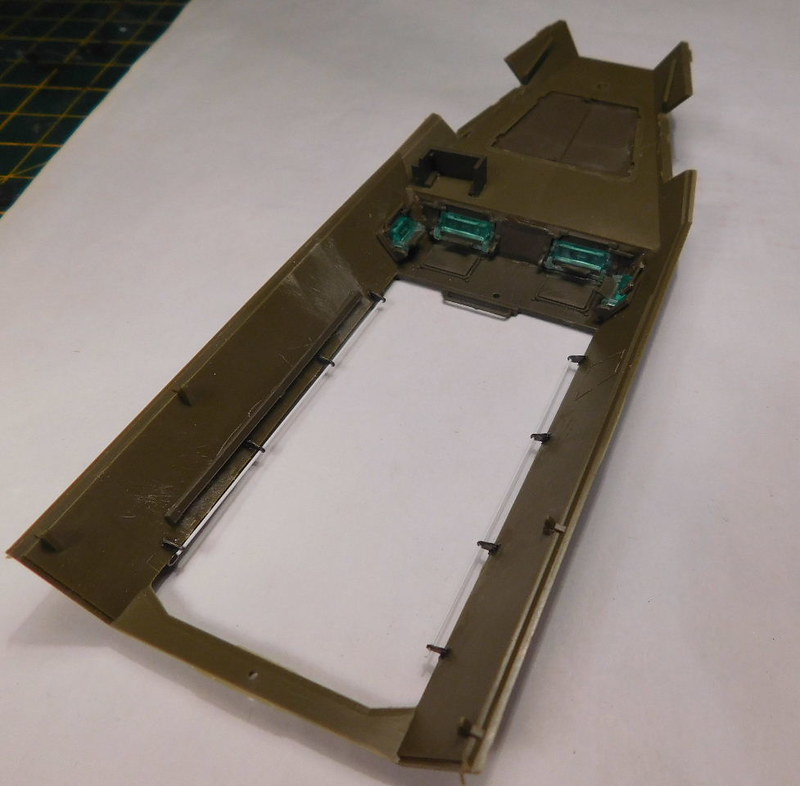
And adding a few bits to the inside. This includes vision blocks, radio mount, which the instructions say not to fit for the /4 but according to my referances should be in place for a vehicle in 1943. And the long thin item on the left side in the pic are the rods for holding up the tarpaulin when placed over the vehicle. AFV club are the only company i have found that includes this. And despite have done their Ausf D which has it a few years ago, i over looked this item when i did my Dragon and Tamiya kits more recently, so thats a lesson i will take next time, that wil need some scratch work.
And i have just realised i had not taken any pics of the lower hull Bang Head Well, its all now in the shed having been primed and painted along with seats, seat backs and otehr items kept lose for fitting later. And while thats drying, i will be getting the weapons painted tonight.

More soon.

I am a Norfolk man and i glory in being so


On the bench: Airfix 1/72nd Harrier GR.3/Fujimi 1/72nd Ju 87D-3

  • Member since
    December 2012
Posted by Ixion on Saturday, February 24, 2018 1:08 PM

I looked into your rear door hinge mystery. There seems to have been a few minor parts changes to the rear doors and this is one of them. Some photos show the extension in question, others don't;


http://www.pietvanhees.nl/251/02-doors.htm

Note one shows an angle iron joining the top and bottom of the door panels, others are merely welded, perhaps a improper restoration, or just a small manufacturing change? Also note minor differences with the locking mechanism.


  • Member since
    December 2002
  • From: Bury St Edmunds, Suffolk, England
Posted by Bish on Saturday, February 24, 2018 1:21 PM

Another head bang on my part Bang Head. I have been loking through his site as usual when i do a 251 build and never checked that section. Cheers Ixion.

I am thinking it may have been a late edition to stop the door swinging out of control when opened. I may have been wrong to remove them. Most of the pics i have show A and B model doors, and the panzer tracts bok don't mention it as a modification.

Thanks for that info, i will keep that in mind. Its likely that if my vehicle was built in 43, then it would have had that extension. Loking at the pics i think it would be simple enought o replace with rod.

That will teach me.

I am a Norfolk man and i glory in being so


On the bench: Airfix 1/72nd Harrier GR.3/Fujimi 1/72nd Ju 87D-3

  • Member since
    August 2012
  • From: Parker City, IN.
Posted by Rambo on Saturday, February 24, 2018 6:22 PM
Looking good Bish other for the color of the plastic seems just like the dragon kits, I'll end up doing the same and buying afv club from now on when both companies have the same 251 kit

Clint

  • Member since
    April 2015
Posted by Mopar Madness on Saturday, February 24, 2018 8:15 PM

I like your added details Bish.  I still have the AFV Club 250 “Uhu” that I bought for your halftrack GB.  Maybe it’s time to crack it open!

Chad

God, Family, Models...

At the plate: 1/48 Airfix Bf109 & 1/35 Tamiya Famo

On deck: Who knows!

  • Member since
    December 2002
  • From: Bury St Edmunds, Suffolk, England
Posted by Bish on Sunday, February 25, 2018 3:41 AM

Cheers guys.

Clint, there are few they both do and thats what i have done, apart from the /21 where i have both. They are very similar in level of dtail and how they go together. Though the rear dor frame on this Ausf C is different, i think i prefer how the AFV kit goes together. The Dragon kits do include detail for under the floor such as fuel tanks. Both brands are very nice but the AFV just has the edge for me due to the way the lower hull sides fit.

MM, thats a nice looking kit, be nice to see you doing that one.

I am a Norfolk man and i glory in being so


On the bench: Airfix 1/72nd Harrier GR.3/Fujimi 1/72nd Ju 87D-3

  • Member since
    April 2005
  • From: Gothenburg
Posted by JohanT on Sunday, February 25, 2018 9:32 AM

Hi Bish,

Coming along nicely here :)
I think I just might shadow you on your build, never came about to start the /17.
I have an Aber LeFH 18 Detail set that I think would work with your gun, happy to donate the freet if you are interested.

Thank you for sharing!

Very Best Regards
Johan

  • Member since
    December 2002
  • From: Bury St Edmunds, Suffolk, England
Posted by Bish on Sunday, February 25, 2018 10:41 AM

Cheers Johan. Which /17 kit is that.

Thanks for the offer, but i have the Eduard set for the gun as well.

I am a Norfolk man and i glory in being so


On the bench: Airfix 1/72nd Harrier GR.3/Fujimi 1/72nd Ju 87D-3

  • Member since
    April 2005
  • From: Gothenburg
Posted by JohanT on Sunday, February 25, 2018 11:17 AM

Hi Bish,
That is the AFV Club 35118, Sd.Kfz. 251/17 Ausf. C.

The gun is actually from Tristar.

Working on the suspension, will post in separate thread.

Have had the kit is the stash since I worked in Kaohsiung back in 2011 :)

The Aber set looks like this:

The set is wasted sice I am done with the LeFH 18/40. 

Very Best Regards
Johan

  • Member since
    December 2002
  • From: Bury St Edmunds, Suffolk, England
Posted by Bish on Sunday, February 25, 2018 12:55 PM

Nice, will keep an eye out for that thread. I have that kit and the command version. I had read it is a nice kit and that gun is supposed to be very nice.

And thanks again, but i think i have my work cut already with the Eduard sets lol.

I am a Norfolk man and i glory in being so


On the bench: Airfix 1/72nd Harrier GR.3/Fujimi 1/72nd Ju 87D-3

  • Member since
    August 2009
  • From: MOAB, UTAH
Posted by JOE RIX on Tuesday, February 27, 2018 11:52 PM

Really excellent progress Bish. Not only is your attention to detail remarkable but, also, your execution of said detail is outstanding. You sure know your stuff when it comes to the 251.

"Not only do I not know what's going on, I wouldn't know what to do about it if I did". George Carlin

  • Member since
    December 2002
  • From: Bury St Edmunds, Suffolk, England
Posted by Bish on Wednesday, February 28, 2018 2:11 AM

Thanks Joe, and as you can see from the info provided by Ixion, there is always somthing new to learn.

I am a Norfolk man and i glory in being so


On the bench: Airfix 1/72nd Harrier GR.3/Fujimi 1/72nd Ju 87D-3

  • Member since
    April 2005
  • From: Gothenburg
Posted by JohanT on Friday, March 2, 2018 9:39 AM

That is very informative.
Thanks Ixion.
Any verdict on the inside colour of the fighting compartment?

Bish,
Your decision?

Best Regards
Johan

  • Member since
    December 2002
  • From: Bury St Edmunds, Suffolk, England
Posted by Bish on Friday, March 2, 2018 9:50 AM

I have gone for Dark Yellow. The 1st Pz Div were withdrawn to France in early 43 for refitting. So chances are this vehicle would have been issued new and built after Feb 43. No way to know for certain, so its a best guess.

I am a Norfolk man and i glory in being so


On the bench: Airfix 1/72nd Harrier GR.3/Fujimi 1/72nd Ju 87D-3

  • Member since
    December 2002
  • From: Bury St Edmunds, Suffolk, England
Posted by Bish on Tuesday, March 6, 2018 3:25 PM

Time for another update. The buld has been going nicley, though i did once again have an issue when it came to the oil wash. But first, i forgot to add pics of the lower hull before painting, so here it is after.

I had also fitted the front suspension. Unlike the Dragon kits which pivot in the middle and the wheels can be turned, this is fixed.

And the upper hull also got painted. Just in time i realised i had not masked the vision blocks, so i applied liquid mask.

And then the weathering. First some dry brushing, a clear gloss coat and oil wash. Ever since i swictched from future to Alclad clears, on every armour build i have had small patches of paint effected by the wash, bubbling up. And this was no exception. I have tried a thick coat of clear, multiple thin coats, make sure i am very precise in geting the clear in every spot. But, it happens every time. Fortunatly, its in areas that are hidden and it setteled back down. I finished off with a flory wash, not the look i had intended but it will suffice.

So with that done, the seats weapons and other parts were added and the upper hull fitted.

I also got started on the gun. After some thoguht, i decided to use the kit shield rather than the Eduard one. The PE shiled is a better scale, but what should be raised rivets are reccessed. I decided the work to correct it was not worth it and the kit shield was just fine if a little bit thick.

Well, this build has setteled it. I am switching to Mr paint for armour as well as aircraft. I'll just use up my stocks of enamel on builds i want to be on the cleaner side and can use flory on.

I am a Norfolk man and i glory in being so


On the bench: Airfix 1/72nd Harrier GR.3/Fujimi 1/72nd Ju 87D-3

  • Member since
    April 2015
Posted by Mopar Madness on Tuesday, March 6, 2018 4:17 PM

Bish, I really like how you streaked the crew compartment!  I too made a recent paint discovery with my Fw 190.  I used Mr Hobby Aqueous acrylics for the first time to lay down the camouflage.  The “Mr” line of products are not readily available in the states though.  I had to buy mine from an online stockist in Fort William, UK. Sad

Chad

God, Family, Models...

At the plate: 1/48 Airfix Bf109 & 1/35 Tamiya Famo

On deck: Who knows!

  • Member since
    August 2012
  • From: Parker City, IN.
Posted by Rambo on Tuesday, March 6, 2018 5:33 PM
Amazing job on the inside Bish she's looking like her crew has been in the field for a long time.

Clint

JOIN OUR COMMUNITY!

Our community is FREE to join. To participate you must either login or register for an account.

SEARCH FORUMS
FREE NEWSLETTER
By signing up you may also receive reader surveys and occasional special offers. We do not sell, rent or trade our email lists. View our Privacy Policy.