SEARCH FINESCALE.COM

Enter keywords or a search phrase below:

Building the M40/75-18 semovente WIP

36997 views
28 replies
1 rating 2 rating 3 rating 4 rating 5 rating
  • Member since
    September 2005
  • From: Uppsala, Sweden
Posted by bultenibo on Thursday, January 17, 2008 6:48 PM

Hi Luftroller!


I finished the Semovente quite some time ago, but posted the pics in a separate thread. You'll find them here:

/forums/820505/ShowPost.aspx 

Good luck with the building! It's a great little kit.


/Tony aka bultenibo 

  • Member since
    February 2007
  • From: Bournemouth UK
Posted by Luftwoller on Wednesday, January 9, 2008 12:23 PM

Ive just bought one of these and think the work youve done is 1st rate. Have you finished it yet?

...Guy

..'Your an embarrassment to the human genus, makes me ashamed to call myself Homo'.
  • Member since
    September 2005
  • From: Uppsala, Sweden
Posted by bultenibo on Sunday, July 22, 2007 9:50 AM

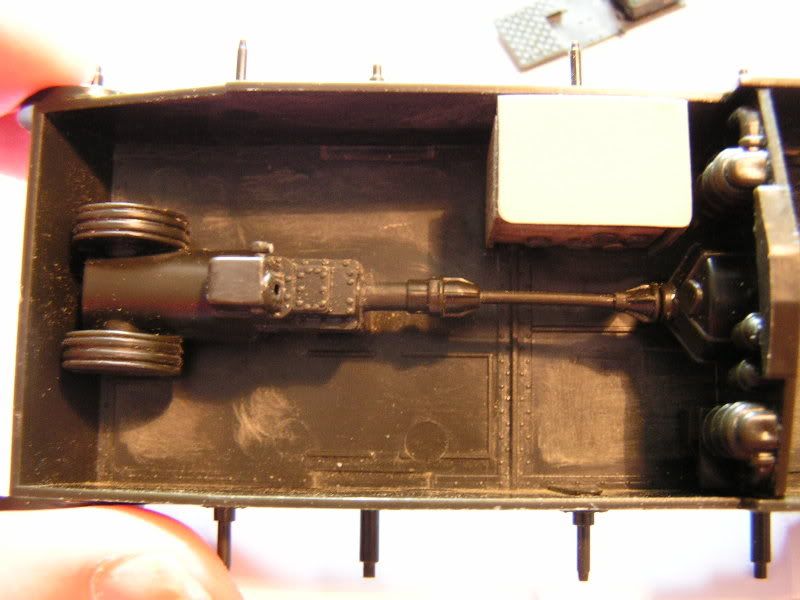
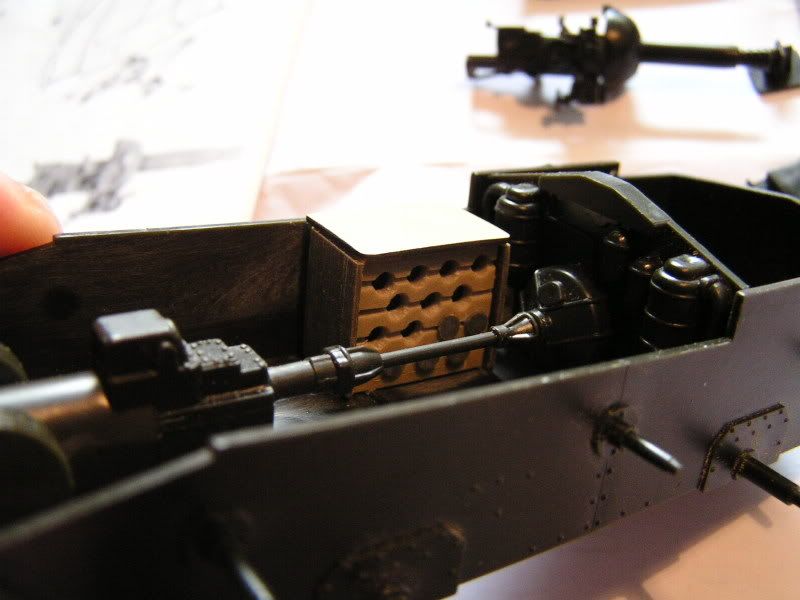
Here's some progress pics of the interior. It's almost finished. The only think that's lacking is the radio- and instumentation equipment and some metallizing work. After that I'll  glue it together and hope that I havn't missed anything important.Wink [;)]

During the painting of the interior I have really suffered from the lack of space, especially when painting the rivets. There's no room for more delicate painting when you have to do it from the bottom of the superstructure and upwards. I should not have glued the two "shelves" on each side of the fighting compartment in place before I was done painting the interior.

So, what do yo say? Does anyone have any suggestions of anything else I should do/apply/paint before gluing the thing together - speak now (or be silent forever).Wink [;)]

/Tony


  • Member since
    September 2005
  • From: Uppsala, Sweden
Posted by bultenibo on Friday, July 20, 2007 9:51 AM

I just managed to find out what kind radio equipment was installed in the Semovene: a italian RF 1CA radio. Since the it is clearly visible through the hatches, I thought that it would be a good idea to get the radio, its wires and its colors right. I probably paint it right away.

The RF 1CA:

The color of the front of the radio equipment and its brackings:

/Tony

  • Member since
    July 2006
  • From: San Francisco, CA
Posted by telsono on Thursday, July 19, 2007 3:49 PM

Tony

You 've made some great progress there so far. 

I remember seeing a picture of a mortar crew British or Polish set up in a bomb crater near Monte Cassino. behind them was a disabled Semovente with German markings. For the most part, the Germans didn't re-paint the vehicles just added their markings.

I would love to have a model of the 105mm version of the Semovente, the Bassoto, but all the models are in resin at about $120 a pop.

Mike T.

Beware the hobby that eats.  - Ben Franklin

Do not fear mistakes. You will know failure. Continue to reach out. - Ben Franklin

The U.S. Constitution  doesn't guarantee happiness, only the pursuit of it. You have to catch up with it yourself. - Ben Franklin

  • Member since
    September 2005
  • From: Uppsala, Sweden
Posted by bultenibo on Thursday, July 19, 2007 1:44 PM

Manstein:

Funny you mention the simlarities between the Semovente and the Stug. I just read that the initiative to put the 75mm field howitzer on the m/40 tank chassi came from a high ranking Italian artillery officer, Colonel Berlese. He had studied the german blitzkrieg in France and was especially impressed by the perfomence of the Stug III. His ideas was well taken and the decision to produce an italian version was taken in the fall of '40. Only 3 month later, in february '41, the first prototype was finished. So one can actually call the Semovente an true "Italian Stug".

/Tony

  • Member since
    September 2005
  • From: Uppsala, Sweden
Posted by bultenibo on Thursday, July 19, 2007 11:20 AM

Manstein:

The reason for saving the resin set is that on this kit I would like to build everything from scratch. It is not some principle I have to scratchbuild everything. LOL! But I thought that building the Semovente should be the very opposite - and very cheap - alternative to the Matilda mk II that I'm building for the Kursk GB. On that kit I've already spent $200 on update sets and reference material.

I agree with you on the interior, Manstein. I'll never built one before, but I think it gives another dimension to a tank if one can peek inside it.

I'm not saving the  resin kit for some other planned project, but I sure would like to build a Semovente captured, re-painted and used by the Germans sometimes in the future. Then the kit should could come in handy. 

mamillar:

You are right, the set is from LifeColor. I think I'll go with that one, since you say its a good one.

/Tony aka bultenibo

  • Member since
    November 2005
Posted by Anonymous on Thursday, July 19, 2007 9:22 AM

quote: "Regarding replicating stuff: my idea is to not use the the resin coversion set that I have on this kit. I only use it as a reference material for my "copies", which certainly will not be as fine as  the original."

...can you clarify above statement? Is it because you like the challenge of scratchbuilding as much as you can, or are you saving the resin parts for another project?--just curious...very nice build so far---I love modelers who tackle interiors...!!! And I always thought this vehicle had a cool look to it, sorta' the "Italian StuG"...LOL...

  • Member since
    February 2005
Posted by mamillar on Thursday, July 19, 2007 8:55 AM
Ahh, that looks like the LifeColor set, the paint is very good and dries dead flat. Just be carefull thinning for the airbrush. Try to stick with their own thinner and you should be ok.
  • Member since
    September 2005
  • From: Uppsala, Sweden
Posted by bultenibo on Thursday, July 19, 2007 5:46 AM

I just found this Acrylic paint set, that I thought could be useful. Does anybody have some experience in using this paint? Is it a good choice?

 /Tony 

  • Member since
    January 2007
Posted by the doog on Wednesday, July 18, 2007 10:07 AM

Hi Tony...thanks, glad you like the photo. It's the DML early Hetzer with a Verlinden interior, but with at least 40% scratchbuilt/corrected.

I think I painted the shaft Tamiya XF24 Dark Grey, and the rust shades are just randomly stabbed/mixed combinations of oil raw umber, Burnt sienna, orange, and black.

I think your method described would work, but I would eliminate steps 5 & 6, and drybrush with a metallic gray/brown--you're not gonna be able to pick up a white DB over an off-white interior, and I wouldn't let the interior color get too dark anyway. I just did an off-white mix (white mized with a drop of Dark Yellow) and then overall washed it with raw umber oil and then DB'ed and chipped with met. gray/brown. 

I also didn't dullcoat/seal anything. I stopped using a sealing coat years ago and have never had any problems; you just have to let your base coat dry. Of course if I have glossy spot issues, I'll do it. The darker colors over the white acrylic aren't going to hurt it anyway.

If you have any more questions, feel free to ask--BTW, the date for that interior WIP post was May 27, if you care to reference it. A guy named Roosterpelo also was working on one (the Eduard offering) recently and has a Hetzer WIP interior thread up a few weeks later which was also really well done.

  • Member since
    September 2005
  • From: Uppsala, Sweden
Posted by bultenibo on Wednesday, July 18, 2007 3:29 AM

Thumbs Up [tup] Doog: The interior looks great! Thumbs Up [tup] It's just that feeling of a worn-down fighing compartment with chipped-off paint and accumulated dirt that I'm going to try to achieve. What kit is it? DML?

I've been giving some thoughts of in which order I should paint the interior on the Semovente. This is my idea.

1. White primer (Tamiya)

2. White/light gray base coat with Vallejo Achrylics. (I want to be able to highlight the finer details with pure white later).

3. An general wash with very diluted oil paints (raw umber mixed with some ochra), more like a filter.

4. Pinwashes with more concentrated raw umber, especially around the rivets.

5. Drybrushing with the base coat (Vallejo Acrylics).

6. Soft drybrushing with white (Vallejo Acrylics).

7. Seal the whole thing with Testor Dull coat. (I want to do this early on since I'm goint to use both Humbrol Metallic Enamel and graphite for the metal parts.

8. Paint "Paint chips" throughout the interior.

9. Then it's time to begin with the painting of the other details. Leather seat, metal gun breech and sight, steering levers, ammo brass and the radio equipment.

10. Local washes and drybrushing of these parts.

11. Metallizing with a mix of Humbrol silver and raw umber.

12. Metalizing with graphite.

13. Add some accumulated dirt and sand using pastel chalk.

 Do you think it would work? Any suggestions? Btw what color did you use for the transmission shaft and its stains?

 /Tony

  • Member since
    January 2007
Posted by the doog on Tuesday, July 17, 2007 11:55 AM

Tony: Thanks for the link; I actually have this in a magazine and it was one of my sources for inspiration and reference. I had a few WIPs on here a while ago, but I just got home from a month in Europe, so I'm a bit behind on my modelling. Here was a shot of the interior so far...

Good luck with the sandbags! I'll be paying attention! 

  • Member since
    September 2005
  • From: Uppsala, Sweden
Posted by bultenibo on Tuesday, July 17, 2007 10:24 AM

Doog:

The Hetzer is a great tank to do some serious detailing work on, especially the interior. Looking forward to see yours when you are finished. Have you seen Miguel Jimenez model of a Hetzer that was captured by the ploish resistance in the wasaw uprising?

http://www.missing-lynx.com/gallery/allied/mighetz.htm

Regarding replicating stuff: my idea is to not use the the resin coversion set that I have on this kit. I only use it as a reference material for my "copies", which certainly will not be as fine as  the original.

Thumbs Up [tup] Thanks for the tips on the sand bags. I'll get some two-part putty and start experimenting right away. My idea is to drape the Semovente in sandbags and spare tracks, as they used to do for extra protection. Something like this:


/Tony

  • Member since
    January 2007
Posted by the doog on Tuesday, July 17, 2007 9:45 AM

    Wow, it's looking seriously COOL, Tony! You're doing some great work here, but I have to say don't make unnecessary work for yourself by replicating things that already look fine, i.e., the radio. I would guess that, when painted, the resin radio would look better than your plastic copy.

    I love tanks with busy interiors--I'm currently patiently finishing a busy Hetzer--and this one looks to be a winner already! Plus your build log is helping me, as I have one of those Italeri models in the can! BTW, I agree with you about reference material--it's a modeller's best friend. But a GREAT job can still be done with creativity and imagination!

    Sand bags are easy--use a two-part epoxy putty (Milliput is my fave) and simply form the bags to size, and then press a rough sandpaper into them on both sides to give them texture. Add details as necessary...

    I'll be watching your progress! 

  • Member since
    September 2005
  • From: Uppsala, Sweden
Posted by bultenibo on Tuesday, July 17, 2007 9:15 AM

Here's an update on the interior work. All the details of the fighting compartment are in place, except for the stuff that I will add after painting the interior: the radio set, with its cables, the Breda MG and the drivers instrumentation.

I have made one big mistake so far. Since I opted for a Semovente with short fenders (from the front mudguard to the begining of the superstructure), I had to build seperate "shelves" on each side of the fighting compartment (the long fenders provided in the kit is otherwise also used  for shelves). Therefor I had to glue these shelves (the long parts made out of yellow plastic) to the superstructure at this early stage. I should have primed and painted the inside of the superstructure first. So now I have to paint the four parts (gun, front armor plate, superstructure and the inside of the hull) separately before glueing them together. That's the only way I can reach all the corners for the finer painting/chipping/weathering.

Well, here comes the pics:

The finished rear wall:

The finished front armor plate.

The drivers hatch:

The riveted inside of the superstructure:

The drivers seat and steering levers:

Interior seen from the front:

Everthing in place inside the hull:

The right wall and shelf of the interior, together with ammo box and the gun rack for the Breda 6.5 mm MG:

Peeping through the top hatches, with the MG in place:

Another view from the front:

The radio (still lacking its brackings, cables and plug-ins). To the right is the resin original from the Historica conversion set that I used for reference.

The left wall and shelf of the interior, together with radio. 

And lastly, a picture of a modellers best friend - the scrap box!

Two useful lessons learned so far:

1. If you are going to build the Italeri kit, try to get one moulded in yellow plastic, it's much easier to work with than the dark green one in my kit.

2. The only thing that limits the level of detailing is actually information. With a complete set of walk-around pictures of the interior ("walk-inside"?), one could fill the kit with a billion finer details. since I don't have enough ref pics, I'll made the following choices: I only add details that I'm 100% sure of, and I include only the details that can bee seen from through the hatches.

By the way, I need to learn how to make realistic sandbags to put on the model. Does somebody have some tips on how to make these?

/Tony aka bultenibo

  • Member since
    July 2006
  • From: San Francisco, CA
Posted by telsono on Monday, July 16, 2007 11:17 AM

Tony - Ariete was the first division to utilize the Semovente. More were built on the M14/41 (162) chassis than the M13/40 (60). The Italian liked the Semovente as it could deal with the M3 Grants and M4 Shermans as well as have a good HE shell against infantry. There is always a chance for hybrid vehicles as the two basic chassis were very similar. Italian mechanics in North Africa became very good at repairing vehicles which may have led to some vehicles being cobbled together.

Actually an Italian armor division (or even an infantry division) was more the size of a British Brigade or a German Regiment being about 8000 men. They had organic infantry and artillery which helped them against their British opposite numbers.

Mike T.

Beware the hobby that eats.  - Ben Franklin

Do not fear mistakes. You will know failure. Continue to reach out. - Ben Franklin

The U.S. Constitution  doesn't guarantee happiness, only the pursuit of it. You have to catch up with it yourself. - Ben Franklin

  • Member since
    September 2005
  • From: Uppsala, Sweden
Posted by bultenibo on Monday, July 16, 2007 10:21 AM

 matthew9 wrote:
Very cool! I really like tanks with rivets. I'll also be following your progress.

I was also lfond of tanks with riveted armor, but that was before I had too "harvest" 160 rivets from one model and glue it to another. Sigh [sigh] I'll post some pics of the result tomorrow, if I haven't been committed to some mental institution by then.

/Tony

  • Member since
    July 2004
  • From: Texas
Posted by matthew9 on Sunday, July 15, 2007 11:20 AM
Very cool! I really like tanks with rivets. I'll also be following your progress.
Matt
  • Member since
    December 2002
  • From: Fort Knox
Posted by Rob Gronovius on Sunday, July 15, 2007 11:07 AM
Interesting thread. I have the Italeri Semovente and the Tamiya tank kit. I got the RCR detail set for the 40/41 and the RCR barrel for the Semovente. I have the Model Victoria tracks, they are a beauty, but were hard to find.
  • Member since
    September 2005
  • From: Uppsala, Sweden
Posted by bultenibo on Sunday, July 15, 2007 7:17 AM

I'm glad to see that there are such intrest in this thread. Thanks for all the nice comments. Big Smile [:D]I'll try to post new pics as soon as I can.

Telsono:

Thanks for the tip. I'll see if I can't find "Iron Hulls, Iron Hearts" on ebay. I haven't read too much about the battles in the weastern desert, but I find them very fascinating.

I've done some research on the organisation of the Semoventi (plural), and it seems that they were organized in separate batallions. The one I'm building is an early Semovente, that belongs to the 5th Semovente Btn, the first to be deployed in Africa. Their "baptism of fire" was at Bir Hakim in late may 1942. I think that they must have been incorporated in Ariete.

I checked out the Tamiya Semovente, and there is no big difference between the kits. The Tamiya kit is better molded though and the plastic is easier to work with.

Two observations on the Tamiya kit:

1). One drawback: The hatchet for the gun sighting periscope on top of the hull is not molded separatly, which means that there is quite a lot of work if you want it to be open.

2) The seats inside the fighting compartment - both there shape and their place - is more accurate than in the Italeri kit. The commander/gunner had a round seat in front of the ammo rack and, according to the pics I have, the loader/radio operator had no seat at all.

Both kits are problematic in another way - one can't really tell if they are to represent a Semovente built on the m13/40 or the m14/41 chassi!

Both kits have:

Long fenders, running the whole lenght of the tank = m13/40 (The Semovente had short fenders that only covered the first third of the tracks.)

Engine deck cooling grills, aligned transversally =   late m14/41.

Two spare road wheels, one on each side = m13/40 or an early to mid production m14/41.

There is obviously some choises to be made and some work to be done, to get the kit historically accurate!

/Tony aka bultenibo

  • Member since
    September 2005
  • From: beacon falls , Ct.
Posted by treadwell on Saturday, July 14, 2007 9:10 PM
EXCELLENT!-- tony,the interior work is just awsome!Thumbs Up [tup]Thumbs Up [tup]-- treadCool [8D]


  • Member since
    July 2004
  • From: Texas
Posted by wbill76 on Saturday, July 14, 2007 5:17 PM
Off to a great start, looking forward to watching this one come to completion. Thumbs Up [tup]
  • Member since
    July 2006
  • From: San Francisco, CA
Posted by telsono on Saturday, July 14, 2007 2:17 PM

Tony- A great book in reference to the use of these vehicles is "Iron Hulls, Iron Hearts" by Ian W. Walker. I have mentioned it on this forum several times and it centers on the three Italian Armor divisions and their use in WWII. Its mainly about the Ariete Division since it saw the most action as a unit. This gives a better balanced view of the Italian armor forces and the handicaps they were under. Believe it or not, the 21 New Zealand Battalion to this day in their official history doesn't tell which unit captured them at Point 175 in a coup de main. They felt embarassed about being captured by Italians! But these were not the same troops as they met along the Egyptian frontier a year earlier. Rommel was not quick to give them praise, but von Luck was on better terms with his fellow combatants. Its a good read.

Mike T.

Beware the hobby that eats.  - Ben Franklin

Do not fear mistakes. You will know failure. Continue to reach out. - Ben Franklin

The U.S. Constitution  doesn't guarantee happiness, only the pursuit of it. You have to catch up with it yourself. - Ben Franklin

  • Member since
    September 2005
  • From: Uppsala, Sweden
Posted by bultenibo on Saturday, July 14, 2007 11:12 AM

Telsono: You are one lucky Evil [}:)] to own the Model Victoria update set. If I had one I'll begin build it right away.

I do have the Tamiya kit and I'll check it out when I get back home (at work right now). I think that the interior of that kit is a bit more "chunky" than the Italeri, which actually has some finer details. One thing is clear though, both kits miss a lot of the interior details of the Semovente. When looking at actual photos of the interior, I'm amazed to find how many wires that was drawn and how many mecanical gatgets that was bolted to the walls of the fighting compartment - they are all over the place!

Since I don't have enough information - I would probably need 40-50 photos of the interior - it's beyond my ability to represent 100% of these details, but from the pics I have, I'll try my best.

 /Tony aka bultenibo

  • Member since
    March 2003
  • From: Rain USA, Vancouver WA
Posted by tigerman on Friday, July 13, 2007 4:32 PM

Freaking cool! I wish i could work like that, but I have neither the time nor the talent. Keep it up and look forward to more.

In viewing my own Tamiya kit in the box, I wish someone would build an updated kit.

   http://i7.photobucket.com/albums/y269/wing_nut_5o/PANZERJAGERGB.jpg

 Eric 

  • Member since
    July 2006
  • From: San Francisco, CA
Posted by telsono on Friday, July 13, 2007 3:16 PM

Bultenibo - I am going to watch this one intently. I have the Italeri kit with the Model Victoria upgrade, tracks and decal sets. These I won on Evil Bay about a month and a half ago. The Tamiya kit is not supposed to be as accurate, any thoughts on that? From what I had read, these vehicles were very successful in combat in North Africa.

Mike T.

Beware the hobby that eats.  - Ben Franklin

Do not fear mistakes. You will know failure. Continue to reach out. - Ben Franklin

The U.S. Constitution  doesn't guarantee happiness, only the pursuit of it. You have to catch up with it yourself. - Ben Franklin

  • Member since
    July 2003
  • From: Toronto, Ontario, Canada
Posted by zokissima on Friday, July 13, 2007 2:44 PM
Awesome work man. Definitely not enough representation of Italian armour here, so its a refreshing change to see something like this.
  • Member since
    September 2005
  • From: Uppsala, Sweden
Building the M40/75-18 semovente WIP
Posted by bultenibo on Friday, July 13, 2007 7:32 AM

Since Italian tanks don't seem to get that much attention on this forum, I thought I would document my work with the Italian M40/75-18 Semovente tank throught bunch of wip pics. Since this is my fist wip-thread, I'm a bit of an amateur (both with the camera and the description of the process). Anyway, I hope that someone will find it interesting.

When I first decided to build the Semovente I found out that I had two alternatives, at least in the 1/35 scale.

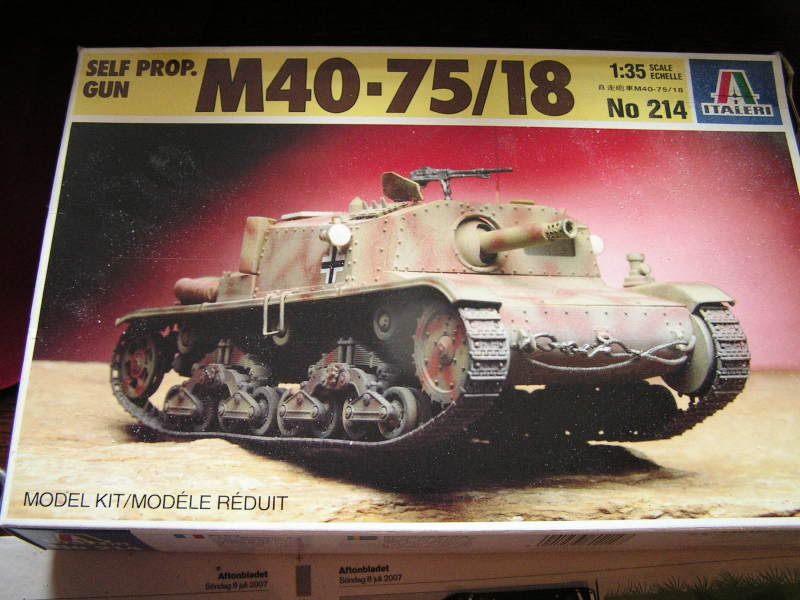
First there is the old Italeri kit, which is not that expensive ($ 17-21 in e-bay stores), but with not that high quality of the moulding. The details are ok, but the kit has some sink marks. This kit is also molded in a plastic hard to work with and, since it's black-green, it's difficult to see all the finer details.
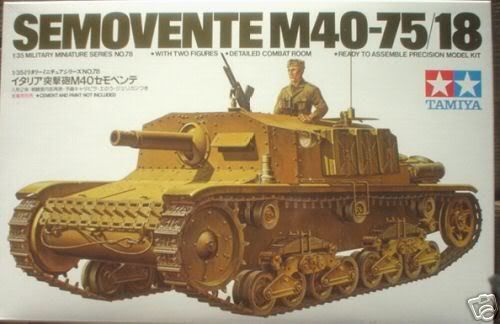
The second is the Tamiya kit ($14-25 in e-bay stores). The molding is far better. The plastic is in Tamiyas yellow color and more easily worked.
In both these kits interior details are included. This is important since the top hatches are quite large on the Semovente, and if these are going to be open, one can see almost the entire interior of the tank. The problems with both kits are that the interior details are very basic. They include only: the gun, transmission, gearbox, three seats. Only one of the walls - the rear end of the fighting compartment - have some finer details molded. (In the Tamiya kit, you also get the ammo rack). So I decided that some extra set of details was needed. I found two of choices:

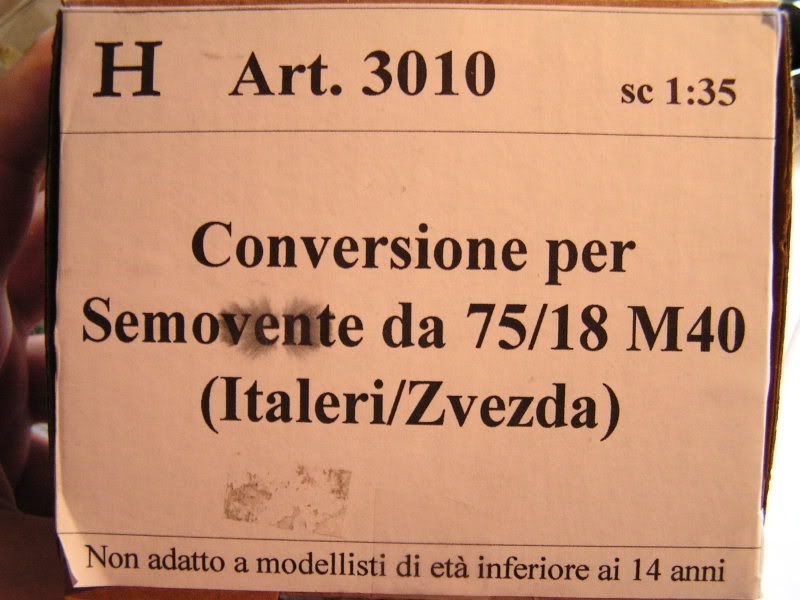
First an old resin set from the Italian company Historica production (Set no.3010), in which a whole new interior is provided. I think this one has been out of production for quite a while. I was fortunate to find one on e-bay, but it cost me $ 40.
The second - resin and PE - update set is from another Italian company, Model Victoria. This set is not cheap, approx. $ 60-70, according to the home page.

http://www.modelvictoria.it/vehicles/italian_semovente_m40_75_18.htm

By this time, I was getting pretty angry. Angry [:(!] I imagined that it would cost me between $ 60-90 just to get a kit with a decent interior. If I was going to pay that much, I'd probably wanted to get some new tracks - either white metal (Friulmodel) or resin ones (Model Victoria) - and a new aluminum barrel. That would bring up the total cost to $ 100-130, which is a lot of money!

But then I thought: if "time is money", as the saying goes, it must also be true the other way around: "money is time". Wink [;)] So I decided that I would get the cheapest kit, and invest a huge amount of time (and patience) to build it - just to save money! So, I bought myself the cheapest Italeri kit (I got it for $ 11 on a e-bay auction), took out my scrap box, and started harvesting nuts and bolts and other stuff for scratch-building the interior.

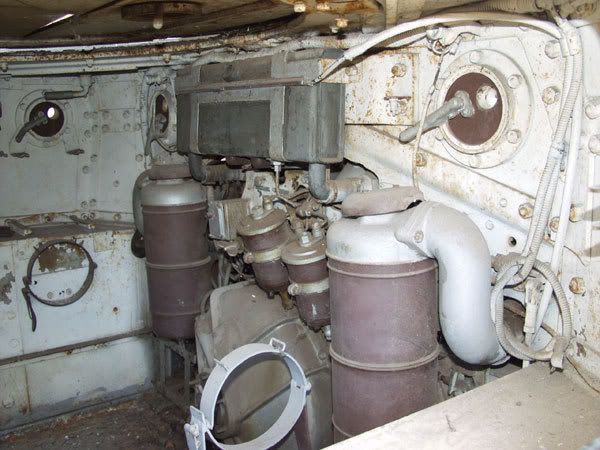
Here I encountered the next problem - how to get some credible descriptions of the interior of the Semovente. The Signal/Squadron "Italian medium tanks" was of no use, since it doesn't contain any interior pics. So I browsed the net, collected a few modern photos that were available and some pics from other modelers. Together with the basic instruction sheet from the Historica update set I got some ideas of what the interior looked like.
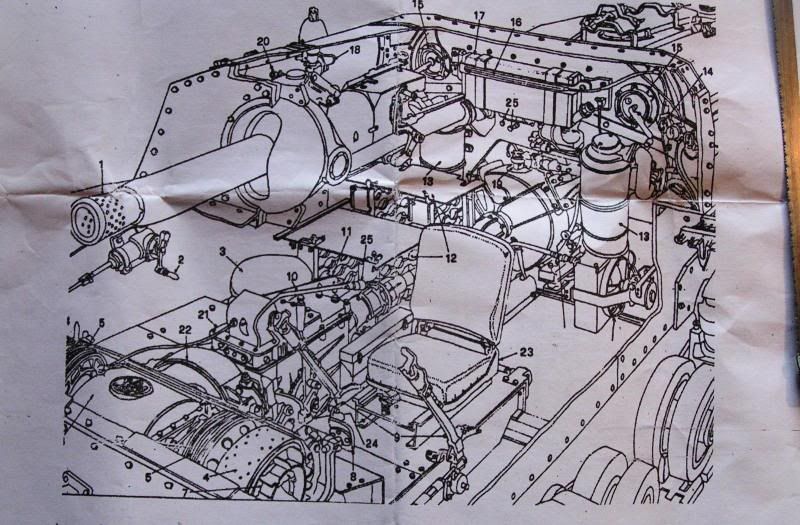
For example:

Here's the drivers seat and transmission/gearbox:
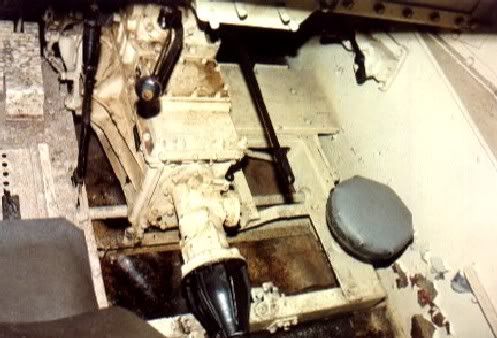
Heres some details of the pistol port:
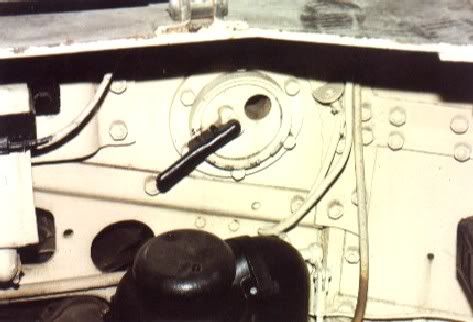
Here's the rear end of the fighting compartment of an italian m13/40 tank (same chassi as the Semovente):
Two modelers work with update sets:
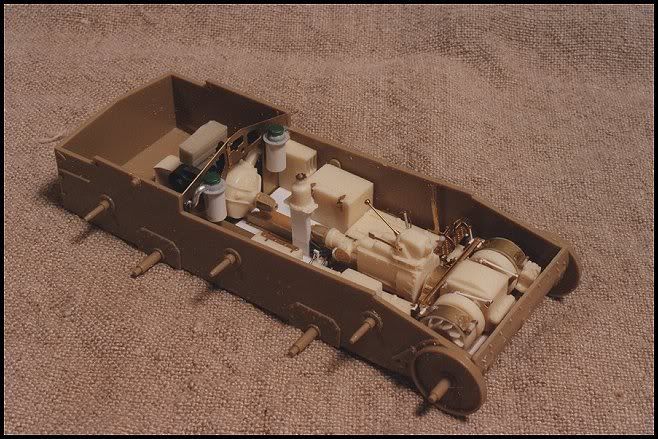
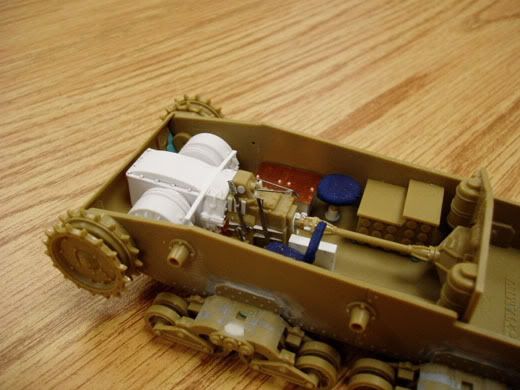
View from above:
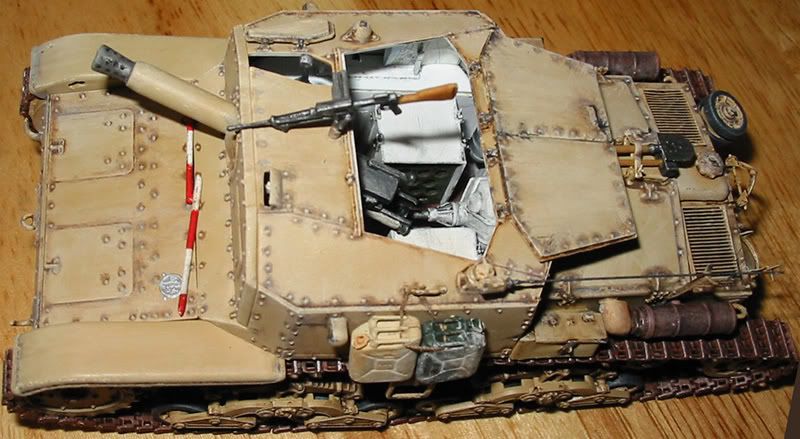
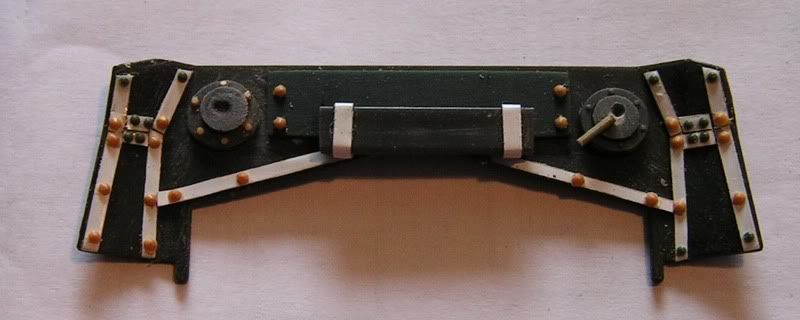
Then it was time to start. I decided that I would build and paint the interior completely before I started on the outside of the tank. Here are the first shots from the work process. It includes removing the annoying sink marks in the hull, scratch building an ammo rack and detailing the rear end of the fighting compartment with thin led foil straps and applying nuts and bolts (harvested from some other kits).

Here's the inside, with the new ammo rack:
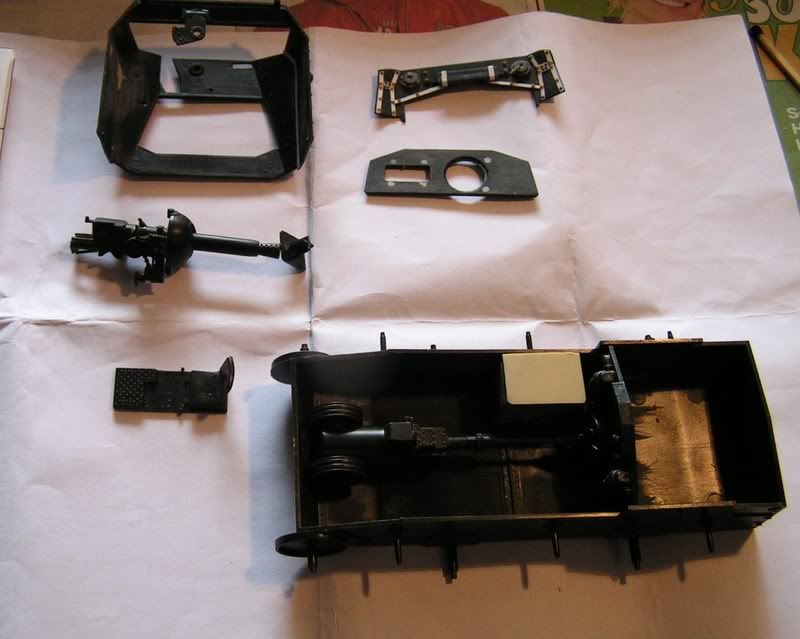
Then it was time for the rear end of the compatment, which is highly visible through the hatches and need a lot of detailing.
Currently I'm working on the upper hulls walls and ceiling. Quite boring actually.
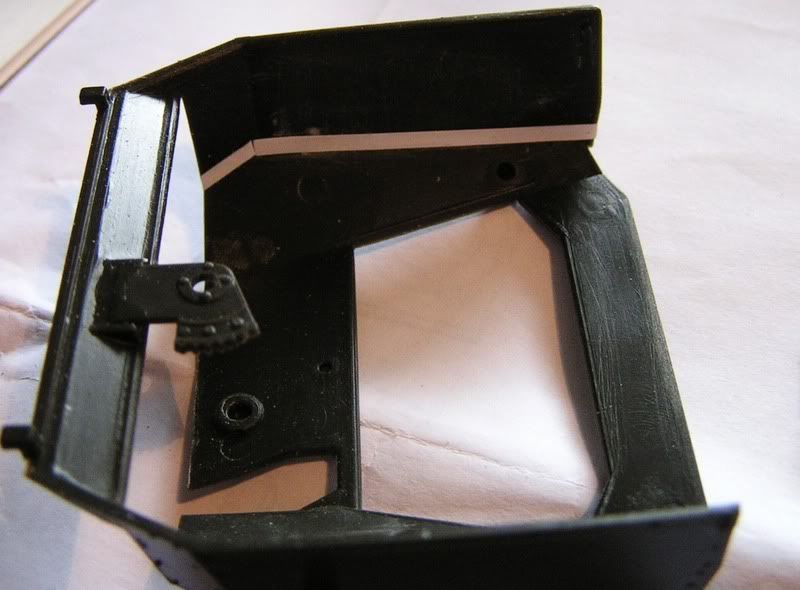
By now, I think the whole kit looks like SH-T! But hopefully some more work and getting the thing painted in the same color will make it look a lot better. And, if it would not turn out to my expectations, at least I haven't spent $100+ on the kit. Wink [;)]

Til next time,

/Tony aka bultenibo

JOIN OUR COMMUNITY!

Our community is FREE to join. To participate you must either login or register for an account.

SEARCH FORUMS
FREE NEWSLETTER
By signing up you may also receive reader surveys and occasional special offers. We do not sell, rent or trade our email lists. View our Privacy Policy.