SEARCH FINESCALE.COM

Enter keywords or a search phrase below:

54 Chevy Sedan Delivery-COMPLETED-09/16

19868 views
336 replies
1 rating 2 rating 3 rating 4 rating 5 rating
  • Member since
    July 2014
  • From: Franklin Wi
Posted by Bakster on Saturday, August 6, 2016 7:10 PM

Beautiful work Joe.

Yes

  • Member since
    March 2012
  • From: Corpus Christi, Tx
Posted by mustang1989 on Tuesday, August 9, 2016 7:17 AM

Thanks for the encouragement fellas.

I got the TV glued down to the table yesterday but had some difficulty in getting the body to fit right on the chassis due to not positioning the TV in the right spot on the table. This morning I was able to remove the TV and reposition it on the table to allow the body to sit properly onto the rolling chassis. Looks like everything is fitting the way it's supposed to now.


 Forum | Modelers Social Club Forum (proboards.com) 

  • Member since
    August 2015
  • From: the redlands Fl
Posted by crown r n7 on Tuesday, August 9, 2016 8:45 AM

Looking real good 


 Nick.

  • Member since
    August 2007
  • From: back country of SO-CAL, at the birth place of Naval Aviation
Posted by DUSTER on Wednesday, August 10, 2016 8:36 PM

"I was able to remove the TV and reposition it on the table to allow the body to sit properly onto the rolling chassis. Looks like everything is fitting the way it's supposed to now." 

Betcha  TV moving isn't one of your usual needed body/frame corrections 


Steve

Building the perfect model---just not quite yet  Confused

  • Member since
    March 2012
  • From: Corpus Christi, Tx
Posted by mustang1989 on Friday, August 12, 2016 5:39 AM

LOL. Thanks guys.

I hit a snag that I hadn't anticipated concerning the rear door hinge. You see...............this is the available room that I have at the L/H side of the door opening between the opening and the couch:

Image

and this is the OOB molded in door hinge which would normally work great but won't with the addition of that couch. It's not such a big deal at the bottom hinge but you can see that there's not enough room in there for that upper hinge. Yeah.............that aint happenin'

Image

So I broke out my spare kit and robbed the inside door trim panel, removed the molded in OOB hinge and broke out a piece of 1/8" brass rod, adhered it to the door and formed a door hinge rod out of some thick ass wire. Believe me.....this stuff aint gonna bend for nothin'. The idea is that the pivot point is at the door and not the body and now I have all the room I need to open and close the door.

Image


 Forum | Modelers Social Club Forum (proboards.com) 

  • Member since
    August 2015
  • From: the redlands Fl
Posted by crown r n7 on Friday, August 12, 2016 6:42 AM

awesome stuff !


 Nick.

  • Member since
    August 2009
  • From: MOAB, UTAH
Posted by JOE RIX on Saturday, August 13, 2016 6:57 AM

Excellent solution Joe. The things you come up with to resolve issues is truly a credit to your inginuity. Well done.

"Not only do I not know what's going on, I wouldn't know what to do about it if I did". George Carlin

  • Member since
    February 2003
  • From: East Bethel, MN
Posted by midnightprowler on Saturday, August 13, 2016 7:15 AM

Bow Down

Hi, I am Lee, I am a plastiholic.

Co. A, 682 Engineers, Ltchfield, MN, 1980-1986

1 Thessalonians 4:13-18 1 Corinthians 15:51-54

Ask me about Speedway Decals

  • Member since
    May 2013
  • From: Indiana, USA
Posted by Greg on Saturday, August 13, 2016 10:29 AM

Excellent hinge solution!!!

+1 to Prowler's "Bow Down"


  • Member since
    August 2007
  • From: back country of SO-CAL, at the birth place of Naval Aviation
Posted by DUSTER on Monday, August 15, 2016 1:10 AM

It jus' keep gettin' better 'n better-er Yes


Me? I'd a cut the couch down and made it a camp stool....'course I'da had to cut the roof off the get to it.....well that why HE's a modeler an' Im a ..... fan! Bow Down

Steve

Building the perfect model---just not quite yet  Confused

  • Member since
    March 2012
  • From: Corpus Christi, Tx
Posted by mustang1989 on Friday, August 19, 2016 8:02 AM

Thanks again for the comments fellas. These days I'll take any encouragement / eggin' on with this thing that I can get. I had the door / hinge all set into the body yesterday. First off , my initial attempt on opening the door was frustrating because I forgot to allow proper spacing from the edge of the door to the door opening on the hinge side so there was interference there.  I was able to remove the door and hinge assy and sand the edge of the door to allow for proper opening and closing with no interference. Secondly, once I fixed that and installed the door/ hinge for a second time I ran into the body not sitting down on the frame all the way in the back because.......................... I forgot about how low the hinge was positioned on the door.   The hinge made contact with the floor before the body could be set all the way down on the frame.  So off comes the hinge again......only this time I created a noticeable vertical crease line on the exterior finish on the rear door. So I ended up separating the interior trim panel from the door skin, removing the door hinge rod from the interior panel and dunking it in brake fluid again. I was able to save the exterior finish on the door skin with wet sanding and polishing...............thankfully.

I cut another door hinge rod to a shorter length and shortened the hinge mount to the frame and will position the door hinge further up on the door panel. Here's an illustration that I modified to show what I did and what needs to be done here:

Image

The short black line is where the floor is making contact with the hinge. I need to position it up well out of the way to allow some room so the lower part of the hinge needs to be where the red line is. A bit of overkill on the higher up position but it'll definitely be out of the way.

I'd like to refer to this as..............backwards progress to remain positive about all this.


 Forum | Modelers Social Club Forum (proboards.com) 

  • Member since
    May 2013
  • From: Indiana, USA
Posted by Greg on Friday, August 19, 2016 10:01 AM

You'll get it working the way you want it, Joe. You always do. Yes

  • Member since
    August 2007
  • From: back country of SO-CAL, at the birth place of Naval Aviation
Posted by DUSTER on Sunday, August 21, 2016 2:38 AM

Just keep on keeping on Joe. Beer

Yes In the end it'll be worth it

Steve

Building the perfect model---just not quite yet  Confused

  • Member since
    March 2012
  • From: Corpus Christi, Tx
Posted by mustang1989 on Sunday, August 21, 2016 8:15 AM

Thanks fellas. Yes

I'm moving past the last obstacle. I've stripped the paint job, replaced and relocated the hinge on the door and have primed and repainted the door trim panel. I've also added a filler/ seal strip at the rear of the flooring so that you can't see through the floor at the body/ floor joint at the end of the flooring. Additions to the interior include an issue of Hot Rod magazine on the coffee/ TV table and a pair of John Lennon sunglasses that I applied chrome BMF to the lenses on. Sorry....you just can't be too cool when you're builin' a street rod. :wink:

Image

Image


 Forum | Modelers Social Club Forum (proboards.com) 

  • Member since
    May 2013
  • From: Indiana, USA
Posted by Greg on Sunday, August 21, 2016 10:56 AM

Big Yes re the glasses and magazine. Gotta love it.

  • Member since
    August 2009
  • From: MOAB, UTAH
Posted by JOE RIX on Sunday, August 21, 2016 11:09 PM

Good to see that you're whooping that rear door into shape. Nice touches to the interior. I like it. Man, you're almost there to the finish. Knock it out.

"Not only do I not know what's going on, I wouldn't know what to do about it if I did". George Carlin

  • Member since
    March 2012
  • From: Corpus Christi, Tx
Posted by mustang1989 on Thursday, August 25, 2016 5:25 AM

Thanks Greg and Joe.

As far as the finish line goes, I'm just taking my sweet time with it.  I'm still plugging away on this one and am down to the last stages so I had to do what I normally do and put it all down on paper so I could do things in the proper order. It may not seem like a whole lot but it is. Here's what's left to do:


1. Install Rear door hinging assembly
2. Install Windshield, Rear View Mirror and "Tree" Hanging from the Mirror
3. Steering Wheel-Choose, Paint and Install
4. Dash installation
5. Install Filler for R/H floor area (to hide glaring daylight caused by gap at R/H rear well and flooring)
6. Interior Door Trim Panel Installation
7. Headlight Bucket Alclad Application
8. Headlight lenses and Headlight Bucket Installation
9. Install Rear Bumper Mounts
10. Install Rear Bumper
11. Install Rear License Plate Assembly
12. Install Radiator Core Support Assembly
13. Install Front Grille to Include Painting Park / Turn Signal Lamps
14. Build and Complete Battery Cable Installation
15. Research Battery Operated Interior Lighting-(This one I'm not sure about how will turn out)
16. Install Body Onto Chassis
17. Install Front Bumper
18. Install Door Handles
19. Gloss Coat Hood Assembly

Hopefully I'll be able to post some updates in the near future that will show some progress.


 Forum | Modelers Social Club Forum (proboards.com) 

  • Member since
    August 2009
  • From: MOAB, UTAH
Posted by JOE RIX on Thursday, August 25, 2016 12:41 PM

Although that may seem a lengthy list, in no time it will be completed. Just take it one task at a time my friend.

"Not only do I not know what's going on, I wouldn't know what to do about it if I did". George Carlin

  • Member since
    May 2013
  • From: Indiana, USA
Posted by Greg on Thursday, August 25, 2016 7:54 PM

JOE RIX

Although that may seem a lengthy list, in no time it will be completed. Just take it one task at a time my friend.


Decades ago, I had a business consultant ask me if I knew how to eat an elephant. The answer is one bite at a time, and I failed the quiz. Eats

  • Member since
    March 2012
  • From: Corpus Christi, Tx
Posted by mustang1989 on Saturday, August 27, 2016 8:04 AM

LOL! That's how it's getting done with this one alright.

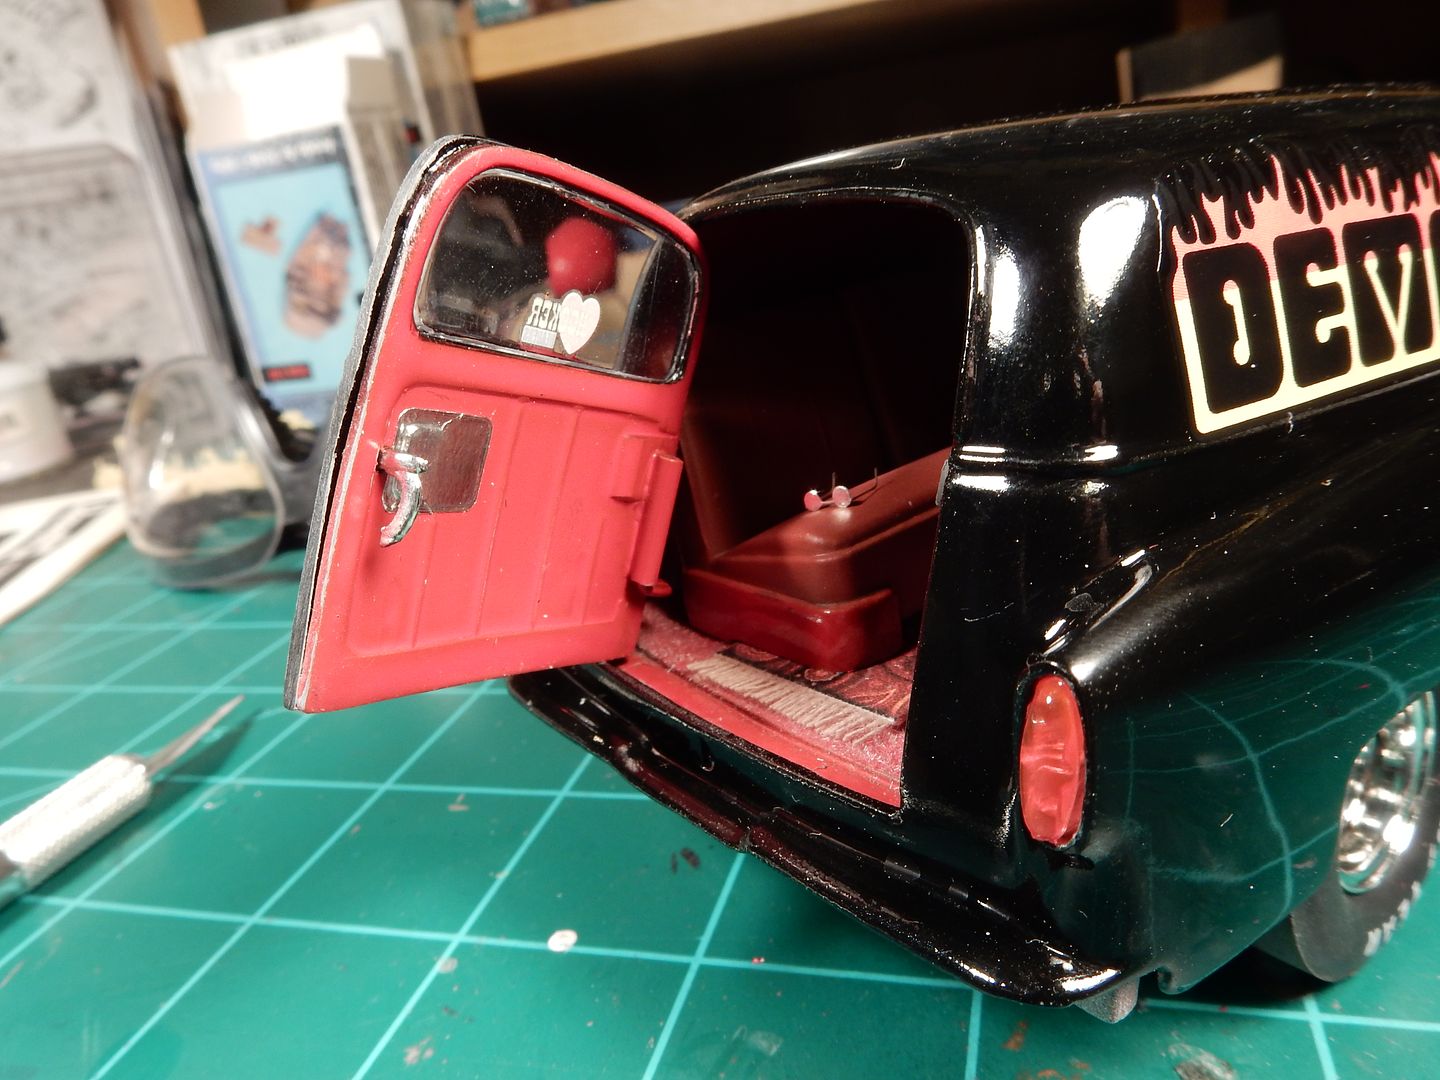
The results of relocating the hinge, sanding the left hand edge of the door to allow for proper opening and closing and installing a door stop

Closed: (wouldn't you know there'd be a stupid dog hair in the middle of the door-no worries-it'll get dusted off)
Image

I still have to shave some off of the floor at the door hinge area to allow for the body to sit low on the frame and for the door to open fully but here it is anyway with the body a slight bit off of the frame. Don't worry, the outer door edge at the R/H side of the door will be painted the proper body color. I'll get to it shortly

Open:
Image

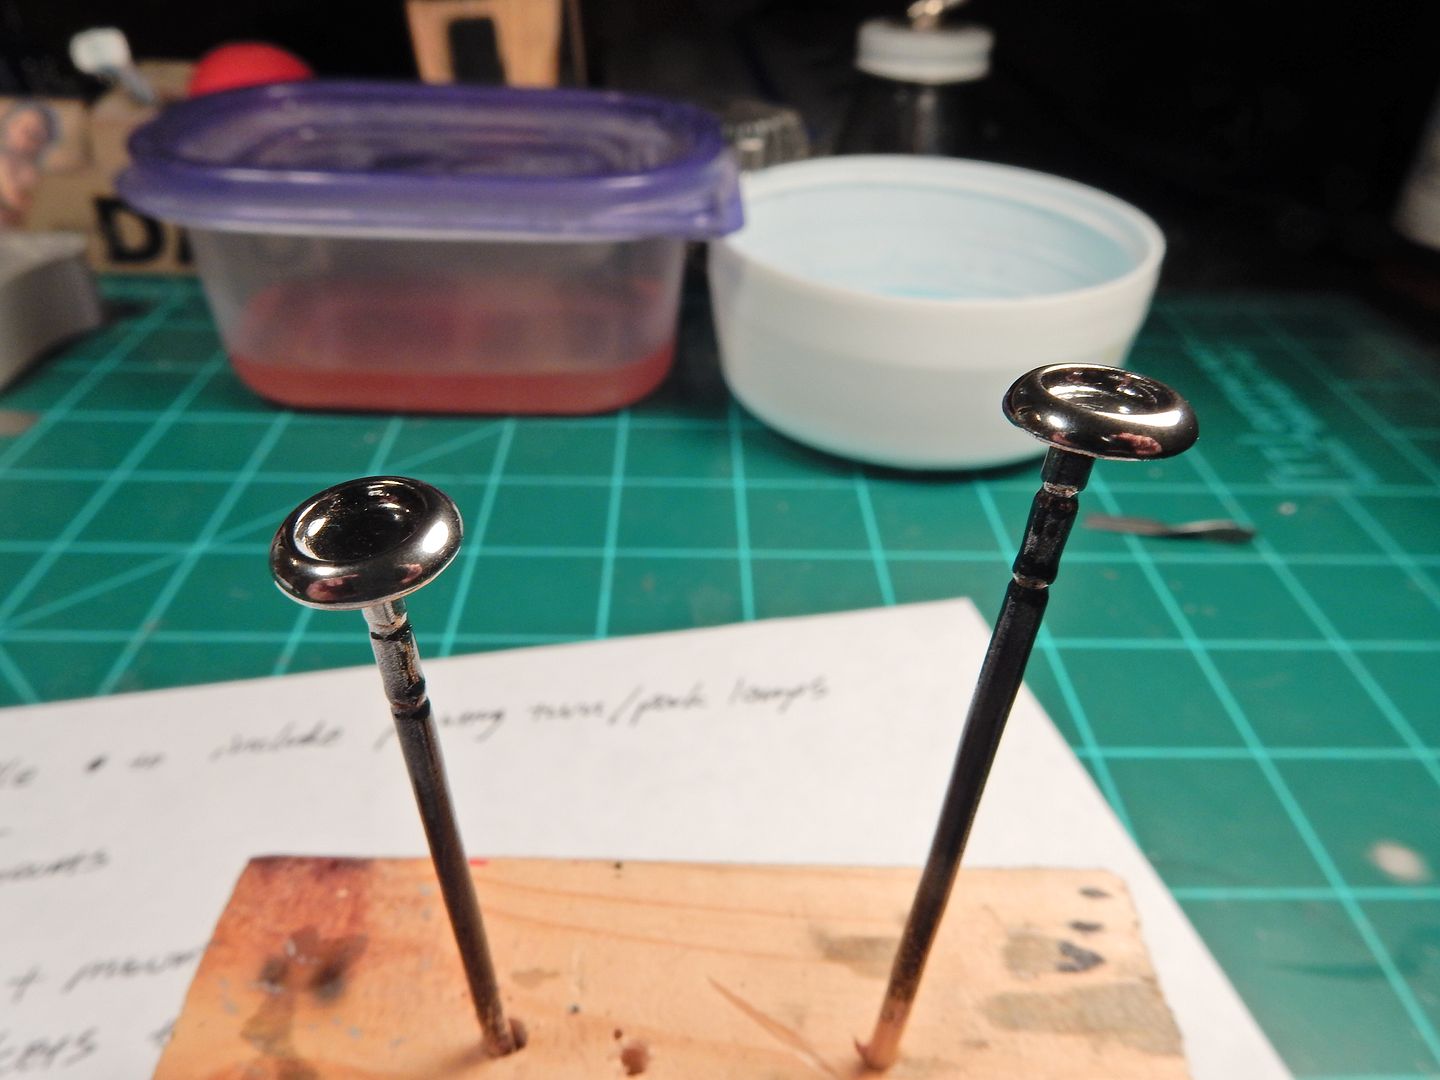
Oh and before I forget. I've been working on the headlight bezels. I had to strip the chrome on from them and try my luck with the Alclad II Chrome. I'm getting a lot more comfortable with my results.

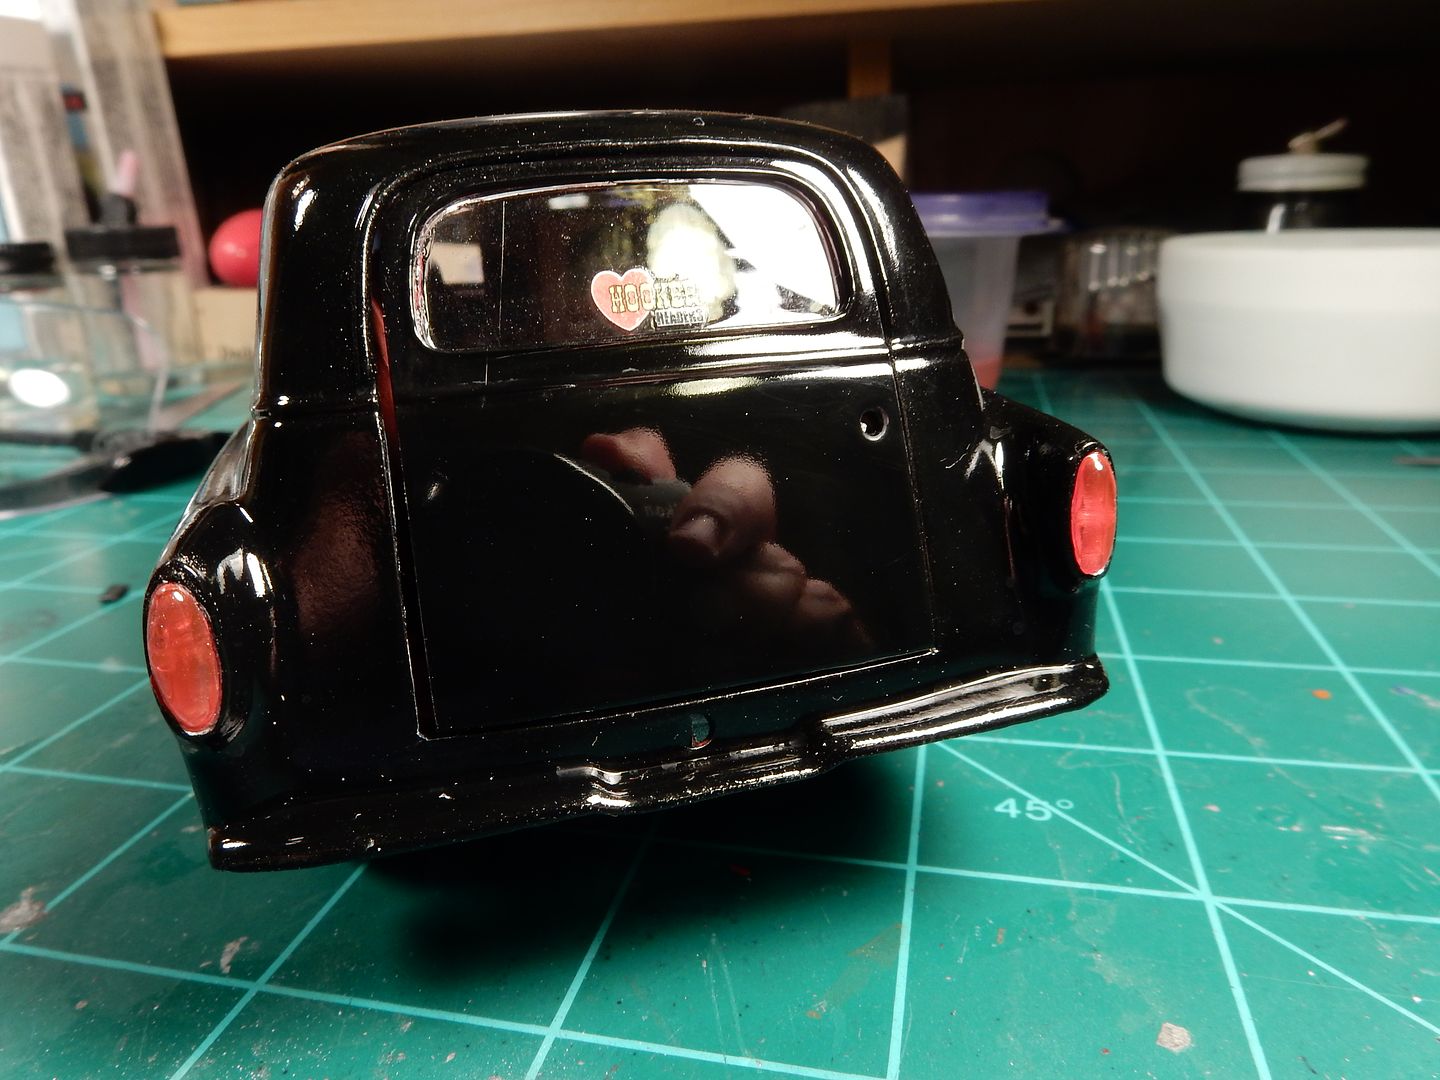
Here the both of them are after polishing:

Image

Let's zoom in a lot closer (the boo-boo will be on the bottom and therefore be unseen) to define that reflection of my hand a little better:

Image

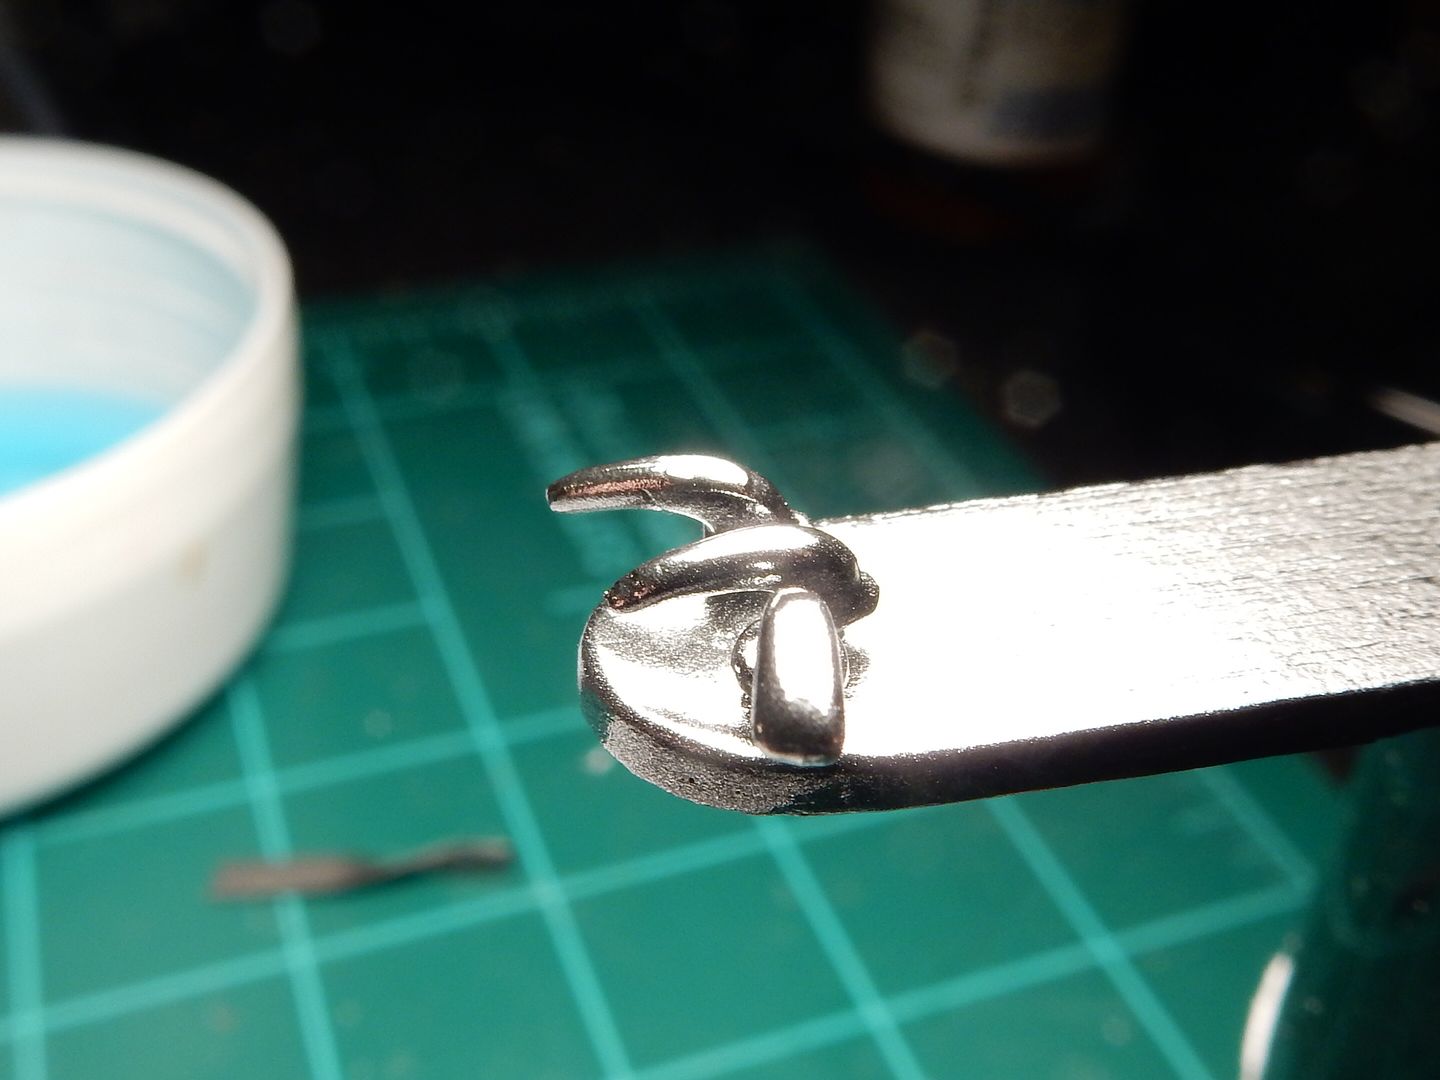
and the Alclad door handles are ready for installation as well:

Image


 Forum | Modelers Social Club Forum (proboards.com) 

  • Member since
    August 2009
  • From: MOAB, UTAH
Posted by JOE RIX on Saturday, August 27, 2016 8:19 AM

Outstanding progress Joe. You know you have yourself one nice glossy paint finish when you can see the reflection of yourself taking the pic. NICE!!!

"Not only do I not know what's going on, I wouldn't know what to do about it if I did". George Carlin

  • Member since
    March 2012
  • From: Corpus Christi, Tx
Posted by mustang1989 on Sunday, August 28, 2016 7:20 AM

Thanks Joe!

Well..............I had success with the gloss coat on the hood today and I discovered something by accident. I decanted my aerosol MM "Wet Look" Lacquer into a paint bottle and shot it through an airbrush and it turned out REALLY good. The problem is that I have two airbrushes and only thought I'd run enough thinner through the airbrush to rid all of the Alclad from it. I will say that it's a bittersweet mistake in the fact that if I ever want a slight glitter in my gloss that I know what to do now. What I'll do from here is shoot another coat of black followed up with another coat of decanted "Wet Look" without the glitter in it as opposed to dunking the whole thing in brake fluid again.

The glitter seems to show up well in photos as does the gloss:

Image


 Forum | Modelers Social Club Forum (proboards.com) 

  • Member since
    February 2003
  • From: East Bethel, MN
Posted by midnightprowler on Sunday, August 28, 2016 7:59 AM

Looking great. What camera setup do you use?

Hi, I am Lee, I am a plastiholic.

Co. A, 682 Engineers, Ltchfield, MN, 1980-1986

1 Thessalonians 4:13-18 1 Corinthians 15:51-54

Ask me about Speedway Decals

  • Member since
    August 2009
  • From: MOAB, UTAH
Posted by JOE RIX on Sunday, August 28, 2016 8:47 AM

Regret that you have to shoot the hood once again but, that is a very cool "accident".

"Not only do I not know what's going on, I wouldn't know what to do about it if I did". George Carlin

  • Member since
    March 2012
  • From: Corpus Christi, Tx
Posted by mustang1989 on Sunday, August 28, 2016 12:41 PM

Thanks Joe and Lee.

Lee: I'm using a Nikon 9700 and absolutely love the camera for all of my modeling needs. I still have quite the time trying to learn how to use it for other things like family pics and outdoors stuff but it's perfect for the bench.

Joe: I do like the outcome and will be using it on future builds I've gotta keep this one uniform. I've already shot the black coat on and will be waiting a day or so and shooting another coat of Wet Look on


 Forum | Modelers Social Club Forum (proboards.com) 

  • Member since
    February 2003
  • From: East Bethel, MN
Posted by midnightprowler on Sunday, August 28, 2016 12:46 PM

Does it have adjustable f stop and shutter speed? How much? Where did you get it?

Hi, I am Lee, I am a plastiholic.

Co. A, 682 Engineers, Ltchfield, MN, 1980-1986

1 Thessalonians 4:13-18 1 Corinthians 15:51-54

Ask me about Speedway Decals

  • Member since
    March 2012
  • From: Corpus Christi, Tx
Posted by mustang1989 on Sunday, August 28, 2016 12:56 PM

I haven't seen an option for either one yet to tell you the truth but I learn something new about the camera every day it seems like. It was originally a $400 camera but I got it from Best Buy last year sometime for $300 on sale.  It's been worth every dollar I can tell you that. When close up photos are taken it'll make even the slightest mistake clearly visible.


 Forum | Modelers Social Club Forum (proboards.com) 

  • Member since
    August 2007
  • From: back country of SO-CAL, at the birth place of Naval Aviation
Posted by DUSTER on Sunday, August 28, 2016 4:22 PM

Alclad head light bezels look amazing.  YesBeer

With your skill at the shiny black  and the glossie gloss, I’m not surprised it looks so good.

As to the camera showing off mistakes, I solved the problem (No, not by not taking any pictures Sad) but by only taking pictures from 27.3 feet away on the “micron setting”. Works great- no faults to be seen Angel


Steve

Building the perfect model---just not quite yet  Confused

  • Member since
    August 2015
  • From: the redlands Fl
Posted by crown r n7 on Sunday, August 28, 2016 4:40 PM

 Stunning Cool


 Nick.

  • Member since
    March 2012
  • From: Corpus Christi, Tx
Posted by mustang1989 on Tuesday, August 30, 2016 7:15 AM

Steve: LOL....and thanks buddy.

crown: Thank you as well for the encouraging words.

This morning I worked on a couple more interior items. I was looking for something to put at the R/H rear corner of the flooring to hide the light that can be seen between the R/H rear wheel opening and the floor and my eyes cast upon a 1/43rd scale Great Garages kit that I've got in my stash. There's a tool box in there that in 43rd scale is supposed to be a parts trunk but in 25th scale it works perfectly as an "on-the-go" toolbox. I primed it and painted it yesterday and detailed the handle and hinges. This morning I applied a couple of decals to give it a more "true mechanics toolbox" look and installed it on the floor.

Image

then I applied a "Chevrolet/ Bowtie" banner on the wall just behind the couch.

Image


 Forum | Modelers Social Club Forum (proboards.com) 

JOIN OUR COMMUNITY!

Our community is FREE to join. To participate you must either login or register for an account.

SEARCH FORUMS
FREE NEWSLETTER
By signing up you may also receive reader surveys and occasional special offers. We do not sell, rent or trade our email lists. View our Privacy Policy.