SEARCH FINESCALE.COM

Enter keywords or a search phrase below:

Mack RW rebuild

2053631 views
239 replies
1 rating 2 rating 3 rating 4 rating 5 rating
  • Member since
    October 2009
  • From: SURREY ,B.C.
Posted by krow113 on Tuesday, November 23, 2010 12:09 PM

Jus' checkin' in Pawel . work like this needs to be on top of the page...

Thank you ,Krow113

  • Member since
    August 2007
  • From: Bundaberg, Qld , Australia
Posted by holdenmaniac on Wednesday, November 24, 2010 1:01 AM

Small question for a novice at rebuilding old models, How did you dismantle the project so neatly without much damage?

If it jams, force it. If it breaks,

it needed replacing anyway.

  • Member since
    May 2009
  • From: Poland
Posted by Pawel on Wednesday, November 24, 2010 4:48 AM

Hello everybody! It's been some time, but I didn't want to bore you all with fotos showing puttying and sanding.

Steve - thanks a lot, I appreciate it!

holdenmaniac - welcome aboard! Well, to be true, it was more my fault than my merit... I just used tube glue many years ago on some places and then I didn't scrape the paint away in other places... So these joints can be pried apart pretty clean, as long as you use some "feeling" doing it. Having assembly instructions at hand is helpful, to know exactly where the part joints are. Where the glue holds like it should, a razor saw is most helpful. I made mine myself, by filing an old razor blade (you can hardly find one nowadays). Other than the "feeling" you also need luck, and then it can be done.

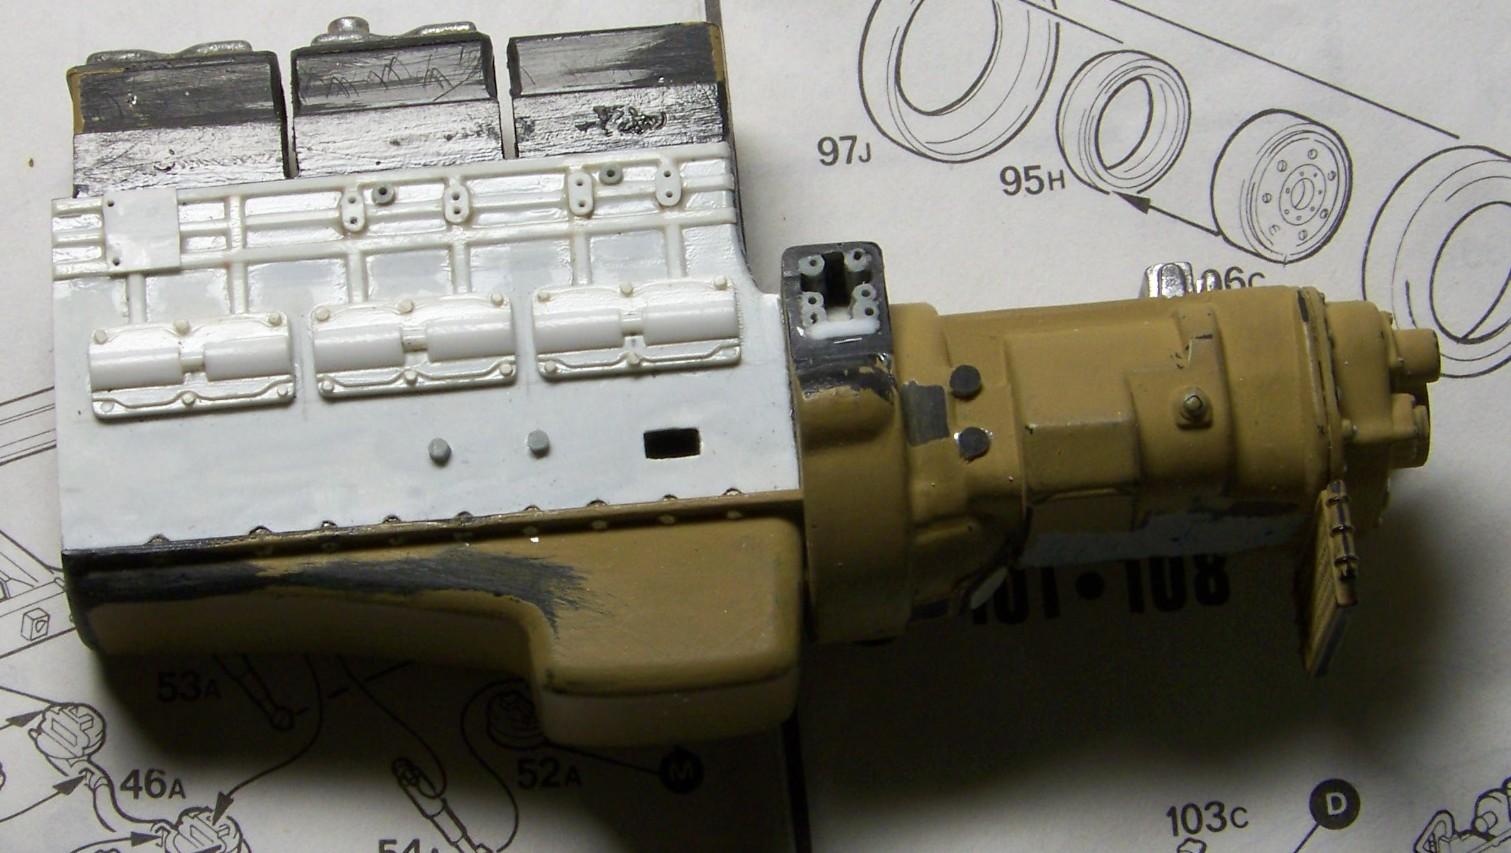
But I also have a bit of an update for you! This time I put some more work in the engine and the rear suspension. I added yet another casting details on the motor block and I also depicted the motor mounts taken off the flywheel housing - on Macks the power pack hangs by the tranny, by the clutch housing to be exact. This way the torque is carried better by the pack and by the frame too. Here's a picture

1:24 Cummins engine by Pawel Mroczkowski

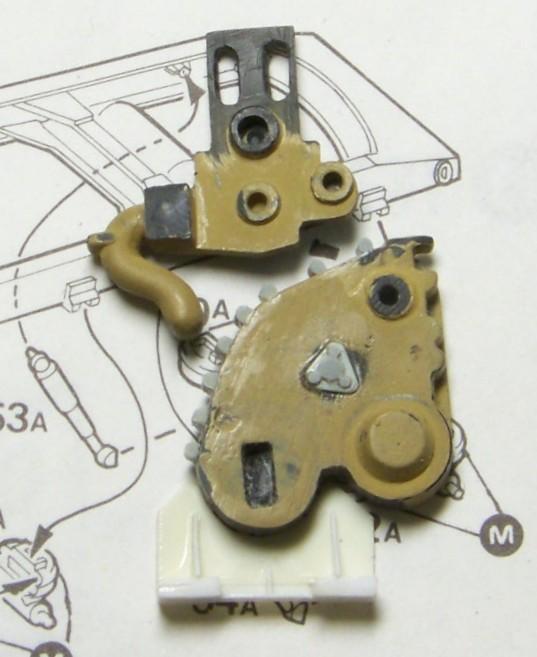
I also worked on parts mounted on the front of the block - the chain cover, the motor mount, which I scratchbuilt, and the upper part containing the water pump and the radiator fan bearing:

1:24 Cummins engine by Pawel Mroczkowski

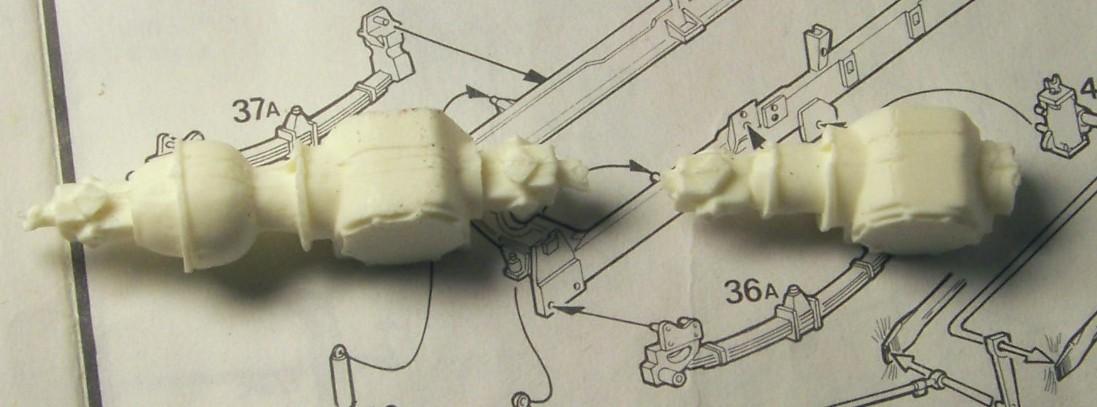
Moving over to the rear suspension, here are the gears as I got them:

1:24 Mack Superliner by Pawel Mroczkowski

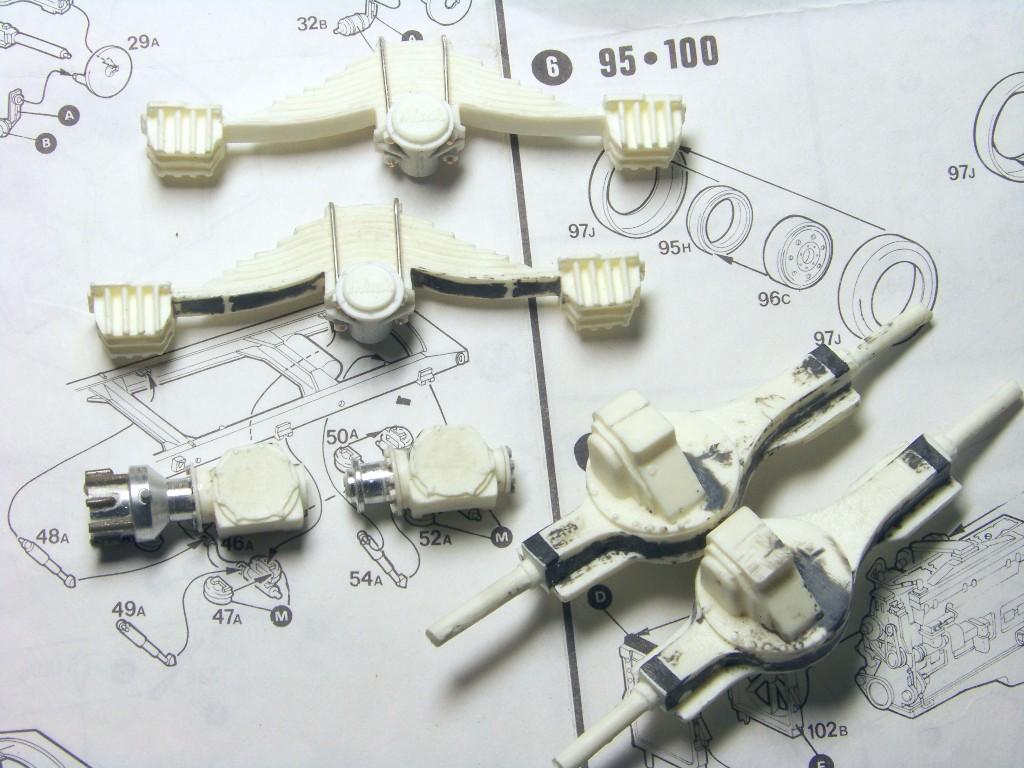
Instead of cleaning them up intensively, I decided to build a portion of the gears myself, using turned aluminium parts I fabricated myself. After it was done, I finally had all the parts for the rear suspension:

1:24 Mack Superliner by Pawel Mroczkowski

I still need to do the brakes, but I hope to have a complete rear bogie soon, so please stay tuned and have a nice day

Paweł

All comments and critique welcomed. Thanks for your honest opinions!

www.vietnam.net.pl

  • Member since
    August 2007
  • From: Bundaberg, Qld , Australia
Posted by holdenmaniac on Wednesday, November 24, 2010 7:40 AM

Thanks mate, appreciate it!

If it jams, force it. If it breaks,

it needed replacing anyway.

  • Member since
    February 2010
  • From: Maine
Posted by Stage_Left on Wednesday, November 24, 2010 10:20 AM

Pawel,

I've been lurking here for a while now, but you're doing a fantastic job on this rebuild. I love the big rigs; I built a few of the AMT kits when I was a kid, and currently have a few in the stash. Fond memories........

  • Member since
    July 2008
  • From: Florida
Posted by Railfan 233 on Wednesday, November 24, 2010 12:22 PM

Man, the suspension is looking great.  I don't even know how to describe it no more.

Keep up the good work Pawel, and Keep on truckin' Cowboy


http://i6.photobucket.com/albums/y211/razordws/GB%20Badges/WMIIIGBsmall.jpgRed, White, and YOU! group build of 2010

  • Member since
    May 2009
  • From: Poland
Posted by Pawel on Thursday, November 25, 2010 4:01 AM

Gennulmen, thanks a lot for your comments! Nice to know I don't write it only for myself!

Stage_Left - good you surfaced! Welcome aboard! The AMT kits are cool, they had many cool trucks in program, pity you almost don't see them any more. I managed to get a hold of a dual drive Freightliner cabover last time they reissued it and I feel lucky. I also recommend to try Petes and Kens from Italeri, the detail on them is even nicer than on AMT kits, other trucks can be tricky sometimes, lots of factual errors if you're unlucky, like my Mack which hadly is a Mack at all.

Railfan 233 - please don't make me blushEmbarrassed Thanks for your continued interest, I'll try my best to keep this WIP good!

Please stay tuned and have a nice day

Paweł

All comments and critique welcomed. Thanks for your honest opinions!

www.vietnam.net.pl

  • Member since
    May 2009
  • From: Poland
Posted by Pawel on Friday, December 3, 2010 6:47 AM

Breaker, breaker, we've got another update just around the bend!

So I kept on bothering the engine block, this time the slightly forgotten right side. I changed it's shape slightly with sheet styrene, and added come cast features and the alternator mount. Here's what it looks like, ready for the first coat of paint, after many years, that is:

1:24 Cummins NTC450 by Pawel Mroczkowski

1:24 Cummins NTC450 by Pawel Mroczkowski

1:24 Cummins NTC450 by Pawel Mroczkowski

I also primed the real axles and added a small hanger for suspension arms on top of each one:

1:24 Mack Superliner by Pawel Mroczkowski

It's also high time to do something about the frame. I started by smoothing the insides of the rails with surfacer 500:

1:24 Mack Superliner by Pawel Mroczkowski

I also made the motor mount crossmember:

1:24 Mack Superliner by Pawel Mroczkowski

And then I dry fitted the frame:

1:24 Mack Superliner by Pawel Mroczkowski

I hope you liked it, please stay tuned and have a nice day!

Paweł

All comments and critique welcomed. Thanks for your honest opinions!

www.vietnam.net.pl

  • Member since
    July 2008
  • From: Florida
Posted by Railfan 233 on Friday, December 3, 2010 2:12 PM

The engine looks closer and closer  to being able to haul 20 tons every time I see it. The frame and rear axles are also looking up to the job of doing their fare share in the haul, too.

Keep the hammer down, and keep on truckin'

                                        -Railfan out. Cowboy


http://i6.photobucket.com/albums/y211/razordws/GB%20Badges/WMIIIGBsmall.jpgRed, White, and YOU! group build of 2010

  • Member since
    March 2010
Posted by shoot&scoot on Friday, December 3, 2010 8:37 PM

Always love it when somebody takes one of these older kits and shows what they are capable of being built into.  You're doing a great service to this rig.  Keep up the great work Pawel!

                                                                                              Pat.

  • Member since
    May 2009
  • From: Poland
Posted by Pawel on Saturday, December 4, 2010 3:01 PM

Railfan 233, Pat - thanks for your interest in this thread and your kind words! I'm movin' on with the build and I'm gonna keep it up, because it's a lot of fun. 20 tons of fun, you might say Big Smile Thanks again, and have a nice weekend

Paweł

All comments and critique welcomed. Thanks for your honest opinions!

www.vietnam.net.pl

  • Member since
    May 2009
  • From: Poland
Posted by Pawel on Friday, December 10, 2010 4:30 AM

Awright, another update!

I started painting the engine:

1:24 Cummins NTC450 by Pawel Mroczkowski

What we got here is the power pack with the tranny painted blue and masked, you can also see some of the preshading on the engine, and also the devices that attach to the block, on their holders for painting. My favourite is the one with the pipe - that's the oil pump I scratchbuilt, together with the external oil line.

After the first layers of paint the engine looks like this:

1:24 Cummins NTC450 by Pawel Mroczkowski

It has to dry throughly now, so I went on to the rear axles' brakes:

1:24 Mack Superliner by Pawel Mroczkowski

On the right of the foto you can see the kit-supplied brakes. Of course I didn't like 'em, so I just cut off the brake chambers and went on to scratchbuild the linkages. I also made new backing plates, so I didn't have to clean up the Italeri ones, which also seemed a bit small in diameter. On the top of the foto you can also see the parts I made of copper sheet, they connect the brake chambers to the backing plates. I still need more parts:

1:24 Mack Superliner by Pawel Mroczkowski

Here, you can see the separated brake chambers, with linkage and lever parts, and the brake backing plates almost ready to accept the brake actuators. And the finished actuators:

1:24 Mack Superliner by Pawel Mroczkowski

I also have an announcement to make - I have to move temporarily, so the next update in this thread is to be expected mid-january 2011. Where I'm going I have an unfinished build going on for years now, so maybe I'll start another thread in the armor forum. For now thanks for reading and have a nice day

Paweł

All comments and critique welcomed. Thanks for your honest opinions!

www.vietnam.net.pl

  • Member since
    October 2009
  • From: SURREY ,B.C.
Posted by krow113 on Friday, December 10, 2010 11:40 AM

Pawel Thanks for leavin' us hangin'! I look forward to seeing this DONE in the new year.

Thank you ,Krow113

  • Member since
    July 2008
  • From: Florida
Posted by Railfan 233 on Friday, December 10, 2010 1:40 PM

Wow!

I'm amazed at how everything is turning out. The brake system is looking better and better (if I didn't know better, I'd say I was viewing a factory photo of new brake parts waiting for the next truck on the production line)

I'll be looking foward to mid-2011 (The Suspence is killing me!Indifferent)


http://i6.photobucket.com/albums/y211/razordws/GB%20Badges/WMIIIGBsmall.jpgRed, White, and YOU! group build of 2010

  • Member since
    May 2009
  • From: Poland
Posted by Pawel on Saturday, December 11, 2010 4:59 PM

Howdy friends! Thanks a lot for your kind words! I also think this will get done in 2011, remember what Ray from the "Ghostbustars" said - it's a nice car, you only need to do the body, chassis, engine, suspension, wiring, exhaust, paint, chrome - and it's done!

So, I'll stick around and I think we'll stay in touch. Have a nice day and 'till next time

Paweł

All comments and critique welcomed. Thanks for your honest opinions!

www.vietnam.net.pl

  • Member since
    January 2006
  • From: NW Washington
Posted by dirkpitt77 on Sunday, December 12, 2010 8:44 PM

Hi Pawel,


      As a kid I often took week long road trips with my stepdad who worked as a trucker, although he drove Kenworths. Your build is coming along nicely and really evokes memories for me.  Your work is excellent and inspiring.

      One thing I did want to mention:  on the Kenworths, on the rear outside wall of the sleeper, there were mounted two flood lights.  These were used when hooking up or releasing a trailer.  They were flush mounted into the wall.  I didn't see these on your build, but wanted to mention it in case they may be of concern.  Don't know if Macks had them or not though.

     Overall, though, this is a fantastic build and I am really enjoying following it.  Great work!!


                                                                                                                 Chris

    "Some say the alien didn't die in the crash.  It survived and drank whiskey and played poker with the locals 'til the Texas Rangers caught wind of it and shot it dead."

  • Member since
    May 2009
  • From: Poland
Posted by Pawel on Friday, January 21, 2011 5:17 AM

And the beat goes on!

After about a month's break I have another update for you.

Chris - sorry I didn't reply so long. Thanks for your comment. I've also seen lights on the rear wall of the sleeper on Macks, so as there is still a lot of work on the sleeper to do, maybe I'll go for it. For now I'm working more on the chassis.

And here's where my update comes in. I started putting the motor together, and while I was at it I started adding the plumbing to the motor. On the photos it's still unpainted, so you can more clearly see what I added:

1:24 Cummins NTC 450 by Pawel Mroczkowski

1:24 Cummins NTC 450 by Pawel Mroczkowski

I also did some work on the front suspension - I finished carving the front springs, and added the U-bolts to join one of them with the front axle:


1:24 Mack RW Superliner by Pawel Mroczkowski


I chose not to modify the front springs too much, as they also hold the hood hinge axis, so they are critical to the hood-chasis-front axle-wheels fit.

Hope you liked it, thanks for reading and have a nice day

Paweł

All comments and critique welcomed. Thanks for your honest opinions!

www.vietnam.net.pl

  • Member since
    October 2009
  • From: SURREY ,B.C.
Posted by krow113 on Friday, January 21, 2011 1:24 PM

Great work Pawel.!

Thank you ,Krow113

  • Member since
    July 2008
  • From: Florida
Posted by Railfan 233 on Friday, January 21, 2011 1:41 PM

Exelent work, Pawel. That engine looks like it's ready to pull 18 tons of steel on a 6 day run already.

I'm glad to see you back in the driver's seat with this truck. I missed watching as you re-built it from the ground up.


http://i6.photobucket.com/albums/y211/razordws/GB%20Badges/WMIIIGBsmall.jpgRed, White, and YOU! group build of 2010

  • Member since
    May 2009
  • From: Poland
Posted by Pawel on Friday, January 21, 2011 1:55 PM

Steve, Railfan 233 - thanks a lot boys, I knew you wouldn't let me down without your comments. It means a lot to me! Please stay tuned for more next week and have a nice weekend

Paweł

All comments and critique welcomed. Thanks for your honest opinions!

www.vietnam.net.pl

  • Member since
    May 2009
  • From: Poland
Posted by Pawel on Wednesday, February 2, 2011 3:55 AM

And the next update is there!

I moved on with the rears. First I had to add yet another "gizmo" - the inter-axle differential lock. Here it is:

1:24 Mack RW Superliner by Pawel Mroczkowski

After that was done I went to town and sprayed the rear axles:

1:24 Mack RW Superliner by Pawel Mroczkowski

When I was done recovering from the shock, I moved on to work on the grille. I dechromed it with brake fluid and removed the sinkmarks from the Italeri part. Then I fitted the metal part with MACK lettering I cut out of a metal superliner grille made by a company called AITM. Now I needed a bulldog. I also got it from AITM, but it's base was incorrect for a Superliner, so I made my own base from sprue. Here's what the grille looks like now:

1:24 Mack RW Superliner by Pawel Mroczkowski

1:24 Mack RW Superliner by Pawel Mroczkowski

Hope you like it, looking forward to your comments and have a nice day

Paweł

All comments and critique welcomed. Thanks for your honest opinions!

www.vietnam.net.pl

  • Member since
    May 2009
  • From: Poland
Posted by Pawel on Friday, February 4, 2011 4:32 AM

And before anybody had a chance to comment on this one, another, surprise update!

I glued three crossmembersto the frame rails, put it under a book on an even surface, and after it dried a little I could do some dry-fitting:

1:24 Mack RW Superliner by Pawel Mroczkowski

Then I went on to work on the front suspension. Well what I wrote about the front suspension about two posts ago was a bad idea - both springs have to be fitted to the axle and to the frame simultaneously, or else the chance that everything ill fit together is only marginal. Please note the axle mounted steering box, a feature characteristic for the Mack W Cruiseliner and early RW Superliners:

1:24 Mack RW Superliner by Pawel Mroczkowski

1:24 Mack RW Superliner by Pawel Mroczkowski

1:24 Mack RW Superliner by Pawel Mroczkowski

Quite different than the Italeri kit, isn't it? Hope you like it, thanks for reading and have a nice day

Paweł

All comments and critique welcomed. Thanks for your honest opinions!

www.vietnam.net.pl

  • Member since
    May 2009
  • From: Poland
Posted by Pawel on Friday, February 18, 2011 3:42 PM

Awright, truckin' on!

I fianlly assembled the front axle, with articulating front wheels!

1:24 Mack RW Superliner by Pawel Mroczkowski

1:24 Mack RW Superliner by Pawel Mroczkowski

1:24 Mack RW Superliner by Pawel Mroczkowski

1:24 Mack RW Superliner by Pawel Mroczkowski

While at it, I also tackled the front brakes:

1:24 Mack RW Superliner by Pawel Mroczkowski

I also put together the rear bogie. I fitted rubber tires to the eight rear wheels, and it was a good time to fit the suspension to the frame:

1:24 Mack RW Superliner by Pawel Mroczkowski

Here's what the rear suspension looks like now:

1:24 Mack RW Superliner by Pawel Mroczkowski

Still missing is the inter-axle drive shaft and the two bars preventing the axles from rotating, together with their fittings on the frame crossmember.

I also tackled this engine part

1:24 Mack RW Superliner by Pawel Mroczkowski

It's the cold side of the turbocharger with modified air crossover.

So whatcha think? Keep on truckin'

Paweł

All comments and critique welcomed. Thanks for your honest opinions!

www.vietnam.net.pl

  • Member since
    October 2009
  • From: SURREY ,B.C.
Posted by krow113 on Friday, February 18, 2011 3:55 PM

Pawel-The loooooooooooooooooooooooooooooooooooooooooooooooooooooooooooong haul trucker ,keep on it mate and get it finished!

Looks good goin' together.

Thank you ,Krow113

  • Member since
    February 2010
  • From: Maine
Posted by Stage_Left on Saturday, February 19, 2011 1:16 AM

Pawel- more outstanding work. I love watching your progress on this....

  • Member since
    May 2009
  • From: Poland
Posted by Pawel on Saturday, February 19, 2011 3:47 PM

Gennulmen,

thanks for your comments, I just can't get enough of them!

Steve - will do, it will take some time, but I'll eventually get there!

Stage_Left - thanks for your kind words, please stay tuned!

Now, back to the engine and the hood, have a nice day and keep on truckin'!

Paweł

All comments and critique welcomed. Thanks for your honest opinions!

www.vietnam.net.pl

  • Member since
    May 2009
  • From: Poland
Posted by Pawel on Wednesday, February 23, 2011 10:09 AM

And here I am again! I did some fitting, to see how everything comes together, here's what it looks like:

1:24 Mack RW Superliner by Pawel Mroczkowski

1:24 Mack RW Superliner by Pawel Mroczkowski

And also two photos of the brakes on the front axle:

1:24 Mack RW Superliner by Pawel Mroczkowski

1:24 Mack RW Superliner by Pawel Mroczkowski

How do you like it? Thanks for reading and have a nice day

Paweł

All comments and critique welcomed. Thanks for your honest opinions!

www.vietnam.net.pl

  • Member since
    July 2008
  • From: Florida
Posted by Railfan 233 on Thursday, March 3, 2011 4:21 PM

Everything is looking good Pawel.

My computer died a few weeks ago, so I havn't been able to follow the build.  It looks like you are still truckin' through it.

 I like this a lot


http://i6.photobucket.com/albums/y211/razordws/GB%20Badges/WMIIIGBsmall.jpgRed, White, and YOU! group build of 2010

  • Member since
    May 2009
  • From: Poland
Posted by Pawel on Friday, March 4, 2011 7:43 AM

Railfan 233, good to hear from you again! I was already beginning to miss you Big Smile. I hope you could sort out that computer problem.

Plus, I have another update comin', here it is:

I finally installed the water manifold, the turbocharger with the air crossover and the alternator, and all the belts and pulleys. Now the engine looks like this:

1:24 Mack Superliner by Pawel Mroczkowski

1:24 Mack Superliner by Pawel Mroczkowski

I also did some more work on the rear suspension, I reworked the Italeri inter-axle shaft and made the attachment points on the crossmember for the suspension links. Currently the rear suspension looks like this:

1:24 Mack Superliner by Pawel Mroczkowski

I also started working on the battery boxes and I did minor working on the hood - more on that to follow... Hope you liked it, thanks for reading and have a nice day

Paweł

All comments and critique welcomed. Thanks for your honest opinions!

www.vietnam.net.pl

  • Member since
    July 2008
  • From: Florida
Posted by Railfan 233 on Monday, March 7, 2011 4:21 PM

Still looking good, Pawel. It's just a matter of time untill the MACK is ready for another run.

I'm West Bound and Down, Keep 'em rollin.


http://i6.photobucket.com/albums/y211/razordws/GB%20Badges/WMIIIGBsmall.jpgRed, White, and YOU! group build of 2010

JOIN OUR COMMUNITY!

Our community is FREE to join. To participate you must either login or register for an account.

SEARCH FORUMS
FREE NEWSLETTER
By signing up you may also receive reader surveys and occasional special offers. We do not sell, rent or trade our email lists. View our Privacy Policy.