SEARCH FINESCALE.COM

Enter keywords or a search phrase below:

Mack RW rebuild

2054457 views
239 replies
1 rating 2 rating 3 rating 4 rating 5 rating
  • Member since
    September 2007
  • From: Truro Nova Scotia, Canada
Posted by SuppressionFire on Monday, June 13, 2011 10:04 AM

His stash contains more styrene kits than all of Atlantic Canada!

Kind words, they will fair well when I pester him for that truck kit!

Besides I really do not think he will get around to building all those kits in this life time...

Unless slaves are constructing a terracotta army of modelers to build with him in the afterlife?

http://i6.photobucket.com/albums/y211/razordws/GB%20Badges/WMIIIGBsmall.jpg


  • Member since
    November 2003
Posted by halfpint33 on Friday, June 24, 2011 4:48 PM

Impressive rebuild there Pawel.

  • Member since
    March 2004
Posted by Grimmo on Sunday, July 3, 2011 5:40 AM

Pawel, your talent amazes me! brilliant work!

  • Member since
    May 2009
  • From: Poland
Posted by Pawel on Sunday, July 3, 2011 1:21 PM

halfpint33, Grimmo - thanks a lot for your kind words, gennulmen! I didn't post any update for some time now, hope to change that soon. You know - lots of work, not much to show. But I'll try anyhow, thanks again, have a nice day

Paweł

All comments and critique welcomed. Thanks for your honest opinions!

www.vietnam.net.pl

  • Member since
    May 2009
  • From: Poland
Posted by Pawel on Friday, July 8, 2011 4:10 PM

Hello again!

Here I go with the promised update. Not much to show, but still. First a rare photo of the real thing:

Reference photo I got from Doug

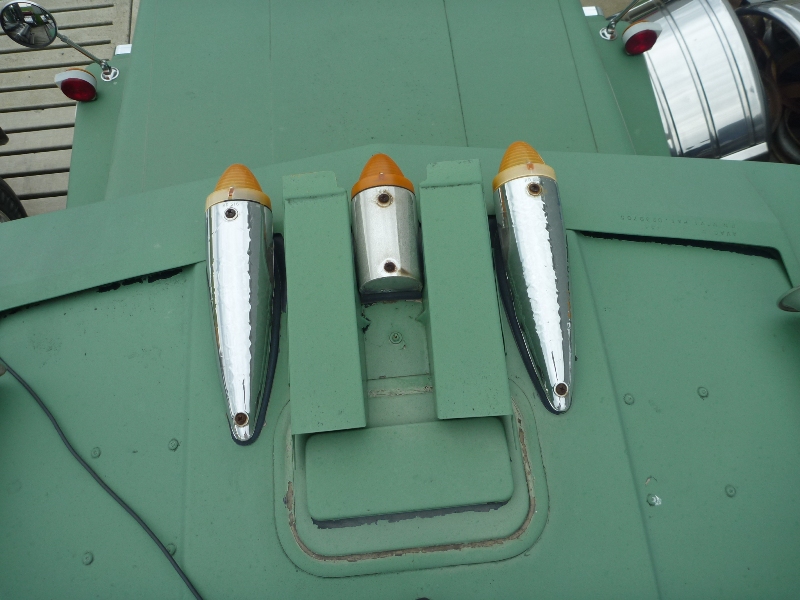
Not everything as you would expect it, huh? Definitely different from what Italeri depicted in the kit. Guess they didn't climb up there... OK, so we got the roof vent, three "bullet" lights, the middle one "bobbed" and we also have those two mysterious objects - now I know they are "air diverters" - they are there to streamline the air flow in/out of the vent.

Having such a cool piece of reference I decided to rip the roof one more time:

1:24 Mack RW Superliner by Pawel Mroczkowski

I removed the kit supplied vent, blanked the resulting hole and I'll fabricate a new vent out of three pieces of sheet styrene. I'll also cut one of five bullet lights - the one still needing most work. All parts I dechromed previously are now gloss black, as preparation for Alclad 2. In the top portion of the photo you can see the tool I made for decanting gloss black paint. Spraying this paint through the airbrush lets me control the process better and thus avoiding streaks.

I also worked some on the frame mounted items. Going front to rear we have the battery boxes:

1:24 Mack RW Superliner by Pawel Mroczkowski

Also working on the preparation for chrome. I also had some work on shortening the air tanks and making new mounting rings for them.

Then there are the fuel tanks:

1:24 Mack RW Superliner by Pawel Mroczkowski

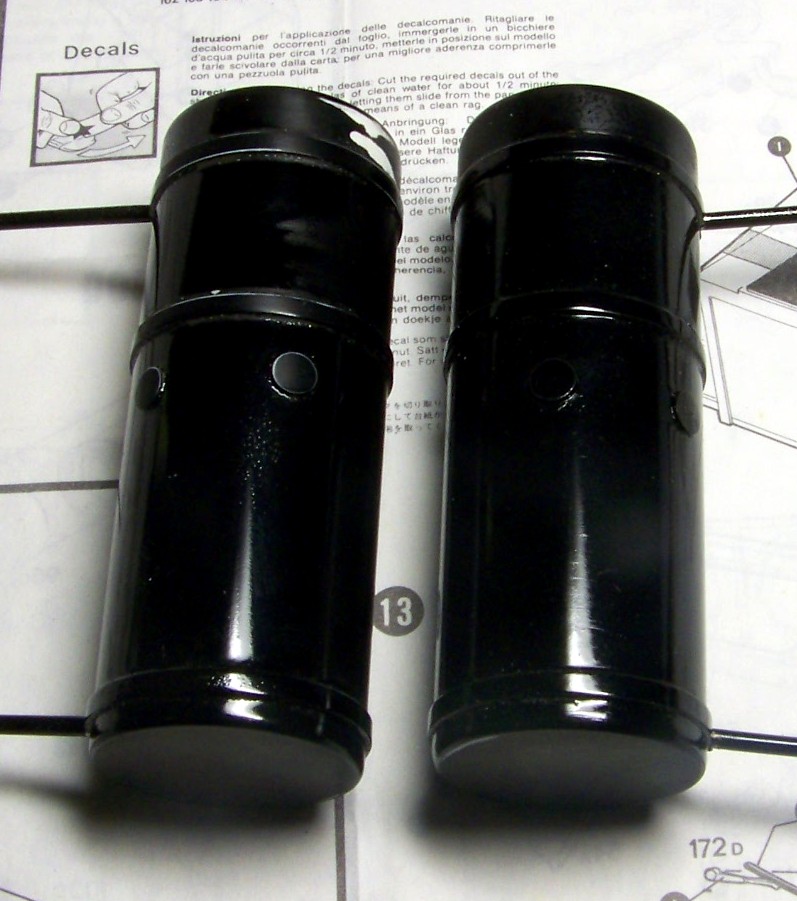
Same thing - how to paint good, absolutely smooth gloss black without streaks? I sand them like third time now. I'm also afraid to chrome the tanks too early - that would give me the chance of wrecking the finish while handling the tanks...

Then there are the tool boxes:

1:24 Mack RW Superliner by Pawel Mroczkowski

Those are resin parts, I had some work filling lots of tiny air bubbles there. Did that combining filling primer and CA glue in multiple passes. I also reworked the "wings" that will take the photoetched steps I bought from a british company called KFS. I bought two sets of steps, one will go on the toolboxes, one will go on the fuel tanks.

So that'd be it for now. My company sends me to Germany now, so I'm not sure how this will play with the build. Let's hope for the best - thanks for reading, have a nice day

Paweł

All comments and critique welcomed. Thanks for your honest opinions!

www.vietnam.net.pl

  • Member since
    May 2009
  • From: Poland
Posted by Pawel on Friday, September 2, 2011 7:55 AM

Hello everybody!

The business trips to Germany are still slowing me down, at least the money is OK, but I thought I'll post an update for the few kind people who are reading this, so they know I didn't give up just yet.

So I'm still working on the cab roof - Italeri has managed to botch even that. The roof vent is too far aft, and the air diverters are actually one part, fastened to the roof by one screw, as far as I can tall - I'll try to depict that. I also "bobbed" the middle bullet marker light. Dry fitted the roof looks like this:

1:24 Mack RW Superliner by Pawel Mroczkowski

There's also the inner cab roof, I worked on this too. It was shot with filler primer and the scars from the narrowing of this part are hardly visible anymore. I also milled the vent out and replaced it with copper mesh, I think it looks better now:

1:24 Mack RW Superliner by Pawel Mroczkowski

The filler primer also came in handy for the sleeper roof, on coat showed lots of pinholes and other bad things, anyhow, it needs more work than I thought (again!). I'm on it.

1:24 Mack RW Superliner by Pawel Mroczkowski

I'm also fabricating smaller details all the time, like in the photo below:

1:24 Mack RW Superliner by Pawel Mroczkowski

Here we have a tthe top of the picture, the tank that'll come on the top of the radiator, plus two suspension arms that will be installed when the rear suspension mates with the frame. Those arms work parallel with the camelback springs and keep the rear axles from rotating.

Could I please have a coment sometime Big Smile Thanks a lot for reading, have a nice day

Paweł

All comments and critique welcomed. Thanks for your honest opinions!

www.vietnam.net.pl

  • Member since
    March 2010
Posted by cj0203 on Monday, September 5, 2011 3:32 AM

Really nice work mate, especially love the reworking of the cummins, looks sweet.

Don't suppose you have a spare Cummins to part with?


Once again, top stuff.


Chris

  • Member since
    February 2010
  • From: Maine
Posted by Stage_Left on Monday, September 5, 2011 10:44 AM

Pawel- great stuff, as usual.This truly is a five-star thread.  

  • Member since
    May 2009
  • From: Poland
Posted by Pawel on Tuesday, September 6, 2011 10:23 AM

Stage_Left - thanks for staying tuned to this one! It means a lot to me!

Chris - thanks, I like that engine too. Can you tell me what you need that engine for? PM me if you like (it's called conversation on this particular forum). Oh, and welcome to the forums.

Thanks again for the comments, have a nice day

Pawel

All comments and critique welcomed. Thanks for your honest opinions!

www.vietnam.net.pl

  • Member since
    March 2010
Posted by shoot&scoot on Wednesday, September 7, 2011 7:08 PM

First rate all around on this!  The cab is coming along nicely, can't wait for this to head toward the finish line.  Truly exceptional work (the Force is strong in this one...........).

                                                                                                       Pat.   

  • Member since
    April 2004
  • From: Boston MA
Posted by vespa boy on Thursday, September 8, 2011 6:28 PM

Beautiful work on the truck, and very nice corrective surgery. I hope that you are going to be able to take full advantage of the cabin and turn it into a diorama of its own, like Ken Hamilton has done with this truck he is building:

http://public.fotki.com/nkhandekar

This ain't no Mudd Club, or C.B.G.B.,
I ain't got time for that now

  • Member since
    May 2009
  • From: Poland
Posted by Pawel on Friday, October 7, 2011 5:37 PM

Pat, Narayan - thanks a lot for your kind words! Sory for replying so late - a lot is been going on. Luckily I've been able to build a little, too! Pat - this one is moving slowly - I'd like fo finish it soon, but my feeling is it's going to take some time yet... Narayan - that's a strong photo you posted, looks like Ken really knows what he's doing! I aim for something different - I'd like to build a model of a clean, well maintained truck, but one that doesn't look like a toy.

But - I mentioned building! Here's what I managed to do since the last time:

First I chromed - or alcladed - the roof lights, the air diverter and the air horns. Here's what it looks like now:

1:24 Mack RW Superliner by Pawel Mroczkowski

I also painted the roof itself, but the coat is far from perfect, So I'll sand it some and put on another one. This one is good for you to see what color I'm planing as base for the cab:

1:24 Mack RW Superliner by Pawel Mroczkowski

I'm still working on the radiator - recently I fitted parts together and decided to take 2mm off the radiator height so it fits under the hood with no problems. I also further detailed the tank on top of the radiator. Now the radiator parts look like this:

1:24 Mack RW Superliner by Pawel Mroczkowski

Since the bumper I had needs rechroming to match the grille, I decided to build a new front bumper - this way I don't need to dechrome the old one, and the new one is far more accurate for a Mack Superliner. It looks like this:

1:24 Mack RW Superliner by Pawel Mroczkowski

And from the other side:

1:24 Mack RW Superliner by Pawel Mroczkowski

I also started building the intermediate bearing for the propeller shaft. The bearing itself is represented by a piece of aluminium tube. The fitting to hold the bearing to the frame crossmember is a lot harder to do. Here are the beginnings:

1:24 Mack RW Superliner by Pawel Mroczkowski

1:24 Mack RW Superliner by Pawel Mroczkowski

Thanks a lot for your attention, I look forward to your comments and wish everybody a nice day

Paweł

All comments and critique welcomed. Thanks for your honest opinions!

www.vietnam.net.pl

  • Member since
    May 2009
  • From: Poland
Posted by Pawel on Friday, October 14, 2011 5:09 PM

A tough audience, as Bugs Bunny once said! But, like him, I'm movin' on!

Last weekend I played with my lathe a little - here's what I turned out:

1:24 Mack RW Superliner by Pawel Mroczkowski

So now I have one spare oil filter, I'm sure I'll put it to good use later, given how popular the Italeri-Cummins is. The kit part, by the way, is hollow, and has paper-thin walls, that's why I decided to replace it.

I also made a pair of vents for the sleeper:

1:24 Mack RW Superliner by Pawel Mroczkowski

Then I went on with the bumper, I added two narrow tabs it has, and a license plate holder.

1:24 Mack RW Superliner by Pawel Mroczkowski

That's very curious for me - around here in Europe one vehicle only has one license plate. I've sen the big rigs peppered with them - why is that?

I also completed building the driveshaft support bearing - here's what it looks like:

1:24 Mack RW Superliner by Pawel Mroczkowski

1:24 Mack RW Superliner by Pawel Mroczkowski

I also finally painted the insides of the cab roof - please take a look at the vent:

1:24 Mack RW Superliner by Pawel Mroczkowski

Thanks for your attention, hope you liked it and have a nice day

Paweł

All comments and critique welcomed. Thanks for your honest opinions!

www.vietnam.net.pl

  • Member since
    July 2011
Posted by ronrod62 on Wednesday, October 26, 2011 6:33 PM

awesome detail. I drive a truck and im really impressed with that suspension. Brake cans and slack adjusters are prefect to what you would see on real trucks. Keep up the great job..

  • Member since
    February 2010
  • From: Maine
Posted by Stage_Left on Wednesday, October 26, 2011 7:14 PM

Pawel

That's very curious for me - around here in Europe one vehicle only has one license plate. I've sen the big rigs peppered with them - why is that?

Pawel- fantastic work as always; the parts turned on your lathe look particularly magnificent.

About the license plates: before deregulation in 1980, the routes tractor trailers were allowed to travel were very specific, and I believe trucks were required to be registered in each state their territory covered.

  • Member since
    May 2009
  • From: Poland
Posted by Pawel on Friday, November 25, 2011 2:56 AM

Hello everybody! I'd like to apologize for not replying for so long. I hoped to reply and do an update at the same time and it took me 'till now...

ronrod62 - Thanks a lot for your kind words! Your opinion as a real-life truck driver means a lot to me. I guess I'll have questions as the build moves along. Do you know the old regulations concerning the tags/licence plates?

Stage_Left - Thanks for your continued interest! I'm also glad I bought this lathe, I'm still learning to use it properly, but it's fun, and it comes handy for many applications every now and then. Thanks for the info on the plates, I'm still researching this. I might also show my truck "modern times" - I heard it all got more simple recently.

OK, but as I said, I have a small update for y'all Big Smile I have my battery boxes almost done (they only miss the latch yet), the most difficult part of the job was to do the chrome halfway right. It still isn't perfect, but I'm practicing. Here's what it looks like:

1:24 Mack RW Superliner by Pawel Mroczkowski

1:24 Mack RW Superliner by Pawel Mroczkowski

Hope you like it, thanks for readin' this and have a nice day!

Paweł

All comments and critique welcomed. Thanks for your honest opinions!

www.vietnam.net.pl

  • Member since
    May 2009
  • From: Poland
Posted by Pawel on Tuesday, December 13, 2011 8:30 AM

Well, OK - next little update. First I went on to build an air dryer. I used some scrap parts and ended up with something like this:

1:24 Mack RW Superliner by Pawel Mroczkowski

1:24 Mack RW Superliner by Pawel Mroczkowski

It's still a mystery, where the air dryer should be located on a Superliner - some sources say behind the cab, inside the frame, on the left rail. Others say behind the fuel tank, outside the frame, on the left rail. Some photos (although of a Superliner II) show it behind the fuel tank on the right rail. I'm still not so sure.

I also returned to the filters - I painted my machined oil filter and fabricated a fuel filter out of 4mm styrene rod. I finished the filters with decals taken out of 1:72 Chinook decal sheet. The decal on the red oil filter is yellow - it's a little hard to see on the photo:

1:24 Mack RW Superliner by Pawel Mroczkowski

Now the engine looks like that:

1:24 Mack RW Superliner by Pawel Mroczkowski

1:24 Mack RW Superliner by Pawel Mroczkowski

Now that'd be it for now. If you know something more about the air dryer location - please let me know! Thanks for reading and have a nice day

Paweł

All comments and critique welcomed. Thanks for your honest opinions!

www.vietnam.net.pl

  • Member since
    December 2002
  • From: Northern California
Posted by jeaton01 on Friday, December 16, 2011 2:06 PM

Air dryers can be just about anywhere as many were added to already built trucks.  It just has to be connected to the first air tank, called the wet tank (if I remember right).

John

To see build logs for my models:  http://goldeneramodel.com/mymodels/mymodels.html


  • Member since
    May 2009
  • From: Poland
Posted by Pawel on Saturday, December 17, 2011 2:20 PM

Thanks a lot John!

The longer I research, the more I'm convinced to put it behind the left fuel tank - this way the sleeper box doesn't get in the way of changing the cartridge. What do you think?

Thanks a lot for your comment, have a nice day

Paweł

All comments and critique welcomed. Thanks for your honest opinions!

www.vietnam.net.pl

  • Member since
    May 2009
  • From: Poland
Posted by Pawel on Tuesday, January 24, 2012 7:35 AM

Hello again!

I'm glad to inform you I have quite an update for you - I fought my fear and got to painting the exterior of my truck model at last! First I went on with the sleeper, to use it as a kind of "proving ground". Here's what I managed to do. First, I painted the sleeperbox white, then I laid out the stripes with thin tape:

1:24 Mack RW Superliner by Pawel Mroczkowski

After that, I sprayed some white again - it was an idea I picked up watching some german house improvement show. The idea is: should paint sip under the tape, let it be the same colour. After it dried, I masked the area where the stripe would be and started applying the base colour - unfortunately it needed some three coats to really cover - bad for the "step" where the colours meet:

1:24 Mack RW Superliner by Pawel Mroczkowski

After the base colour dried, I had to "reverse" the mask - uncover the stripes and mask the base colour:

1:24 Mack RW Superliner by Pawel Mroczkowski

Then I applied black primer:

1:24 Mack RW Superliner by Pawel Mroczkowski

And after it was dry, I went to town - green to brown to gold prismatic paint:

1:24 Mack RW Superliner by Pawel Mroczkowski

Then the thrilling moment came, to remove the masking. Here's what was underneath:

1:24 Mack RW Superliner by Pawel Mroczkowski

1:24 Mack RW Superliner by Pawel Mroczkowski

1:24 Mack RW Superliner by Pawel Mroczkowski

As can be seen, some red paint still managed to seep under the tape, but I think I can work on it. There is also a distinctive "step" where the colours meet, but I hope I can improve it some with clear coat. How do you like my colour choice? I think Railfan 233 should like the stripes, he asked for them on Page 1 of this thread, more than a year ago - time flies when you're havin fun! Thanks for reading, have a nice day

Paweł


All comments and critique welcomed. Thanks for your honest opinions!

www.vietnam.net.pl

  • Member since
    January 2006
  • From: NW Washington
Posted by dirkpitt77 on Friday, January 27, 2012 8:31 PM

Man, that's gorgeous.  Yes

    "Some say the alien didn't die in the crash.  It survived and drank whiskey and played poker with the locals 'til the Texas Rangers caught wind of it and shot it dead."

  • Member since
    May 2009
  • From: Poland
Posted by Pawel on Monday, January 30, 2012 9:21 AM

Thanks a lot, glad you like it. Cab and hood to match coming soon! Have a nice day

Paweł

All comments and critique welcomed. Thanks for your honest opinions!

www.vietnam.net.pl

  • Member since
    May 2009
  • From: Poland
Posted by Pawel on Tuesday, January 31, 2012 7:35 AM

And here they are! The procedure was very similar to that used on the sleeper. Unfortunately I got carried away at the start, so I don't have a photo of the first steps, where the cab and the hood were painted white and then the masking was laid out. I made the first photo after I sprayed the base colour:

1:24 Mack RW Superliner by Pawel Mroczkowski

Then I "inverted" the masking, to cover the surfaces that are to stay burgunda - please note the fenders are not among them:

1:24 Mack RW Superliner by Pawel Mroczkowski

Then I applied two layers of gloss black base and one layer of prismatic paint:

1:24 Mack RW Superliner by Pawel Mroczkowski

Then I removed the masking. The finish has it's problems, but working on the sleeper proved most of them can be easily dealt with, mostly by using a surgical blade tip. Here's what the cab and hood look like now:

1:24 Mack RW Superliner by Pawel Mroczkowski

1:24 Mack RW Superliner by Pawel Mroczkowski

1:24 Mack RW Superliner by Pawel Mroczkowski

1:24 Mack RW Superliner by Pawel Mroczkowski

1:24 Mack RW Superliner by Pawel Mroczkowski

Thanks for reading, have a nice day

Paweł

All comments and critique welcomed. Thanks for your honest opinions!

www.vietnam.net.pl

  • Member since
    January 2010
  • From: St. Louis
Posted by Shawn M. on Wednesday, February 1, 2012 3:17 PM

wow!

That paint looks great, what a great scheme for a well detailed build.

I love the smell of plastic in the morning

  • Member since
    May 2009
  • From: Poland
Posted by Pawel on Thursday, February 2, 2012 10:03 AM

Yeah! Smells like... Victory!

Glad you like it, thanks for your kind words and have a nice day

Pawel

All comments and critique welcomed. Thanks for your honest opinions!

www.vietnam.net.pl

  • Member since
    February 2012
Posted by rwaldram on Saturday, February 11, 2012 4:12 PM

Thanks for this walkthrough mate, you've done an amazing job in the kit. I'm currently scratchbuilding an RM series mack and using this cab as a donor, i'd picked up on how the cab tapered in at the front but wasn't aware of the fact that this was actually the correct width, the rest of the cab was too wide. Needless to say, i made a jigsaw out of it and removed 4mm as you suggested. A lot of work but it'll be a far better build for having done so.

Also, i'm glad to see i wasn't the only one who noticed that the roof vent on the inner and outer didn't align (10mm of difference between the two).


Keep up the good work mate, it'll be great to see this one finished.


  • Member since
    May 2009
  • From: Poland
Posted by Pawel on Sunday, February 12, 2012 8:07 AM

rwaldram - thanks a lot fot your comment! I'm glad this WIP can be of assistance, nice to know I'm not writin' it for nothing Big Smile. I looked up the RM - a n interesting machine, and I'd say pretty rare, too. Unless you have one to look at (like I wish I did!), the reference must be pretty hard to come by. To complete it you have to put a lot of work in anyhow, so what's the point of making shortcuts - then later you are looking at them and thinking "wish I did that right, then!".So good luck with your project, post some pictures, too - If you opened a second Mack thread  I promise to read it regularly! Thanks again, have a nice day

Paweł

All comments and critique welcomed. Thanks for your honest opinions!

www.vietnam.net.pl

  • Member since
    February 2012
Posted by rwaldram on Monday, February 13, 2012 12:30 AM

Thanks for the reply, if you're interested, the version i'm actually building is an Australian Army RM6866RS, it's the new wrecker that we're operating... that i guess, also give's you a hint as to what i do, i'm a recovery mechanic and as such, have pretty much unrestricted access to this vehicle so it makes getting reference material/photos/measurements etc quite easy.

The build is posted on a few other forums (truck model world, 24th scale model truck forum and a couple of others) so i don't really want to bombard too many site's with it. If you'd like to see progress photos PM me and i'll email some to you.

  • Member since
    May 2009
  • From: Poland
Posted by Pawel on Wednesday, April 4, 2012 8:23 AM

Hello everybody!

It's been a long time, but for some time I'm building again and I decided it is time for another update. I'm still working on the cab and hood, I put a lot of clear on 'em and the "steps" between colours are almost gone now. I also work to "chrome" the fuel tanks and the tool boxes. But what I wanted to show were the headlight bezels I scratchbuilt - please see the photo below together with the bumper:

I took the lamps themselves and the glass for them out of the Italeri Truck Accesories kit, but I had to cut the lamps down and work the lenses for correct diameter - 6,5 mm. I also did the fog lights in the bumper, they have the same diameter. Now I have to chrome all the parts, that's a chore... Anyhow, thanks for reading and have a nice day

Paweł

All comments and critique welcomed. Thanks for your honest opinions!

www.vietnam.net.pl

  • Member since
    January 2007
Posted by the doog on Wednesday, April 4, 2012 10:26 AM

This build is just freakin' EPIC, Pawel! Please don't skimp on any photo coverage for us here--the detail and painting is just inspiring!

BEAUTIFUL WORK!!! Bow Down

JOIN OUR COMMUNITY!

Our community is FREE to join. To participate you must either login or register for an account.

SEARCH FORUMS
FREE NEWSLETTER
By signing up you may also receive reader surveys and occasional special offers. We do not sell, rent or trade our email lists. View our Privacy Policy.