SEARCH FINESCALE.COM

Enter keywords or a search phrase below:

Mack RW rebuild

2053743 views
239 replies
1 rating 2 rating 3 rating 4 rating 5 rating
  • Member since
    May 2009
  • From: Poland
Posted by Pawel on Tuesday, January 28, 2014 10:26 AM

Hello Steve, thanks a lot for your comment! True, I put lots of time in this one - but it's been fun and I learned a lot. Even more true - I forgot to mention the disconnecting Big Smile. By all means, disconnect before using wire in modelling!

Thanks again, have a nice day

Paweł

All comments and critique welcomed. Thanks for your honest opinions!

www.vietnam.net.pl

  • Member since
    December 2013
Posted by jetmaker on Tuesday, January 28, 2014 3:11 PM

Wow. I just read through this entire thread. I'm speechless. I think doog said something about how you can see the love put into this. That's about the best I could put it. I get tons of inspiration from the builds shared here, but this one is really special. It's badly needed on my end too because I've been fighting a very stubborn illness for the last two weeks, and haven't been able to make any progress in my own project. God bless you, Pawel!

  • Member since
    August 2007
  • From: back country of SO-CAL, at the birth place of Naval Aviation
Posted by DUSTER on Tuesday, January 28, 2014 3:16 PM

Get Well soon JETMAKER 

Steve

Building the perfect model---just not quite yet  Confused

  • Member since
    December 2013
Posted by jetmaker on Tuesday, January 28, 2014 4:20 PM

Thanks DUSTER!

  • Member since
    May 2009
  • From: Poland
Posted by Pawel on Wednesday, January 29, 2014 8:23 AM

Hello jetmaker!

Thanks a lot for your comment and for your kind words. Like Steve wrote, I also hope you will get well soon and I look forward to see your build here on the forums. Good luck with your project and have a nice day

Paweł

All comments and critique welcomed. Thanks for your honest opinions!

www.vietnam.net.pl

  • Member since
    February 2014
Posted by jazzsoul60 on Monday, February 17, 2014 10:57 PM

Dude, when are you gonna finish this thing?  I like the engine improvement.  It's really a step up from the stock Italeri Cummins lump.

  • Member since
    May 2009
  • From: Poland
Posted by Pawel on Tuesday, February 18, 2014 10:24 AM

Many people ask me that - and since like four years, the answer still is ASAP Big Smile I still hate to set any deadlines... Like I never know when my company sends me on a lengthy business trip. But now I'm working on putting the cab on the frame, so I guess I'm getting there.

Glad you like the engine, it needs a lot of work, but it has potential for improvement.

Thanks for your comment and have a nice day

Paweł

All comments and critique welcomed. Thanks for your honest opinions!

www.vietnam.net.pl

  • Member since
    May 2009
  • From: Poland
Posted by Pawel on Tuesday, March 25, 2014 10:23 AM

Hello!

It's been a long time again - I put in some work, but don't have too much to show. My main goal now is to put the cab on the frame at last. As it looks like I had to make an assumption, that the main structural element holding it all together will be the sleeper cab with its 6 mounts - as the front cab mounts turned out to be too fragile to handle it. So first I glued the cab to the sleeper cab and painted the crawl-through between them dark grey. Arrow points to the front cab mount:

The photo from underside shows all the braces of the cab floor and the six holes drilled to accept the mounts:

As for the frames I put six brass bolts on the sleeper cab mounts to reinforce the joints. The arrows point to all the cab and sleeper cab mounts. As can be seen, I also painted the exhaust and dry-fitted it to the chassis. The question still is where to put the exhaust while installing the cab - on the cab together with the muffler guards, or on the chassis?

Thanks for reading and have a nice day

Paweł

All comments and critique welcomed. Thanks for your honest opinions!

www.vietnam.net.pl

  • Member since
    December 2002
  • From: Northern California
Posted by jeaton01 on Wednesday, March 26, 2014 10:52 AM

Coming along nice, Pawel.  Looks like you'll have to do some test fitting on the exhaust, but attaching it to the cab/sleeper and then the turbocharger looks easiest to me.

John

To see build logs for my models:  http://goldeneramodel.com/mymodels/mymodels.html


  • Member since
    May 2009
  • From: Poland
Posted by Pawel on Wednesday, March 26, 2014 4:29 PM

Hello John!

Thanks for your comment! Yeah, the more I fit it, the more I'm leaning toward the approach you suggested. Let's see how it goes! Thanks again and have a nice day

Paweł

All comments and critique welcomed. Thanks for your honest opinions!

www.vietnam.net.pl

  • Member since
    May 2009
  • From: Poland
Posted by Pawel on Wednesday, April 23, 2014 4:56 PM

Hello!

I finally found my man-up pills and glued the exhaust guards to the cab, and so I could dry-fit the cab to the chassis. Like John said I installed the exhaust in the guards first (without glueing) and then put the cab/sleeper subassembly on the chassis:

I'm glad to see the hood meets with the cab nicely. Looking under the hood on the other side it also looks like the exhaust mates with the turbocharger, too:

Now before I glue the cab permanently I'll try to figure out at least some of the lines running along the firewall - and there are many of them!

Thanks for reading and have a nice day

Paweł

All comments and critique welcomed. Thanks for your honest opinions!

www.vietnam.net.pl

  • Member since
    January 2007
Posted by the doog on Wednesday, April 23, 2014 5:27 PM

Pawel,

As you know, I've been away and haven't been on the forums much, but coming back to look at this amazing, INCREDIBLE model, it reminds me of what I so love about this hobby. You are making an absolutely incomparable work of art here. It looks simply stunning, and the love and dedication put into it is obvious in it just by looking at the unbelievable amount of detail. I am 1000% impressed!

  • Member since
    May 2009
  • From: Poland
Posted by Pawel on Thursday, April 24, 2014 9:35 AM

Karl,

you're being just too kind! Thanks a lot for your kind words! Welcome back and have a nice day!

Paweł

All comments and critique welcomed. Thanks for your honest opinions!

www.vietnam.net.pl

  • Member since
    August 2007
  • From: back country of SO-CAL, at the birth place of Naval Aviation
Posted by DUSTER on Friday, April 25, 2014 8:06 PM

 Bravo just Bravo

Steve

Building the perfect model---just not quite yet  Confused

  • Member since
    May 2009
  • From: Poland
Posted by Pawel on Monday, April 28, 2014 1:39 PM

Thanks a lot for your kind words, Steve! Have a nice day!

Paweł

All comments and critique welcomed. Thanks for your honest opinions!

www.vietnam.net.pl

  • Member since
    May 2009
  • From: Poland
Posted by Pawel on Tuesday, June 3, 2014 9:11 AM

Hello!

Not a big update today, but I tried to overcome a building crisis here, and so I built a small detail, that you don't see on most truck models - the clutch cable. Here's what it looks like:

Hope you like it, have a nice day and thanks for reading

Paweł

All comments and critique welcomed. Thanks for your honest opinions!

www.vietnam.net.pl

  • Member since
    August 2007
  • From: back country of SO-CAL, at the birth place of Naval Aviation
Posted by DUSTER on Sunday, June 15, 2014 2:39 AM

I like it. But don't forget to lubricate it before you  driv..... OH wait; got myself confused for a second 

Steve

Building the perfect model---just not quite yet  Confused

  • Member since
    May 2009
  • From: Poland
Posted by Pawel on Monday, June 16, 2014 4:21 PM

Hello Steve! That's a good one! Big Smile

Thanks a lot for your comment! I hope to post an updateon the brake system plumbing soon. Thanks again and have a nice day

Paweł

All comments and critique welcomed. Thanks for your honest opinions!

www.vietnam.net.pl

  • Member since
    February 2014
  • From: N. MS
Posted by CN Spots on Tuesday, June 17, 2014 8:47 AM

At some point along the line this evolved from a model into a work of art.  Outstanding job!

  • Member since
    May 2009
  • From: Poland
Posted by Pawel on Tuesday, June 17, 2014 5:05 PM

CN Spots - thanks a lot for your kind words!

Just today I put some time in those air brakes again. Here's what I have under the cab so far:

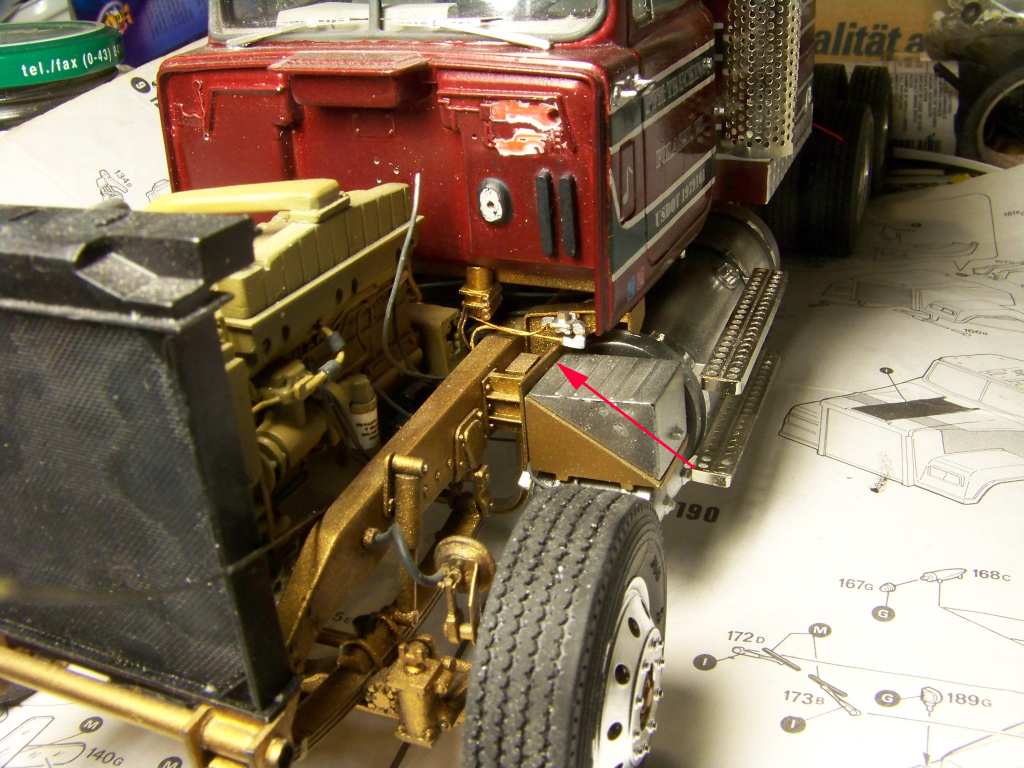
That's a so called threadle valve (the one under the pedal) and the silver one is the quick release valve - working with the brakes on the front axle. I also tried to do the rest of the fittings under the cab:

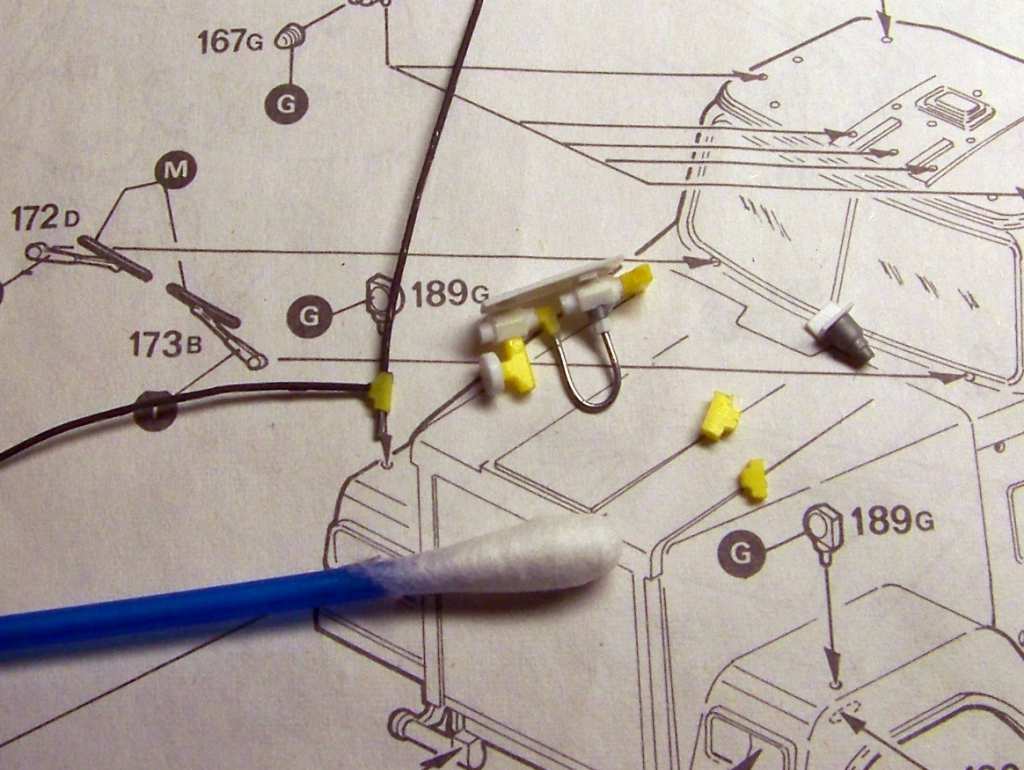
Unfortunately, as small as those babies are, they are still too big. I'm going to try again and simplify the whole thing to fit it under the cab - won't be too visible anyhow!

And life is getting in the way, too - next week I'm on a business trip in Germany, and I'm already planning amove to another town - moving this project won't be easy! So wish me luck, thanks a lot for reading and have a nice day

Paweł

All comments and critique welcomed. Thanks for your honest opinions!

www.vietnam.net.pl

  • Member since
    August 2007
  • From: back country of SO-CAL, at the birth place of Naval Aviation
Posted by DUSTER on Wednesday, June 18, 2014 11:33 AM

Spectacular brake valves/lines. 

As to the future move; try to collecting each portion of your inwork  project(s) and place them in plastic bags (sized to suit), then putting the bags into a single large container. Marked with the projects name and sealed by tape. That way if a bag comes open, the outer container will catch the loose part- usually  .

Steve

Building the perfect model---just not quite yet  Confused

  • Member since
    May 2009
  • From: Poland
Posted by Pawel on Thursday, June 26, 2014 11:01 AM

Hello Steve!

Thanks a lot!

Excellent tip for the move - that's how I will do it!

Thanks again and have a nice day

Paweł

All comments and critique welcomed. Thanks for your honest opinions!

www.vietnam.net.pl

  • Member since
    April 2012
Posted by Reserve on Sunday, May 21, 2017 5:18 PM

As ambitious a project as I've ever seen; your work is excellent I may add. I wanted a Mack on the shelf as well so I took the easy way and got one of the AMT R685 re-release kits.

I say it's gonna be easy but as of yet it's still in the box


Regards,

Mark

  • Member since
    May 2009
  • From: Poland
Posted by Pawel on Sunday, May 21, 2017 6:20 PM

Hello Mark!

I'm glad you like it and thanks a lot for your kind words. Good luck with your Mack and have a nice day

Paweł

All comments and critique welcomed. Thanks for your honest opinions!

www.vietnam.net.pl

  • Member since
    June 2015
Posted by wazza on Wednesday, August 15, 2018 4:14 AM

great lookin Mack mate,how did you make the decals for the door?escpecially the decals over the red?Thanks

  • Member since
    June 2014
  • From: New Braunfels , Texas
Posted by Tanker - Builder on Wednesday, August 15, 2018 11:29 AM

Hi Pawel ;

 My son said to remind you to make sure , If you keep it a Mack . Don't forget the Golden Or Chrome Bulldog ! LOL.LOL. he now drives a New Mack " Anthem " In Pewter and Silver . I see , you didn't forget , But he hasn't been able to visit here lately ( Computer problems ) . .

 I have followed this and have been enjoying your work . Keep it up ! T.B.

  • Member since
    May 2009
  • From: Poland
Posted by Pawel on Wednesday, August 15, 2018 11:57 AM

Hello!

It kinda surprises me to get comments here. The project is frozen for now, until I can find a bigger workshop.

wazza - yes I did - the decals are custom made to my specifications by a German company called Decalprint. The trick here is they print the outline of the decal with a nice, opaque white. Then they print the colours on top of that. This way the colours can show right no matter what colour they are put on. This is also one of the reasons I always let my decals be printed by pros instead buying the equipment, supplies and printing them myself. The pros are also usually able to print colours like white, silver and gold.

TB - you're right, I didn't forget. I really went out of my way to put that bulldog there - it wasn't there in the Italeri kit, and it was important for me to have it there.

1:24 Italeri Mack RW Superliner by Pawel

Thanks a lot for your comments and have a nice day

Paweł

All comments and critique welcomed. Thanks for your honest opinions!

www.vietnam.net.pl

  • Member since
    February 2005
  • From: Cleveland, OH
Posted by RadMax8 on Monday, August 27, 2018 7:29 AM

Paweł,

I just read through the whole thread here, and I am blown away. You’ve taken a real hodge-podge of a kit and turned it into a work of art. Your dedication to accurately representing the real machine is quite impressive. I’m sad I didn’t see this the first time around!

I hope you can find the bench space soon to finish this one off... it’s truly an amazing build. Thank you for taking the time to document and share this with us!

  • Member since
    December 2002
  • From: Northern California
Posted by jeaton01 on Monday, August 27, 2018 8:48 PM

Yeah, get back on this one, Pawel!

By the way, the valve under the brake pedal is a treadle valve, not threadle.  It's also known as the foot valve.  Offered in the sense I know you want accuracyBig Smile

John

To see build logs for my models:  http://goldeneramodel.com/mymodels/mymodels.html


  • Member since
    March 2012
  • From: Corpus Christi, Tx
Posted by mustang1989 on Tuesday, August 28, 2018 8:29 AM

WOW!! This is intense!!


 Forum | Modelers Social Club Forum (proboards.com) 

JOIN OUR COMMUNITY!

Our community is FREE to join. To participate you must either login or register for an account.

SEARCH FORUMS
FREE NEWSLETTER
By signing up you may also receive reader surveys and occasional special offers. We do not sell, rent or trade our email lists. View our Privacy Policy.