SEARCH FINESCALE.COM

Enter keywords or a search phrase below:

1966 Ford Fairlane GTA

15813 views
71 replies
1 rating 2 rating 3 rating 4 rating 5 rating
  • Member since
    March 2012
  • From: Louisville, KY
Posted by Builder 2010 on Friday, June 22, 2018 1:13 PM

I'm glad you didn't give me that detail (just did in 1:350...) until today or I might not have been so bold as to try it, but... I had nothing to lose. I think more experimentation is necessary to figure out how to heat the styrene just the right amount. Right now it's really hit or miss...mostly miss. I could help to preheat the pusher and the mold so the styrene doesn't cool too quickly before it has the chance to really conform to the mold.

  • Member since
    November 2003
  • From: State of Mississippi. State motto: Virtute et armis (By valor and arms)
Posted by mississippivol on Friday, June 22, 2018 3:09 PM

Success! 

 windows screenshot

  • Member since
    March 2012
  • From: Louisville, KY
Posted by Builder 2010 on Friday, June 22, 2018 5:27 PM

Well... almost success...

With all those nice new windows in place, I got the body mounted to the chassis, got all the chrome on the car (except for the GTA badges that go on top of the racing stripes) and put on the wheels. I touched up the chrome... AGAIN, and it's really almost done. I am not happy about the paint or the chrome. I'm out of practice building model cars and all the handling, fixing things that broke, etc., kept messing up both. It's a good model from 2 feet away, but looking closer there's a lot of difficulties.

In looking at this picture I realized I still have to do the whitewalls on those Firestone Wide-Oval tires.

The tail came out nicely especially the chrome trim on the taillights.

The front was more difficult. This was caused by me gluing the chassis in place a fraction of an inch to frar forward so the horns were forcing the grill away from nesting properly. I got rid of the horns since they were almost invisible anyway and the grill went on. Of course this took place after the paint around the front started showing wear.

I would really like to do the foil work around the front window again. It didn't hold up well through all the windshield troubles.

Lastly, I positioned me and my wife in our 1967 pose. I'm going to re-do those characters. They about 10% to big. I scale out to 2.78" in 1:25. My cut out is over 3.0". I was waiting for the racing stripe decal to fully dry (after using MicroSol MircoSet solvent to get them to snuggle into the door grooves. When dry, I'll attach those last chrome badges.

As a memory jogger, he's the original pic on which this whole effort was based. We were already engaged and were having a 1967 Memorial Day camping trip in Muskegon State Park, MI. I was a senior at Michigan State and she was back home in Philly. It was a terrific weekend. That was 51 years ago. My car had white walls although those tires also came with red stripes and I didn't have the chrome steel wheels... I had hubcaps.

I need to put on a radio antenna (AM only).

  • Member since
    March 2012
  • From: Louisville, KY
Posted by Builder 2010 on Monday, June 25, 2018 6:02 PM

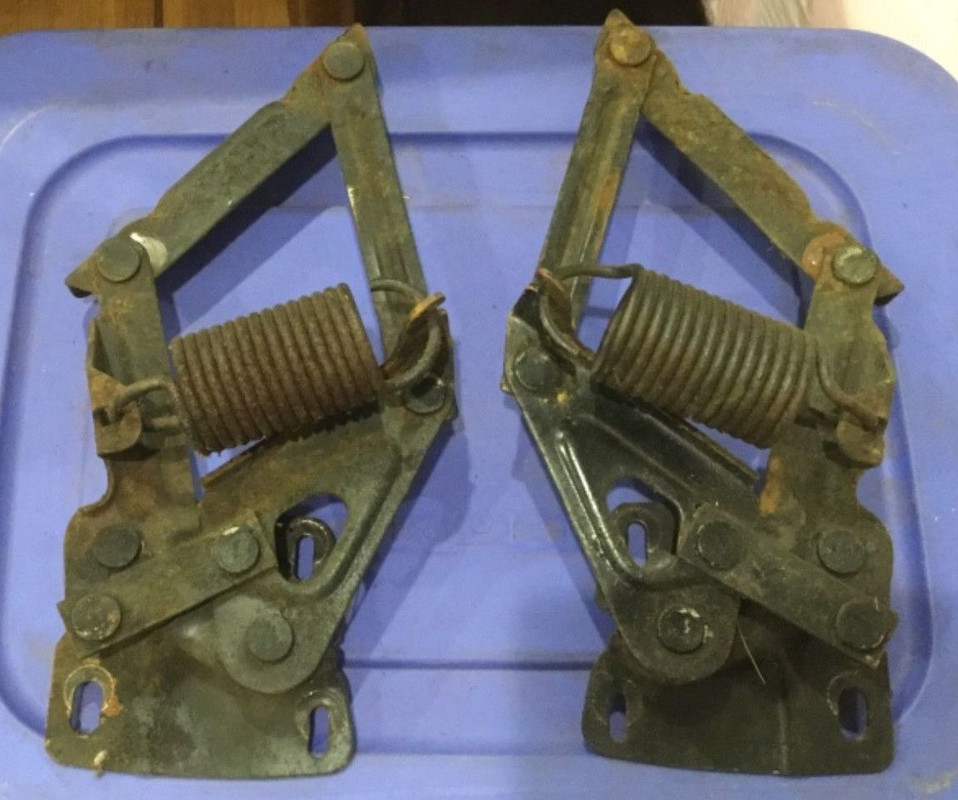
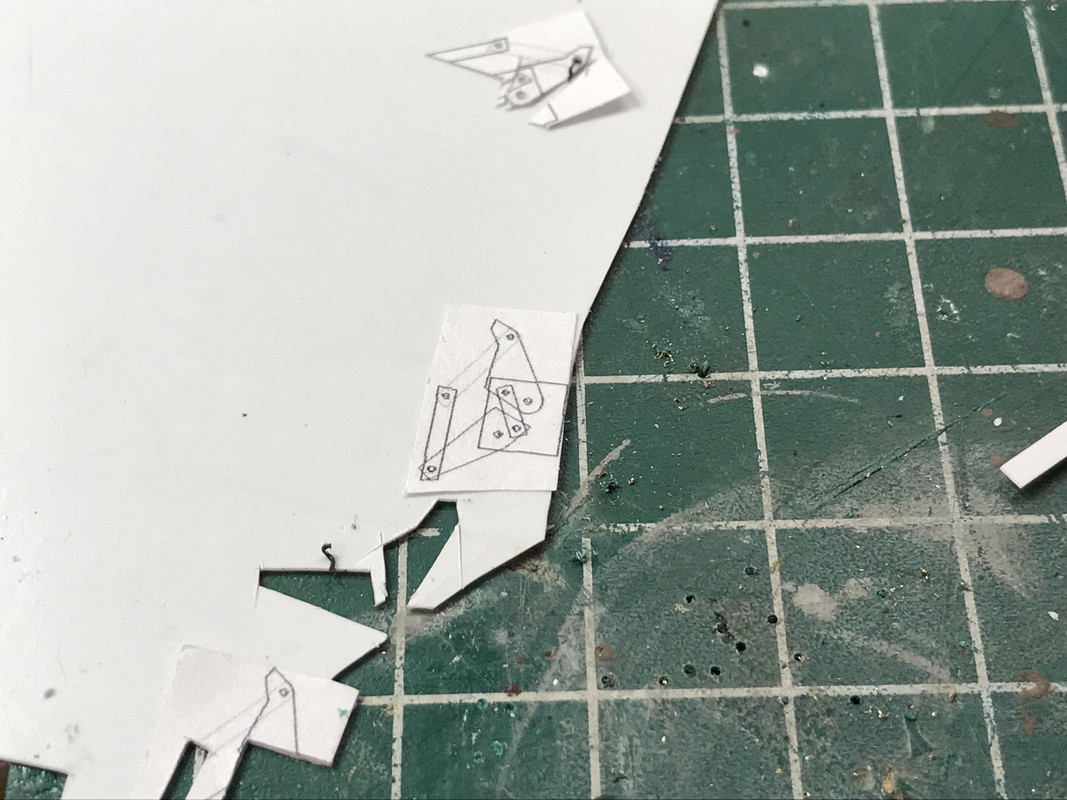
I'm just about done screwing around with this model. It's reaching the law of diminishing returns. That being said, I wanted to try one more thing... I had drawn some near scale hood hinges directly over photos of 66 Fairlane hood hinges, and made patterns of them to eventually fabricating them.

At first I was going to make them entirely out of styrene, but quickly added photo-etch fret brass for some of the bars. The end product while technically correct, are not operable due to the flexiblility of the styrene parts that I did use.

I had made multiple copies of the image so I could cut different parts out from the same drawing, since the act of cutting one part destroys the drawing of the part to which its connected. I put some pressure sensitive adhesive on the paper and stuck it too thin styrene sheeting.

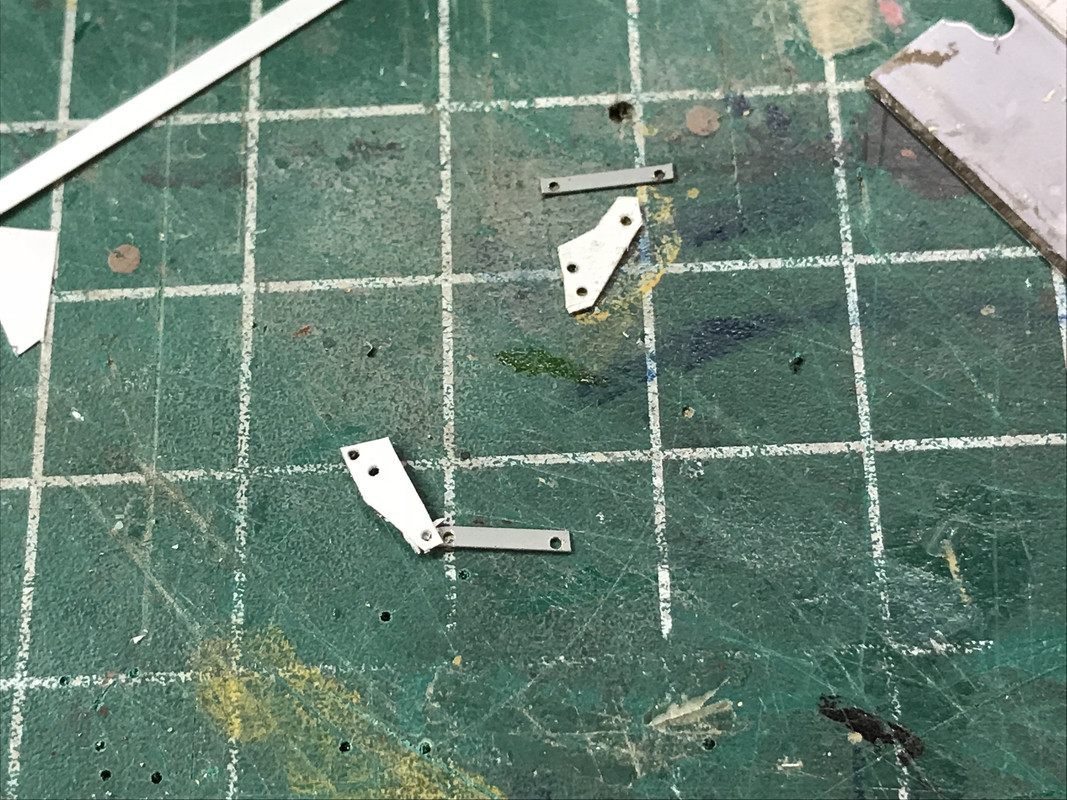
I used plastic pins made of 0.025" round Evergreen styrene rod. That was another reason why it really can't operate. The pins are simply not strong enough or mounted strongly enough to be workable.

The smaller links are brass. I CA'd the pins into the non-movable part and used a heated small screwdriver to rivet the other end after it was assembled. I came up with a very easy way to heat the screwdriver tip... just grab it with the resistance soldering unit for a few seconds. I found it easier to drill the PE brass while it was still captivated in the fret and then cut it to length. I meausred the hole spacing with a precision dividers. Holes are 0.026" so the plastic pins are a slip fit.

All the plastic parts were cut out with an Xacto.

It all went together nicely, and I used thick CA to join the hinge to the sides of the engine compartment. I put them in the up position and then CA'd them so they didn't budge.

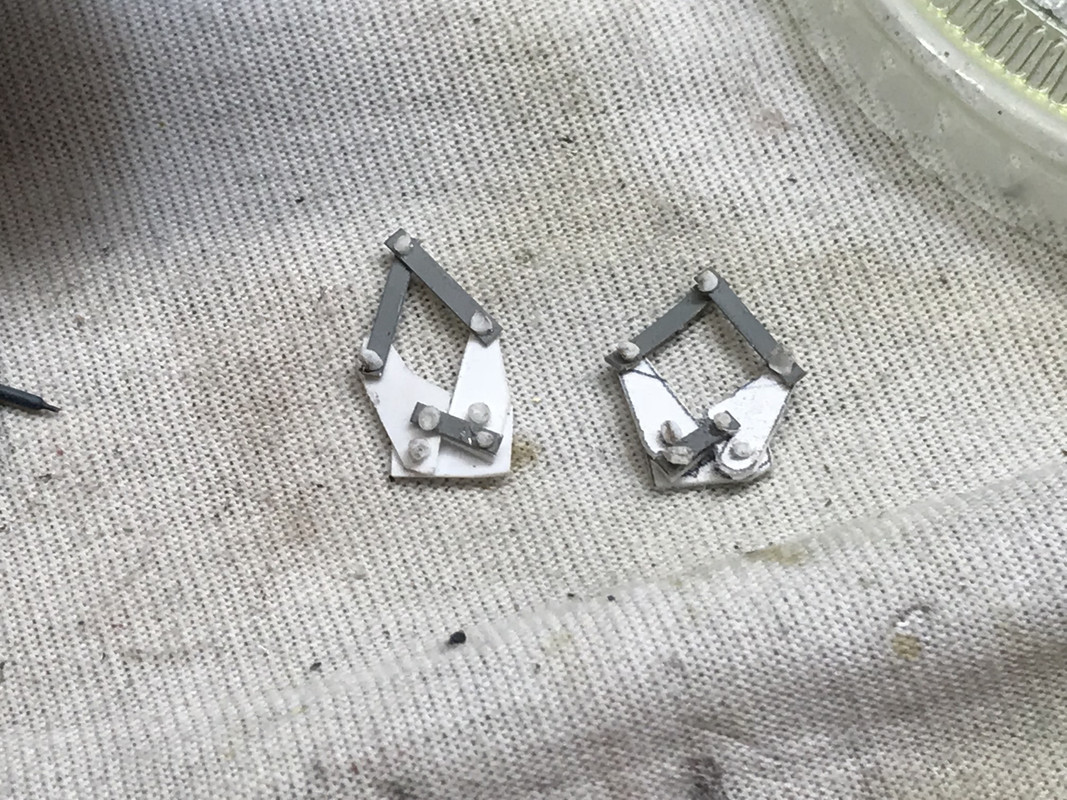
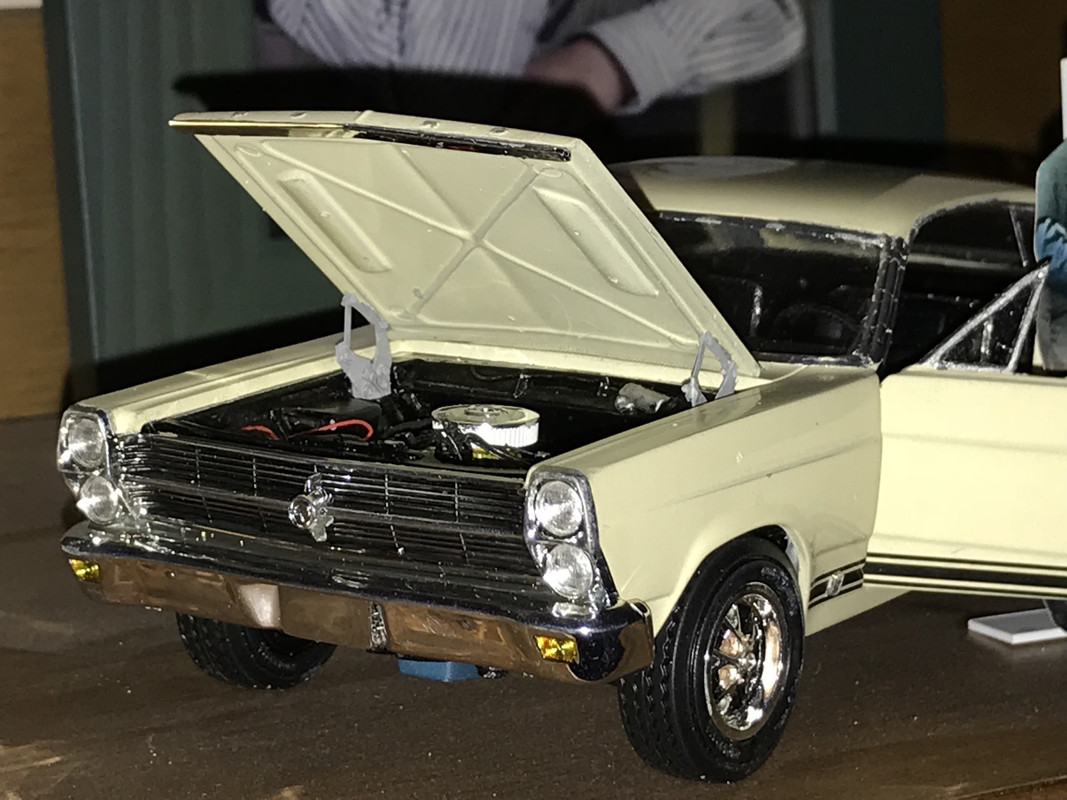
The hood was CA'd to the hinges. It's now sitting at a realistic angle with the back edge elevated above the body as it should be with a parallelogram hinge. If I were to do it again and wanted them fully operable I would make them completely out of brass with the pins soldered to the non-moving parts. I would also make the upper bar that mounts to the hood out of angle stock. That will have to wait for the next car I make. And I didn't even think about putting that humongous spring in the assembly. I would also do something to fake that as well. However, it looks pretty convincing.

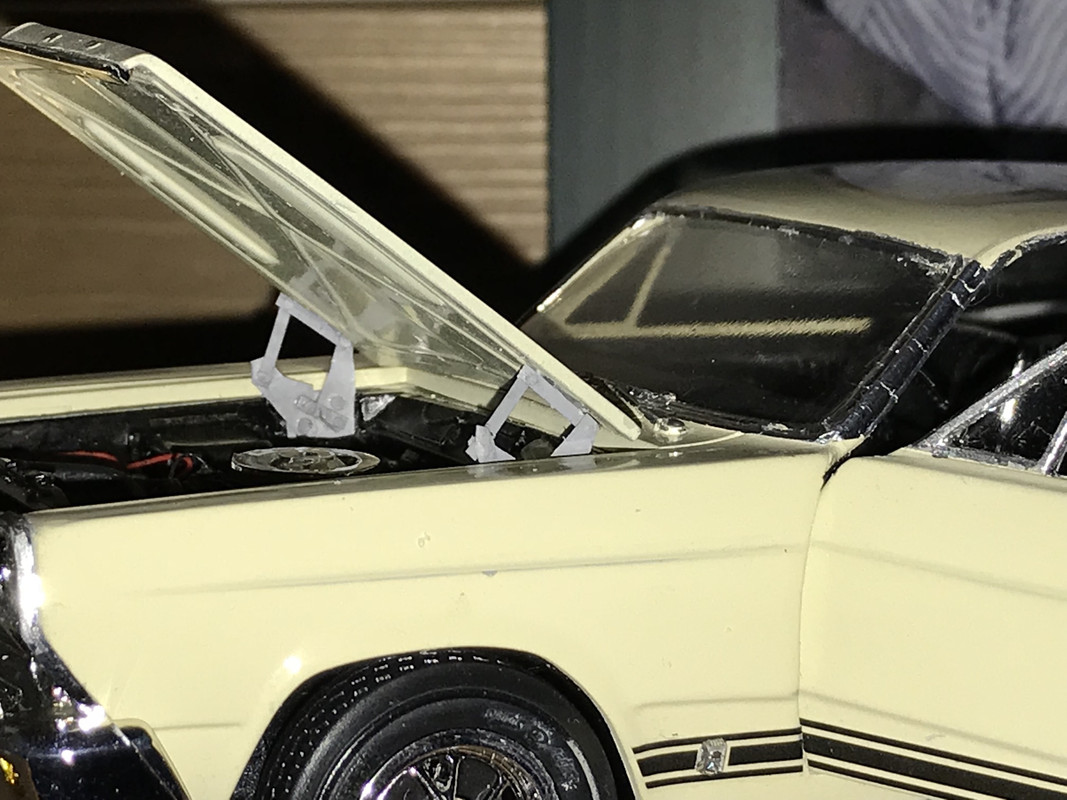
I had to estimate the actual size that this thing really is since I only had a photo of the front and back from an eBay listing from which to figure its sizes. I made three different size drawings with this being the smallest. It's still a little big since in the full-down position, the hinge extended to high and the hood wouldn't have fully closed, which is the other reason it wasn't going to be operable. Would I do this again? Probably. Hood hinges are very visible vs. the door hinges which are difficult to visualize on a real car.

  • Member since
    February 2003
  • From: East Bethel, MN
Posted by midnightprowler on Monday, June 25, 2018 6:15 PM

Beautiful.

Hi, I am Lee, I am a plastiholic.

Co. A, 682 Engineers, Ltchfield, MN, 1980-1986

1 Thessalonians 4:13-18 1 Corinthians 15:51-54

Ask me about Speedway Decals

  • Member since
    August 2007
  • From: back country of SO-CAL, at the birth place of Naval Aviation
Posted by DUSTER on Tuesday, June 26, 2018 7:47 PM

Now, Thats what we call Modeling!

or

OCD

I forget whichStick out tongue

Steve

Building the perfect model---just not quite yet  Confused

  • Member since
    March 2012
  • From: Louisville, KY
Posted by Builder 2010 on Wednesday, June 27, 2018 7:30 PM

Thank you folks!

Right now I'm working on another model railroad structure; a Victorian corner building with turret with the interior attempting to resemble Edward Hopper's masterpiece, "Night Hawks".

I may post it here since it's being build mostly of styrene so that classifies it as a model... right?

  • Member since
    March 2012
  • From: Corpus Christi, Tx
Posted by mustang1989 on Thursday, June 28, 2018 6:45 PM

Very nice scratch work and totally cool progress. I'm floored!!


 Forum | Modelers Social Club Forum (proboards.com) 

  • Member since
    March 2012
  • From: Louisville, KY
Posted by Builder 2010 on Thursday, June 28, 2018 8:43 PM

Thank you very much. I appreciate the kudos.

  • Member since
    June 2014
Posted by BrandonK on Friday, June 29, 2018 12:59 PM

Wow, those hinges are amazing and they really set the build off and add that realism.

BK

On the bench:

A lot !! And I mean A LOT!!

2024 Kits on deck / in process / completed   

                         14 / 5 / 2  

                              Tongue Tied

  • Member since
    March 2012
  • From: Louisville, KY
Posted by Builder 2010 on Friday, June 29, 2018 7:33 PM

Thank you! They did come out well. So well, that the owner of my local (and favorite) hobby shop has asked me to produce a set for a 1958 Chevy Impala that he's building. He's a great model builder and is doing a terrific job on this model. I told him if I could find a good image that I draw over I would give it a shot. I found a great image on eBay and drew them up tonight. I left the springs off since they'll be simulated and are not necessary for the hinges since the plastic hood is so light and there will be friction in the machinery.

The image size varies at 10% increments since I didn't have the actual size of the hinge. The middle set is the nominal one which I estimate to have an 8" width. I'm letting him cut them out and see which size looks more correct. The Ford hinges mounted on the side walls of the engine compartment. The Chevy hinge hs a 90 degree bracket and mounts straight back on the fire wall. The model has two flat spots on the firewall that would accept the hinge bracket. It I'm going to build them out of brass, I'm not sure if it's easier to use bras angle or bend sheet stock to fit. I drew the angles folded outward so I can bend them if necessary. I can either use 0.005" fret brass or some thicker sheeting I have. I would use 0.021" brass wire for the hinge pins.

I'll let you all know how this works out.

  • Member since
    August 2007
  • From: back country of SO-CAL, at the birth place of Naval Aviation
Posted by DUSTER on Saturday, June 30, 2018 4:27 PM

Those are incredible . The idea of making “real” hinges is so cool. Great job.


Steve

Building the perfect model---just not quite yet  Confused

JOIN OUR COMMUNITY!

Our community is FREE to join. To participate you must either login or register for an account.

SEARCH FORUMS
FREE NEWSLETTER
By signing up you may also receive reader surveys and occasional special offers. We do not sell, rent or trade our email lists. View our Privacy Policy.