SEARCH FINESCALE.COM

Enter keywords or a search phrase below:

Tyrrell P34 1977 Monaco Grand Prix

12558 views
114 replies
1 rating 2 rating 3 rating 4 rating 5 rating
  • Member since
    May 2011
  • From: Honolulu, Hawaii
Tyrrell P34 1977 Monaco Grand Prix
Posted by Real G on Friday, February 1, 2019 5:06 PM

I don't think I have posted a thread on this model - that's what happens when you are a glacier-slow builder like me and forget stuff.  Anyway, I have always liked this weird 6-wheel design, so decided (many years ago) to try my hand at a Formula-1 car.  Please pardon my ignorance, as I knew basically nothing about them and learned stuff along the way.

Here's the kit:

https://flic.kr/p/rcLwP4] 
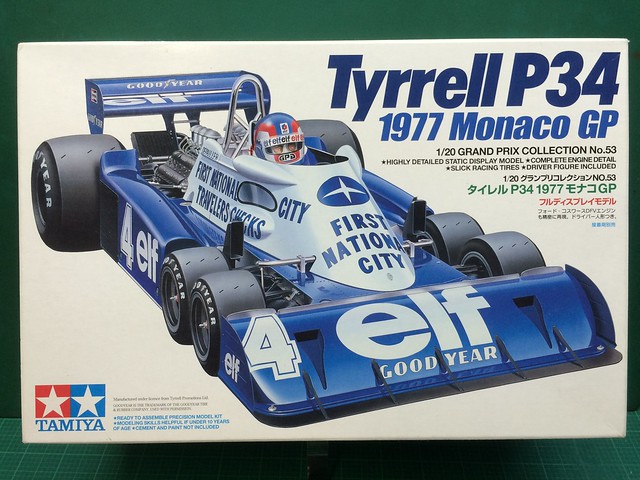
[/url]P34-Box Art by N.T. Izumi, on Flickr

I wanted to try detailing the kit as best as I could, plus make painting easier.  That meant re-engineering the body to separate along areas of different color.  To this end, two kits were purchased to hack apart and reassemble.  The vertical sides of the monocoque where the front suspension attaches to were molded with the upper body, so they were separated and glued to the bottom plate.  These parts would be all painted aluminum.

https://flic.kr/p/r7ASCn] 
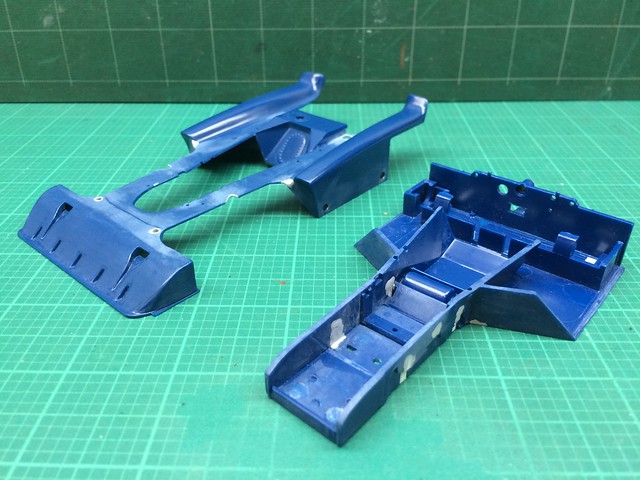
[/url]P34-002 by N.T. Izumi, on Flickr

The small side windows were provided as clear acetate sheets which were supposed to be glued into recesses on the inside of the upper cowl, but you can see into the cockpit after the kit is finished.  So I glued a solid sheet of plastic into the recesses, filling them flush, and opening up the windows while leaving a small ledge to attach new windows from the outside.  The windows have a rubber gasket around their perimeters, but I'll figure them out later.

https://flic.kr/p/rK5m2K] 
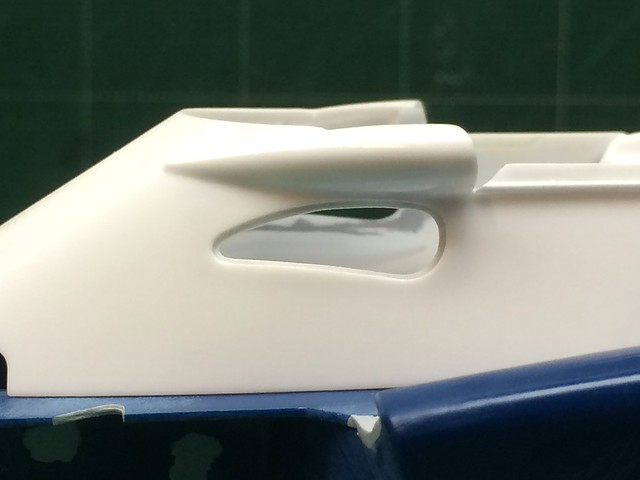
[/url]P34-005 by N.T. Izumi, on Flickr

The upper cowling aft of the driver's seat had a poorly molded rib that did not match the one molded to the forward cowling, so they were removed in their entirety and replaced with triangular strip plastic.

https://flic.kr/p/r7ARcg] 
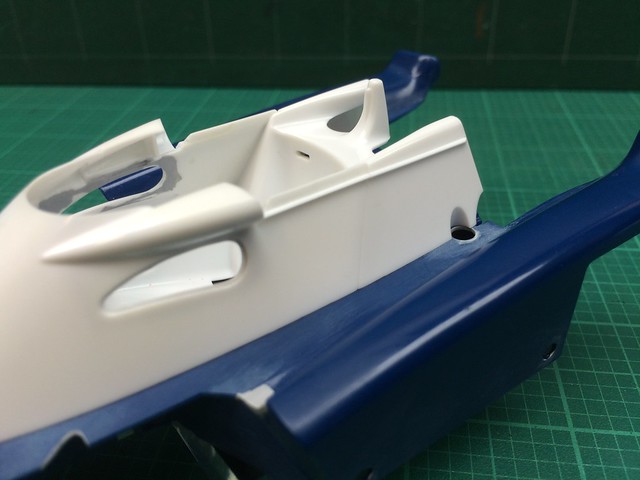
[/url]P34-004 by N.T. Izumi, on Flickr

A painful (but educational) lesson in buying a bunch of aftermarket accessories is that some (or in my case a lot) of that stuff really isn't all that helpful.  Case in point the PE for the backsides of the front spoiler.  I think it is made of stainless steel, which proved difficult to cut/trim and impossible to curl to accurately fit the spoiler edge contours.  So out came the sheet plastic and with little fuss, the job was done.

https://flic.kr/p/s7hcwj] 
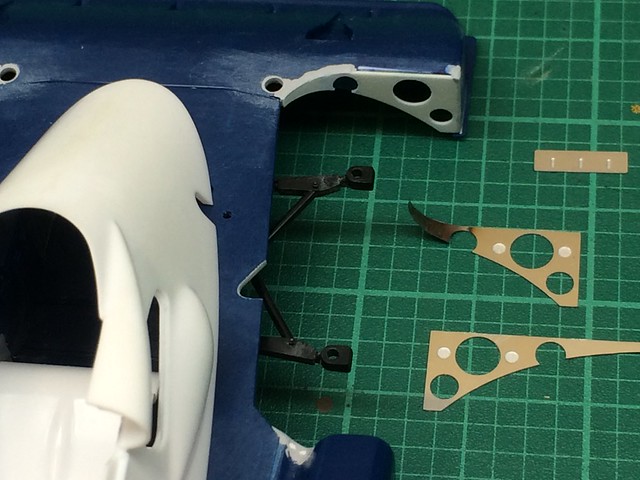
[/url]P34-006 by N.T. Izumi, on Flickr

The kit is old, so there is a battery compartment underneath that fit poorly.  I tried to fill/sand the gaps, but just gave up after several tries.  A sheet of 0.010 sheet plastic was used to plate over the mess.

https://flic.kr/p/s5xsF8] [/url]P34-010 by N.T. Izumi, on Flickr 

https://flic.kr/p/swx9ZA] 
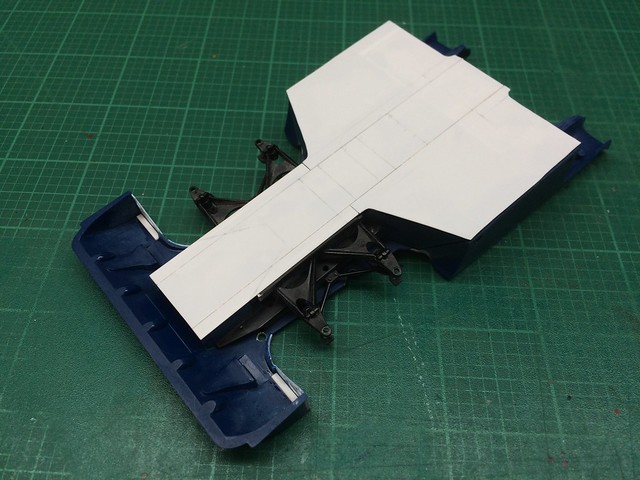
[/url]P34-012 by N.T. Izumi, on Flickr

I have posted some pics of Archer rivet decals before, and this is the project where I first used them.  A reference book I have included a large photo of a wrecked P34 being hoisted off the track, which afforded a rare, clear shot of the underside.  I used the photo to add the rivet pattern.

https://flic.kr/p/uwLYLN] 
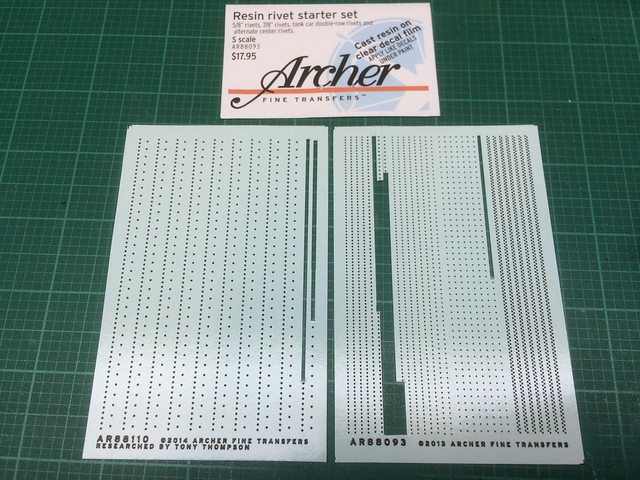
[/url]P34-037 by N.T. Izumi, on Flickr

https://flic.kr/p/vruyku] 
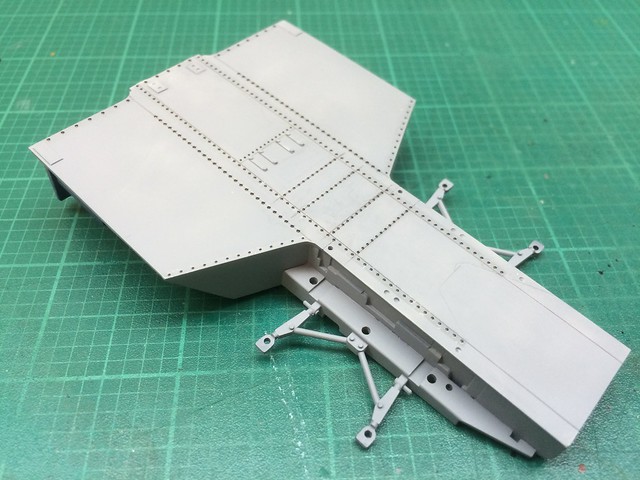
[/url]P34-038 by N.T. Izumi, on Flickr

Coat of primer, then some Alclad aluminum.

https://flic.kr/p/vjt7gb] 
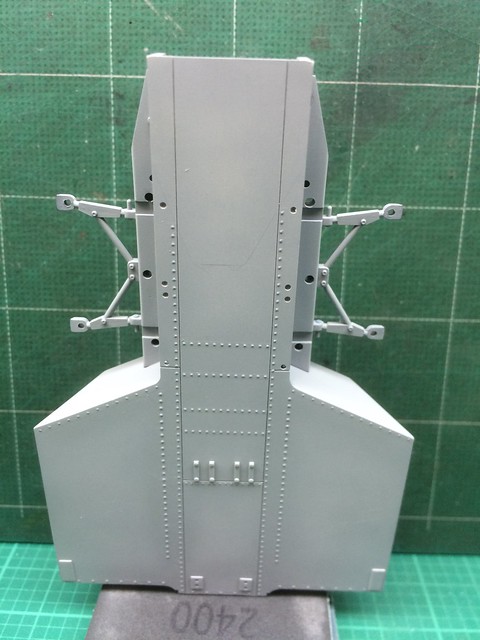
[/url]P34-039 by N.T. Izumi, on Flickr

https://flic.kr/p/vmvkiy] 
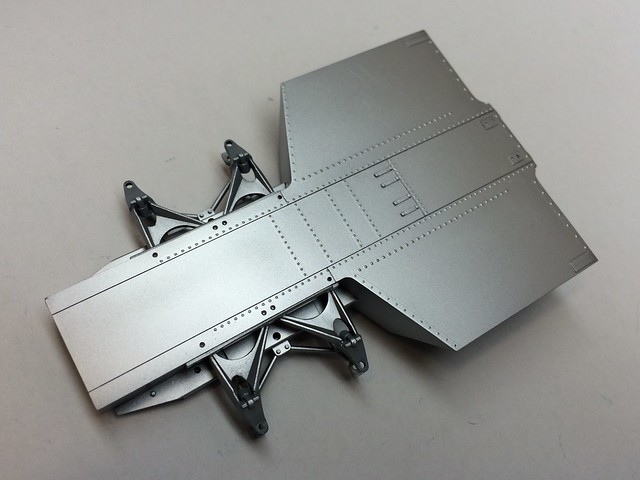
[/url]P34-064 by N.T. Izumi, on Flickr

So after much filling of ejector pin marks and such, primer was applied to the body pieces to see how things were proceeding.

https://flic.kr/p/sCDWhw] 
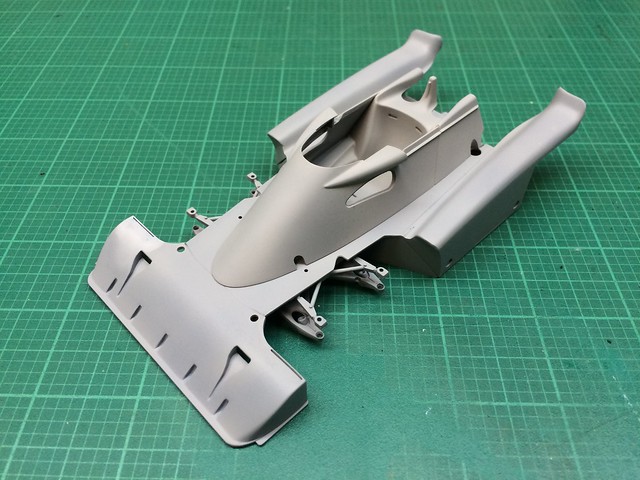
[/url]P34-013 by N.T. Izumi, on Flickr

https://flic.kr/p/smfAqL] 
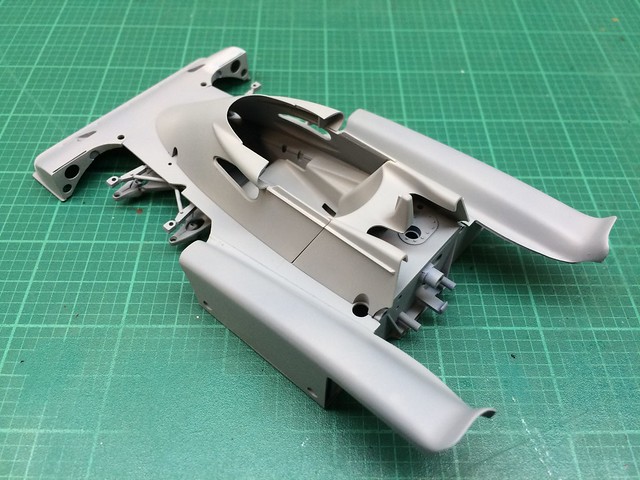
[/url]P34-014 by N.T. Izumi, on Flickr

Anyway, more later!

“Ya ya ya, unicorn papoi!”

  • Member since
    July 2008
Posted by Est.1961 on Friday, February 1, 2019 5:27 PM

Very nice Real G will keep watching. Finishing Airfix 1930 Bentley 1/32 and ordered Tamiya's Morgan today.

  • Member since
    April 2003
  • From: USA
Posted by keavdog on Friday, February 1, 2019 5:37 PM

Oh cool!  A lot of work so far and looking nice.  Following this one.

Thanks,

John

  • Member since
    March 2007
  • From: Northeast WA State
Posted by armornut on Friday, February 1, 2019 7:48 PM

    I have 2 of the 1/12 scale kits, an old release and the re-issue with photo etch. My plan is to build one track ready and the other one showing the PE details. Always loved thjs akward looking race car. Turns out the idea of 6 tires was useless as the r steer tires wore faster than the drive tires and no real speed advantage in turns was gained.

    An awesome endeavour for sure, I will be checking in from time to time.

we're modelers it's what we do

  • Member since
    May 2011
  • From: Honolulu, Hawaii
Posted by Real G on Friday, February 1, 2019 8:43 PM

Yep, the aerodynamic advantage of hiding the front wheels in the body was offset by excessive scrub in turns.  The Tyrrell team endlessly tinkered with the steering geometry to try and get all four front wheels to track correctly but apparently were never 100% successful.  The added weight of the extra set of wheels and suspension was also a factor, and Goodyear’s halting development of the tiny tires spelled the end of the P34’s career.

By the time the 2nd gen P34s were on the track in 1977, the front wheels were moved out into the airstream to improve roll stability, but negated the aerodynamic advantage of the narrower track 1st gen cars.

“Ya ya ya, unicorn papoi!”

fox
  • Member since
    January 2007
  • From: Narvon, Pa.
Posted by fox on Friday, February 1, 2019 8:44 PM

Very good work. I plan to follow your build closely. Heard about those rivet decals but never saw them in actual use. Great job. Gonna have to get me some of those.

Keep up the good work. Toast

Jim  Captain

 Main WIP: 

   On the Bench: Artesania Latina  (aka) Artists in the Latrine 1/75 Bluenose II

I keep hitting "escape", but I'm still here.

  • Member since
    May 2011
  • From: Honolulu, Hawaii
Posted by Real G on Friday, February 1, 2019 9:40 PM

Thanks guys for the positive comments!  A disclaimer though - this build is several years old, so hopefully by the time the photo posts catch up to where the project is at, I’ll resume work on it.  I did get to the decal stage, but am having wonky clearcoat issues.  The drivetrain also needs a few small parts, but the big stuff is substantially complete.

And Armornut, I also have two 1/12 kits just like you - one a fresh reissue and another tatty boxed, but intact kit.  I plan on building one stripped down and the other all buttoned up.  That way I can work around the yellowed decals in the older kit.

“Ya ya ya, unicorn papoi!”

  • Member since
    April 2003
  • From: USA
Posted by keavdog on Friday, February 1, 2019 10:01 PM

Thinking of the Ackerman angle/steering on this makes my head hurt...lol

Thanks,

John

  • Member since
    May 2011
  • From: Honolulu, Hawaii
Posted by Real G on Friday, February 1, 2019 11:25 PM

keavdog

Thinking of the Ackerman angle/steering on this makes my head hurt...lol


Apparently it was not so straightfoward as putting in two sets of front steering wheels.  I think the only way they could have achieved 100% perfect coordination under all cornering conditions would be to have computer-controlled individually steered wheels, something not possible in those analog days.

BUT, that is why I am so fascinated by the P34.

“Ya ya ya, unicorn papoi!”

  • Member since
    March 2012
  • From: Corpus Christi, Tx
Posted by mustang1989 on Saturday, February 2, 2019 6:40 AM

Goin' all out on this bad boy I see. Progress looks good so far. No matter how old the kit may be.......at least it's a Tamiya offering. Looking forward to more.


 Forum | Modelers Social Club Forum (proboards.com) 

  • Member since
    May 2011
  • From: Honolulu, Hawaii
Posted by Real G on Saturday, February 2, 2019 1:34 PM

mustang1989

Goin' all out on this bad boy I see. Progress looks good so far. No matter how old the kit may be.......at least it's a Tamiya offering. Looking forward to more.


Considering this kit was one of Tamiya’s earliest F-1 models, it’s not bad.  There’s a bunch of little nicks and spurs in mostly hard to reach areas, probably due to the mold getting old.  Some ejector pin marks are also in annoying, tight spots, but all can be filled.  The Ford-Cosworth V-8 is still a very nice piece of plastic.

To borrow the military expression “mission creep”, what started out as an OOTB project rapidly mushroomed into a complex one.  This was primarily due to the acquisition of several excellent books on the car.  The more I read and studied photos, the more I wanted to improve things.  The downside is you get bogged down, the upside is that you try new things.  Plus almost everything I now know about F-1 came from reading up about the car.

“Ya ya ya, unicorn papoi!”

  • Member since
    December 2018
Posted by Ted4321 on Saturday, February 2, 2019 2:44 PM

Looking forward to watching this build.  Great work so far. 

One of my favorite parts about this hobby is learning about the subject at hand.  

Thanks for sharing. 

T e d


  • Member since
    August 2007
  • From: back country of SO-CAL, at the birth place of Naval Aviation
Posted by DUSTER on Saturday, February 2, 2019 6:46 PM


I'll just sit over here and watch intently 


Steve

Building the perfect model---just not quite yet  Confused

  • Member since
    June 2018
  • From: Ohio (USA)
Posted by DRUMS01 on Saturday, February 2, 2019 7:57 PM
  • Member since
    May, 2011
  • From: Honolulu, Hawaii
Posted by Real G on Friday, February 01, 2019 9:40 PM

Thanks guys for the positive comments!  A disclaimer though - this build is several years old, so hopefully by the time the photo posts catch up to where the project is at, I’ll resume work on it.  I did get to the decal stage, but am having wonky clearcoat issues.  The drivetrain also needs a few small parts, but the big stuff is substantially complete.

And Armornut, I also have two 1/12 kits just like you - one a fresh reissue and another tatty boxed, but intact kit.  I plan on building one stripped down and the other all buttoned up.  That way I can work around the yellowed decals in the older kit.


Real G, I noticed in your comment about the yellow old decals. Did you know you can get some high quality replacements at a site called www.indycals.net . He offers them from 1/64 up to 1/12 scale. This is not a plug for him really. It's just I have this car too and purchased some of his custom decals to replace old yellowed ones.

The owner is Michael, he is a great retailer and modeler as well. He offers top quality products and service; like I said, I purchased several different ones. You may want to check him out in the event you would want to make the second car in the colors of the test car; the 76, or the 77 car. Just letting you know....

Ben a.k.a. DRUMS01


"Everyones the normal until you get to know them" (Unknown)

LAST COMPLETED:

1/35 Churchill Mk IV AVRE with bridge - DONE

NEXT PROJECT:

1/35 CH-54A Tarhe Helicopter


  • Member since
    May 2011
  • From: Honolulu, Hawaii
Posted by Real G on Saturday, February 2, 2019 11:39 PM

Thanks Ben, good to know!

“Ya ya ya, unicorn papoi!”

  • Member since
    May 2011
  • From: Honolulu, Hawaii
Posted by Real G on Monday, February 4, 2019 4:39 PM

OK here are some additional pics of the body work.

https://flic.kr/p/tbSCrH] [/url]P34-016 by N.T. Izumi, on Flickr

https://flic.kr/p/sePvWC] [/url]P34-018 by N.T. Izumi, on Flickr

https://flic.kr/p/sUepaE] [/url]P34-019 by N.T. Izumi, on Flickr

https://flic.kr/p/tbztro] [/url]P34-017 by N.T. Izumi, on Flickr

https://flic.kr/p/trQVd4] [/url]P34-022 by N.T. Izumi, on Flickr

Lots and lots of filling/sanding was in order!  But I eventually got there.


“Ya ya ya, unicorn papoi!”

  • Member since
    May 2011
  • From: Honolulu, Hawaii
Posted by Real G on Tuesday, February 5, 2019 4:31 PM

After a second go-around with filler and sandpaper, the model looked like this.

https://flic.kr/p/uoPT4K] [/url]P34-020 by N.T. Izumi, on Flickr

https://flic.kr/p/trN5CT] [/url]P34-021 by N.T. Izumi, on Flickr

The aftermarket plate is one of the few PE parts I found useful.  The asymmetrical shape is the reason the added rivets on the underside were not even at the front.

https://flic.kr/p/v4ATYF] [/url]P34-032 by N.T. Izumi, on Flickr

The pedal group had some heavy mold parting lines that defied my attempts to clean up.  Since I had two kits, I removed the pedals from one kit and evened out the base plate.  I then took the pedals from the other kit and added them to the cleaned base.

https://flic.kr/p/viKFMw] [/url]P34-033 by N.T. Izumi, on Flickr

“Ya ya ya, unicorn papoi!”

  • Member since
    March 2007
  • From: Northeast WA State
Posted by armornut on Saturday, February 9, 2019 4:52 AM

   Looking good G, itching to start mine. By yellow decals do you mean old and yellowed or are you refering to the color of the actual markings? If so I may need that afore mentioned decal address as well.

we're modelers it's what we do

  • Member since
    May 2013
  • From: Indiana, USA
Posted by Greg on Saturday, February 9, 2019 9:40 AM

This is fun to watch, first Formula car I remember seeing built here (since '13, anyway).

Thanks for posting this.

  • Member since
    May 2011
  • From: Honolulu, Hawaii
Posted by Real G on Saturday, February 9, 2019 12:32 PM

Armornut - By yellow I mean the decals have turned color due to age.  But the original kit’s yellow stripes were not the right color.  They were supposed to be a kind of fluorescent yellow that the reissued kits have corrected.

Greg - This is my first seroius attempt at an F-1 kit, and it has been a fascinating journey so far.  I am learning a lot about F-1 technology as well as the the race itself and the people involved.

“Ya ya ya, unicorn papoi!”

  • Member since
    March 2007
  • From: Northeast WA State
Posted by armornut on Saturday, February 9, 2019 7:29 PM

   Thanks Real G, I'm in good shape as I have new decals for the old kit, missing when purchased, and yessir they are BRIGHT YELLOW.  Watching with interest.

we're modelers it's what we do

  • Member since
    May 2011
  • From: Honolulu, Hawaii
Posted by Real G on Monday, February 11, 2019 4:55 PM

I have noticed the box art of Tamiya kits provide a wealth of detail information that the parts themselves lack.  Case in point the side plates on the front spoiler.  The kit parts have incorrect ribbing and lacks the kinked lower edge as shown on the box.  (By the way, I did some deep diving and got lucky to get ahold of a Model Art magazine that had an exhaustive article on the P34, with painstaking info on the different details found on the cars during their 2-year career.)

https://flic.kr/p/2duXUpL] [/url]P34-073 by N.T. Izumi, on Flickr

Sorry about the bad photo, but from L to R, the kit part, the Studio 27 PE part, and the scratchbuilt part.

https://flic.kr/p/uY3UyZ] [/url]P34-025 by N.T. Izumi, on Flickr

The embossed ribbing was done using a ball point pen tip on 0.015" styrene sheet backed with a rubber block that came with a beading tool set.  A friend had tried this technique to get stamped sheet metal boxes for a scratchbuilt Soviet ICBM carrier, and it worked well so I cribbed it!

https://flic.kr/p/u4Dvdg] [/url]P34-027 by N.T. Izumi, on Flickr

https://flic.kr/p/u23Ted] [/url]P34-026 by N.T. Izumi, on Flickr

https://flic.kr/p/voaWgA] [/url]P34-035 by N.T. Izumi, on Flickr

The kinked lower edge was done by scoring fold lines, bending to shape, then setting it with glue.  The beading tool provided punched dome rivets to finish them off.  The result is overscale, but at least the pattern is correct.


“Ya ya ya, unicorn papoi!”

fox
  • Member since
    January 2007
  • From: Narvon, Pa.
Posted by fox on Monday, February 11, 2019 7:48 PM

V E R Y Nice work. Toast

Jim  Captain

 Main WIP: 

   On the Bench: Artesania Latina  (aka) Artists in the Latrine 1/75 Bluenose II

I keep hitting "escape", but I'm still here.

  • Member since
    March 2015
  • From: Close to Chicago
Posted by JohnnyK on Wednesday, February 13, 2019 5:28 PM

Very nice work so far.

I remember building one of those in 1973. I think that it was the 1/12 kit. That was my first big scale kit and I was amaized by the amount of detail. It was so different from the 1/24 scale car kits.

Your comments and questions are always welcome.

  • Member since
    May 2011
  • From: Honolulu, Hawaii
Posted by Real G on Thursday, February 14, 2019 10:36 AM

JohnnyK

Very nice work so far.

I remember building one of those in 1973. I think that it was the 1/12 kit. That was my first big scale kit and I was amaized by the amount of detail. It was so different from the 1/24 scale car kits.


I can only imagine the reaction that model got when it first came out.  It is impressive even today.  I have been using the instructions of this kit to figure out where all the pipes go on the 1/20 kit.  It’s been educational, as I don’t have much automotive experience.

“Ya ya ya, unicorn papoi!”

  • Member since
    May 2011
  • From: Honolulu, Hawaii
Posted by Real G on Tuesday, February 19, 2019 12:16 PM

Here is a little workaround - I needed plugs of a certain diameter that weren't available as plastic rod stock.  What to do?  I drilled a hole in an old resin pour plug to the correct diameter, then heated a sprue and plunged it into the hole to get what I needed.  The ends were squared off and were cut to the needed length.

https://flic.kr/p/s4pgwe] [/url]P34-003 by N.T. Izumi, on Flickr

The plugs I believe are retainers for the fiberglass body shell on the real car.  The 1/12 kit has them, but were missed on the smaller 1/20 kit.

Although not on the box top illustration, a standard piece of equipment on F-1 cars is an emergency pull ring which activates the on-board fire extinguisher.  To make the pull ring, styrene rod was tightly coiled around a drill bit and plunged into boiling water.  I experimented to find the right diameter.  A segment was cut out and fitted to a straight piece of rod.  Heat stretched styrene tubing (yes, you can do it just like sprue!) was used to make a sleeve.

https://flic.kr/p/wbULwr] [/url]P34-063 by N.T. Izumi, on Flickr

The real thing was just scabbed onto the roll bar assembly and welded in place, so I notched the roll bar a little and glued the pull ring on.  A Bowden cable will be fished to places unkown (probably towards the extinguisher bottle located under the driver's legs) later on.

https://flic.kr/p/veUe7b] [/url]P34-063 by N.T. Izumi, on Flickr

The ring is ususally painted red, but I cannot see it on Depallier's car in what photos I have of the 1977 Monaco race.  There are other photos from other races where it is silver, so I may go with that.

As can be seen, the photo was taken after painting and decaling had commenced, but I wanted to cover the work in a logical sequence.  But note the red "E" decal, indicating the location of the pull ring.

“Ya ya ya, unicorn papoi!”

  • Member since
    July 2014
  • From: Franklin Wi
Posted by Bakster on Tuesday, February 19, 2019 6:07 PM

Real G
I don't think I have posted a thread on this model - that's what happens when you are a glacier-slow builder like me and forget stuff.

Welcome to the club. 

Cool project and what a machine. Watching.

  • Member since
    May 2011
  • From: Honolulu, Hawaii
Posted by Real G on Monday, February 25, 2019 4:34 PM

For the 1977 season, team Tyrrell used a rectangular tachometer pasted directly over the existing round faced instruments.  Tamiya did not include this bit with their 1977 Monaco release, but neither did Fujimi with their 2nd gen 1977 kits.  It was simple enough to make a framed box to represent the tach.  The gauge face was drawn up on the computer and test printed on paper.  I think if I paste clear tape over it, it will be useable.

https://flic.kr/p/vSTkL8] [/url]P34-061 by N.T. Izumi, on Flickr

The yellowish rectangle is supposed to represent some kind of data chart which was attached to the top of the fuel injector box.  I also made some round gauge faces with the redline limit, as the kit decals lack this.

The P34 featured rear inboard disc brakes, which means the disc was mounted close to the transmission case rather than the wheel hub.  This was done to reduce the unsprung mass of the tire/wheel assembly to improve suspension response.  The kit discs are molded integral with the calipers, and lack the slotted edges.  Since the brakes will be readily visible after assembly, I wanted to feature the slots.  Sooooooo the first impulse was to buy a white metal aftermarket set - which I didn't like.  I ended up making my own from sheet styrene, which ended up looking much better.

https://flic.kr/p/vPLCzC] [/url]P34-053 by N.T. Izumi, on Flickr

https://flic.kr/p/vS6gHX] [/url]P34-054 by N.T. Izumi, on Flickr

At first I tried using 0.010" sheet for the disc surfaces, but they proved too fragile for gorilla handling.  I switched to 0.015" sheet which yielded more durable discs.  I also increased the diameter of the inner insert to increase stiffness.  Fine square section strip was used to make the fins.  I used the white metal brake insert as a guide to evenly space the strips.  The photo was taken before the slotted edges were cleaned up.  The kit's plastic calipers will be salvaged to use with the scratchbuilt discs.

The rear brakes have cooling scoops which are again highly visible, so the solid kit intakes were redone using sheet plastic boxes grafted on to the shortened assemblies.

https://flic.kr/p/vB3t7K] [/url]P34-040 by N.T. Izumi, on Flickr

At first, I tried hollowing out the ends of the kit parts, but that required way too much skill to execute properly.  The chop-n-box method was much easier.


“Ya ya ya, unicorn papoi!”

  • Member since
    June 2018
  • From: Ohio (USA)
Posted by DRUMS01 on Monday, February 25, 2019 7:20 PM

You are a person after my own heart (meaning I prefer scratchbuilding more than buying detail parts). Your eye for creating detail added to your modeling skills are really bringing the best out in this kit. GREAT JOB!

YesBig SmileYes

Ben

"Everyones the normal until you get to know them" (Unknown)

LAST COMPLETED:

1/35 Churchill Mk IV AVRE with bridge - DONE

NEXT PROJECT:

1/35 CH-54A Tarhe Helicopter


  • Member since
    May 2011
  • From: Honolulu, Hawaii
Posted by Real G on Monday, February 25, 2019 9:00 PM

Ben,

Wellll... to be honest, I am using mostly scratchbuilt parts because the aftermarket stuff is wrong and/or poor!  Not because of any virtue on my part.  The upside is that I get more modeling “exercise” trying to solve problems myself.

“Ya ya ya, unicorn papoi!”

JOIN OUR COMMUNITY!

Our community is FREE to join. To participate you must either login or register for an account.

SEARCH FORUMS
FREE NEWSLETTER
By signing up you may also receive reader surveys and occasional special offers. We do not sell, rent or trade our email lists. View our Privacy Policy.