SEARCH FINESCALE.COM

Enter keywords or a search phrase below:

Tyrrell P34 1977 Monaco Grand Prix

12558 views
114 replies
1 rating 2 rating 3 rating 4 rating 5 rating
  • Member since
    May 2011
  • From: Honolulu, Hawaii
Posted by Real G on Monday, March 4, 2019 4:51 PM

Here are the new brake discs dry fitted in place.  The kit brake assemblies are on the bottom of the photo.

https://flic.kr/p/vV22Zf] [/url]P34-055 by N.T. Izumi, on Flickr

The kit's front tires are molded in a different material than the rears, and have some nasty parting lines and sprue attachment points that are impossible to fix.  I sourced an aftermarket set of rain tires, which were molded from a material that feels and smells like tire rubber rather than vinyl.  They lend some visual interest, plus the car I am building ran with rain tires during qualifications.  The PE set I bought had "Goodyear" stencils, which worked well; the real tires had visible overspray so some slop was okay.  I'll add some yellow grease pencil marks later on for added realism; based on photos of the real car, individual tires were numbered according to specific positions, and had the driver's initials.

https://flic.kr/p/wgdyT7] [/url]P34-065 by N.T. Izumi, on Flickr

The front rims were missing some details, which were added using sheet plastic and punched rivets.  I got lazy and found some turned metal tire valve stems, so I'll be adding those as well.

https://flic.kr/p/v1kdbN] [/url]P34-056 by N.T. Izumi, on Flickr

“Ya ya ya, unicorn papoi!”

  • Member since
    August 2015
  • From: the redlands Fl
Posted by crown r n7 on Monday, March 4, 2019 5:17 PM

thats one sharp looking build!!


 Nick.

  • Member since
    March 2007
  • From: Northeast WA State
Posted by armornut on Monday, March 4, 2019 11:41 PM

   AAAARRRGGGGHHHH darnit Real G...Valve stems! I keep telling myself to add them but do I? NOOOO, LOL thanks for reminding me yet again. Really itching for my 12 scale. Looking good sir.

we're modelers it's what we do

  • Member since
    May 2011
  • From: Honolulu, Hawaii
Posted by Real G on Tuesday, March 5, 2019 1:53 PM

Nick, thanks for lookng in!

Armornut, you KNOW you have to do the valve stems now, don't you?  Stick out tongue

I didn't take any pics of the ugly kit front tires, so this is what you get in the box:

https://flic.kr/p/RhiN24] 
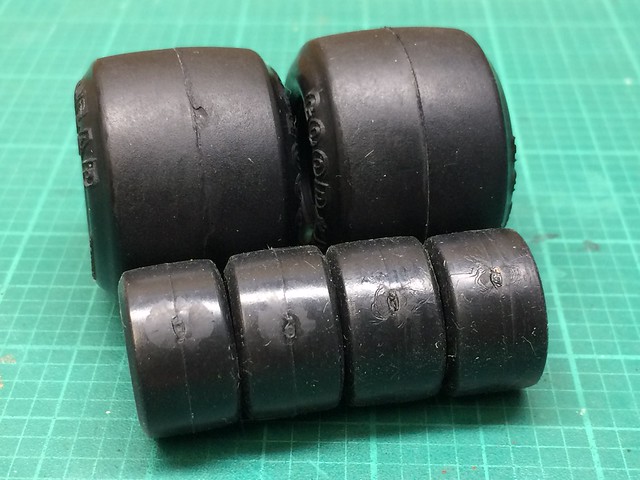
[/url]P34-73 by N.T. Izumi, on Flickr

The small front tires are probably vinyl, not the synthetic rubber that the rear tires are made from, so they are soft, squishy, sticky, and have prominent flaws at the sprue gate attachment points.

The aftermarket tire valve stems are beyond my phone camera's ability to effectively photograph.  I think 1/12 scale ones would be more manageable.

https://flic.kr/p/RhiN9i] [/url]P34-74 by N.T. Izumi, on Flickr

https://flic.kr/p/2dWKE1d] 
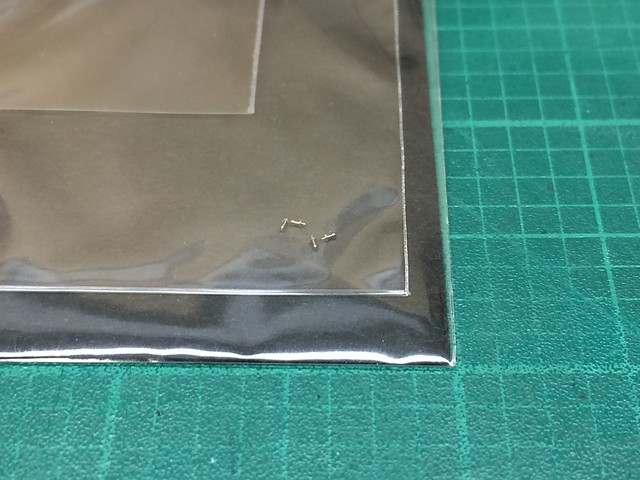
[/url]P34-75 by N.T. Izumi, on Flickr

The toggle switches are a little bigger.

https://flic.kr/p/2dWKDPm] 
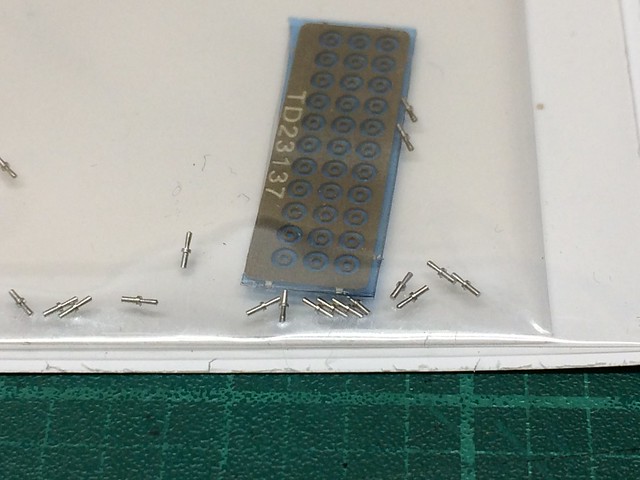
[/url]P34-76 by N.T. Izumi, on Flickr

The only reason I went down the tire stem rabbit hole was that I had read in the IPMS judging guidelines that such details are looked for.  And then a dive into the internet yielded such products.

“Ya ya ya, unicorn papoi!”

fox
  • Member since
    January 2007
  • From: Narvon, Pa.
Posted by fox on Tuesday, March 5, 2019 9:53 PM

Bow Down Bow Down Bow Down

Jim  Captain

 Main WIP: 

   On the Bench: Artesania Latina  (aka) Artists in the Latrine 1/75 Bluenose II

I keep hitting "escape", but I'm still here.

  • Member since
    March 2015
  • From: Close to Chicago
Posted by JohnnyK on Wednesday, March 6, 2019 12:49 PM

Here is a suggestion for some additional detail on the wheels. How about adding wheel weights? I did that on my large scale  Lotus. First I glued a thin piece of plastic to the wheel. Then I put a piece of Bare Metal Foil over the piece of plastic to simulate the duct tape that was used on the real car.


Your comments and questions are always welcome.

  • Member since
    May 2011
  • From: Honolulu, Hawaii
Posted by Real G on Thursday, March 7, 2019 12:34 PM

!!!  JohnnyK, now look what you did!  I have to consult my references to see if wheel weights are visible - if they are, I HAVE to do it!  Argh, the mind poisoner has beome the mind poisonee!  Surprise

“Ya ya ya, unicorn papoi!”

  • Member since
    March 2015
  • From: Close to Chicago
Posted by JohnnyK on Thursday, March 7, 2019 3:32 PM

Here is a photo of a 1:1 Lotus type 49. Notice the size of the wheel weight and the silve tape. 

Your comments and questions are always welcome.

  • Member since
    May 2011
  • From: Honolulu, Hawaii
Posted by Real G on Thursday, March 7, 2019 11:32 PM

Ah yes, and that lovely Ford DFV V8!

Post a couple pics of your Lotus here JohnnyK, I won’t mind at all!  There is not enough F1/race car action going on in the forums, and I always like eye candy!

“Ya ya ya, unicorn papoi!”

  • Member since
    March 2015
  • From: Close to Chicago
Posted by JohnnyK on Friday, March 8, 2019 11:59 AM

You are doing a great job on detailing your model. As you requested, here are a few pics of my 1/12 scale Lotus 49:

The wiring is different sizes of wire, such as boorbell wire, mouse cable wire, printer cable wire, etc. The bands that hold the ignition wires together are pieces of insulation from a mouse cable. The braided hoses, extruded aluminum compression fittings, and hose clamps are from Detail Master. I removed all of the molded bolt heads and replaced them with stainless steel bolts from Model Motor Cars/Scale Hardware. I don't remember where I bought the seatbelts, but they are nicely detailed. I bought a black leather purse from Goodwill and used the leather for the seat cushion on the Lotus. The engines on large scale models really sparkle when additional detailing is added. All it takes is time. "There is so much detailing to be done, and so little time to do it"

Keep up the good work on your model.


Your comments and questions are always welcome.

  • Member since
    May 2011
  • From: Honolulu, Hawaii
Posted by Real G on Friday, March 8, 2019 4:24 PM

JohnnyK, that is a fabulous looking model!  Thanks for posting!  Now I know how hight the bar goes, so I'd better step it up!

“Ya ya ya, unicorn papoi!”

  • Member since
    December 2008
  • From: UK
Posted by PatW on Friday, March 8, 2019 4:31 PM

I built both the Tamiya F1 models here when they first offered both in 1/2th scale. The 1/20 scale versions are quite recent.

As a race and airfield marshal at the time watching these was incredible.

The March F1 team from Bicester about 12 miles away tried the same trick of having 6 wheels but 4 were at the back , so to keep the airstream clean the rears were small as were the fronts, but putting the power of V8 Cosworth engine through such small wheels/tyres was a disaster and quickly shelved the project.

Your build is looking very good, so keep up the good work! 

Remember , common sense is not common.

  • Member since
    May 2011
  • From: Honolulu, Hawaii
Posted by Real G on Friday, March 8, 2019 4:55 PM

PatW

I built both the Tamiya F1 models here when they first offered both in 1/2th scale. The 1/20 scale versions are quite recent.

As a race and airfield marshal at the time watching these was incredible.

The March F1 team from Bicester about 12 miles tried the same trick of having 6 wheels but 4 were at the back , so to keep the airstream clean the rears were small as were the fronts, but putting the power of V8 Cosworth engine through such small wheels/rtyes was a disaster and quickly shelved the project.

Your build is looking very good, so keep up the good work! 


PatW, that car looks amazing!

...and where can I fnd some common sense?  I looked around and can't seem to find any.  Stick out tongue  I guess that's normal for a guy who gravitates to oddball F-1 cars.  BTW I also have a Brabham BT46B "suction fan" car in the stash.  Banned after only one race!  I like the oddballs.

Anyway, thanks for looking in and for the interesting pic!

“Ya ya ya, unicorn papoi!”

  • Member since
    March 2015
  • From: Close to Chicago
Posted by JohnnyK on Friday, March 8, 2019 6:02 PM

You actually have a Brabham BT46B "suction fan" car in your stash. Is that the one with the big turbofan thing stuck on it's butt? Man, that would be a really neat car kit.

Your comments and questions are always welcome.

  • Member since
    May 2011
  • From: Honolulu, Hawaii
Posted by Real G on Friday, March 8, 2019 6:17 PM

JohnnyK

You actually have a Brabham BT46B "suction fan" car in your stash. Is that the one with the big turbofan thing stuck on it's butt? Man, that would be a really neat car kit.


Yes, that’s the one!  Fujimi made it.  It’s a recent kit, so it is pretty nice.  The fan stators are kind of thick though.

“Ya ya ya, unicorn papoi!”

  • Member since
    April 2003
  • From: USA
Posted by keavdog on Friday, March 8, 2019 7:03 PM

So much eye candy in this thread!  Great stuff.

Thanks,

John

  • Member since
    March 2015
  • From: Close to Chicago
Posted by JohnnyK on Friday, March 8, 2019 8:11 PM

Real G


JohnnyK

You actually have a Brabham BT46B "suction fan" car in your stash. Is that the one with the big turbofan thing stuck on it's butt? Man, that would be a really neat car kit.


Yes, that’s the one!  Fujimi made it.  It’s a recent kit, so it is pretty nice.  The fan stators are kind of thick though.


That's a crazy car! I can see how it was banned after one race. 

Your comments and questions are always welcome.

  • Member since
    March 2007
  • From: Northeast WA State
Posted by armornut on Saturday, March 9, 2019 12:43 AM

   HA! Wheel weights!!! Kinda humbling when ya know something should be there yet your brain seems to delete that file after first contact LOL LOL. Go for it Real G, "you can do it"!

     Sweet work on a smaller scale. And if ya hadn't figured I'm just teasing......cause I NEVER would have though about the wheel weights. More stuff to add to my 12th scale.....sometime in the next 50yrs or so.

we're modelers it's what we do

  • Member since
    May 2011
  • From: Honolulu, Hawaii
Posted by Real G on Saturday, March 9, 2019 12:49 AM

keavdog

So much eye candy in this thread!  Great stuff.


To me, Formula-1 is automotive eye candy!  The exposed engines of the 1970 era cars must be the reason I fell in love with the Y-Wings from Star Wars. 


“Ya ya ya, unicorn papoi!”

  • Member since
    April 2003
  • From: USA
Posted by keavdog on Saturday, March 9, 2019 1:40 AM

Oh I'm right there with you, but maybe a bit older vintage :)  I did these Tamiya kits

EBBRO has some great subjects (and they sure look like Tamiya kits).  I have this one in the stash

Thanks,

John

  • Member since
    December 2008
  • From: UK
Posted by PatW on Saturday, March 9, 2019 1:44 AM

It's interesting to note that the erstwhile head of F1 Bernie Ecclestone was the owner of the Brabham F1 team at the time of the 'Turbo Fan' car, that as you say was banned after just one meeting.

As the head of the F1 circus, he always criticized F1 teams for breaking the rules!

Remember , common sense is not common.

  • Member since
    May 2011
  • From: Honolulu, Hawaii
Posted by Real G on Saturday, March 9, 2019 3:39 AM

Yeah back when the BT46B appeared, there was already a rule in place that prohibited any mechanical or moving aero devices.  The excuse the Brabham team used was that the fan was to cure engine overheating problems, which the flat boxer engine actually did have.  But once the car got on the track, it was clear the tremendous downforce the fan created was being used to advantage in turns.  Driver Niki Lauda commented that the car took some getting used to, as the more power you used in a turn, the better the car cornered.

The Tyrrell kit has been a tremendous educational tool for me, as I knew nothing about F1 cars or the race itself before starting it.

Nice cars Keavdog!

“Ya ya ya, unicorn papoi!”

  • Member since
    March 2015
  • From: Close to Chicago
Posted by JohnnyK on Saturday, March 9, 2019 10:15 AM

I like the older F-1 model kits because the engines are exposed. The newer F-1 cars have their engines fully enclosed.

Your comments and questions are always welcome.

  • Member since
    May 2011
  • From: Honolulu, Hawaii
Posted by Real G on Monday, March 11, 2019 10:14 PM

The rear wing has a spoiler strip, which is basically a 90 degree channel secured by rivets.  Tamiya represented this as just an upturn of the wing trailing edge, so it was trimmed off and replaced with some strip plastic and punched fasteners.

https://flic.kr/p/v78w2m] [/url]P34-036 by N.T. Izumi, on Flickr

One aspect of modeling that I am absolutely incompetent in is attaining a high gloss finish.  Seemingly to prove my point, the paint crinkled on the underside of the rear wing.

https://flic.kr/p/uGXJva] [/url]P34-044 by N.T. Izumi, on Flickr

But Tamiya rattle can paint is very forgiving, so I just let it dry then wet sanded the crinkles flat.

https://flic.kr/p/vDfvs7] [/url]P34-045 by N.T. Izumi, on Flickr

Then I used some polishing cloths to get back the shine.

https://flic.kr/p/vKeu3i] [/url]P34-046 by N.T. Izumi, on Flickr

That was good enough to start the decaling process.

https://flic.kr/p/zw69fY] [/url]P34-069 by N.T. Izumi, on Flickr

It's not perfect, but perhaps a little more finesse with some fine polishing compound will make it right.


“Ya ya ya, unicorn papoi!”

  • Member since
    March 2015
  • From: Close to Chicago
Posted by JohnnyK on Tuesday, March 12, 2019 7:06 PM

WOW, that's a really nice  save with the crinkles!!

Your comments and questions are always welcome.

  • Member since
    May 2011
  • From: Honolulu, Hawaii
Posted by Real G on Tuesday, March 19, 2019 2:16 PM

Yes JohnnyK, Tamiya spray paint is very forgiving; it dries fast and sands well.  Just have to remember to wait a bit after a paint diaster before hitting it with the sandpaper.

The Ford Cosworth V8 is pretty darned good considering the age of the kit, and still stands up well against 21st century competitors IMHO.  (I know very little about the classic powerplant, but the kit engine sure looks like the real deal!)  Test fitting the serpentine exhaust pipes revealed a snag - when all the pipes were in place, the collector piece did not sit correctly (it wanted to rotate the pipes) plus there didn't seem to be enough space for the straight pipe in the back.  So I fit each pipe separtately along with the straight rear run to see where the problem was.  It turns out that the straight pipe was slightly too long on both sides.  To figure out how much to cut, the first pipe on each side was dry fitted along with the straight run.  After they were trimmed, the pipes on the left side all fit perfectly and the collector was in proper alignment.  The last pipe on the right side needed a little shortening for everything to fall into place.  It's not a ding on Tamiya, as the kit came out in the 1970s.

https://flic.kr/p/wMTmJH] [/url]P34-67 by N.T. Izumi, on Flickr

https://flic.kr/p/x4Cueu] [/url]P34-68 by N.T. Izumi, on Flickr

The kit's intake trumpets are chrome plated and while nice, they have sprue gates that will show scars.  So the plating was stripped off with Purple Power and they were joined to their bases that had the fuel injector horns.  Fit was not so great, so some tedious filling was in order.  Alclad or Molotow chrome finish to follow.

https://flic.kr/p/v4usrQ] [/url]P34-034 by N.T. Izumi, on Flickr

I'm starting to run out of WIP pics, so I'd better get back to this stalled project (check the date of the pics - 2015 or so) and finish the clear coating before the weather turns hot again.


“Ya ya ya, unicorn papoi!”

  • Member since
    June 2018
  • From: Ohio (USA)
Posted by DRUMS01 on Saturday, March 23, 2019 12:10 AM

Still watching and enjoying every update. Keep up your great work...and good save on the rear spoiler. 

Ben

"Everyones the normal until you get to know them" (Unknown)

LAST COMPLETED:

1/35 Churchill Mk IV AVRE with bridge - DONE

NEXT PROJECT:

1/35 CH-54A Tarhe Helicopter


  • Member since
    May 2011
  • From: Honolulu, Hawaii
Posted by Real G on Saturday, March 23, 2019 1:10 PM

Thank you for checking in Ben!  Hope to make new progress soon!

“Ya ya ya, unicorn papoi!”

  • Member since
    May 2011
  • From: Honolulu, Hawaii
Posted by Real G on Monday, March 25, 2019 5:19 PM

To start the paint process, I used Floquil light blue and Tamiya white primer.  I figured the flat colors would be easier to sand out dust and imperfections.

https://flic.kr/p/tSQTyU] [/url]P34-023 by N.T. Izumi, on Flickr

This was followed by Tamiya rattle can gloss pure white and blue.

https://flic.kr/p/vEaS5x] [/url]P34-042 by N.T. Izumi, on Flickr

https://flic.kr/p/vDeF6N] [/url]P34-043 by N.T. Izumi, on Flickr

The white went on well, but the blue was another story!  Horrifying orange peel covered the model!

https://flic.kr/p/vGypVL] [/url]P34-048 by N.T. Izumi, on Flickr

https://flic.kr/p/vMKwJu] [/url]P34-051 by N.T. Izumi, on Flickr

Sand, sand, sand, paint burn thru, @#$%&* , touch up, sand, sand, sand...  Now I know why I have avoided car models in the past.


“Ya ya ya, unicorn papoi!”

  • Member since
    June 2018
  • From: Ohio (USA)
Posted by DRUMS01 on Monday, March 25, 2019 11:51 PM

Stay with it as the blue body is one of the most important visuals. I am sure you will pull it out, especially with a nice gloss coat. I've seen your work and have 100% confidance in you on this one...

Ben

"Everyones the normal until you get to know them" (Unknown)

LAST COMPLETED:

1/35 Churchill Mk IV AVRE with bridge - DONE

NEXT PROJECT:

1/35 CH-54A Tarhe Helicopter


JOIN OUR COMMUNITY!

Our community is FREE to join. To participate you must either login or register for an account.

SEARCH FORUMS
FREE NEWSLETTER
By signing up you may also receive reader surveys and occasional special offers. We do not sell, rent or trade our email lists. View our Privacy Policy.