SEARCH FINESCALE.COM

Enter keywords or a search phrase below:

WALL-E

8129 views
39 replies
1 rating 2 rating 3 rating 4 rating 5 rating
  • Member since
    October 2008
  • From: Georgia
WALL-E
Posted by Rigidrider on Thursday, March 8, 2018 11:11 AM

Morning all...

Just a while ago, My grand daughters and I were watching my (our) favorite Pixar movie "WALL-E" and my one grand daughter knowing how much I loved building models asked me to build a WALL-E figure. Well I thought about it and after studying a number of pictures I down loaded, thought, Why not? Being retired now I'll have plenty of time to work on him, SO, here I go with a Scratch Built WALL-E. 

This is going to be the base material for this project. The toys and such are from a local Thrift (second hand) Store, the paint and wood dowels are from Home Depot, and the misc plastic sheets I've had aroung the shop for awhile now.

OK, starting with his head and eyes, I've cut out the general shape from .093 plastic sheet with my band saw, and will keep them all in a stack so as to keep the same shape while being shaped and sized on the belt/disc sander.

This old plastic tissue box cover will serve as the basis of his body. I at first had to experamint a bit when I found that the blade I was using to make this cut was too fime, and the speed of the stroke and travel was too fast, as the cut from the jig saw was just rewelding behind the blade as it passed . lol... I found by using a coarser blade and slowing down both the travel and the stroke speed that it cut much better. OK, Thats about it for now, and Thanks for looking! 

Doug

When Life Hands You A Bucket Of Lemons...

Make Lemonade!

Then Sell It Back At $2 Bucks A Glass...

  • Member since
    May 2013
  • From: Indiana, USA
Posted by Greg on Thursday, March 8, 2018 12:51 PM

Holy Cow, it's Doug! Hey, buddy.

I had to look up "WALL-E" to bring myself up to speed, but I see where you are going now. This should be fun to watch. 


  • Member since
    October 2008
  • From: Georgia
Posted by Rigidrider on Thursday, March 8, 2018 8:18 PM

Greg, good to hear from you! I miss seeing your posts and miss also the rest of the ole group. Yeah, Wall-E is my favorite Pixar movie, and two of the grand daughters love it too. They get a big kick from the scene where he finds a bra and tries to figure out what it is. So that's what I'm planning to try and build. More to come shortly. Plenty of time to build now that I'm fully retired! Take care bud!

Doug

When Life Hands You A Bucket Of Lemons...

Make Lemonade!

Then Sell It Back At $2 Bucks A Glass...

  • Member since
    May 2013
  • From: Indiana, USA
Posted by Greg on Friday, March 9, 2018 11:02 AM

Fully retired, eh? One of these days we gotta talk.

Will you share the project with your grand daughters as it's in progress or wait until it's done and surprise them?

  • Member since
    December 2002
  • From: Fort Knox
Posted by Rob Gronovius on Friday, March 9, 2018 12:03 PM

When the movie came out, my young son loved it. I remember buying all sorts of Wall-E toys, one was fairly decent sized with replacable tracks and other damaged items.

  • Member since
    October 2008
  • From: Georgia
Posted by Rigidrider on Friday, March 9, 2018 7:27 PM

Hey Greg... Yup, Fully retired now and LOVING IT! Unfortunately I don't get to see them all that often, but they do Skype or Viber, and I send them updates like these...

Rob, Yeah, I still love the flick. I've seen all sorts of toys and plushes but never a model... Hmm...

Any way, a bit more progress, I had to visit my doctor this morning, but after getting home had all day to work on.

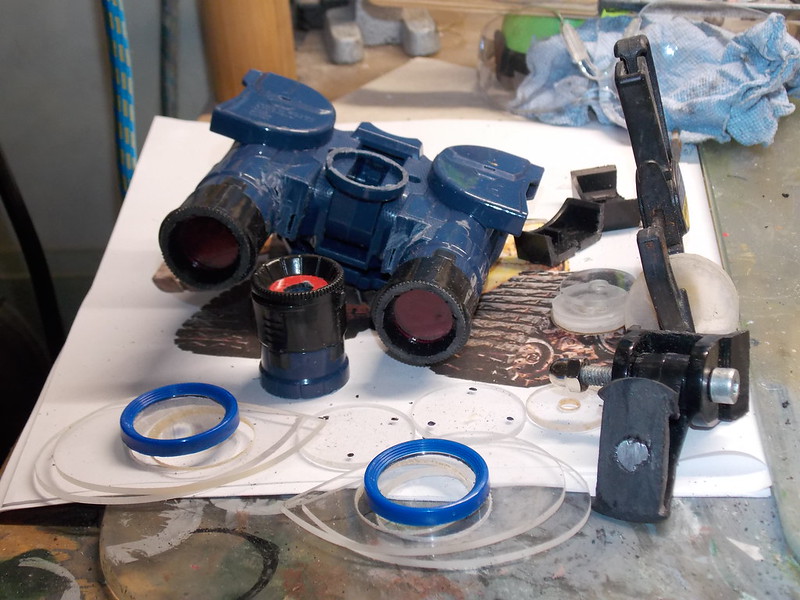
Well, got all the eye pieces shaped on the disc/belt sander. It did a nice job, The little piece in fromt of the binocs was from a kiddies telescope along with the articulation piece and both will be part of the neck. The discs I'm cutting with a drill press and a whole saw set are for the articulating joint that allows the neck to raise and lower, the other will be for the the head to be able to mount anf pivot.

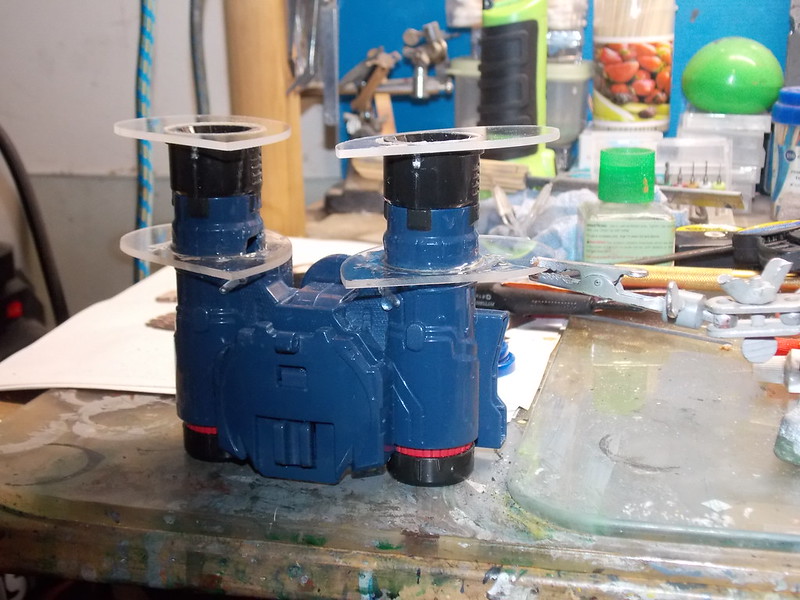
The back side pieces had to be trimmed a bit to allow them to fit right but other then that they fit perfectly. They are also now epoxied in place.

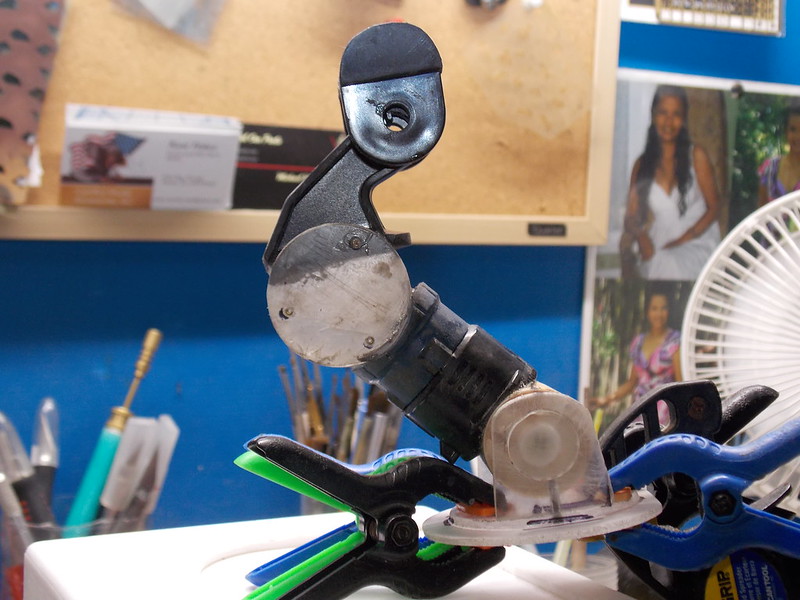
And the neck is assy. and the epoxy is setting, actually the pivot jionts aren't that hard to do, and whin I do them if you look closely at the connecting point, I've drilled and inserted pins to strengthen the joints so as to not allow them to fall apart if hit.

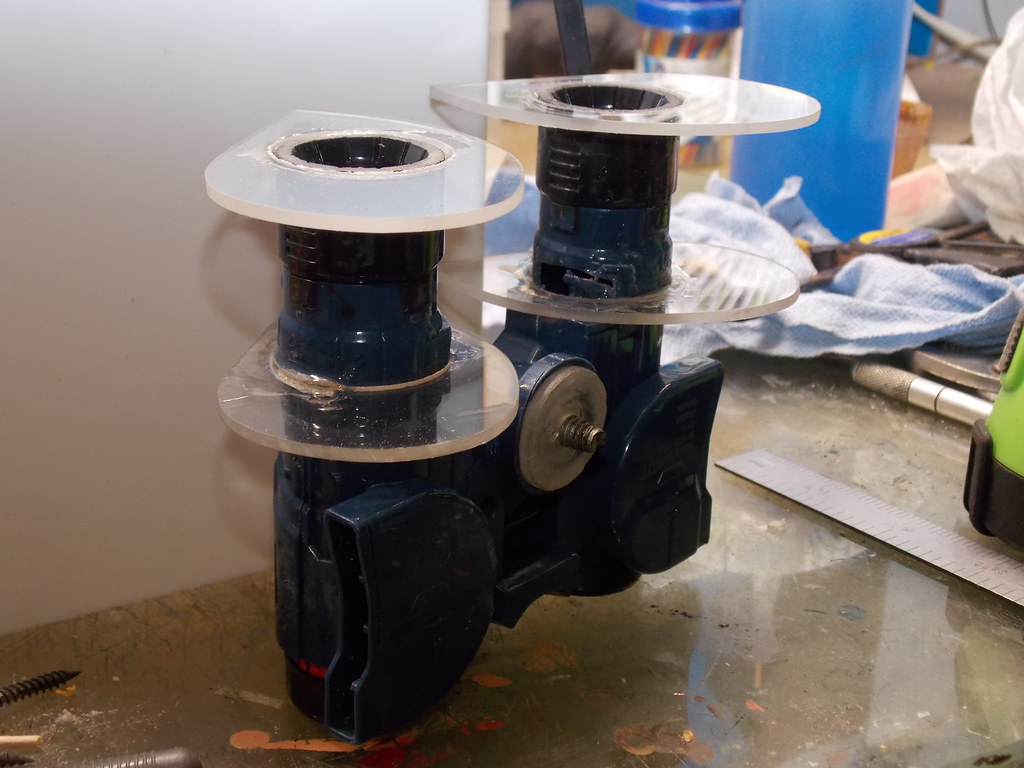
And heres the basic eye assy and the head pivot is installed... Love quick setting epoxy! Well, tis all for now. Thanks again for looking, and more in a bit!  Take care...

Doug

When Life Hands You A Bucket Of Lemons...

Make Lemonade!

Then Sell It Back At $2 Bucks A Glass...

  • Member since
    October 2008
  • From: Georgia
Posted by Rigidrider on Sunday, March 11, 2018 6:35 PM

OK, I finally got the neck pieces together and painted...

And starting to get his eyes painted pre assy.

Well, thats about it for now... Hope everyone had a good weekend. Thanks for looking!

Doug

When Life Hands You A Bucket Of Lemons...

Make Lemonade!

Then Sell It Back At $2 Bucks A Glass...

  • Member since
    October 2008
  • From: Georgia
Posted by Rigidrider on Monday, March 12, 2018 7:46 PM

Evening all... Todays offering...

I have begun working on the eyes, and I do apologize but I got ahead of myself again, and didn't take pictures along the way. But, I think you will be able to see how it was done.

What I did was took a sheet of .010 plastic sheet, cut and fit to be able to wrap around the eye shape, then used plain ole cement and would glue an area, wait until it was secured, the glue some more until it was completely around and secured. You can tee the left eye is still in the raw. After it was set, I painted with Model Master non buffing steel metalizing paint and let it set. That didnt take long being its lacquer and I use a thinner thats a tad hotter the normal. Next I took some Ameracana brand acrylic paint, (available reasonibly priced at Hobby Lobby) and got my favorite rust colors, Raw umber, Burnt umber, Raw sieana and burnt sieana, and started layering the bolors until they appeared like a light rust. Dont worry about being smooth. Any one thats seen rust , well, ith rough. So layer kinda like dry brushing.After that I added three small screws to the eye plate (per the pictures) and another small strip of .010 plastic, anain per the pictures, to simulate an inspection cover? 

and thats about where I'm at now... I'll try and finish up the other later tonight. Take care all! Thanks for the interest,,

Doug

When Life Hands You A Bucket Of Lemons...

Make Lemonade!

Then Sell It Back At $2 Bucks A Glass...

  • Member since
    October 2008
  • From: Georgia
Posted by Rigidrider on Tuesday, March 13, 2018 10:06 AM

Morning all... I stayed up till about 2 this morning getting the eyes and head assy finished enough to mount to the neck assy.

The eyes are painted now, and I've started rusting and weathering on the neck.

Still have a gfew pieces to make to finish the eye/head assy...

Above the eyes, I cut shaped and folded some tin from an old lasagna tray lid, to make the shields above the eyes. Also cut up the remainder of the second pair of toy binoculars and fit them to the sides of the eyes after drilling a series of vent holes. The head is now ready to fit to neck.

A bit more touch up with the airbrush, and For now its about done. There will be a bitmore to do after mounted to the body.

Well, thats it for now...

Thanks for looking..

Doug

When Life Hands You A Bucket Of Lemons...

Make Lemonade!

Then Sell It Back At $2 Bucks A Glass...

  • Member since
    October 2008
  • From: Georgia
Posted by Rigidrider on Thursday, March 15, 2018 12:19 PM

Afternoon all! I'm starting work on the main body now...

 OK, due to the amount of detail I see on the body section, I figure that the shell will need to be reinforced to take the added weight , and decided to make the body (again) like a submarine with an inner and outer hull.The octoganal pieces at the top are ith back pieces where his rear compartment door appear to slide in. The square looking pieces will be the sides. This is a .220 plastic I bought from a local window store for about 5$ as a miss cut piece from their seconds rack. I also have glued down the 5/16 sq. tubing to act as a standoff. The arms and legs will be screwed to these sections. The .220 plastic will be much stronger to mount to.

The pieces are now glued in place. The rectangular cuts will be where the arm clevis will slide. These arms will be fixed in place and won't slide. The lines etched in the piece will simulate where his body opens when a load is released but will not actually open on this one. I think with proper paint and rusting I can make it look like it does.

The rear slide pieces being installed...

and the trim and finishing pieces being installed... Tis all for now, Back in a bit!

Doug

When Life Hands You A Bucket Of Lemons...

Make Lemonade!

Then Sell It Back At $2 Bucks A Glass...

  • Member since
    August 2016
Posted by Keyda81 on Thursday, March 15, 2018 6:42 PM

That's awesome!  Wall-E is one of my favorite movies too.  Keep up the good work, it's really coming together!

  • Member since
    May 2009
  • From: Poland
Posted by Pawel on Friday, March 16, 2018 3:16 AM

Hello!

You're doing top notch job here! That's scratchbuilding at its finest! I also like your "worn metal" a lot!

Good luck with your build and have a nice day

Paweł

All comments and critique welcomed. Thanks for your honest opinions!

www.vietnam.net.pl

  • Member since
    November 2009
  • From: Twin Cities of Minnesota
Posted by Don Stauffer on Friday, March 16, 2018 6:58 AM

Keyda81

That's awesome!  Wall-E is one of my favorite movies too.  Keep up the good work, it's really coming together!


Indeed!

I do some scratch building myself, but I wouldn't attempt something that complex!

Don Stauffer in Minnesota

  • Member since
    October 2008
  • From: Georgia
Posted by Rigidrider on Friday, March 16, 2018 9:50 AM

Keyda, Pawel,Don... Thank you all very much. Like I said earlier, its just time consuming pouring over the picturers and trying to figure out how to reproduce what you see. But thats the challange and fun in this build. I'll post more later today of tomorrow. Thanks again for the interest.

Doug

When Life Hands You A Bucket Of Lemons...

Make Lemonade!

Then Sell It Back At $2 Bucks A Glass...

  • Member since
    October 2008
  • From: Georgia
Posted by Rigidrider on Saturday, March 17, 2018 9:06 AM

Morning all! A bit more progress from yesterday...

OK, after priming the basic body, (I find it helps to see everything in 1 color) to be able to judge where I'm at, I've decided to do some work to the back side. 

The upper door and handle are installed, using .093 plastic sheet. square tubing for the handle, and a piece of aluminum tubing for the hinge. There is also some ribbing to simulate the strengthening ribs of two different sizes of plastistruct rectangular strips.The inner compartment door is again .093 plastic with popcycle sticks evenly spaced for strengthining ribs. The bump guards are probably a rubber material in theory but I used 1-1/2 corner trim, wood shaped on the belt/disc sander.

These pieces will serve as his "legs" to attach and support the track assys. I know the actual pictures show a more mechanical looking piece, but I saw these and figured, they mount under him, and won't be that noticable, and are shaped very close to what I need to have any way. These pieces are the hind legs from a robot dog toy I found again at the second hand store. I filled the cavities with a mixture of plaster and sand to give them the added weight required for stability.

And this is how I intend to mount them when needed.

And the front is about ready to finish. Again, the corner guards shaped and installed, the stand offs in place where the speaker, and solar charge display will mount, and the recess where the hands fit when he tucks himself into a cube shape. Thats about it for now... Thanks for the interest and for looking...

Doug

When Life Hands You A Bucket Of Lemons...

Make Lemonade!

Then Sell It Back At $2 Bucks A Glass...

  • Member since
    October 2008
  • From: Georgia
Posted by Rigidrider on Monday, March 19, 2018 7:56 AM

Morning... More WIP from yesterday...

After a little more priming, The upper trim pieces are now in place. This is a vinal 11/16 corner trim, molded in white, trimmed and thinned down on the belt sander to match photos. 

In the arm clevis slots, it in some pictures shows what looks like a rubber (?) type of weather/debris guard, and in some it looks like a "hair" type. I couldnt find anything I liked, so I glued in place some .010 X .250 plastic stpip on the top and bottom, which leaves a slight gap in between, then trimmed all the way around with a 1/16 round plastic rod. This worked out pretty good. The clear disc near the back is a pivit point cap with super glue gel around it to simulate a weld. This where his upper and lower body sections pivot when they seperate to deposit a load.

A view of the back side. I still need to make 2 small cylinders to place 1 on either side of the hatch, but will hold off until I make the arms which are also cylinders, and doo all at the same time.

After all this sets up I think I'll try some paint to see how it looks. Thanks for looking..

Doug

When Life Hands You A Bucket Of Lemons...

Make Lemonade!

Then Sell It Back At $2 Bucks A Glass...

  • Member since
    October 2008
  • From: Georgia
Posted by Rigidrider on Tuesday, March 20, 2018 5:41 PM

Evening all! 

I managed to get some paint on him today. Krylon makes a near "School Bus Yellow" (at least thats what I call it) and I think it'll do the job.

I'm not terribly concerned about the coverage and such of the finish.. I mean after all, WallEs about 700 years old. There are several spots where I kinda figured that dampness and soforth would collect and cause heavily rusted areas, so I took some lacquer thinner and wrinkled the paint to make it look like raised rusty paint when I'm done.

OK, in this picture, I apologize but I kinda got ahead of the pictures and had the front hatch (door) made and installed before I realized I hadn't took a picture. The front door was made from the lid off an old Lasagna tray, being a nice thin, but reasonably sturdy material to work with. I cut to fit with enough over hang to be able to "fold) the edges all around to give it a bit more strength.In every picture of Wall-E the front door has a dent in it, I think mine is a tad low, but it will do. Well, I'll lety this set until morning and do some more if possible. Take care and thanks for the interest.

Doug

When Life Hands You A Bucket Of Lemons...

Make Lemonade!

Then Sell It Back At $2 Bucks A Glass...

  • Member since
    March 2016
  • From: Ipswich, Massachsetts
Posted by Johnny Reb on Wednesday, March 21, 2018 4:02 PM

Sir;

your build is fantastic! Thank you for sharing; I will be watching with great interest!

  • Member since
    October 2008
  • From: Georgia
Posted by Rigidrider on Wednesday, March 21, 2018 4:07 PM

Thank you Johnny... Never tried any thing this complex, but just slow and steady... Stay the course, lolol...

Doug

When Life Hands You A Bucket Of Lemons...

Make Lemonade!

Then Sell It Back At $2 Bucks A Glass...

  • Member since
    October 2008
  • From: Georgia
Posted by Rigidrider on Wednesday, March 21, 2018 5:11 PM

Afternoon all! Little more done today...

Starting on the front, The speaker louvers are from an old modem box, cut up, sanded, glued back together( to make it the right size) and a button added for record function. The Solar display is a shaped piece of .093 clear plastic, painted near as I could get to chartruce green, dried then flipped over, taped on the other side to show charge bars, then painted flat black. after drying The masking tape was removed and I used dry transfer (rub on) letters to word the panel. The little sun was a small dot of yellow paint, (airbrushed) then the "rays" were from a set of luftwaffe decals, They are the kill marks with the national insignias cut off.

Starting to trim him out now. His name was done with a 2in piece of masking tape, with the lettering laid out with striping tape, about 3/32 in wide, cut around with an exacto 11 blade then removed , then airbrushed. Ther circle was done the same way, spraying white first, then taping out the letter, spraying over with red and removing the tape. The rest is airbrushed to match the pictures close as I could.

And thats about it for now. Thanks for looking!

Doug

When Life Hands You A Bucket Of Lemons...

Make Lemonade!

Then Sell It Back At $2 Bucks A Glass...

  • Member since
    October 2008
  • From: Georgia
Posted by Rigidrider on Thursday, March 22, 2018 8:29 PM

Evening ... Well , just, ... damn. My band saw broke this afternoon, and I was about to start on the arms which are cylinders, and I need them very cleanly cut. Oh well, I ordered the parts required to make the repair, they should be here in a day or two, so..... I'm going to attempt to make a passable Hal, Wall-e's little cockroach buddy. 

I think everything showing here will do thge trick.

To start I use a popcicle stick, some old under wing tank parts from the spare box, and some tooth picks, glued together with one of those "ultra violet" glue devices. you just add a drop of epoxy, and hit it with the ultra violet light pen provided and it sets firm immeadiately. 

Got the little front legs on...

A little .010 folded plastic sheet for the wings and head, a dab of paint airbrushed on, some copper wire for feelers, and hes about finished.

And I think that'll do. Maybe tomorrow the tracks will be here per the shipping tracker, and I can start the track assys, or maybe get what I can done on the rusting and weathering... Any how, Thanks again for looking! Take care all!

Doug

When Life Hands You A Bucket Of Lemons...

Make Lemonade!

Then Sell It Back At $2 Bucks A Glass...

  • Member since
    July 2013
Posted by steve5 on Thursday, March 22, 2018 11:25 PM

that is so cool doug


  • Member since
    May 2009
  • From: Poland
Posted by Pawel on Friday, March 23, 2018 5:33 PM

Hello!

Like I already wrote - that's some nice scratchbuilding going on here! Good luck with your build and have a nice day!

Paweł

All comments and critique welcomed. Thanks for your honest opinions!

www.vietnam.net.pl

  • Member since
    October 2008
  • From: Georgia
Posted by Rigidrider on Saturday, March 24, 2018 1:44 PM

Steve 5 , Pawel, Thank you both for the kind words! I pretty happy with the way hes going. I guess hes somewhere around the 50 - 60% done range.

Well... My saw parts didn't arrive yet, so yesterday, I started the rust and weathering on the body, I was up about 05:00 this morning with coffee near at hand, going at it again. I think I've got the bulk of the rusting/weathering done now...

And thats about where we're at for now... Have a good weekend! Thanks...

Doug 

When Life Hands You A Bucket Of Lemons...

Make Lemonade!

Then Sell It Back At $2 Bucks A Glass...

  • Member since
    May 2013
  • From: Indiana, USA
Posted by Greg on Sunday, March 25, 2018 4:03 PM

Doug, every progress pic I see makes my smile broader.

Great project, great progress, how clever.

  • Member since
    October 2008
  • From: Georgia
Posted by Rigidrider on Wednesday, March 28, 2018 10:59 AM

Thank you Greg! Very kind of you, and I'm glad your enjoying...

OK, Got my parts for the band saw and made repairs yesterday, and am coming along with the tracks now...

This is the initial design and arangement. The support piece is the .093 plastic, and other then some drive wheels I bought at the local Hobby Shop for 1/16 Tanl. the rest is again parts removed from old second hand toy store toys.

One asyembled, and one being assy.

I'll try to get painted and weathered today, so I can start on arms tomorrow...

Thanks,

Doug


When Life Hands You A Bucket Of Lemons...

Make Lemonade!

Then Sell It Back At $2 Bucks A Glass...

  • Member since
    October 2008
  • From: Georgia
Posted by Rigidrider on Thursday, March 29, 2018 5:26 PM

Evening all! I got my track assys painted, weathered and epoxied on today, and started on his arms...

These are the clevis anchors that will mount the arms to the body.

And these cylinders will become the arms. The clevis and anchors are already attached here. Thats about it for now. I should have them finished by tomorrow along with the rear hatch cylinders... Take care...

Doug

When Life Hands You A Bucket Of Lemons...

Make Lemonade!

Then Sell It Back At $2 Bucks A Glass...

  • Member since
    October 2008
  • From: Georgia
Posted by Rigidrider on Friday, March 30, 2018 6:26 PM

Evening everyone! Got Wall-e's arms done and am awaiting the epoxy to set up! I can see the completion in sight now and am anxious myself...

Painted them early this morning,

I added the "warning flats to them. I wish I had thought to take a picture, but at the front where there is just a bit of yellow on the first rod, there is a small piece to level the flat plate to the cyl barrel... That so far has been the hardest little part to make. I tried shaping the piece and then drilling... No way, I made about 4 sets until I figured out , Drill FIRST, then cut out and shape...DUH. 

OK again, got a bit ahead of taking the pictures and had them finished and ready to install befor realizing it, but.. The "chrome " on the rods is chrome foil from LHS, the "wiper rings" around the rod caps are just o-rings, and they are painted , weathered and aged, and installed. 

And thats it for now! Wishing everyone a blessed Easter weekend! Thanks...

Doug

When Life Hands You A Bucket Of Lemons...

Make Lemonade!

Then Sell It Back At $2 Bucks A Glass...

  • Member since
    October 2008
  • From: Georgia
Posted by Rigidrider on Tuesday, April 3, 2018 6:11 PM

Evening everyone! Hope everyone had a good weekend... Able to get some more done today, 

OK, I got the hand pieces made...

 The material is both the .220 and .093 plastic, plus some 1/4 in plastistruct tubing The pieces were taper sanded (along with a tad bit of skin) on the belt sander, then glued to the tubing.The small pieces of tubing are going to be spacers, and the small clear bean shaped pieces are what connects the thumb to the fingers.

And this is roughly how they will look when mounted.

And lastly for now, the clevises are attached to the rod ends, and when dried they will be assy to the "fingers" . Of course all this will be finished in a rusty steel look. After this its just a matter of making his dio and putting his head and neck on. Give me a day or two, and I think He'll be all but done!

Thanks

Doug

When Life Hands You A Bucket Of Lemons...

Make Lemonade!

Then Sell It Back At $2 Bucks A Glass...

  • Member since
    October 2008
  • From: Georgia
Posted by Rigidrider on Saturday, April 7, 2018 10:06 AM

Good morning all! Well, Hes done! I have worked on his dio for a day or so and finally have him assembled. 

His little cooler is scratch built from plastic sheet .010 thick, and assorted other plastistruct shapes and pieces. The "junk" around him is just left over pieces of toys I dissassembled to get things to use to build him, "rusted" and glued down on the dio.

The base is just a large picture frame with sand and such white glued to it, I mix about 1/4 glue and the rest water in an atomizer and spray it until damp, then allow to  dry.

Should have seen the funny looks I got walking into the store asking for the smallest bra they had! lol...

Well, thats about it... It was a fun ,interesting and different build for me. I want to Thank, each and every one for the interest, comments and encouragement during the build. Take care one and all, and I hope that you not only enjoyed but got a laugh out of some of this! Thanks again...

Doug

When Life Hands You A Bucket Of Lemons...

Make Lemonade!

Then Sell It Back At $2 Bucks A Glass...

JOIN OUR COMMUNITY!

Our community is FREE to join. To participate you must either login or register for an account.

SEARCH FORUMS
FREE NEWSLETTER
By signing up you may also receive reader surveys and occasional special offers. We do not sell, rent or trade our email lists. View our Privacy Policy.