SEARCH FINESCALE.COM

Enter keywords or a search phrase below:

Scratchbuilding a 'Nam era, Program IV, Armored Troop Carrier, "Tango" boat

17381 views
108 replies
1 rating 2 rating 3 rating 4 rating 5 rating
  • Member since
    October 2019
  • From: New Braunfels, Texas
Posted by Tanker-Builder on Tuesday, February 11, 2020 3:03 PM

Aha!!

    Boy do I know those locations " G ". That seal was as wide as the last Thunderboat I saw in Martinez. Oh, as well as the one in Rio Vista! The one in the last location was stumbled upon as I got lost getting out of Station Rio Vista after visiting some " Coastie " Friends.

      Had to check measurements on some items on a 95' cutter for a presentation model. They were doing Swimmer insertions into the Sacramento river that day. Closest I ever got to a C.G. Dauphin Helo!

  • Member since
    October 2019
  • From: New Braunfels, Texas
Posted by Tanker-Builder on Tuesday, February 11, 2020 3:11 PM

Pawel;

 Hi Guy. Listen There's a lot we can discuss. How do I get in touch with you in a specific Thread or Site?

  • Member since
    May 2009
  • From: Poland
Posted by Pawel on Tuesday, February 11, 2020 3:58 PM

TB - I'm sending you a private message and there's also the address of my website in my signature - where you can find out more under "contact" - so until next time! Have a nice day

Paweł

All comments and critique welcomed. Thanks for your honest opinions!

www.vietnam.net.pl

  • Member since
    August 2019
  • From: Central Oregon
Posted by HooYah Deep Sea on Tuesday, February 11, 2020 4:55 PM

Gary,

As for the bar armor, or as it was actually called, "trigger shield", I am doing them section by section. I'm using wood for the whole thing. 1/8th square stock for the verticals, and 3/32nds round stock for the rebar. Assembled and painted, it looks pretty good. Unfortunately, they are labor intensive, and I've got lots of them to make.


"Why do I do this? Because the money's good, the scenery changes and they let me use explosives, okay?"

  • Member since
    August 2019
  • From: Central Oregon
Posted by HooYah Deep Sea on Friday, February 14, 2020 12:08 PM

Received a bit of assistance from friends, so here is the latest;

"Why do I do this? Because the money's good, the scenery changes and they let me use explosives, okay?"

  • Member since
    October 2019
  • From: New Braunfels, Texas
Posted by Tanker-Builder on Sunday, February 16, 2020 10:08 AM

Yup!

           "Just what I thought. A waterborne Tank! I swear fellas that's what I saw!" Great progress!

  • Member since
    August 2019
  • From: Central Oregon
Posted by HooYah Deep Sea on Sunday, February 16, 2020 3:55 PM

Thank you for the comments, I wasn't sure anyone was following .  .  .

Now, in actuality, though the upper works are progressing, I've been having some issues with the prop tunnels. as an afterthought I should have build them separately and then installed them as an assembly. If anyone would make this as a kit, I would recommend that the prop tunnels be molded / vacuformed plastic pieces that would be inserted, glued, and then glassed in.

Also, I'm going with a single strut rather than the 'V' strut. It's not "to spec", but the single strut was 'available'.

"Why do I do this? Because the money's good, the scenery changes and they let me use explosives, okay?"

  • Member since
    October 2019
  • From: New Braunfels, Texas
Posted by Tanker-Builder on Monday, February 17, 2020 1:26 PM

Hi;

        The single strut was more common than thought.

  • Member since
    August 2019
  • From: Central Oregon
Posted by HooYah Deep Sea on Friday, February 21, 2020 2:03 PM

As many of you already know, building models, especially large ones, is not a project but a series of projects culminating in a single finished product. At this point the Tango hull is at 85%, and the superstructure / deckhouse is at 60%. I'm working on the shafting and running gear right now as well as prep work for the bow ramp install. I've decided that though the ramp will be open-able, I'm not installing an operating system. Retro-fitting one later is still a available option. 

At the start of this I was, and frankly still am, debating on the level of detail I would put into this. On one hand I want it to look good and authentic, but since it is to be R/C'ed, I don't want it to be too fragile. This decision factor is coming into play with the gun mounts. They are a rather unique build in themselves. I could construct them fairly realistically or just have the guns stickiing out of the armor tubes .  .  . decisions, decisions, decisions. No definite plan yet.


"Why do I do this? Because the money's good, the scenery changes and they let me use explosives, okay?"

  • Member since
    August 2019
  • From: Central Oregon
Posted by HooYah Deep Sea on Wednesday, February 26, 2020 10:56 AM

Got more work done on the prop tunnels and the stern tubes, struts, shafts and props installed. There is progress topside too with the deck house and gunnel walls coming along nicely.

"Why do I do this? Because the money's good, the scenery changes and they let me use explosives, okay?"

  • Member since
    September 2012
Posted by GMorrison on Wednesday, February 26, 2020 12:50 PM

Fine skills, very impressive. 

As for the gun tubs, I think you answered your own question.

Make them removable so that you can decide on your level of detail as you choose later.

 Modeling is an excuse to buy books.


  • Member since
    August 2019
  • From: Central Oregon
Posted by HooYah Deep Sea on Wednesday, February 26, 2020 1:53 PM

Sounds right. I really lucked out on the scale as the armored gun shields scale down to almost exactly 4.5", the size of 4" ID plastic pipe. Also, for the plastic, anti-hand grenade covers, I found a particular brand of salsa has the perfect fitting lid. The question is whether that type of plastic will hold paint.

These mounts are rather unique as the circular shield is actually supported by the mount's pedestal, rather than a ring mount as in the PBR and PCF boats. Frankly, if I were designing this beast, I'd have put in two twin .50 ring mounts and a M134 minigun in place of the 20mm; just for the entertainment!


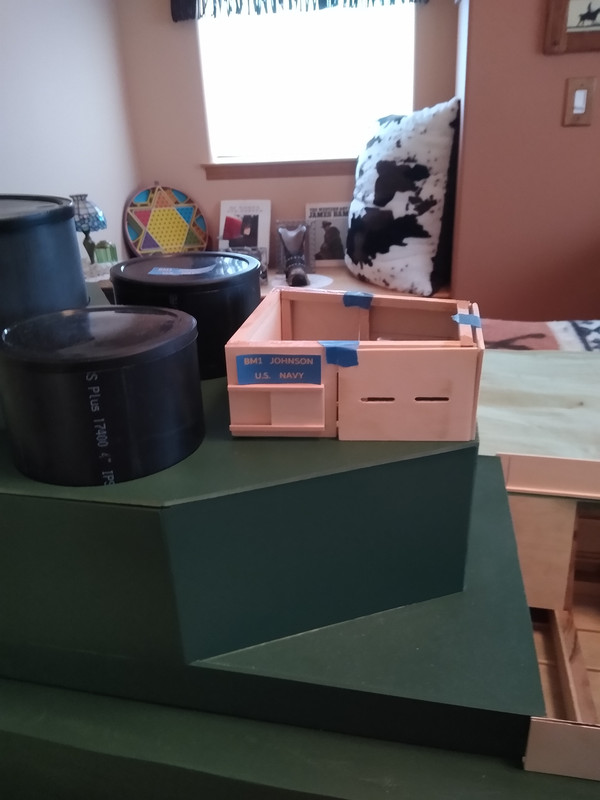
Another thing that I found was that a drywall router / roto-zip bit, chucked into a drill press can become a great wood mill; hence the slots.

"Why do I do this? Because the money's good, the scenery changes and they let me use explosives, okay?"

  • Member since
    August 2019
  • From: Central Oregon
Posted by HooYah Deep Sea on Monday, March 2, 2020 9:36 PM

The boat is progressing fairly well so, the crew and supplies are starting to arrive to get this puppy going .  .  . For those with Navy service, you know how things go; yard periods, don't you love them!!!


"Why do I do this? Because the money's good, the scenery changes and they let me use explosives, okay?"

  • Member since
    November 2018
  • From: Saskatchewan, Canada
Posted by sickdude on Monday, March 2, 2020 9:50 PM
Mighty impressive build sir! Following along now Smile.

William (Willy)

 
  • Member since
    October 2019
  • From: New Braunfels, Texas
Posted by Tanker-Builder on Tuesday, March 3, 2020 3:12 PM

Hey:

 Now that is looking Shipshape and Bristol fashioned!

  • Member since
    August 2019
  • From: Central Oregon
Posted by HooYah Deep Sea on Tuesday, March 3, 2020 8:45 PM

As Elvis would put it, "Thank You, Thank you very much." 

Actually, I am now debating on making the bow ramp operable. I already put in the hinge, but I'm figuring if it's worth the effort to install the lift cable, sheaves, et al. It would mean I have to disassemble or "dig into" a few things. Decisions, decisions .  .  .

"Why do I do this? Because the money's good, the scenery changes and they let me use explosives, okay?"

  • Member since
    August 2019
  • From: Central Oregon
Posted by HooYah Deep Sea on Saturday, March 14, 2020 12:05 PM

One of the fun / scary things about scratchbuilding is the doing thing completely on your own. no drawings, no precut pieces, etc. (especially when you haven't done this stuff in years!) So, this mornings project was to install the rudder stocks, or actually, the wood block I set rudder stock stuffing tubes into. I'd measured, and then measured, and then marked, and then dry fit as best I could, then measured .  .  . well, you get my drift. So, today I had to drill through the top of the prop tunnel and set everything in place. Holy Crap, it worked; just like it was planned. What's that old line; "I love it when a plan comes together!" Okay, on to the next crisis.

"Why do I do this? Because the money's good, the scenery changes and they let me use explosives, okay?"

  • Member since
    September 2012
Posted by GMorrison on Saturday, March 14, 2020 12:56 PM

I have a suggestion for you. As you are doing a lot of scratchbuilding and moving into the detail level, consider making lots of extra parts as you go. In other words, if you need 8 life rings, make 24. 

Since you are interested in the subject, those may come in handy for your next model.

 Modeling is an excuse to buy books.


  • Member since
    August 2019
  • From: Central Oregon
Posted by HooYah Deep Sea on Saturday, March 14, 2020 3:11 PM

Thanks, but I already thunk of that. Unfortunately it will only apply the the peripherals, since my next boat, if I do it, will be based on the LCM 6 Mod 1 hull, and will be a Program 5 boat. Though they appear very similar, there are lots of major structural differences. But the 24 life rings will come in very handy. 

This stuff is getting weird .  .  . I'm using parts of my brain I haven't play with in quite a while.

While waiting for paint to dry, I've completed the cox'n flat awning and started the control console. I still haven't found a large enough steering wheel yet so I'm working on the engine control levers.

"Why do I do this? Because the money's good, the scenery changes and they let me use explosives, okay?"

  • Member since
    August 2019
  • From: Central Oregon
Posted by HooYah Deep Sea on Saturday, March 21, 2020 8:25 PM

Finally got some help; hired on a Mini Me to work on things while I'm out. Here's Mini Me dry-fitting the bar armor while I was working on the running gear.

Running gear in progress.

I know, the hull bottom surface sucks. Yeah, not my best work.

"Why do I do this? Because the money's good, the scenery changes and they let me use explosives, okay?"

GAF
  • Member since
    June 2012
  • From: Anniston, AL
Posted by GAF on Monday, March 23, 2020 7:22 AM

Coming along nicely.  The hull bottom is supposed to look like that!  Big Smile

Gary

  • Member since
    October 2019
  • From: New Braunfels, Texas
Posted by Tanker-Builder on Monday, March 23, 2020 7:41 AM

What?

 Obviously you never saw the underside of one after some missions. You nailed the rough and ready part most folks NEVER see!

  • Member since
    October 2019
  • From: New Braunfels, Texas
Posted by Tanker-Builder on Monday, March 23, 2020 7:42 AM

How big a wheel do you need?

  • Member since
    August 2019
  • From: Central Oregon
Posted by HooYah Deep Sea on Tuesday, March 24, 2020 10:21 AM

The helm wheel should be 2" / 50-55mm for this scale.

(Picture from NHC, via John Carrico's excellant book, Vietnam Ironclads)

"Why do I do this? Because the money's good, the scenery changes and they let me use explosives, okay?"

  • Member since
    August 2019
  • From: Central Oregon
Posted by HooYah Deep Sea on Tuesday, March 24, 2020 10:44 AM

The 'other end' of the steering gear is ready, now I just need the wheel (actually, it will be a servo, but .  .  .) And, I just about ready to start installing the bar armor. I've been fitting it up and it seems to be coming together pretty well.

"Why do I do this? Because the money's good, the scenery changes and they let me use explosives, okay?"

  • Member since
    October 2019
  • From: New Braunfels, Texas
Posted by Tanker-Builder on Tuesday, March 24, 2020 1:47 PM

Okay!

    Now the wheels did vary , Based on Bu.#  And the Builder the wheels did have smooth rims too.

  • Member since
    August 2019
  • From: Central Oregon
Posted by HooYah Deep Sea on Tuesday, March 24, 2020 7:17 PM

Decided to put all of the sub-assemblies together, just to see how it looks at this point.

Yeah, we're getting there.


"Why do I do this? Because the money's good, the scenery changes and they let me use explosives, okay?"

  • Member since
    May 2009
  • From: Poland
Posted by Pawel on Wednesday, March 25, 2020 6:29 PM

Oh yeah, impressive!

Good luck finishing it and have a nice day!

Paweł

All comments and critique welcomed. Thanks for your honest opinions!

www.vietnam.net.pl

  • Member since
    August 2019
  • From: Central Oregon
Posted by HooYah Deep Sea on Sunday, March 29, 2020 10:04 AM

The beast is slowly coming together. Fortunately, the finish is looking better here than the bottom of the hull. It almost looks like I know what I'm doing!

"Why do I do this? Because the money's good, the scenery changes and they let me use explosives, okay?"

  • Member since
    October 2019
  • From: New Braunfels, Texas
Posted by Tanker-Builder on Monday, March 30, 2020 10:51 AM

Hi; 

     Still watching. I like this color better, I gotta say.

JOIN OUR COMMUNITY!

Our community is FREE to join. To participate you must either login or register for an account.

SEARCH FORUMS
FREE NEWSLETTER
By signing up you may also receive reader surveys and occasional special offers. We do not sell, rent or trade our email lists. View our Privacy Policy.