SEARCH FINESCALE.COM

Enter keywords or a search phrase below:

1/350 Scale Gulfstream IV-SP by R&R Modelers

18509 views
56 replies
1 rating 2 rating 3 rating 4 rating 5 rating
  • Member since
    March 2012
Posted by Rdutnell on Tuesday, March 25, 2014 11:22 PM

UPDATE 27 – 3/25/2014

Good Evening Everyone!

Using a plan sheet identifying the locations of the antennas, I added them to the model, as seen in the images below.  I created one using lofted ellipses, then mirrored it and copied it twice.

I created tabs on them using spheres, and since all three of them are on the centerline of the airframe where it is split, I had to subtract a 0.002” larger sphere from both airframe halves to make the recess for them as seen below.

After adding the antennas, I still wasn’t happy with the cockpit, even more so when Ron pointed a couple of features out that I hadn’t really noticed before, so I redid it.  I didn’t document the process, but the result is shown below.

The interior parts are now completed as shown below.


Ron also mentioned the skid pad on the underside, and sent a couple of pix showing it pretty good, so I tried to replicate it by lofting between four rectangles as shown in the first two images below.  Because the skid pad is also on the centerline, I had to slice it in half and add half to one airframe part and the other half to the other part.  The third image below shows it with the port side of the airframe moved out a tad so you can see how the pad was split.


Some time back, Ron had pointed out that when the flaps extend out and down in the fully down position.  I decided to make another part for those who may want to show the plane coming in for a landing, with flaps down.  To make them, I moved the port side flap out and down as shown in the first image below.  I then drew arcs connecting circles drawn at the base and the moved aft ends  (also in the first image) and lofted them, as shown in the second image.

This completes the model, which may be built in flight, as seen below. Note the hole drilled in the underside to accommodate a 1/16”rod.


The model may also be built flaps down…


...Or on the tarmac.


Things remaining to be done include, putting the small parts of frets, making decals and making a parts diagram.


CHEERS!!!

  • Member since
    March 2012
Posted by Rdutnell on Thursday, March 27, 2014 9:54 PM

UPDATE 28

Hi All!

Well, I lied.  I wasn’t finished.  First I had intended to put railing on the access ladder and realized that I had forgotten to do that, so using pix Ron sent me, I made a rough simulation of them, as seen below.

Ron also pointed out that his GIV has 4 antennas, instead of the 3 shown in the plans, and sent me another picture showing the location.  In the picture, the thrust reversers were deployed, the first time I had seen them in action.  I think they look cool so I made another set of engines with them doing their jobs, as seen below.

In yet another sign of the fortunate collaboration between Ron and I, he pointed out that adding the ventral ram air scoops on each side of the vertical stabilizer's spine would add a lot to the model.  I hadn’t noticed it before and agreed, so I added them using the plans (one of them actually had the outline of the scoops on it) and a pic Ron sent.


Now, with the model completed, I laid the parts out and put the little ones on frets.  It’s easy to forget how small everything is, so in the image below, I added a dime for scale.  It is to scale.

Below is a Part List I made for the model.

Now for the decals…

  • Member since
    March 2012
Posted by Rdutnell on Saturday, March 29, 2014 2:46 PM

UPDATE29 – 3/29/2014

Hi Everybody!

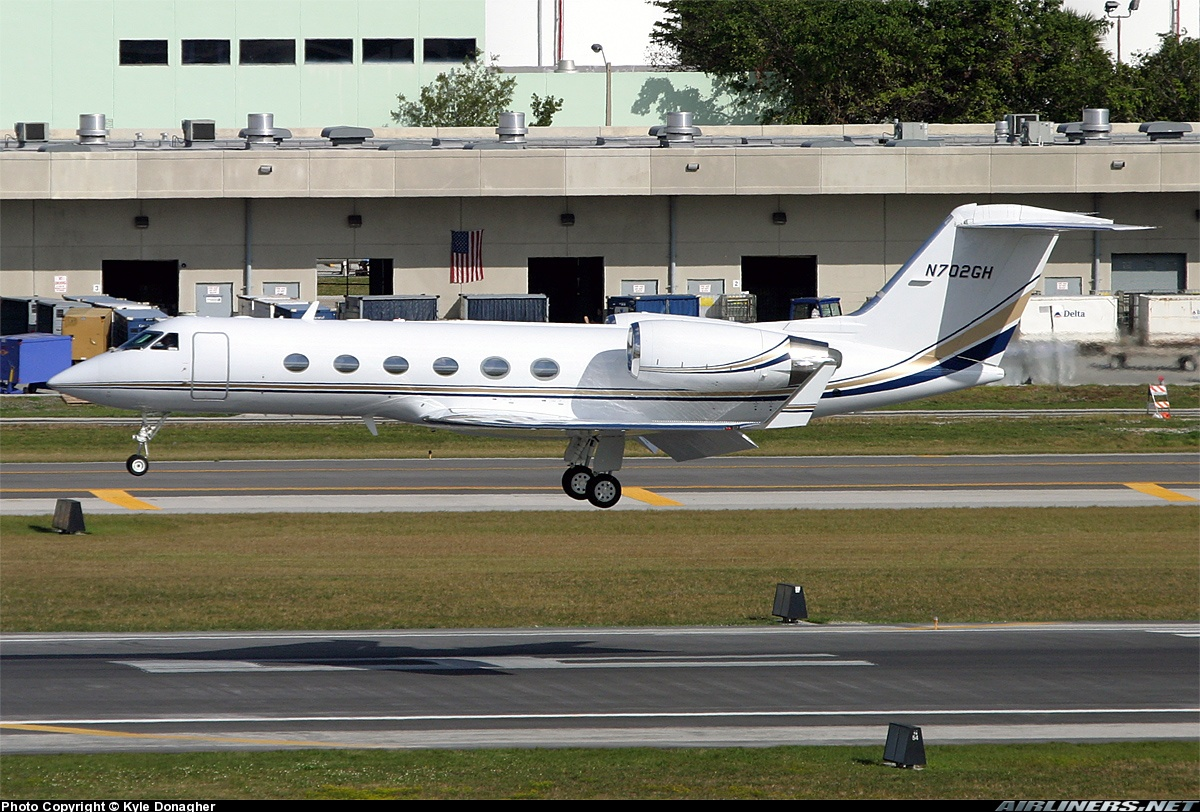
Before doing the decals, I decided to add the VOR/LOC antenna on the vertical stabilizer, as show below.

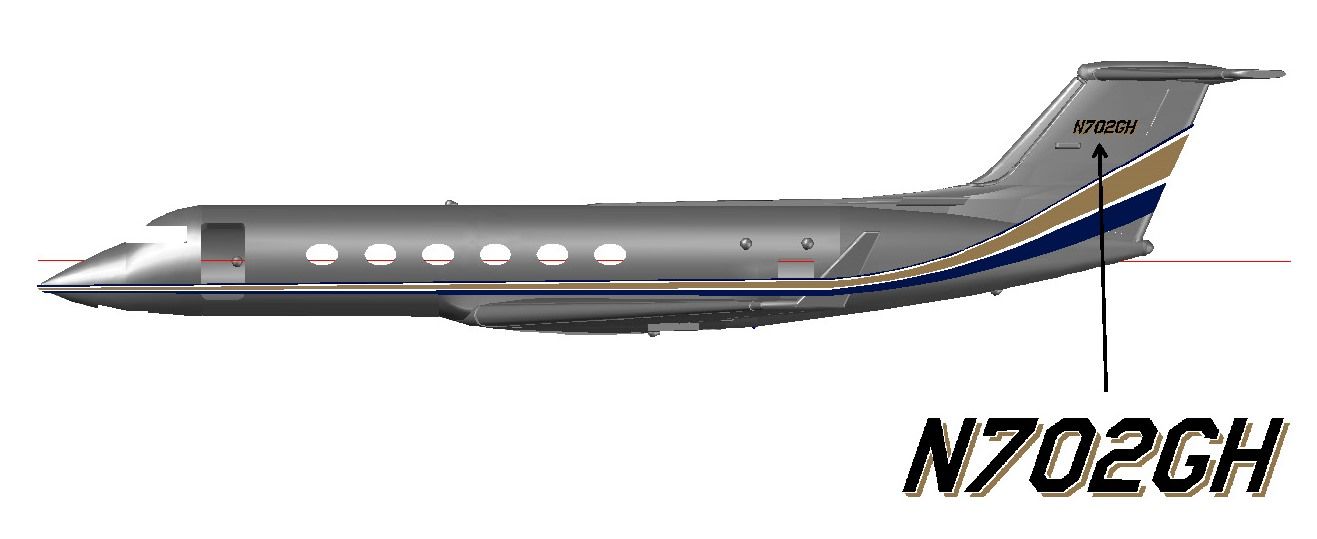
To make the decals, I used this side view of the aircraft.

I did the decals in Paper Space with the model in a view port so I could draw over it easier. I started with the fuselage markings which consist of 5 enclosed polylines, 2 blue, 2 white, and a tan. Note that the markings are above the winglet.  Next I added the letters using Amarillo USAF font that I italicized.  I then traced the letter outlines of the letters and numbers, modifying the 7 and G slightly in the process.  The tracings were then copied twice (down at a 45 degree angle) The outlines were then diced, sliced and rejoined to form the tan shadow, seen below.

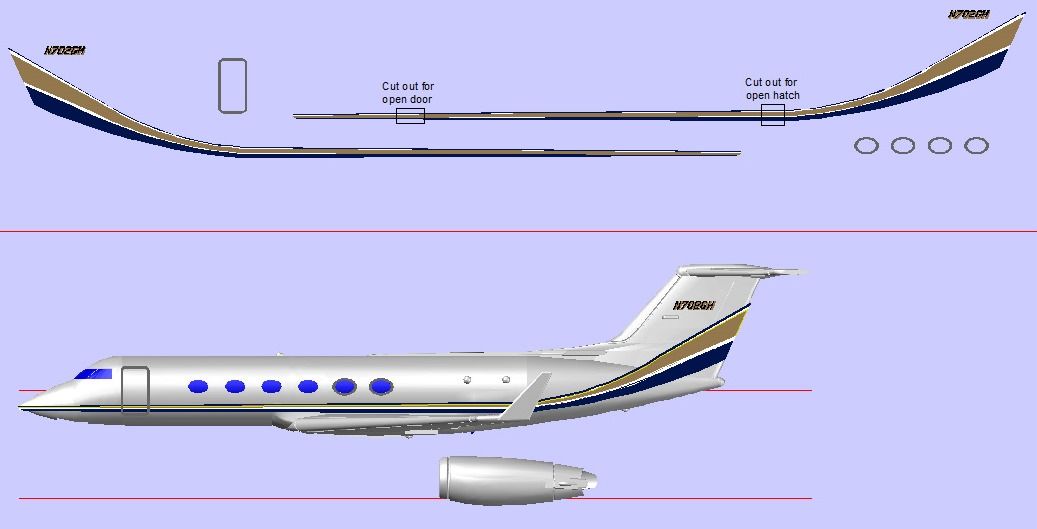
The image below shows the decal sheet in progress.  I have mirrored the port side decals for the starboard side decals and marked where the door openings would be.  I also made the gray outlines for the aft four windows and the door.  Note that I made the background light blue and changed the color of the aircraft to white.  After all, that’s what color it is in real life.  I also trimmed the decal set over the model, so it would look better.  The actual decals are not cut.  Last, I copied the port side engine just below the airframe.

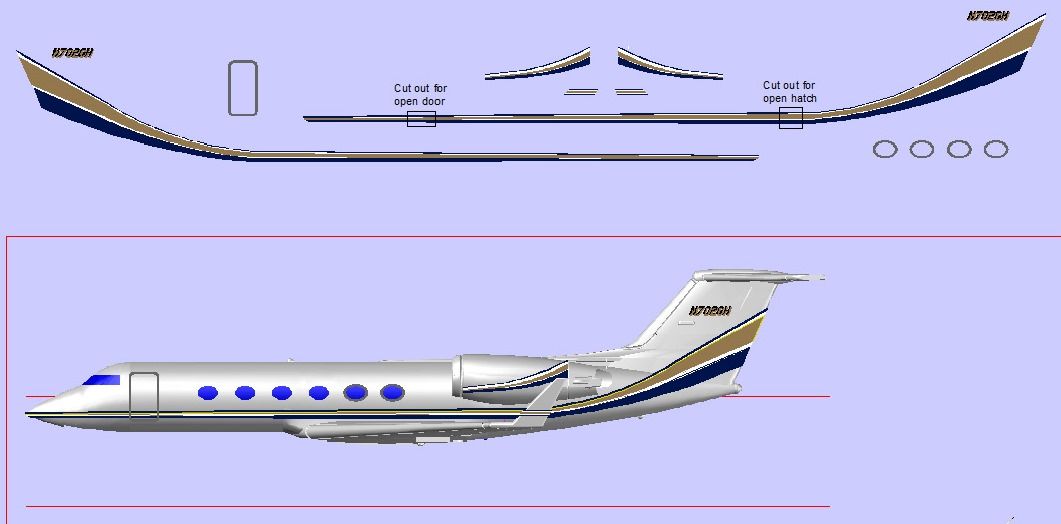
In the image below, I have completed the markings on the engine and winglet, mirrored them and copied them all up to the decal section of the sheet.  Note that I then trimmed the engine decal on the aircraft side view so it wouldn’t cover the winglet.

At this point Ron sent me a picture showing the wing walk outlines, so I added them, as seen below.  I also added what appeared in the picture Ron sent to be Red arrows, which may or may not be correct.


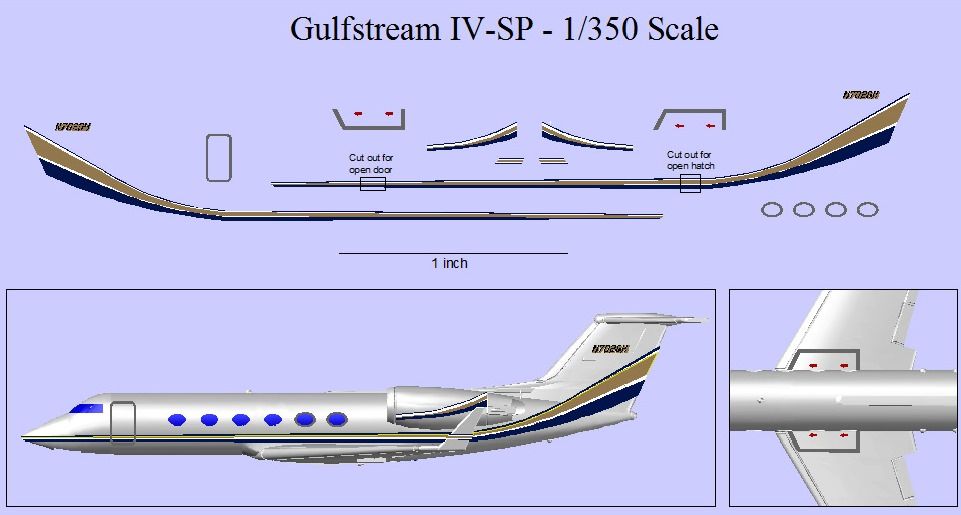
For those who may wish to cut the windows out of thinner plastic than the 3D printer can do, I added templates that may be used for this purpose.  The first draft version of the sheet is shown below.  It was designed to fit on an 11”x17” sheet of paper and needs to be reduced 25% for proper scaling.

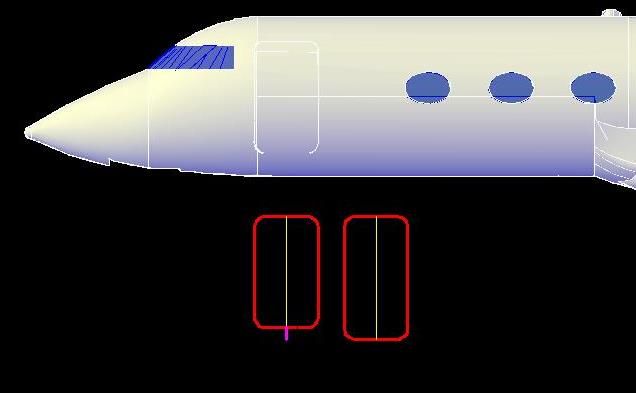
Note that I said first draft.  This is because I know it is going to need modification, because curved lines are longer than straight ones.  Consider the door shown below.  The  outline of the door that I used to cut it out of the fuselage ison the left, and the outline of the gray door decal is on the right.  Note the extra length, 0.02" to be exact.  This is because the decal is on the circular surface of the door.  The length of the decal is the arc length associated with the chord length of the airframe diameter. 


The door was easy to do, the fuselage decals, which are curving on a surface that is curving in two directions, is another matter.  I know that the decals need to be lengthened in both directions, but I have no idea how much. You can break it down into 4 sections, the nose (from the door forward), the body (where the sides are straight), the aft end, and the tail.  The body and tail surfaces are essentially straight so no length adjustment is necessary, but the nose and aft end are a different story.  The increased length on the nose, I think I accounted for by adding some length up front.  It may or not be enough. 

The aft end starting at about the winglets in the side view, is essentially a cone, so it curves on 2 planes.  If the markings were straight, it would be difficult but with them curving too…, Man, I can't figure out how to do it.  I know that it needs to be at least 0.02" longer in the vertical direction, but how much longer in the horizontal direction, I don't know.  And the really hard part is that the stripes don't all need the same amount of stretching.  This is definitely a thought provoker.  Does anybody have any tips on how to approach this issue?  Any and all comments would be appreciated.

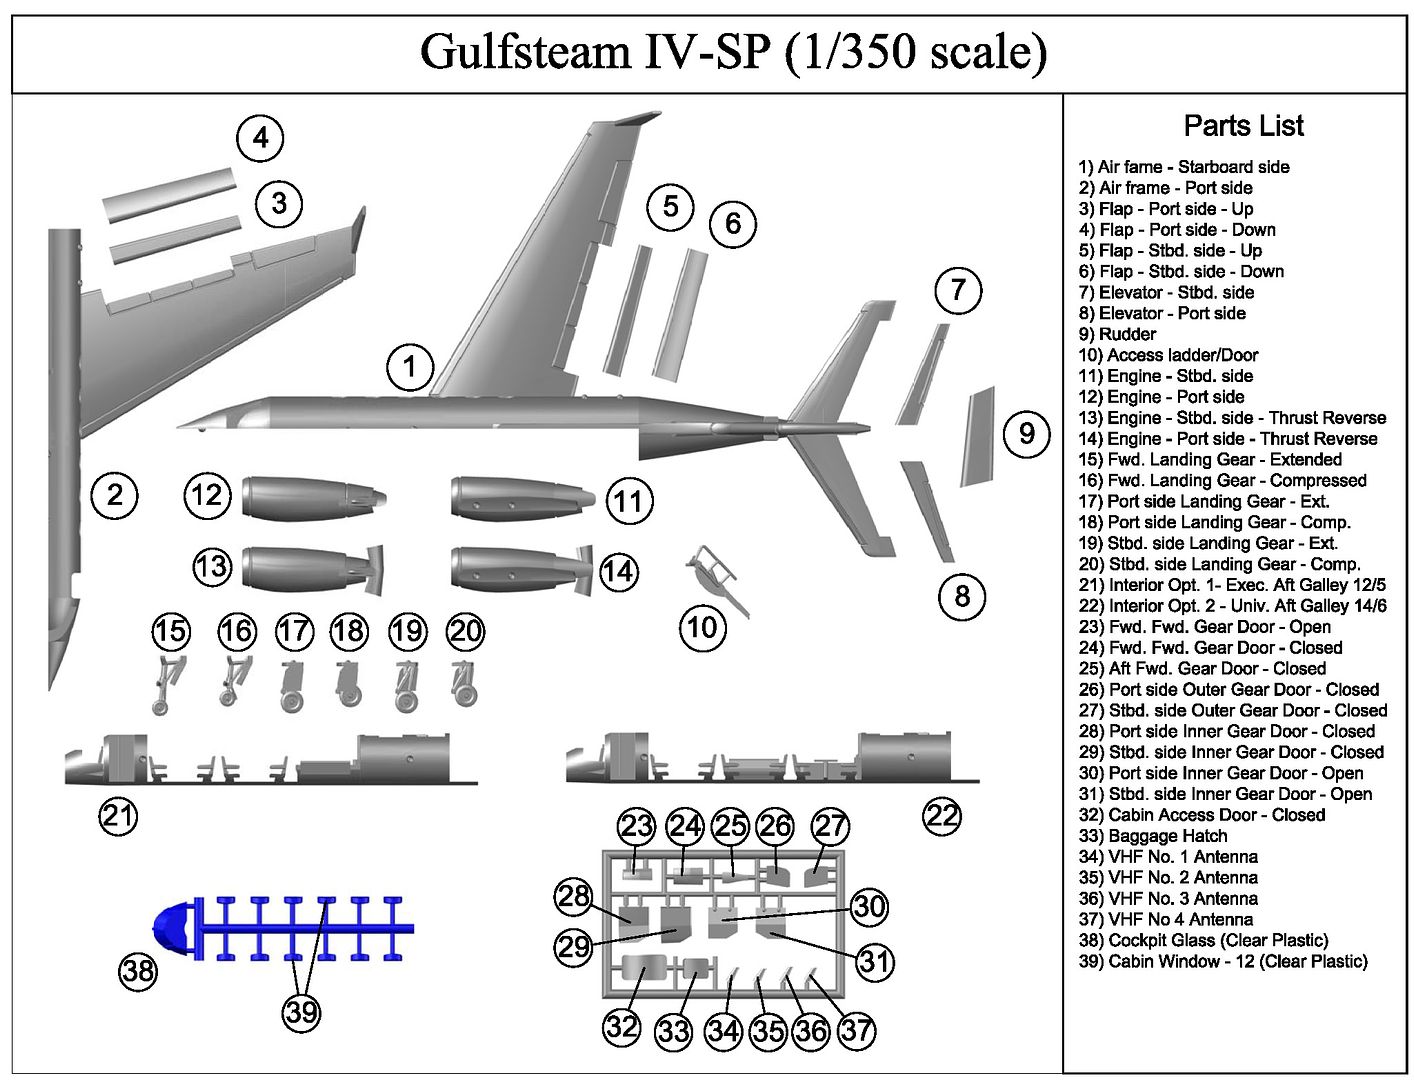
In the meantime, I made some minor modifications to the Parts List and Diagram.  The final version is shown below.

CHEERS!!!

  • Member since
    March 2012
Posted by Rdutnell on Saturday, April 5, 2014 9:09 PM

UPDATE30

Hi Everybody!

Well, the engineer in me took a back seat to a WAG.  I just made the decals slightly longer than they needed to be and split the long ones into two pieces at the location of the hatch (on the port side) as seen below.

The model and decals have been uploaded and are available at C2D.

https://click2detail.com/products/CY/Gulfstream-IV-SP

I’m getting one of them to go in the diorama I am doing with my 1/350 scale planes (and perhaps one or two 1/144 scale suspended in flight).  I have a place for it, as seen below.


I have printed the base, which is different than my initial design…


…And have cut out the grass areas and attached it to my base board.  The 1/144 scale aircraft would be suspended from the overhanging shelf, if I decide to add them.

Ron has also ordered 3 and will no doubt work his magic on them at some point in the future.

CHEERS!!!

  • Member since
    March 2012
Posted by Rdutnell on Sunday, June 29, 2014 7:18 AM

UPDATE 31


Greetings All!

It’s been over 2 months since my last post, but C2D had problems with their printer, and weren’t processing any orders.  They have got it fixed now, and I received the G-IV on Friday.  I’m really happy with the way it turned out.


I also received my two T-38’s…


…And my F-111TACT.  These, like the G-IV, are 1/350 scale models I made to include in my diorama.


The next step is to wash them with isopropyl alcohol. 


Ole!  Ole! Ole! Ole!

  • Member since
    June 2014
Posted by staybolt on Monday, June 30, 2014 3:13 PM

I wondered how long it would take before somebody showed us just what goes into designing and fabricating a kit before we get the joy of assembling it.  This thread should be mandatory reading for everyone on the forum, I know I sure enjoyed it.  Kudos on a job well done!

                                                                                                          Pat.

  • Member since
    March 2012
Posted by Rdutnell on Thursday, July 3, 2014 11:35 AM

UPDATE 32

I’m glad you enjoyed reading this WIP Pat, and I appreciate the response, but if it was mandatory reading, nobody would enjoy it.   Big Smile

I’m not sure that the process I show is anything close to what the big model makers use, although I think that the process would be similar.  Of course this would be just the first step for them, because they would use the 3-D printed parts to make molds, which they would then use to cast the parts in resin.  I know very little about the molding/casting process, but it seems like it would be time consuming and messy. 

The main problem with 3-D printing at the moment, in my opinion, is cost, so if you are going to make and sell a lot of a particular model, it is cheaper to make them in resin.  I don’t know what the magic number is to make it worth the effort, but I think 3-D printing is the only option for limited production. 

The best part of 3-D printing though, is that it allows you to make whatever model you want, so that you aren’t limited to what is on the market, and you get to make 2 models, first the virtual model, then the real McKoy.

I sprayed the large parts of the G-IV with Future, and after they dried, I sprayed a coat of white Rust-Oleum Plastic Primer on them.  I didn’t do a very good job of it, but I still need to sand it, so it should be OK.


I also did the T-38’s at the same time.


CHEERS!!!

  • Member since
    December 2013
Posted by Pelican on Thursday, July 3, 2014 7:52 PM

Hopefully you won't have to do too much sanding and the thicker base coat should mask most of the stepping if there is any.  Your models are fantastic and the ones I purchased are well worth the price I think.

Ron

  • Member since
    January 2014
  • From: Toronto
Posted by Rob S. on Tuesday, July 8, 2014 8:01 PM

Man, they are small...but cool!!

______________________________________________________________________________


On the Bench: Nothing on the go ATM

  • Member since
    March 2012
Posted by Rdutnell on Friday, July 25, 2014 6:31 PM

UPDATE 33

Thanks Ron and Rob, I appreciate the kind comments!

It’s been a while, but I finally found time to play with the Gulfstream model some more.  I just finished painting the interior, and in hindsight, I should have made the kitchenette cabinets and sink part of the fuselage sides.  The way it is makes it really hard to paint.  I didn't even try painting the sink and mirror.  I was lucky to get the brush in there to get any paint on it. 

My colors aren't the best, due to my limited color options.  I used Testor's enamel Light Tan for the carpet, and then attempted to mix it with white for the cabinets and table tops.  It’s not the best, but the real color would be really hard to match.  It seems to have a yellowish tint to it in places, but it isn't a solid color.

I still don't know how and the heck I'm going to do the windows, but I've got some time to think about it.


CHEERS!!!


  • Member since
    March 2012
Posted by Rdutnell on Monday, July 28, 2014 10:47 AM

UPDATE 35

Hi Everybody!

I did a little bit of painting on the G-IV this past weekend, as seen in the pictures below.  The small parts were hand painted using Testors enamel, gloss black for the wheels and gloss white for everything else.  The unpainted parts in the picture are parts I won’t be using.  I might have to get another one to model coming in on final approach, but I’m modeling it on the tarmac.

The airframe was sprayed with Krylon Colormaster gloss white.  I put on a fairly thin coat, and didn’t completely cover a few spots, but I think a little bit of sanding followed by another thin coat, should do the trick.


CHEERS!!!

  • Member since
    January 2010
Posted by CrashTestDummy on Monday, July 28, 2014 12:17 PM

For the passenger compartment windows, that should be easy: get some Testor's Clear Parts Cement and Window Maker, and follow the directions to make windows.  For the cockpit glazing, I'm thinking some thin clear plastic.  Probably some clear plastic from some packaging would work wonders.  

Nice work, so far.  I'd love a larger scale G-II.  I've flown one of those, as well as the turbo prop version, the G-I.  

Gene Beaird,

Pearland, Texas

G. Beaird,

Pearland, Texas

  • Member since
    March 2012
Posted by Rdutnell on Monday, July 28, 2014 12:59 PM

Thanks for the advice Gene!

Actually, when I said that “the unpainted parts in the picture are parts I won’t be using” in my last post, I wasn’t entirely correct.  At the lower left of the first picture, you can see the “clear parts” fret that goes with the kit.  I think I will at least use the canopy part.

As for the side windows, they are pretty dang tiny, so I was originally thinking along the lines you mentioned.  However Ron said that he was going to try to use Quick Water, and I thought it sounded like a good idea, so I think I’m going to try it as well.  The procedure he recommended is as follows:  After painting the exterior and allowing it to set several days, I will apply scotch tape to the exterior, mix the Quick Water and dab it in the window openings from the inside.  After it sets for several days, I will assemble the two halves, with the interior inside of course, then fill and sand the gap.   A light coat of paint to cover the parched areas will follow.

I will keep you posted.

  • Member since
    December 2013
Posted by Pelican on Monday, July 28, 2014 6:23 PM

I tried some larger test windows using this "Quick Water" method and it worked well with the windows being crystal clear and holding their shape so I'm betting it will work nicely on this tiny scale.  The Testor's window maker worked too but remained a little soft.  Using the Quick Water I was able to make the windshields the same way.

Ron

  • Member since
    March 2012
Posted by Rdutnell on Saturday, August 9, 2014 5:12 PM

Hello Everybody!

Well, I thought I was ready to do the windows, so I applied Scotch tape to over the openings.  Looking at it under a magnifying light though, I noticed some holidays in the paint job, so I decided to give it another coat of paint.  It’s a good thing that I did, because when I took the tape off, the paint peeled off in a couple of places on one side.  So I sanded the heck out of the parts and sprayed them for the third time.  The results are very satisfying, although now I’m a little leery of putting Scotch tape on it again.  The other side did fine though, so maybe it just peeled off because the paint job was crappy.


CHEERS!!!

  • Member since
    March 2012
Posted by Rdutnell on Saturday, August 23, 2014 8:13 AM

Good Morning Everybody!

Well guys, I decided not to use the Quickwater.  Not because of the tape issue, but because the packaging says that you have to use it all in one setting, and there is a lot of it.  Since it cost almost $20, I returned it, and opted for the Testor’s Clear Part Cement and Window Maker, using a straight pin to apply it, and I am very pleased with the results.  You can’t even see it unless the light reflects off of it.  If you look closely at the third window on the starboard side part, in the first two pictures below , you can see it slightly, as this window had not dried yet.


After the windows were dry, I put the interior in place, and glued the two sides together.  The pieces fit together well, although I did have to apply pressure when I was gluing it to get the edges together.


Here is a picture of the windows, with the light reflecting off of them.  At this scale, I would say that the window maker is very effective, and like Ron pointed out, the best thing about it is that if I “break” a window, it is easy to replace.


Now I have some seams to fill.  I’m thinking that at this scale superglue might do it.  Any thoughts?

  • Member since
    August 2008
Posted by tankerbuilder on Saturday, August 23, 2014 11:27 AM

Hello There;

    I have a question for you .This is a great plane , But , I am partial to Dassault Aviation's " Falcon 20 and 30 series " aircraft ,used to fly them too .What would the Gulfstream cost ? You can message me offline if you will .This looks fascinating .    Tanker - Builder

  • Member since
    March 2012
Posted by Rdutnell on Saturday, August 23, 2014 6:48 PM

UPDATE 37

Good Evening Guys!

I masked the windows with 3M EdgeLock tape and sprayed the seams, trying to avoid the window areas as much as possible.  Under normal light, with the naked eye it looks great.  Under a bright light, you can barely see the seam.  Under a bright light and with a telephoto lens, the seam is apparent, as you can see in the pictures below.


I think one more light coat will do it, except perhaps the vertical seam at the aft end.  In any case, I’m going to put the engines on before I do any more painting.

  • Member since
    March 2012
Posted by Rdutnell on Saturday, August 23, 2014 9:38 PM

UPDATE 38

Hi Again everybody!

Well, I added the engines and gave it another thin coat.  You can still see the seam at the nose, but I didn’t spray there much so I might give it another shot.  On the other hand, you can’t even see it without strong light and serious magnification, so I might leave well enough alone.  It’s looking pretty good to me.


  • Member since
    March 2012
Posted by Rdutnell on Monday, August 25, 2014 2:59 PM

UPDATE 38

I put the last coat of the base white on the G-IV last night, and under bright light and magnification, the seam is evident, but the very fine lines that appeared when I removed the masking tape were easily sanded away.  I’m not thrilled with it though because I put too much paint on it so that the detailing doesn’t show up very well.  Oh well, hopefully I will get better at it, and it doesn’t look bad.


  • Member since
    March 2012
Posted by Rdutnell on Wednesday, August 27, 2014 4:59 PM

Oops!  I posted to the wrong spot.  Sorry!

 I'll post something later tonight though.


  • Member since
    March 2012
Posted by Rdutnell on Thursday, August 28, 2014 8:21 AM

UPDATE 39

I didn’t get to post it last night, but I painted the silver bits on the G-IV, over the last couple of days.  I didn’t do a great job, but it is what it is.  I also tried the window maker for the windshield, but it didn’t turn out so good.  I’m not sure what I was thinking with that move.  Not a good idea.


  • Member since
    March 2012
Posted by Rdutnell on Saturday, August 30, 2014 10:11 AM

UPDATE 40- 8/30/2014

Good Morning Fellow Modelers!

I still haven’t decided what to do about the paint smudges.  I’m thinking I’ll just chalk it up to experience again and keep going.  I can always come back and redo it at some point in the future.  In any case, I added the gear to the G-IV.  It didn’t go smashingly.  Somehow the one on the right side got askew.  It must have shifted, or gotten bump as it was setting, because it was good at the tack stage.  It’s set good now though and I don’t think I could get it off in one piece.  I’m going to run out of chalk.

Right now, the model doesn’t like to sit flat as there is more weight aft of the center of gravity, so it wants to pop a wheelie.  I’m going to hold off on the main access door/ramp and luggage access door until after I put the decals on.


  • Member since
    March 2012
Posted by Rdutnell on Monday, September 29, 2014 3:41 PM

UPDATE 41

Hi All!

It’s been a busy month, so I haven’t gotten a lot of modeling done, but I did add the decals to the G-IV.  The model still “pops a wheelie” so it supported with a plastic nut for the pictures.  I am mostly happy with it, but looking at the pictures I realized that I still have some small decals to add to the top of the wing, nor have I cut the decal out of the luggage compartment doorway and added the door.  Other issues include a ramp that is too steep, which is probably a result of me not getting the gear completely into the recesses, and the fact that the wing tips are sagging, probably due to the material used in 3-D printing.


For more pictures of the G-IV, in position in the diorama I’m making, go to this link.

http://cs.finescale.com/fsm/modeling_subjects/f/19/t/161594.aspx

  • Member since
    November 2009
Posted by artworks2 on Tuesday, September 30, 2014 4:52 PM

How cool is this?????

  • Member since
    October 2014
Posted by Captain Crunch on Wednesday, October 8, 2014 9:47 AM

Way too cool!  I just bought a kit. Can't wait to get started. I actually fly a G-IV based in Van Nuys and have seen this airplane quite a few times. A couple questions for Rdutnell...

Were the decals provided or did you have to print them yourself?  The website mentions a decal file.

What glue do you recommend for this material?  

I saw the diorama you are working on and it is apparent you have some experience with this scale.  Nice work!

  • Member since
    March 2012
Posted by Rdutnell on Thursday, October 9, 2014 10:12 AM

Hi Everybody!

I haven’t done anything else on the G-IV, so there is nothing to update, but I want to thank artworks2 and Captain Crunch for your comments and answer your questions Captain.  

First, C2D does not provide printed decals, but like you mentioned, a file is available for printing decals to fit the model.  I’m glad you asked this question Captain, because I should have mentioned it.  Although I have printed my own decals for previous models, in this case I did not.  Because I am doing the diorama, I have a lot of decals, and some of them are white.  Since my printer doesn’t print white (few do) and I don’t particularly like the paper decals (especially at this small scale), I was going to have to get some of them printed elsewhere, so I decided to just have them all printed.

Ron told me about Yuuichi Kurakami, so I worked with him via e-mail, and modified my files slightly to be compatible with the Alps printer he uses.  I couldn’t be happier with the results.  The decals printed nicely, and the material he uses is the perfect combination of flexible and stiff.  I was surprised at how easy they were to work with, and how smoothly they went on.   Plus, they were inexpensive and I would definitely recommend them.  Let me know if you want his contact info.

Superglue.  I use mostly liquid form, but in some case uses gel.

Some experience is right Captain, but not much.  I started modeling about 3 years ago.  I have built two and a half ships, two AC-47’s, and the display for my dad, that has 6 more models (including another AC-47), all at 1/350 scale, before starting on the diorama.  It sure is fun!

JOIN OUR COMMUNITY!

Our community is FREE to join. To participate you must either login or register for an account.

SEARCH FORUMS
FREE NEWSLETTER
By signing up you may also receive reader surveys and occasional special offers. We do not sell, rent or trade our email lists. View our Privacy Policy.