SEARCH FINESCALE.COM

Enter keywords or a search phrase below:

1:35 Verlinden Good Morning Vietnam - DONE!!

12781 views
98 replies
1 rating 2 rating 3 rating 4 rating 5 rating
  • Member since
    March 2014
Posted by BarrettDuke on Tuesday, February 6, 2018 9:38 PM

Pawel, If you're going for the level of realism some of these posts suggest, then I recommend that you remove that spoon and replace it with something smaller. The current one would be about the size of a ladle at full scale! Barrett

  • Member since
    October 2004
  • From: Orlando, Florida
Posted by ikar01 on Tuesday, February 6, 2018 11:01 PM

Verlinden had a habit of not knowing what he was doing with dioramas.  H did one of a F-105 in a reventmant that had a number of problems.  There was a recip engine from some aircraft sitting in a back corner and he had the ground crew wearing T-Shirts with their job name on the back like you would see on a carrier.  Both wrong.  Only the aircraft would be in the reventment with some support equipment if they were being used.  If the aircraft was ready to leave teh equipment was rolled out of the way.  A lot of times the mechanics and weapons guys didn't even wear shirts let alone marked like that, because of the heat on the fligh line.

One time he did a resin kit of one of our M-706 armored cars and molded a large tarp over the parapit armor.  I can only guess that he either didn't know what the top of the vehicle looked like inside the armored walls or he just got lazy and figured nobody would know or care.  No 706 would be covered with a tarp because  it covered the gun mounts on all sides.  If it rained the reaction team would just close the blast doors and keep dry.  I know, I used to drive A.F. armored vehicles.


  • Member since
    April 2016
  • From: N. Burbs of ChiKawgo
Posted by GlennH on Wednesday, February 7, 2018 8:09 AM
Nice touch with the crate Pawell. Here's your peaches and pound cake feast. If you were lucky you could cobble one together once a week depending on the luck of the c-rat draw.  Veterans day 2015 by Glenn Hanson, on Flickr

A number Army Viet Nam scans from hundreds yet to be done:

https://www.flickr.com/photos/southwestdreams/albums/72157621855914355

Have had the great fortune to be on every side of the howitzers.

  • Member since
    June 2014
  • From: New Braunfels , Texas
Posted by Tanker - Builder on Wednesday, February 7, 2018 2:07 PM

Pawel :

 Like I have said . You are an awesome modeler , Guy . Very well done ! T.B.

  • Member since
    May 2009
  • From: Poland
Posted by Pawel on Wednesday, February 7, 2018 3:54 PM

Hello everybody!

Thanks a lot for your great comments!

ikar01 - that's a great observation. Too bad I can't yet show that "wetness" in the painting of my dios - I have to work on that skill. And I'll definitely come back to you WHEN I get to building my Cadillac armored car.

As for Verlinden - he was definitely setting his priorities for cool looks, and in the pre-internet days he couldn't conduct his research as easy as we can nowadays. I'll try to research what I can, and I also get a kick out of it!

Capn - thanks a lot! Those photos you posted really help me. That's a great idea with the can. It would be enough to make an opened lid at the bottom to show this can as empty and discarded. The doggy could be sniffing at it! Then there's this grenade to take care of.

I understand you about that LBE. I don't quite know what could be done with it, though.

Midden - I had to check it up, but now I've learned a new word, so the day wasn't wasted! Thanks a lot!

That's very interesting about Steve1989 - I'll take a look.

Barrett - I don't know how much realism I can achieve, but the comments I had so far are themselves worth the research! Thanks for the heads up on the spoon, I'll remove it and probably put it in the Dude's hand, just have to figure out how to make something smaller here.

Glenn - thanks a lot for the photo! Now it's tempting to show the open can to contain apricots. But did you hear about that some units believed having apricots on you or near you brought bad luck to the whole unit or at least to the individual in question?

T.B. - thanks a lot for your kind words, they mean a lot to me!

I have primed the head and the hands of the figure and I'm going to paint the flesh now. I'll show you the pictures when I'm done. Thanks for reading and have a nice day

Paweł

All comments and critique welcomed. Thanks for your honest opinions!

www.vietnam.net.pl

  • Member since
    October 2004
  • From: Orlando, Florida
Posted by ikar01 on Thursday, February 8, 2018 3:29 PM

If you'e interested, I have a book that detyails the 706 that I can send to you.  I had a project on my hands converting the army version to one of the A.F. types I used to drive.  I hear that there is a conversion kit out for that but I cna't find it.

The H.B. kit is an enclusive kit.  It has parts for several versions up to the V-150 type.  I had to completely build the insides and just boxed up most of the original parts.  Even the seats were wrong, and the engine was a waste of plastic.  We used big Chrysler engines that were inside a walled area.  For some reason they provided a chain for the whinch instead of the cable we actually had.

I'd send some shsots of the detail  added to all the hatches, the inside gunport shields that moved at the same time as the outside ones. and so much more, but I still haven't done anything about the photobucket problem.

If you'd like th book, send me your address and I'll get it to you.

  • Member since
    November 2005
  • From: Formerly Bryan, now Arlington, Texas
Posted by CapnMac82 on Friday, February 9, 2018 7:31 PM

Some more pics, then Smile

This is M-67 LBE

This is M-56 gear, which pahased out in late 67/69, bbut parts were used for a long time.

That's a rooled poncho underneath.  Those are the oldest of the M-16 specific mag carriers.

Here are all the mag pouches used in that decade--the two short ones are the ones specific to the 20 round M-16 Magazine (top left to bottom right, chronologically)

"Jungle" boots stirs a pot.  There were 4 or 5 generations of the boots, with either 3 or 4 sole patterns.  "Panama" sole:

"Waffle" tread:

The color of the green nylon is a near match to NATO Meduim Green; the soles and leather looked more NATO Black in real life.  If you hold an unissued pair in your hand, as 18" the drains are a shiny brass; after use this fades to a bronze/brown color--note that the early pattern boots had drains on the outside ; the later generations are on the inside edge of the boots.

  • Member since
    May 2009
  • From: Poland
Posted by Pawel on Saturday, February 10, 2018 2:06 PM

Hello Capn!

Thanks a lot for the reference pictures, they will be an inspiration for me as to the colours I should use, and they also make this thread so much more valuable to the readers!

It's a bit surprising for me to see how the suspender belts cross on the M-67, most of the figs have those H-shaped design of the M-56. It's actually a challenge to get figs that don't wear LBE like redlegs or anybody else doing the REMF stuff.

I've been working to refine some pointsmentioned above. First the Ice cooler - I had to repair the handle, I got mine broken out of the box:

1:35 Verlinden Good Morning Vietnam by Pawel

I have also corrected the spoon issue, mentioned by Barett:

1:35 Verlinden Good Morning Vietnam by Pawel

And here the claymore bag (containing maps or whatever) covers the grenade that shouldn't be there and the oversize M16. The out of reach dose was converted to empty (paper and super glue):

1:35 Verlinden Good Morning Vietnam by Pawel

Please tell me what do you think about it, and I'm working on the face and the hands.

Thanks for reading and have a nice day

Paweł

All comments and critique welcomed. Thanks for your honest opinions!

www.vietnam.net.pl

  • Member since
    March 2014
Posted by BarrettDuke on Saturday, February 10, 2018 6:12 PM

Pawel, These are all great solutions and superbly executed. This is going to be a really fantastic looking piece. Barrett

  • Member since
    November 2005
  • From: Formerly Bryan, now Arlington, Texas
Posted by CapnMac82 on Sunday, February 11, 2018 12:34 AM

That looks outstanding--your skills are really showing.

Thos suspenders above are twisted to show the stuff along the belt.  Flat, they'd look like this:

The hooks near the horizontal bit of the yoke are to attach a field pack (actually the "butt" pack on an adapter, which our man here is not using as he has a pack nearby.  Two hooks to left of above photo go eitehr to bet, or top eyes in a butt pack.  The "y" straps go to either side of the belt's buckle, then to either side (usually just past the ammo pouch).

As to packs, these are actual packs used in RVN:

I think the Verlinden sculpt is meant to be the pack in the front row above, furthest to the right.  This was known as an "ARVN ruck" as the design was taken from a locally produced pack.
Which has a very prominent "X" frame on the back:

Which is supposed to have a prominent cure in it to keep the back out of contact with the wearer's back.  These are the packs that are depicted on the Tamiya M-113 crew figures.

  • Member since
    May 2009
  • From: Poland
Posted by Pawel on Sunday, February 11, 2018 3:18 PM

Hello!

Barrett - thanks a lot for your kind words!

Capn - another very informative post! That's a great cross reference of the packs and looks like a manual for this Plus Model set:

Plus model 191 - Vietnam rucksacks and bags

I took my claymore bag from this set.

But I think the bag on the base isn't the first in the front row, but the second in the front row - the one on the base has three pockets.

I'm not sure if I get it - does the rucksack have it's own straps or does it attach to the LBE?

Do I understand you right - you would most probably lake your rucksack down together with all the web gear, right? Or would it be possible/practical for any situation to take down the rucksack first and then to take off the rest of the gear?

In the meantime I started painting the face. I'm doing the hands at the same time. First I have put on a coat of Humbrol 63 as primer:

1:35 Verlinden Good Morning Vietnam by Pawel

1:35 Verlinden Good Morning Vietnam by Pawel

This has to dry for at least 24 hours. Next thing is to put on a brown wash - in my case Humbrol 113:

1:35 Verlinden Good Morning Vietnam by Pawel

1:35 Verlinden Good Morning Vietnam by Pawel

Then, directly afterwards I dry brush, using a nice, soft brush a coat of Humbrol 61:

1:35 Verlinden Good Morning Vietnam by Pawel

1:35 Verlinden Good Morning Vietnam by Pawel

This is followed by another dry brush with a mixture of Humbrol 61 and white, for lightening:

1:35 Verlinden Good Morning Vietnam by Pawel

1:35 Verlinden Good Morning Vietnam by Pawel

1:35 Verlinden Good Morning Vietnam by Pawel

The hands are actually done at this point, I only painted out the fingernails with the mixture of Humbrol 61 and white. The head still needs eyes. To paint them I used light and dark grey as opposed to white and black to keep the contrast down and help the face look more realistic. I started by painting small horizontal dots of Humbrol 147 with a small brush:

1:35 Verlinden Good Morning Vietnam by Pawel

Then I painted two horizontal lines over and under each eye. This was done using a single hair. Yup, the details here are this small. In the end I used the same hair to paint the eye centers, being careful not to make the Dude cross-eyed. The paint is Humbrol 27:

1:35 Verlinden Good Morning Vietnam by Pawel

The lower lip was also painted with Humbrol 113.

Now it's time to think about painting the hair and the eyebrows.

Thanks for lookin' and have a nice day!

Paweł


All comments and critique welcomed. Thanks for your honest opinions!

www.vietnam.net.pl

  • Member since
    November 2005
  • From: Formerly Bryan, now Arlington, Texas
Posted by CapnMac82 on Sunday, February 11, 2018 5:18 PM

Pawel
But I think the bag on the base isn't the first in the front row, but the second in the front row - the one on the base has three pockets.

Peachy, that' actually a late war (1970 IIRC) limited issue pack. Quickly replaced wit hthe Lightweight Rucksack (top row, third from left in the pack set; the one to its left is a 1975--post war--LC pack and frame).

I'm not sure if I get it - does the rucksack have it's own straps or does it attach to the LBE?


US practice was to "ruck" separately from one's LBE.
However, the original doctrine was to have some stowage (the butt pack) included in one's LBE.  That doctrine was not really followed much in RVN.

So, your LBE would have ammo and water and first aid, possibly a compass.  The pack would carry essentials like food, extra gear, poncho, and the like. 

On a halt, you doff pack first, then LBE.

Most people would put immediate-use food items in the outer pockets, which keeps you from digging in the pack.  That neatly folded poncho (or maybe a poncho liner) might ride just under the pack flap.

VN era poncho:

Note the gloss on this.  Bbrand new, these were almost as dark OD as a helmet (or a military vehicle).

Poncho liner:

It's distinctly semi-gloss IRL.

Mind, Adrian Cronauer was only in-country 65-66, and we have a mix of 69-70 things going on here, but it's do the best with what's there.

Since you are so excellently on the way with face and hands, our guy would probably be dressed like this:

There is a reasonable change our man might have had ERDL camo by 69-70

Which was often mix-n-match.  They'd get beat up in the field, then go to a field laundry and maybe you'd get your stuff back, maybe not. 
The OG-107 would fade unpredictibly, somethimes getting quite pale.  But the cotton ripstop was replaced pretty often, too.

Your choice.

  • Member since
    May 2009
  • From: Poland
Posted by Pawel on Wednesday, February 14, 2018 2:26 PM

Hello Capn!

Those fotos sure will come handy! If it's a late war pack, then it's tempting to do a late war jacket and paint it in the ERDL pattern. That could give a very nice colour variation if - I can pull it off.

And in the meantime I have finished the head - I painted the hair. Used mix of Humbrol 63 and 27 for the shadows, andstraight Humbrol 63 for the highlights. The result looks like this:

1:35 Verlinden Good Morning Vietnam by Pawel

And I'm starting to paint the base. Thanks for lookin' and have a nice day

Paweł

All comments and critique welcomed. Thanks for your honest opinions!

www.vietnam.net.pl

  • Member since
    April 2016
  • From: N. Burbs of ChiKawgo
Posted by GlennH on Thursday, February 15, 2018 11:20 AM
Looking great. I'm pretty certain I had that second pack from the left in 70. I don't recall the frame just know it had a prc25 on top. lol Don't go too much by issue dates. RVN after your first issue of clothes was more like a goodwill shop. My RTO ruck was handed to me by the guy I was replacing and for all I know he got it the same way.

A number Army Viet Nam scans from hundreds yet to be done:

https://www.flickr.com/photos/southwestdreams/albums/72157621855914355

Have had the great fortune to be on every side of the howitzers.

  • Member since
    November 2009
  • From: SW Virginia
Posted by Gamera on Thursday, February 15, 2018 11:33 AM

Really nice work there on the face and skin tones Pawel. 


And thanks guys, I'm getting a whole new education reading though all these posts. 

"I dream in fire but work in clay." -Arthur Machen


  • Member since
    May 2009
  • From: Poland
Posted by Pawel on Friday, February 16, 2018 2:55 PM

Hello everybody!

Glenn - thanks a lot! Ain't that curious - such a giant organization as US Army and in war it's almost everyone for himself!

Gamera - thank you very much! Thanks to the great comments I'm getting here this turned out to be much more informative that I could ever dream of!

And I started putting colour on the base. But first I have put on a layer of Tamiya spray primer. Then I went on with the ice cooler - I was trying to show that galvanized look by putting on various silver paints with a sponge. Then I put a thin grey wash on top of that.

I have taped the base to a small cardboard box to be able to handle it without actually touching.

The ground was done in two layers - first was black, and the second a colour called "Doombull brown" (ah those Citadel names!).

I'm also trying to get some variation in the wood colour by putting on different shades of yellow-brown. I think I have to add a few layers yet.

What I have so far looks like that:

1:35 Verlinden Good Morning Vietnam by Pawel

1:35 Verlinden Good Morning Vietnam by Pawel

1:35 Verlinden Good Morning Vietnam by Pawel

Thanks for looking and have a nice day

Paweł

All comments and critique welcomed. Thanks for your honest opinions!

www.vietnam.net.pl

  • Member since
    November 2005
  • From: Formerly Bryan, now Arlington, Texas
Posted by CapnMac82 on Friday, February 16, 2018 9:30 PM

Looks good.

Colors are deceptive online, particularly uploaded photos.

But, you may need a red wash for the dirt.

Vietname is famous for its red dirt.

Which has a number of hues, wet to dry.

Ignore this, if the ground work really is reddish already.
The reds and greens can get christmas-kitsche-y quickly, so a deft hand is needed, which cameras and uploading can disguise all too easily.

  • Member since
    May 2009
  • From: Poland
Posted by Pawel on Sunday, February 18, 2018 2:45 PM

Hello!

Capn - thanks a lot for the pics - they are great, as usual. I'd say the colour I see with my eyes is a pretty good match for your photo no.3, but the photos I shoot don't convey this very well. But your post has prompted me to add a bit of an orange (tiny little bit) to the ground.

I have a question: I'll try to paint ERDL pattern on the jacket laying on the ground under the rifle. Would that mean the Dude would also have to have ERDL trousers, or could he have OG trousers and ERDL jacket?

In the meantime I have taken my first shot at shading with acrylics and I have done the pack:

1:35 Verlinden Good Morning Vietnam by Pawel

1:35 Verlinden Good Morning Vietnam by Pawel

And the opened can of apricots, inspired by the photo of Glenn (thanks again, Glenn!):

1:35 Verlinden Good Morning Vietnam by Pawel

1:35 Verlinden Good Morning Vietnam by Pawel

I hope you like it - thanks for looking and have a nice day!

Paweł

All comments and critique welcomed. Thanks for your honest opinions!

www.vietnam.net.pl

  • Member since
    November 2005
  • From: Formerly Bryan, now Arlington, Texas
Posted by CapnMac82 on Sunday, February 18, 2018 5:09 PM

Ok, try this again.

ERDL was often mix-n-match.  Sometimes things fel apart (or just nebvver came back) from the field laundry.  You'd draw a new item to replace the missing item.  Or, maybe, you'd get a local tailor to make you something from a Mitchel-pattern selter half:

Later on, there were two schemes of ERDL; the "green dominant" (called "lime" by collectors) and "brown dominant."  The latter only really appears in 1972, though.


Arrrgggh, that pack.  The Verlinden-itis hurts my eyes.
I have one of those--had another, a "bring back" given to me at age 13 in 1973 for Scout camping--those pockets are awful.  They woul look like that if stuffed with a cardboard or metal box--which was not done in the field.  They should be rounded.

Verlinden has stuck a thing which looks suspiciously like a Wehrmacht dagger on the pack, at a location where there is no attachment point.  (US troops had a number of US commercial knives with them, but they were kept on the person, not fastened to the pack.)  It could be painted green and black to make it hide a bit, be indistinguishable.  Surgery would be inapt, as, at that point, the whol pack ought be excised and one from an aftermarket set substituted.

The shading on the pack is quite good, though, ditching all that work would be a waste.  So, it probably wants being toned down.  In a perfect world, there would be an aftermarket set of LBE that could be tossed over.  Sigh.

The poncho needs to be a bit shinier on its oustide.  The coating had a sheen wet or dry.

Still looks exceptional though.

  • Member since
    May 2009
  • From: Poland
Posted by Pawel on Tuesday, February 20, 2018 4:55 PM

Hello Capn!

Thanks a lot for your comment! Those local tailors in Vietnam must have ben able people! Mitchell pattern - I'm just painting it on the helmet liner. So after having read what you wrote I'm going on with my original plan - ERDL jacket and OG trousers.

Too bad about that pack. I'd even have one to replace it with, from that plus model set - but If I was to correct all the faults of the Verlinden vignette - like cutting the Dude out, cutting the pack out, removing the ice cooler, removing the oversize M16, the M1911 colt - then I'd actually be better off starting from scratch, wouldn't I? Like you wrote, sigh!

I'll make the poncho shinier with a little future.

Thanks again for your comment and have a nice day!

Paweł

All comments and critique welcomed. Thanks for your honest opinions!

www.vietnam.net.pl

  • Member since
    November 2005
  • From: Formerly Bryan, now Arlington, Texas
Posted by CapnMac82 on Wednesday, February 21, 2018 9:15 PM

LoL.  Modeling, like life is a compromise between what is wanted and what is to hand.

Was just thinking about this.  I have all the items to replicate this but for c-rations, the metal cooler, and th transistor radio.

And, a legit '67-69 radio would be probably hardest to get.

So, now I'm sore tempted to gather up my stuff and see how complicated it would be to recreate this, just in real life Smile  Would probably have to drive up to Wichita Falls as there is red dirt galore there.  Mind, I'd have to decide on Marine (easy) or Army (more complicated).  Would be tempting to do a "late" edition more like the figure, too.

  • Member since
    April 2016
  • From: N. Burbs of ChiKawgo
Posted by GlennH on Thursday, February 22, 2018 8:36 AM

And the opened can of apricots, inspired by the photo of Glenn (thanks again, Glenn!):

Peaches Pawel! Peaches and poundcake. I've forgotten more than I remember but I only recall peaches and that fruit mix as far as fruits in C's. Details are looking great in your build.

A number Army Viet Nam scans from hundreds yet to be done:

https://www.flickr.com/photos/southwestdreams/albums/72157621855914355

Have had the great fortune to be on every side of the howitzers.

  • Member since
    May 2009
  • From: Poland
Posted by Pawel on Thursday, February 22, 2018 3:58 PM

Hello Gennulmen!

Capn - thanks a lot for your kind words! That sure would be a sight to see if you did this thing in 1:1. I'd be glad to post a picture like that here in this thread and on my web page, too!

Glenn - thanks again for the inspiration and for your kind words, that means a lot to me!

And I have painted the jacket and rifle group. Like Capn already mentioned that Colt M1911A1 isn't really at home here, and it's in a funny shoulder holster - It's called M3 if I'm right by my google search. The jacket is ERDL pattern, and the helmet is Mitchell pattern. I haven't decided yet what brand of cigarettes it's going to be. I also have a dose on the other side of the vignette - I'd like it to be some kind of beer, haven't decicided on that neither. Anyhow what I have recently painted looks like that:

1:35 Verlinden Good Morning Vietnam by Pawel

1:35 Verlinden Good Morning Vietnam by Pawel

Now I have only the radio left to be painted yet, then I'm movin' on to the olive greens. Thanks for looking and have a nice day

Paweł

All comments and critique welcomed. Thanks for your honest opinions!

www.vietnam.net.pl

  • Member since
    May 2015
Posted by Griffin25 on Thursday, February 22, 2018 4:27 PM

Nice work. The detail is great for such small items. You should zoom the picture out a little. Just a little. It is unnatural to view this sooo close up, IMO. Like looking through a microscope. I love the rifle. Really well done.


Griffin

  • Member since
    April 2016
  • From: N. Burbs of ChiKawgo
Posted by GlennH on Thursday, February 22, 2018 10:57 PM

Kool cigs and Schlitz beer Pawel if you are going Army Issue. No clue why they picked that aside from the cans made good for feeding door 60's

 Schlitz beer at 2000 feet by Glenn Hanson, on Flickr

A number Army Viet Nam scans from hundreds yet to be done:

https://www.flickr.com/photos/southwestdreams/albums/72157621855914355

Have had the great fortune to be on every side of the howitzers.

  • Member since
    November 2005
  • From: Formerly Bryan, now Arlington, Texas
Posted by CapnMac82 on Saturday, February 24, 2018 1:39 AM

GlennH
Schlitz beer Pawel if you are going Army Issue. No clue why they picked that

Schlitz was low bidder for the contract.

In the 80s, Pearl Brewing of San Antonio, Texas won the genereic "Beer" AAFES contract (plain white cans "BEER" Smile ). 

Contract was valuable enough that Rolling Rock bought Pearl in 1988 or so, just to get the AAFES contract.  AAFES also contracted for "name brand' beer for PX/BX sale, too.

  • Member since
    December 2017
Posted by Returner43 on Saturday, February 24, 2018 7:15 AM

Wow Pawel, I have to congratulatute you on your dedication to this project as well as all the people who supported you in making this a more accurate and believable setting.

You mentioned that you used a jigsaw to cut out the figure, are you talking about a motorized hobby jigsaw like a Proxxon or something else? Also what did you use to make the initial hole in order to start cutting and then how did you cut the excess material from the bottom of the figures legs?

Sorry for all the questions, I am probably at least a couple of years away at my current skills before attempting anything like that. If the day comes I just want to do it right.


Can't wait to see the fully finished kit! I've always liked how in this forum members will simply point out obvious kit errors and give suggestions or simple facts about why it is wrong and, like in this case, how to correct it. Like one member pointed out they even mentioned how some corrections may not even be worth it.


  • Member since
    November 2009
  • From: SW Virginia
Posted by Gamera on Saturday, February 24, 2018 8:08 AM

Looks cool Pawel!

And Capn Mac & Glenn, thanks from me as well about pointing out all this stuff. I'm trying to remember as much as possible for when I get around to my Vietnam M48.

"I dream in fire but work in clay." -Arthur Machen


  • Member since
    May 2009
  • From: Poland
Posted by Pawel on Saturday, February 24, 2018 10:38 AM

Hello everybody!

Griffin - Thanks a lot! You're right, if you zoom it up this much, every little imperfection comes out right at you... When I look at the vignette with my own eyes it looks much better. I try to use it to my advantage and spot imperfections this way, but sometimes it's no use to repair something that only shows on the photo.

Glenn - thanks a lot for the tip, I already painted the one pack to show Kools, the other pack (on the crate) was already done to look something like Winstons. I'm sure they didn't choose that beer because of the can suitability for feeding ammo!

Capn - interesting info! I have to tell you I don't really understand how they supplied beer to the troops - I mean in my country they treat beer as alcoholic beverage and so they always wanted (in vain!) the soldiers to stay away from it, to keep sober. Maybe it also has something to do with alcohol levels in beer. I don't know how much alcohol this GI issue beer had, the beer we have here is just under 10% of alcohol. Beer with less than 4% of alcohol is considered alcohol-free here in Europe!

Returner - thanks a lot for your kind words, and I think you're right - I'm lucky to have very good people with me on this thread, with very valuable comments, that other modellers also can benefit from.

As for the cutting, I have used a jewellers jigsaw like this one:

Jeweller's jigsaw

The blade for it that I used was only 1mm wide, with about 40 TPI (teeth per inch). So to start cutting I only had to drill a small hole, a little more than 1mm in diameter (let's say 1/16''). Then I just used lots of care and running water to keep the dust down. After I had the legs separated from the base I have cut the base chunk off the legs with one horizontal cut, parallel to the base of the vignette, leaving some excess resin on the legs. Then I just carved some material away to reconstruct the portions of the legs that just wasn't there. This was done using a scalpel. After I glued the base chunk back on the base there was a recessed spot there that I filled with black Milliput. Re-creating the "dirt" texture was easy, done by stippling with a water-moistened brush. So I hope it helps you and I'd be glad to answer other questions in this thread as well.

Gamera - Thanks a lot for your comment, and like I wrote, this thread turned out to be something very good!

Following the advice of Griffin and to sum up my progress I have done this photo:

1:35 Verlinden Good Morning Vietnam by Pawel

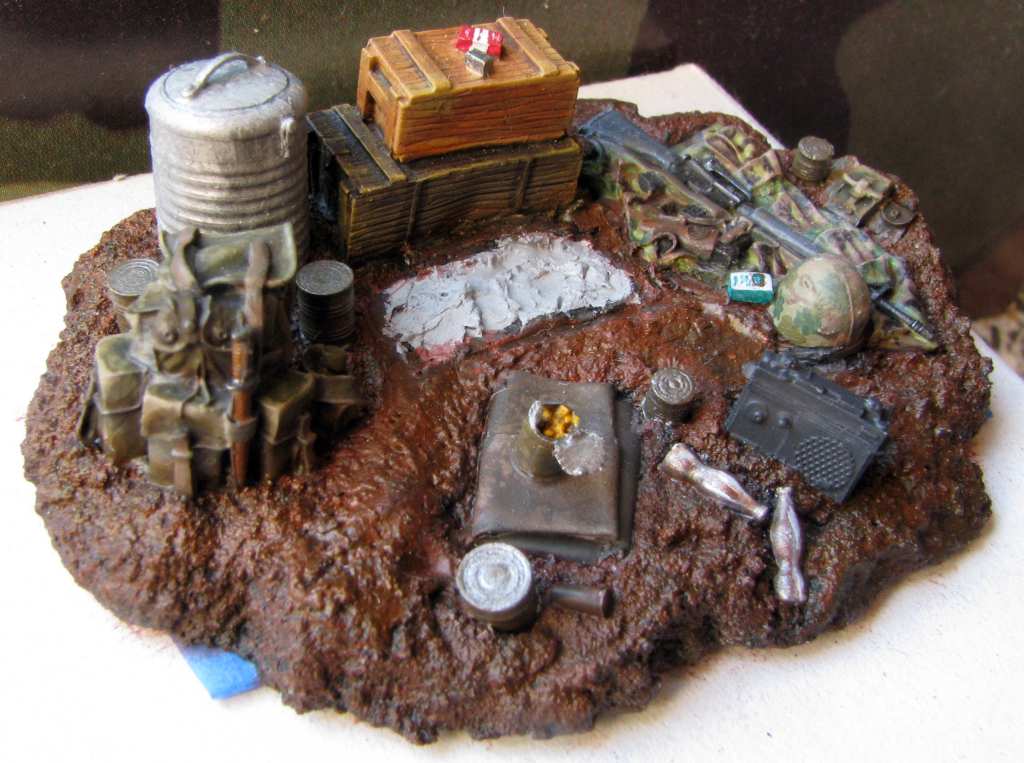
As you can see it's almost done, just the radio left to be finished, together by the beverage can lying in the dirt. I assume those are empty - who in his right mind, having an ice cooler would lay out the drinks on the ground to warm up? As you may notice the cigarettes are supposed to represent Winstons (on the crate) and Kools (on the jacket).

I also started to paint the legs. I wanted the trousers to be considerably faded and here's how my shading turned out:

1:35 Verlinden Good Morning Vietnam by Pawel

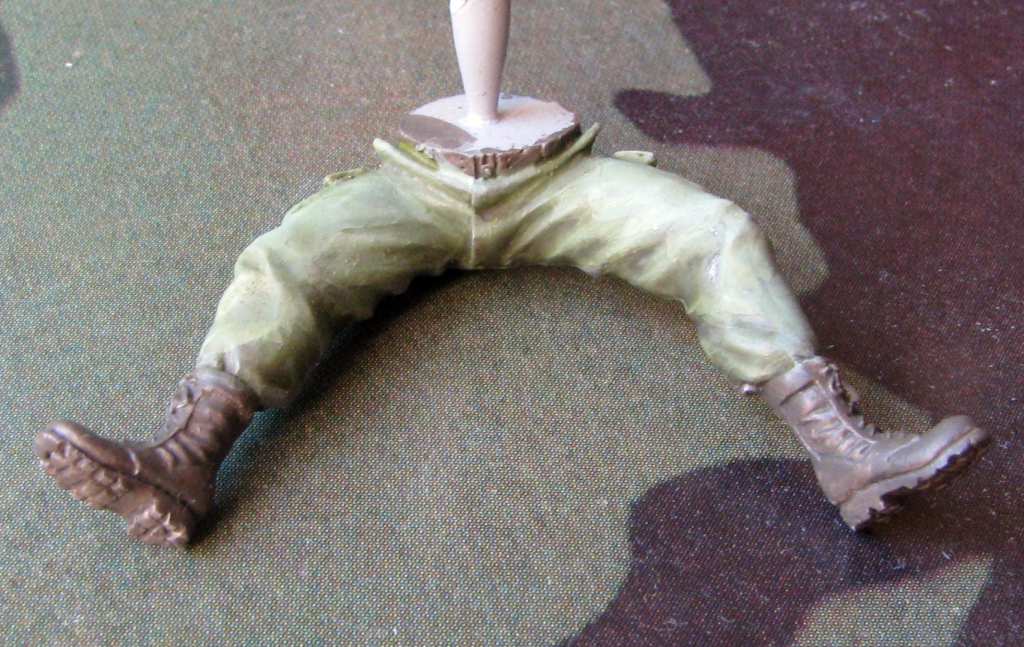
By the way - another picky question that I have come up with is this: The Dude is wearing a belt. This belt would normally be part of the web gear, and not serve to hold up the trousers, right? So when you removed the web gear, you also took of the belt. Did you need something, or was there something to keep the trousers from going down?

Thanks for looking and have a nice day

Paweł

All comments and critique welcomed. Thanks for your honest opinions!

www.vietnam.net.pl

  • Member since
    December 2017
Posted by Returner43 on Saturday, February 24, 2018 1:37 PM

Wow. That is super impressive. Thanks for the info on the jewler's jigsaw. Didn't expect you to go into that level of detail with the explanation. I know I have one somewhere, I just never got a chance to use it. 

This kind of work is the stuff that I really hope to acheive someday. Instead of just buying a kit that already has mostly everything, just take an existing kit and see how you can modify or improve it to your own taste. 

JOIN OUR COMMUNITY!

Our community is FREE to join. To participate you must either login or register for an account.

SEARCH FORUMS
FREE NEWSLETTER
By signing up you may also receive reader surveys and occasional special offers. We do not sell, rent or trade our email lists. View our Privacy Policy.