SEARCH FINESCALE.COM

Enter keywords or a search phrase below:

Romulan Bird of Prey WIP (old AMT kit) Complete

7816 views
38 replies
1 rating 2 rating 3 rating 4 rating 5 rating
  • Member since
    July 2014
Romulan Bird of Prey WIP (old AMT kit) Complete
Posted by modelcrazy on Thursday, June 25, 2015 9:07 AM

I've started an old (a Round 2 release from a few years back) AMT Bird of Prey, which I will be posting in the Star Trek GB. I wanted to post a WIP thread for those who may be interested, but not following the Star Trek GB. My plan is to install lighting in this puppy. I will be using a lighting circuit of my own design. This is the first kit I have attempted to light, so we'll see how this goes. There is a TON of other stuff I could do to get this thing more accurate like slant the side of the hull, install a step on the upper hull where it connects to the sides, extend the tail bla, bla, bla. Needless to say, I'm not going to go that far. It will be a pretty much OTB build. And after the Indianapolis and Musashi, I'm looking forward to something simple.
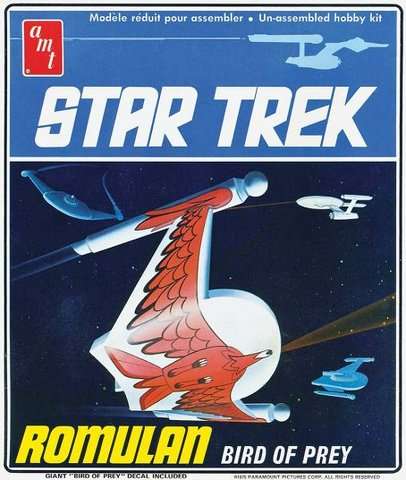
So here is the kit.

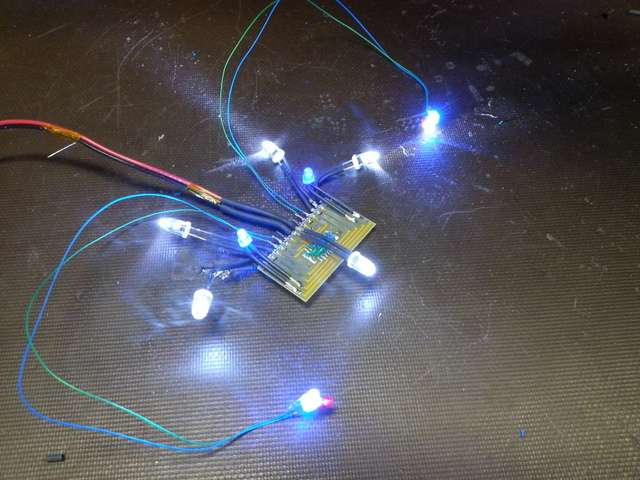
And the lighting circuit. The long multi colored wires and LED's will route to the engine nacelles. The LED's are Red, Blue and Yellow. The wires have since been lengthened to ensure they will reach the engine caps. I also have two blue LED's in the hull. I doubt this will add any effect, but I had some laying around, so what the heck. The red/black power wires will route down to the base.

I drilled holes for view ports and sensors, following some interesting drawing from the internet.

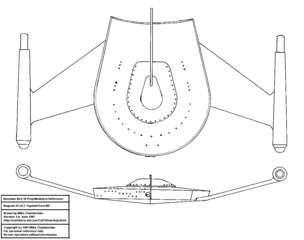
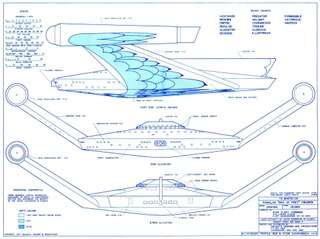
The first drawing appears to be a guide for the kit. The second drawing looks like something from a blueprint book. The engines on these drawings show to be warp engines (with impulse engines in the stern), but in the original show, the ship only had sub-light abilities.

I know I'm geeking out right now  

Sooo, then I painted the inside black. I will paint a coat of chrome on the black, hopefully this will stop any light from shining through, if not, I'll line some aluminum foil on the inside. The view ports will then be lined with wax paper for light diffusion and the sensor ports will be backed with sheet styrene to prevent light from shinning through. I also coated the engine nacelles with black and they will follow the same process.

More to follow.

Steve

Steve

Building a kit from your stash is like cutting a head off a Hydra, two more take it's place.


http://www.spamodeler.com/forum/

  • Member since
    February 2015
Posted by RRA2 on Thursday, June 25, 2015 1:13 PM

Nice, I built this as well, lit the inside and the engines.  I have some words of caution. Make sure you at least copy (exact size) the decal sheet.  The body of the bird is very fragile and very difficult to manipulate. After I ruined mine, I had to get some thin inkjet adhesive vinyl and use that in place of the decals.  Works OK unless you have some extreme bends. I did with the wing tips on the nacelles. I ended up CA gluing them down.  I tried Testor's Decal Sheets and they didn't work either.  Good luck!!!  Please post the final.

RA in AZ

  • Member since
    December 2002
  • From: Bury St Edmunds, Suffolk, England
Posted by Bish on Thursday, June 25, 2015 1:51 PM

Glad to see your doing a WiP on this, look forward to seeing this coming on.

I am a Norfolk man and i glory in being so


On the bench: Airfix 1/72nd Harrier GR.3/Fujimi 1/72nd Ju 87D-3

  • Member since
    July 2014
Posted by modelcrazy on Thursday, June 25, 2015 2:36 PM

Thanks RA and Bish.

RA,

I was watching some you tube vids on this kit, and they cautioned the same thing. The new kit does have newly designed decals, but they still looks touchy

Bish,

I'm trying to get into the habit of posting a WIP when I work on a build for a GB. There are just so many members, including me, who don't look into a GB but may follow a WIP

Steve

Steve

Building a kit from your stash is like cutting a head off a Hydra, two more take it's place.


http://www.spamodeler.com/forum/

  • Member since
    December 2002
  • From: Bury St Edmunds, Suffolk, England
Posted by Bish on Thursday, June 25, 2015 2:37 PM

I have noticed that Steve and well done. I try and do the same and I know a couple of others do as well.

I am a Norfolk man and i glory in being so


On the bench: Airfix 1/72nd Harrier GR.3/Fujimi 1/72nd Ju 87D-3

  • Member since
    March 2010
  • From: Boston
Posted by mach71 on Thursday, June 25, 2015 3:40 PM

Steve,

The new decals are not much better than the old ones. Mine shattered in a few places.

Looking good so far!

  • Member since
    July 2014
Posted by modelcrazy on Thursday, June 25, 2015 4:27 PM

That's encouraging.

Steve

Building a kit from your stash is like cutting a head off a Hydra, two more take it's place.


http://www.spamodeler.com/forum/

  • Member since
    July 2014
Posted by modelcrazy on Thursday, June 25, 2015 11:23 PM

I finished painting the interior and ran the wires in to the wings and nacelles. I also epoxied the light board onto the bottom hull, I laid the top hull down to show what the lights will look like. I must say, this is turning out better than I thought.

Steve

Steve

Building a kit from your stash is like cutting a head off a Hydra, two more take it's place.


http://www.spamodeler.com/forum/

  • Member since
    March 2010
  • From: Boston
Posted by mach71 on Friday, June 26, 2015 7:58 AM

looks Great all lit up!

Nice job on the light blocking.

  • Member since
    July 2014
Posted by modelcrazy on Friday, June 26, 2015 9:58 AM

I forgot to mention that I still need to block off the sensor holes, so not all of the holes will be lit.

Steve

Steve

Building a kit from your stash is like cutting a head off a Hydra, two more take it's place.


http://www.spamodeler.com/forum/

  • Member since
    February 2015
Posted by RRA2 on Friday, June 26, 2015 11:57 AM

What are you using for light block?

RA in AZ

  • Member since
    July 2014
Posted by modelcrazy on Friday, June 26, 2015 12:26 PM

I'm just using a board I build up myself.

Steve

Building a kit from your stash is like cutting a head off a Hydra, two more take it's place.


http://www.spamodeler.com/forum/

  • Member since
    April 2013
Posted by KnightTemplar5150 on Friday, June 26, 2015 2:48 PM
I'm quickly becoming a fan of your versatility, Steve! Looks like another great WIP that I'm going to have to follow!
  • Member since
    July 2014
Posted by modelcrazy on Friday, June 26, 2015 2:56 PM

LOL, thank you KT.

I'm am surprising myself as well. I have always been a little apprehensive about stretching outside my envelope.

Steve

Building a kit from your stash is like cutting a head off a Hydra, two more take it's place.


http://www.spamodeler.com/forum/

  • Member since
    July 2014
Posted by modelcrazy on Friday, June 26, 2015 11:58 PM

Before I close it up for good I wanted to show the wax paper and how it is defusing the light.

I guess the blue LED's in the hull do make an interesting hue. I didn't think they would make a difference.
Now to button it up and do some filling.

Steve 

Steve

Building a kit from your stash is like cutting a head off a Hydra, two more take it's place.


http://www.spamodeler.com/forum/

  • Member since
    July 2014
Posted by modelcrazy on Sunday, June 28, 2015 11:28 PM

I put everything together this weekend, filled and painted. It looks like I have some more filling to do. Now I'm assuming the BOP is an atmospheric craft, so I am going to weather it accordingly.

Steve

Building a kit from your stash is like cutting a head off a Hydra, two more take it's place.


http://www.spamodeler.com/forum/

  • Member since
    September 2006
  • From: Ridott, Illinois
Posted by Banshee1000 on Monday, June 29, 2015 12:19 PM

That looks great!  What color did you use for the exterior!

  • Member since
    July 2014
Posted by modelcrazy on Monday, June 29, 2015 12:32 PM

I used MM Gloss Ghost Grey enamel, but was very disappointed in the coverage. I will probably just spray it with some Krylon after I get the seams where I want them. Much less expensive than going through another bottle of MM.

Steve

Building a kit from your stash is like cutting a head off a Hydra, two more take it's place.


http://www.spamodeler.com/forum/

  • Member since
    July 2014
Posted by modelcrazy on Friday, July 3, 2015 12:06 AM

well this is about as far as I'm going to get before my vacation. I will be back on the 11th. All that's left is to put on the decals and do some weathering.

Steve

Building a kit from your stash is like cutting a head off a Hydra, two more take it's place.


http://www.spamodeler.com/forum/

  • Member since
    March 2010
  • From: Boston
Posted by mach71 on Friday, July 3, 2015 3:15 PM

Looks nice!

Enjoy your vacation

  • Member since
    April 2010
  • From: San Diego, CA, USA
Posted by Gerry on Sunday, July 5, 2015 1:26 AM

Pretty!

Gerry ...Young at Heart - Other parts slightly older.

  • Member since
    January 2011
  • From: Springfield, MA
Posted by TigerEP1 on Friday, July 10, 2015 2:01 AM

Awesome, totally looking forward to more on this :)

On the bench:

1/35th Tamiya Willi's MB


  • Member since
    July 2014
Posted by modelcrazy on Sunday, July 12, 2015 11:04 PM

OK guys, I'm back home from vacation and back on the forum as usual. My wife and I are moving at the end of July, so I have packed up all the stash (thank goodness it still relatively small) and builds until the first part of Aug.

Nice thing is, I'll actually have my workbench back. I have been working on a TV tray for 3 years. At least I've learned space management, but that's not going to matter. once I start spreading out it will be a mess again.

I will continue the BoP in Aug.

Steve

Building a kit from your stash is like cutting a head off a Hydra, two more take it's place.


http://www.spamodeler.com/forum/

  • Member since
    July 2014
Posted by modelcrazy on Thursday, August 20, 2015 10:30 AM
OK, it’s still August, and as promised, I’m getting back to the BoP. It took me a little while to get my bench put together, and things like paint still needs to find a better home. I took a good look at the BoP last night and saw that I still needed some paint on the bottom, so I got to it. It looks like all that’s needed to finish is the decals and weathering. I also need to work on a better solution to hide the battery pack and the rod to hide the wires, maybe convert to AAA’s instead of AA’s, although I don’t know if AAA’s can handle the current.
Once I complete the paint and get the decals on, I’ll get some pics up.
Thanks for following.

Steve

Steve

Building a kit from your stash is like cutting a head off a Hydra, two more take it's place.


http://www.spamodeler.com/forum/

  • Member since
    July 2014
Posted by modelcrazy on Thursday, August 20, 2015 9:52 PM

OK dog gone it, I can't find my decals. I may have to talk to AMT.

But here it is for now.

Steve

Building a kit from your stash is like cutting a head off a Hydra, two more take it's place.


http://www.spamodeler.com/forum/

  • Member since
    August 2015
  • From: Northeast Florida
Posted by Arved on Thursday, August 20, 2015 10:03 PM

I have a Romulan Bird of Prey model, too. Only it's cloaked, and I can't find it anymore. :-P

Nice job, but I couldn't pass up the poor joke.

- Arved

e-mail | Blog

"Simplicate and Add Lightness" — design philosophy of Ed Heinemann, Douglas Aircraft

  • Member since
    September 2006
  • From: Ridott, Illinois
Posted by Banshee1000 on Tuesday, August 25, 2015 12:26 PM

If helpful, you can find after market decals here http://federationmodels.com/decals/jt_graphics/default.htm. Just scroll down to the 1/650 AMT Romulan decals.

I'm looking forward to seeing more of your build!

  • Member since
    July 2014
Posted by modelcrazy on Tuesday, August 25, 2015 1:36 PM

Thanks Banshee, I did just that yesterday.

Steve

Building a kit from your stash is like cutting a head off a Hydra, two more take it's place.


http://www.spamodeler.com/forum/

  • Member since
    July 2004
  • From: Sonora Desert
Posted by stikpusher on Tuesday, August 25, 2015 4:09 PM

Yes Very cool! Since completing my K'T'Inga, I have been thinking of getting one of these. After seeing yours, I think I will just have to do that... Wink


F is for FIRE, That burns down the whole town!

U is for URANIUM... BOMBS!

N is for NO SURVIVORS...

       - Plankton

LSM


  • Member since
    July 2014
Posted by modelcrazy on Friday, August 28, 2015 12:25 AM

Thanks Stick,

There some serious work to be done to bring it up to code, but it's a fun kit regardless.

I received some AM decals I orders from Federation Models. The shipping was a little steep, but I received them in what seems like 2 days.


I’ll continue working on it this weekend.

Steve

Building a kit from your stash is like cutting a head off a Hydra, two more take it's place.


http://www.spamodeler.com/forum/

JOIN OUR COMMUNITY!

Our community is FREE to join. To participate you must either login or register for an account.

SEARCH FORUMS
FREE NEWSLETTER
By signing up you may also receive reader surveys and occasional special offers. We do not sell, rent or trade our email lists. View our Privacy Policy.