SEARCH FINESCALE.COM

Enter keywords or a search phrase below:

AMT Eagle --- FINISHED PICS!

10020 views
68 replies
1 rating 2 rating 3 rating 4 rating 5 rating
  • Member since
    January 2007
Posted by the doog on Wednesday, May 25, 2016 9:06 PM

Bob, thanks, I honestly appreciate your comments. It's always nice to know that my work inspires people and so nice to actually get responses here. I appreciate your following along! New update coming right now! :)

  • Member since
    January 2007
Posted by the doog on Wednesday, May 25, 2016 9:08 PM

Gamera

Yeap, I'm with Bob here, neat work on the landing gear. And that Raboesch bendy styrene looks really useful. 


Yes, it's great! Wonderful for bending around the engines and for car engine wiring, etc. I actually placed an order the other day and am expecting a haul of it to come in.

In the meantime, I found a few pieces of it for the engine tubing that I needed so I have the engines finished. Here comes the update... :)

And thanks for following along. I really appreciate the support! Big Smile

  • Member since
    January 2007
Posted by the doog on Wednesday, May 25, 2016 10:13 PM

OK, big update here; I can't believe how quickly and relatively easily this went. (kettledrums...) The engines are plumbed! Big Smile

But first, I detailed the leg pod suspension things: Here's how I built them. The ParaGraphix set has parts for these, but they're mere suggestions, not really usable. I built them from:

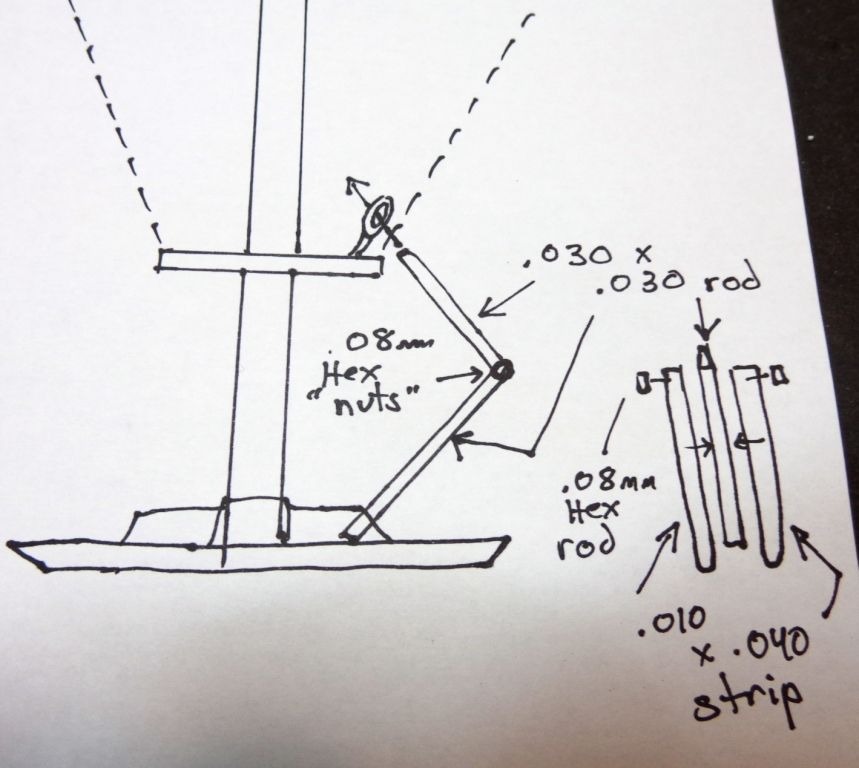
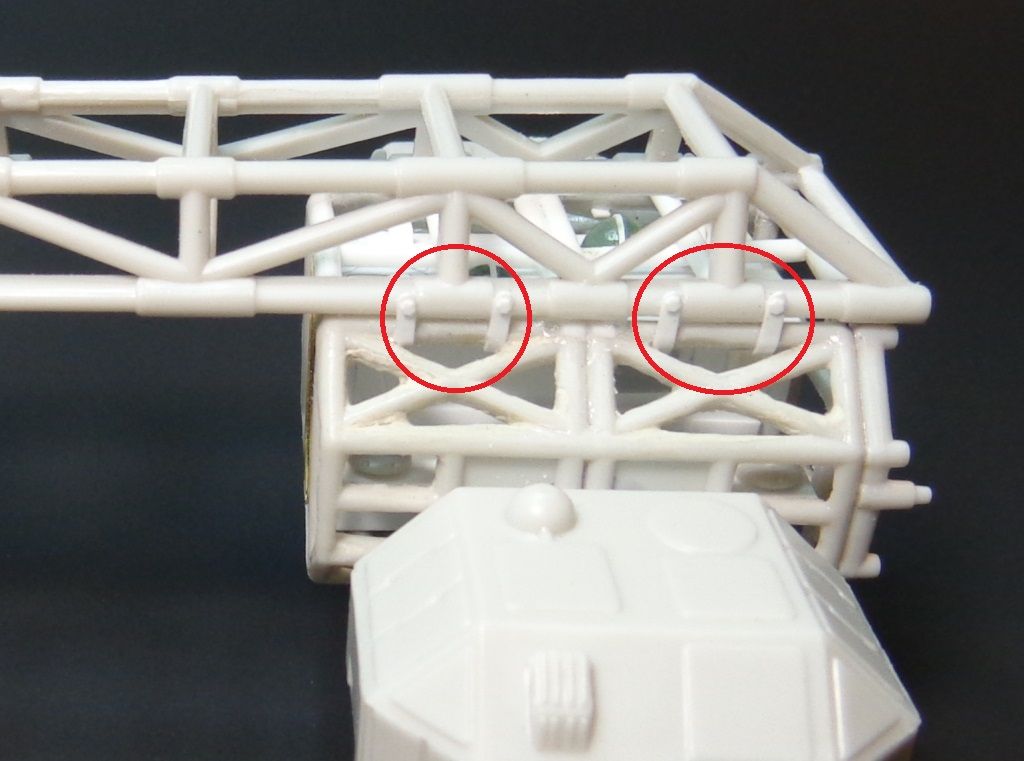
Nothing elaborate; they look the part. I also put in the connecting tabs that connect the rail to the cages from .010x.040 strip with a .030 hex rod rivet on each.

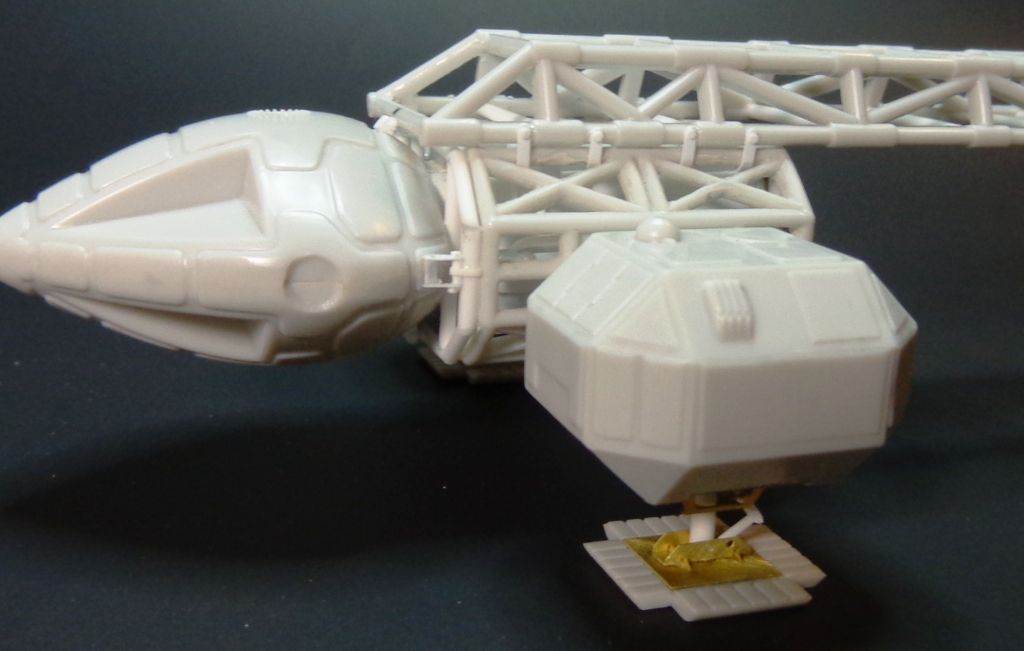
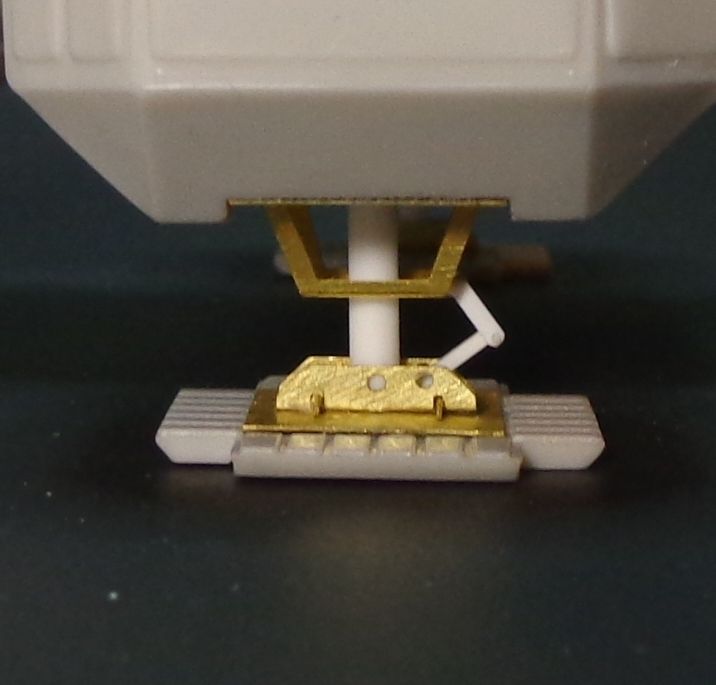
And here's the completed legs/feet.

OK, now if you know anything about this kit, you know that the engines are really simplified to the point of being awful.

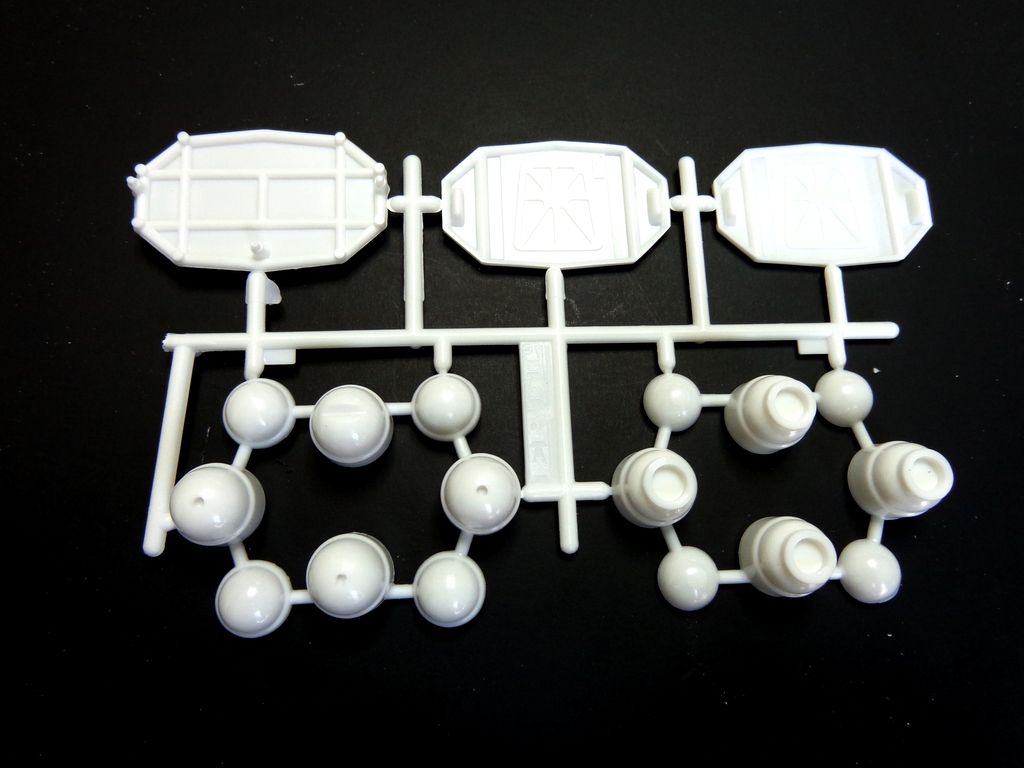
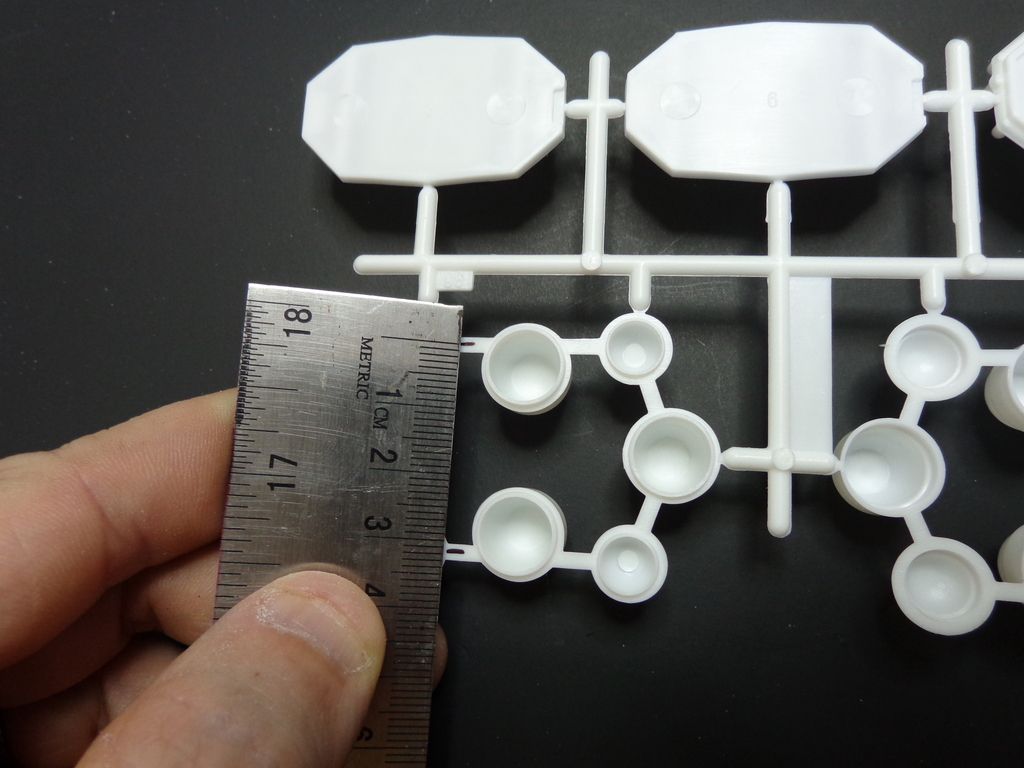
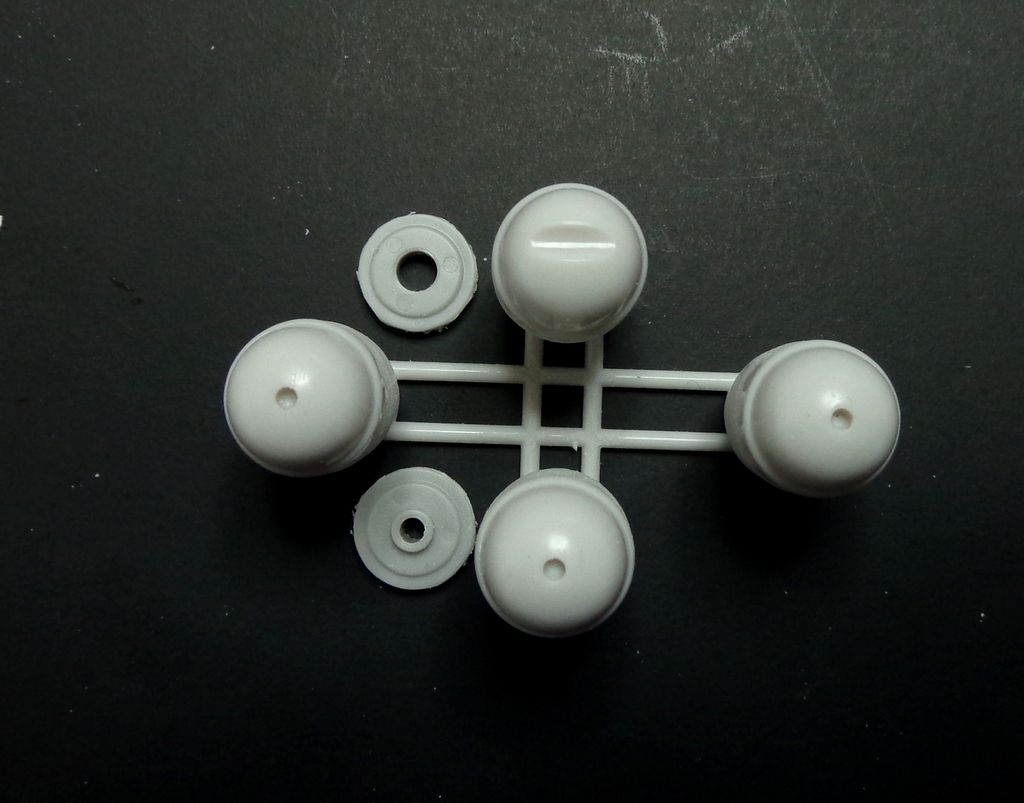
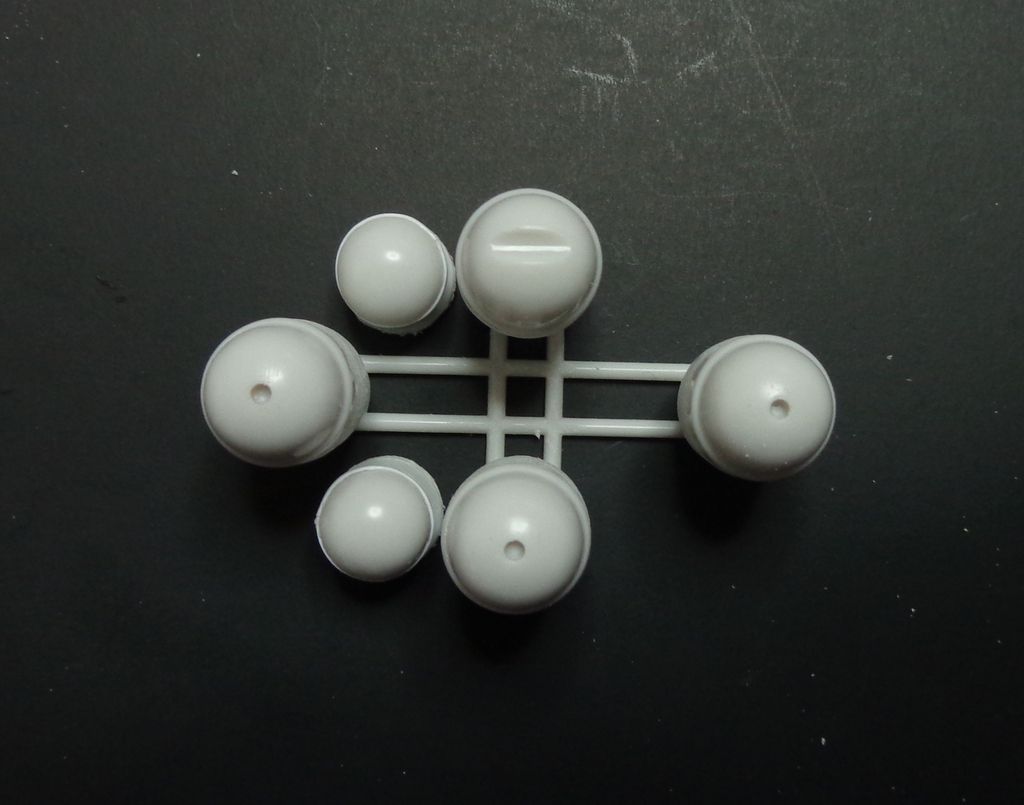
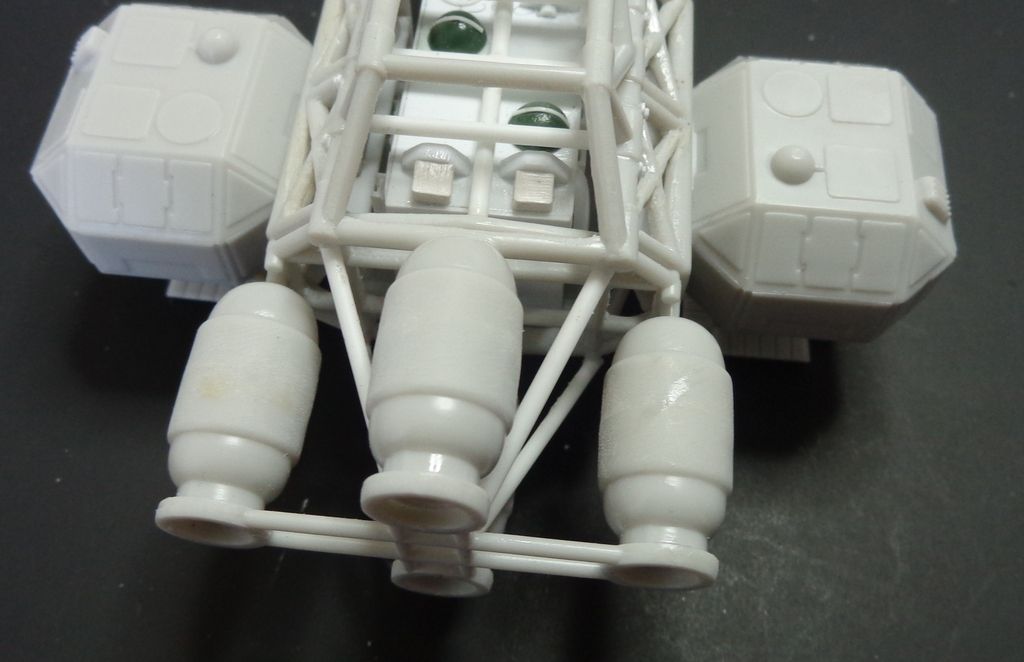
I think that the small engine "balls" are much too proud of the whole assembly; the real ones sit more "inside" of the engine circumference. Here I measure them to check....about 31.5 mms.

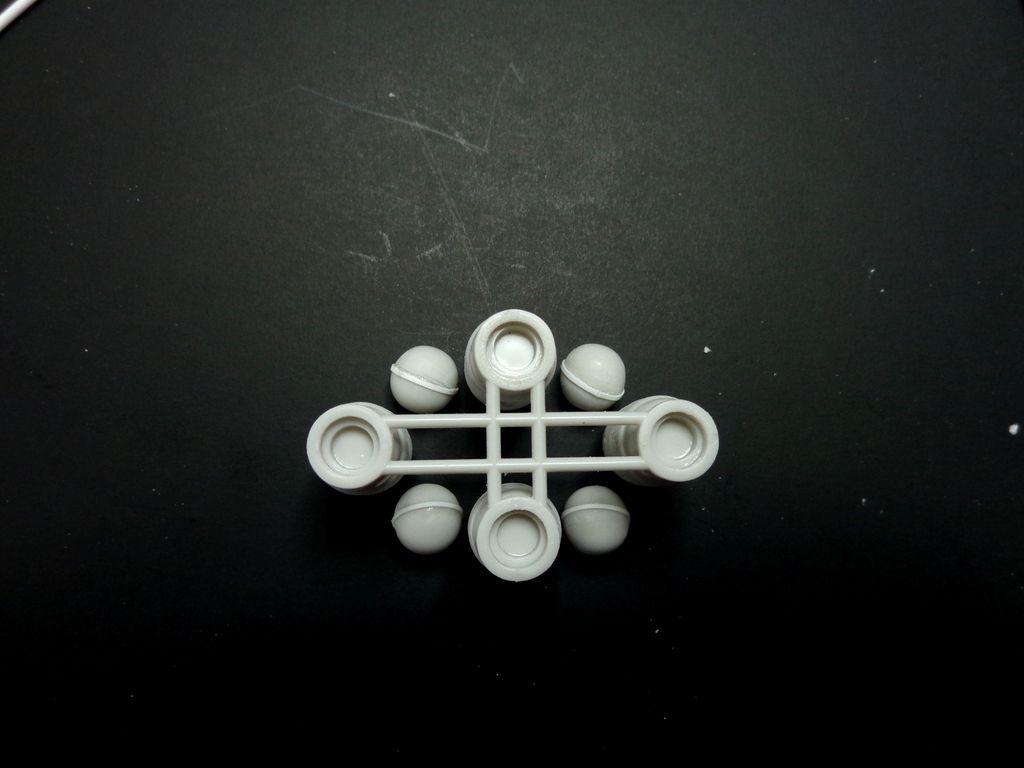
First things first: I cut the balls off the framework and filed the oversized rings around them. I attached the outside frame but did not attack the big nozzles yet...this will help give me better access to the work needing to be done.

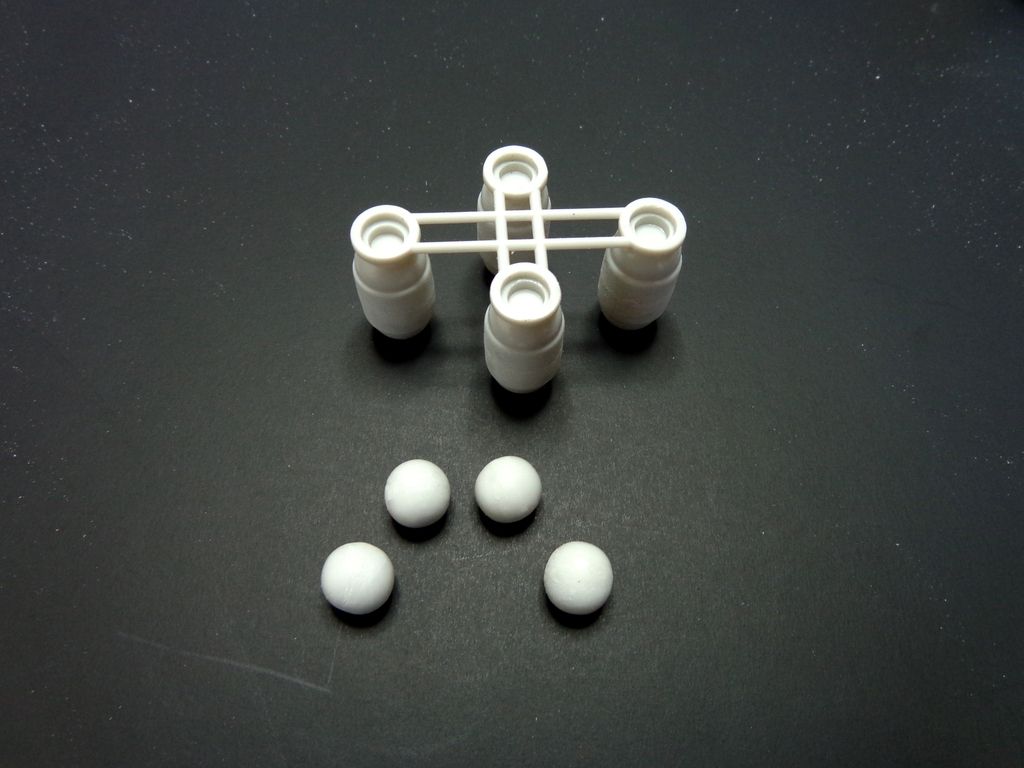
Next, I replaced the rings with .010x.030 strip. When I build my next Eagle, I will wait until I have the balls mounted properly to perform this step. It will be easier to keep them straight.

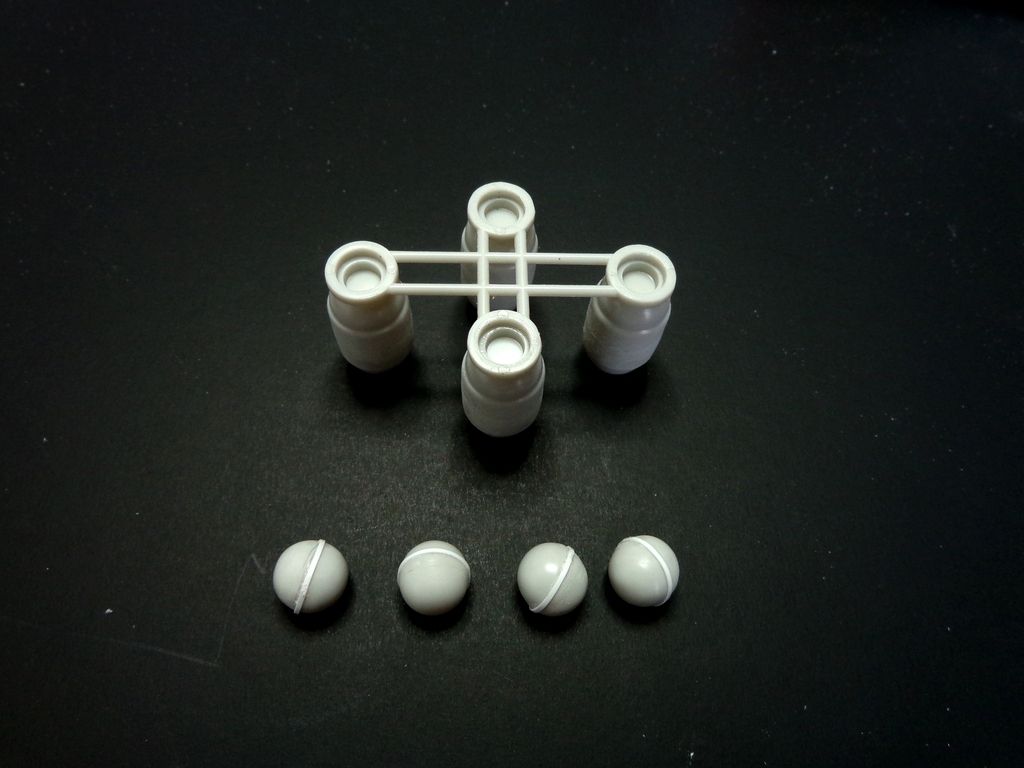
This is really where the balls ought to be.

I used some old Panzer IV wheel parts to position the balls in their place, so that I could then measure their distance apart.

 A small spot of marker on top gave me a point which to measure...about 25mm.

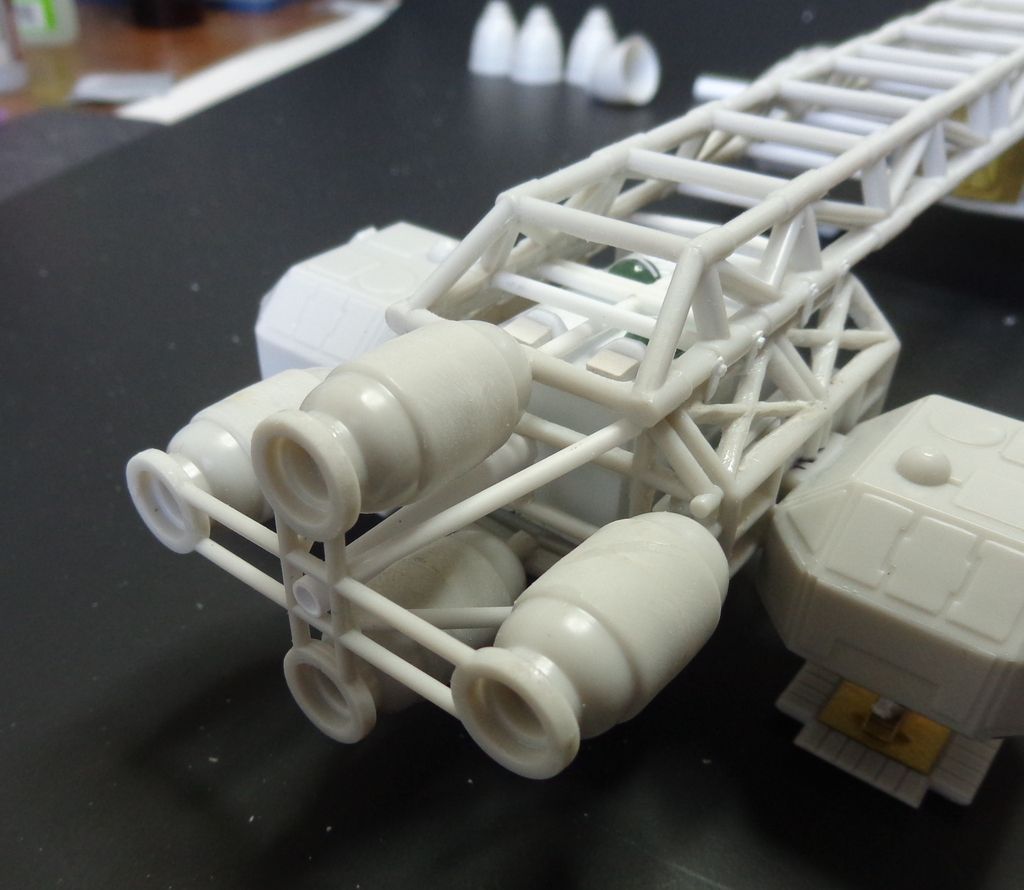
OK, call the plumber....I started by attaching the four engine pods to the frame.

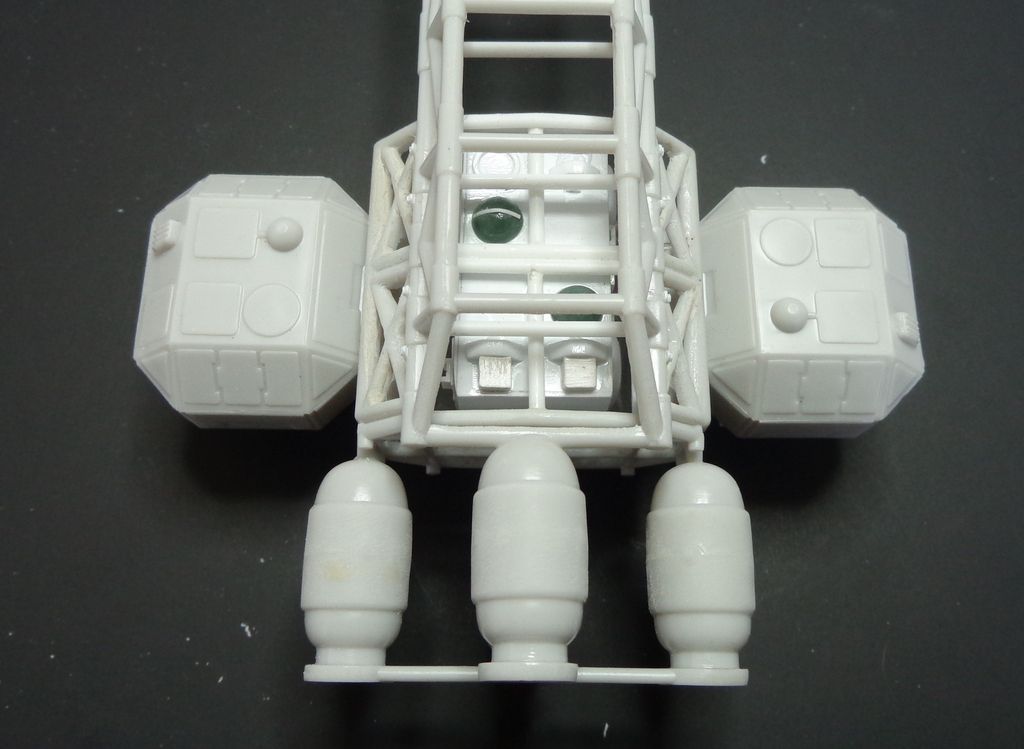
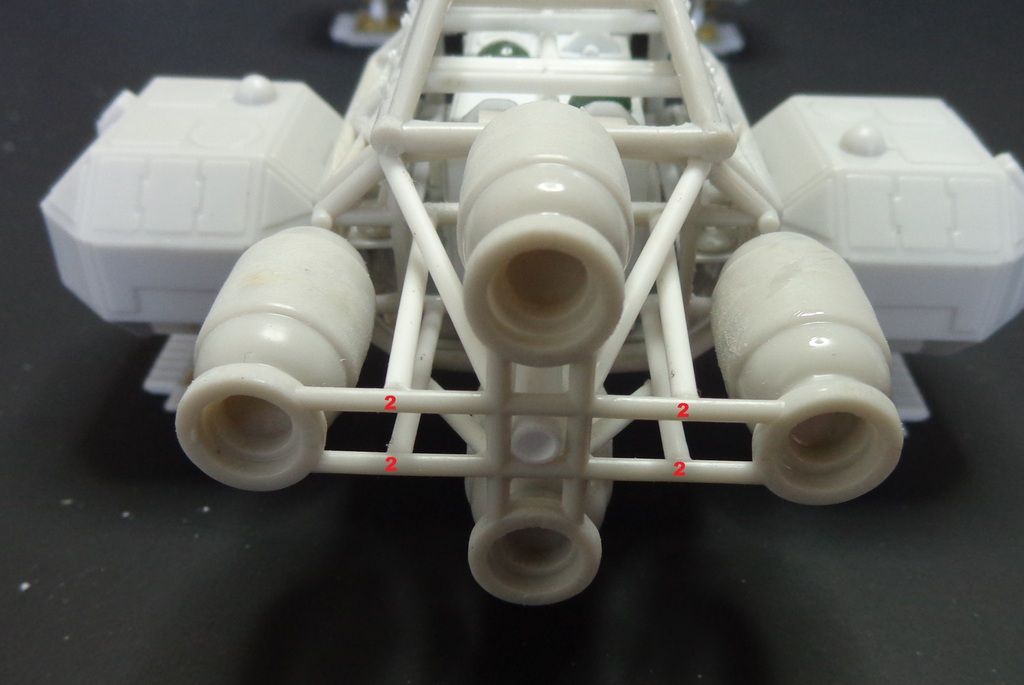
Next, I used some .080 styrene rod to add four strengthening rods inside. These are about 30.5mm long, each end has to be filed to a slant to glue flush...note the attachment points in following photos.

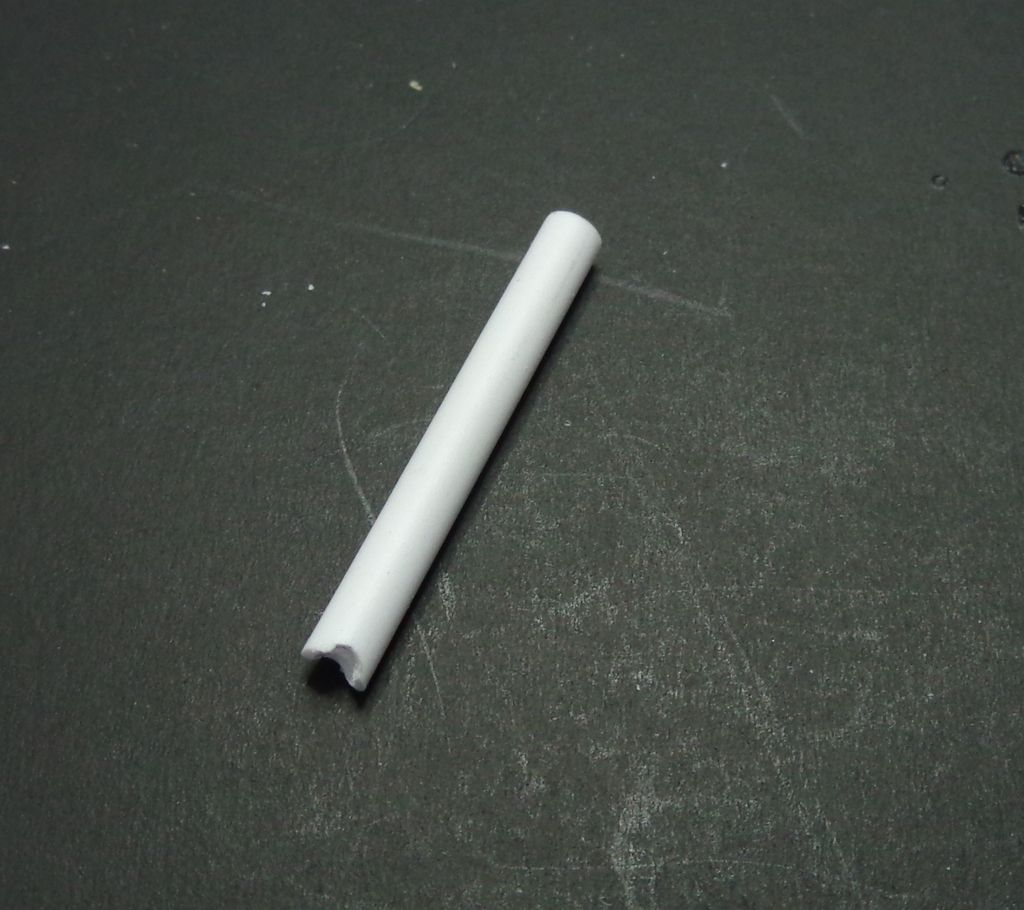
Next, I made one cylinder tube of 5/32 tube of 31.5mm and filed a groove to accept the mounting point on the upright post of the Eagle body.

And glued that in the very middle.

Rod placement #2. Four rod braces, 28mm each, straight back from these points. NOTE: I do not pretend that these are exact placements of measurements. They are what I could perceive to be the best possible representation from photo references within the excellent "Modelling the Eagle" publication.

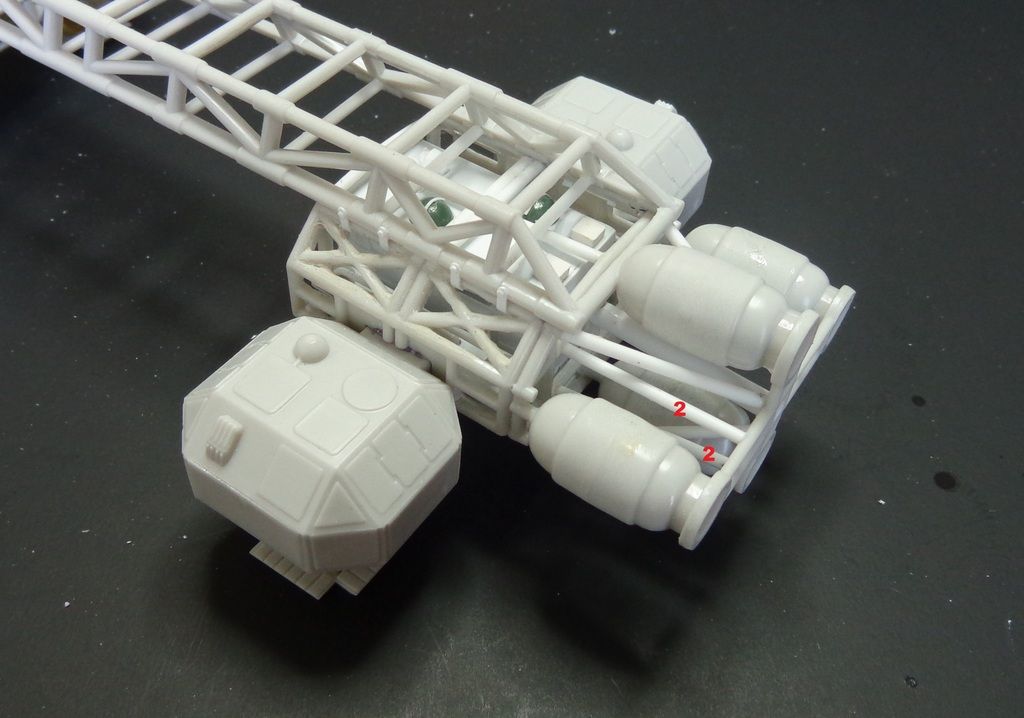
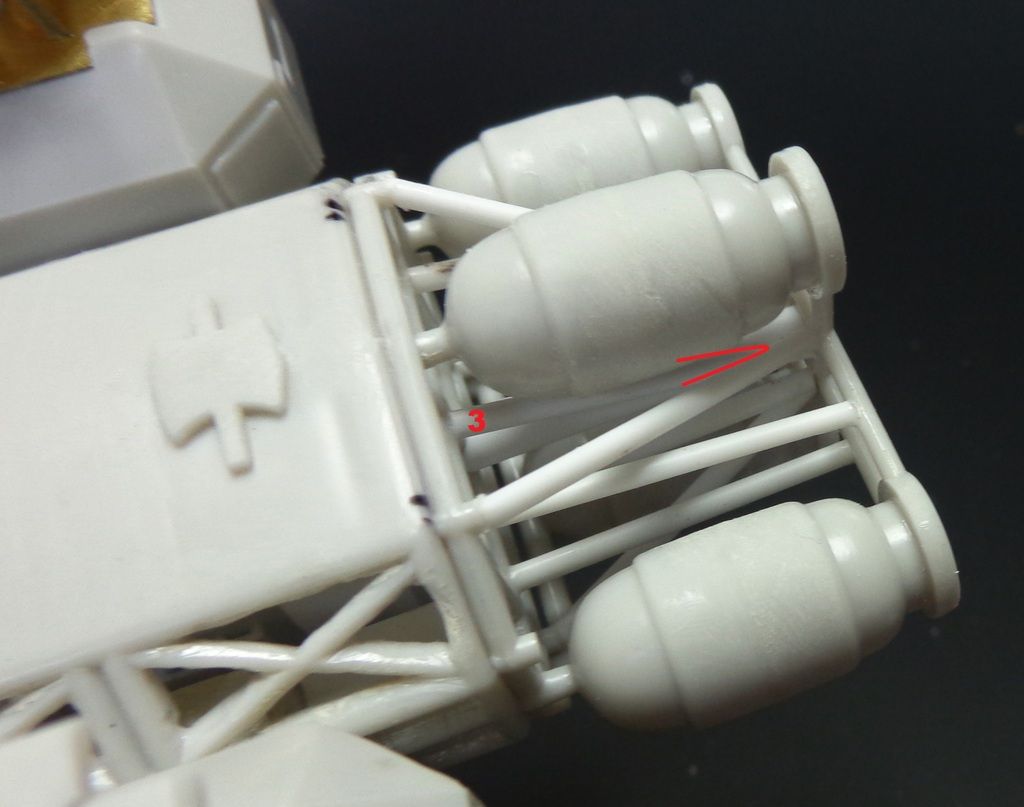
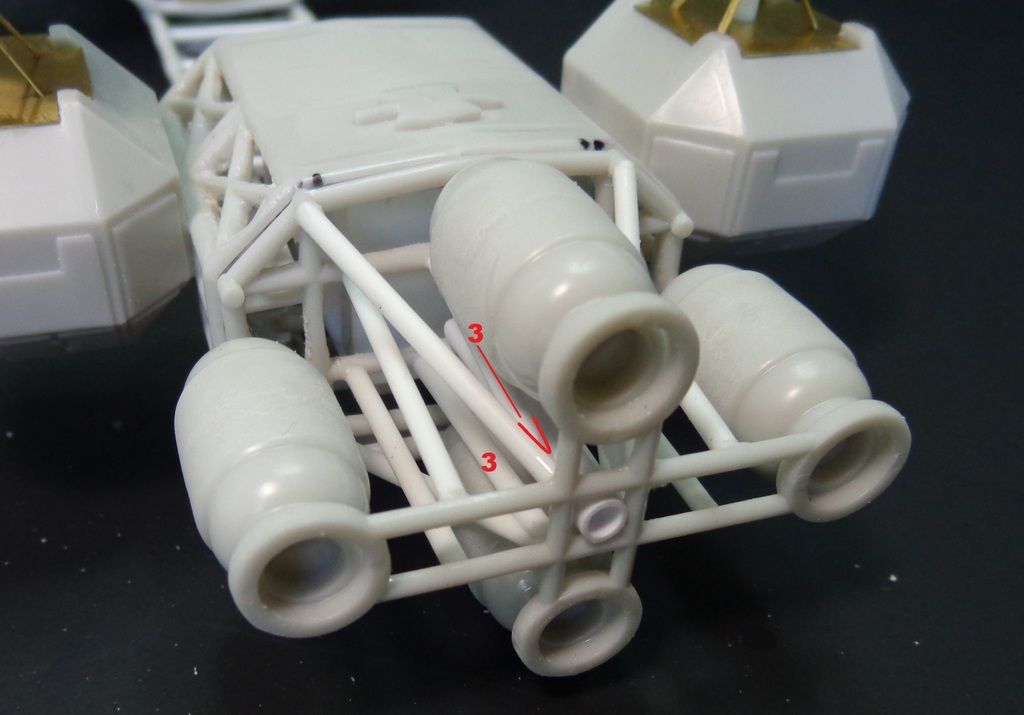
Rods #3 were tight placements---they had to be chamfered at the edges to nestle up against the #1 rods already there. These rods go down along the center rod, basically enclosing it.

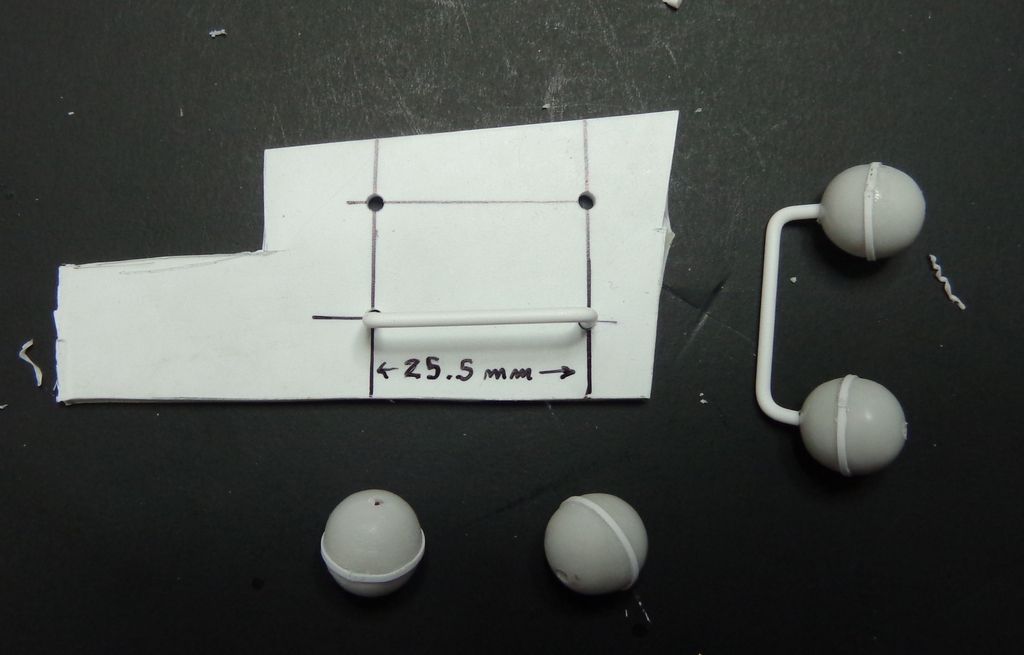
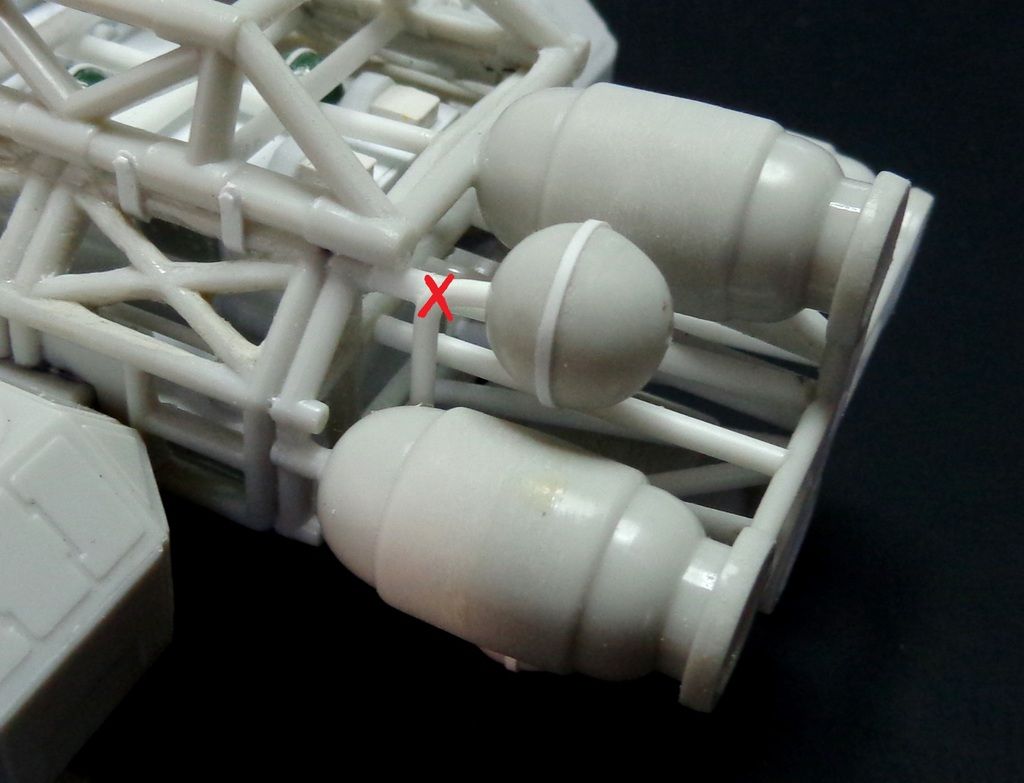
So here's how I managed to suspend/glue the balls. I had previosuly measured the distance that I liked them and made a template out of scrap stock--25.5mm. I vent the 1.5mm Raboesch Super Styrene into shape and slid the balls into them, but did not glue yet, as I have to wrangle that into the mess of tubes yet.

I tool one ball off, cocked the rod into the framework and then attached the other ball, gluing them. The "X" is where I would up securing the assembly to the engines. Only the rod is glued there. It tool some patient adjusting and re-adjusting to get the four balls square...

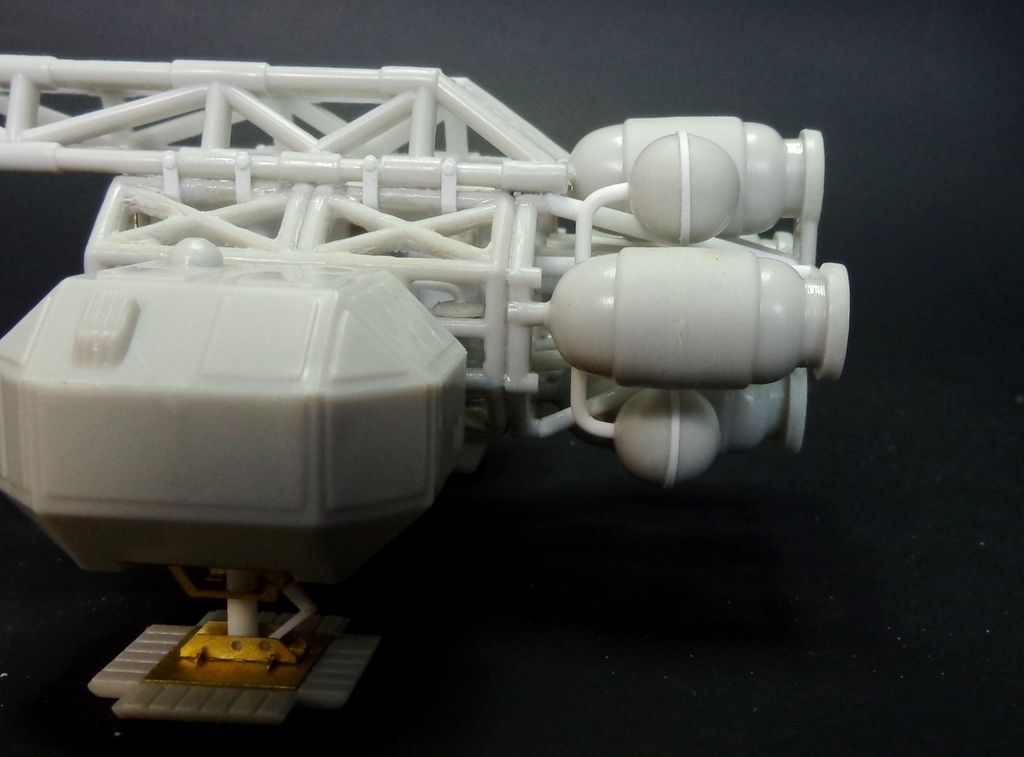
Drawing on photos in the aforementioned Eagle manual, I added the four random pipes coming off the back of the balls with Super Styrene.

The last two pieces were these horizontal pipes on the opposite sides of the engine pods...
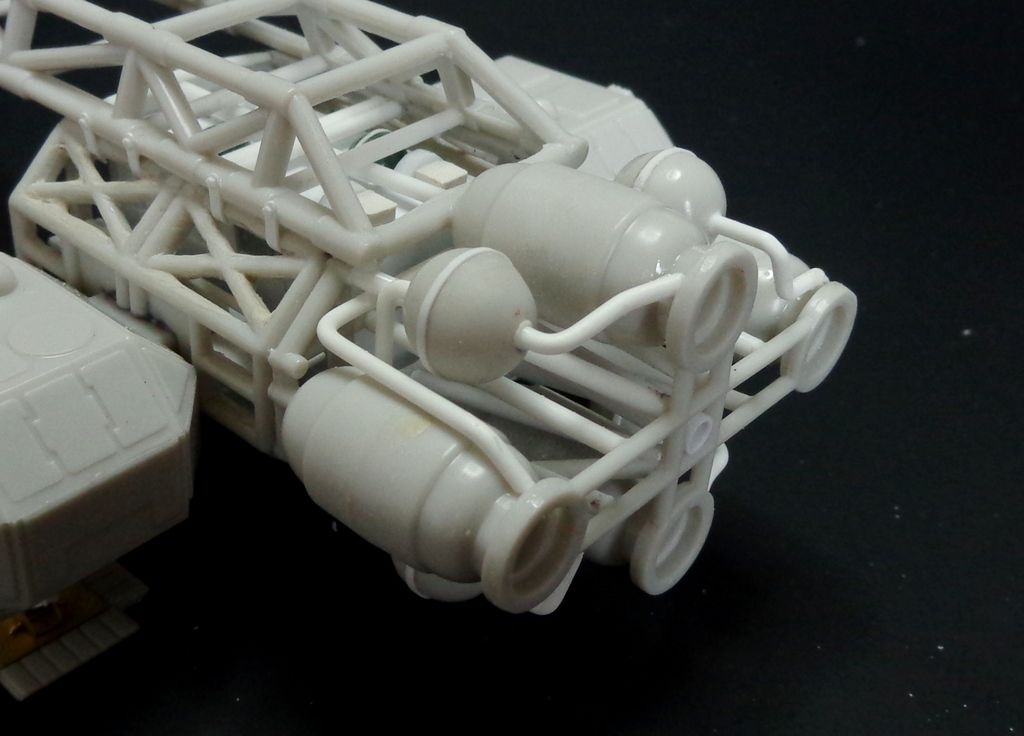
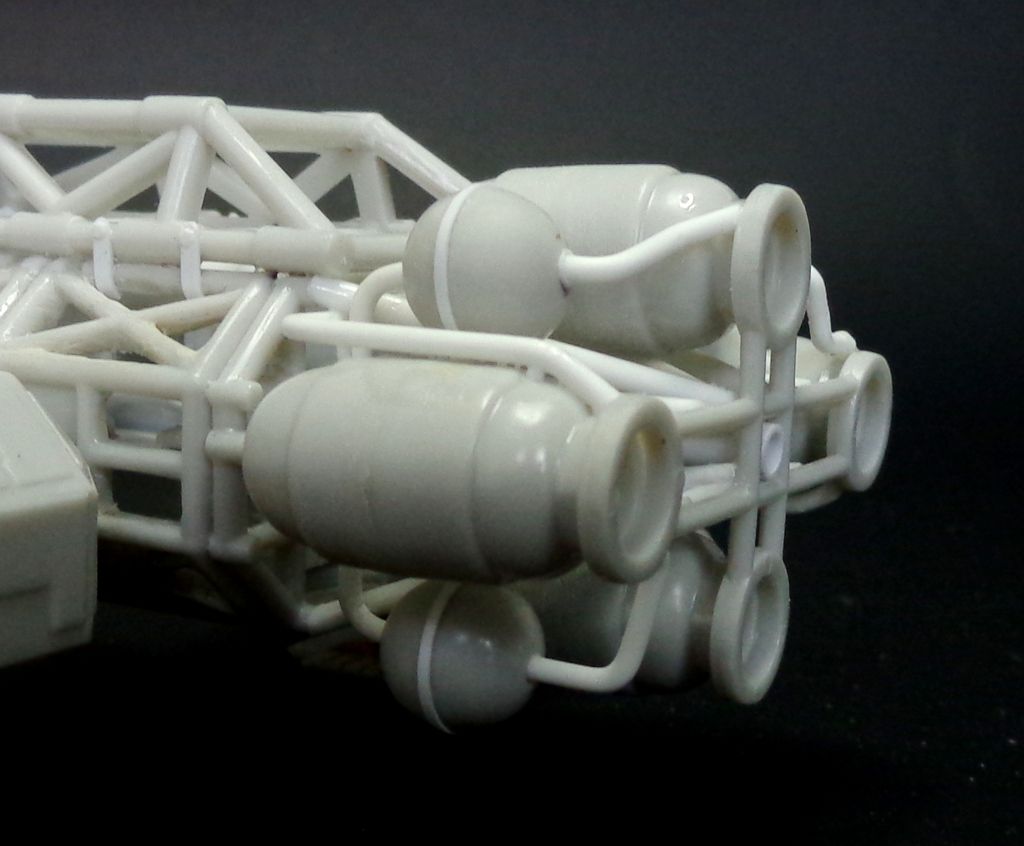
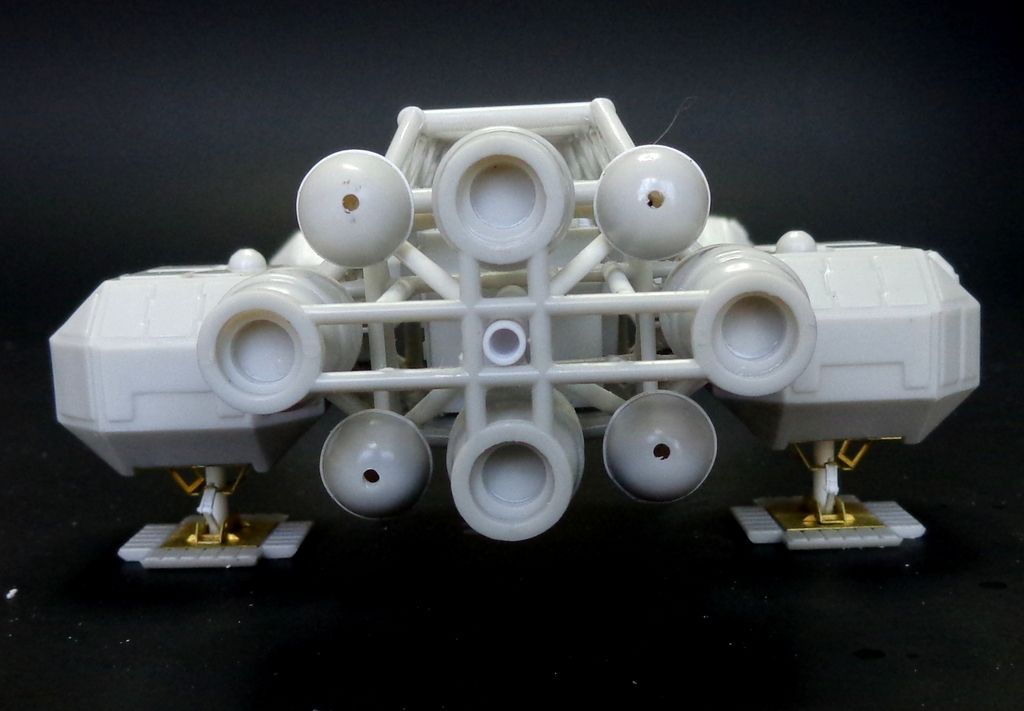
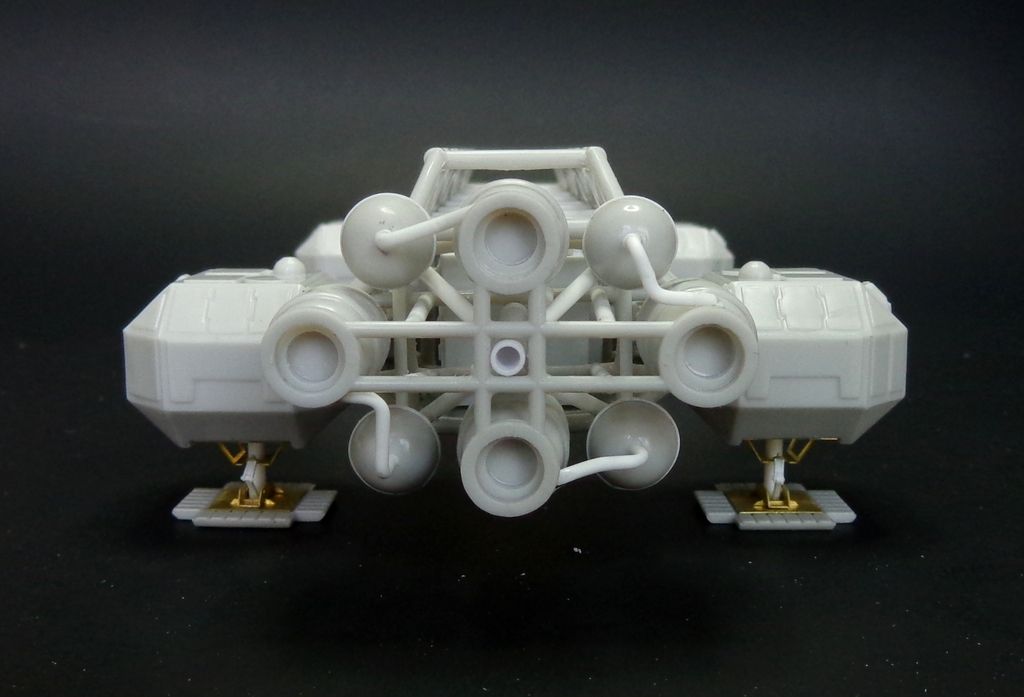
An overview...

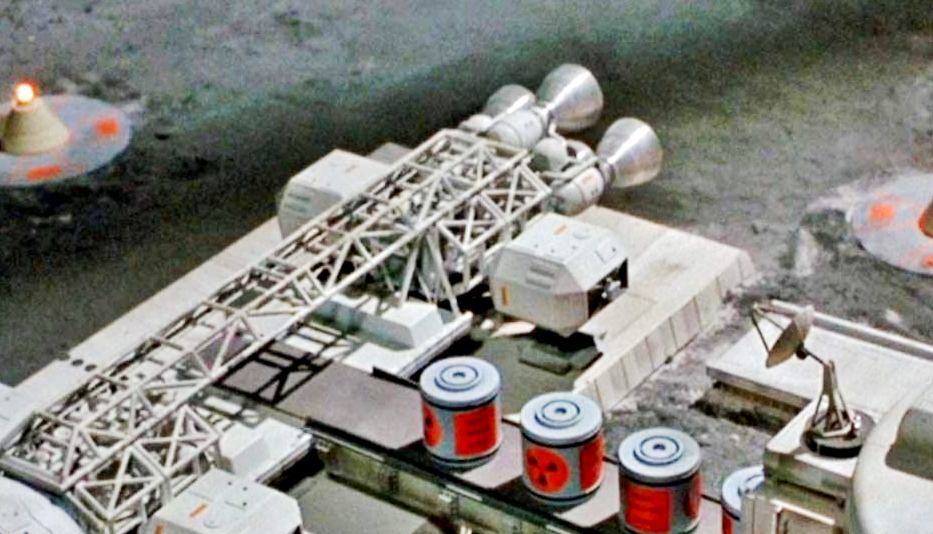
Looking at a screenshot from the show, I am pretty convinced that this is an accurate plumbing job for this particular Cargo Eagle. It doesn't have the encircling ring of later engine configurations and has those odd last four pipes coming off the rear of the balls.

Well, phew! That's it for tonight. I have to still put in the engine nozzle inserts, build the cargo pad and finish the passenger pod legs on the seperate pod display.

Thanks for looking in and all comments are welcomed!! Big Smile


  • Member since
    February 2014
  • From: Michigan
Posted by silentbob33 on Thursday, May 26, 2016 9:56 AM
Wow! That's a lot of work but it really paid off. I'm going to have to order my own haul of super styrene.

On my bench: Academy 1/35 UH-60L Black Hawk

  • Member since
    November 2009
  • From: SW Virginia
Posted by Gamera on Thursday, May 26, 2016 11:48 AM

Dang, that's why you're a master modeler Karl, you do all that scratchbuilding and detail work and I've been fumbling around for about six months on the cockpit of a single 1/32nd Zero... Embarrassed

"I dream in fire but work in clay." -Arthur Machen


  • Member since
    January 2007
Posted by the doog on Thursday, May 26, 2016 4:42 PM

Thanks, Bob and Chris! I appreciate you guys following along and taking the time to leave some encouragement and support! Big Smile

  • Member since
    May 2016
Posted by Xena on Friday, May 27, 2016 2:09 PM
Wow!! So much attention to detail! This is going to look so good when completed. Cant wait to see the next step :)
  • Member since
    February 2011
Posted by knox on Saturday, May 28, 2016 8:14 AM

    I'll start with the absurd ( juvenile ).  You said "balls",  a lot. ( my inner Bevis and Butthead ).

   Now the sublime.  Gamera is dead on. You really are a master model builder.  This kit just isn"t that good, yet you're turning it into a museum piece.  I'm really enjoying the ride. Thank you.                                          gk


  • Member since
    July 2010
Posted by roony on Saturday, May 28, 2016 12:48 PM

I've enjoyed watching the build.  We are probably getting a preview of an FSM article.  Looking forward to the finish.

  • Member since
    September 2006
  • From: Central Texas
Posted by NucMedTech on Sunday, May 29, 2016 11:22 PM

Doog, this is really great work you got going on here. Looking forward to the next step.

Most barriers to your successes are man made. And most often you are the man who made them. -Frank Tyger

  • Member since
    January 2007
Posted by the doog on Monday, May 30, 2016 9:34 AM

Xena
Wow!! So much attention to detail! This is going to look so good when completed. Cant wait to see the next step :)
 

Thank you, Xena, and thaks for following along! Big Smile

knox

    I'll start with the absurd ( juvenile ).  You said "balls",  a lot. ( my inner Bevis and Butthead ).

   Now the sublime.  Gamera is dead on. You really are a master model builder.  This kit just isn"t that good, yet you're turning it into a museum piece.  I'm really enjoying the ride. Thank you.                                          gk

Thanks so much, Knox! I appreciate the kind comment! And thanks for staying with me on this build. It's nice to have an "audience" who appreciates the work I'm doing here! Yes

roony

I've enjoyed watching the build.  We are probably getting a preview of an FSM article.  Looking forward to the finish.


Hmm, that has seriously crossed my mind..! Stick out tongue It would be nice to see this in an article format, and what better time than now, when the Eagle is in a sort-of "renaissance" right now.. Thanks for looking in and commenting! Smile

NucMedTech

Doog, this is really great work you got going on here. Looking forward to the next step.


Thanks too, NucMedTech! The next step is, I believe, going to be primer! She's just about ready for a coat! Stay tuned, and thanks again for coming along on the ride! :)

  • Member since
    January 2007
Posted by the doog on Wednesday, June 1, 2016 10:20 AM

Building done, ready for primer!

The legs and "feet" for the spare pod are done:

Using strip and rod, I build a reasonable fascimile from .030x030 strip and some circles cut from larger rod to simulate the hinges.

It sits perfectly within the frame. What a lucky coincidence...

Here's the cargo pod. I am not going to actually assemble it perfectly just yet; I want to be able paint the inside corridor doors.

The metal struts are not glued in yet.

I put some "nozzles" made from cut tube inside the rocket engine pieces for additional visual interest.

I also painted the main nozzles inside in prep for main painting.

The bottom of the pod was a little tricky to line up. The legs just barely eclipse the nozzles. Still, they have enough plausible clearance for me.

Here's all the pieces bascally lined up for primer..

The "extra" main nozzle deflectors are for the first medical Eagle that I built. I got these resin pieces off eBay, and decided to add them to make it more accurate.

In other news, I'm also working on refurbishing my big Mattel toy Eagle that I recently acquired. It's been improved by filling most of the seams and a new coat of white paint to get rid of the yellowed glue seams that is characteristic of this toy at this stage of age. I did some masking after priming and some panel detailing. I have to put on the extensive set of sticker-decals that I also got off eBay now. I had one of these when I was like, 10 years old.

Well, time to get some primer on it and see how much more work has yet to be done....hope the primer doesn't bring out too many pimples! Surprise

Stay tuned, guys! Thanks for following along!! Big Smile

  • Member since
    November 2009
  • From: SW Virginia
Posted by Gamera on Wednesday, June 1, 2016 12:06 PM

Very cool! Yes

"I dream in fire but work in clay." -Arthur Machen


  • Member since
    July 2014
Posted by modelcrazy on Wednesday, June 1, 2016 12:21 PM

That is much larger than I thought.

Steve

Building a kit from your stash is like cutting a head off a Hydra, two more take it's place.


http://www.spamodeler.com/forum/

  • Member since
    August 2007
  • From: back country of SO-CAL, at the birth place of Naval Aviation
Posted by DUSTER on Thursday, June 2, 2016 7:59 AM

Great! Two bilds in one WIP; Can life get any better?

Seriously, the pod legs and engine improvements are  making this  better and better-erWink

Steve

Building the perfect model---just not quite yet  Confused

  • Member since
    May 2016
Posted by Xena on Thursday, June 2, 2016 9:40 AM

wow Doog, its really looking good!

& now to hear there is another one in the works.. exciting stuff Bow Down

thank you for sharing

  • Member since
    December 2002
  • From: Bury St Edmunds, Suffolk, England
Posted by Bish on Thursday, June 2, 2016 2:36 PM

Some lovely work there, karl, i really like the detail your putting in there. And great informative posts as well, very useful.

I am a Norfolk man and i glory in being so


On the bench: Airfix 1/72nd Harrier GR.3/Fujimi 1/72nd Ju 87D-3

  • Member since
    August 2005
  • From: Sydney, Australia
Posted by Phil_H on Thursday, June 2, 2016 7:10 PM

Coming along very nicely. Karl, the pipework on the engines is outstanding, as is your effort to open up the cages. You make it look easy. Yes

  • Member since
    September 2009
Posted by Cobra 427 on Thursday, June 2, 2016 11:16 PM

Oh, my God! Doog!!! You're killing me with all that photo-etch, and scratch building! I'm usually the only one sweating the accuracy issues here since most of our members buy such good quality kits here on finescale. But of course I'm the only one stupid enough to think that scratch building everything is so cool! (roll eyes)  Any way, if I can get photo etch like this in the scale that I work in most I'd be in seventh heaven. I have to MAKE my detail pieces. Thank you for showing us this. I've always wanted to make the Eagle that I had as a child more realistic, but my mother decided that it wasn't worth keeping and gave it away.  :( <--- Sad face


~ Cobra Chris

Maybe a picture of a squirrel playing a harmonica will make you feel better?


  • Member since
    February 2014
  • From: Michigan
Posted by silentbob33 on Friday, June 3, 2016 10:00 AM
Super awesome work Karl! I can't wait to see some paint on it. It'll make for a really nice display with the other pod next to it.

On my bench: Academy 1/35 UH-60L Black Hawk

  • Member since
    January 2007
Posted by the doog on Monday, June 6, 2016 7:04 PM

Gamera

Very cool! Yes


Thanks, Cliff! YesSmile

modelcrazy

That is much larger than I thought.

Yes, the Mattel Eagle is quite large! It was a large toy even when I was a kid!

DUSTER

Great! Two bilds in one WIP; Can life get any better?

Seriously, the pod legs and engine improvements are  making this  better and better-erWink

Thanks, Steve! I appreciate the comments! Big Smile

Xena

wow Doog, its really looking good!

& now to hear there is another one in the works.. exciting stuff Bow Down

thank you for sharing

Thanks, Maggs! I appreciate you looking in again!

Bish

Some lovely work there, karl, i really like the detail your putting in there. And great informative posts as well, very useful.

Thanks, Bish. Glad to help out. I am a member of a group on Facebook exclusively dedicated to the Ships and Props of Space 1999, and its another great source of info. Smile

Phil_H

Coming along very nicely. Karl, the pipework on the engines is outstanding, as is your effort to open up the cages. You make it look easy. Yes

Thank you, Phil. I put so much more effort into this one. Now I'm screwed, because I won't be able to build another one without all the work again, lol. It'll be good though to have this template to go by. It should make the next one quicker. Propeller

Cobra 427

Oh, my God! Doog!!! You're killing me with all that photo-etch, and scratch building! I'm usually the only one sweating the accuracy issues here since most of our members buy such good quality kits here on finescale. But of course I'm the only one stupid enough to think that scratch building everything is so cool! (roll eyes)  Any way, if I can get photo etch like this in the scale that I work in most I'd be in seventh heaven. I have to MAKE my detail pieces. Thank you for showing us this. I've always wanted to make the Eagle that I had as a child more realistic, but my mother decided that it wasn't worth keeping and gave it away.  :( <--- Sad face  ~ Cobra Chris

Chris, thanks for your comments. These Eagles aren't cheap on eBay, but now that there's a bit of a renaissance with them, you can get some of them cheaper. I paid a little more for my complete one, but I put another one together for around $200, and I'm going to be refurbishing that one too and selling it for a profit. Surprise

silentbob33
Super awesome work Karl! I can't wait to see some paint on it. It'll make for a really nice display with the other pod next to it.

Thanks, Bob! Yup! My thoughts exactly!!! Yes

New update below!!! (coming)...


  • Member since
    January 2007
Posted by the doog on Monday, June 6, 2016 7:29 PM

Ready for paint...first, I had to prime it and look for flaws--oh, there were plenty of those. Mostly the biggest problem was just seams that I missed, but also my sometimes-sloppu work on the cage sides came back to haunt me. Next time, I think I'm going to cut out the top "X"'s and replace them with rod. I'll hollow out the bottoms like I did, but the tops will look better without the hacking that it took to get them where they are. In any case, I had to take some serious care to re-shape and refine them after looking at them in primer..

The pod PE pieces also needed "sealing", as they looked funny standing somewhat-proud of the plastic.

There were some seams on the CM too. And some other superglue blobs, like under the side of the pod PE there...

Once I cleaned up the sides and the cages, it looked better. Not perfect, but better..

A coat of Tamiya Flat White was followed by a coat of Gloss WHite. The flat base under it helps cover the primer better.

The pod looks pristine...man, that almost looks like CG!

A bunch of patterns and shapes were cut out of graph paper in order to do the distinctive panelling that is seen on the original Eagles. The graph squares are perfect to get good squares and rectangles, cut out with an Exacto. You might also notice a cut-out of a small Maltese cross which is seen on the cargo pod, but there's no decal for it, unfortunately, so I'll have to MacGuyver it. I mixed up some paint shades from combinations of Tamiya White mixed with Dark Grey, Blue, Buff, and Sea Grey. Nothing definite here, just eyeball what looks right.

The masks were then used to carefully add random shapes and colors to the Eagle. There is no canon here; the original Eagles were painted and repainted many times during the shows, and eventually came to be peppered with all kinds of tints and tones, and this expression of color serves to break up the pure white, and has become a mark of personal distinction and creativity among the modelers who model Eagles online. I chose to go a bit more restrained than some, as the earliest Eagles were the most pristine and unadorned.

The pod got a bit of color as well...

The cargo pod got a more dirtied appearance, using more of the Buff color to look old and faded...note my orangy cross there too...

A last look at the paneling and colors so far.

Next step will be decaling and then a light gray wash, followed by detail painting. Thanks for looking in and staying with this build, all!!

Smile Karl doog.

  • Member since
    December 2002
  • From: Bury St Edmunds, Suffolk, England
Posted by Bish on Tuesday, June 7, 2016 1:01 AM

I do like how you have painted that, nice idea.

I am a Norfolk man and i glory in being so


On the bench: Airfix 1/72nd Harrier GR.3/Fujimi 1/72nd Ju 87D-3

  • Member since
    November 2009
  • From: SW Virginia
Posted by Gamera on Tuesday, June 7, 2016 7:27 AM

Lol, yeap does look like CGI in the pristine gloss white. I like the different coloured panels you added there, I remember an article in one of the first FSMs I picked up about twenty-five years ago where the writer did it the same way with graph paper. I wonder if he was inspired by 1999. 

Again, she looks great, almost done now! 

"I dream in fire but work in clay." -Arthur Machen


  • Member since
    February 2014
  • From: Michigan
Posted by silentbob33 on Tuesday, June 7, 2016 8:52 AM
The panelling looks great Karl! I've done it on The Next Generation Enterprise where the accurate panel lines were already there. The real challenge will be filling in all the inaccurate lines on the refit version and painting the Aztec pattern.... This is going to look really cool once you start weathering.

On my bench: Academy 1/35 UH-60L Black Hawk

  • Member since
    September 2009
Posted by Cobra 427 on Wednesday, June 8, 2016 11:44 PM

silentbob33
This is going to look really cool once you start weathering.
 

No weathering needed! This is beautiful! You're killing me with all the detailing, and painting! The tiny panel paint chips are a great touch along with that white. Man, Doog - you really have the touch. You're building a true testiment to the glory of modeling, and the history of the Eagle clan that so few are brave enough to follow along with. I would'nt go too busy with the weathering since there isn't a lot of moon dust floating around in outer space. The engine bells are a classy touch, and all the photo etch that you've used really makes for a much better looking build.

I can't say enough about how this looks, and how it makes me feel going back all those years to when this was popular. It feels like I'm in the eighties again going through the sci-fi glory days when everything was "Space aged" and white! That seems to be the classic colour of choice when making things that are related to the "Space Race", and all things sci-fi.However you slice it you can't get away from it as this is the "go to" choice as it looks so clean, and it's always futuristic looking when white, and new. It's my colour of choice for making space ships, and interiors, and clothing such as astronaut suits and the like. I see now how well the two colours you used go together to compliment each other instead of simply black streaks, or dark spots, or something that clashes, but this really sings! You've definately nailed it. Now I see why sci-fi movies use white with either black or gray, or some other complimentary colour.  It's what really makes the stormtrooper suit truly pop with the black under the white armour.


~ Cobra Chris

Maybe a picture of a squirrel playing a harmonica will make you feel better?


  • Member since
    June 2016
Posted by Dim Rod on Thursday, June 9, 2016 8:09 PM

What did you use for the side and top round craters in the head in the second photo?

  • Member since
    January 2007
Posted by the doog on Wednesday, June 15, 2016 10:25 PM

Bish, Cliff, Bob, thanks all, sincerely, for your comments and for following along with me through this build. It is much appreciated. Smile

CHRIS---I appreciate your comments too, and thanks for following along!

I think that the white color of spaceships is a very practical color, as it is the best color to refract light and to show up in deep space. The original Eagle models that they used in the filming of the show were painted and re-painted alot over the course of the seasons, and these variations in paint tone are what I was trying to simulate. Big Smile

Dim Rod, those are Italeri German Helmets, filed to roundness. :)

  • Member since
    June 2016
Posted by Dim Rod on Wednesday, June 15, 2016 11:53 PM
I meant the ones on the head pod/cockpit.
  • Member since
    January 2007
Posted by the doog on Thursday, June 16, 2016 10:47 AM

Hello all,

A final update and then the finished results!

I'd also like to thank the classy individual who gave this thread a "one star" rating. Nice to know that my work and willingness to share is appreciated. Confused

Anyhoo....all the panels on the model were given a light-gray wash, carefully applied with a fine brush.

The next day, the excess and heavier lines were removed with a flat brush. You can really shape the outlines into a fine line using this method.

Note how the excessively-thick lines have been cleaned up here. (decals have been added in this shot)

Adding the "decals" which are available on eBay. They are not actually "decals" per se as you would expect, but "stickers" which are actually printed on sticky-backed paper which is quite thick and a genuine pain to pry off the backing when you cut out the small pieces. Furthermore, being quite thick they are hard to cut out without deforming or ruining some of them. They also simply don't last long after you stick them on without some kind of sealing or improvement to the adhesive. I decided here to pry off the backing, and stick them onto the cutting matt, and then cut them out and apply them, each one, with superglue.

Same with the nuclear canisters: here, you can see how on the day after I applied these "decals" to the nuclear pods, they are already peeling off. And this was even over a smooth gloss coat to promote adhesion. A plea to manufacturers!: -- to WARP models who made this conversion kit, and to the cottage industries which produce "decals" for this Eagle; I realize that cost is always an issue, but I would gladly pay a few dollars more for some real waterslide decals!!

Again, I had to fix them with some superglue, applied with a precision tip.

Next, it's time to put some "moon dust" on the cargo pallet. I chose three WILDER pigments: Street Dust (a light gray), Tire Gray (a darker shade of gray) and Dry Russian Earth (a slightly tannish tone, for warmth). This is done after the pallet has been washed with oils in grayish-black.

The pigments are applied with a raggedy paint brush...

And sealed in with WILDER fixer.

The cargo pallet was then carefully attached with 5-minute epoxy because it is heavier than styrene, being resin and white metal. I added the four diagonal white metal reinforcing bars, replacing them with .080 styrene rod after the epoxy had set.

The inserts for the rocket thrusters were inserted and painted smoky black after the thrusters themselves were painted ALCLAD Chrome. I realize that I inserted the baffles wrong; they should be "cocked" with the holes at 3,6,9, and 12 o'clock. I have ordered some superglue debonder and will fix the thrusters' positions when I receive it.

I also decided to add some pigments to the "crosses" to simulate heat-degradation from the side thrusters. I also added some to the landing "feet" which are painted in Testor's Gunship Gray, and washed with Dark Gray oil.

Lastly, I glued in the nuke pods, and tidied up some small detail painting, and these are finished pics. I'm still finishing up the passenger pod; pics of that later..

THE FINISHED CARGO EAGLE:

The command module decals look nice behind the PE "frames" which were the last thing I added.

I decided to leave off a lot of the red/black and yellow "spine" decals which you often see, because they were added later in the season and you don't really see them in early episodes, nor on this Eagle. Early Eagles were rather "clean".

Details:

My two Eagles so far....

That's it for now! Check back later for pics of the passenger pod, and I'll probably throw in a photo of my finished Mattel Eagle when done! Thanks in advance to Cliff, Bob, Bish, and everyone else who has been following along on this build and showing so much support and interest! Comments always appreciated! Big Smile


JOIN OUR COMMUNITY!

Our community is FREE to join. To participate you must either login or register for an account.

SEARCH FORUMS
FREE NEWSLETTER
By signing up you may also receive reader surveys and occasional special offers. We do not sell, rent or trade our email lists. View our Privacy Policy.