SEARCH FINESCALE.COM

Enter keywords or a search phrase below:

The Endless Nausicaa Model Thread

57520 views
335 replies
1 rating 2 rating 3 rating 4 rating 5 rating
  • Member since
    May 2011
  • From: Honolulu, Hawaii
The Endless Nausicaa Model Thread
Posted by Real G on Saturday, October 20, 2012 1:49 PM

Nausicaa was the first Miyazaki film that I watched back in the 1980s, and it was stunning compared to the Japanese shows I was familiar with (Mazinger Z, Raideen, etc).  What really blew me away was the design of the aircraft, which had an almost Mobeius aesthetic.  I loved the chemical rocket propulsion, open cockpits, and utterly alien layouts.  Tsukuda released a couple of plastic kits from the movie including the Valley of the Winds Gunship, and promised an extensive lineup, but alas none materialized.

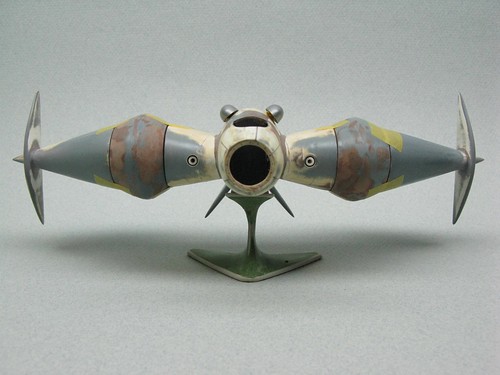
After watching the movie, I was so crazy about having models of the hardware from the show that I began a couple of scratchbuild projects.  The first was the Pejite Gunship, which made a spectacular but brief appearance in the movie.  The small one man fighter with its blood red paint scheme reminded me of the first Me-163B Komet to perform a combat sortie.

Pejite Gunship 01

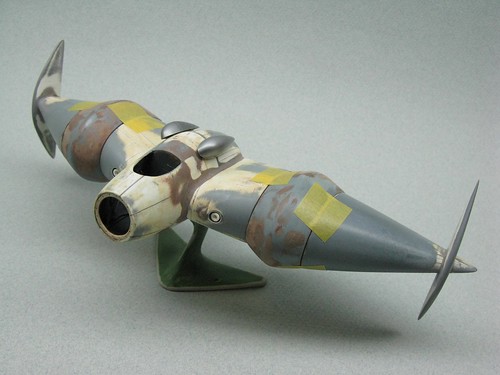
I didn't really have any scratchbuilding experience back in the day, so I used some questionable techniques, like plank on frame!  I also used Bondo filler between plastic formers to make compound curved parts like the mid wing bulges.  Just the forward fuselage was vac formed over balsa masters, which is what I should have done for the entire airframe.

Pejite Gunship 02

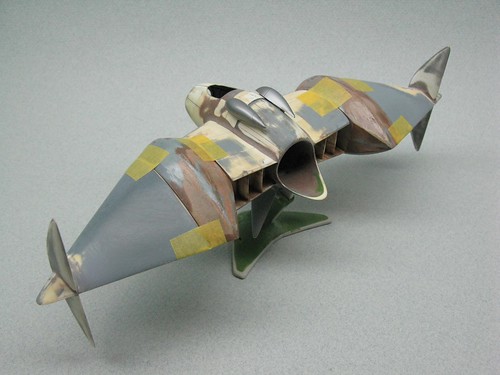
The model is guesstimated at 1/48, as I only had some development sketches and movie stills to go by.  I think my interpretation was off, as I feel the wings are too chunky overall.

Pejite Gunship 03

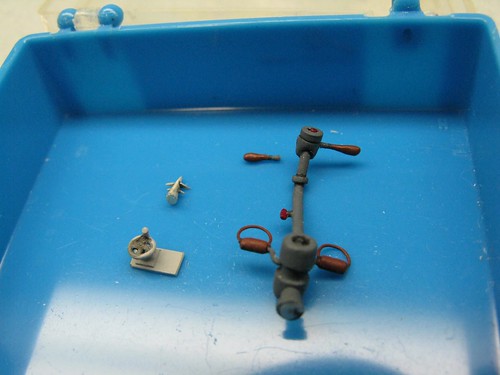
Below are some bits I made for the cockpit.  20 years of knocking about in a box has led to one of the control handles breaking off.  The little triangular thing on the left is a sighting vane, made from carved sheet plastic.  I can't see well enough to attempt such things anymore; I'd better not lose that part.

Pejite Gunship 05

The second "oldie-moldie" project is the Tolmekian Empire "Bakagalas" heavy transport.  The lumbering Me-323-like aircraft were seen being decimated by the Pejite gunship in the movie.  For this model, I used aircraft plywood and sheet plastic profiles and formers filled in with balsa wood to establish the basic shapes, and covered the surfaces with bent up sheets of plastic.  The aircraft in the movie had a lumpy, bumpy, saggy look to them, which carried over to the enormous wings.  They had all manner of dihedral and anhedral along the entire span, which would have made the Handley Page Victor blush!  Scale is again a best guess, but I am claiming 1/200 and am sticking with my story!  As you can see from the photo below, the span is over two feet.

Bakagalas 01


Bakagalas 02

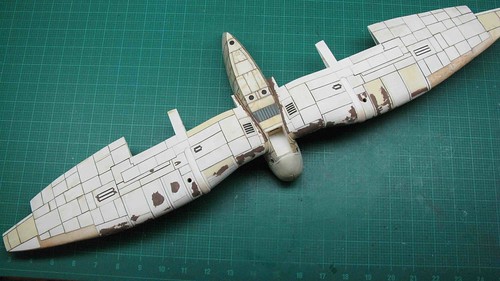
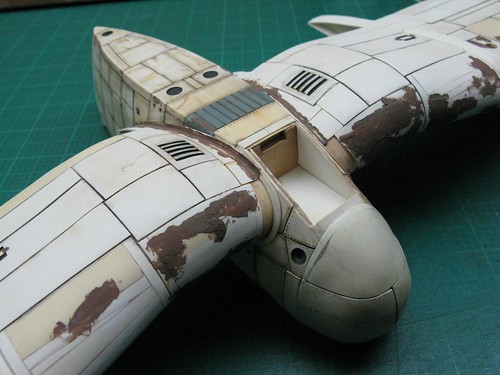
Again, plank on frame sheet plastic construction featured in this build.  I started having trouble when I got to the outer wings, where the leading edges were too sharp to bend the sheet material around, thus bringing the project to a halt.  I didn't think to heat form or use thin sheets of epoxy putty at the time.

Bakagalas 03

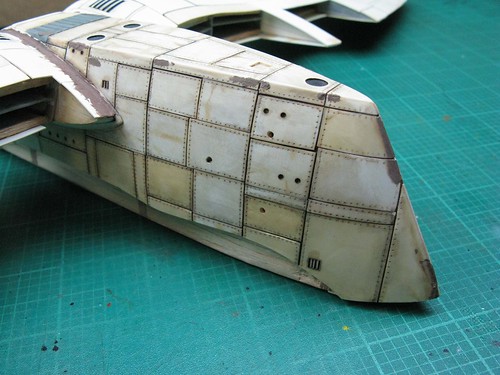
I used a compass needle to make rivets (which will now require the use of an Optivisor to complete the work).  It is interesting to see that the sheet plastic has yellowed differently over the years in storage.  I started the twin fins and the landing gear fairings, but can't find them at the moment.  Back then, I was stumped for a source of multiple balloon tires.  The aftermarket has sure grown, as it will be extremely easy to get them now.

When I started these projects two decades ago, I just charged into them without knowing how I would make any of the parts.  I think I bit off more than I could chew, which is what led them to be shelved.  The Bakagalas' structure is extremely sound, and has withstood time well.  The Gunship's proportions look off to me, so it might be scrapped and redone using smarter techniques.  I never did start on the Tolmekian Corvette, which looks like a scrapped He-111 fuselage with tandem wings.  Maybe I'll attempt that one and the Pejite Gunship in 1/72, to go with Tsukuda's Valley of the Wind Gunship.  Which I also have not started.  Embarrassed

Anyhow, comments, critiques, and a motivational kick in the pants are welcome!

“Ya ya ya, unicorn papoi!”

  • Member since
    July 2003
  • From: Huntington, WV
Posted by Kugai on Saturday, October 20, 2012 3:07 PM

Those are really impressive, especially the transport!

The corvette you mention is probably my favorite design from the story.  You'll have to post it if you ever make one.

In case you're interested in the valley of the Wind Gunship, Bandai made a kit, but availability may be an issue.

http://i712.photobucket.com/albums/ww122/randysmodels/No%20After%20Market%20Build%20Group/Group%20Badge/GBbadge2.jpghttp://i6.photobucket.com/albums/y211/razordws/GB%20Badges/WMIIIGBsmall.jpg

  • Member since
    May 2011
  • From: Honolulu, Hawaii
Posted by Real G on Saturday, October 20, 2012 7:05 PM

Thanks for the comments Kugai!

Yeah, I bought all the kits when they were first issued, but only finished two of the "Nausica on Kai" figure and one "Nausica with Ohmu".  Unfortunately, they were all for friends and I didn't have a digital camera back then, so no photos.  Sad  I noticed Bandai re-engineered the kits for snap construction.  Did they alter anything else?  There were some details that were correct for the comic but not the movie, like Nausica's headgear.  While digging around in the Moeve's box where the Pejite Gunship was stored, I noticed that I made new flaps of a more rectangular shape compared to the kit supplied items, plus a scratchbuilt "golf club" thingy that Nausica had in the movie.  You see, the models sat for so long that I forgot what I had done to them!

If I get around to doing the Corvette, it will probably be mostly vac formed sheet.  A friend has started dabbling in resin casting, so maybe I'll see if I can cast the detail parts that require multiple copies.

I wonder if anyone ever tried to make the other machines in the show, like the Pejite Barge and "anti-gravity flower pot", or the Tolmekian assault tank?  I saw some hand made bugs from the movie for sale at the Studio Ghibli shop in Japan.  They were mounted in wood boxes with glass tops, just like real preserved insect specimens, but a quick peek at the price tags discouraged me from a purchase.  (They were something like $1,500 to $2,500 USD, if I recall.  And no, I didn't inadvertently add extra zeros.)  The dragonfly looking things really caught my eye, as I couldn't figure out how the wings were made.  The veining was utterly realistic.

“Ya ya ya, unicorn papoi!”

  • Member since
    July 2003
  • From: Huntington, WV
Posted by Kugai on Sunday, October 21, 2012 12:38 AM

I never got to see any older kits that you mention, and only have the gunship ( not up to getting too many figure kits at this point ), so I can't really compare to the older versions you mentioned.

If I really wanted to make the Ohmu or other bugs, I'd rather try to make them myself than pay the prices you mentioned.  Even if it took 4 or 5 tries to get the sculpting right, it seems to me that the time and materials would cost a heck of a lot less for what I'd be content to display.

http://i712.photobucket.com/albums/ww122/randysmodels/No%20After%20Market%20Build%20Group/Group%20Badge/GBbadge2.jpghttp://i6.photobucket.com/albums/y211/razordws/GB%20Badges/WMIIIGBsmall.jpg

  • Member since
    May 2011
  • From: Honolulu, Hawaii
Posted by Real G on Sunday, October 21, 2012 4:32 AM

Here  is a link to the other Nausica kits, as produced by Bandai:

http://www.hlj.com/scripts/hljlist?GenreCode2=Sci&Word=nausicaa&x=23&y=20

The Ohmu could easily represent an adult, as they all look the same save for size.  The big harpoons in the kit are optional, so the baby Ohmu comes without any pre-molded injuries thank goodness.  It was a pretty nice kit; the only mods I did were to move the legs a bit inboard (which the Bandai version seems to have addressed?) and added some yellow antennas from Kynar wire.

The Studio Ghibli bugs were really nice, but yeah, I'd rather try to make them myself.  I'd fancy the big flying centipede (I think it was called a Hebigera).  But I still can't figure out how to make realistic transparent veined wings.  Plus I already have too many projects.

“Ya ya ya, unicorn papoi!”

  • Member since
    July 2003
  • From: Huntington, WV
Posted by Kugai on Sunday, October 21, 2012 7:17 PM

Real G

I'd fancy the big flying centipede (I think it was called a Hebigera).  But I still can't figure out how to make realistic transparent veined wings.  Plus I already have too many projects.

In case you seriously try that some day, I can think of a few ways that could be done, but I don't know how thin and delicate the wings were on the originals you're talking about.

One option I can think of is vacuform with clear styrene.  That's the best way I can think of to get the parts thin enough to look right, but the catch is having the equipment.

Another option would be clear resin, which I've never used, but the parts could end up being very brittle if  that stuff behaves like the resin I've used when cast in thin pieces.

Another that might work could use clear brush-on material of some type and a leaf with a vein pattern that fits what you like ( I remember this being used in a science class so that we could see what some structures look like under a microscope when we couldn't use the leaf itself ), cover the area with layers of the clear paint ( the science class project used clear nail polish ) as needed, then peel it off when it's dry.  You can use a water-based wash to bring out the vein details on the rough side, and trim to fit a thin wire "outline" of the wing shape that the sheet could be glued to.  Again, this would be delicate, but it would have a natural look to it and save you the trouble of sculpting the details, or messing with molds for resin or equipment for vacuforming.

http://i712.photobucket.com/albums/ww122/randysmodels/No%20After%20Market%20Build%20Group/Group%20Badge/GBbadge2.jpghttp://i6.photobucket.com/albums/y211/razordws/GB%20Badges/WMIIIGBsmall.jpg

  • Member since
    June 2010
  • From: Australia
Posted by OctaneOrange on Tuesday, October 23, 2012 9:38 PM

interesting modelling work there. a shame the styrene panels need to be covered in paint (hopefully you wont' loose to much detail). it's worth pushing ahead with these, they are so unique.

  • Member since
    March 2006
Posted by TD4438 on Wednesday, October 24, 2012 8:25 AM

That is some spectacular workmanship.

  • Member since
    October 2009
Posted by DrShrinker on Wednesday, October 24, 2012 10:03 AM

wow effing cool.

  • Member since
    October 2008
  • From: italy
Posted by bsyamato on Wednesday, October 24, 2012 11:39 AM

Real ,you're really a scratchbuild masters!! just other day discussing with an italian modeller that want to build the "porco rosso" pirates fliyng boat , i proposed a scratchbuild of one from miyazaki giant planes too.. but i just kidding Indifferent

  • Member since
    January 2005
  • From: Cave City, KY
Posted by Watchmann on Wednesday, October 24, 2012 1:33 PM

Yes, please continue working on these projects!

I'd like to make some myself. :)

Have you all seen the Miyazaki Mecha Modeler's Club website?  Some great inspiration and tips!

Yamato, check your Messages.

m@

  • Member since
    May 2011
  • From: Honolulu, Hawaii
Posted by Real G on Wednesday, October 24, 2012 2:23 PM

Guys, thanks for the positive comments!

Watchmann, that is a fantstic site!  I see someone else has started a Pejite Gunship.  The caption says that he modeled it after the comic version, which is a little different in shape compared to the movie.  And two Tolmekian Corvette builds!  Wow!

I am hoping to get motivated to restart these projects, especially the Bakagalas.  I still can't find the stabilizers, wheel fairings, and flaps.  I know they are some place, I just can't remember where I put them.  I took a look at what I still needed to make, and it is a lot!  That plane was covered with lots and lots of lumps and bumps.  Plus I need to make the underwing fairings for the engines, and figure a way to make the angular canopy.  I tried making a test canopy with clear sheet and white plastic frames, but it was too clumsy looking.  Maybe lead foil frames over a vac-form shell would do the trick for the canopy.

It is also my hope that I have poisoned a few minds into starting similar projects.  Come on, Bsyamato, I know you can do it!  (I apologize for not finishing any OYW kits.  I will finish them, really!)


“Ya ya ya, unicorn papoi!”

  • Member since
    May 2011
  • From: Honolulu, Hawaii
Posted by Real G on Wednesday, October 24, 2012 8:51 PM

I found some sketches I did way back when I started the models.  I used to make a lot of sketches, including multi-views to establish proportions and details prior to construction.  Nowadays, I don't do such things.  I just wait for the injected kit to come out.  Anyway, here they are:


Bakagalas-2 View


Bakagalas-Front View


Bakagalas-Wing


Pejite Gunship-2 View


I think the Pejite Gunship was developed using more finished drawings, as I seem to recall doing a side view as well.


Tolmekian Corvette-Side View 


The last sketch is of the Tolmekian Corvette, which obviously was my least developed project.

Hopefully I can get back on the Bakagalas model soon and finish it.  It is kind of embarassing to have stuff like this just lying about for two decades, while I sit around doing nothing.  To be honest, I would not have started something like this today.  I'd better find those AWOL parts.

So how does everyone else start their projects?  (Mine goes something like this:  1) Find something that catches my fancy.  2) Make frenzied sketches.  3) Start chopping sheet plastic.  4) Realize that I haven't thought something through.  5) Get depressed and shelve the model.  6) Wait 20 years.  7) Dig model out of closet.  8) Put model back in closet.  9) Wait a couple of years.  10) Pull model out again.  11) Repeat a couple of times.  13) Realize that the previously unsolvable problem can now be solved.  14) Finally get off my duff and finish the model.  I hope it works this time around!


“Ya ya ya, unicorn papoi!”

  • Member since
    January 2005
  • From: Cave City, KY
Posted by Watchmann on Wednesday, October 24, 2012 9:08 PM

Thanks for the sketches!

And yes, that's how all my projects go... except for number 14.

  • Member since
    November 2009
Posted by artworks2 on Wednesday, October 24, 2012 11:19 PM

Awesome  Details,I like SciFi models.....

  • Member since
    May 2011
  • From: Honolulu, Hawaii
Posted by Real G on Friday, October 26, 2012 6:52 PM

I found  the remaining parts last night:

Bakagalas-Bits N Pieces-1

The canopy was an experiment, to figure out how to fabricate it.  It was not successful, so I will use another method which will yield a better fitting canopy with fewer parts.  Right now I am leaning towards carving one from polyester putty, and vac-forming it in two or three pieces due to the inward slant of the lower windows.

Bakagalas-Underside-1.

The landing gear sponsons still need to be shaped, and will require fairings inboard of the wheel wells.  The similarity to the Me-323 (powered Me-321) Gigant is particularly striking here.

Progress photos will follow, hopefully in less time than the ADP Heli.  Embarrassed.

“Ya ya ya, unicorn papoi!”

  • Member since
    August 2007
  • From: back country of SO-CAL, at the birth place of Naval Aviation
Posted by DUSTER on Friday, October 26, 2012 9:53 PM

OK I'll say it   thats hot!  (means Very Good fyi)

Your idea to vac form the canopy sounds like a better alternative; also don't forget you can vacuum form needed body /wing panels in white styrene as well.

 It might save a bit of time cutting and gluing multiple small styrene parts together.


Reguardless, great job to date; looking forward to your next update.


Steve

Building the perfect model---just not quite yet  Confused

  • Member since
    May 2011
  • From: Honolulu, Hawaii
Posted by Real G on Friday, October 26, 2012 10:04 PM

Thanks Duster!

I think I will also try lead foil to make confomal sheeting for some of the details.  I just need to source a lot of thin lead sheet.  (I don't drink wine.  Toast )

“Ya ya ya, unicorn papoi!”

  • Member since
    May 2011
  • From: Honolulu, Hawaii
Posted by Real G on Monday, February 12, 2018 5:19 PM

Super necro-thread!!!

I dusted off this 25+ year old shelf queen and decided I'd better finish it before I start collecting social security (assuming there will be such a thing by the time I retire).  One of the problems I was faced with was how to set the alignment of the fins.  At the time, I had never used jigs to assist in assembly and didn't know how to make one.  Fast foward to last week, and after an evening doodle session and another one cutting up foam core, I have this.

https://flic.kr/p/24fg4HG] [/url]Bakagalas-07 by N.T. Izumi, on Flickr

The portion of the base with the fin jig slides out to allow its removal while leaving the fins in place.  Hopefully this will allow me to fabricate and install struts with the correct lengths and angles.

https://flic.kr/p/KiAdLM] [/url]Bakagalas-05 by N.T. Izumi, on Flickr

The enormous base also helps to get the wingtips level and to set the ground clearance.

This model was the most ambitious scratchbuild I have ever attempted, but despite its age, it has proven to be structurally sound.  Some of my construction choices are laugable today, but the advantage to being a glacially slow modeler is that you pick up all kinds of tricks during the passage of time.  What was once unsolvable is now possible.  I was also at a loss to source wheels, but now the question is not "where" but "which one".  Hopefully it will be possible to finish this one.

“Ya ya ya, unicorn papoi!”

  • Member since
    May 2011
  • From: Honolulu, Hawaii
Posted by Real G on Tuesday, February 13, 2018 4:37 PM

I cut some brass wire to make the support struts for the fins and test fitted them using the jig.  The narrow space between the fins, fuselage and jig made it difficult to take measurements for the struts, so I made a set of dividers composed of a pair of old Xacto blades, magnets, and a steel tweezer.  It worked well, but I'd better get a set of real dividers next time!

https://flic.kr/p/23e4Hq5] [/url]Bakagalas-08 by N.T. Izumi, on Flickr

Everything seemed to line up pretty well, so the next step is to clad the wires with sheet plastic to form the airfoil cross section.  Some teardrop shaped sheet plastic will form the basis for the strut to fuselage/fin fairings.

https://flic.kr/p/23e4GKC] [/url]Bakagalas-09 by N.T. Izumi, on Flickr

“Ya ya ya, unicorn papoi!”

  • Member since
    January 2006
  • From: California
Posted by SprueOne on Tuesday, February 13, 2018 7:59 PM

Clever idea making the dividers Idea Yes


Beer

Anyone with a good car don't need to be justified - Hazel Motes


Iron Rails 2015 by Wayne Cassell Weekend Madness sprueone

  • Member since
    November 2009
  • From: SW Virginia
Posted by Gamera on Wednesday, February 14, 2018 11:56 AM

Oh very cool! Glad to see you pull this back out of mothballs. 

"I dream in fire but work in clay." -Arthur Machen


  • Member since
    January 2018
Posted by PeterPan on Friday, February 16, 2018 12:43 AM

Peter

  • Member since
    May 2011
  • From: Honolulu, Hawaii
Posted by Real G on Wednesday, February 21, 2018 4:42 PM

Oh Peter Pan, yousa breenga thats lousy Jarjar!  He no welcome here!  Stick out tongue

Not having much bench time, but I have been working on the fin assemblies.  One support strut has been fitted with base plates.  Things have gone better than I was expecting, as fitting the struts to the curved fuselage was not too diffcult.

https://flic.kr/p/ELm1de] [/url]Bakagalas-11 by N.T. Izumi, on Flickr

https://flic.kr/p/24nkCeJ] [/url]Bakagalas-12 by N.T. Izumi, on Flickr

But I realized the fins needed to have their rudders fitted to ensure proper fit into the jig assembly, so some sheet plastic was stacked and glued together.  The inner two sheets' mating surfaces were colored with pencil lead to provide a centerline reference during the shaping process.  I have used permanent marker for this previously, but it gets messy with the liquid glue.

https://flic.kr/p/23sWNxQ] [/url]Bakagalas-13 by N.T. Izumi, on Flickr

https://flic.kr/p/23sWNom] [/url]Bakagalas-14 by N.T. Izumi, on Flickr

https://flic.kr/p/24tNjFh] [/url]Bakagalas-15 by N.T. Izumi, on Flickr

The plan is to finish the fins as close to 100% as possible to get a morale boost.  Then the wings will be tackled, followed by the landing gear sponsons.  By that time I should be in the swing to make the faceted canopy and all the little bits like the gun ports.

The glue is drying while I am at work today.  Can't wait to get home and crack on with sanding the rudders!


“Ya ya ya, unicorn papoi!”

  • Member since
    November 2009
  • From: SW Virginia
Posted by Gamera on Thursday, February 22, 2018 7:31 AM

Awesome G, love the steampunkish look of all those rivets. 

"I dream in fire but work in clay." -Arthur Machen


  • Member since
    May 2011
  • From: Honolulu, Hawaii
Posted by Real G on Thursday, February 22, 2018 6:19 PM

I was able to sand one rudder last night.  Note the slight curve at the top trailing edge, which is intentional in order to meet up with the fin profile.  I hope to get the other one done soon.  They will get lots of lumps and bumps to set the "feel" for the rest of the model.

https://flic.kr/p/21Py24y] [/url]Bakagalas-16 by N.T. Izumi, on Flickr

Gamera, the recessed rivets will be replaced with raised resin rivets.  The fins will be the test to verify if this is the way to go.  I'll be using Archer rivet decals, as they are quality and go on easily.

https://flic.kr/p/uwLYLN] [/url]P34-037 by N.T. Izumi, on Flickr

“Ya ya ya, unicorn papoi!”

  • Member since
    November 2009
  • From: SW Virginia
Posted by Gamera on Friday, February 23, 2018 9:49 AM

Oh cool G, I've picked up a sheet of those Archer rivet decals but haven't used any yet. Looking forward to seeing how they work for you. 

"I dream in fire but work in clay." -Arthur Machen


  • Member since
    May 2011
  • From: Honolulu, Hawaii
Posted by Real G on Friday, February 23, 2018 4:10 PM

Gamera,

The Archer rivet decals work really good.  The clear film is thin yet fairly durable, and it responds to Micro-Set and Micro-Sol.  No need to break out the heavy duty Solvaset or Mr. Mark Softer.  It also sticks pretty good too.  The only tip I can offer to get the most out of using the decals is to use a sharp knife to cut as close to the line of rivets as possible.  Oh and measure first - this stuff is expensive!

Here is another stalled project that trialed the Archer rivets:

https://flic.kr/p/sCQ9Zz] [/url]P34-015 by N.T. Izumi, on Flickr

https://flic.kr/p/vruyku] [/url]P34-038 by N.T. Izumi, on Flickr

https://flic.kr/p/vmvkiy] [/url]P34-064 by N.T. Izumi, on Flickr

“Ya ya ya, unicorn papoi!”

  • Member since
    November 2009
  • From: SW Virginia
Posted by Gamera on Saturday, February 24, 2018 8:11 AM

Thanks G for the info on the rivets. And nice work there with them!

"I dream in fire but work in clay." -Arthur Machen


  • Member since
    May 2011
  • From: Honolulu, Hawaii
Posted by Real G on Wednesday, February 28, 2018 11:35 AM

The fin support struts had their base plates trimmed, and the starboard rudder has been scribed.  Now to detail the fins with lumps, bumps, and access panels.

https://flic.kr/p/23ozuxP] [/url]Bakagalas-21 by N.T. Izumi, on Flickr

https://flic.kr/p/GBhrw7] [/url]Bakagalas-20 by N.T. Izumi, on Flickr

I am still undecided how to make the many aerodynamic lumps needed for the model.  Heat press, i.e. smash molding, is easy to do but yields inconsistent results.  A female mold made from quick set plaster is more labor intensive to set up, but will get better results and allow for mass production.  I am leaning towards the second option as I have never tried this.

“Ya ya ya, unicorn papoi!”

JOIN OUR COMMUNITY!

Our community is FREE to join. To participate you must either login or register for an account.

SEARCH FORUMS
FREE NEWSLETTER
By signing up you may also receive reader surveys and occasional special offers. We do not sell, rent or trade our email lists. View our Privacy Policy.