SEARCH FINESCALE.COM

Enter keywords or a search phrase below:

The Endless Nausicaa Model Thread

57510 views
335 replies
1 rating 2 rating 3 rating 4 rating 5 rating
  • Member since
    May 2011
  • From: Honolulu, Hawaii
Posted by Real G on Thursday, June 28, 2018 6:12 PM

Until I find my vac-former (ex-bread pan), I decided to get back on the engine fairings.  Since I never did drawings of them, except for the largest inboard units, I estimated their size and shape, cut some patterns from old business cards, and taped them to the underside of one wing.  It took two tries to refine their shapes, but I think I have something that I like.  The problem with making something from an anime is that a lot of times getting hard information is imposssible, and the images in the show are wildly inconsistent.

https://flic.kr/p/28Baiya] [/url]Bakagalas-152 by N.T. Izumi, on Flickr

https://flic.kr/p/28BahBv] [/url]Bakagalas-153 by N.T. Izumi, on Flickr

And this is a glimpse into the inside of my disorganized mind trying to figure stuff out.  Also, I have to write stuff down, or else I'll forget how much to cut!  It happens more often than I care to admit.

https://flic.kr/p/JXjzH6] [/url]Bakagalas-154 by N.T. Izumi, on Flickr


“Ya ya ya, unicorn papoi!”

  • Member since
    May 2011
  • From: Honolulu, Hawaii
Posted by Real G on Friday, June 29, 2018 5:44 PM

The four outboard engine fairings have been started.  They have a simple shape compared to the four inboard units, so should be relatively trouble-free.

https://flic.kr/p/28DryGc] [/url]Bakagalas-158 by N.T. Izumi, on Flickr

I've also started on the second inboard fairing, but this is as far as I got before 1:00 am.

https://flic.kr/p/28yWqjy] [/url]Bakagalas-157 by N.T. Izumi, on Flickr

I'm getting more used to setting the alignment of the fairings to the wings now, and improving accuracy when drilling locator holes.  The new fairings stay in place but are easy to remove for work.

https://flic.kr/p/28yWr3N] [/url]Bakagalas-156 by N.T. Izumi, on Flickr

https://flic.kr/p/28yWqPw] [/url]Bakagalas-155 by N.T. Izumi, on Flickr

Now where did that vac-form rig go...

“Ya ya ya, unicorn papoi!”

  • Member since
    July 2014
  • From: Franklin Wi
Posted by Bakster on Friday, June 29, 2018 6:05 PM

I admire your dedication to this project and the results. Nice work.

  • Member since
    May 2011
  • From: Honolulu, Hawaii
Posted by Real G on Saturday, June 30, 2018 3:13 PM

Thank you Bakster!  I don't have "clever apes" to assist me, so the going is much slower than I'd like.  Stick out tongue  

“Ya ya ya, unicorn papoi!”

  • Member since
    May 2011
  • From: Honolulu, Hawaii
Posted by Real G on Saturday, June 30, 2018 4:41 PM

Some progress on the outboard engine fairings.

https://flic.kr/p/LxeWnm] [/url]Bakagalas-159 by N.T. Izumi, on Flickr

https://flic.kr/p/LxeVL1] [/url]Bakagalas-160 by N.T. Izumi, on Flickr

https://flic.kr/p/Ly3GKN] [/url]Bakagalas-166 by N.T. Izumi, on Flickr

I also started to make some vent details that could be dropped into blocked out openings in the fairings as well as other locations around the airframe.

https://flic.kr/p/25V2nZf] [/url]Bakagalas-163 by N.T. Izumi, on Flickr

https://flic.kr/p/LxeW2w] [/url]Bakagalas-164 by N.T. Izumi, on Flickr

They are built up as a strip that can be cut to needed lengths.  I figure this is an easier way to make rather than building them individually and directly on the model.  I made enough to do all eight engines, plus extra for the wings.  I'm going to need more sizes and different shapes for the wings, so this is a good way to trial the technique.

“Ya ya ya, unicorn papoi!”

  • Member since
    March 2007
  • From: Northeast WA State
Posted by armornut on Saturday, June 30, 2018 6:07 PM

    Real G, I am gonna figure out how to bookmark this thread so I can find it in my archives. These most resent pictures are really helping me to put the puzzle of scratch building together. I understand that practice is the key but you kinda showing how to start the prosess is great. 

     Absolutely love your progress, totally AWESOME!

we're modelers it's what we do

  • Member since
    May 2011
  • From: Honolulu, Hawaii
Posted by Real G on Saturday, June 30, 2018 11:12 PM

Armornut, glad to have inspired you!  Scratchbuilding is really about understanding the geometry of your subject and figuring out how to make it using the simplest methods possible.  Experience comes in mostly to help decide which technique to use to make it happen.  Honestly I am figuring out stuff as I go; there is no master plan.

Detail work is coming really soon, so hopefully I can reveal more helpful ideas!

“Ya ya ya, unicorn papoi!”

  • Member since
    May 2011
  • From: Honolulu, Hawaii
Posted by Real G on Monday, July 2, 2018 5:20 PM

Not much to show over the weekend, but here is where I'm at.

https://flic.kr/p/27DnnCY] [/url]Bakagalas-168 by N.T. Izumi, on Flickr

The maze of strip plastic is to help define the major panel line locations, and to create block-outs for the vent detail.

https://flic.kr/p/27mXEEt] [/url]Bakagalas-169 by N.T. Izumi, on Flickr

This shot is just for fun.  It made me think of the RAF's Vulcan B.2 bomber, with its cranked wing leading edge.  I got to see real, live Vulcans on two occasions, when they stopped by Hickam AFB during open house day back in the 1970s.  Gosh, I wish I had a digital camera back then.  As it is, I only got the unit marking of the second one - I might have to build that particular aircraft later on.

Anyway, I'm behind schedule building the engines - I have just started on the #5 unit, and the #3 and #6 units have yet to even be roughed out.  I'm thinking of using Milliput to speed the filling process, as the strip lay-up method yields great results but is time consuming.  Here is the start of the #5 unit, which will be identical to the finished #4.

https://flic.kr/p/27mXEWF] [/url]Bakagalas-171 by N.T. Izumi, on Flickr

Now where the heck is that vac-former?

“Ya ya ya, unicorn papoi!”

  • Member since
    November 2009
  • From: SW Virginia
Posted by Gamera on Monday, July 2, 2018 9:46 PM

Oh wow, those engine parts look friggin' amazing!

"I dream in fire but work in clay." -Arthur Machen


  • Member since
    May 2011
  • From: Honolulu, Hawaii
Posted by Real G on Tuesday, July 3, 2018 1:41 PM

Thanks Gamera!

I decided to go with the more time consuming method of using sheet plastic versus epoxy putty, as I am planning on adding small detail parts with liquid cement.  I don't like the one-shot aspect of CA, plus I have had CA spall the epoxy putty when the parts got bumped.

https://flic.kr/p/K7TY6c] [/url]Bakagalas-173 by N.T. Izumi, on Flickr

The outboard engine fairings are not fully filled in, so they kind of look like mock-up aircraft cockpits at the moment.

Gotta hurry up and do the remaining inboard engines.

“Ya ya ya, unicorn papoi!”

  • Member since
    July 2014
  • From: Philadelphia Pa
Posted by Nino on Tuesday, July 3, 2018 5:22 PM

Real G

[/url]Bakagalas-173 by N.T. Izumi, on Flickr

Gotta hurry up and do the remaining inboard engines.


Thank you for this great Flickr link (and pic of the Star Wars Toast).

I am late for dinner 'cause I could not stop reviewing the hundreds of photos.

   Nino.

  • Member since
    May 2011
  • From: Honolulu, Hawaii
Posted by Real G on Tuesday, July 3, 2018 6:12 PM

Nino, ha-ha you found the Star Wars toast!  They should have done a Kylo Ren toaster that only shredded and burned the toast!  Glad to have provided some entertainment!

“Ya ya ya, unicorn papoi!”

  • Member since
    May 2011
  • From: Honolulu, Hawaii
Posted by Real G on Thursday, July 5, 2018 1:31 PM

I managed to get some bench time between grilling hot dogs and burgers over the July 4th holiday (and got a mean sunburn in only 1-1/2 hours manning the grille).

Anyway, all of the underwing fairings have been started; it's getting crowded under there!

https://flic.kr/p/28PitHF] 
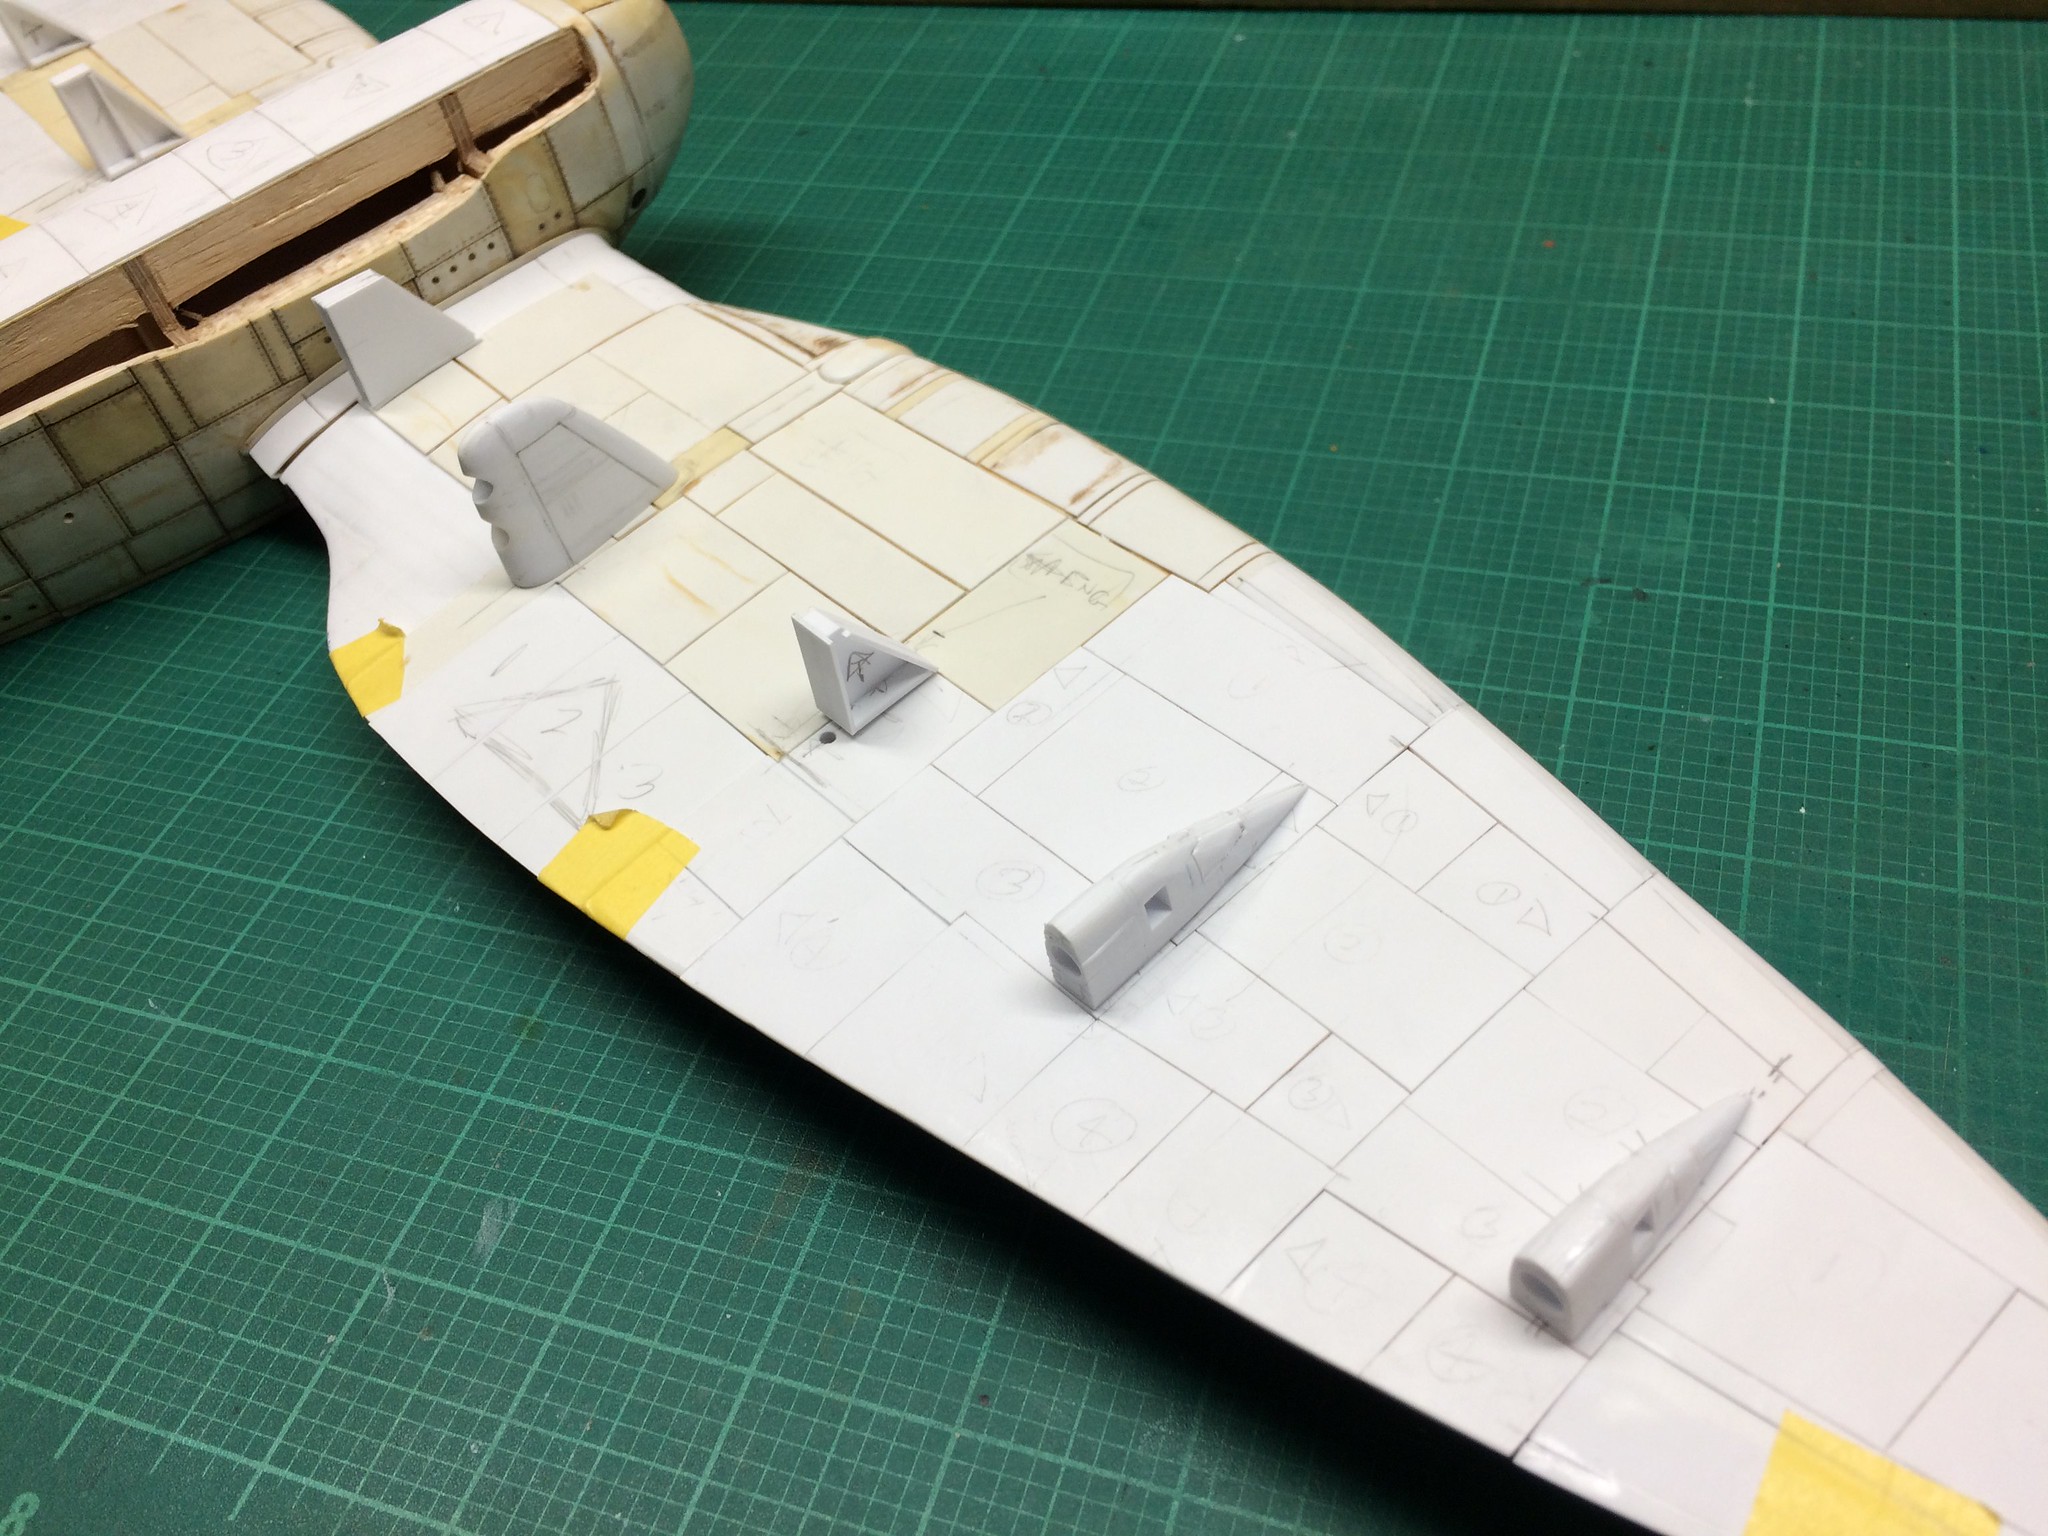
[/url]Bakagalas-174 by N.T. Izumi, on Flickr

https://flic.kr/p/28JTKz3] 
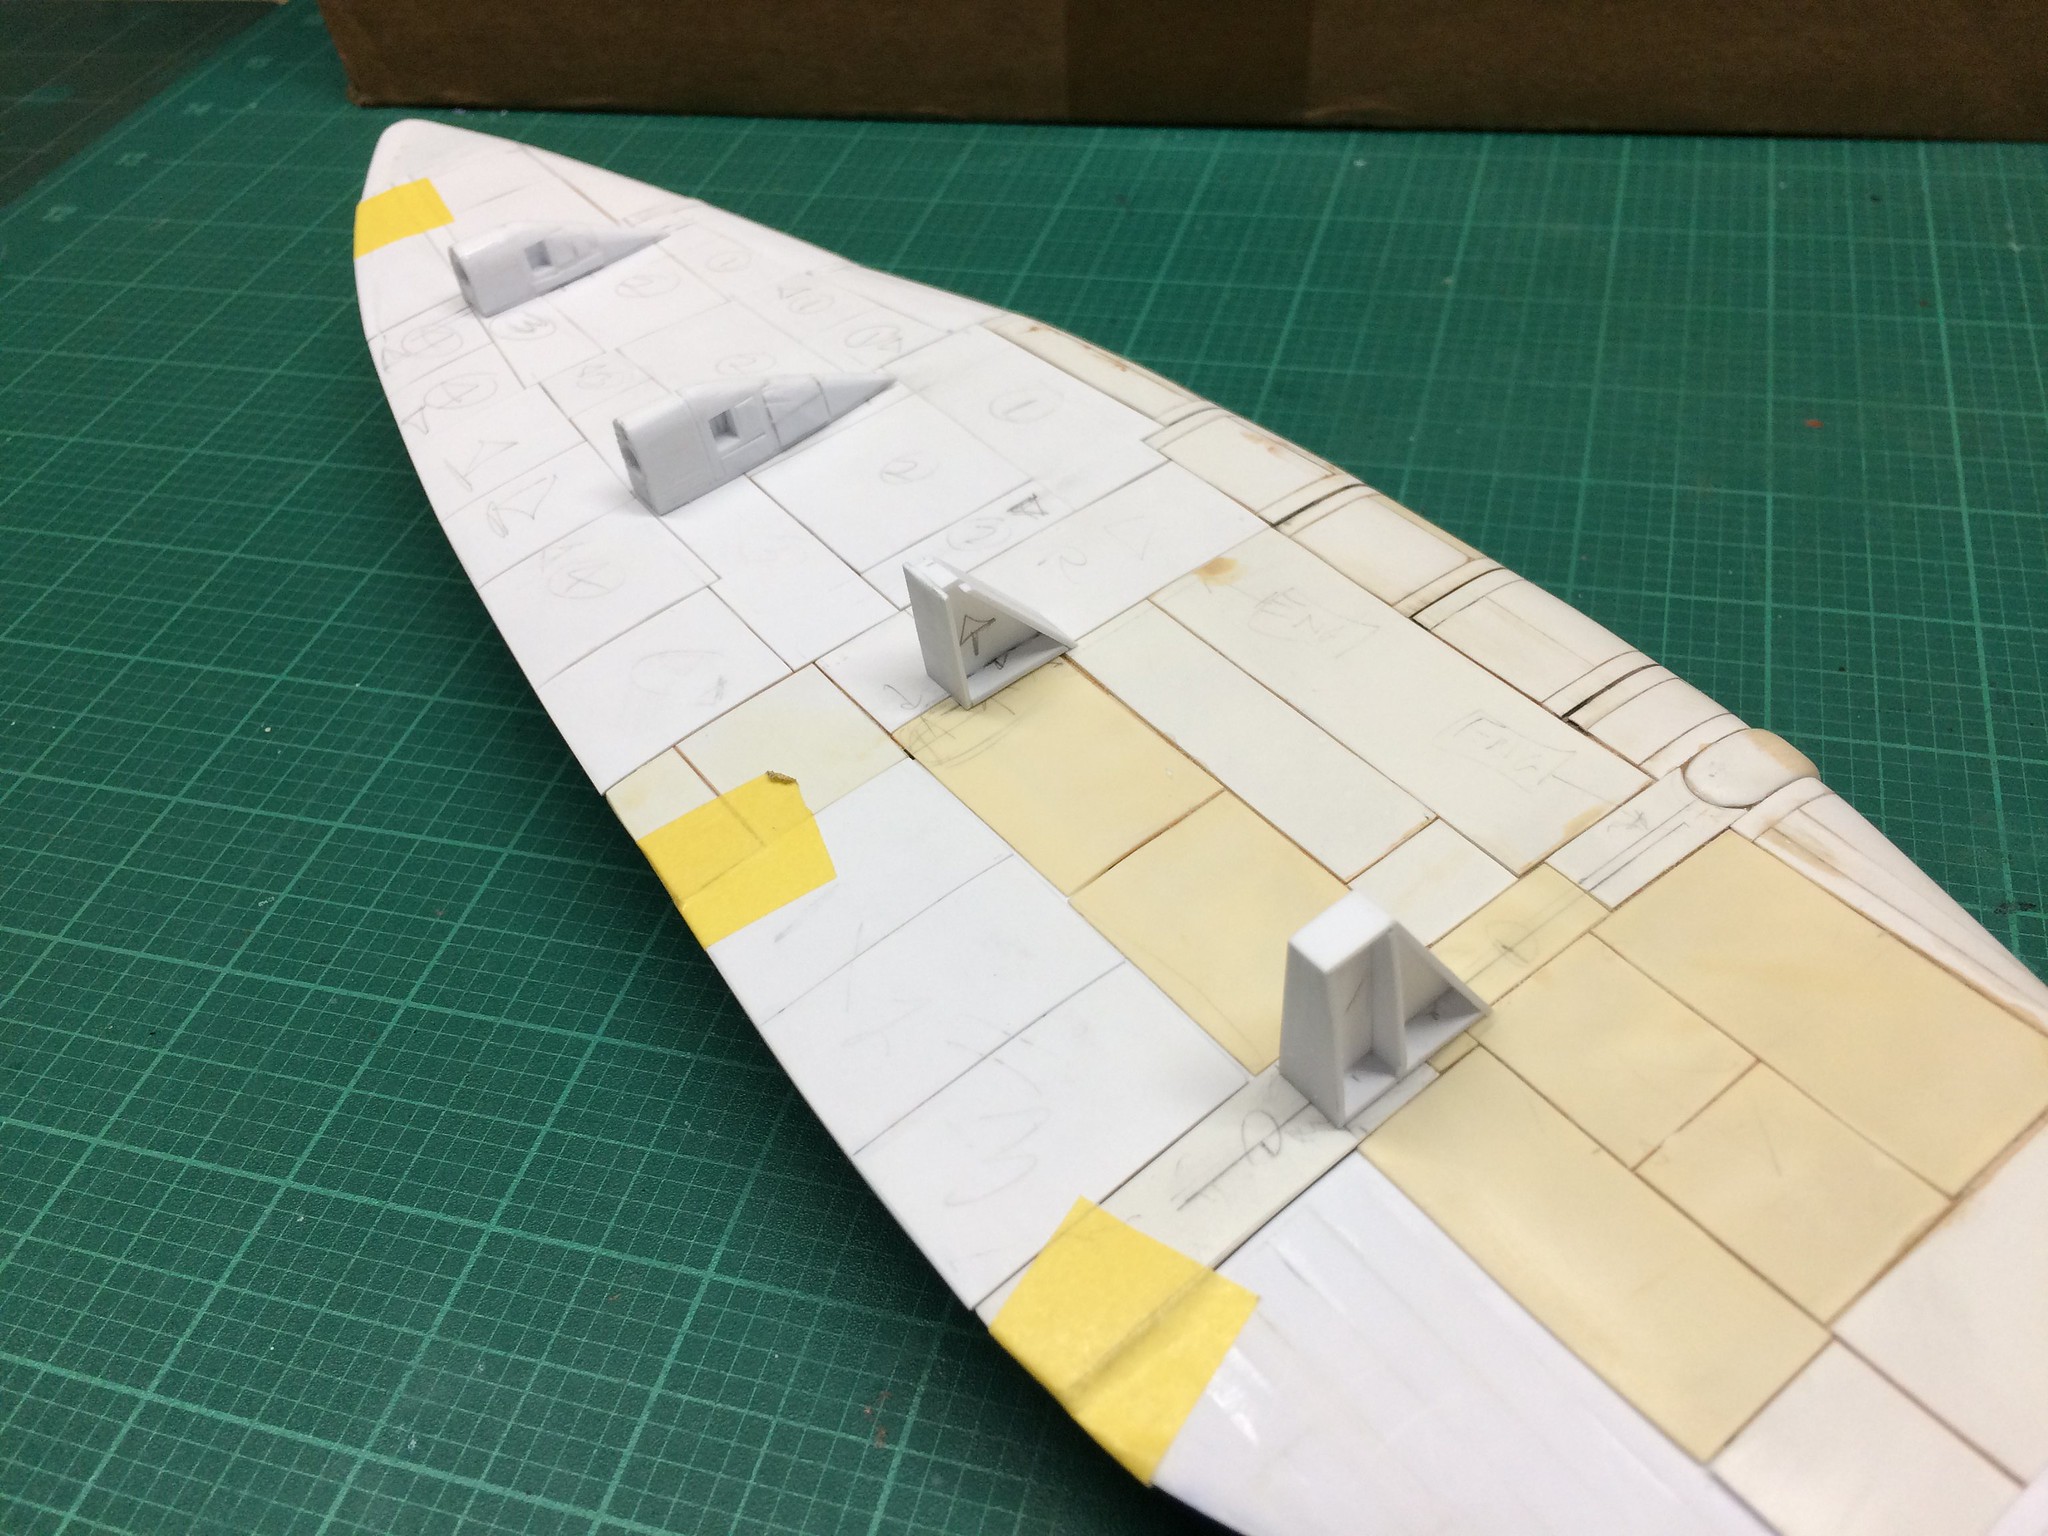
[/url]Bakagalas-175 by N.T. Izumi, on Flickr

I'm not looking forward to finishing up the #3, #5, and #6 engine fairings, as they require careful measurement and cutting.

https://flic.kr/p/LFAW95] 
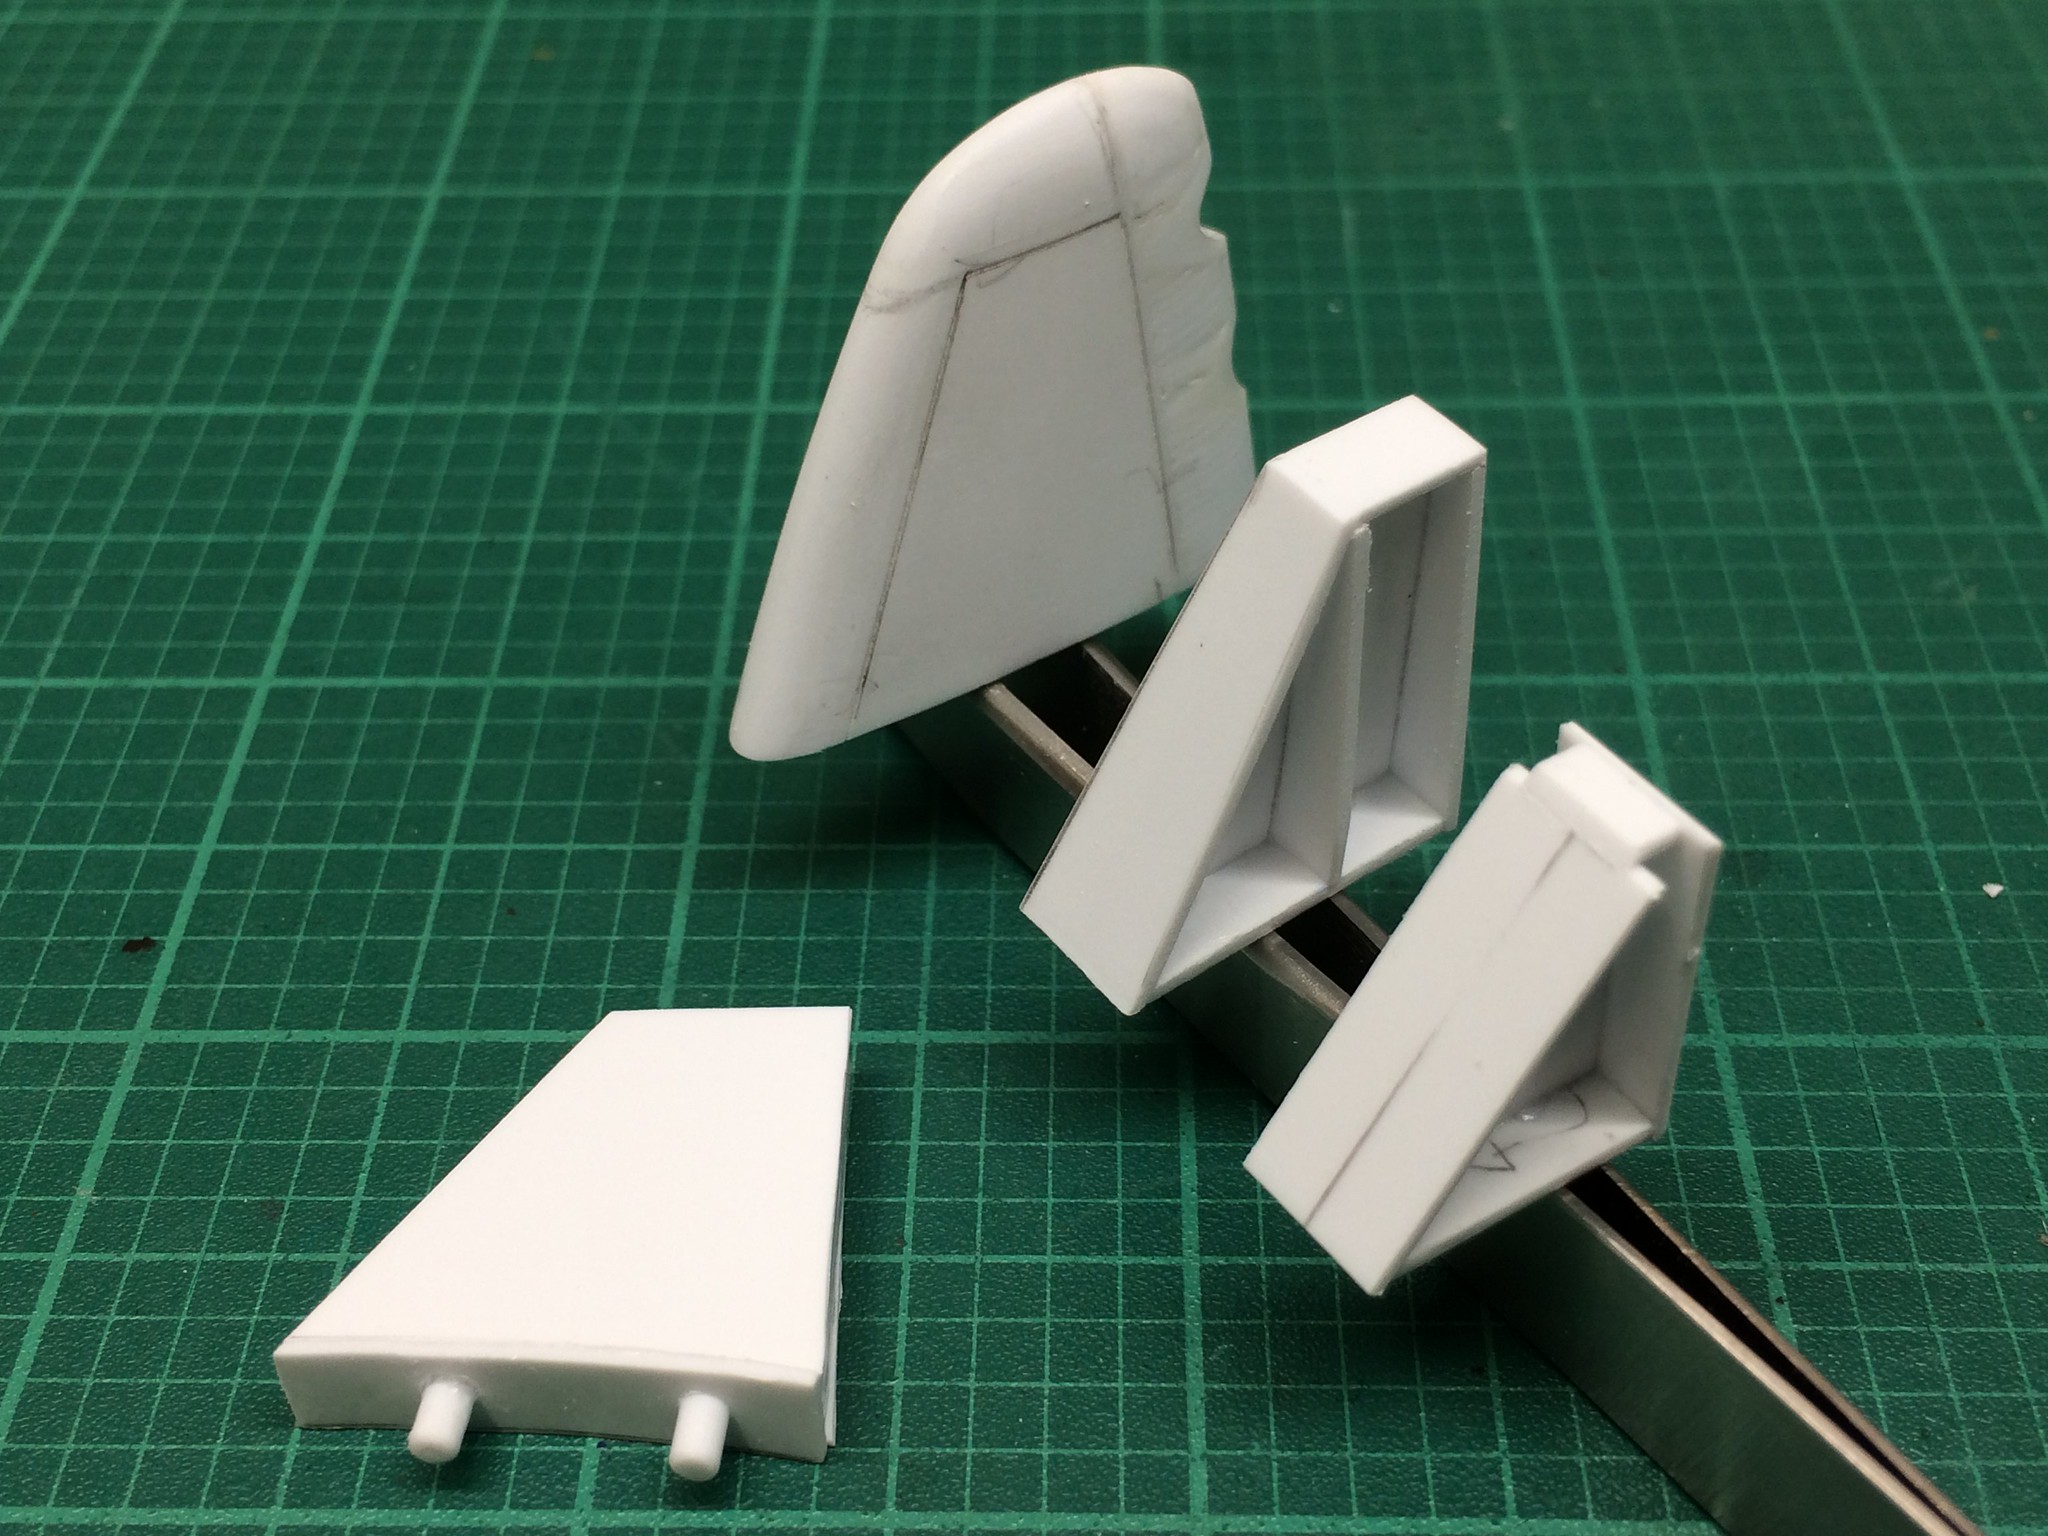
[/url]Bakagalas-177 by N.T. Izumi, on Flickr

Here are the cores for the #5 and #6 engines next to the fully shaped #4 unit, along with an inboard flap fairing.  I made sure the piping that forms the sleeves for the engine exhaust tubes would fit within their cross sections.  The Bakagalas appears to have two sizes of engines - the #4 and #5 fairings have one each of the large and small size, the#1-3 and #6,-8 have only one.  Since the outer engines use the small size, I thought it appropriate for the #3 and #6 units to use the large size.  It's really hard to tell relative size from the anime.

https://flic.kr/p/28K1FCm] 
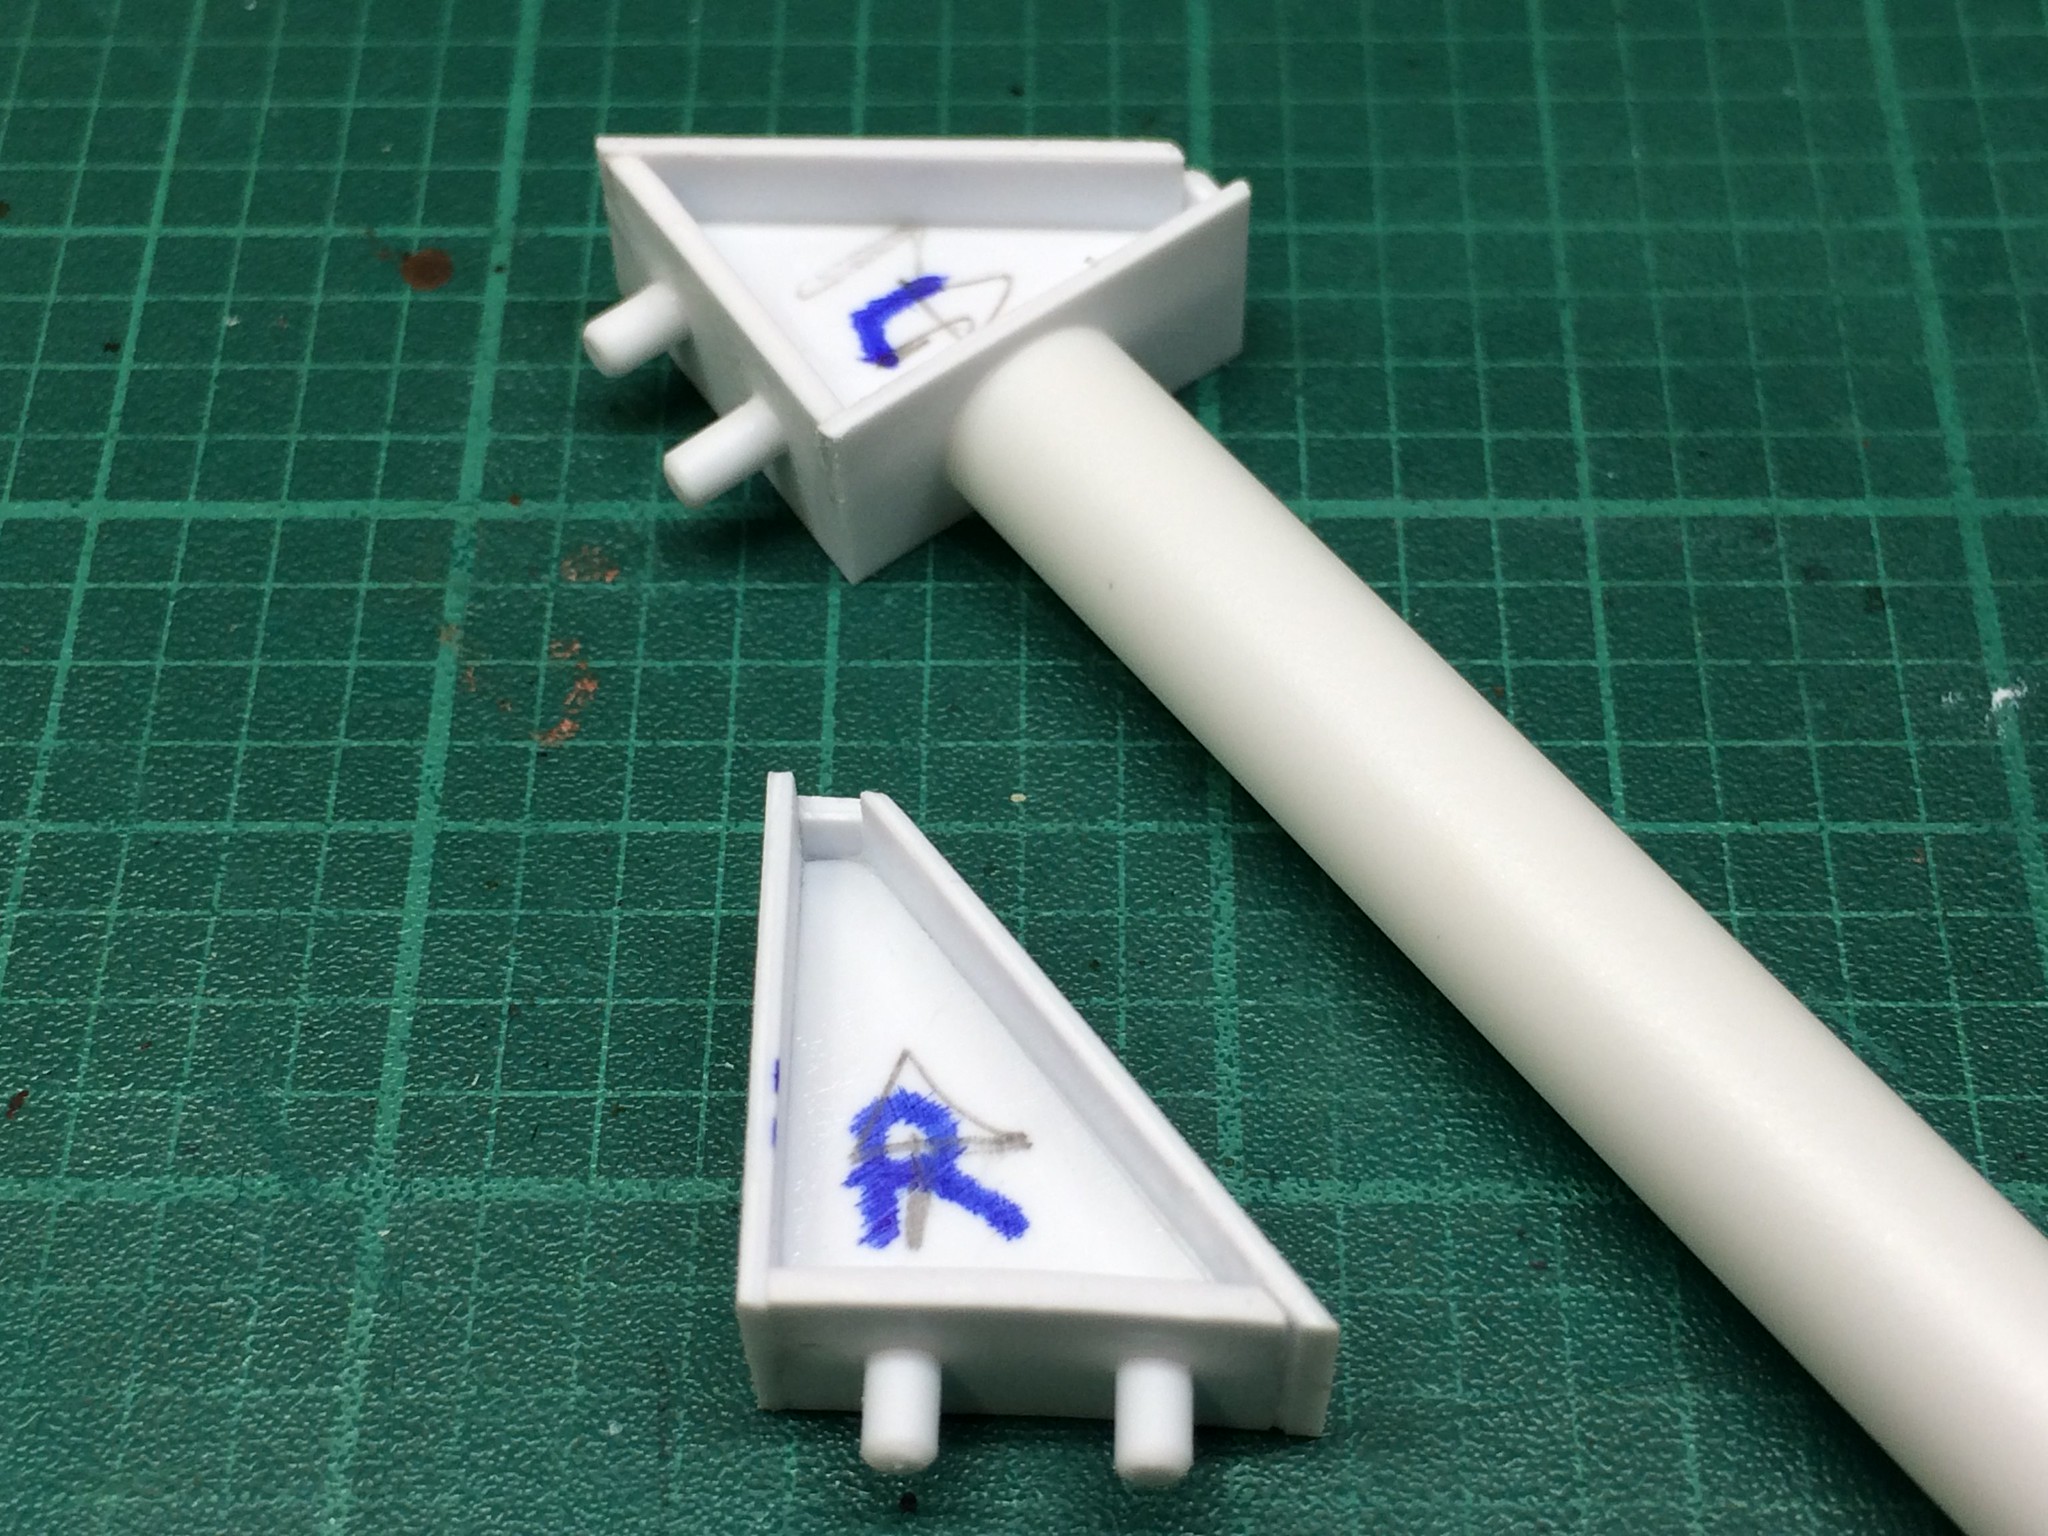
[/url]Bakagalas-178 by N.T. Izumi, on Flickr

After much thought (and staring at anime stills from the movie) I'm having second thoughts about using the AH-64 Apache blades for the Youngman-type flaps.  I might substitute some Contrail airfoil strus which have a narrower chord.  I have had the struts for ages, about as long as I've had the Bakagalas, and never even used a single piece.  Time to make them go to work.  Photos will follow.

“Ya ya ya, unicorn papoi!”

  • Member since
    November 2009
  • From: SW Virginia
Posted by Gamera on Friday, July 6, 2018 11:32 AM

Love seeing how you're making complex shapes out of sheet and simple parts! 

"I dream in fire but work in clay." -Arthur Machen


  • Member since
    May 2011
  • From: Honolulu, Hawaii
Posted by Real G on Friday, July 6, 2018 2:06 PM

Gamera, that is the thinking behind scratchbuilding - how to make something as simply as possible.  I make lots of mistakes in that area, but I learn eventually!  Stick out tongue

Last night I managed to rough shape the four outboard engine fairings and set the grille detail into them.  I'll fill in the ugly gaps tonight.

https://flic.kr/p/27M5Tuh] [/url]Bakagala-180 by N.T. Izumi, on Flickr

The remaining three inboard engine fairing cores got skinned and are now ready to take the leading & trailing edges and the tip cap.  I had to rip the skins off the #3 and #6 fairings because I stupidly didn't sand the core profiles down to where I had marked them.  The cores ended up looking too fat when I placed them on the wings.  I should have followed the plan.  Sad

https://flic.kr/p/267DCSd] [/url]Bakagalas-179 by N.T. Izumi, on Flickr

The small inboard flap support fairings have also been sanded.

https://flic.kr/p/27M5ViN] [/url]Bakagalas-181 by N.T. Izumi, on Flickr

I was not looking forward to shaping all the fairings, but the problem was not the actual work.  I (re)learned an important lesson in modeling, something I constantly forget - use fresh sandpaper!  It cuts faster and cleaner.  It's cheap.  Change often.


“Ya ya ya, unicorn papoi!”

  • Member since
    May 2011
  • From: Honolulu, Hawaii
Posted by Real G on Monday, July 9, 2018 5:28 PM

Getting closer to finally finishing off the engines!  Gah I'm so relieved.

https://flic.kr/p/269DknG] [/url]Bakagalas-182 by N.T. Izumi, on Flickr

https://flic.kr/p/26bRrVL] [/url]Bakagalas-184 by N.T. Izumi, on Flickr

https://flic.kr/p/LPAZQW] [/url]Bakagalas-187 by N.T. Izumi, on Flick

https://flic.kr/p/26ci46L] [/url]Bakagalas-188 by N.T. Izumi, on Flickr

https://flic.kr/p/28XRo28] [/url]Bakagalas-189 by N.T. Izumi, on Flickr

https://flic.kr/p/LQeUw5] [/url]Bakagalas-190 by N.T. Izumi, on Flickr

I did all three inboard engine fairings at once to get it over with.  Just the fin caps need installing, followed by some shaping, filling and general cleanup.

“Ya ya ya, unicorn papoi!”

  • Member since
    May 2011
  • From: Honolulu, Hawaii
Posted by Real G on Tuesday, July 10, 2018 5:09 PM

Tip caps are on.  Final shaping to follow shortly.  I added 0.005" sheet spacers so that I would not have to scribe the panel line going around the front of the caps.  The first fairing I built did not have this feature, so it had to be carefully scribed by eye.

https://flic.kr/p/28Vv5y5] [/url]Bakagalas-191 by N.T. Izumi, on Flickr

The engine nozzles will then be installed, followed by surface detailing.  Woo-hoo, almost out of the woods.

“Ya ya ya, unicorn papoi!”

  • Member since
    May 2011
  • From: Honolulu, Hawaii
Posted by Real G on Wednesday, July 11, 2018 8:49 PM

Okay all engine fairings have been roughed out.  Some pretty-pretty will be followed by the addtion of the rocket exhausts.

https://flic.kr/p/292P2xH] [/url]Bakagalas-194 by N.T. Izumi, on Flickr

https://flic.kr/p/28YEQwu] [/url]Bakagalas-198 by N.T. Izumi, on Flickr

The landing gear sponsons are next on the to-do list.  I'm picking up my vac-former from a friend's house tonight.

“Ya ya ya, unicorn papoi!”

  • Member since
    May 2011
  • From: Honolulu, Hawaii
Posted by Real G on Thursday, July 12, 2018 5:06 PM

I finally have my old vac-form pan in hand!

https://flic.kr/p/294szyg] [/url]Bakagalas-199 by N.T. Izumi, on Flickr

The landing gear sponsons fit nicely, but I may have to do them separately to maintain a useful side wall thickness.  I plan on making them in two parts, the top/sides and separate bottom.

https://flic.kr/p/27FyW8V] [/url]Bakagalas-200 by N.T. Izumi, on Flickr

Most likely I'll make some kind of structure to hold the wheels and support the sponson shell.

“Ya ya ya, unicorn papoi!”

  • Member since
    November 2009
  • From: SW Virginia
Posted by Gamera on Thursday, July 12, 2018 6:44 PM

Awesome! Looking forward to how this comes out, good luck!

"I dream in fire but work in clay." -Arthur Machen


  • Member since
    May 2011
  • From: Honolulu, Hawaii
Posted by Real G on Friday, July 13, 2018 6:13 PM

Thanks Gamera, I'll need every inch of it!

Got the rocket exhausts cut and test fitted to all engines last night:

https://flic.kr/p/KrmNJp] [/url]Bakagalas-201 by N.T. Izumi, on Flickr

https://flic.kr/p/2923Zjy] [/url]Bakagalas-205 by N.T. Izumi, on Flickr

A little bit of cleanup and they will be done.

The landing gear sponsons are up next...

“Ya ya ya, unicorn papoi!”

  • Member since
    May 2011
  • From: Honolulu, Hawaii
Posted by Real G on Monday, July 16, 2018 5:29 PM

Moving along, but a lot slower than I'd like.  The engine fairings got a coat of primer over the weekend.  They needed a LOT of spot filler to clean them up.  The vac-form masters for the landing gear sponsons were a lot better.

https://flic.kr/p/KujpSP] [/url]Bakagalas-207 by N.T. Izumi, on Flickr

https://flic.kr/p/297Gqzu] [/url]Bakagalas-210 by N.T. Izumi, on Flickr

The 30 year old airframe also got some attention with stretched sprue and spot filler.  A lot of the joint lines were filled in ages ago with CA glue and as a result are hard to tell from actual gaps.  I'm going to rough sand the leading edges and hit the model with primer to check.  Bye-bye yellow patina, and good riddance!

https://flic.kr/p/297Gq9Q] [/url]Bakagalas-211 by N.T. Izumi, on Flickr

https://flic.kr/p/297GpYu] [/url]Bakagalas-212 by N.T. Izumi, on Flickr

“Ya ya ya, unicorn papoi!”

  • Member since
    March 2007
  • From: Northeast WA State
Posted by armornut on Monday, July 16, 2018 6:56 PM

   Speechless, wow, can't wait for more.

    That reads WAY worse than I truly mean. Probably one of the coolest things I have seen, and I can only imagine what the finished product will look like. Keep it up good sir, PLEASE.

we're modelers it's what we do

  • Member since
    November 2009
  • From: SW Virginia
Posted by Gamera on Monday, July 16, 2018 8:26 PM

armornut

   Speechless, wow, can't wait for more.

    That reads WAY worse than I truly mean. Probably one of the coolest things I have seen, and I can only imagine what the finished product will look like. Keep it up good sir, PLEASE.


Amen!!!  I couldn't have said it any better myself!

Thanks again for letting us follow along here.

"I dream in fire but work in clay." -Arthur Machen


  • Member since
    May 2011
  • From: Honolulu, Hawaii
Posted by Real G on Tuesday, July 17, 2018 2:18 AM

Thank you Armornut and Gamera for your patience and continued support!  I hope to get out of the rough carpentry phase real soon.  Thanks to you two guys, I got excited and jumped the gun, quickly sanding the wings, and went outside to hit the model with primer.  It looks awful, but now I can see where the awful parts are!  Seeing the entire model in primer gives me a morale boost for the intense road ahead - again, thanks guys!  I'll post pics tomorrow.

“Ya ya ya, unicorn papoi!”

  • Member since
    May 2011
  • From: Honolulu, Hawaii
Posted by Real G on Tuesday, July 17, 2018 5:30 PM

Here ya go guys - I'm stoked and even more motivated!

https://flic.kr/p/29eSHJg] [/url]Bakagalas-224 by N.T. Izumi, on Flickr

https://flic.kr/p/27QFEaV] [/url]Bakagalas-215 by N.T. Izumi, on Flickr

https://flic.kr/p/299keom] [/url]Bakagalas-217 by N.T. Izumi, on Flickr

https://flic.kr/p/29aAj7y] [/url]Bakagalas-218 by N.T. Izumi, on Flickr

https://flic.kr/p/KynWwV] [/url]Bakagalas-219 by N.T. Izumi, on Flickr

Now that everyone can see the ugly flaws, it's time to patch/sand/fill.  But first, tonight will be for vac-forming the sponsons!

“Ya ya ya, unicorn papoi!”

  • Member since
    November 2009
  • From: SW Virginia
Posted by Gamera on Tuesday, July 17, 2018 6:26 PM

Oh wow!!!

Great progress, you're at around what? About 75% on construction now???

"I dream in fire but work in clay." -Arthur Machen


  • Member since
    May 2011
  • From: Honolulu, Hawaii
Posted by Real G on Tuesday, July 17, 2018 6:43 PM

Gamera, the sponsons and canopy are the last large items on the to-do list.  The rest is the small stuff and the rivets.

“Ya ya ya, unicorn papoi!”

  • Member since
    January 2015
Posted by PFJN on Tuesday, July 17, 2018 11:10 PM

Wow, your build look s incredible.  It's fascinating seeing how it all came together. Surprise

1st Group BuildSP

  • Member since
    May 2011
  • From: Honolulu, Hawaii
Posted by Real G on Wednesday, July 18, 2018 1:01 PM

Thanks for looking in PFJN!

No vac-forming last night because I got home late from work.  Sad  By the time all the chores were done it was past 10:30.  I have this old vacuum cleaner that I use that is powerful but very noisy, so I didn't want to scare the neighbors.

But the show must go on, so I tried making some aerodynamic bumps, of which I will need several dozen of various sizes and shapes.  Try #1 was heating sprue and pushing througn a hole in a plywood sheet.  Results were not satisfactory, as the center tends to bulge out more than the ends (hey didn't I have the same results with the quickie vac-form?).

https://flic.kr/p/27SJ3VZ] [/url]Bakagalas-225 by N.T. Izumi, on Flickr

I got two useable pieces, but they needed extensive reshaping while still attached to the sprue.  Actually I got three, but lost one to "finger ping" while sanding.  I found it this morning while getting dressed for work.  Do you see the divot in the bulge that is still attached to the sprue?  I think the sprue has an air bubble in it, since I got the same thing on the last three tries.  I'll switch over to better materials when Try #2 is attempted.  And look at the bottom of the fin!  Yuck, I have to also fill in all the ugly bits on the airframe.

https://flic.kr/p/29brFJ3] [/url]Bakagalas-226 by N.T. Izumi, on Flickr

Anyway, all the vac-form junk is lying about my dining room floor, so it's a go tonight!  Pinkie promise.

“Ya ya ya, unicorn papoi!”

JOIN OUR COMMUNITY!

Our community is FREE to join. To participate you must either login or register for an account.

SEARCH FORUMS
FREE NEWSLETTER
By signing up you may also receive reader surveys and occasional special offers. We do not sell, rent or trade our email lists. View our Privacy Policy.