SEARCH FINESCALE.COM

Enter keywords or a search phrase below:

Star Trek 1/2500th scale "Dark Fleet"

2683 views
16 replies
1 rating 2 rating 3 rating 4 rating 5 rating
  • Member since
    January 2010
Star Trek 1/2500th scale "Dark Fleet"
Posted by Klik on Tuesday, October 6, 2015 5:20 PM

I recently got duplicates of kits that I had already built, and since I already had one on the shelf, I decided to paint them in a new, dark grey scheme (inspired by the color scheme of Star Trek Online).

Here's all three together:

The Ent-E was the first of this fleet that I built, and set the tone for the other two:

My brother refers to this ship as the "Shiny" version of the Enterprise-E (a-la Pokemon, if you know what I'm refering to), with nearly perfectly inverted colors:

This ship was "enhanced" with a couple bits from my spares bin (a recurring theme with these vessels). I originally intended to paint the red sections with a shiny coat of clear red, but when I finished, it looked so cool dull red that I left it, and called the red coating over the nacelles "Armor" to protect them from damage.

This also led me to invent a story for these vessels: a top-secret, off-the-books strike fleet that is unaffiliated with Starfleet, and uses vessels that have no names, with only skeleton crews. They would be a disposable, suicidal dark fleet that would only be used on the most dangerous missions against the enemies of the Federation. Thier crews would wear no uniforms and would report only to Starfleet Intelligence (Section 31).


The next one I built was the Defiant-class, which I decided needed battle-damage:

This meant that I had to build a "Nacelle" inside the damaged engine housing:

and a quick coat of paint on the top (with everything else painted too):

so, with striping and decals, the Defiant-class came out like this:

and a view into the nacelle damage:

I tried to keep this Defiant simpler than the original one from DS9, with fewer markings, and less colored panels. I think that it looks fearsome with the darker colors, and fewer colors on the hull. What do you think?

I'll post the final, most recent ship in a following post (it's still not entirely finished yet)

Klik

oneyearwar1

The hardest part of flying isn't flying...it's landing.

  • Member since
    January 2010
Posted by Klik on Tuesday, October 6, 2015 5:37 PM

And here's the most recent addition to the fleet, which is still sitting on my workbench (the saucer section still needs to be glued to the secondary hull). In keeping with the theme, this one too has "add-ons" (see if you can spot them all!Wink)

I went crazy with the battle damage on this kit, something that I'd never before done. Using a Dremel with a high speed bit actually caused the plastic on the kit to melt as it was being dug into, resulting in realistically melted hull plating, which I then added little bits of carved sprue to model "interior sections" that were exposed by the damage to the hull. I even drilled out an airlock, with a chunk of plastic glued behind it to represent a hatch, though my camera wouldn't zoom close enough to show it.

(tape provided for scale and to support the kit while I took pictures)

(upside view is illuminated better).

And now, for a whole bunch of close-up views of the battle damaged sections:

Big SmileGeeked

and a final picture of my favorite section:

Thank you for looking. These are, by far, my favorite Star Trek ships, and making them with my own paint scheme makes them even more my favs. 

Comments, Critiques welcomed and encouraged. Tell me what you think!

Klik


oneyearwar1

The hardest part of flying isn't flying...it's landing.

  • Member since
    March 2015
Posted by MCHALE on Tuesday, October 6, 2015 5:56 PM

cool i like them i realy like the battle damaged 

  • Member since
    November 2009
  • From: SW Virginia
Posted by Gamera on Wednesday, October 7, 2015 7:54 AM

Cool, nice work on the paint and the battle damage. I like the idea of a small fleet attached to Section 31, neat idea. 

Speaking of STO, I'd thought about trying to scratchbuild a model of my Phantom intel escort but it looks like a LOT of work... 

"I dream in fire but work in clay." -Arthur Machen


  • Member since
    February 2011
Posted by knox on Wednesday, October 7, 2015 8:20 AM

Well done!  I REALLY like the color scheme and damage you've created on those models.

                                                                                                             knox

  • Member since
    June 2010
  • From: Australia
Posted by OctaneOrange on Thursday, October 8, 2015 4:59 PM
some interesting work here. i quite like seeing battle damage on trek ship models.
  • Member since
    January 2010
Posted by Klik on Thursday, October 15, 2015 4:52 PM
Thanks for the kind comments, guys.

oneyearwar1

The hardest part of flying isn't flying...it's landing.

  • Member since
    January 2010
Posted by Klik on Saturday, November 14, 2015 11:01 PM

Recently finished yet another damaged ship, will post pictures if you're interested.

Klik

oneyearwar1

The hardest part of flying isn't flying...it's landing.

  • Member since
    November 2009
  • From: SW Virginia
Posted by Gamera on Tuesday, November 17, 2015 5:40 PM

Klik, I'd love to see her.

"I dream in fire but work in clay." -Arthur Machen


  • Member since
    February 2011
Posted by knox on Tuesday, November 17, 2015 8:20 PM

  Please do.  I would like to see it.

  • Member since
    January 2010
Posted by Klik on Monday, November 23, 2015 4:14 PM

My word, a busy week kept me from getting to this until today (Thank goodness for Thanksgiving BreakBig Smile).

Ok, so I hadn't yet built the Saratoga from my 2nd DS9 series box, so I pulled it out, and added it to my "Dark Fleet" as a sort of Spy/Comms/Scout type vessel.

For this build, I also did "battle damage", but unlike last time, I took pics in progress...

First pic--with the newly damaged hull.

Hard to see on the plain plastic, but you can see how the Dremel literally melts the hull.

A quick coat of paint reveals the damage:

On the underside (interior) of the hull, I used sprue flash to build up the visible decking, but it faded into nothingness as the damage was painted and detailed. This ship also differs from the previous one in that the damage is more melted hull than penetrated hull.

You can also see a few of my additions, which serve as the ship's "antenna and eavesdropping array".

Then comes the black undercoat:

With that dried, comes a quick dry-brushing of white (Yes, WHITE) paint to highlight details.

I then dry-brush thinned black paint to add depth and blast scars:

I also added some orange "flames" to make the damage more recent-looking.

Next post: Final pics for y'all.

Klik

oneyearwar1

The hardest part of flying isn't flying...it's landing.

  • Member since
    January 2010
Posted by Klik on Monday, November 23, 2015 4:22 PM

Ok, Final Pics of the new ship:

You can sort of see in this pic that the damage actually sticks up from the hull.


(Close up view of damage)

and a final pic with my favorite viewpoint.

Thanks for looking. Please comment what you think of this latest addition to my fleet.


Klik


oneyearwar1

The hardest part of flying isn't flying...it's landing.

  • Member since
    February 2011
Posted by knox on Monday, November 23, 2015 8:53 PM

    Awesome job!  It looks like there are still fires burning in some of the damage.  Thanks for sharing.  It was fun to see the process.

  • Member since
    November 2009
  • From: SW Virginia
Posted by Gamera on Wednesday, November 25, 2015 7:42 AM

Very cool Klik! And thanks for the walk-though on how you did it. The only thing that would make her better is if you could find a way to put the electrical arcs on her like in 'The Wraith of Khan'. 

"I dream in fire but work in clay." -Arthur Machen


  • Member since
    January 2010
Posted by Klik on Thursday, December 3, 2015 5:11 PM

Seems that I'm running a theme here. Just wrapping up yet another damaged vessel for my Dark Fleet. 

I can get pictures up this weekend as I wrap her up.


Klik

oneyearwar1

The hardest part of flying isn't flying...it's landing.

  • Member since
    January 2010
Posted by Klik on Sunday, December 20, 2015 4:01 PM

Ok, got a few more ships for y'all here. Seems that I had a lot more spare time post--Thanksgiving (and with Christmas break, even more Big Smile), so I've been working through my stash of Star Trek models, so that I can work on new stuff post-Christmas.

First off, the Ent-B, as a member of the Dark Fleet:

And with the initial coat of paint:

the nacelle was shot open, and I chiseled a damaged section of the interior out of sprue:

with several coats of paint, it came out awesome!

Finished pics:

Changed the lighting a bit:

Note the custom-made stand, which was scratched out of sprue bits. I intended it to look a bit like an old space station, to which the ship is docked by a long, flexible black tube.

Next post (to keep these to a reasonable length): The other two ships!

Klik

oneyearwar1

The hardest part of flying isn't flying...it's landing.

  • Member since
    January 2010
Posted by Klik on Sunday, December 20, 2015 4:25 PM

Ok, the other two.

Background on these two builds: one is a leftover from waaaay long time ago, and had given it to my brother to build, but he never did, and gave it back a few weeks ago. 

Both of these are (or rather, were) Refit Enterprise/Constitution-class ships, one with surface details, and one without. Since I already had one refit Enterprise, and had no desire to have another one, I kitbashed the two of them into new ships.

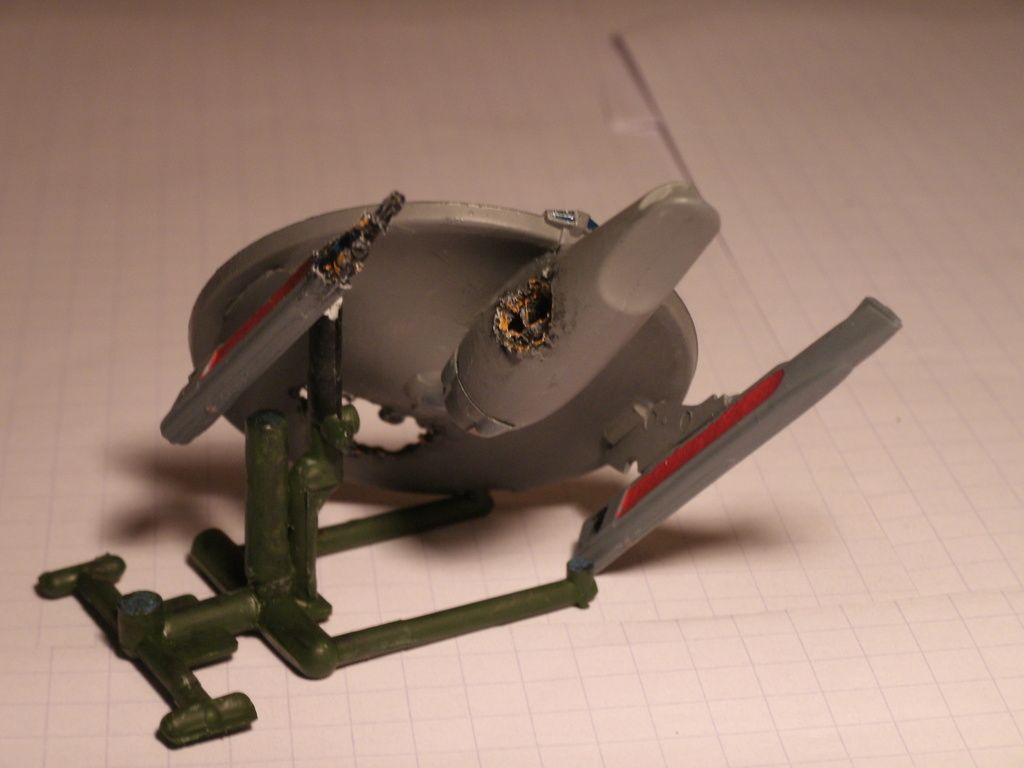
The first one (without surface details) was rebuilt into a proto-Pegasus (as in the concept Pegasus). I don't know if you recall The Next Generation episode where Riker is tasked by his former captain-now-Admiral to find his former ship, the Pegasus. In the episode, the Pegasus is an Oberth-class ship, but was originally going to be a rebuild of the Ambassador-class into this: (via Memory Alpha)

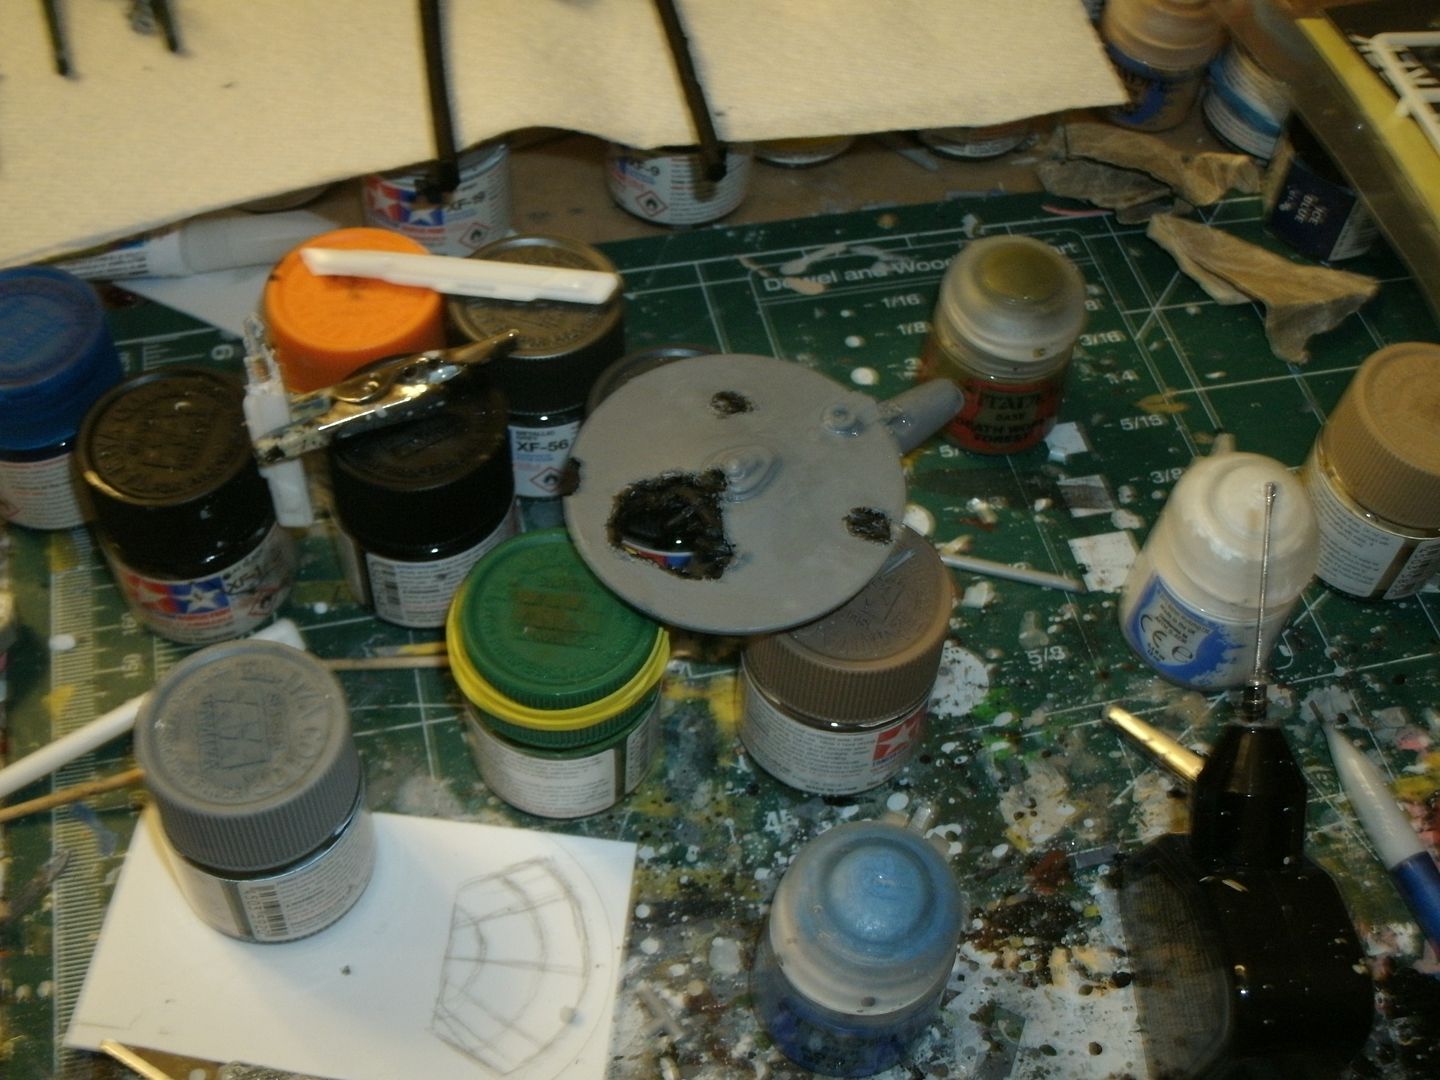
So, you can see my inspiration for this next ship. I cut the neck off the secondary hull, filed and fitted it to the saucer, after damaging both of them extensively (thus far, my most damaged vessel). I actually had to build an interior for the front of the saucer to fill in the hole left by damage. I mention all this, because I plain forgot any "in progress pics" of the damage phase of the build.

The only in-progress shots I've got:

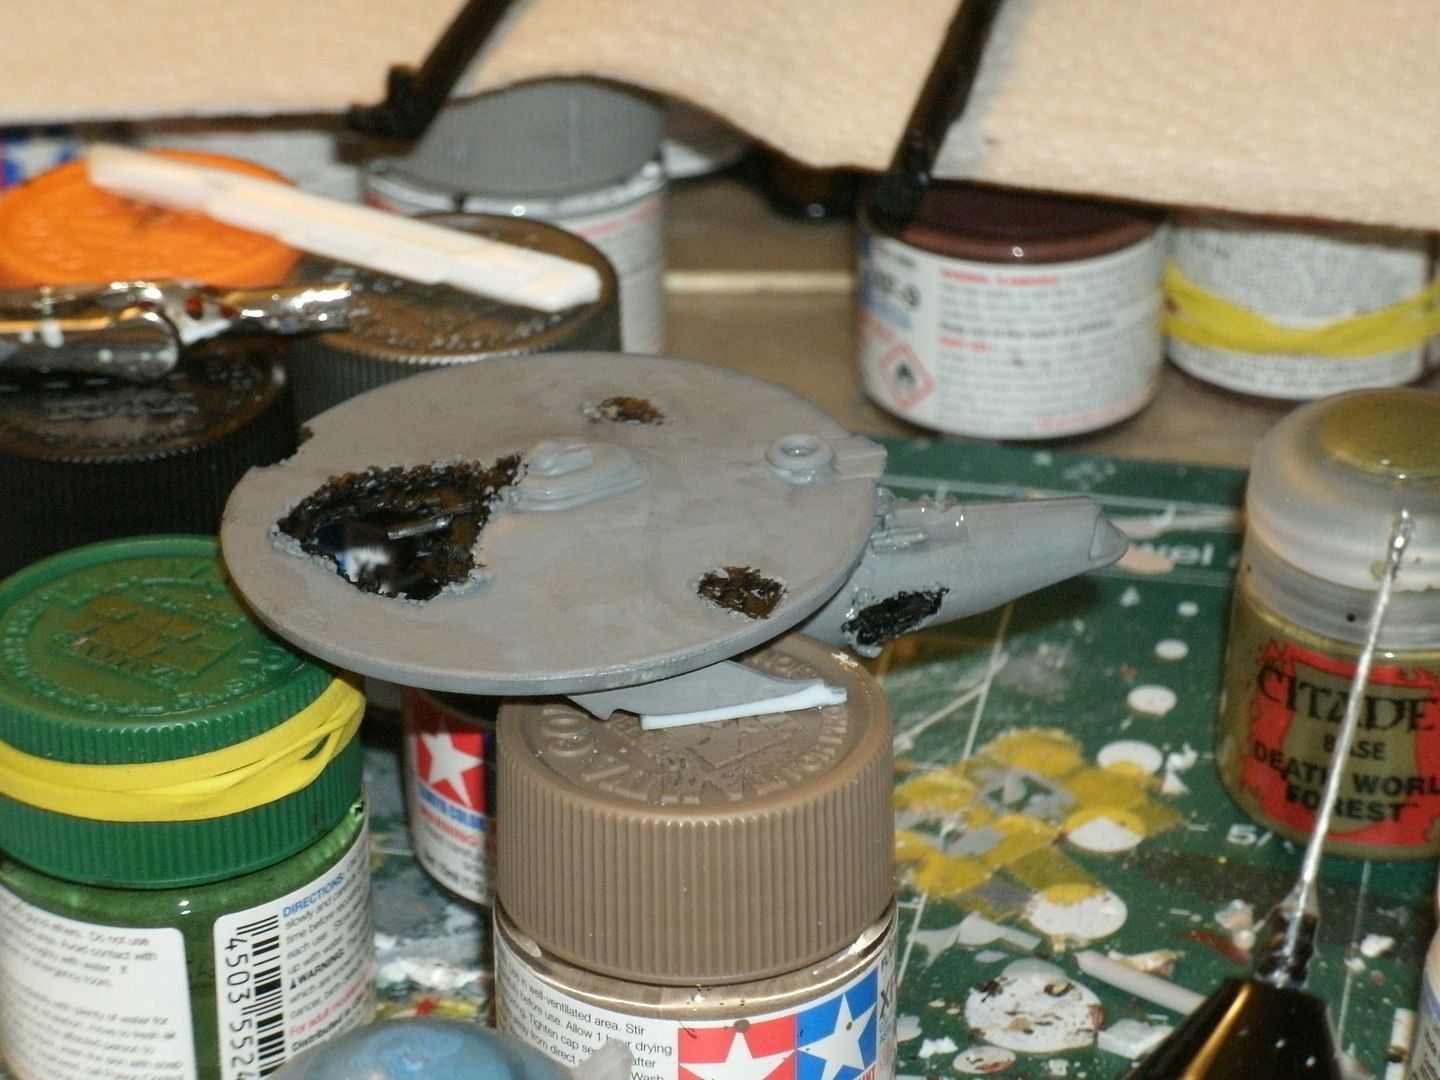
Not too impressive at that point, but here it is finished up:

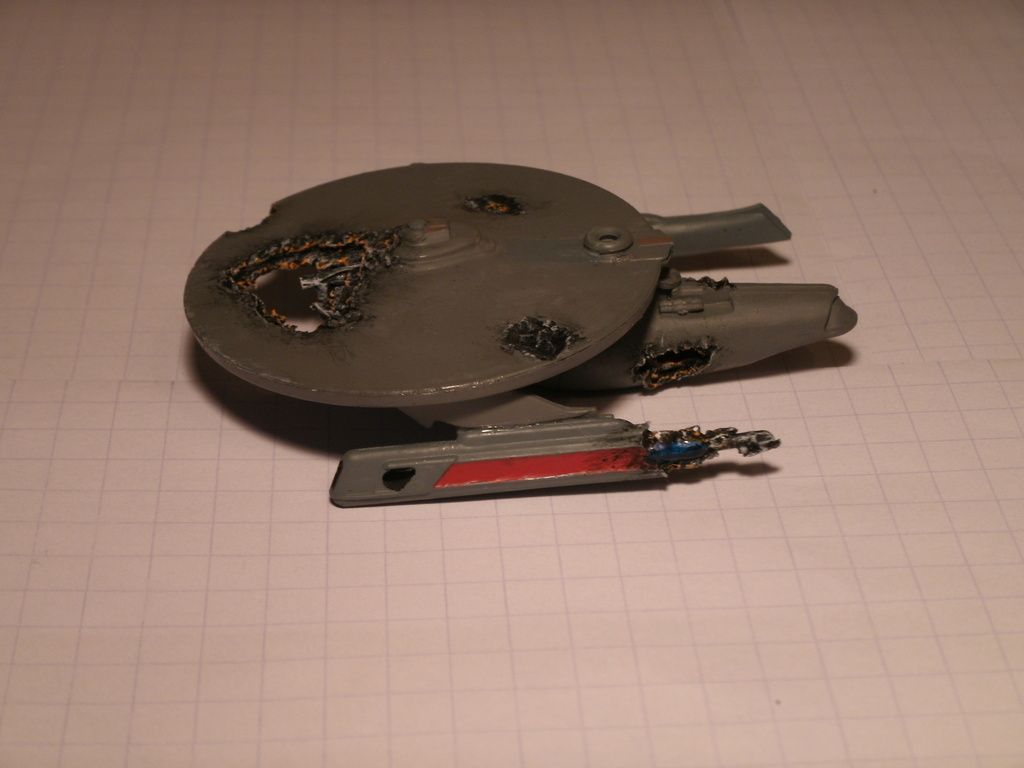
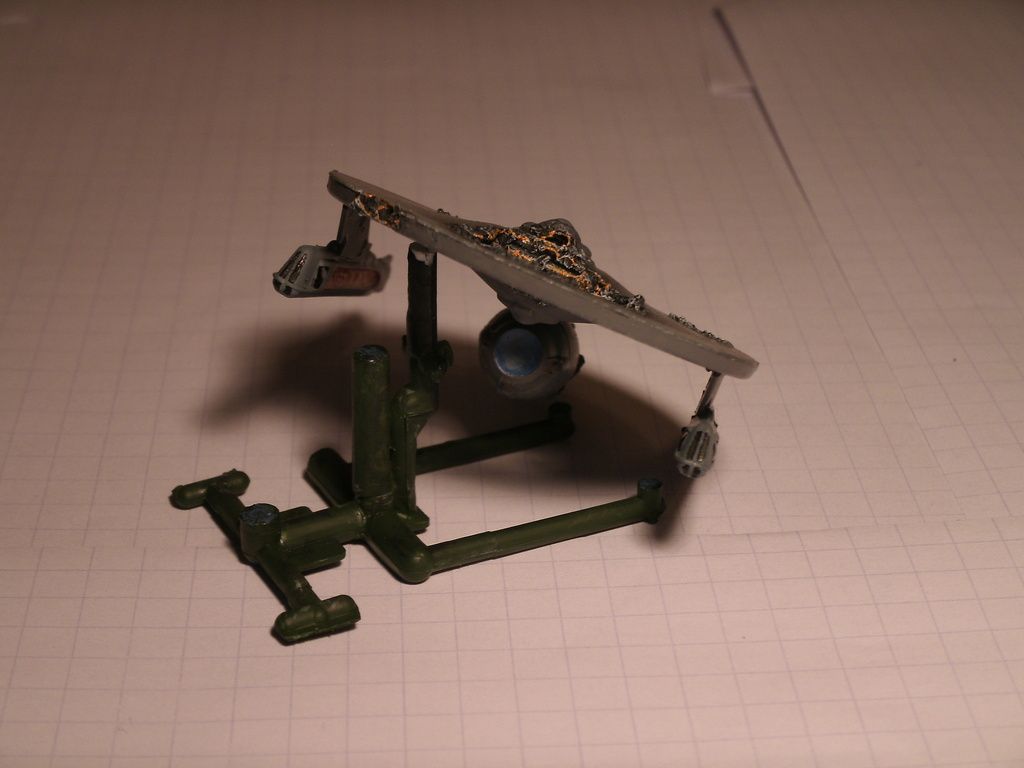
And, for this build, I gave the exposed nacelle a 'glow', using a Meng water bottle and clear blue paint, so that when the nacelle is back-lit, it does this:

Pretty sweet, no?

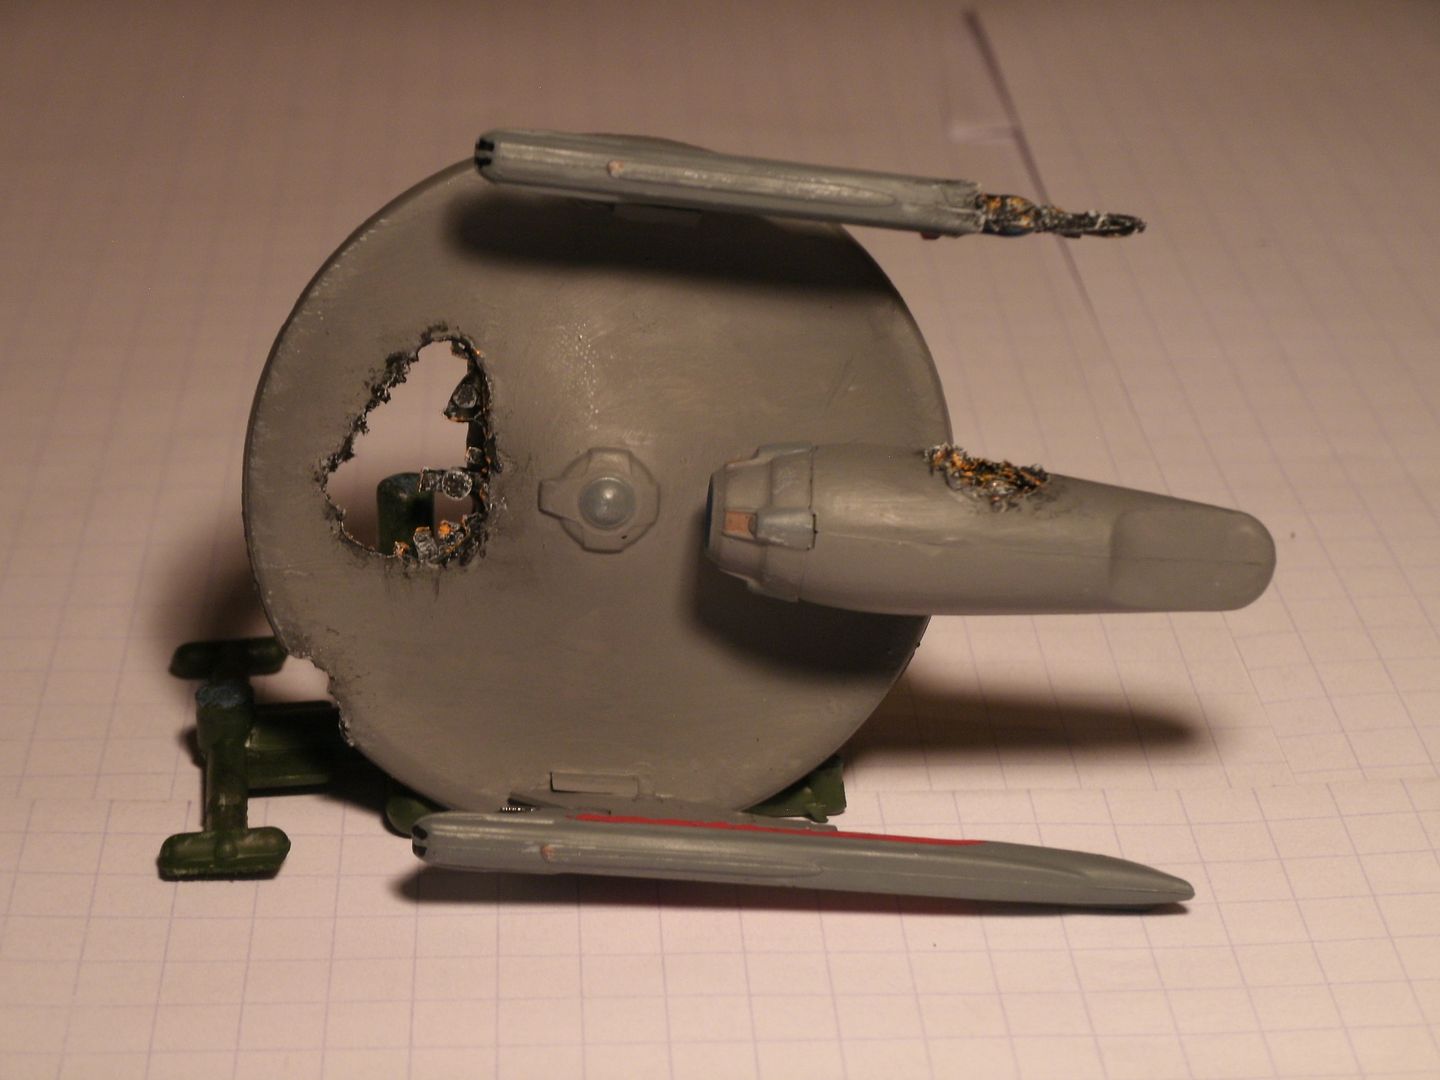
And a final, edge-on view:

I decided that this damage should be more 'fresh', hence the flames licking the edges of the hole, and each exposed deck. I tried to keep it simple, yet realistic, and I hope that you will agree that I did so.

The next, and last ship that I finished has no WIP pics, sorry. I didn't decide the damage on this one (guess I kept up a theme...should there be a diorama in the future...hmmm). My brother wanted a ship that was damaged by ramming something, so that's what I did. He was the one to draw out the section of damaged hull, and I just made his vision a reality.

Again, another kitbash of a refit Enterprise, this time in standard Starfleet colors and markings. (I got lax with the decals, and just cut off the 1 in 1701, so it's NCC-170).

Without further ado, the U.S.S. Terp:

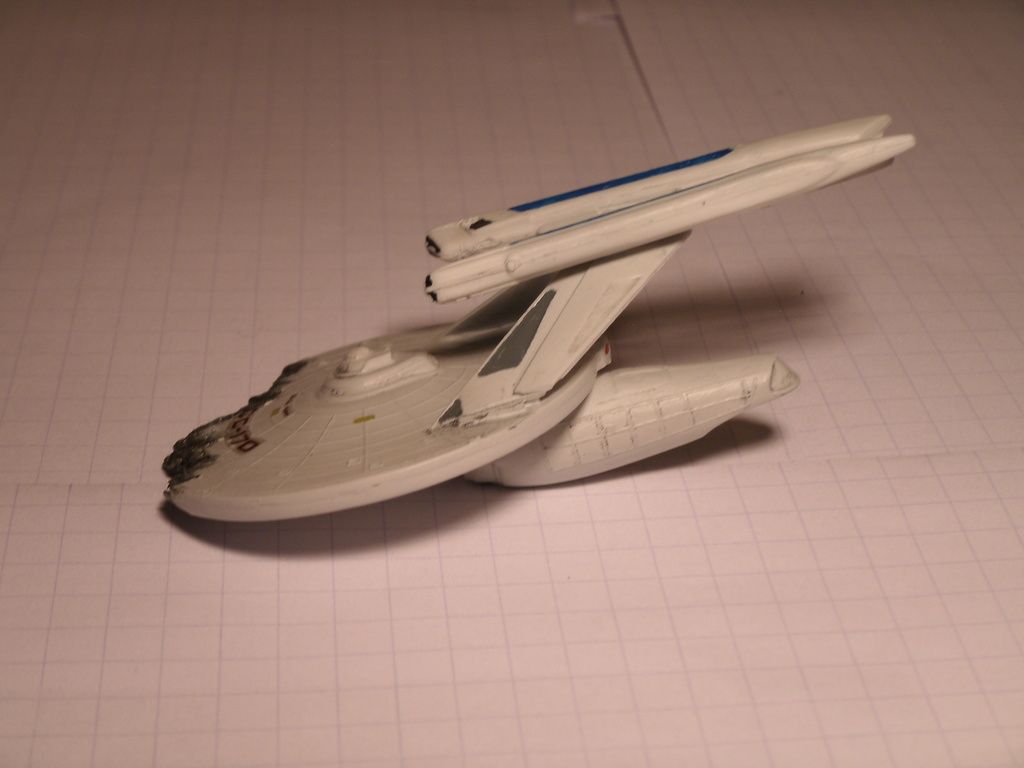
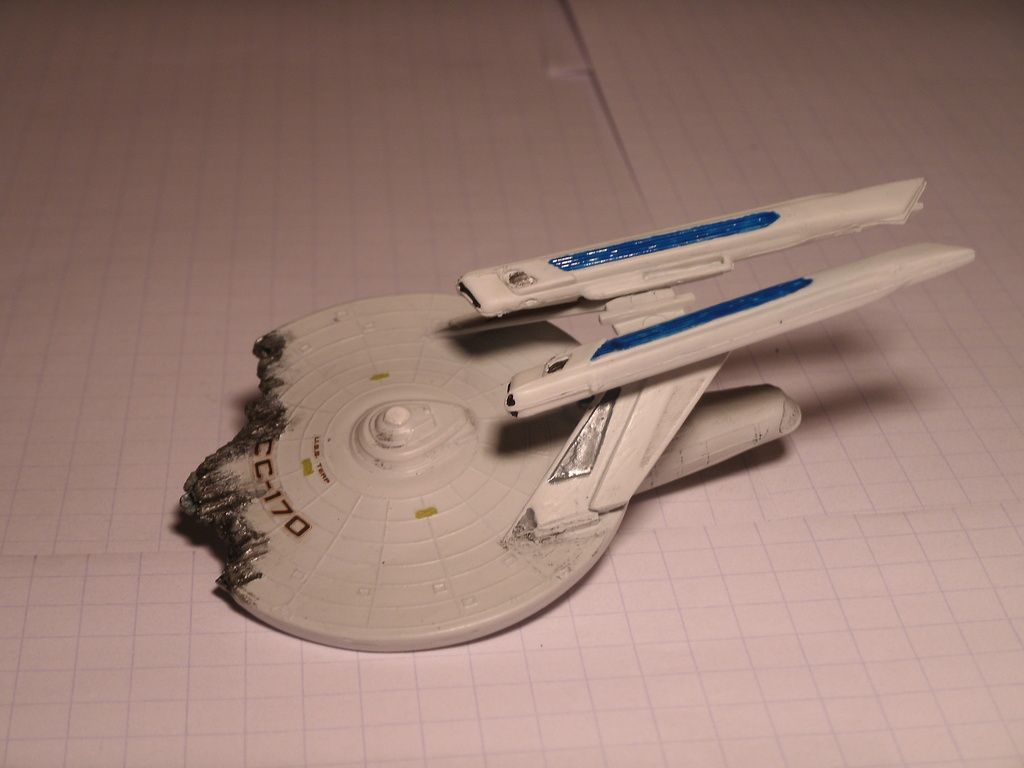
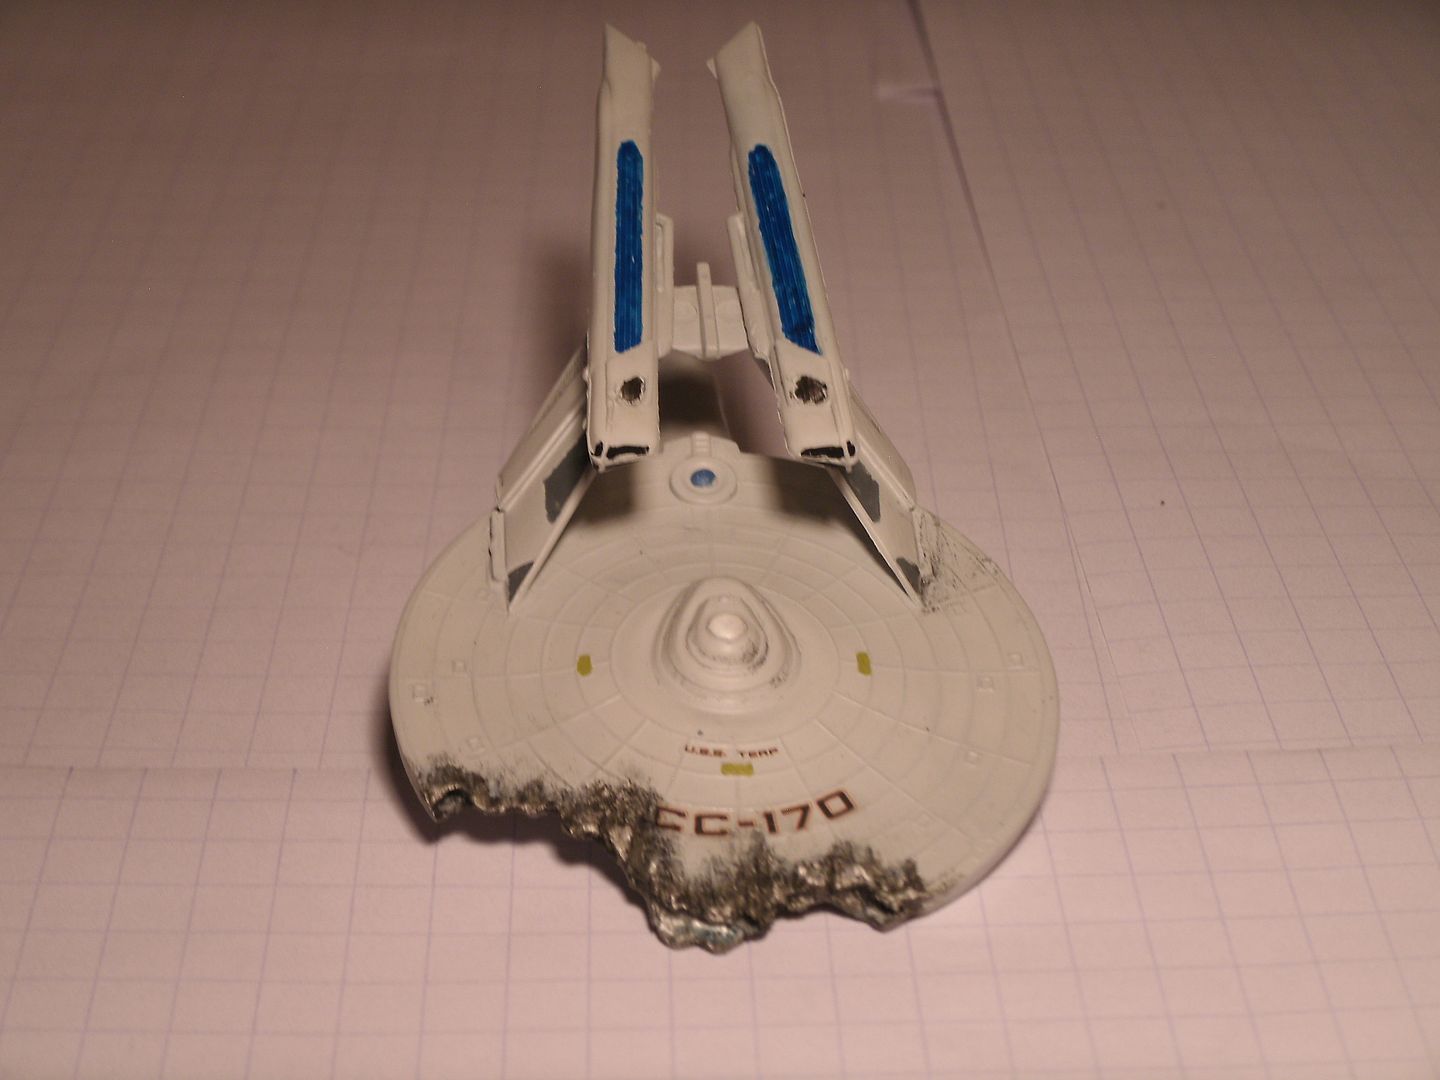
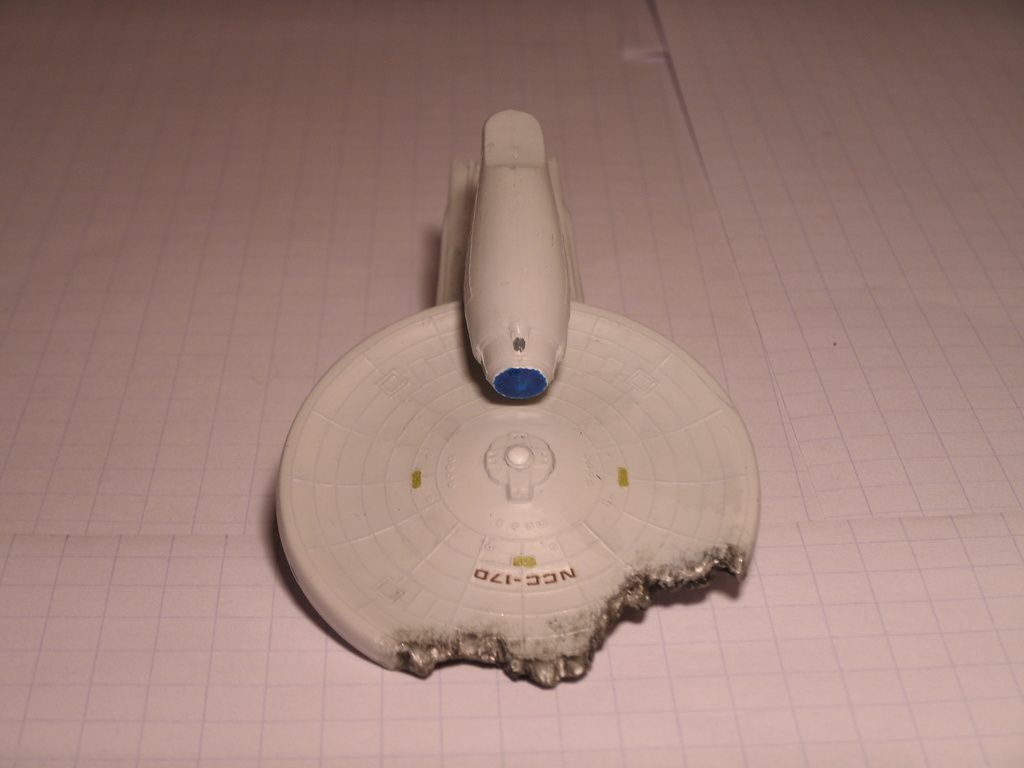
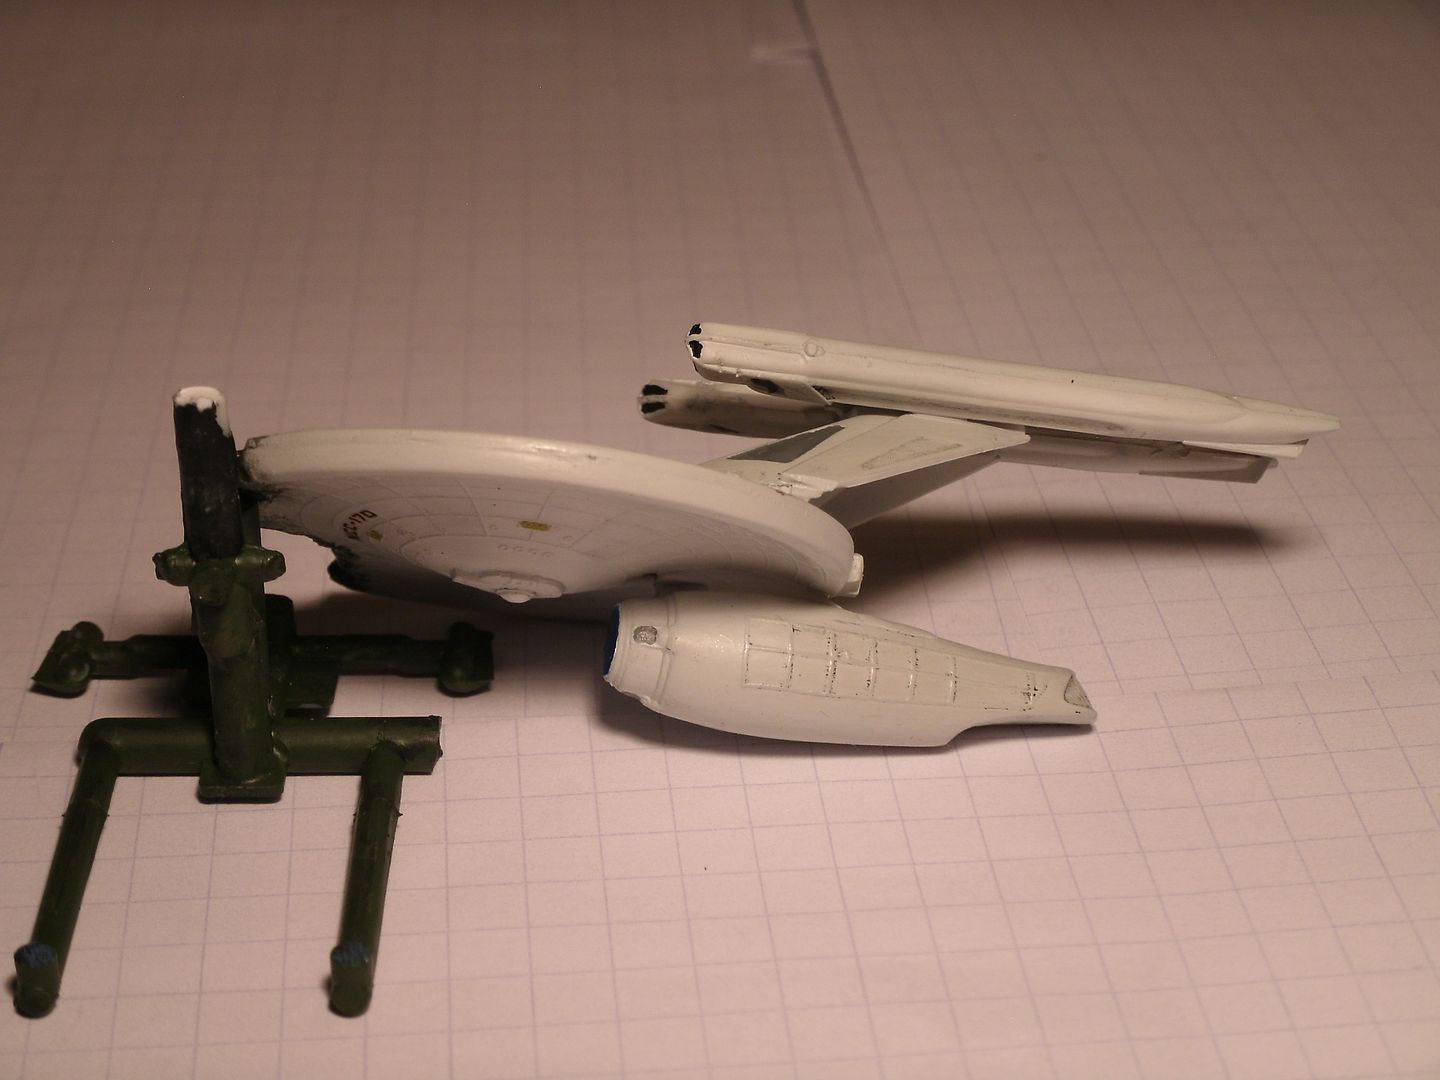
Before you ask, Yes, the nacelles are canted outward, and yes, that was deliberate (though it doesn't look it, they are in fact, canted at the same angle). Makes it look faster.

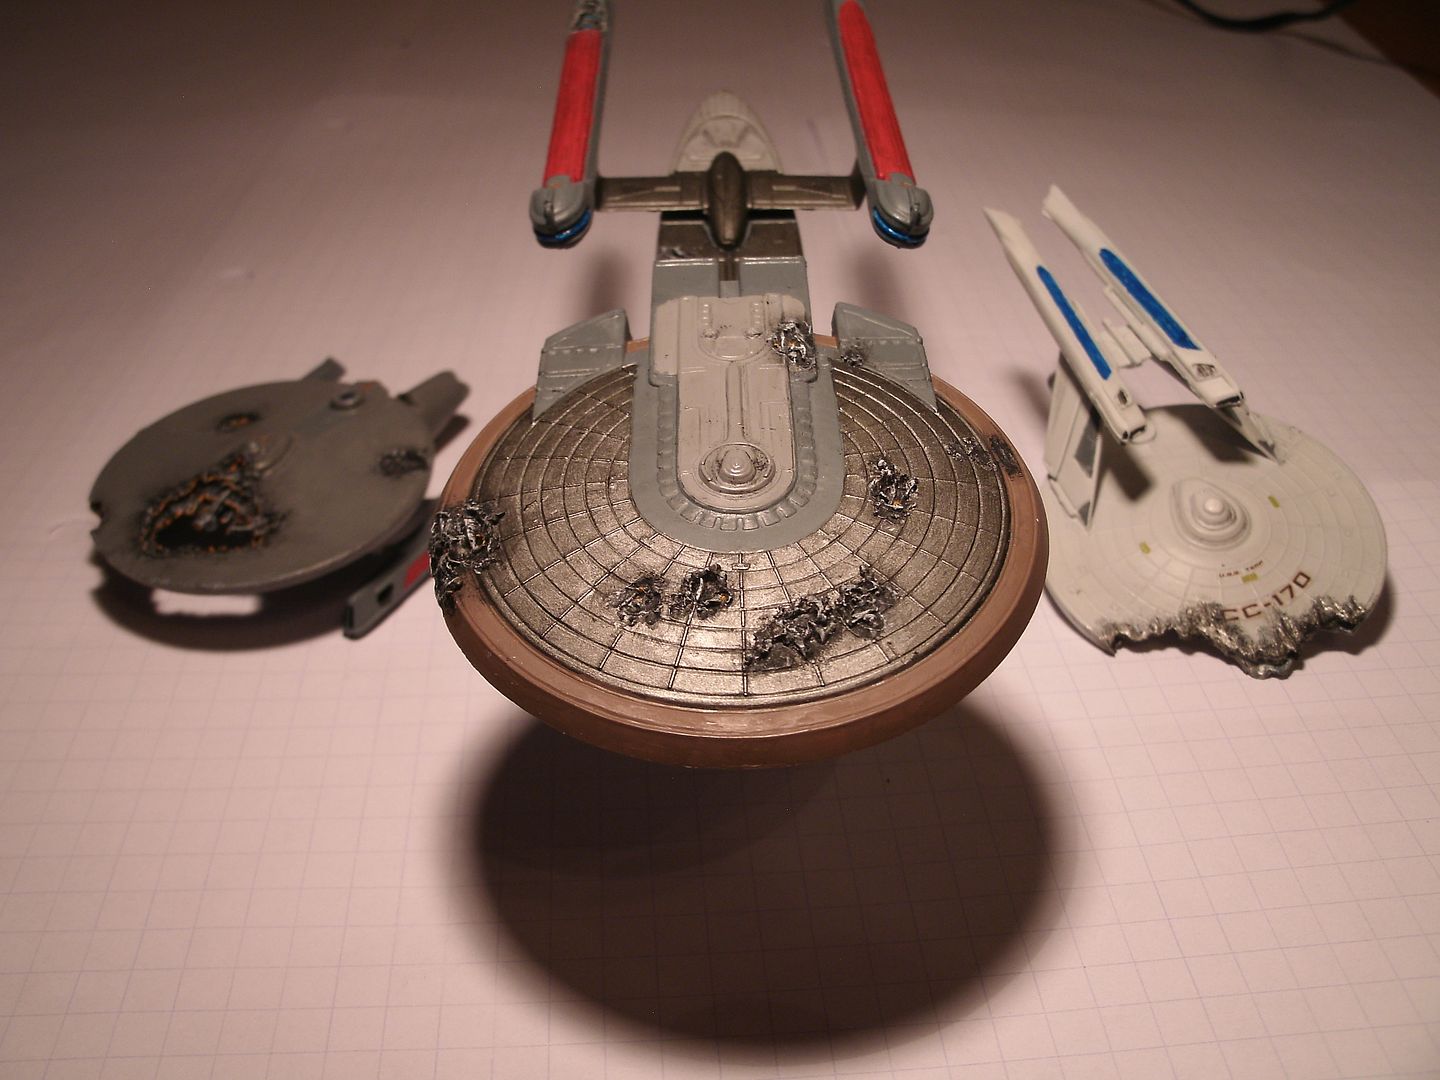
Final picture of all three for you.

And that's all I've got for you,

Thank you for looking, Comments, Critiques, and especially Criticisms welcomed and appreciated.

Klik

oneyearwar1

The hardest part of flying isn't flying...it's landing.

JOIN OUR COMMUNITY!

Our community is FREE to join. To participate you must either login or register for an account.

SEARCH FORUMS
FREE NEWSLETTER
By signing up you may also receive reader surveys and occasional special offers. We do not sell, rent or trade our email lists. View our Privacy Policy.