SEARCH FINESCALE.COM

Enter keywords or a search phrase below:

Satyr's DeAgostini Millenium Falcon Build Log

13081 views
125 replies
1 rating 2 rating 3 rating 4 rating 5 rating
  • Member since
    April 2015
Posted by LrdSatyr8 on Thursday, November 12, 2015 12:49 PM
Ok.. onto the build... I'm up to issue 20 so far. Got most of the lower hull put together. One thing that I HIGHLY recommend when assembling the hull panels on the framework, following the order of attaching each panel as it's laid out in the instructions. Reason being is that each one interlocks and overlaps the one that came before it. I learned the hard way that if you just start attaching the panels willy nilly, before long they don't fit... so you end up having to take them off and start over again. I think I did that about 3 times before I went back to the instructions and finally laid them on in the order they were suppose to fit. Once I did that they went on perfectly. Fitting the plastic studs in the metal holes makes it a little difficult at times, but once they go in they fit like a glove, and they are a tight fit! 

Next little piece of advice when putting the metal frame pieces together with the long thin ribs make sure you use the right screws. There are 2 types of gold long screws. One has tightly spaced threads and the other has threads that are wider apart. The wide threaded screws will slide in easily and won't screw at all. The tight threaded screws are what you need to use. I got a small little container with separate compartments that I put all my screws in. I separate them so that I can find them when I need them. Would be a good idea if you did the same thing. 

Now with the lower hull done as far as I can go I put together the cargo bay. Mind you I haven't screwed or glued anything together yet... still got a lot of painting to do on it. The access corridor is gonna look good too. I still have to put together all the padded rings. There are about 8-10 of them in total and each one has about 16 pads that need to be glued onto it. I plan on sanded them down a bit and rounding the edges a bit more then they are. I also haven't glued anything together yet... am probably gonna put the greeblies on the cockpit tube thou. Guess we'll see what happens soon!

I also plan on stealing my friend Ian's ideas for the interior cargobay and doing a lot of detail work in there. Anyway... I was really pleased to see the first pit. I'm not gonna do any external painting until everything is all together. But this thing looks incredible! LOVE IT! Here's the pics... enjoy!
Attached Thumbnails Attached Thumbnails           


Things to think about... What would happen if you put a werewolf on the moon?  h is just a little chair and the human brain named itself!

  • Member since
    April 2015
Posted by LrdSatyr8 on Thursday, November 12, 2015 12:51 PM

I just got Issues 21-24 yesterday and put more of the bottom hull together. It's interesting that the corridor cover is all one piece instead of two like what came in the first package. The nice thing though is that the bottom edge of the hull plating on it has the notched (unlike the first corridor pieces). In this package also came another part to the jig that is suppose to support the bottom hull during assembly to keep the shape of it from warping while working on the upper levels. Looks like about half of the bottom hull is now done. One nice thing is that this shipment also includes one of the bottom hull panels that has visible damage. It's a long streak of damage however it looks more like someone scribbled with a magic marker and then sunk in the details. Will have to fix that before painting the hull at a later stage. Oh and for those that are posting here about other stuff, just remember this is my build log for this kit. There are other threads for posting pics and stuff of your own progress... thanks! 


Now something I highly recommend is getting yourself a small container for your screws and what-not. I found this nice little 6 compartment plastic box for beading at Wal-mart in the craft department. Its perfect for holding all the screws... here's what mine looks like:


Once I got the everything together that I could up to this issue, I noticed the weight of the whole thing. So I decided to see just how heavy just the lower hull has gotten so far. Was amazed to see that this thing is already almost 2 lbs so far (1.80 lbs)... this is without the recess, just the framing and the hull panels on the bottom so far. So the way I figure it, if this is about halfway thru the bottom half, without the center turret section, then when the whole bottom is together, I figure it'll weigh about 5 lbs (give or take a few ounces when it's all together).


Now I realize I have missed a few postings lately but don't worry. I've gotcha covered... I've watched other build logs and keep hearing people complain about the rings with the pads and how tired they were of putting them together... sure there are a lot of them. 9 total... each with 18 pads, making 182 pads total. That's a lot of pads, but here's what I did and did them all in about an hour. First I waited until I had all of them... makes it a lot easier when you have all of them together at once rather then doing them one at a time as they come in. First thing, I worked on each ring one at a time... removed all the pads from the sprue and didn't worry about sanding the sprue nubs yet.


I glued each pad on the ring...


and when dry, I sanded the nubs off to give the rings a more even look. Then I sanded the hard edges down to round them off a bit to give that look of a rounded pad.


In the end they came out looking pretty good, and couldn't help but take a few pics of them in place in the corridors to see how they look.


I haven't put the wall cushions on yet... am working on something special to create a couple of ripped up ones to see if I can make them look good. That's it for now. More to come later!

Things to think about... What would happen if you put a werewolf on the moon?  h is just a little chair and the human brain named itself!

  • Member since
    April 2015
Posted by LrdSatyr8 on Thursday, November 12, 2015 12:52 PM

Lately I have been doing a lot of epoxy putty work lately and one thing I've discovered is that when you do putty work, you always end up with a little extra putty that if you don't do anything with it, it hardens and you end up throwing it away. Well being the frugal guy that I am, I found a good way of putting it to use. Now, needless to say I don't have many spare parts for making greeblies, so I figured why not just go ahead and use the extra putty to make some greeblies of my own. Here's what I made so far...


I'm sure I'll be able to find a place to put them somewhere in this build. I've been working on the interior walls and arches... I knew I had to cut out the long holes in the arches but I also wanted to put the ribbing in between the arch holes. After many failed attempts with styrene, I decided to use putty instead. Came out looking pretty good, but I also wanted to hollow out the inside of the arch to allow me to put some wires and greeblies. So using my Dremal, I cut a long trench on the outside all the way down to the bottom and sanded it out using needle files. I think they didn't come out too bad... what do you all think?


As you can see above I also cut out the holes in the side wall and intend to put some greeblies there as well. But since that came out so well, I figured I might tackle the wall behind the nav computer with putty and see how it comes out... I cut a couple of square holes out of it where I intend to greeble and here's the result.


Well that's where I'm at right now. As soon as I get some primer and paint on these I'm sure they will look really good. Lemme know what you all think!

Things to think about... What would happen if you put a werewolf on the moon?  h is just a little chair and the human brain named itself!

  • Member since
    April 2015
Posted by LrdSatyr8 on Thursday, November 12, 2015 12:53 PM

I did come up with some new stickers for this puppy. The ones that come with the kit aren't very accurate and basically suck in the graphics department... here's comparision of the ones I've made to replace the ones in the kit. I am still working on a few other things for them, but all in all what I got came out pretty good.


If you'd like a copy of these, you can download them for free here:

https://www.dropbox.com/s/es5y0pghay...ckers.pdf?dl=0

If you use them, please post pics and let everyone know where you got em, that's all I ask!

Things to think about... What would happen if you put a werewolf on the moon?  h is just a little chair and the human brain named itself!

  • Member since
    April 2015
Posted by LrdSatyr8 on Thursday, November 12, 2015 12:54 PM

I've just been having way too much fun lately making various random greeblies for general use throughout the interior and various other uses. Can never have too many odds and ends greeblies. But here's what I've got so far... Whatcha all think?

Things to think about... What would happen if you put a werewolf on the moon?  h is just a little chair and the human brain named itself!

  • Member since
    April 2015
Posted by LrdSatyr8 on Thursday, November 12, 2015 12:54 PM

Been working on a map of details for the interior... I think I have it mapped out pretty well for the hallway cushions and light sconces. Here's my map... I'm also gonna work on the details of the walls, etc.


The biggest problem I see is the one mentioned in the graphic above. They moved the entrance to the cockpit hallway about 2 feet down the hallway and in effect stretched out the whole cushion panel. It should also be noted that there should also be a cushion ring right next to it, I may have to fabricate one but not sure yet, but a happy compromise would be to cut the middle cushion in half to allow for those details to be placed in the proper place. If anyone else has a better idea, please let me know.

Things to think about... What would happen if you put a werewolf on the moon?  h is just a little chair and the human brain named itself!

  • Member since
    April 2015
Posted by LrdSatyr8 on Thursday, November 12, 2015 12:55 PM

Here's another plan for the hallway damaged wall cushions I came up with.


The top and bottom halves should be cut slightly smaller then the cushion to allow for detailing. A sheet of styrene glued behind the opening will allow it to appear sunken into the wall. The gray lines represent structural beams, the white lines pipes/wire lines, and the tan represents torn insulation.

Things to think about... What would happen if you put a werewolf on the moon?  h is just a little chair and the human brain named itself!

  • Member since
    April 2015
Posted by LrdSatyr8 on Thursday, November 12, 2015 12:56 PM

Been doing more detail work on my Falcon... Around the edges of the holes in the main wall it appears as if it is framed with two separate frames the top having a bridge making it look like 3 different cutouts but there's only two. Here's what I've got so far.


I've also been working on some other details for the cockpit. Don't know why these little greeblies were never added to begin with... but there's also 2 more below the top ones on each panel that I'm going to put on as well.


I can only do greeblie per panel at a time... why? Because I have to let the putty dry totally before putting the next one on, otherwise with all the handling I'm doing while making them, if they aren't dry, I end up messing up the first one no matter how hard I try to keep from touching it. So I do one, and wait 5 hours, then do the next... makes things take so much longer then I wished. But lemme know what you think so far!

Things to think about... What would happen if you put a werewolf on the moon?  h is just a little chair and the human brain named itself!

  • Member since
    April 2015
Posted by LrdSatyr8 on Thursday, November 12, 2015 12:57 PM

More work on the Falcon interior stuff. Been working on the bunk. I think I have figured out a way to make the oblong opening without having to do any major surgery. I cut out a thin sheet of styrene and cut a proper opening. I also discarded the included pads and used putty to create the pads.


I also used my references to make the bunk side wall. Still have a few greeblies to make for it, but all my greeblie practice with random stuff gave me enough skill to recreate it pretty accurately. Here's a put I'm working from...


More to come!

Things to think about... What would happen if you put a werewolf on the moon?  h is just a little chair and the human brain named itself!

  • Member since
    April 2015
Posted by LrdSatyr8 on Thursday, November 12, 2015 12:58 PM

Did a bit more work tonight... I didn't like the frames I cut out of styrene... they seemed to thick and after trying another cutting with an xacto blade, I got fed up and broke out my putty... I think these frames look a lot better! What do you all think?


As soon as the putty dries I'll be able to sand them to look a bit more even. I also fixed my nav wall and added some greebling... it's not accurate but you really can't see much of this area very well so I fudged it and just put stuff in there to make it look good. What do you think?

Things to think about... What would happen if you put a werewolf on the moon?  h is just a little chair and the human brain named itself!

  • Member since
    April 2015
Posted by LrdSatyr8 on Thursday, November 12, 2015 1:00 PM

Well I finally got around to making the pit box for my holes in the main wall. Using putty I attempted to create the details there as close as possible to the movie. Here's the scene I'm working with:


And here's what I came up with:


I also greebled out my nav wall and got it painted... I think I am finished with that one.


And just for reference, here is the scene I was working from... it's not perfect but I'm happy with it:


Also got around to painting the cockpit panels. They came out looking better then I expected!


More to come... lemme know what you think!

Things to think about... What would happen if you put a werewolf on the moon?  h is just a little chair and the human brain named itself!

  • Member since
    April 2015
Posted by LrdSatyr8 on Thursday, November 12, 2015 1:00 PM
Well I dry fitted everything I've done so far. Just to see how it's coming along. So far I think its really looking pretty good...


but of course I always end up finding something that I need to fix...


Notice how close the top of the seat cushion is to the top of the platform... I thought about shaving off a couple of millimeters off the top of the seat cushion itself, or maybe even the bottom of it or the whole seat support... but I don't think I'll be able to remove enough and the thought of fixing those areas again brings on nightmares. So I am thinking of using putty to elevate the platform up about 2mm. But that also means that I'll have to preserve the control details on the side curve. So taking a piece of putty I covered the controls and allowed it to dry to take an impression of them for stamping into putty later.


That's about it for now... more to come... hope you all are enjoying this.


Things to think about... What would happen if you put a werewolf on the moon?  h is just a little chair and the human brain named itself!

  • Member since
    April 2015
Posted by LrdSatyr8 on Thursday, November 12, 2015 1:01 PM

Been working on detailing out my nav console. Got most of the detail done, still trying to figure out a way to do the light cans on the console... but I think I got everything else in there. What do you think?

Things to think about... What would happen if you put a werewolf on the moon?  h is just a little chair and the human brain named itself!

  • Member since
    April 2015
Posted by LrdSatyr8 on Thursday, November 12, 2015 1:03 PM

Well I think I just about got the nav console figured out and detailed out. My biggest problem was figuring out how to do the big view cans on it. So I tried something. I took a baboo skewer and put some putty on the pointed end. Made it as thin as possible and allowed it to harden. I ended up making a few of these. 


Picked out the best ones and trimmed them to size. Needless to say they fit the bill. Came out looking better then I had hoped. Here's a pic of the final outcome before painting.... 


and here's what it looks like after painting with a little dry brushing thrown on for effect. 

Completed painting the nav console.

What do you all think?

Things to think about... What would happen if you put a werewolf on the moon?  h is just a little chair and the human brain named itself!

  • Member since
    April 2015
Posted by LrdSatyr8 on Thursday, November 12, 2015 1:05 PM

I'm not quite happy with my cockpit console... So I have been thinking of totally scratch building it. I started making some rocker switches and a button panel. Needless to say... they are extremely tiny!

Things to think about... What would happen if you put a werewolf on the moon?  h is just a little chair and the human brain named itself!

  • Member since
    April 2015
Posted by LrdSatyr8 on Thursday, November 12, 2015 1:06 PM

Latest progress build... I finally finished the nav console and got all the fibers run. Just got to separate out the whites and blues and reds but took a test photo and it looks better then I thought it would... What do you all think?

Things to think about... What would happen if you put a werewolf on the moon?  h is just a little chair and the human brain named itself!

  • Member since
    April 2015
Posted by LrdSatyr8 on Thursday, November 12, 2015 1:07 PM

I think I got my cockpit finished and fibered. I did all the details in putty that includes the nav shroud, the lever box, the light domes and all the little toggle switches. I used my custom sticker replacement for the graphic background. Made finding the holes for the fibers alot easier. I hooked up some LEDs to it temporarily and took some pics to see how it will look. Whatcha think?


Things to think about... What would happen if you put a werewolf on the moon?  h is just a little chair and the human brain named itself!

  • Member since
    April 2015
Posted by LrdSatyr8 on Thursday, November 12, 2015 1:09 PM

Here's a tip for doing fibers... go on Ebay and get the AMT/Ertl Fiber Optic Lighting Kit. I dunno how much they go for anymore since they are getting harder to find. I first bought mine when they came out and they were only like $10 at the time. I picked another one off of Ebay a few years ago and it was only like $20, but it's got a great tool in it for doing fiber optics. It doesn't have but maybe 2-3 feet of fibers, but it has this nifty little battery drill with 2-3 drill bits. You gotta be careful with the bits thou because if you are too forceful you can break them easily... but I've had mine for about 20 years and the bits are still going strong! Come in real handy for drilling out tiny little holes for fibers. It also has a bunch of other things like reflective tape, and some bulbs cans and fiber holders (of which I haven't used yet but may on this build). Needless to say it comes in handy!

Oh... and for those that may be interested in how these replacement stickers look by themselves... I did manage to take a pic before I put any details on it just after I drilled the holes for the fibers (NOTE: The button placement on the sticker makes an awesome guide for fibers... really allows you to see where they go).

Things to think about... What would happen if you put a werewolf on the moon?  h is just a little chair and the human brain named itself!

  • Member since
    April 2015
Posted by LrdSatyr8 on Thursday, November 12, 2015 1:10 PM

OK you merry peoples... here's the latest updates. I was looking at the floor in my cockpit and decided that it really needed to be fixed. But I really wanted to be able to maintain the tabs for the backwall. So I cut out a good size hole in the floor behind the front seats and decided to make my own flooring to look more like the floor of the actual cockpit. I cut out some pieces of sheet styrene and glued them all together and placed them in the hole and glued them in place. I think it's a pretty good compromise... what you all think?

Things to think about... What would happen if you put a werewolf on the moon?  h is just a little chair and the human brain named itself!

  • Member since
    April 2015
Posted by LrdSatyr8 on Thursday, November 12, 2015 1:11 PM

Alright all you happy peoples... got a big update for everyone. Have been working on scratch building the nav chairs. I got out my reference photos and set to work with my putty and began working on the first frame.


My first task was get some kind of measurements. As far as I can tell from the photo the top of the nav chair is a head and a half taller then the front seats, but I also had to factor in the fact that the floor is also dropped a bit lower then then one the front seat is on (hence the reason for the lowered floor in the cockpit). So I took a stick and placed the front seat in place and eyeballed the measurement on the stick. I used that measurement to figure out the rest of my build. Using that measurement I pulled out some putty and started shaping it. I placed a couple of strips of styrene down to give a better ridge to it. Here's the result...


Althou it didn't come out too bad, I realized I was gonna have to repeat this process 2 more times and frankly, getting the putty to this point took about 2 hours. Didn't like it... so I basically started over again with styrene and think it came out looking better then the putty. I also have some styrene tubing that I thought would make the look a lot nicer, so using the thickness of the tubing, I figured out the width of the framing... Came out looking alot cleaner and straight-edged.


I needed to encase the tubing inside the frame but I also had to make two 90 degree tubes along the side that kinda of protruded thru the framing in the bottom of the top hole of the frame and the second to bottom hole. I used my dremel to make some concave cuts in the end of the tubing and then cut 6 little pieces to glue onto the tube in the proper places. I had to fit them into the holes to make sure I had them in the right places. I painted them black, glued two strips to the sides and then glued them onto the backs of the frames.


So far not looking too bad. I cut out the seats and backs and the back tops. I glued one together and I started thinking that maybe these frames were too big, so I placed them next to the provided seats to compare them and I guess not. Looks like I'm right on track.


More to come!

Things to think about... What would happen if you put a werewolf on the moon?  h is just a little chair and the human brain named itself!

  • Member since
    April 2015
Posted by LrdSatyr8 on Thursday, November 12, 2015 1:12 PM

Now comes the fun part. The seat topper. This thing is completely wacky to try to build from scratch. Hard to make a template for it as well because you have to glue, let dry and shape and round and fix, then glue another piece, let dry and sand and shape, ad nausea... but I got one done. Here's how it looks...


Looks about right to me. So I glued it in place and started working on the line cushions... this time I turned to my trusty putty. Doesn't look too bad... Whatcha think?


Two more toppers to go... then the arms rests, the side greeblies, and the supports and I can start painting! Really starting to come together.

Things to think about... What would happen if you put a werewolf on the moon?  h is just a little chair and the human brain named itself!

  • Member since
    November 2009
  • From: SW Virginia
Posted by Gamera on Friday, November 13, 2015 5:06 PM

Wow, that's incredible! I can't even seem to finish a 1/48th aircraft and you and Eagle are doing stuff like this! Indifferent

"I dream in fire but work in clay." -Arthur Machen


  • Member since
    December 2010
  • From: Memphis TN
Posted by Heavens Eagle on Friday, November 13, 2015 6:10 PM

It's coming along nicely LS8!  You are definitely handy with that sculpt putty!  I like how you solved some of the problems and your control panel in the cockpit is a vast improvement over the stock one in the kit.

  • Member since
    April 2015
Posted by LrdSatyr8 on Friday, November 13, 2015 7:06 PM

Gamera

Wow, that's incredible! I can't even seem to finish a 1/48th aircraft and you and Eagle are doing stuff like this! Indifferent

I am no where near Eagle's level... thanks for that thou!

Things to think about... What would happen if you put a werewolf on the moon?  h is just a little chair and the human brain named itself!

  • Member since
    April 2015
Posted by LrdSatyr8 on Friday, November 13, 2015 7:10 PM

Heavens Eagle

It's coming along nicely LS8!  You are definitely handy with that sculpt putty!  I like how you solved some of the problems and your control panel in the cockpit is a vast improvement over the stock one in the kit.

When I discovered I couldn't get the awesome 3D printed parts, I had to do something.  That sticker just didn't cut it!  RIght now I'm trying to do the greeblies on the nav chairs.  One will probably be super detailed for the lounge area... the other two not so much because you won't see them as clearly.  But am getting there slowly... just taking longer then I want! :)  THanks for the compliment bro!  Your work is amazing!

Things to think about... What would happen if you put a werewolf on the moon?  h is just a little chair and the human brain named itself!

  • Member since
    April 2015
Posted by LrdSatyr8 on Sunday, November 15, 2015 9:21 AM

Ok all... big update... I realize that I should update daily, but work keeps me too busy to do so, so I update at least weekly if possible. So... on with the progress...

I know I wanted to greeble out the hell of this sucker, so I finally found some really good refrerences online... I believe they were by Maruska if I'm not mistaken... but they helped me get a lot of the details that I needed to put into this. Here's a couple of reference pics I used for my detailing.


With those pics I was able to at least get close to the detail I needed and I set to work on the details. The hardest part was getting the toppers right... I think I did but on with the pics.


One thing you have to remember is that I had to do this 3 times... but I realized that I wanted the chair in the lounge to look the best so I made it my hero chair. Its also a but taller with a few more added greeblies that I will add later. Note the top is hollow just like the real chair.


And here is all the pics of the chairs with all the detailing done before painting (don't worry, they are coming up next).


More to come...

Things to think about... What would happen if you put a werewolf on the moon?  h is just a little chair and the human brain named itself!

  • Member since
    April 2015
Posted by LrdSatyr8 on Sunday, November 15, 2015 9:23 AM

And now the completely painted and finished chairs (except for the Lounge chair... still gotta add more greeblies to that).


I even drilled out the holes in the topper so that light shines thru properly. I hope you all enjoy this... let me know what you think! I really do enjoy reading your comments!

Things to think about... What would happen if you put a werewolf on the moon?  h is just a little chair and the human brain named itself!

  • Member since
    July 2014
  • From: Franklin Wi
Posted by Bakster on Monday, November 16, 2015 9:58 PM

Very nice work.  Yet another WIP that I must follow.  Keep up the good work!

Steve

  • Member since
    April 2015
Posted by LrdSatyr8 on Monday, November 16, 2015 10:45 PM

Bakster

Very nice work.  Yet another WIP that I must follow.  Keep up the good work!

Steve

Thanks Steve... Truly appreciate it... am done with the nav chairs now... Finished my hero chair for the lounge... Added the radar dish to the top, and made a set of headphone/microphones out of a piece of beading wire that I hammered flat and then carved the "speaker" end with my Dremel. I also added all the rivets... wish I could have gotten them more uniform but at this scale even using a needle doesn't work consistently. So on with the pics and lemme know what you think!


Things to think about... What would happen if you put a werewolf on the moon?  h is just a little chair and the human brain named itself!

  • Member since
    July 2014
  • From: Franklin Wi
Posted by Bakster on Tuesday, November 17, 2015 8:42 PM

I have to say it again...very nice work. Nice detailing that you are doing.  They look like they could be used as a prop in a movie!

Steve

  • Member since
    April 2015
Posted by LrdSatyr8 on Wednesday, November 18, 2015 7:57 AM

Bakster

I have to say it again...very nice work. Nice detailing that you are doing.  They look like they could be used as a prop in a movie!

Steve

Thank you... you are much too kind.  I'm just muddling thru this on my own! :)

Things to think about... What would happen if you put a werewolf on the moon?  h is just a little chair and the human brain named itself!

  • Member since
    April 2015
Posted by LrdSatyr8 on Wednesday, November 18, 2015 8:02 AM

I did some comparative pics last night and came to the conclusion that I'm gonna have to rebuild the lounge chair fro m scratch.  It's too tall.  Which is odd because the cockpit chairs are close to perfect.  Here's the pics to show you what I mean.

The top of the chairs should be right about where the top of the top lightbar is on the back wall... mission accomplished.

However, as you can see above, the top of the nav chair should be about the same height as the top of the nav console.  It's about a foot too tall and with the radar dish is even taller then the doorway... so that leads me to 1 of 3 options... 1) Either leave it as is and continue on with the build... 2) Buy one of the Shapeways printed ones and give up... or 3) Build a new one from scratch.  Seeing as I'm not a quitter, I think I'm gonna have to go with 3!  Stay tuned!

Things to think about... What would happen if you put a werewolf on the moon?  h is just a little chair and the human brain named itself!

  • Member since
    July 2014
  • From: Franklin Wi
Posted by Bakster on Wednesday, November 18, 2015 8:53 AM

Hey... that's how I roll.  I muddle all the time!  So you are in good company. Tongue Tied

This is a fun project that you are working on. Keep going...

And may the Force be with you.

  • Member since
    April 2015
Posted by LrdSatyr8 on Wednesday, November 18, 2015 10:08 AM

Bakster

Hey... that's how I roll.  I muddle all the time!  So you are in good company. Tongue Tied

This is a fun project that you are working on. Keep going...

And may the Force be with you.

Thanks bro... am doing what I can! :)

Things to think about... What would happen if you put a werewolf on the moon?  h is just a little chair and the human brain named itself!

  • Member since
    April 2015
Posted by LrdSatyr8 on Wednesday, November 18, 2015 2:51 PM

I'm hoping I'll be able to use some of the detail that I put on this thing in the smaller version rebuild.  Nice thing about putty is that once it hardens, it can be popped off and still retain it's shape.  So I think that's what I'll do.  I just hope the topper can be salvaged because that was the worst thing to build from scratch! LOL

Things to think about... What would happen if you put a werewolf on the moon?  h is just a little chair and the human brain named itself!

  • Member since
    November 2009
  • From: SW Virginia
Posted by Gamera on Wednesday, November 18, 2015 7:29 PM

Wow, I'd never have noticed the size issue, I love that attention to detail!

Now I'm wondering if you're going to add shed Wookie fur to the cushions! Wink

"I dream in fire but work in clay." -Arthur Machen


  • Member since
    April 2015
Posted by LrdSatyr8 on Wednesday, November 18, 2015 8:35 PM

Gamera

Wow, I'd never have noticed the size issue, I love that attention to detail!

Now I'm wondering if you're going to add shed Wookie fur to the cushions! Wink

Everyone knows that Wookies are hypoallergenic and don't shed!  But I do know that if you used a black light in the Falcon it would light up like a Jackson Pollack painting! LOL  Lando had some wild parties!

Things to think about... What would happen if you put a werewolf on the moon?  h is just a little chair and the human brain named itself!

  • Member since
    April 2015
Posted by LrdSatyr8 on Wednesday, November 25, 2015 3:15 PM

Ok all... got some good news I believe. For those of you who have been wanting to use the replacement stickers, I've found that althou the backwall is accurate, it doesn't quite work with the backwall part that DeAgo supplies with the kit... so I had to figure out a way to fix that. And here it is...


Yep... that's right... Satyr is 3D now! Muahahhaahahahahahahahha! Give this a try as a replacement to the backwall and all the lights should line up perfectly. I also didn't put the holes in for the fibers but I did thin out the back... reason being is that at the cheaper plastic, it doesn't allow for holes smaller then .7mm and since most fibers are .2mm if I put in the hole it just wouldn't work, however, since all the lights on my graphic are right there, you have a perfect template for drilling the fiber holes yourself. Little more work, cheaper price. Sorry Tony... Had to do it! Hope this helps everyone out and I look forward to hearing about your experiences!

Here's the link for the part on Shapeways: https://www.shapeways.com/product/D2...ionId=58465112

Things to think about... What would happen if you put a werewolf on the moon?  h is just a little chair and the human brain named itself!

  • Member since
    October 2014
Posted by TomZ on Thursday, November 26, 2015 6:38 PM
Please keep the reports coming! I love following this build.
  • Member since
    April 2015
Posted by LrdSatyr8 on Thursday, November 26, 2015 11:11 PM

TomZ
Please keep the reports coming! I love following this build.

Thank you so much... I'm just doing what i can bro!  Glad you enjoy it!

Things to think about... What would happen if you put a werewolf on the moon?  h is just a little chair and the human brain named itself!

  • Member since
    April 2015
Posted by LrdSatyr8 on Thursday, November 26, 2015 11:13 PM

Now that I've dipped my toe in the 3D printed parts arena... here's my second contribution... I had to remake the bunk sidewall to be more accurate to the ESB... so here ya go... lemme know what you think


You can get it here: https://www.shapeways.com/product/CH...ionId=58481587

Things to think about... What would happen if you put a werewolf on the moon?  h is just a little chair and the human brain named itself!

  • Member since
    April 2015
Posted by LrdSatyr8 on Friday, November 27, 2015 7:34 PM

Because I've been getting some flac on other forums, about this wall and why I went ahead and did another bunk wall when there are two others available on Shapeways, lemme show you the difference between mine and the others.

While I was at it, had a request for a new *** pit back wall that would work with the Paragrafix PE set... so I went ahead and made one.


You can get it here: https://www.shapeways.com/product/BR...ionId=58487267

Things to think about... What would happen if you put a werewolf on the moon?  h is just a little chair and the human brain named itself!

  • Member since
    December 2010
  • From: Memphis TN
Posted by Heavens Eagle on Saturday, November 28, 2015 8:46 AM

Hey Jim!  I see you got your Truespace working!  Good deal!  As to the holes for the fiber optics on the back bulkhead, you might be able to do a small dimple to help locate the drill bit on the back side.

For those of you using the Paragrafix cockpit, be aware that it is the New Hope version which is shorter.  The ESB pit has an extra set of panels added in between the New Hope sides and the windows.

Oh, seems I saw someplace a comment that the nav computer in the kit is possibly too small (or short).  Check your seat against the doorway.  I have not checked this part out yet myself so don't know for sure.  As we have discussed, everything internal is questionable on sizing.

  • Member since
    April 2015
Posted by LrdSatyr8 on Saturday, November 28, 2015 3:08 PM

Yeah I think the scales are all over the place on the inside.. oh well... will just have to make due!

Things to think about... What would happen if you put a werewolf on the moon?  h is just a little chair and the human brain named itself!

  • Member since
    November 2009
  • From: SW Virginia
Posted by Gamera on Sunday, November 29, 2015 5:10 PM

That's awesome. I'd never have noticed the difference.

"I dream in fire but work in clay." -Arthur Machen


  • Member since
    April 2015
Posted by LrdSatyr8 on Sunday, November 29, 2015 6:14 PM

Gamera
That's awesome. I'd never have noticed the difference.

I think that's my biggest problem... my OCD goes crazy when I see details being overlooked... they just poke out at me and offend my OCD so bad it makes me shake.  So I do one of two things... I either wait and hope that someone fixes the problem (or I point out the problem to them if I can) or I go ahead and do it myself so that my OCD calms down!  I had to do the latter for this one!  Thanks bro... glad I was able to help!

Things to think about... What would happen if you put a werewolf on the moon?  h is just a little chair and the human brain named itself!

  • Member since
    April 2015
Posted by LrdSatyr8 on Sunday, November 29, 2015 7:29 PM

Ok all... Here comes another piece. It's taken way too long for someone to do, but I figured I would try my hand at figure modeling. THey have done a Han, a 3 legged R2, a 3PO and even a Chewie, but no one has done a Leia yet. So here's my offering. It's not perfect or detailed right, I know, I'm not that good with human modeling. However I think it may be a good base for modding and detailing properly. It should be the perfect size at 1:43 scale to sit in the back nav chairs. Give it a try and lemme know what you think.


Here's the link: https://www.shapeways.com/product/8U...X/leia-sitting

Things to think about... What would happen if you put a werewolf on the moon?  h is just a little chair and the human brain named itself!

  • Member since
    November 2009
  • From: SW Virginia
Posted by Gamera on Monday, November 30, 2015 7:48 AM

A little hard to tell without paint but she looks really good as far as I can tell. 

"I dream in fire but work in clay." -Arthur Machen


  • Member since
    April 2015
Posted by LrdSatyr8 on Monday, November 30, 2015 9:19 AM

Gamera
A little hard to tell without paint but she looks really good as far as I can tell. 

She's not perfect, but I think it would be a good base for modding... adding putty to etc to detail out properly.  I'm still working on her a bit and will update her as I keep doing so.  But for now, it's what I got so far!

Things to think about... What would happen if you put a werewolf on the moon?  h is just a little chair and the human brain named itself!

  • Member since
    April 2015
Posted by LrdSatyr8 on Wednesday, December 2, 2015 12:30 PM

All the standing and seated figures have been replaced and are no longer available.

Things to think about... What would happen if you put a werewolf on the moon?  h is just a little chair and the human brain named itself!

  • Member since
    November 2009
  • From: SW Virginia
Posted by Gamera on Thursday, December 3, 2015 7:38 AM

Whoa those are awesome!!! 

BTW, is there some website you can direct me to that gives a little overview on how you do this? I assume it's some sort of CAD program? I've been looking for some '50s Korean civilian figures for a Korean War diorama I've been wanting to build and there isn't much available. I've thought about trying to sculpt my own but this is interesting, to be honest with my lack of knowledge about CAD I'd probably be better off just doing it by hand though. 

"I dream in fire but work in clay." -Arthur Machen


  • Member since
    April 2015
Posted by LrdSatyr8 on Thursday, December 3, 2015 9:58 AM

I've been doing this a long time, but there is a program out there that you can use to make figures... it's called Poser and has been around for a very long time... here's a link for ya...

http://my.smithmicro.com/poser-3d-animation-software.html

Things to think about... What would happen if you put a werewolf on the moon?  h is just a little chair and the human brain named itself!

  • Member since
    November 2009
  • From: SW Virginia
Posted by Gamera on Thursday, December 3, 2015 11:19 AM

Thanks! I'll give it a good looking over this weekend. 

Little expensive for something to fool around with but have a few arty friends that might have an old copy lying around after upgrading. 

"I dream in fire but work in clay." -Arthur Machen


  • Member since
    April 2015
Posted by LrdSatyr8 on Tuesday, December 8, 2015 12:22 PM

All the standing and seated figures have been replaced with separated figures that should make things alot easier for you to put in any pose you want!

Things to think about... What would happen if you put a werewolf on the moon?  h is just a little chair and the human brain named itself!

  • Member since
    November 2009
  • From: SW Virginia
Posted by Gamera on Wednesday, December 9, 2015 12:52 PM

Wow, they look pretty darn good to me! 

"I dream in fire but work in clay." -Arthur Machen


  • Member since
    April 2015
Posted by LrdSatyr8 on Wednesday, December 9, 2015 3:40 PM

All the standing and seated figures have been replaced with separated figures to make it easier to pose in whatever manner you want!

Things to think about... What would happen if you put a werewolf on the moon?  h is just a little chair and the human brain named itself!

  • Member since
    November 2009
  • From: SW Virginia
Posted by Gamera on Wednesday, December 9, 2015 8:48 PM

Cool, they look even better together!

"I dream in fire but work in clay." -Arthur Machen


  • Member since
    April 2015
Posted by LrdSatyr8 on Sunday, December 13, 2015 1:36 AM

All the standing and seated figures have been replaced with separated figures to make it easier to pose in whatever manner you want!

Things to think about... What would happen if you put a werewolf on the moon?  h is just a little chair and the human brain named itself!

  • Member since
    July 2014
  • From: Franklin Wi
Posted by Bakster on Sunday, December 13, 2015 10:41 AM

That is very cool! 

  • Member since
    November 2009
  • From: SW Virginia
Posted by Gamera on Sunday, December 13, 2015 4:48 PM

They look friggin' awesome to me!

"I dream in fire but work in clay." -Arthur Machen


  • Member since
    April 2015
Posted by LrdSatyr8 on Sunday, December 13, 2015 10:54 PM

Thanks G... they've been a pain in the butt... been really dusting off my 3D modeling skills to get them working right. Glad everyone likes them so far!

Things to think about... What would happen if you put a werewolf on the moon?  h is just a little chair and the human brain named itself!

  • Member since
    April 2015
Posted by LrdSatyr8 on Monday, January 18, 2016 3:41 PM

Wow... I really gotta get on the ball here.  Been kinda stalled out lately due to the delay problem DeAgo has had in shipping 11 to me.  Just got it Saturday and billed for 12 today, so  in any event, hopefully I'll be able to get some more work done.  Been busy making a bunch of new stuff for Shapeways too.  Well be featuring them here when I get them in the mail next week.  Here's a preview of what I've made so far...

Here's a wall pit for the wall to the side of the interior nav computer.  Goes behind the wall after you cut the 2 holes out for it.


Here's a new front wall insert... instead of gluing onto the wall, this one is made to be inserted into the wall after cutting a hole in it... will allow the whole assembly to be set back far enough to allow the bunk wall to look better.

Here's one I've thought of doing for awhile now.  It's a Fake Wall for the gunner turret hallway.  You place this (with the ladder attached) before the bend in the hallway and it will look alot more screen accurate (even thou it doesn't actually go to the turrets).

This piece is a translucent light pipe to replace the bunk light.  You glue a single 1.8mm LED in the middle hole and paint it all black.  Then sand off the large round areas and the light should be more to scale then having a full on LED there blowing out the lighting in your kit.

So... I have been busy working on stuff... a few little things to help the cause for everyone.  You can see my shop on Shapeways if you'd like any of these here: https://www.shapeways.com/shops/satyrsmodels

Lemme know what you think!

Things to think about... What would happen if you put a werewolf on the moon?  h is just a little chair and the human brain named itself!

  • Member since
    December 2010
  • From: Memphis TN
Posted by Heavens Eagle on Monday, January 18, 2016 4:09 PM

I see you have been busy on the 'puter again Jim.  Big Smile

As to the light pipe, you really don't need to paint the whole thing black.  If it comes as a slightly frosted part, just paint the recessed area in the center and that will work.

As to that wall part next to the nav 'puter, you know I will be checking so it better be right.  Wink

Just waiting on parts to get here before trying to mod the hold.  Too much is going  to change, so I want to know how it all fits first rather than mod it and it not fit.

Stuff is looking good though!

  • Member since
    April 2015
Posted by LrdSatyr8 on Monday, January 18, 2016 10:11 PM

Heavens Eagle

I see you have been busy on the 'puter again Jim.  Big Smile

Yeah... been waiting for my latest pack of parts... 11 just arrived and I got billed for 12.

As to the light pipe, you really don't need to paint the whole thing black.  If it comes as a slightly frosted part, just paint the recessed area in the center and that will work.

That was the idea.  To make the light be diffused a bit more then direct LED.  The easiest way to handle it, it glue a 1.8mm blub to the end, then paint the whole thing black with a couple of layers.  Once it's dry, sand the outside rounded tubes along the length of them to expose the translucent clear resin beneath.  The sanding will also aide in diffusing the light and making it more uniform, otherwise you end up with hotspots.

As to that wall part next to the nav 'puter, you know I will be checking so it better be right.  Wink

Let's take a look shall we?

Ok... you tell me! :)

Just waiting on parts to get here before trying to mod the hold.  Too much is going  to change, so I want to know how it all fits first rather than mod it and it not fit.

Stuff is looking good though!

Thanks bro... glad you like em!

Things to think about... What would happen if you put a werewolf on the moon?  h is just a little chair and the human brain named itself!

  • Member since
    November 2009
  • From: SW Virginia
Posted by Gamera on Tuesday, January 19, 2016 7:36 AM

Cool stuff!!! 

"I dream in fire but work in clay." -Arthur Machen


  • Member since
    April 2015
Posted by LrdSatyr8 on Tuesday, January 19, 2016 1:06 PM

Gamera

Cool stuff!!!  

Oh... I'm just getting warmed UP! LOL  Glad you like it bro!

Things to think about... What would happen if you put a werewolf on the moon?  h is just a little chair and the human brain named itself!

  • Member since
    April 2015
Posted by LrdSatyr8 on Monday, February 1, 2016 12:06 PM

Ok all... here's the latest news on the figure front.  I took down all the sitting figures (really didn't want to bend them anyway).  The reason... Well first off they appeared too big so I shrunk them down about 10% and now they are too small.  But they weren't too big, just the way the legs were bent made them impossible to fit under the cockpit dashboard without tons of sanding to get them to fit.  So... I took them down.  Now something else that has come to light is that the interior is actually a smaller scale then the cockpit... it appears it's around 1:47.3 scale.  So that means having to make 2 different sizes 1:43 for the cockpit and 1:48 for the interior.  BUT don't fear... I'm fixing them.  Now, I have separated all the arms and legs and now you can pose them any way you want and you shouldn't have any more problems!  Here's the new offerings:

https://www.shapeways.com/product/D4X7JGAZF/1-43-han-esb-separated-for-deago-falcon?li=shop-results&optionId=58943655

https://www.shapeways.com/product/LB64G9AWP/1-48-han-esb-separated-for-deago-and-hasbro-falcon?li=more-from-shop&optionId=58945303

https://www.shapeways.com/product/DAA5NGK25/1-43-leia-separated-for-deago-falcon?li=more-from-shop&optionId=58985494

https://www.shapeways.com/product/7QRUNL22X/1-48-leia-esb-separated-for-deago-and-hasbro-falco?li=shop-results&optionId=58999952

https://www.shapeways.com/product/U5WECXLSP/1-43-chewie-separated-for-deago-falcon?li=shop-results&optionId=58953585

https://www.shapeways.com/product/66FSVJYCP/1-48-chewie-separated-for-deago-and-hasbro-falcons?li=shop-results&optionId=58999846

https://www.shapeways.com/product/GC6NK2YNE/1-43-c-3po-separated-for-deago-falcon?li=shop-results&optionId=59039142

https://www.shapeways.com/product/DNM6JVTSV/1-48-c-3po-separated-for-deago-hasbro-falcons?li=shop-results&optionId=59040240

Things to think about... What would happen if you put a werewolf on the moon?  h is just a little chair and the human brain named itself!

  • Member since
    April 2015
Posted by LrdSatyr8 on Monday, February 1, 2016 12:14 PM

been getting alot of questions about my figs and parts and figured I would post it here for anyone that has any questions... I'm currently reworking all my sitting figures and have removed them... I have been separating all the figures so they can be put together in any pose or position you want... but until then... here's are my FAQ (Frequently Asked Questions)

Q: Which scale figures should I get for my Falcon?
A: Depends on which Falcon you're building and where you're putting them.

  • If you're looking for figures for the cockpit of the DeAgostini Falcon - Get the 1:43 Separated Figures. You can also get the 1:43 Standing Figures and cut them yourself...
  • If you're building the Hasbro Falcon and want figures for the cockpit - Get the 1:48 Separated Figures. They will fit perfectly.
  • If you want figures for the interior cargo lounge of the DeAgo Falcon - Get the 1:48 Separated Figures... the interior is smaller scale then the rest of the ship and the 1:48 should work perfectly.


Q: Where do I put the Pit Wall?
A: The Pit Wall goes behind the plastic wall after cutting the holes next to the corridor opening next to the nav computer. They don't go in front of the wall... only behind it.

Q: Why did you make a front wall rib peice?
A: The other available front wall piece glues onto the surface of the wall and ends up being too far forward blocking the far sidewall and the bunk wall details. Mine is made to be inserted THRU the wall. You cut out a hole in the forward wall and glue this in it. It gives a false sense of more space and places the ribs further against the wall freeing up space for detail on the side walls!

Q: Where does the Fake Ladder go?
A: The Fake Ladder goes in the bent hallway leading to the gun turrets. It should be placed right before the bend in the hallway (it may need to be trimmed a bit to fit and conform to the ribbed cushions on the side walls) and painted and lit from behind to more accurately represent the full size set.

Q: How does the Light Pipe work?
A: The light pipe is placed just in front and below the upper bunk. You need to glue a 1.8mm LED into the hole (using a clear cement) and paint the whole thing with a couple of layers of flat black. Then sand off the paint on the tubes outer surfaces. When the LED is lit it should light up the entire piece more realistically and look really good.

Q: Where did you get the figures from?
A: I used publically available sources for the base designs for many of the figures but have extensively modified, fixed, repaired, upgraded, rebuilt, and reconstructed them for printing.

That should do it for now... please feel free to ask any other questions you may have about any of my products and I'll respond on my blog on the RPF and on my Facebook group here for first hand updates when I release any new products... and above all... thanks for your support!

Things to think about... What would happen if you put a werewolf on the moon?  h is just a little chair and the human brain named itself!

  • Member since
    December 2010
  • From: Memphis TN
Posted by Heavens Eagle on Monday, February 1, 2016 12:38 PM

The figures are all looking quite good Jim!  Have decided to shelve my build until I have enough of the hull parts to properly determine sizes and fits.   Until then I will be watching.  

  • Member since
    April 2015
Posted by LrdSatyr8 on Monday, February 1, 2016 1:56 PM

Heavens Eagle
The figures are all looking quite good Jim!  Have decided to shelve my build until I have enough of the hull parts to properly determine sizes and fits.   Until then I will be watching. 

Well we at the RPF have pretty much worked out the math.  The provided cockpit is squeezed and distorted an falls at 1:41.5 approx.  The Shapeways cockpit by Tony is dead on 1:43.  Now as for the Cargo interior lounge, the scale we've found is 1:47.3 based on the known measurements from the blueprints and scaled to the provided parts.  So.. in rounding it out... 1:48 for the inside... 1:43 for the cockpit (scrap the provided one).  Work for you? :)

Things to think about... What would happen if you put a werewolf on the moon?  h is just a little chair and the human brain named itself!

  • Member since
    April 2015
Posted by LrdSatyr8 on Monday, February 1, 2016 1:59 PM

I'll just drop this here: 

Things to think about... What would happen if you put a werewolf on the moon?  h is just a little chair and the human brain named itself!

  • Member since
    November 2009
  • From: SW Virginia
Posted by Gamera on Tuesday, February 2, 2016 2:05 PM

Those figures are amazing, I want to build a Falcon now myself just so I can use them!!!

"I dream in fire but work in clay." -Arthur Machen


  • Member since
    April 2015
Posted by LrdSatyr8 on Tuesday, February 2, 2016 3:57 PM

Thanks... It looks like all those are mine except R2 and 3PO

Things to think about... What would happen if you put a werewolf on the moon?  h is just a little chair and the human brain named itself!

  • Member since
    April 2015
Posted by LrdSatyr8 on Sunday, March 20, 2016 10:52 AM

It's been awhile... I've been doing alot of work lately and getting things ready for painting... got the underside all together and ready... here's a few pics of what I've got done so far.


I started working on the bottom details as well... love detail on the back engine.


And when everything is in place... oh mamma!!


Also got the recess pits finished


Really starting to come together!

Things to think about... What would happen if you put a werewolf on the moon?  h is just a little chair and the human brain named itself!

  • Member since
    April 2015
Posted by LrdSatyr8 on Sunday, March 20, 2016 10:57 AM

Something I was looking at are these stupid indented "damage" marks all over the hull.


Been thinking about what to do to make them more realistic.  I've seen all kinds of approaches to the problem and I'm sitting here thinking that the marks themselves are in the proper place, even the correct shape.  I'm thinking that when they did a scan of the hull for these places, the computer couldn't interpret what was actually there and used a default setting to just make an indention instead of the actual way the damage was on the hull... and that got me thinking.  Perhaps if I just took the harsh edges off the sides of them they might look alot better.  So, I got out my dremel and a fine bit and went to town on all the damage marks.  I think they came out looking alot better... what do you think?


Came out looking better than I expected


What do you guys think?

Things to think about... What would happen if you put a werewolf on the moon?  h is just a little chair and the human brain named itself!

  • Member since
    April 2015
Posted by LrdSatyr8 on Sunday, March 20, 2016 10:58 AM

Here's the mostly completed underside... getting it all prepped for painting...


Things to think about... What would happen if you put a werewolf on the moon?  h is just a little chair and the human brain named itself!

  • Member since
    April 2015
Posted by LrdSatyr8 on Sunday, March 20, 2016 12:08 PM

Well seeing as I'm waiting for my paints from DOA to arrive I figured I would make myself a Airbrush Spray Booth so I didn't get paint all over the floor.  So I went to Walmart and picked up the follow supplies...

- 7 sheets of 30x20 foam core board
- 1 12x12x1 Hepa filter
- 1 12 inch square battery operated/ac adapter powered box fan
- 1 cheap power strip
- 1 cheap under cabinet fluorescent light


Total was under $50 bucks... not too bad.  I started with a basic design...


Since the sheets were 30x20 inches I figured I would use one whole sheet for the working area.  So I set to cutting out my sheets.


Not having a compass, I discovered that using a paper plate it was the perfect size for the opening in the fan, and by folding it in half horizontally and vertically I could find the center with no problem.  I used it to cut a hole out of one sheet and then hot glued my fan in the center of it.  I made sure that I filled all the gaps to make it air tight.


I cut a wire coat hanger and used a few bolts, nuts and washers to hold the filter to the inner wall.  This will allow me to change out the filter relatively easy.  I used some weather stripping on the back side of the filter to give it a better seal against the opening I cut and started putting all the parts together.


Got everything together with duct tape and some hot glue alot all the inside edges to make it air tight... here's the final outcome and first test run.

Things to think about... What would happen if you put a werewolf on the moon?  h is just a little chair and the human brain named itself!

  • Member since
    November 2009
  • From: SW Virginia
Posted by Gamera on Sunday, March 20, 2016 3:03 PM

Nice work, the reworked hull damage does look much better than what was molded in. 

And neat air booth there, please let us know how it works out. 

"I dream in fire but work in clay." -Arthur Machen


  • Member since
    July 2014
  • From: Franklin Wi
Posted by Bakster on Sunday, March 20, 2016 5:58 PM

It looks cool...

  • Member since
    April 2015
Posted by LrdSatyr8 on Monday, March 21, 2016 7:27 AM

Gamera
Nice work, the reworked hull damage does look much better than what was molded in. 

And neat air booth there, please let us know how it works out.

Thanks bro... will keep ya posted! :)

Things to think about... What would happen if you put a werewolf on the moon?  h is just a little chair and the human brain named itself!

  • Member since
    April 2015
Posted by LrdSatyr8 on Monday, March 21, 2016 7:28 AM

Bakster

It looks cool... 

Thanks... Glad you like it!

Things to think about... What would happen if you put a werewolf on the moon?  h is just a little chair and the human brain named itself!

  • Member since
    April 2015
Posted by LrdSatyr8 on Tuesday, March 29, 2016 9:59 AM

Latest update... been using my new spray booth and it works like a champ.  Really draws the fumes out and works better then I could have hoped!  I've been using it for some small stuff right now... have been experimenting with different colors for the base coat... I picked up a few different Krylon paints to see which one would look best as a base coat.  I got Ivory, Sea Green, White, and Almond... will paint as swatches and do a comparison soon to see which one comes out looking best.  Will post the results here to let everyone know when it's done!

Things to think about... What would happen if you put a werewolf on the moon?  h is just a little chair and the human brain named itself!

  • Member since
    April 2015
Posted by LrdSatyr8 on Tuesday, March 29, 2016 9:59 PM

I've been testing various other base paints to use as a substitution for the hard to find Tamiya Insignia White.  I tried out 4 different Krylon colors and my initial thoughts were correct.  The colors I tried are Almond, Ivory, Flat White and Aqua.  Here's what they look like and are pretty readily available just about everywhere in large supplies (so no need to worry about them running out of stock any time soon).


I took some paint swatches I got from walmart and painted them each color to test against the unpainted hull and then took photos under a Daylight bulb.  Its a bit lighter which is a good thing because after weathering it's gonna be darker anyway.  You can see the results for yourself.


So I'm definitely going with Ivory... I went ahead and painted the top turret and placed it on the unpainted hull and you can definately see how nicely it looks!


Things to think about... What would happen if you put a werewolf on the moon?  h is just a little chair and the human brain named itself!

  • Member since
    April 2015
Posted by LrdSatyr8 on Thursday, March 31, 2016 8:39 AM

Mental note to self... remember that not all lights are as cool as LED bulbs are now!


So here's the situation... Here I am happy as can be using my new spray booth and everything is going great... I get up from it for a moment and turn my back and all the sudden I hear CRASHHHHHHHHHH! The florescent light strip I was using in the hood I had attached with hot glue thinking it would be good enough to hold it with no problems seeing as its a florescent bulb... well I was wrong... it got hot enough to melt the glue and the whole think came crashing down... luckily the bulb didn't break. So I drilled a couple of holes in the top of the hood and reattached the lamp and now everything is right with the world again! I'm just glad that nothing was damaged (including none of the parts I was working on including some printed pieces!)


Things to think about... What would happen if you put a werewolf on the moon?  h is just a little chair and the human brain named itself!

  • Member since
    July 2014
  • From: Franklin Wi
Posted by Bakster on Thursday, March 31, 2016 9:14 AM

Just a few comments for you.

1. Nice job on the MacGyver like spray booth. It seems like it is low cost but very functional unit. Way to go...

2. Live and learn about the light. I am glad it didn't damage anything.

What happened to you sounds like my world.  Like the time that a leg gave out on my chair sending me to the floor.  Or, more recently... I was squeezing some putty out of a tube of plastic filler when I heard a POP! I'm thinking, what the heck was that? And why is there all this putty on my hand. Well, the back side of the tube burst sending putty all over me and on my work bench. It was quite the scene man.

Thanks for sharing..


  • Member since
    April 2015
Posted by LrdSatyr8 on Thursday, March 31, 2016 2:35 PM

Bakster
Leg gave out on my chair sending me to the floor.  Or, more recently... I was squeezing some putty out of a tube of plastic filler when I heard a POP! I'm thinking, what the heck was that? And why is there all this putty on my hand. Well, the back side of the tube burst sending putty all over me and on my work bench. It was quite the scene man.

Thanks bro... yeah... Murphy's Laws for Modeling kick in everyday!  Like, no matter how careful you are with the Superglue, you always end up getting it on your fingers.  Or no matter how careful you are in placing two peices together for gluing, or how many times your test fit something, once glue is applied it's always off!  Yeah... maybe we should come up with a list of Modeling Murphy's Laws! :)  I'm sure with all of us here we'd be able to come up with a pretty extensive list! :)

Things to think about... What would happen if you put a werewolf on the moon?  h is just a little chair and the human brain named itself!

  • Member since
    April 2015
Posted by LrdSatyr8 on Monday, April 4, 2016 7:15 AM

And so the painting begins!  I started with a good preshading of the lower hull.  I went a little heavy because I will be covering it with the base color coat afterward.


I gotta say... I really am loving my spray booth... works better then I expected it too!  After the preshading I covered it with a good light coating of my base color.  This serves two purposes... one the base coat since its a lacquer, will be easy to fix errors on, and two it acts as a great light barrier for the lights inside!  Here's the result using the Krylon Ivory paint/primer that I used from a rattle can.  The results are better than I expected!


The preshading is subtle but really makes the details pop!  Whatcha all think?

Things to think about... What would happen if you put a werewolf on the moon?  h is just a little chair and the human brain named itself!

  • Member since
    April 2015
Posted by LrdSatyr8 on Tuesday, April 5, 2016 7:53 AM

Oooooooo... almost got ahead of myself here.  Before I settled on this color, I sprayed the top turret to see how the colors would look.  I also did some light weathering to see if the color holds up under weathering.  Here's the result (before I painted the hull).


Things to think about... What would happen if you put a werewolf on the moon?  h is just a little chair and the human brain named itself!

  • Member since
    April 2015
Posted by LrdSatyr8 on Tuesday, June 14, 2016 3:30 PM

Yeah yeah I know... you're expecting more build pics.  Well I've been kinda stalled out lately due to a number of factors that are slowly starting to clear up.  1) I had to wait for the DOA paints to come back in stock and FINALLY after about 4 months they have arrived, I feel kinda sorry for Andy Preston... he's been making those paints by hand and I'm sure he didn't expect the demand for them.  SOOOOOOO... if you want them, expect a long waiting line.  2) Waited over a YEAR for the binders to finally come in stock for the US market.  Was so tired of digging thru my boxes to find the mag issue with references.  Seeing as I'm up to issue 64 (and have 68 arriving this week) you can imagine all the magazines that have been laying around.  But now I have 3 binders filled and started on a 4th.  Can't believe we're already more than 3/5ths of the way thru this build!  3) I've been hard at work making new and exciting 3D parts to detail out my build.  I finally got around to making a completely detailed and photo-matched replica of the ESB Port Side Wall.  Came out looking better then I hoped, but I didn't stop there.  I know a few of my friends are making the ANH version of this kit and I decided to go ahead and make that too!  If you'd like to get them for your build here they are:


Link: https://www.shapeways.com/product/6VCRMQF7X/esb-port-side-wall-for-deago-falcon-1-of-2?optionId=60005343

You can click the image to see the details of it.  It's got several parts including a separate door, light grill, side room, electrical room light above the door and both rings (outer and cushion).  In order to make it more affordable I split the parts into the ones that can be printed in ABS and the ones that require FXD for printing.  Or you can get the whole thing in FUD/FXD material in one shot.  Read the description for details.

Here's my ANH Port Side Wall as well:


Link: https://www.shapeways.com/product/FSAP2FBUB/anh-port-wall-for-deago-falcon-1-of-2?optionId=60029415

I tried to be as accurate as possible to the movie.  Where detail couldn't be found I used my best judgement, but I hope everyone likes it!  Please let me know if they are useful.  I'm also working on a TFA wall with the bunk room and extra lighting.  Should be interesting to say the least!  

Things to think about... What would happen if you put a werewolf on the moon?  h is just a little chair and the human brain named itself!

  • Member since
    December 2010
  • From: Memphis TN
Posted by Heavens Eagle on Tuesday, June 14, 2016 4:11 PM

I got the one binder that they sent with the second monthly shipment.  Really didn't like the binder at all.  I thought about using some 8-1/2 by 11 side mount page protectors to mount the magazines, but the magazines are about 1/32 inch too big to fit.  The mount tabs I am using do the job and while a bit loose, hold the skinny magazines quite nicely.  Once I get a current printer that will work on my new computer I will print out some sheets to insert in the outer slips so that they will look like the DeAg binders.

Your wall sections are looking good Jim.  I am still waiting to see how all this carpola actually fits together before doing any more interior work.  There is just too much that it should have done to it to guestimate before I have all the needed info.

  • Member since
    November 2009
  • From: SW Virginia
Posted by Gamera on Wednesday, June 15, 2016 11:28 AM

Awesome! I was worrying you guys had stopped updating here and really want to see how she turns out. 

"I dream in fire but work in clay." -Arthur Machen


  • Member since
    April 2015
Posted by LrdSatyr8 on Wednesday, June 15, 2016 2:39 PM

Heavens Eagle

Your wall sections are looking good Jim.  I am still waiting to see how all this carpola actually fits together before doing any more interior work.  There is just too much that it should have done to it to guestimate before I have all the needed info.

 
Thanks bro... yeah... as I dig into the interior I keep finding more and more stuff that just needs to be fixed.  Am working on the TFA Port Wall now... am also considering redoing the Starboard wall.  Oh... and here's a little tidbit of knowledge that I discovered on my own without realizing it.  Not sure if anyone else caught this or not, but... I discovered that there are only 4 Support Pylons in the hold in ANH and in ESB there are 5.  Sooooooo that means I gotta make a new version for the ANH version.  Joy of joys! :)  What really sucks is if I keep making more and more accurate parts I might as well just redo the entire interior! LOL

Things to think about... What would happen if you put a werewolf on the moon?  h is just a little chair and the human brain named itself!

  • Member since
    April 2015
Posted by LrdSatyr8 on Wednesday, June 15, 2016 2:42 PM

Gamera

Awesome! I was worrying you guys had stopped updating here and really want to see how she turns out.  

Oh no my friend... the work drudges on endlessly.  I keep finding more and more things to fix as I go.  Wanna know what really sucks?  I haven't glued anything together on the interior YET!  And I started back in March of 15... am up to issue 68!  The only thing I've actually got together so far is the bottom hull.  I have a few more parts I wanna make before I start gluing everything together!  But I'm sure in the end it's gonna be LEGEND... wait for it... DARY!!

Things to think about... What would happen if you put a werewolf on the moon?  h is just a little chair and the human brain named itself!

  • Member since
    April 2015
Posted by LrdSatyr8 on Tuesday, July 5, 2016 9:22 AM

Well... I know it's been awhile since I posted but here's what I've been working on... My OCD won't let me move on until I fix a bunch of the parts in the DeAgo interior (and there are alot of things that need fixing).  So I'll start off with how all this started.  First things first... I wanted to make a detail on the Port Side wall to give it a little umph... so I made this thingy:

Port Wall Greeblie

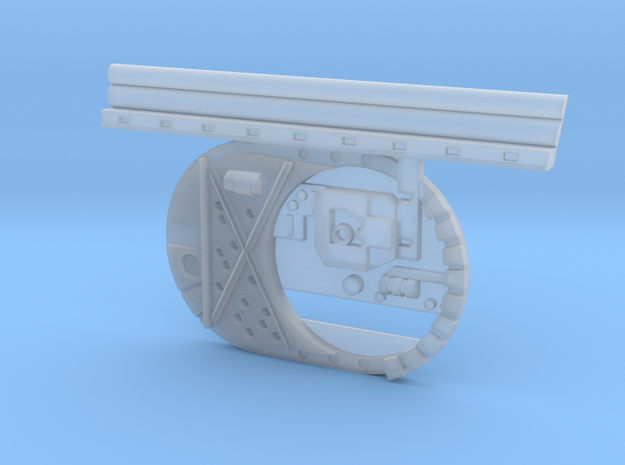
It would work perfectly on the Port Side wall... but then I started noticing things... for example... the door to the maintence room was not only the wrong shape, but the wrong size and not even in the right spot, so I ended up having to redo the entire wall from scratch... here's how it came out:

ESB Port Side Wall

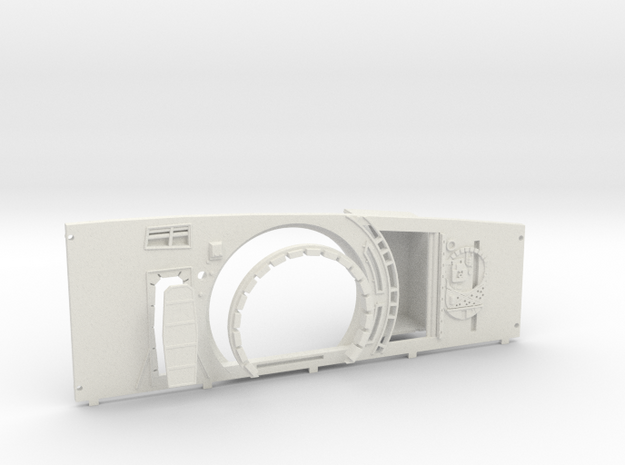
Notice I used my greeblie I made earlier.  Well now I'm happy and then a friend of mine said he could use the ANH version of that wall... so of course, here I come to the rescue...

ANH Port Side Wall

Well while I was working on that, I discovered something... there's only 4 support frames on the front in ANH.  So that means I had to redo my whole front support beams, but while I was at it I might as well replace that whole wall... so of course I had to make 2 versions... a ANH and an ESB version... here they are:

ANH Front Wall


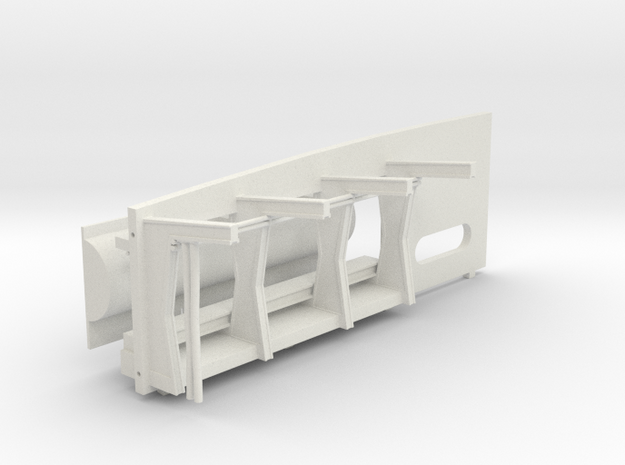
(Notice there are 2 hoses hanging off the frame itself and only 4 frames in ANH)... here's the ESB version:

ESB Front Wall

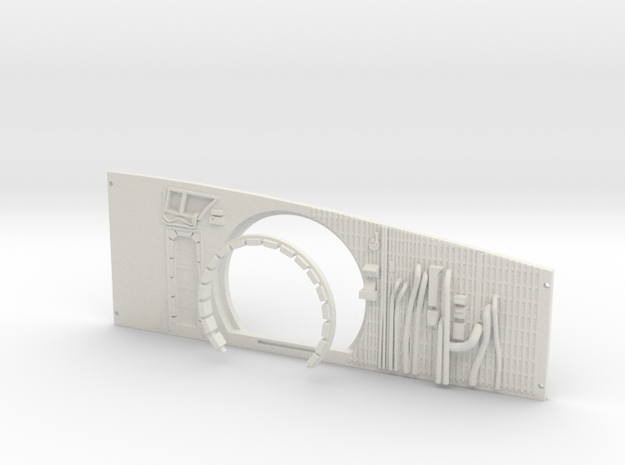
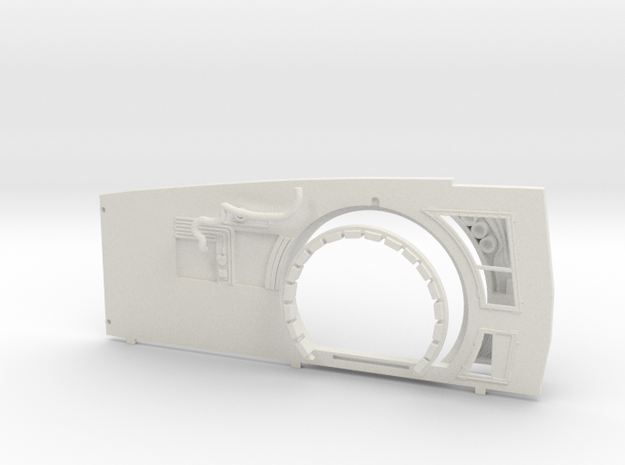
Well... around this time, I realized that if I was gonna do two walls I might as well go ahead and do the Starboard wall as well... it's completely messed up... and in a dire need for an upgrade... so I made this:

Starboard Wall Replacement

So needless to say, I've been busy making parts to replace in my Falcon build.  Lemme know what you think!

Things to think about... What would happen if you put a werewolf on the moon?  h is just a little chair and the human brain named itself!

  • Member since
    December 2010
  • From: Memphis TN
Posted by Heavens Eagle on Tuesday, July 5, 2016 10:38 AM

It's about time you posted some pics of your Shapeways stuff on here Jim.  You can tell that a lot of time was spent doing comparisons to photos.  Why Deag didn't try and get this part a little closer I don't know, but it makes a market for those that DO pay attention to the CORRECT details to create "The Right Stuff".

  • Member since
    February 2003
  • From: UK
Posted by gregers on Tuesday, July 5, 2016 10:42 AM

What I think?. Blimming awesome. Excellent work. I had thought of getting the DeAg Falcon. Seeing the two on here made me glad I didn't because there's no way I could come close to matching your builds. That and where would I put it?. though my good wife may have had a suggestion Surprise Keep up the good work. I'll be watching with interest and if you don't mind, using your build for reference when I do my AMT 'Cutaway' version.

All the best.

Greg

Why torture yourself when life will do it for you?
  • Member since
    April 2015
Posted by LrdSatyr8 on Tuesday, July 5, 2016 2:31 PM

Thanks guys... yeah I've been a busy boy! :)  Matter of fact I just finished a new part that I just finished submitting to Shapeways to replace the entire Turret Hallway.  Here's a couple of pics to wet your whistles with:

Needless to say it looks a whole lot better then the one they provide.  Whatcha think?

Things to think about... What would happen if you put a werewolf on the moon?  h is just a little chair and the human brain named itself!

  • Member since
    April 2015
Posted by LrdSatyr8 on Tuesday, July 5, 2016 2:58 PM

Mind you... the tube does NOT go up into the gun turrets... because of the bad geometery between the sets and the model, it's impossible.  But that part will make it LOOK like it does from the inside.  It's kinda a faux tunnel! :)

Things to think about... What would happen if you put a werewolf on the moon?  h is just a little chair and the human brain named itself!

  • Member since
    April 2015
Posted by LrdSatyr8 on Monday, August 8, 2016 12:40 PM

Am really stoked. I got my ESB Port Wall from SW the other day and finally got around to painting it last night. I tell you what... this thing looks AWESOME! And I haven't even put the light or the tubes/wires/cubby hole in it yet. Take a look for yourself!


Things to think about... What would happen if you put a werewolf on the moon?  h is just a little chair and the human brain named itself!

  • Member since
    April 2015
Posted by LrdSatyr8 on Monday, August 8, 2016 12:43 PM

Well I got my latest shipment of Shapeways parts in the mail yesterday and am pretty pleased with the results!  The Starboard wall although has some nasty print lines in it (hoping to get it reprinted for free) fits the slotted holes on the floor perfectly.  Also the greeblies that glue into the recesses of the wall fit perfectly as well.  I had it printed in White ABS plastic Here's how everything looks on it.


Now, also got my front wall printed and ran into a slight problem.  Althou the tabs fit into the holes perfectly, the detached tube on the back is off  and doesn't quite fit for some reason.  May have to repair that and reupload a new version onto shapeways.  I had it printed in Black ABS plastic and it doesn't look too bad!  I shorted the frames up a bit on both sides to allow room for details on the bunk wall and the Port Side wall.


Here is my Turret Alcove replacement.  Came out looking grate and the fit is perfect.  Gonna be an awesome addition to my kit!  This is printed in White ABS with the Resin Ladder (not pictured):


And finally got my Cockpuit Corridor Wall Replacements... these came out looking AWESOME!  The fit was a little tight but with a little sanding of the front tabs, they slid right into place with no problems!  Here's how they look prepainted!


Now I can really start painting and getting everything together and I feel so stoked about how things are coming together!  Lemme know what you think!

Things to think about... What would happen if you put a werewolf on the moon?  h is just a little chair and the human brain named itself!

  • Member since
    April 2015
Posted by LrdSatyr8 on Monday, August 8, 2016 1:01 PM

Alright folks... time for a new update.  I've gotten a bunch of my Shapeways parts that I've made printed and delivered and have been painting them up, but my Front Wall Replacement had a couple of small issues (that I've fixed since then) that have cropped up that I figured I would address here.  The biggest being that the tube wall doesn't fit in the the back properly.  Well it's a pretty easy fix.  If any of you have ever had after market parts to detail your model would know, not all of them are perfect and you usually end up having to "fix" them to get them to fit properly.  This is a pretty easy fix.  All you need to do is trim about 1mm off the front edge of the tube itself on both sides with a dremel tool.  Easy right... well here's what it would look like.

Using the dremel, sand down both ends of the tube about an inch (pictured here I did it at an angle).


Test fit as you go to make sure you don't overdo it.


Once you get them trimmed properly it all falls right into place and even the tabs at the top and bottom fit into the slots properly.


Welcome to the wonderful world of after market parts!  Now I've since fixed this issue with the front wall replacement.  So if you were to order it today you wouldn't have this problem, but for those that have ordered it prior to today, it's an easy fix so you don't have to worry about buying a whole new part!  Easy pezy! Smile

Things to think about... What would happen if you put a werewolf on the moon?  h is just a little chair and the human brain named itself!

  • Member since
    April 2015
Posted by LrdSatyr8 on Monday, August 8, 2016 1:18 PM

Yep... lots of updates!  I've been been painting my Turrent Tube Replacement and I gotta say... I'm very happy with it.  Here's what it looks like (before I add lights to it!)


And here's a comparision of my part against the supplied stock part.  You can see, mine definitely looks more movie accurate (even if it doesn't connect the turrets together, but then it never would be able to!)

Things to think about... What would happen if you put a werewolf on the moon?  h is just a little chair and the human brain named itself!

  • Member since
    April 2015
Posted by LrdSatyr8 on Wednesday, August 17, 2016 3:28 PM

OK all... here's the latest updates to my build.  I decided to go with the Paragrafix corridor photoetch kit.  I like them over the 3D printed hallways.  Why?  All the corridors have these little floor slits that emit light.  Here's a screen cap of the floor lights.

But you have to trim the sides down but leave the spots where the cushion rings fit.  That was a major pain in the tush!  However... after trimming my floor plates... the first thing I wanted to do was get these floors looking at least somewhat accurate.  That meant gluing, alot of cutting, and repainting.  Here's how they came out.

Now, notice the step to the cockpit corridor... this really can't be avoided due to the pit on the bottom of the hull, but this PE kit comes with a nice little plate to put there to light up that section.  It also comes with the "hidden floor comparatments" but I'm not gonna use them at all... I just glued them into place.  Why?  Well... in order to actually do them would mean that I would have to scratch build a little compartment under each floor section, cut out the hole in the floor and then figure out a way to still light up the floor slits an avoid the compartments.  Besides, I don't think they will be seen once everything is together, but those floor slits will be, so they are my priority.

Things to think about... What would happen if you put a werewolf on the moon?  h is just a little chair and the human brain named itself!

  • Member since
    April 2015
Posted by LrdSatyr8 on Wednesday, August 17, 2016 3:30 PM

Ok... so I got a plan.  Now that my floors are all painted and grunged properly, I need to think about how I'm going to put the lights under them.  The first task is to paint the areas under the floors white.  Why white?  I could paint them silver but they wouldn't quite look right and would generate alot of hot spots.  White on the otherhand would disperse the light more evenly with less hot spots and would be more visually appealing.  So I masked off my corridor tubes and started painting.

With that done I had to see just how good the light gets dispersed.  So I tossed a couple of white LEDs on the floor, put the floors over them and VIOLA... I think we've got a winner here.

Of course I won't be using just regular LEDs here... I'm waiting for my LED strips to come in.  So... while I wait for them, I decided it's time to paint these cushion rings to match the rest of my interior.  Of course I'm talking about using the Buffing Metalizer Gun Metal... love this stuff.  Spray it on, wait for it to dry, buff it to a shine and it looks like metal... used it on the floors too with a little bit of weathering powders to dirty them up a bit if you were wondering!

Well that's it for now troopers... more to come... I assure you! :)

Things to think about... What would happen if you put a werewolf on the moon?  h is just a little chair and the human brain named itself!

  • Member since
    November 2009
  • From: SW Virginia
Posted by Gamera on Tuesday, August 23, 2016 7:23 AM

Oh wow, that's one heck of a frame there! And love the floor lights, that's gonna look amazing with everything together and up and running. Yes

"I dream in fire but work in clay." -Arthur Machen


  • Member since
    April 2015
Posted by LrdSatyr8 on Tuesday, August 23, 2016 10:53 AM

Gamera
Oh wow, that's one heck of a frame there! And love the floor lights, that's gonna look amazing with everything together and up and running. Yes

I know right?  The framing alone is beautiful!  Thanks bro!

Ok... new update!  I got a few parts from Shapeways and one of them was the electrical room where Han and Leia kissed (otherwise known by my friend and guy who designed it the Kissing Booth).  He did a really good job on it.  Only thing missing were the various wires and pipes that lined the wall randomly.  But I can understand that those are really difficult to print.  So, getting out my trusty epoxy putty, I made some wires and pipes as close to the movie as I could possibly get and added them to the part.  Now I'm not fretting over the paint job because this area won't really be seen very well.  I basically started with a base of Buffing Gun Metal (to tie the color to the rest of my interior) and then did some dry brushing of light gray, dark gray, silver and light tan weathered with pastel mud.  The only lights in this section are on the panel on the wall (still need to add the fibers to it) and the overhead light.  But the effect came out looking pretty phenominal.  I'll let you judge for yourself. (NOTE: The light by the doorway is lit up and ready to go! :))

Wall seen in the movie (before painting the wires):

After painting the piping/wires:

Unseen wall:

Room Assembled:

Mocked up in place (Here's how it will look when it's in place):

Needless to say, it's coming together nicely!  In the immortal words of George Peppard "I love it when a plan comes together!"

Things to think about... What would happen if you put a werewolf on the moon?  h is just a little chair and the human brain named itself!

  • Member since
    April 2015
Posted by LrdSatyr8 on Monday, August 29, 2016 1:03 PM

And so the painting has begun!  I split the painting into two parts.  The back half I started painting the panels.  The front half I started experimenting with some weathering.  I tried several different methods and if I wasn't happy with the way it came out I would wipe it off and start again.  I finally settled on a Water Color wash of sorts.

Basically just black water color thinned down to water consistency.  Brushed over the surface and allowed to dry for a short time (enough to let it seep into all the nooks and crannies) then wipe it off with a paper towel.  I used Tamiya Weathering Pastels to makes the oils streaks along the bottom.  I think the effect came out looking pretty good.  What do you think?


Now, on the back half, I decided to do the "hairspray" method for the panels.  I masked each panel off and began by painting each with a coat of hairspray.  The kind I used doesn't matter, its just the bargian bin pump bottle, not the aerosol.  Reason why is that you can unscrew the pump top off and pour the hairspray into your airbrush and use it like paint.  I let it dry completely overnight then started painting each panel the proper color.  I'm using the DOA Falcon Acrylic Paints... great paint set!


Now I let the panels dry completely overnight.  When the paints had cured, I went over each one with a water wet Q-tip and wiped it over each panel.  I let that set for a few moments and then I took a toothpick and gently scratched the edges of the paint off.  Some places were a bit more "weathered" then I liked, so I just touched them up with the same paint and started over.  You can't use a paint brush with this method.  You should only use a airbrush.  Using a paintbrush will cause the hairspray to soften and will gum up the paint and look horrible then you have to start over from scratch (trust me, I KNOW! LOL).  In any event, here's what the panels look like when done!


To be continued...

Things to think about... What would happen if you put a werewolf on the moon?  h is just a little chair and the human brain named itself!

  • Member since
    April 2015
Posted by LrdSatyr8 on Monday, August 29, 2016 1:06 PM

Things to think about... What would happen if you put a werewolf on the moon?  h is just a little chair and the human brain named itself!

  • Member since
    July 2014
  • From: Franklin Wi
Posted by Bakster on Monday, August 29, 2016 5:18 PM

Looking excellent...

  • Member since
    November 2009
  • From: SW Virginia
Posted by Gamera on Tuesday, August 30, 2016 7:31 AM

The different shades on the panels and wear to them looks fantastic! Love how she's coming out.  

"I dream in fire but work in clay." -Arthur Machen


  • Member since
    April 2015
Posted by LrdSatyr8 on Tuesday, August 30, 2016 8:34 AM

Thanks guys... she's really starting to come together nicely!

Things to think about... What would happen if you put a werewolf on the moon?  h is just a little chair and the human brain named itself!

  • Member since
    April 2015
Posted by LrdSatyr8 on Tuesday, August 30, 2016 8:34 AM
Just like many of you, I have been watching other's build this same model kit with awe and amazement.  I've watched how some people tackle a particular problem with detail or inaccuracy and think to myself why didn't I think of that.  I've seen some fantastical elaborate ways of solving problems that come out looking extremely incredible... but I think to myself why go thru all that trouble.  Well, here's my solution to a problem with the blaster holes on the top hull behind the radar dish. I don't know why, but it seems as if the scan of those "bullet holes" came out as indentions.  Almost as if they are some kind of computer artifact that the computer couldn't quite interpret and just said fudge it and made them all even.  Now, I've seen some builders actually cut these holes out completely, use a soldering iron to melt the plastic, burn the plastic... heck... I've even seen some people replace the entire panel itself with their own scratch built part.  The problem they all run into is the metal framework behind them.  You could cut the framework or try to work around it.  Me... my solution doesn't damage the plastic panel or the framework at all.  All it takes is a little Epoxy Putty (also known as Apoxie Sculpt, Aves, Magic Sculpt, or any 2 part Epoxy Clay Compound that you mix equal parts together and it hardens by itself)! Here's the panel I'm talking about...  Now notice how nice and symmetrical these blaster holes are?  Even thou all the "holes" are in the proper place and position... they don't look anything like they should on the actual prop here (image of the actual prop on display at Star Wars Identities in France photographed by Jean-Marc Deschamps & Olivier Cabourdin)...  So here's my method... take a small ball of putty and place it into the hole.    Squish it down until it fills the entire hole...  then wet your finger and make a depression or dimple in the putty.  Smooth it out so that all the edges are even with the top edges of the hole and then take a hobby knife or whatever else that you use for fine detail work and stab it in the middle of the putty.  Slowly and gently move it back and forth to create a hole in the middle wiping away the putty from the black inside the hole.    You can work it back and forth to create a realistic hole but not too big.  Remember the hole is only in the center of the depression.  Use the pushed aside putty gathered around the hole you made to create the torn flaps.  Notice that there are 2 completely filled holes here just like on the original prop.  Repeat the same process for each hole and set it aside for the putty to cure and harden.  Paint to taste!    Viola... you've just created realistic blaster holes without cutting, marring, maiming, melting, defiling or otherwise destroying the plastic whatsoever (however you can berate the plastic and call it names to your hearts content because it doesn't know any better, just make sure to kiss and make up afterward!) and you never have to worry about the framing behind it! :)  When it's dry and all painted up you'll see a world of difference!  Hope this little tip helps!  Lemme know what you think!

Things to think about... What would happen if you put a werewolf on the moon?  h is just a little chair and the human brain named itself!

  • Member since
    April 2015
Posted by LrdSatyr8 on Tuesday, September 6, 2016 2:58 PM

Well I had a 4 day weekend thanks to the holidays and spent them hand painting and assembling my droids I made for Shapeways.  First up was my 1:48 R2.  I was very pleased that everything fit together so nice an snug.  Didn't even have to use any glue on him at all.  He comes with 3 legs and I can position him with either 3 or 2 legs.  I will probably not even include him in my diorama at all, but I love this little guy.  


Told ya he was tiny, can fit him on a dime, almost so tiny that it's hard to get him to be in focus with my phone camera.  But once I put him inside the cargo lounge, he just shined.


Really just puts things into perspective doesn't it?  Well... of course I can't have R2 without his lifemate and constant companion, so I began to paint my 3PO.  Of course R2 had to oversee the entire operation to make sure I did it right!


Now one of the things about 3D printing is there are limits to just how small you can make things.  One of these things are the pistons on his arms and legs.  I had to leave them off the 3D print but they are pretty easy to replace with some stretched sprue.  You take a straight piece of sprue (you know, that little frame that's left over after you cut all the model parts off of) and hold it over a candle flame until it gets really soft in the middle.  Then you pull until you have the right thickness of "wire" you want.  Can get really thin wires this way.  So... here's the stretched sprue I used from a piece of black plastic sprue I had in my toolbox...


Then I cut some straight lengths out of the thinnest area of the sprue and began to glue them to his arms and leg joints.  I painted them to match the rest of him and they came out looking pretty good.  Oh... R2 had to show off his 3rd leg and hopped up on an actual DIME... he's such a frisky droid.


And finally... the money shot... yes they both stand on their own.  I haven't "permenantly" glued any of 3PO's joints together because I haven't commited to a pose just yet.  So many come to mind, and I guess we'll see what happens next.  Hope you all had a wonderful weekend... and are enjoying the build so far.


Lemme know what you think!

Things to think about... What would happen if you put a werewolf on the moon?  h is just a little chair and the human brain named itself!

  • Member since
    May 2006
Posted by Rob Beach on Thursday, September 8, 2016 8:00 AM

Fine job!  I visited your SW shop and was stoked by all the figs you've worked up.  I appreciate that you've also made 1/48 scale versions for those of us working on the Hasbro Rebels Falcon.  Obviously, you're having fun with this project.  Keep it up!

Regards, Robert

  • Member since
    April 2015
Posted by LrdSatyr8 on Thursday, September 8, 2016 9:56 AM
You're welcome Rob. I've also got the Hasbro Falcon... I bought it just before I got the DeAgostini. I also got the resin detail parts for it recently. I was thinking of after making this one, making the Hasbro into a coffee table. Still not sure yet, but at least I'll have the completed DeAgo for detail reference!

Things to think about... What would happen if you put a werewolf on the moon?  h is just a little chair and the human brain named itself!

  • Member since
    November 2009
  • From: SW Virginia
Posted by Gamera on Thursday, September 8, 2016 11:19 AM

LrdSatyr8


You should have let the Wookie win C3P0 and he wouldn't have ripped your arms off! 

Nice work on the droids, I guess they could make a bigger R2 for an X-Wing right> 

"I dream in fire but work in clay." -Arthur Machen


  • Member since
    April 2015
Posted by LrdSatyr8 on Thursday, September 8, 2016 12:59 PM

Gamera
You should have let the Wookie win C3P0 and he wouldn't have ripped your arms off! 
Nice work on the droids, I guess they could make a bigger R2 for an X-Wing right>

Thanks bro... yeah, I think R2 set up for that one I suppose... I dunno why 3PO is always falling apart... maybe because Anakin really didn't know what he was doing! LOL  I've got a 1:43 R2 and 3PO as well.  I can make them just about any size... One of the nice things about making this stuff in 3D! :)

Things to think about... What would happen if you put a werewolf on the moon?  h is just a little chair and the human brain named itself!

  • Member since
    April 2015
Posted by LrdSatyr8 on Monday, September 26, 2016 1:21 PM

Ok folks... time to add a new update to my build.  I've been getting alot of questions about my new corridor sconce light sets on Shapeways.  I made them because all the offerings so far (PE/SW) have all been too large! You should be able to fit 5 lights per large cushion.  All the offerings so far you can only fit 3-4.  That don't cut it for my OCD!


They both (the ESB and ANH versions) come with this little tool I designed called the Drill Guide.  


But yet, no one can figure out how to use it.  I painted it with primer so it's easy to see... It's really simple to use... here's how: 


First things first, identify the top of each cushion that needs a light on it.  On the back mark the top position so you don't forget.  Then, take the edge of my tool and place it on the top edge as shown and push it against the surface of the cushion.  Rub it back and forth creating a very light mark on the plastic (not so hard it does damage, and not so light you can't see it).  You can prepaint the cushion whatever color you want and it'll make the marking a bit easier as well...


Next, dip the pointed marker ends in a little bit of paint (doesn't really matter what kind, I like to use watercolor or arcylic paint here because it can be removed easily if I make a mistake.


Next, touch the painted tips to the surface along the line you "rubbed" into the cushion previously.  Just a dot of paint is all you need.  These will be the drill points where you will drill a hole.


Some have worried about how it will work with the convex or concave cushions, well never fear, just by tilting it sideways you can still get a good point mark on those cushions easily as you can see below!


Convex Cushion:

Concave Cushion:


You should now have perfectly spaced dots on each cushion.  5 for the large cushions (try to center them as best you can), 3-4 for the medium cushions and only 1 for the small ones.  Now, you want to prepare your holes for drilling, so, take a sharp hobby knife and prep your drill holes.  You don't want to make these too big, just large enough to give the drill bit something to grab onto as you start drilling your holes.  Make the starter holes for each pin point marking you made earlier.  Try to be as precise as possible in this step.  If you move off the first line you made it'll show later.


Next you want to take a small drill bit (here I got a 1/16th) and begin drilling the holes in each cushion where you made your marking starter holes.


Now that you got all your small holes drilled, you have 2 options here.  #1 you can begin gluing and drilling the large holes all the way thru both the cushion and the corridor parts or #2 you can set the part on the corridor and using the small holes drill thru the corridor.  I chose the second option here because my larger drill isn't very delicate, so I have to be careful when I drill with it.


The drill bit to use for my corridor lights will be a 5/16th inch or 3.8mm bit.


Yes I know, an extra step! LOL


Now that all the holes are drilled you're ready to install the lights.  Hope this helps and enjoy! :)


Things to think about... What would happen if you put a werewolf on the moon?  h is just a little chair and the human brain named itself!

  • Member since
    November 2009
  • From: SW Virginia
Posted by Gamera on Tuesday, September 27, 2016 7:47 AM

Clever idea there with the drill guide. Seems like it would make things pretty much fool-proof! 

"I dream in fire but work in clay." -Arthur Machen


  • Member since
    April 2015
Posted by LrdSatyr8 on Wednesday, September 28, 2016 7:14 AM

That it does.  I hate having to measure all the time.  Figured this would help alot more and it really does.  Makes finding the starting of your dril holes soooooooo much easier!

Things to think about... What would happen if you put a werewolf on the moon?  h is just a little chair and the human brain named itself!

  • Member since
    April 2015
Posted by LrdSatyr8 on Wednesday, November 16, 2016 2:25 PM

Would anyone be interested in these?   Been sitting on these for awhile now, since the release of the Japanese Prototype photos a few months back, but wasn't sure if DeAgo was going to release the Landing Gear Bay Doors or not.  Well, here's my accurized doors that I hope everyone will be able to use. Please lemme know what you think!

Open Landing Gear Bay Tri-Doors: http://shpws.me/MVzo

Things to think about... What would happen if you put a werewolf on the moon?  h is just a little chair and the human brain named itself!

  • Member since
    March 2015
  • From: Streetsboro, Ohio
Posted by Toshi on Sunday, December 4, 2016 10:57 AM

Ingenious drill mechanism!

Toshi

On The Bench: Revell 1/48 B-25 Mitchell


Married to the most caring, loving, understanding, and beautiful wife in the world.  Mrs. Toshi


  • Member since
    April 2015
Posted by LrdSatyr8 on Monday, January 23, 2017 9:27 AM
Thanks bro... just needed to be able to put all the drill holes in an even spacing is all.

Things to think about... What would happen if you put a werewolf on the moon?  h is just a little chair and the human brain named itself!

JOIN OUR COMMUNITY!

Our community is FREE to join. To participate you must either login or register for an account.

SEARCH FORUMS
FREE NEWSLETTER
By signing up you may also receive reader surveys and occasional special offers. We do not sell, rent or trade our email lists. View our Privacy Policy.