SEARCH FINESCALE.COM

Enter keywords or a search phrase below:

H.M.S. Bounty

23171 views
36 replies
1 rating 2 rating 3 rating 4 rating 5 rating
  • Member since
    May 2003
  • From: Greenville, NC
H.M.S. Bounty
Posted by jtilley on Tuesday, July 30, 2013 1:42 PM

Quite a long time ago (between 1976 and 1978, I think) I built a model of H.M.S. Bounty, loosely based on the 1956 Revell kit.  Since we've mentioned the subject several times here in the Forum, and since I've just acquired the ability to post photos, I thought I'd post these.

The old Revell kit was state-of-the-art in 1956, but it obviously isn't today.  I wound up keeping the hull halves, the quarterbadges, the transom, the figurehead, the hull of the launch, and the crew figures.  The rest went into the spares box.  I don't think I'd build another model this way.  Not making my own hull probably saved me a week - in a project that took a couple of years.

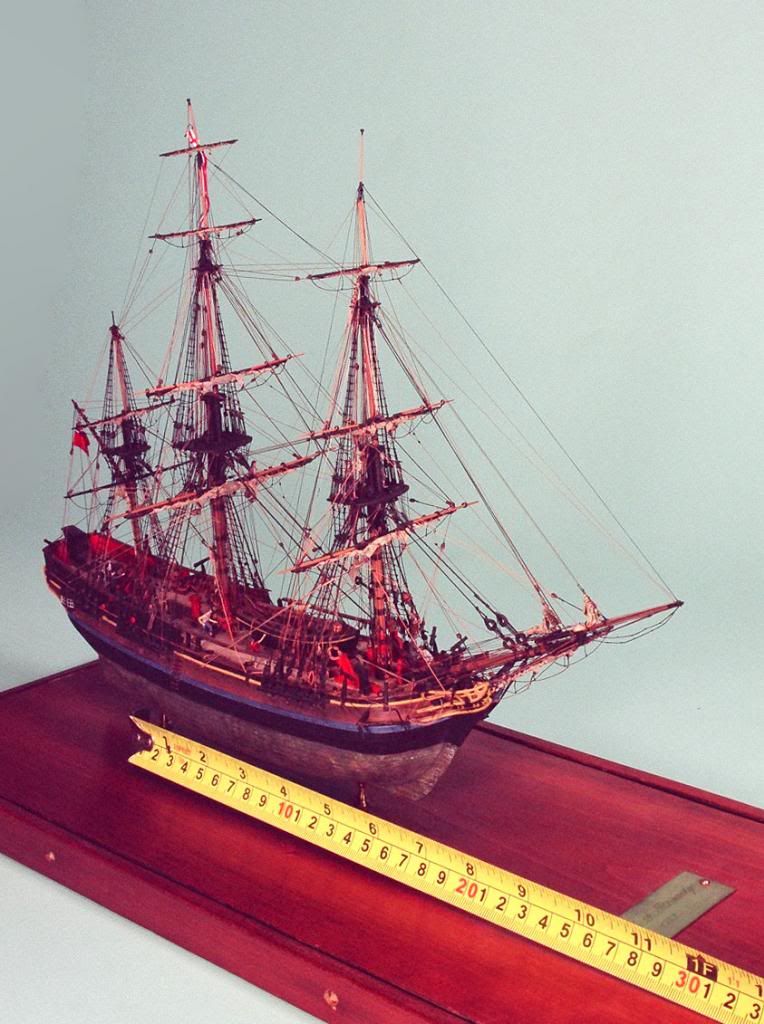
The oddball, fit-the-box scale works out to 1/110 - slightly larger than 3/32"=1'.  The model is about 17" long overall.

It lives in a plexiglas case (which is why it's lasted 35 years).  What's shown in the picture is the base of the case - cherry veneer over plywood.  I can build better cases nowadays; someday maybe I'll build a new one for this model.


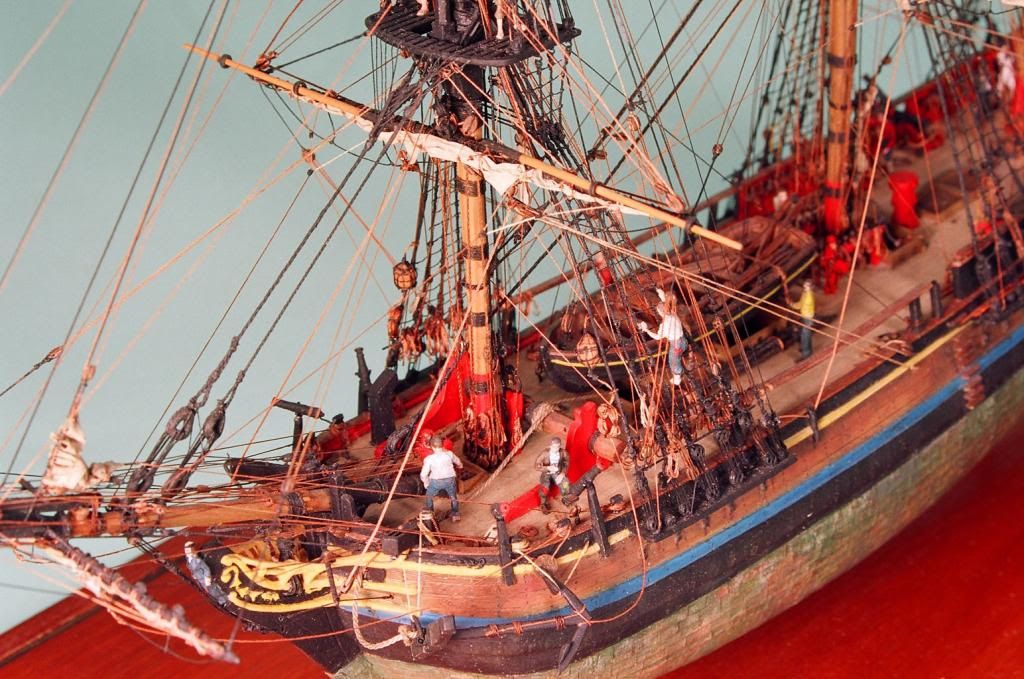
The deck is basswood (laid a plank at a time).  The fittings are made out of lots of stuff:  styrene sheet and rod, boxwood, cherry, brass, etc.  The figurehead in the kit is a little undersized, but it's so beautifully done that I figured any attempt of mine to make a replacement would be stupid.


I scraped off the raised "surface detail" and scribed the edges of the hull planks.  The bottom is covered with individual copper plates.  (Revell missed the well-documented fact that the Bounty was copper-sheathed.)  Model Shipways used to sell .001" sheets of copper.  (Nowadays I'd use the self-adhesive copper tape sold by places like Model Expo.)  The adhesive is good old-fashioned contact cement (the kind that really stinks).  It's held firmly for 35 years.  The indentations for the nails were put in with a dull needle chucked in a pin vise.  The copper is weathered with PollyS paint (as it was called in those days). 

The crew figures came from the kit, and from several others:  the Revell Santa Maria and harbor tug Long Beach, and the Airfix Endeavour.  Revell's human figures in those days were real tributes to the sculptor and the pantograph machine.  Captain Bligh has individual upper and lower eyelids, and square buckles on his shoes.


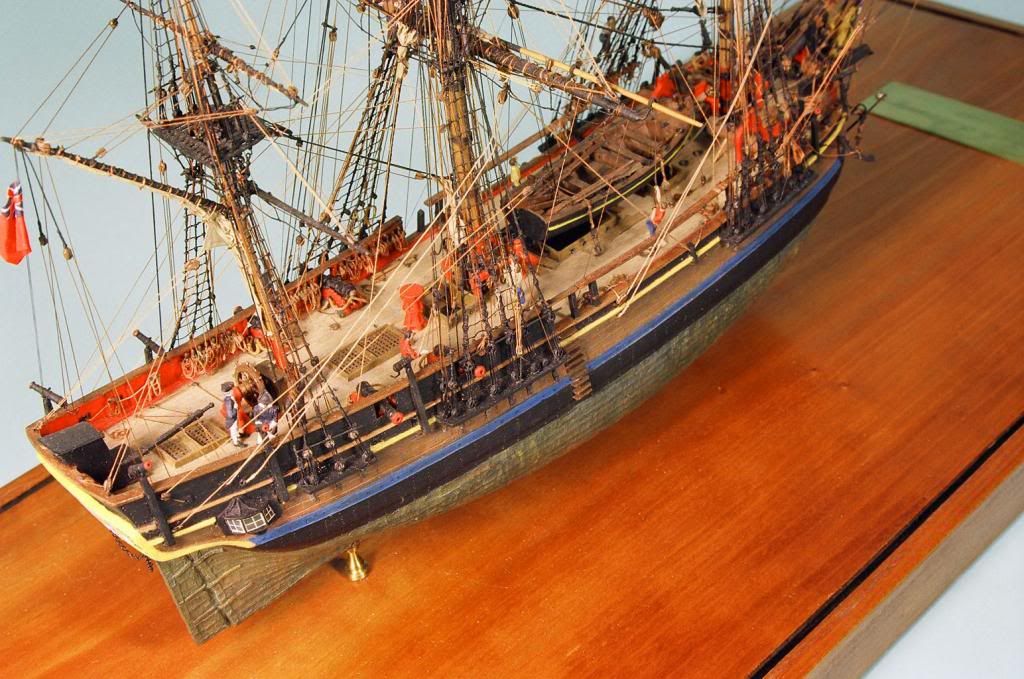
My principal source of information for this model was an article in the Mariner's Mirror from about 1937.  (The subject was hot at that time, because the Nordoff and Hall novels had just been published.)  The article contained fold-out copies of the two Admiralty draughts of the ship - one as she'd been purchased and one after she'd been modified for her trip to the Pacific.  (Revell - like lots of other people - apparently used the first set which, coincidentally or otherwise, was reproduced on exactly the same scale as the kit).  I followed the second; my intention was to show her as she looked at the time of the mutiny.  The changes include the capstan on the quarterdeck, the new ports in the side aft (to ventilate the breadfruit trees), and, most conspicuously, the little "deckhouse" at the stern.  Some people have tried to convince themselves that it's a flag locker.  I think it's a water closet for the captain, who got evicted from his cabin when it got turned into a garden for the breadfruit.

The spars are turned from degama (aka lancewood).  The guns are turned from brass.  The blocks and deadeyes are britannia metal castings from Bluejacket, as are the gratings.  Most of the other fittings are scratchbuilt.

The rigging is silk thread, spun up into the appropriate sizes (hawser- and cable-laid, as appropriate) on my primitive "rope-making machine."  At that time I think I was using one made from an Erector set.

The ratlines are the finest silk thread I could find at the time.  (Good fabric stores in Columbus, Ohio in those days sold two sizes.  I used those two to make all the lines in the ship.)  By the time I finished this model a friend had given me a spool of very fine nickel-chromium wire, which I used for the ratlines on my next project, the Continental Frigate Hancock.  The wire looks a lot better. 

I can now see lots of things in this model that I could have done better.  But that's a great part of the hobby.

Thanks for looking.

Youth, talent, hard work, and enthusiasm are no match for old age and treachery.

  • Member since
    March 2004
  • From: Spartanburg, SC
Posted by subfixer on Tuesday, July 30, 2013 3:24 PM

YesYes ToastWow

I'm from the government and I'm here to help.

  • Member since
    December 2002
  • From: Greenville,Michigan
Posted by millard on Tuesday, July 30, 2013 3:41 PM

JTilley

  I've always admired your model from the first time I saw it a few years back.Very well done.

Rod

  • Member since
    September 2012
Posted by GMorrison on Tuesday, July 30, 2013 4:00 PM

Very nice. Wow what a lot of detail! Tiny little thing too. I always appreciate when people include scaling elements in model photos.

You have a pretty interesting approach to hybridizing the materials you use. I'll take a wild guess and say that you probably knew the work of John Allen pretty well, have some experience with Varney, and still have a Grandt line catalog around somewhere.

 Modeling is an excuse to buy books.


  • Member since
    May 2003
  • From: Greenville, NC
Posted by jtilley on Tuesday, July 30, 2013 4:06 PM

Many thanks again, G. Morrison.  I got familiar with John Allen's work when I was working my way through grad school in a hobby shop.  I never built a Varney kit, but I'm quite familiar with Grandt Line.  As a matter of fact the eyebolts for the (unrigged) train tackles behind the guns on this model are Grandt Line plastic castings.  I used to spend a fair amount of time when there weren't any customers around (there was quite a bit of time like that at that store) trolling through the Grandt Line, Detail Associates, Campbell, Preiser, Calscale, and Kemtron parts looking for stuff that would be useful for ship models.  I also picked up useful stuff from the aircraft and armor departments.  Modelers who wear blinders are making a big mistake.

Youth, talent, hard work, and enthusiasm are no match for old age and treachery.

  • Member since
    March 2004
  • From: Kincheloe Michigan
Posted by Mikeym_us on Tuesday, July 30, 2013 9:51 PM

John I've actually wondered if the original release of the Bounty coincided with the Marlon Brandow Mutiney on the Bounty since both came out within a couple years of each other.

On the workbench: Dragon 1/350 scale Ticonderoga class USS BunkerHill 1/720 scale Italeri USS Harry S. Truman 1/72 scale Encore Yak-6

The 71st Tactical Fighter Squadron the only Squadron to get an Air to Air kill and an Air to Ground kill in the same week with only a F-15   http://photobucket.com/albums/v332/Mikeym_us/

  • Member since
    May 2003
  • From: Greenville, NC
Posted by jtilley on Tuesday, July 30, 2013 10:26 PM

Well, I guess I'm showing my age.  I can remember when the Marlon Brando/Trevor Howard version of Mutiny on the Bounty was released - in 1962.  Revell's kit had already been on the market for six years at that time, but it reappeared in a fancy new box with stills from the movie on it.

The original Mutiny on the Bounty, with Clark Gable and Charles Laughton, dates from 1936 - shortly before that Mariner's Mirror article appeared.  (Source:  Leonard Maltin's 2012 Movie Guide.)  That, of course, was long before the days of plastic kits - and fourteen years before I was born.

Youth, talent, hard work, and enthusiasm are no match for old age and treachery.

  • Member since
    September 2012
Posted by GMorrison on Wednesday, July 31, 2013 12:01 AM

Nordhoff and Hall was in our house when I grew up- the 1940 edition with the Wyeth illustrations. To say I read it cover-to-cover is an understatement. That, Treasure Island, Captains Courageous, The Cruel Sea, and The Sea Devil were a shelf of salty books that must have come from a relative long lost. My father would have fallen into the water getting into a sail boat, so I know not where that collection came from.

Some day I may tackle that Matchbox Flower Class corvette. And didn't the ship in the book have a wonderful name, Compass Rose ?

There was a dory laden sloop model in there somewhere, maybe the Bluenose?

To say that Revell's See Adler was a disappointment, well...

IIRC the Revell Bounty might have been cast in chocolate brown plastic.

There's a famous mutineer in my family tree, whose name I will not divulge except to say that I recently bought the Revell Morgan and there's a general connection. at least by industry.

One of the best sea stories I've read in years is Mowat's The Grey Seas Under.

 Modeling is an excuse to buy books.


  • Member since
    July 2010
  • From: Tempe AZ
Posted by docidle on Friday, August 9, 2013 2:36 AM

Professor T,

I have the Revell Bounty in my stash waiting patiently.  I had started painting the hull tallow but when I saw these pictures a couple of years back I stopped until I could make a good go with it.  I would like to copper the bottom when I get back to it but I do not have a clue on how one would do that.  Any suggestions?

Steve

I did pick up the Anatomy of the Ship - Bounty for reference.


  • Member since
    November 2009
  • From: Twin Cities of Minnesota
Posted by Don Stauffer on Friday, August 9, 2013 9:42 AM

Recently returned from the Duluth Tall Ships 2013.  Sure missed seeing the Bounty.  This is the first time Tall Ships has come to Duluth since the loss of the Bounty replica.  Sure regret that I did not get any good pics of the ship on its previous visit to Duluth.

Don Stauffer in Minnesota

  • Member since
    May 2003
  • From: Greenville, NC
Posted by jtilley on Friday, August 9, 2013 12:12 PM

Well, the first step in coppering the bottom obviously is to sand off all the planking detail.  If (gawd forbid) I were doing it again, I'd use the copper tape sold by Model Expo and Bluejacket.  It obviously will need to be cut into much smaller pieces, but it has pressure-sensitive adhesive on the back.

The process of laying the copper is spelled out in lots of books.  Essentially, on a ship like this there probably would be two "gores."  Start by drawing a horizontal line around the hull about halfway between the keel and the wale, and another horizontal line at the waterline.  Then start laying the copper at the lower of those two lines, working up to the waterline.  (The Royal Navy, unlike many other ship-owning institutions, seems to have laid copper with each row slightly overlapping the row above.)  Then start again at the keel, working up to the area you just laid.  Where the two gores intersect, cut the plates in the lower gore so as to form a nice, straight, horizontal line.

If I remember right, mine took two or three evenings - not bad.  There is, by the way, no room for doubt:  the Bounty was copper-sheathed as soon as the Royal Navy acquired her.

The Anatomy of the Ship volume is excellent.  Mr. McKay is one of the best draftsmen I've ever encountered.  I do have two small quibbles about it.  One - the drawings of the ship's internal structure (framing, etc.) are pure speculation - which is fine, but that point should be acknowledged.  Two - the photos of the replica "movie ship" are irrelevant.  That ship only generally resembled the prototype.  (Among other things, it was built about twenty feet too long - to accommodate the Cinemascope cameras and Marlon Brando's ego.  And most of the deck fittings are pure fiction.  And the overall blue color scheme is the odd product of somebody's imagination.)  But the drawings are exquisite.

Good luck.

Youth, talent, hard work, and enthusiasm are no match for old age and treachery.

  • Member since
    September 2012
Posted by GMorrison on Friday, August 9, 2013 1:37 PM

So I admit to a great deal of curiosity and a little bit of skepticism about the copper plating endeavor.

Is the molded on detail not so good? I don't have the kit and the one I ever built is 40 years gone.

My only point of (questionable) comparison is my recently purchased CW Morgan kit from RoG.

It has sheathing detail that while not strictly accurate (raised panel lines) is so exquisite that I could never imagine even getting close with. My choice there will be to paint it with a good copper lacquer.

Where these projects get tricky, in my very limited experience, is around the stern posts, the rudder and the keel.

I did this once, on my big Victory, and I was quite pleased with the results. In that case I burnished the tape right over the detail, where it even existed. Actually the whole thing even came about because Heller for whatever reason omitted any detail on the flat underside of the hull.

This obviously was not a top tier cop peering job, but my rationale is that it's after all a plastic kit.

Again, just an opinion. I don't have that Bounty, and the CWM is at home( I'm in the doctors waiting room for a routine visit) but I think it's plates are about 1/16" x 1/4".

 Modeling is an excuse to buy books.


  • Member since
    May 2003
  • From: Greenville, NC
Posted by jtilley on Saturday, August 10, 2013 11:36 AM

For some reason or other Revell didn't put "copper sheathing" detail on the Bounty kit - despite the fact that the 1/192 Constitution, released the same year, has it. 

Apparently the Revell designers didn't actually do much research.  As I mentioned earlier, they followed the wrong set of plans - the one drawn just after the ship was purchased.  Actually the situation is a little worse than that.  That first set of Admiralty drawings includes "certain contrivances" - including the capstan and the gunports - that were being considered for addition to her.  On the original drawings, those "contrivances" are drawn in red and green ink - and the colors don't show up in black-and-white reproductions.  Revell included them.  So the kit is actually a mixed bag - part Bounty, part Bethia.

Revell was by no means alone in making that mistake.  There's an amusing moment in the movie The Bounty.  Anthony Hopkins is sitting in his cabin, with a big Admiralty draught of the ship on the bulkhead behind him.  It's the wrong drawing - the first one.

The reason for the lack of  "copper" under the bilges of the Heller Victory has to do with the limitations of the injection-molding process.  (The kit dates from before the days of slide-molding.)  If the master had had those raised plates in those positions, it would have been impossible to get the molded plastic parts out of the molds without damage.  That problem has always plagued designers of ship kits with sharp turns to their bilges.  (Once you know what you're looking for, it's interesting to see how various companies have handled it.  If you look closely at the "copper-sheathed" Revell kits, you'll see that the plating detail sort of fades out at the turn of the bilge.  The transition is done very skillfully and almost imperceptibly.  The "planking" on the Revell Viking ship is especially ingenious that way.  Airfix was good at the trick too.)

Another, more old-fashioned (and less time-consuming) approach to the problem of sheathing the Revell Bounty would be to sand off the planking detail below the waterline and represent the copper with paint.  That can be done quite effectively - especially if you go for a "weathered," rather than new copper look.

As for sheathing the model with real copper - all I can say is that it wasn't as difficult, or time-consuming, as I expected it to be.

A couple of other points about the Revell hull.  Revell left out the hawse pipes.  Adding them is just a matter of drilling a couple of holes just above the deck.  Revell tells the modeler to tie the two anchors together and drape them over the knee of the head, which obviously is ridiculous.  And Revell somehow botched the shape of the knee of the head.  That entire part can be replaced easily with plastic sheet.  (I think the reason may have had something to do with the fact that the figurehead is too small.  I'm not satisfied with the way the figurehead on my model fairs into the knee of the head - but the figurehead is such a superb casting that I didn't have the heart to junk it.)

Youth, talent, hard work, and enthusiasm are no match for old age and treachery.

  • Member since
    March 2009
  • From: brisbane australia
Posted by surfsup on Sunday, August 11, 2013 1:24 AM

All I can say is WOW. Fantastic job you have done.....Cheers mark

If i was your wife, i'd poison your tea! If Iwas your husband, I would drink it! WINSTON CHURCHILL

  • Member since
    July 2010
  • From: Tempe AZ
Posted by docidle on Sunday, August 11, 2013 1:41 AM

Prof Tilley,

I apologize for highjacking your thread, it was not my intention.  I took a couple of pictures of the hull for comparison and I will start another thread of my WIP at the time I seriously start working on her.  Your model is exquisite and should be admired on it's own.

Steve


  • Member since
    May 2003
  • From: Greenville, NC
Posted by jtilley on Sunday, August 11, 2013 12:28 PM

Steve, you didn't hijack the thread.  This sort of thing is exactly why I started it.  If it turns into a discussion of building a model of the Bounty, so much the better. 

If you start a new thread of your own, though, I'll be most interested to read anything that's on it.

Youth, talent, hard work, and enthusiasm are no match for old age and treachery.

  • Member since
    November 2005
  • From: Formerly Bryan, now Arlington, Texas
Posted by CapnMac82 on Monday, August 12, 2013 12:23 AM

And, if we think about it, "modeling the Bounty" is actually a complicated thing.  We have the original HMV Bounty, and we have the movie versions, too.  With the one of those being lost at sea.  

But I have the bias of having McKay's book, which also discusses both of the ships used in the movies.

  • Member since
    July 2010
  • From: Tempe AZ
Posted by docidle on Monday, August 12, 2013 12:39 AM

Thanks Professor, I appreciate it and I will start a thread when I do get around to building her.  Here is a picture of the hull so GM can see the detail.  I have a couple of others if more are requested.  I feel I have too much paint on the hull so when I do start it, I will strip the paint first and start from square one.

Steve


  • Member since
    July 2010
  • From: Tempe AZ
Posted by docidle on Monday, August 12, 2013 12:44 AM

Here is a larger section of the hull.


  • Member since
    November 2013
Posted by Bikerbuster on Monday, January 20, 2014 9:27 AM

Oh No!!!

I have just found this and I feel so incredibly amateur.

I have recently started building the Bounty, but alas my skills are more of the take it out of the box paint it and build it.

This is my first attempt at a kit in about 35 years so I don't expect much, but seeing this build just kills me.

I was looking as to what to do with the anchor cables, they come through the hawse holes onto the deck nicely, but where from there? Any help would be greatly appreciated.

I was going to start a WIP thread but after seeing this I think I'll just get laughed at.....

  • Member since
    May 2003
  • From: Greenville, NC
Posted by jtilley on Monday, January 20, 2014 9:51 AM

The anchor hawsers pass through the hawspipes (which will have to be added to the old Revell kit), then around the windlass barrel, then down the forward hatch.  One of the photos should show this reasonably clearly.  

Good luck!  And don't hesitate to show the Forum your work!

Youth, talent, hard work, and enthusiasm are no match for old age and treachery.

  • Member since
    September 2012
Posted by GMorrison on Monday, January 20, 2014 12:49 PM

I recently discovered an interesting Bounty resource.

There was an article in the Chronicle about a Seventh Day Adventist institution called Pacific Union College in Angwin CA in the Napa Valley.

The SDA church considers the missionary effort in The Pitcairn Islands a significant of its history.

At the College there's a Pitcairn Islands Study Center that has significant documents and artifacts from the history of the mutiny and subsequent settlements.

http://www.library.puc.edu/pitcairn/index.shtml

 Modeling is an excuse to buy books.


  • Member since
    June 2004
  • From: 29° 58' N 95° 21' W
Posted by seasick on Thursday, January 23, 2014 12:09 AM

I had to put my eyes back in my head, nice build.

Chasing the ultimate build.

  • Member since
    August 2008
Posted by tankerbuilder on Thursday, January 23, 2014 5:50 AM

Well :

    See , you are darned good at those sailing thingys .Now where were you when I needed a friend to b.s. with , (and maybe help ) with all those thread thingys ? No , really Proff .that's a nice looking Bounty and thank you for showing her here. You have exonerated this old salt who built one of the wood kits years ago and coppered the Bottom .

    Everyone that saw her said " No  ! you got it wrong , she didn't have any coppering !" There was a model of her in the museum of antiquities in Liverpool that did have a copper bottom and that's where I got the idea . Tis' true though . She did have the " White ( almost a rich cream color ) Lead " bottom when privately outfitted  ,as the private shipowners of the time really couldn't afford such niceities .

   Now , one question .Whe you describe Cap'n Bligh's face you talk about his upper and lower eyelids . .Good gosh man , did you use a jewelers loupe to build her ?  Gees , I thought I was bad .He! He! Just for your information , the wooden kit didn't have any hawse holes marked or shown either!

  • Member since
    November 2013
Posted by Bikerbuster on Thursday, January 23, 2014 10:15 AM

@ Jtilley, here is where I got to with the hawsers, I am assuming the recirocal hatches were for crew access to the rope locker and I am assuming the hawsers got there by way of a pipe?  Beside the access hatches?

Yes, I know the deck is an awful colour, it was the cream as described in the instructions and I haven't as yet learned to weather..

i226.photobucket.com/.../2014-01-19180524_zps5f91412e.jpg


  • Member since
    December 2013
Posted by jetmaker on Tuesday, January 28, 2014 10:32 PM

Wow! All that rigging is insane!! Outstanding job!

  • Member since
    September 2005
  • From: Illinois: Hive of Scum and Villany
Posted by Sprue-ce Goose on Tuesday, January 28, 2014 10:57 PM

Beautiful work !Big SmileYesToastBow Down

I'm surprised all that work only took a couple of years....Surprise

After seeing comments that information on the movie versions have been published, I'll need to check on the first 1930s version.Hmm

Tags: HMS Bounty
  • Member since
    June 2012
Posted by arnie60 on Wednesday, January 29, 2014 10:24 AM

Bikerbuster;

Don't hesitate to post a WIP here, especially if you are new at this. There are tons of people here that would love to help you figure out things along the way. It's not the results so much as it is the processes. You can save your self a lot of frustration by getting feedback from the experienced builders here.

  • Member since
    November 2013
Posted by Bikerbuster on Friday, January 31, 2014 3:39 PM

Cheers Arnie, I'll get one started soon.  Yes

  • Member since
    March 2014
Posted by Kolvir on Tuesday, March 11, 2014 10:10 PM

I can't seem to understand the problem with the knee of the head that you mentioned. I'm not quite sure what you are referring to do to my ignorance of nautical terms. One guide I found lists it like this:

KNEE OF THE HEAD.

The large flat timber fayed edgeways upon the fore-part of the stem. It is formed by an assemblage of pieces of oak coked or tabled together edgewise, by reason of its breadth, and it projects the length of the head. Its fore-part should form a handsome serpentine line, or inflected curve. The principal pieces are named the main-piece and lacing.

which doesn't help a whole lot. I've examined the bow of your photos and the same on the hull of the kit and can't figure it out.

JOIN OUR COMMUNITY!

Our community is FREE to join. To participate you must either login or register for an account.

SEARCH FORUMS
FREE NEWSLETTER
By signing up you may also receive reader surveys and occasional special offers. We do not sell, rent or trade our email lists. View our Privacy Policy.