SEARCH FINESCALE.COM

Enter keywords or a search phrase below:

Project to Tackle-RMS Titanic

9775 views
52 replies
1 rating 2 rating 3 rating 4 rating 5 rating
  • Member since
    January 2012
  • From: this room
Project to Tackle-RMS Titanic
Posted by modelsheek91 on Sunday, October 19, 2014 7:17 PM

So, here I am again. I have made the decision to begin a new kit. Yes, a kit that happens to remain still completely sealed in the box. Yes, and that also means that I am pushing aside the countless unfinished kits that I am also trying to finish.

*sigh

I have chosen to build the 1/400 Academy Centenary Anniversary Edition of the RMS Titanic, and to say that the task is daunting is a little bit of an understatement. I have up to this point never built anything of this size, complexity, detail or caliber. I also know that the only other ship that I have to date finished measured about two inches and had maybe 12 parts.

But believe me, I know that in the back of my head I am thinking that it has to also be in some level with James Cameron's movie (yes, though his was mostly CGI).

Oh, and I only have 4 months to do it in.

Understatement??? Definitely!

On the bench:

Too much

In the hangar:

Again....too much

  • Member since
    January 2012
  • From: this room
Posted by modelsheek91 on Sunday, October 19, 2014 7:48 PM

Now to start with the evidence that I am actually nuts and starting this project.

I almost didn't even want to open the box because it looked so perfect. Well, that didn't last very long.

I have to say, however, that the box art is quite stunning.

When you first open the box, you are presented with a plethora of wrapped sprues, a ziploc of instructions, photo etch, and wooden deck, a stand base, an easy 150 piece puzzle and a hull, measuring about 2 feet. You can't see it at this point, but take my word for it; that bag was pretty full.

I figured I would start easy...

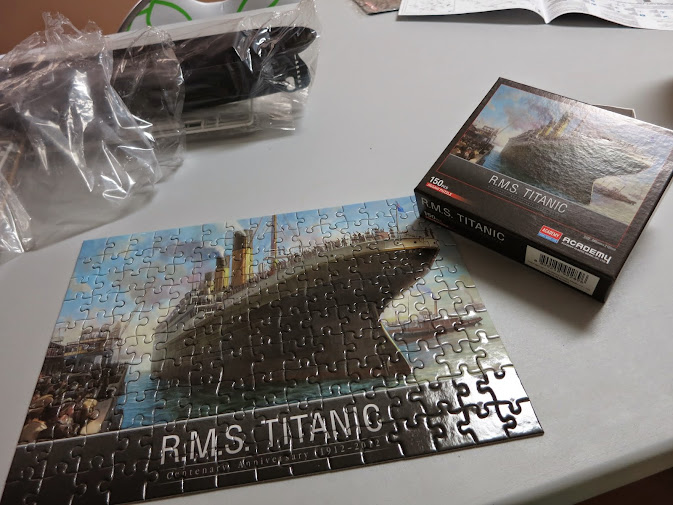
The hull is in the background, still in its plastic bag.

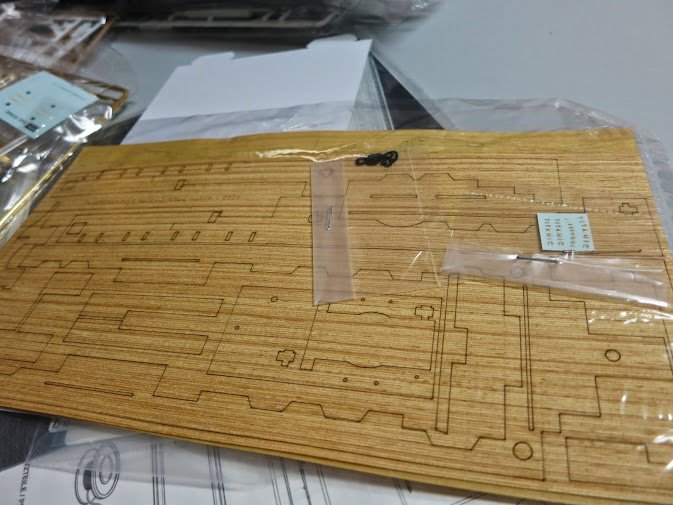
The wooden deck, 1 sheet of it anyways. It will be a whole new thing for me...

Other than the sprues on the top right corner of the table, this signifies the start of the roller coaster, ummm, I mean project.

The stand is actually kinda nice. I think, though, I will spend some $$ on a pair of finials, as the set that comes with the kit is 4 halves to be glued to its pair, and between you and me, I would rather not have the seam line going down the middle. I also did notice that the colours of each half is slightly more or less gold. Huh.

Not pleased about that.

As for the gold, kinda cheesy, mini-ship in the middle, it will not be used.

On the bench:

Too much

In the hangar:

Again....too much

  • Member since
    September 2013
  • From: San Antonio, Texas
Posted by Marcus McBean on Sunday, October 19, 2014 8:34 PM

That is one serious project, good luck with it.  Are you going to add any after-market P.E. or just use the P.E. that came with the kit?

  • Member since
    June 2013
Posted by Matt OBrien on Sunday, October 19, 2014 9:00 PM

Watch out for the adhesive on the back of those decks. Sometimes the decks will pop loose due to humidity affecting the decks. From what I've heard, you might need to back up the deck adhesive with some more glue.

Can't wait to watch the progress.

Matt

  • Member since
    January 2012
  • From: this room
Posted by modelsheek91 on Monday, October 20, 2014 5:49 AM

I have a set of 400 scale photo-etch that a friend gave me. It won't do a whole lot to the kit, but there are some extra bits and pieces from it that I will probably use.

On the bench:

Too much

In the hangar:

Again....too much

  • Member since
    January 2012
  • From: this room
Posted by modelsheek91 on Monday, October 20, 2014 5:50 AM

Matt OBrien

Watch out for the adhesive on the back of those decks. Sometimes the decks will pop loose due to humidity affecting the decks. From what I've heard, you might need to back up the deck adhesive with some more glue.

Can't wait to watch the progress.

Matt

Any specific type of glue that you could recommend. White glue, perhaps?

On the bench:

Too much

In the hangar:

Again....too much

  • Member since
    June 2013
Posted by Matt OBrien on Monday, October 20, 2014 5:26 PM

Y'know, for the life of me I can't seem to find the posts where the humidity problems arose. You could probably try white glue (that might have a little give to it). I'm not sure where you are situated geographically, but the person who noticed the problems was from Australia. Not quite sure what atmospheric conditions are like Down Under.

I'll attach a link to his 1/400 build. Who knows, you might get something out of his build thread.

titanic-model.com/.../dcboard.php

Careful though.......you could get sucked into this build like I did and "lose" years of your life. I'm in 2 1/2 years now but there's a wee bit of light at the end of the tunnel. Just hope it's not an oncoming train.

Enjoy the reading. Lots of cool ideas and fixes.

Matt

  • Member since
    January 2012
  • From: this room
Posted by modelsheek91 on Tuesday, October 21, 2014 8:16 AM

I'm in Nova Scotia, Canada-lots of humidity here! I am hoping it is not a two and a half year project, I only have 4 months!

On the bench:

Too much

In the hangar:

Again....too much

  • Member since
    January 2012
  • From: this room
Posted by modelsheek91 on Tuesday, October 21, 2014 6:43 PM

Now, this is the life, the last sips of wine combined with modelling. 

This time it is a satisfied *sigh

Anyways, getting to it; this has been my task for the week. I told myself to have either a step, or a step of a step completed before the weekend. So, today was part 1, of step 4, as evidence by the photos (unfortunately not as far as step 6, though).

Is that a typo that I see.... ? They must have skipped 'h' on that day.... ??

Because I am not normally a ship modeller, I spent thirty minutes of my time cleaning up these....parts of the ship, for lack of a better name or description.

On the bench:

Too much

In the hangar:

Again....too much

  • Member since
    April 2012
Posted by Flying Finn on Tuesday, October 21, 2014 7:53 PM

I'm glad to see someone else building this kit.  I will following this one closely because I will be starting mine right after the holidays when the doldrums of winter set in.

Academy did a great job packaging this model; it's going to be very hard to break up the perfect packaging.

Cheers,

Wayne

  • Member since
    July 2008
  • From: Summerville, SC
Posted by jeffpez on Wednesday, October 22, 2014 7:06 AM

I'm about 3/4 finished with mine. The wood decks have remained in place without any problems but you need to be careful and take your time applying them. The PE that's supplied with the kit is pretty complete although you can never have too many deck chairs and the kit has none. Most everything fits very well and clean up is minimal. My biggest problem was following the instructions for the Pontos supplied PE. As they typically do there are detailed instructions and pictures to guide you as to what goes where and how it's formed but as they also usually do there's no rhyme nor reason to it so you're constantly scanning two large sheets on both sides trying to find parts numbers and locations and what molded on sections need to be removed etc. I don't think your lack of ship building experience will hurt as long as you have some knowledge gained from building something and don't get too impatient. Best of luck and I hope you enjoy building it as much as I so far have.

  • Member since
    January 2012
  • From: this room
Posted by modelsheek91 on Wednesday, October 22, 2014 8:10 AM

Thanks jeffpez for the advice. I may have to order a set of deck chairs, because they are kinda important.  Any pics of yours?

On the bench:

Too much

In the hangar:

Again....too much

  • Member since
    July 2008
  • From: Summerville, SC
Posted by jeffpez on Wednesday, October 22, 2014 8:34 AM

I still use film in my camera and couldn't figure out how to post something taken with my phone if you paid me so no, I have no pictures.

  • Member since
    January 2012
  • From: this room
Posted by modelsheek91 on Wednesday, October 22, 2014 11:49 AM

That's ok, no sweat.

On the bench:

Too much

In the hangar:

Again....too much

  • Member since
    January 2012
  • From: this room
Posted by modelsheek91 on Friday, October 24, 2014 8:16 AM

So, I have dwelt for some more hours on my new immense project. I am looking for some tips. Is a soldering gun recommended for the kit? I did hear one person at my local club get-together that he used a soldering gun on his 350 scale Titanic. Second, I am not sure if i will model my lifebotas in with their covers on or not, as the detail inside the boat is quite nice.

I am working on some more pics, they will come soon.

On the bench:

Too much

In the hangar:

Again....too much

  • Member since
    June 2013
Posted by Matt OBrien on Friday, October 24, 2014 4:25 PM

I can't think of any reason why you would need to solder any of the PE details. CA glue will work just fine for joining the parts. I have both PE sets (both Tom's and Gold Medal Models) and can't even imagine putting heat to those delicate pieces. The only thing I soldered was a set of new masts.....the ones in the kit leave a lot to be desired.

As to the lifeboats, there were two boats that had no covers. They hung over the sides, just outboard of lifeboats 1 and 2.  Those would be worthy of detailing. It might be quite an undertaking to detail ALL of the lifeboats. Technically, they all had their covers in place........ right up to the point they were needed. If you're under time constraints, maybe save that detail for last and then gauge your time vs. work involved to achieve that level of detail. You don't want to run out of time.

Looking forward to more pictures......

Matt

  • Member since
    October 2013
Posted by infofrog on Saturday, October 25, 2014 8:01 PM

Looks like a very nice model kit

Rick

  • Member since
    January 2012
  • From: this room
Posted by modelsheek91 on Sunday, October 26, 2014 6:46 PM

I am also looking for some deck chairs. Any recommendations on where I could obtain some. My prelim. research showed me a lot of 350 scale chairs, and 400 scale deck benches. 

Shame the kit does not provide them.

On the bench:

Too much

In the hangar:

Again....too much

  • Member since
    January 2012
  • From: this room
Posted by modelsheek91 on Sunday, October 26, 2014 6:57 PM

My initial clean of the crane bases and crane arms.

I am also in the market for some better quality finials, as the ones provided in the kit have a nasty seam line, and on closer inspection, the two halves are a slightly different colour. I have looked through the local craft and hardware stores for an appropriate replacement; to no avail. The best thing to date that I have found are the turned ends that you find with wooden dowels.

Hull sitting on base, view of my table.

After the first coat of Future; I really find that the Future brings out the glossy shine of the gold chrome. I plan on doing a black background and keeping the raised gold letters. Ideas anyone?

On the bench:

Too much

In the hangar:

Again....too much

  • Member since
    September 2013
  • From: San Antonio, Texas
Posted by Marcus McBean on Sunday, October 26, 2014 7:43 PM

Freetime Hobbies have finials on sale.

  • Member since
    August 2007
  • From: back country of SO-CAL, at the birth place of Naval Aviation
Posted by DUSTER on Monday, October 27, 2014 1:10 PM

For finials look in big box stores, hardware stores, etc. in the lamp parts. finals are used to hold down lamp shades and come in a multitude of sizes shapes and forms- all usually brass. so a drill bit through the top and you can use a screw, dowel, pin to attach to the ship and a screw  through the base  to attach the finials.

Steve

Building the perfect model---just not quite yet  Confused

  • Member since
    July 2008
  • From: Summerville, SC
Posted by jeffpez on Tuesday, October 28, 2014 6:29 AM

Pontos has a very nice quality finial set you may like. In looking at your WIP pictures I noticed the crane arms are the kit supplied plastic ones rather than the PE upgrades that are part of the Centenary edition. Give them a try because I think you'll be very impressed at the superior detail.

  • Member since
    January 2012
  • From: this room
Posted by modelsheek91 on Tuesday, October 28, 2014 10:08 AM

Thanks jeffpez, I will look into it. I also do agree; the Pontos finials are very nice.

On the bench:

Too much

In the hangar:

Again....too much

  • Member since
    June 2013
Posted by RobGroot4 on Thursday, October 30, 2014 5:05 AM

I found a place online that I got several lamp risers from by googling "lamp parts."  I think the place was Texas Lamp Parts or something like that.  This was after looking at 3 different hardware stores in my area (your local mileage may vary), maybe a lighting store?

For the nameplate, I would recommend using bare metal foil to mask and then just sanding lightly (I would worry about paint sticking to that glossy surface), paint it, and then unmask and future (or whatever it is we're calling it these days).

Groot

"Firing flares while dumping fuel may ruin your day" SH-60B NATOPS

  • Member since
    January 2012
  • From: this room
Posted by modelsheek91 on Thursday, October 30, 2014 7:48 AM

I think I have found some finials at the local Home Depot, though they come attached to some ceramic rounds-which will have to be removed. I will post pics of the 'usable' finials when they are ready. As to the nameplate, I may mask and than prime, which will remove the need for sanding. I think to get into all of the letter nooks and crannies would be more trouble than it is worth. I have also given some thought of having a nameplate custom made.

On the bench:

Too much

In the hangar:

Again....too much

  • Member since
    October 2014
  • From: Down Dixie Way
Posted by Shipshape on Thursday, October 30, 2014 6:54 PM

Hello, I happen upon your thread and read all the postings.  I too have this kit and also added the complete Tom's PE sets for this vessel as well as what came in the kit.  I won't go into alot about why, just that Tom's PE has some things that the kit set does not and I like the bench's from Tom's better, but the kit ones are easier to make/bend.  Here is a tip, Hold and Fold........a must have for building and using PE on such a large and complex scale model ship.  This can be found on eBay from the small cheaper version, to the larger do it  all expensive one.

As for does one need to solder the PE, that depends on your skill @ doing such as this.  With proper care and attention to what one is doing, this is the best way to join/assemble PE bar none, but also is the hardest to do.  One must learn how to draw heat away from the fine brass etched parts and to allow the solder to get a grip and hold.  I could only recommend this to the most advanced of modelers looking to do this type PE work.  And you will need some very exspensive equipement.

Now with that said, what else is available to attach PE, well for starters here one that has worked many years for me, Future Floor Wax.  Apply to part, place where you want it and after it has dried, apply again around the object and I promise, that part will stay there until you physically pull it off.  Now this does not work for assembles, say like a deck house, for that CA works just fine.  But remember, alittle will hold alot.

And of couse there is clear fingernail polish, that too can be used for attaching small parts to your deck/hull.  Even PVA will hold small PE in place, then after painting, the object will stay put unless pulled free.  All of these are ways I attach to my ship models.  My best suggestion, go easy, use alittle PE here and there and get a feel, then go for the gusto on a project such as this most wonderful kit.

Will be following and watching to see how this turns out.  Good luck and happy modeling.

Rick in NCCool

  • Member since
    January 2012
  • From: this room
Posted by modelsheek91 on Friday, October 31, 2014 8:12 AM

I took a look at Tom's PE stuff, specifically for deck chairs, not benches, and I came up short. I have had a local hobby shop order a set of 400 scale deck chairs for another, more modern ship, but I can't seem to find deck chairs specifically for a 400 scale Titanic.

Thanks for the advice on the Future! I have a bottle of it in the paint cabinet, and I will be sure to put it to good use.

Also, thanks for the soldering tips. My skill level with soldering is nill, so I probably should not dapple in it.

I don't have a 'Hold N' Fold', but I did pick up a very conveniently sized PE bender last week, but I will look at eBay's supply of HNFs. Thanks

On the bench:

Too much

In the hangar:

Again....too much

  • Member since
    January 2012
  • From: this room
Posted by modelsheek91 on Sunday, November 2, 2014 7:21 PM

I have finished the clean of the deck cranes-large and small. Aside from the grainy image, the cranes themselves look pretty good.

Here is a view of the two sizes:

On the bench:

Too much

In the hangar:

Again....too much

  • Member since
    January 2012
  • From: this room
Posted by modelsheek91 on Monday, November 17, 2014 8:16 AM

I have finally finished the finials that are for use with the display stand. I think they look quite sharp. They were from Home Depot, and I modified them to fit. I broke the ceramic 'knob' off, and then used a cut-off disc to chop the screw part in half. I then attached a nut and washer to the original finial base and voila, it was done. 

My finial looked like this one, but brass instead of the horrible bronze-black in the picture.


On the bench:

Too much

In the hangar:

Again....too much

  • Member since
    August 2007
  • From: back country of SO-CAL, at the birth place of Naval Aviation
Posted by DUSTER on Tuesday, November 18, 2014 4:23 PM

So, I guess you mean, you "finally" got the finial done? 

Steve

Building the perfect model---just not quite yet  Confused

JOIN OUR COMMUNITY!

Our community is FREE to join. To participate you must either login or register for an account.

SEARCH FORUMS
FREE NEWSLETTER
By signing up you may also receive reader surveys and occasional special offers. We do not sell, rent or trade our email lists. View our Privacy Policy.