SEARCH FINESCALE.COM

Enter keywords or a search phrase below:

Imai 1/50 Catalan Ship Completed

25892 views
184 replies
1 rating 2 rating 3 rating 4 rating 5 rating
  • Member since
    July 2010
  • From: Tempe AZ
Posted by docidle on Thursday, November 19, 2015 7:41 PM

Thanks guys, I appreciate the input! 

Dave, I agree the Catalan ship model has become expensive if and when they come up on evilBay. The other two Imai sailing ships that I lust in my heart for, are the Napoleon and the Venetian Galleass. A little too rich for my pocketbook at this time.

Rob,

I agree that this is an important model not only for Iberian ship fans but I think for all sailing ship fans. Heck I would love to see other models that are historically accurate for this period. Heck, I would love to see more sailing ship models period!


  • Member since
    July 2010
  • From: Tempe AZ
Posted by docidle on Saturday, January 16, 2016 8:45 PM

Another update on the continuing saga of Bungalow Bill, I mean the Catalan ship. Been busy with a new job, so I have not had time at the desk; however, I have been making small progress just the same. 

After going through each piece and sanding the heck out of the injection seams I finally got to prime the pieces. After priming, I found where I missed, including some injection marks. As I have stated earlier in this WIP, the plastic on this kit is really thick and tough which makes for some heavy duty seams, etc.... needless to say, I have gone through a considerable amount of sanding sticks.

Next came blackening the anchors. The kit supplied anchors were white metal, britannia or lead, not really sure but this is an Imai kit and it might be from the 1970's. One cool thing that happened was that Blacken It not only blackened them but also gave them some rust! A Happy Accident as Bob Ross would have said.

And I have been repainting the structural beams and rails to MM Earth Red, which is a color DavidK recommended(thanks again, bud). Here is and example of the quarter deck's fore railing. I will touch up the sanding marks.

And the final bit of insanity tonight is the taping. After thinking about how many coats of Yellow I will need to cover the section of the hull with, I decided it might be better to spray it. So, the Tamiya tape and pieces of paper came out....... I'll post the results later.

Steve


  • Member since
    September 2012
Posted by GMorrison on Sunday, January 17, 2016 1:42 AM

This is looking good.

David K made a wise observation in his Golden Hind build, where base colors get blended to be alike after a black wash.

I'm tending to extremes on my Viking ship.


 Modeling is an excuse to buy books.


  • Member since
    March 2012
  • From: Marysville, WA
Posted by David_K on Sunday, January 17, 2016 2:09 PM

Looking sweet, Steve!

I love seeing parts go from sprue to base, to final coats and assembly....it's an exciting transformation, and your builds are a joy to follow!

Plus, such a rare model as the Catalan makes this an important thread within the community....  :)

Keep it up!

Dave

        _~
     _~ )_)_~
     )_))_))_)
     _!__!__!_         
     (_D_P_K_)
   ~~~~~~~~~~~~~
    ~~~~~~~~~~~

Current Project:  Imai/ERTL Spanish Galleon #2

Recently Finished: Revell 1/96 Cutty Sark

Next Up:  ???


  • Member since
    July 2010
  • From: Tempe AZ
Posted by docidle on Monday, January 18, 2016 2:22 PM

Thanks Bill and Dave, I appreciate the input.

Actually Bill, I do not use a black wash, just the oils, but they do tend to mute the colors down which is why I try now to use a sharper contrast on colors on some kits. I was originally thinking about painting this as really worn wood, with the patina being basically silver/grays. Maybe I'll try that on another kit.

Dave, I agree that after all the prep work it is very cool to see the kit start to come together. I also really like when I get the hull and masts constructed and start in on the rigging, for me, that is when the ship becomes a sailing ship.

Thanks again guys,

Steve


  • Member since
    July 2010
  • From: Tempe AZ
Posted by docidle on Monday, January 18, 2016 2:26 PM

Here is a quick update. I finished the yellow but will not touch it until the paint cures. So, I decided to paint the "bowsprit". I am going to paint the carved dragon on the stern red so , I painted the dragon's head red. The head, I am not sure if this would constitute a knightshead or not, I decided to paint in different colors. Looking at the picture, I see I need to touch up a bit before the oils go on.

Steve


  • Member since
    July 2014
  • From: Franklin Wi
Posted by Bakster on Tuesday, January 26, 2016 12:00 AM

Hey Steve, your are really plugging right along, and what nice work that you are doing. This is a cool ship. I am watching with great interest.  


Steve


  • Member since
    July 2010
  • From: Tempe AZ
Posted by docidle on Thursday, January 28, 2016 9:21 PM

Thanks Steve for following along. I have actually done more work on her but have not taken any pictures yet. The majority of the painting is now done, so I need to measure off the ship and base so that I can set up the mounting. 

After that will be the construction process and the application of artist oils. I'm actually thinking of using the chunk of plastic that represents the sail..... We will see about that.

I'll try and get some pictures posted this weekend so stay tuned.

Steve


  • Member since
    July 2010
  • From: Tempe AZ
Posted by docidle on Friday, February 5, 2016 2:58 PM

I have all the base painting done and ready for oil. 

The first photo is the hull halves with the upper bulwarks colored.

While going through Pastor's AOTS Columbus' Ships, I realized that there are no bitts for the hawsers. I realize that this is a model of a model and would capsize once it hit the water; however, I felt that she needed bitts. So, I scratched up some using Evergreen. I do not think they came out too badly.

Here is the stern carving. Red dragon matching the red dragon head at the bow.

And finally, a sundry of other parts and the mess that my workbench has become.


  • Member since
    July 2013
Posted by steve5 on Friday, February 5, 2016 3:10 PM

you are one seriously talented painter docidle ., that is really awesome .


  • Member since
    February 2011
Posted by cerberusjf on Tuesday, February 9, 2016 8:51 AM

Hi,

you're doing a great job of this kit!  I have one, but it's missing the instructions unfortunately.  Hopefully I'll get round to it one day and do as good a job as yours.


  • Member since
    July 2010
  • From: Tempe AZ
Posted by docidle on Tuesday, February 9, 2016 5:24 PM

Steve,

Thanks, I really appreciate you folowing along. Let's just say I have a bit of experience in painting but thank you>

Cerberus,

Thanks for checking in. I can scan and email you the instructions if you would like. Send me a PM and let me know.

Steve


  • Member since
    July 2010
  • From: Tempe AZ
Posted by docidle on Tuesday, February 9, 2016 5:28 PM

Finally got a chance to do some work on the ship. I started the oil painting with the decks. Part of me thinks they may be a bit on the dark side, but then this is supposed to be a 15th century merchant ship, so maybe the decks will do.

Enjoy,

Steve


  • Member since
    March 2012
  • From: Marysville, WA
Posted by David_K on Wednesday, February 10, 2016 8:41 AM

Steve....no seriously, these parts look awesome!

Your use of oil weathering seems a bit pulled-back on this effort, and I think it really works...very subtle tones, showing more grain and definition...really good work, my friend!  I'm super impressed.

Dave

        _~
     _~ )_)_~
     )_))_))_)
     _!__!__!_         
     (_D_P_K_)
   ~~~~~~~~~~~~~
    ~~~~~~~~~~~

Current Project:  Imai/ERTL Spanish Galleon #2

Recently Finished: Revell 1/96 Cutty Sark

Next Up:  ???


  • Member since
    July 2010
  • From: Tempe AZ
Posted by docidle on Thursday, February 11, 2016 10:22 PM

Thanks bud! 

Good eye on the weathering techniques I am using on this kit. One of the reasons is due to the beautiful molding that Imai produced on this kit. I think it would be overkill on this kit if I really weathered it. Although, I must admit that I am REALLY tempted to weather the heck out of this ship! The other reason is because I am trying out new techniques and colors to see how well they work. Hopefully it will work out.

I did a dry fitting last night to see how all the colors work together and the decks really fit in well, so I am going to keep them as painted.

I also have been working out how to mount this puppy. With the main deck having to be inserted when the hull halves are glued makes it tough. With the weight of this kit, the mounting really has to be substantial. I also misplaced the only brass pedestals I had that had a slot opening of 1/4".

Anyway, thanks for checking in and please let me know if you think I am missing anything.

Steve


  • Member since
    March 2012
  • From: Marysville, WA
Posted by David_K on Friday, February 12, 2016 5:42 PM

I've had to modify brass pedestals to accommodate a thicker keel...nothing the ol' Dremel couldn't handle!

Yeah, the crisp lines of those Imai kits lend themselves well to light weathering....the texture just pops with even a little color in the crevices.  Don't get me wrong, I dig your heavier weathering (esp Nina and Pinta!), but this effort you're showing a subtle touch that I think really lets the model lines come through.

Nice work, as always my friend.
DK

        _~
     _~ )_)_~
     )_))_))_)
     _!__!__!_         
     (_D_P_K_)
   ~~~~~~~~~~~~~
    ~~~~~~~~~~~

Current Project:  Imai/ERTL Spanish Galleon #2

Recently Finished: Revell 1/96 Cutty Sark

Next Up:  ???


  • Member since
    July 2010
  • From: Tempe AZ
Posted by docidle on Friday, February 19, 2016 10:55 AM

I have been planning the rigging and what needs to be done before I start glueing this together. I decided before hand that I would use Syren line and replace the plastic blocks and deadeyes with wooden ones, which is normal for me... that is if anything is ever normal for me.

Using Xavier Pastor's AOTS, "The Ships of Christopher Columbus" as reference in regards to 15th century Iberian ship buiilding practuces, I found that Pastor has the lower deadeyes secured with chain plates and rods and used hearts as the deadeyes.

I attempted using .032 brass rod but could not get a flush fit. I then tried thinner wire and succeeded. I then twisted the wire and inserted it through the opening that Imai provided.

I then used Blacken' It on both the wire and deadeye. The wire was blackened and the wood block was no worse for wear. Although I will stain the hearts to give them a deeper color.

Thanks Dave for the heads up from your SR thread and John Tilley for the heads up on spraying a dull coat on the blackened wire. It helped prevent the Blacken' It from rubbing off. I need to redo the anchors since the Blacken' It did rub off.

Looking at the dry fit pictures, I realize that I should scratch some plates for the wire connection point on the hull. Not a big deal, I'll just use some Evergreen.

Dave, I have also modified my brass pedestals to fit the various ships I have completed but this keel is way too thick to modify with any of the ModelExpo or Blue Jacket pedestals available. I had an older set that I had picked up but have put them in a very safe place that I cannot find........

Steve


  • Member since
    February 2003
  • From: Lacombe, LA.
Posted by Big Jake on Friday, February 19, 2016 11:39 AM
Hi, Great thread, I've been following to steal ideas from. might I make a suggestion? if you take a fine tip sharpie in dark brown color and tough the hear of each bolt/nail, it may make them look very good - just a thought.


  • Member since
    December 2010
  • From: Salem, Oregon
Posted by 1943Mike on Friday, February 19, 2016 6:49 PM

"....have put them in a very safe place that I cannot find........"

Steve,

I find that the above phenomenon happens more and more frequently in my world ....Wink.

Wonderful thread ... I'm going to use it, among other sailing ship builds, as one reference for the next sailing ship kit I do.

Mike

Mike

"Le temps est un grand maître, mais malheureusement, il tue tous ses élèves."

Hector Berlioz

  • Member since
    April 2008
  • From: Fox Lake, Il., USA
Posted by spiralcity on Friday, February 19, 2016 7:24 PM

Shes looking great! nice work. Beer


  • Member since
    July 2010
  • From: Tempe AZ
Posted by docidle on Saturday, February 20, 2016 7:02 PM


Thank you guys. I appreciate that you are checking in on the thread. 

Jake, steal away. I agree with you about making the nail heads stand out a bit. I had already started the process, so we are on the same wavelength my friend.

Mike, I am glad to know that I am not the only one putting things in a "safe" place. I'll probable find them after I finish this model!

Thanks spiralcity for following along and the kudos.

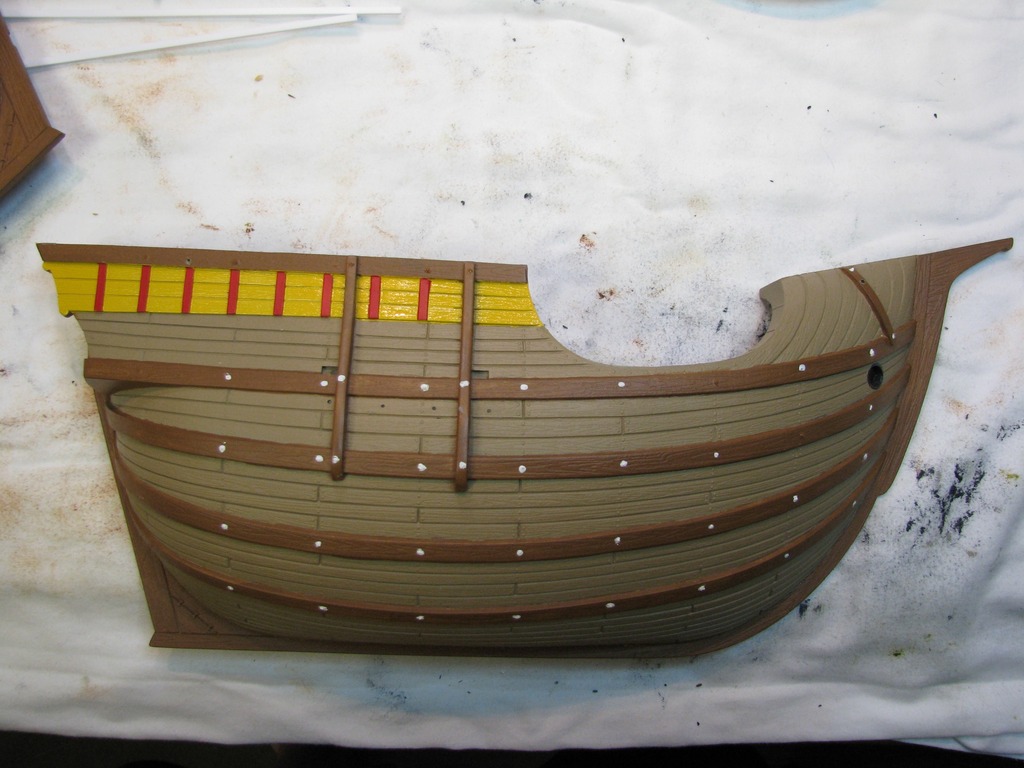
Right then, I noticed another issue, at least in my mind. The model is really well detailed and has a boatload (pun intended) of nailheads on the hull; however, there are none on the wales! I'm not sure how these hunks of wood were suposed to be connected to the hull........

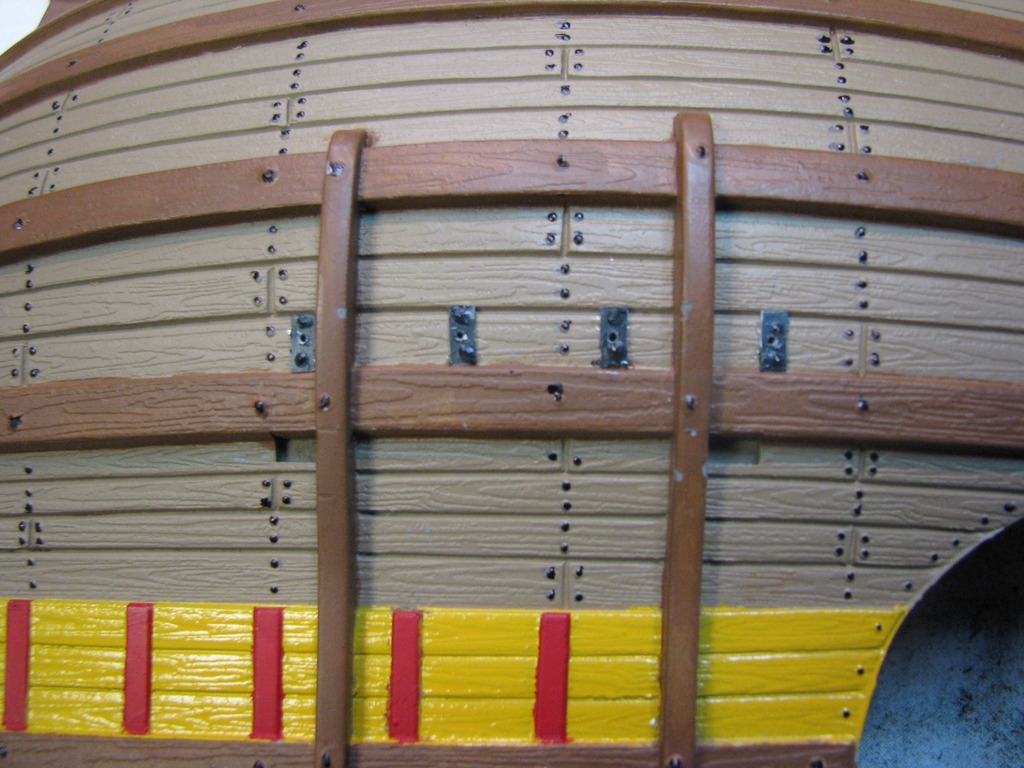
Anyway, I used some Vallejo plastic putty and a toothpick and added some "nailheads" or more appropiately, spike heads on the wales. 

The first picture shows the putty on the wales and the next picture shows them painted along with all the nailheads on the port side. The black on the nailheads looks a bit overpowering but you have to remember that when I get some oil paint on the hull that they will be much more subdued.

I also added the plates for the deadeye chains as well as drilling the hole on the forward upper wale for the line that I cannot remember at this time that helps hold the anchor to the hull. the hole looks a bit rough but I'll clean it up and add a blackened ring around the hole .

Steve


  • Member since
    September 2012
Posted by GMorrison on Sunday, February 21, 2016 12:03 AM

What a nice model!

It would really be cool in a waterline diorama as well.


 Modeling is an excuse to buy books.


  • Member since
    July 2010
  • From: Tempe AZ
Posted by docidle on Sunday, February 21, 2016 11:20 PM

Thanks GM. Although, after seeing Modelcrazy's U-Boat diorama I'm pretty certain that I could never match how well he did it and that to make this tub look anything like seaworthy, I would have to bury her up to almost the second most top wale.

However, it brings up a point I have contemplating this week. I have been trying to decide if I should paint some antifouling tar on her or at least darken the hull that would be theorically submerged. Again, this would have to be almost up to the same wale to make it look right.

Anyone want to weigh in with thoughts or suggestions?

Steve


  • Member since
    September 2012
Posted by GMorrison on Sunday, February 21, 2016 11:43 PM

Well, the thought might be seal oil.

Tankerbuilder suggested plopping the model in liquid fish poop.

If you want to get clever, establish a waterline, maybe one more below it unladen and do two shades of scum. I put little guys on my Gokstad ship. Thats a fun deal to do.


 Modeling is an excuse to buy books.


  • Member since
    July 2010
  • From: Tempe AZ
Posted by docidle on Monday, February 22, 2016 10:41 PM

The liquid fish poop....... I might just pass on that one, but thanks anyway TB! The wife would probably regulate this ship to the fish pond where the smell would not be too offensive.

The seal oil would probably get me in trouble with PETA, and anyhow GM, how does one oil a seal?

On establishing a waterline with darker tones and a bit of scum just might do the trick. Thanks as always for the input.

Steve


  • Member since
    July 2010
  • From: Tempe AZ
Posted by docidle on Friday, March 4, 2016 1:44 PM

Alright, my AMS kicked in bigtime! The nailheads that I created were okay, but not exactly what I was looking for. So, I removed them all and picked up a set of Meng Resin Nuts and Bolts Set B Small that actually look like nuts and bolts.

The first pictures show the wales stripped of the plastic putty nail heads. 

Then I checked out how these looked on the model. There is a excess of glue at this point but I will clean that up after I remove the bolt. Again, this was just to test scale and look. I wanted the nuts and bolts to be faily substantial since they are holding the wales onto the frame........supposedly.


Here are the sheets of bolts and nailheads after and before painting. After that I started cutting them off with a new #11 blade and putting them into a tray, waiting for the insanity to begin.

I will have to repaint the wales first and then attach the painted bolts after the paint dries. After that, I am planning other additives and scratch built goodies to enhance this model before the oil paints go on her. I figure that as rare as these kits are and the price people are asking for them, this will be the only Catalan Ship I build and I want it to be nicely done to the extent of my abilities.


  • Member since
    July 2014
  • From: Franklin Wi
Posted by Bakster on Friday, March 4, 2016 5:50 PM

Hey Steve, nice work sir. The bolts look very nice indeed. Glad to see you are enjoying the build. You are on a roll!

  • Member since
    July 2013
Posted by steve5 on Friday, March 4, 2016 10:03 PM

really nice work steve , where did you find those bolt heads from . they look really cool.


  • Member since
    July 2010
  • From: Tempe AZ
Posted by docidle on Sunday, March 6, 2016 9:58 PM

Thanks SteveB for chiming in. Hopefully I can keep the roll rolling.

Steve5, the nuts and bolts are from Meng and they are the Small Set B. They have others. The main issue I have is that trying to slice them off cleanly, is almost next to impossible. Therefore I ordered MasterClub's 0.9 and 1.2 Spherical head rivets off evilBay. They should be here in about 6 days so I am going to do a comparison at that time. The MasterClub rivets come in many sizes, and head configuration. 

The other thing I like about them, hopefully, is that they actually have a bolt. So, you can either drill a hole and insert them or cut the heads off And glue them on. It looks like it will be a whole lot easier to cut the heads off cleanly than the Meng product.

I will post pictures when I get them.

Steve 


  • Member since
    July 2010
  • From: Tempe AZ
Posted by docidle on Sunday, March 13, 2016 1:58 PM

Latest update of the scratchbuilding insanity. 

The bolts/nailheads arrived and unfortunately the 1.2mm were about the size of the nailheads molded on the model, so...... I won't be using them.

Moving forward, I scratched the cleats for the interior tie off for such lines as the tacks, sheets, bowlines etc.... I also made more ring bolts for tie offs on various points of the exterior. Here is a picture pre primer.

You will also notice that I scratched a knighthead for the halyard to be used with a ramsheads block from Modelshipways. This also means scratchbuilding sheaves on either side of the mast versus the single sheave provided for in the kit. The scratched posts next to the knightshead are for the tying off the anchor. The instructions have you just drape the anchor over the waist rails...... not great considering the size of the anchors provided.

In Landstrom's book, The Ship, he has a drawing of the Mataro Ship and shows square holes on each waist rail that would align with these post and would serve as a tie off. However, in Historic Ship Models, by Wolfram zu Monfeld, he shows that from the 13th to 15th centuries, two fairleads per side would be carved through the hull for anchor lashings. As I stated before, considering the thickness of the plastic of this model, and the state of my hands, I am going with the posts......

Here is an overall view of the model showing where I plan on placing the knightshead. The parts are still just dryfitted but it gives an idea of how things are looking.

Steve 


JOIN OUR COMMUNITY!

Our community is FREE to join. To participate you must either login or register for an account.

SEARCH FORUMS
FREE NEWSLETTER
By signing up you may also receive reader surveys and occasional special offers. We do not sell, rent or trade our email lists. View our Privacy Policy.