SEARCH FINESCALE.COM

Enter keywords or a search phrase below:

1/350 USS Indianapolis CA-35 (Academy) COMPLETE

25169 views
125 replies
1 rating 2 rating 3 rating 4 rating 5 rating
  • Member since
    July 2014
Posted by modelcrazy on Wednesday, May 20, 2015 9:27 PM

Groot,

You can get it in a few different degrees from clear to cloudy and flat to gloss. I was debating whether I should paint first as well. So I just finished the blue, and painted some turquoise in the churn. Once that dries, I'll paint on the gel then apply the cotton.

I can't wait to see how it turns out either. This is my goal. I hope I can reproduce a shadow of Chris' work 

DKM Z-30 Zerstorer 
by Chris Flodberg

Steve

Building a kit from your stash is like cutting a head off a Hydra, two more take it's place.


http://www.spamodeler.com/forum/

  • Member since
    June 2013
Posted by RobGroot4 on Thursday, May 21, 2015 5:22 PM

MC,

 Wow, that looks good!  If you're going for the grey seas kinda look that you get on rough weather days, I would actually not paint until the gel medium was down.  Water just doesn't visually seem to have much depth on days like that.  Do you intend to do the bow spray as well?  It looks like he used a couple cotton balls, but I have no clue how to get one somewhat glossy to look like water.  

Groot

"Firing flares while dumping fuel may ruin your day" SH-60B NATOPS

  • Member since
    July 2014
Posted by modelcrazy on Thursday, May 21, 2015 6:00 PM

Groot,

I applied the gel last night and I'm waiting for it to dry, which could take some time. If the blue does not show through satisfactorily, I will repaint it. That will be a lesson learned. Pictures of the Philippine Sea show a dark navy blue tint to the water, although like you said, a cloudy day would add a hint of gray to the scene. I not sure my painting skills are quite up to that task for that much variation, but I'm sure giving it a try. My hope is to duplicate seas like this.

A lot of churn and foam in windy conditions. Yes, I intend to show a bow splash on the starboard side which is blowing over the bow, also a smaller one just aft of the hanger, with water running off the hanger deck and stern. My vision is pretty precise, I just need to transfer that vision to the diorama.

Steve

Steve

Building a kit from your stash is like cutting a head off a Hydra, two more take it's place.


http://www.spamodeler.com/forum/

  • Member since
    July 2014
Posted by modelcrazy on Thursday, May 21, 2015 10:41 PM

Well, I didn't like the way it was turning out. The sawdust was too lumpy, so I did what Chris Flodburg suggests and went over it with pieces of paper. I think it looks much better. I will paint it again when I dries. I'm really anxious to get to the cotton stage.

Steve

Steve

Building a kit from your stash is like cutting a head off a Hydra, two more take it's place.


http://www.spamodeler.com/forum/

  • Member since
    March 2004
  • From: Spartanburg, SC
Posted by subfixer on Friday, May 22, 2015 8:27 AM

I am glad I came back to the site in time to witness this fine piece of work. Well done!

I'm from the government and I'm here to help.

  • Member since
    July 2014
Posted by modelcrazy on Friday, May 22, 2015 9:34 AM

Thank you subfixer!

After a night and day's drying, I should be back on track and will paint the blue and AB the seafoam color in the wake tonight. I'n not concerned with the brush strokes in the medium as I brushed in the direction of the wind, and there will be a considerable amount of foam on the waves. It should look natural (I hope).

By the way, I wasn't happy at all with the Stars and Stripes that came with the kit, it was a flat Academy decal, yuck! Plus it has 50 stars instead of 48 (which you probably wouldn't notice anyway, but it bothered me). So I tried a method I found in the ModelWarship.com forum. I found a suitable image of a 48 star flag and downloaded it. I used "Paint" to re-size it, copy it and reverse it for the other side  

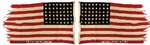
Then I printed the image and taped some white wrapping tissue paper over the printed image (I printed first so I would know where to place the tissue paper). I re-feed the paper/tissue paper into the printer, printed again, and cut out the outline. I didn't want such a tattered flag as the Indy had just come out of the shipyards and was more than likely flying a new one, however after re-sizing to 1/350 and cutting it out, it didn't look tattered, just slightly use. And the best part is that it's correct and much easier to make look like its in a gale force wind.

If you want to make some flying colors other that the decal that come with the kit, I highly recommend this approach. Sorry, I don't have pics of my actual flag yet.

Steve

Steve

Building a kit from your stash is like cutting a head off a Hydra, two more take it's place.


http://www.spamodeler.com/forum/

  • Member since
    March 2004
  • From: Spartanburg, SC
Posted by subfixer on Friday, May 22, 2015 9:52 AM

Great technique on the ensign. It is too bad that aftermarket companies haven't picked up on this. Flags, pennants, and ensigns are rarely represesented in an authentic manner. .

I'm from the government and I'm here to help.

  • Member since
    February 2011
  • From: St louis
Posted by Raualduke on Friday, May 22, 2015 10:07 AM

Absolutely wonderful work. Museum quality. Great job.

  • Member since
    July 2014
Posted by modelcrazy on Saturday, May 23, 2015 10:41 AM

I Painted the blue and sprayed the seafoam green to the churn area. Next it the cotton application.

I also grabbed some pics of the ensign while I had the camera in hand.

Steve

Steve

Building a kit from your stash is like cutting a head off a Hydra, two more take it's place.


http://www.spamodeler.com/forum/

  • Member since
    July 2014
Posted by modelcrazy on Saturday, May 23, 2015 10:42 AM

I Painted the blue and sprayed the seafoam green to the churn area. Next it the cotton application.          

I also grabbed some pics of the ensign while I had the camera in hand.

Steve

Steve

Building a kit from your stash is like cutting a head off a Hydra, two more take it's place.


http://www.spamodeler.com/forum/

  • Member since
    September 2003
  • From: AandF in the Badger State
Posted by checkmateking02 on Saturday, May 23, 2015 4:17 PM

Well done!


  • Member since
    July 2014
Posted by modelcrazy on Monday, May 25, 2015 9:57 PM

Thank you gentlemen,

I'm done with the Indy...Yea!!! I am looking for a suitable backdrop for the pictures, possibly a poster with a stormy sky. If it takes too long (a couple of days), I'll just take some pics in front of a grey background.

Here is the beginning of the stormy sea "wave" application.

      
Acrylic medium and cotton.       Brush the cotton on to the base. Continue application as desired.

Steve

Steve

Building a kit from your stash is like cutting a head off a Hydra, two more take it's place.


http://www.spamodeler.com/forum/

  • Member since
    March 2004
  • From: Spartanburg, SC
Posted by subfixer on Tuesday, May 26, 2015 1:42 PM

Looking forward to seeing photos of the finished product.

I'm from the government and I'm here to help.

  • Member since
    July 2014
Posted by modelcrazy on Tuesday, May 26, 2015 10:15 PM

Gentlemen (and ladies),

Here it is, this was my first attempt at doing water for a ship. So without further adieu, my 1/350 scale Indianapolis. Please excuse the tape in the middle of the backdrop. I need to come up with a better method for a background.

As always comments and critiques welcome.

Steve

Steve

Building a kit from your stash is like cutting a head off a Hydra, two more take it's place.


http://www.spamodeler.com/forum/

  • Member since
    July 2004
  • From: Sonora Desert
Posted by stikpusher on Wednesday, May 27, 2015 1:25 AM

Beautiful work MC! Can I ask you to get one more photo. at around the same angle as the top most photo, but far enough back to get the entire ship and base in the shot. This will be for the front page honor roll photos.


F is for FIRE, That burns down the whole town!

U is for URANIUM... BOMBS!

N is for NO SURVIVORS...

       - Plankton

LSM


  • Member since
    August 2007
  • From: back country of SO-CAL, at the birth place of Naval Aviation
Posted by DUSTER on Wednesday, May 27, 2015 1:37 AM


You don't play around when you make a water base. Spectacular is the idea  for this tour de force

Steve

Building the perfect model---just not quite yet  Confused

  • Member since
    July 2014
Posted by modelcrazy on Wednesday, May 27, 2015 8:07 AM

Thanks Stick and Duster.

Stick, I answered you in the 45 GB. No prob.

Duster, I did extensive research on the subject prior to building the base. I still may play around with the bow crash some at a later date. I'm not totally happy with it. Also, at first, I thought I was going WAY overboard (so to speak) with the waves, but now looking at pictures, I think they are about right.

I just need a better "studio" to capture it better, Maybe a white sheet as a backdrop, or redo the wave backdrop.

My next ship will bet to complete the Yamato or Arizona, which have been box bound for around 15 years.

Steve

Steve

Building a kit from your stash is like cutting a head off a Hydra, two more take it's place.


http://www.spamodeler.com/forum/

  • Member since
    March 2005
Posted by philo426 on Wednesday, May 27, 2015 9:18 AM

Awesome!You even have waves breaking over the sides!Super nice job!

  • Member since
    November 2003
  • From: Virginia
Posted by Mike F6F on Wednesday, May 27, 2015 9:32 AM

Steve,

Congrats on the finished model and sea base, it is one of the best I've seen.  

In your photos, you matched the perspective with the photo background well.  Try taping the seam on the backside of the prints if you can.

If you printed the image yourself and have the ability to print it again, PM me.  I can make a couple of suggestions to help you match the colors, etc., if you'd like.  I don't want to clog the thread with lots of stuff without knowing what imaging capabilities you have.  I have experience doing this kind of display, so let me know.

Again, nice work.

Mike


"Grumman on a Navy Airplane is like Sterling on Silver."

  • Member since
    July 2014
Posted by modelcrazy on Wednesday, May 27, 2015 9:57 AM

Thanks Philo and Mike,

Mike, Yes, actually I just printed a different image and will try it again. I was telling my wife about the tape seam and (of coarse) she asked why I didn't use a glue stick...................ah, I hadn't though of it, that's why. So I'll try that tonight.

Steve

Building a kit from your stash is like cutting a head off a Hydra, two more take it's place.


http://www.spamodeler.com/forum/

  • Member since
    March 2004
  • From: Spartanburg, SC
Posted by subfixer on Wednesday, May 27, 2015 11:06 AM

That is really a superb job on the entire project. My hat is off to you.

I'm from the government and I'm here to help.

  • Member since
    August 2008
Posted by tankerbuilder on Wednesday, May 27, 2015 1:46 PM

WOW ! !

Anyone who's  prone to , could get seasick looking at that . What a gorgeous , gorgeous presentation ! !

  • Member since
    May 2013
  • From: From the Mit, but live in Mason, O high ho
Posted by hogfanfs on Wednesday, May 27, 2015 1:59 PM

Steve,

That's one spectacular build! Outstanding job!

I have several ships to build eventually, and I always thought to present them on a stand. But, after this perfect presentation, I'll have to rethink how great these water scenes can be.


Again, outstanding job!

 Bruce


 On the bench:  1/48 Eduard MiG-21MF

                        1/35 Takom Merkava Mk.I


  • Member since
    March 2005
Posted by philo426 on Wednesday, May 27, 2015 8:43 PM

Looks like a contest winner!

  • Member since
    July 2014
Posted by modelcrazy on Wednesday, May 27, 2015 9:28 PM

Thank you Philo, I'd like to do that at the IPMS at Salt Lake in Oct, if I can get there.

I have new pictures that I like much better.

Steve

Steve

Building a kit from your stash is like cutting a head off a Hydra, two more take it's place.


http://www.spamodeler.com/forum/

  • Member since
    December 2013
Posted by CodyJ on Thursday, May 28, 2015 1:03 AM

Im so jealous.... you have no idea....

Superb Work!!!!!!!!

  • Member since
    July 2014
Posted by modelcrazy on Thursday, May 28, 2015 8:24 AM

Thank you Cody. That's how I feel when it comes to some members builds in armor, cars and aircraft. I'm all WHAAAA, how did you do that?

Steve

Building a kit from your stash is like cutting a head off a Hydra, two more take it's place.


http://www.spamodeler.com/forum/

  • Member since
    June 2013
Posted by RobGroot4 on Friday, May 29, 2015 4:10 AM

MC,

 Just WOW!  The water color and chop look just right on this and I love the dynamic look of the spray, not to mention the fantastic job you did on the ship itself.  You'll have to find a prominent place to put her!

Groot

"Firing flares while dumping fuel may ruin your day" SH-60B NATOPS

  • Member since
    July 2014
Posted by modelcrazy on Friday, May 29, 2015 7:54 AM

Thanks Groot,

I was thinking that I will need to make a glass (or Plexiglas) enclosure for her, like I did for my Mayflower.

It's not tough after you get someone to cut the glass for you.

Steve

Building a kit from your stash is like cutting a head off a Hydra, two more take it's place.


http://www.spamodeler.com/forum/

  • Member since
    November 2003
  • From: Virginia
Posted by Mike F6F on Friday, May 29, 2015 9:28 AM

Steve,

The second group of shots look a lot better with a much better sky.

If you have the software, try shifting the color of the sea in the photo to better match your modeled sea.

That, plus making it a tad darker in tone would heighten you effect.

Nice work.

Mike


"Grumman on a Navy Airplane is like Sterling on Silver."

JOIN OUR COMMUNITY!

Our community is FREE to join. To participate you must either login or register for an account.

SEARCH FORUMS
FREE NEWSLETTER
By signing up you may also receive reader surveys and occasional special offers. We do not sell, rent or trade our email lists. View our Privacy Policy.