SEARCH FINESCALE.COM

Enter keywords or a search phrase below:

Merit 1/48 Elco 80’ PT Boat Early Type Ended

28421 views
195 replies
1 rating 2 rating 3 rating 4 rating 5 rating
  • Member since
    December 2005
Posted by PTConsultingNHR on Sunday, August 16, 2015 9:34 AM

Yes, Steve ...

That's a heating unit.  But, I've read that the boats in the Solomons had them removed (for the obvious reason, ... d'uh, right? Smile).  Dr. Ross can address this for you though.


Tim


  • Member since
    July 2010
  • From: Tempe AZ
Posted by docidle on Sunday, August 16, 2015 3:42 PM

Tim,

Thanks for verifying. I finally found where I saw it, the PT103 site. There was also mention of the crews replacing the heating unit with a boat locker. At this point I am not sure if I'll replace it, reface it or chuck it.

Thanks again,

Steve


  • Member since
    November 2003
  • From: South Carolina
Posted by torybear on Friday, August 21, 2015 8:31 AM

If you are looking to crew your boat...take a look here. (https://www.shapeways.com/product/9VLFG7MAU/1-48-us-navy-sailors-combat-set-3?li=search-results-1&optionId=57170656)

This is a 3D printing company and has some interesting stuff. I ordered the figures displayed in the link for my BlueJacket PT109.

A little pricy, but they look pretty good.

  • Member since
    August 2005
  • From: EG48
Posted by Tracy White on Friday, August 21, 2015 10:42 AM

Bang Head

Tracy White Researcher@Large

  • Member since
    September 2012
Posted by GMorrison on Friday, August 21, 2015 10:58 AM

Overdressed for the Pacific but look like a good start and an option for the tool chest...

 Modeling is an excuse to buy books.


  • Member since
    July 2010
  • From: Tempe AZ
Posted by docidle on Saturday, August 22, 2015 11:23 PM

TB,

Thanks for checking out my thread. I really do appreciate the link and I agree they look great and a bit pricey. I believe they would work out nicely if someone was going to build this kit as say a Mediterranean stationed boat. 

It would be interesting to see a MTB in something like Measure 32/8P rather than tropical green or 31/20L. However, that will have to be someone else's cross to bear. After I finish this kit, I have the "later" version to do. Then there is a 1/72 S-Boat to complete. I might do a Measure 32/8P scheme on the old 1/72 PT-109 I have waiting for me....

Steve


  • Member since
    July 2010
  • From: Tempe AZ
Posted by docidle on Tuesday, August 25, 2015 6:18 PM

Trying to finish all the subassemblies and priming them. It is getting closer to painting this bad boy. The first photo is of the smaller parts primed and drying. The next set is of the various parts coming together. The armored plating in the bridge area is not glued together yet. However, the well is attached and the engine controls are together....that was a fun exercise to say the least. There are 4 pieces and I still have one more to attach. My greatest fear was to get the first two attached to the box and then lose the third one to the ethersphere. I have wood floors under my desk but small parts still disappear. I also changed the hatch on the daycabin from side to side to forward and aft using Dr Ross's drawings of PT-103. And I wasn't going to do any more changes.........

Steve


  • Member since
    July 2010
  • From: Tempe AZ
Posted by docidle on Wednesday, August 26, 2015 1:16 PM

Finished the prop and rudder assembly so I started the painting of the hull. First step, paint it black.... next I will use white to give it a mottled look.

Steve


  • Member since
    November 2008
  • From: Central Florida
Posted by plasticjunkie on Monday, August 31, 2015 10:46 AM

The build is really looking good Steve. Now comes my favorite part, paint and weathering.

 GIFMaker.org_jy_Ayj_O


Too many models to build, not enough time in a lifetime!!

  • Member since
    July 2010
  • From: Tempe AZ
Posted by docidle on Monday, August 31, 2015 2:41 PM

Thanks PJ. I am still installing the fiddly bits such as the support rods on the torpedo mechanisms and the pvc "glass" on the sides of the charthouse and day cabin. And here are some pictures to prove it. 

The rods did not fit exactly, they were too long so I had to do some surgery on them. The PVC needed a little bit of help to come off the sheet. Other than that, I am slowly getting ready to paint this beast.

Steve


  • Member since
    July 2010
  • From: Tempe AZ
Posted by docidle on Tuesday, September 1, 2015 2:40 PM

Worked on the charthouse/bridge today. Added PE and cleaning up any messes. The only things left off were the searchlight and attenna. I will secure the gun tower before I secure the charthouse so that I can deal with the gap. It will be immensely easier to fill the gap with the charthouse off the deck than when it is secured to it.

I was also finishing up the day cabin. The splash guards are left off at this time until I secure the daycabin onto the deck. This will also be the time I secure the gun tower. I also used Squadron's green putty pn the gun splash guard. I have used Mr Surfacer 500 as well but it is SO delicate that it keeps coming apart. We will see if I can close the gap with the putty.

Steve 


  • Member since
    July 2010
  • From: Tempe AZ
Posted by docidle on Tuesday, September 8, 2015 1:18 PM

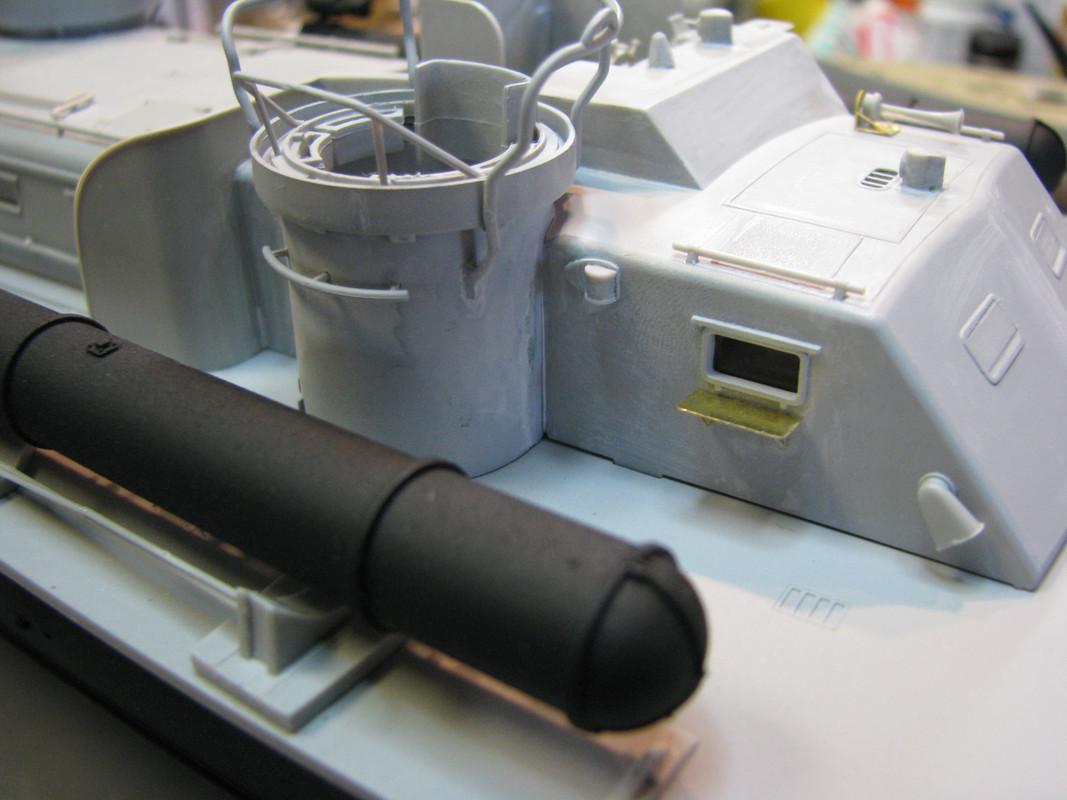
The fiddly stuff continues on. I had a chance to get some modeling done this weekend. Finishing the charthouse except for the searchlight and windscreen since those will break off very easily with my hamfisted modeling skills.

Glued the forward starboard turret onto the charthouse and when that was dry, used Mr Surfacer 500 to fill in the large crack on the front part where it meets the charthouse. I filled in from the back first so I could be messy and get a good seal on it. Thanks again Tracy for the suggestion. I then filled in from the front and any other cracks around the turret. After waiting about 15 to 20 minutes, I used 91% Isopropyl Alcohol on a Q-Tip to wipe away any excess.

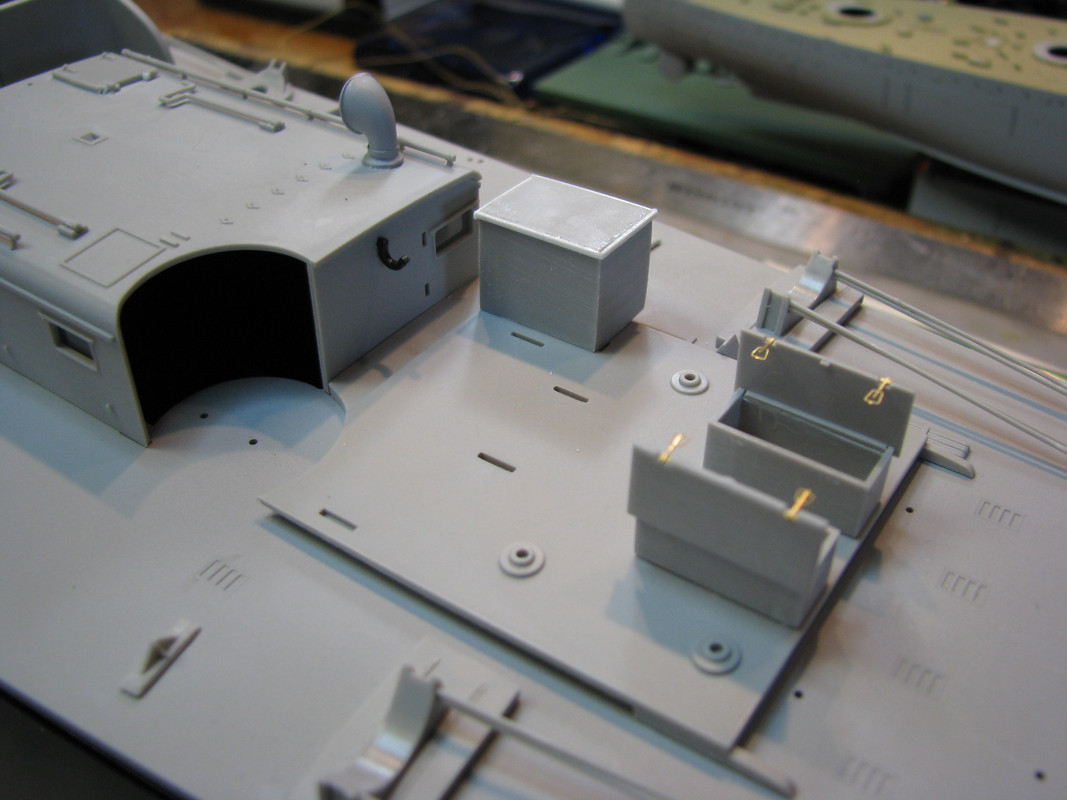
I also did some surgery and scratching on the heating unit to make it a rubber boat locker that the boats used instead of the heater in the South Pacific. I still need to scratch some latches to finish it off. 

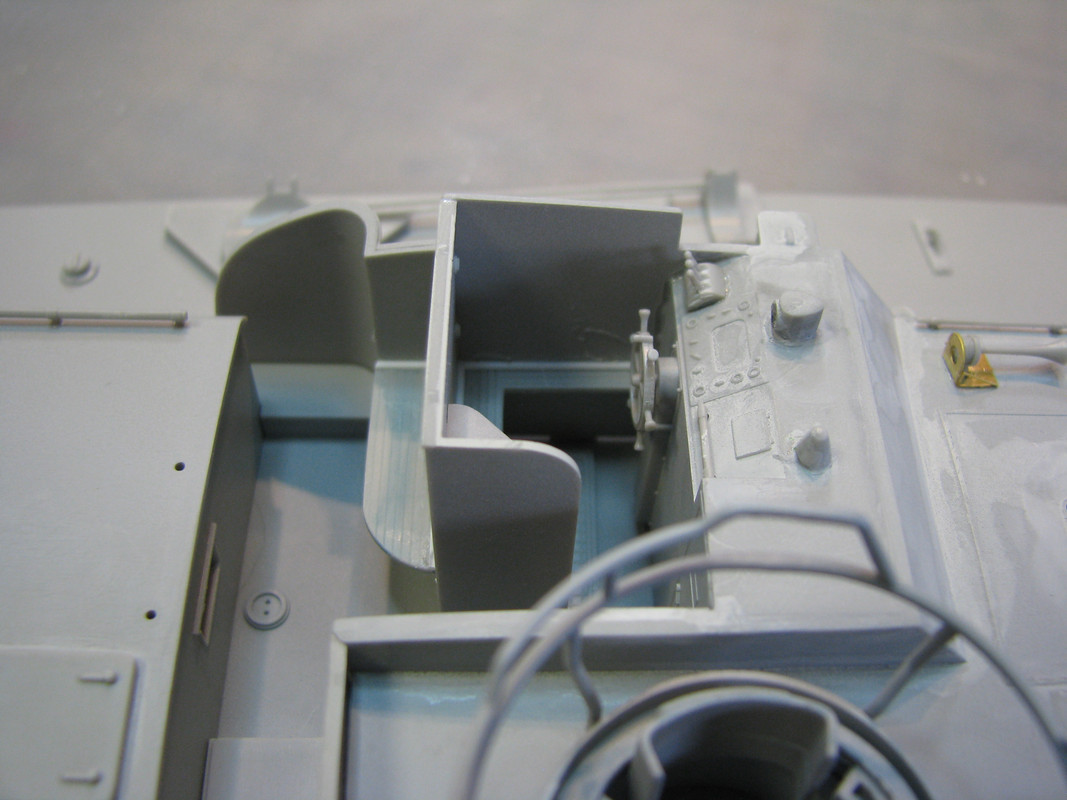
On the port aft turret, Merit made the same mistake that Italeri did on their 1/35 MTB. They molded a large hole on the interior backside of the turret. At first I wasn't going to worry about it but after looking at it when I dry fitted the turret, it was too much. So, out comes the Evergreen sheet styrene again...... after measuring, cutting sanding and glueing, some puttyiing was called for. Here is a picture of the unprimed turret. Not great, but it is better that the hole.

**Nota Bella**

Actually there was a hatch from the Day Cabin to the Aft Turret. So I just created a door to keep water from entering the cabin when not in use.

Finally, an overall picture of the boat and where I am at in the construction. Some of the parts have their coat of primer and a coat of black. Pretty soon, the boat will go from big and Gray to big and Black.

Steve


  • Member since
    November 2008
  • From: Central Florida
Posted by plasticjunkie on Tuesday, September 8, 2015 1:54 PM

Looking very good Steve. Can't wait to see the colors.

 GIFMaker.org_jy_Ayj_O


Too many models to build, not enough time in a lifetime!!

  • Member since
    March 2008
  • From: Cincinnati, Ohio USA
Posted by Drew Cook on Wednesday, September 9, 2015 9:43 PM

Steve,

If you send me your email address, I can send you a screen capture of a bit of vintage WWII film showing a green PT 149 underway.  It's a little fuzzy, but the color comes through.

Drew Cook
rac701@msn.com

  • Member since
    April 2007
  • From: Amarillo, TX.
Posted by captfue on Wednesday, September 9, 2015 9:50 PM

Realy great build...Love the detail...

Rules are overrated
  • Member since
    July 2010
  • From: Tempe AZ
Posted by docidle on Thursday, September 10, 2015 10:40 PM

PJ,

We are getting closer. After I get some White mottled on her, then it is on to the Tropical Green. I hand painted the ring buoys and .50 cals already, I'll take some pictures in the morning and post them so everyone can get a Trop Green and Gun Metal fix. I have not weathered either though so they are what one would call pristine......

Drew,

I sent you a PM with my email address. I would love to see the picture of the 149. I don't mind if you want to post it on this thread if you are so inclined.

Capt and Drew,

Thanks for checking out the thread I appreciate the kudos.

Steve


  • Member since
    July 2010
  • From: Tempe AZ
Posted by docidle on Thursday, October 1, 2015 8:26 PM

Alright, here is the latest update, not much but I have been busy with life.....

I swore I wasn't going to add anymore scratchbuilt thingamaboppers....... yeah, right. I was going over all the cad drawings on PT103.com and noticed that there was trim work around the bottoms of the turrets, the fore portion of the charthouse and along the aft section of the engineroom cover. So....... I added these with some Evergreen strips, I really need to invest in that company, and I don't think they came out too bad but take a look anyway.

I also glued down the charthouse, daycabin and engineroom cover and noticed there were gaps. Here are some pics to show where they are and the add ons. I plan on filling the gaps with Mr. Surfacer 500 and clean it up. After that, some primer and then black. Although I want to really get to the painting, I also want to make sure it looks good and at least appease the AMS in me.

I had to take out the windows from the charthouse and daycabin so that I can paint without trying to mask them. I made sure that I can get to the windows to glue them through the deck openings as long as I do not glue the deck on until I paint both the hull and the decks first, etc.......

Enjoy,

Steve


  • Member since
    November 2008
  • From: Central Florida
Posted by plasticjunkie on Friday, October 2, 2015 3:54 PM

Wow she is coming right along. I know what you mean about refraining from adding scratch built details. I say the same thing about a build then wonder off to add or improve something.

If you have a Touch N Flow applicator and Tenax or Plasti Weld, run a bead while holdingthe parts together and the water thin solvent glue will melt the plastic and close up the gap. Hold the parts for a couple of minutes and gaps are gone. I use this method all the time to get rid of seams on fuselages and armor.


 GIFMaker.org_jy_Ayj_O


Too many models to build, not enough time in a lifetime!!

  • Member since
    March 2009
  • From: brisbane australia
Posted by surfsup on Saturday, October 3, 2015 5:11 AM

I have just come across this Thread and I really like what I am seeing. May have to get one myself.....Cheers mark

If i was your wife, i'd poison your tea! If Iwas your husband, I would drink it! WINSTON CHURCHILL

  • Member since
    December 2010
  • From: Salem, Oregon
Posted by 1943Mike on Saturday, October 3, 2015 4:48 PM

Steve,

Your work is always so nice and neat and clean! I wish I could do the same but, alas, my close up pictures of my WIP always ruin my day.

Keep up the wonderful work! Following with interest.

Mike

Mike

"Le temps est un grand maître, mais malheureusement, il tue tous ses élèves."

Hector Berlioz

  • Member since
    July 2010
  • From: Tempe AZ
Posted by docidle on Saturday, October 3, 2015 11:16 PM

PJ,

i know exactly what you mean about wandering off the path with scratch building. On the Touch and Flow, I do have one and tried using it with Testors Liquid Cement and maybe I was doing it wrong because I could not get the cement to the bottom of the glass container. I tried just using it on this build by dipping it in to the glue and then on the part. However, I am not sure if it is the plastic that Merit uses or "user error," but when trying to glue parts together, you need a fair amount of glue to get the pieces to weld but also you have to be careful not to use too much because it will mar it easily.

If you look closely at some of the pictures I just posted, you'll see where I got a bit too much on the trim pieces and now have to sand carefully to clean it up.

Mark,

Thanks for checking in bud, I always appreciate your remarks and if you do decide to get one of these, I think you'll really like it. Very nice detail and pretty accurate. I am planning on doing the later version after I finish this, so you might want to wait to see the differences of the two. Stik, PJ and I had a nice discussion about the two versions earlier in the thread.

Mike,

I always appreciate your comments and advice. Your Libetry ship, as I have said is looking great. I too look at my close up pictures and groan. I always find something that is off or needs cleaning up, even after working on it for a length of time. But I also look at it as a good thing because I also find things that I might have missed or do need more work on them. I would like to think it makes me want to be a better modeler. I look at it also as a chance to improve and not how I screwed it up.

Again, thanks to every one checking out this thread and for all the comments, I really do appreciate it.

Steve


  • Member since
    November 2008
  • From: Central Florida
Posted by plasticjunkie on Sunday, October 4, 2015 7:52 PM

Steve

The testors liquid cement may not act the same as Tenax and Plast i Weld. The instructions that come with the tool may be the old one and there is an easier and more efficient way to load up the tool. I spoke to the company rep during the IPMS 2012 Nationals  and he explained the proper method of loading the tool. This video explains it:

https://www.youtube.com/watch?v=e2uUUcPjCq4

 GIFMaker.org_jy_Ayj_O


Too many models to build, not enough time in a lifetime!!

  • Member since
    July 2010
  • From: Tempe AZ
Posted by docidle on Monday, October 5, 2015 11:10 PM

PJ,

Thank you SO much for that link! It makes much more sense now......DOH. I have never used PlastiWeld before, how are it's holding properties in comparision to liquid cement? My LHS did not have the kit when I bought the Touch n Flow just the applicator. I guess I'll just HAVE to go buy the kit now......

Steve


  • Member since
    November 2008
  • From: Central Florida
Posted by plasticjunkie on Tuesday, October 6, 2015 5:58 AM

Steve

Plast I Weld and Tenax work the same way. They melt and weld the plastic for a solid join. I use this set up for about 98% of all my gluing eliminating just about any use of fillers along seam lines. 

There are several great videos on YouTube on the actual application of the product. You can see them off to the right of your screen when on the link I gave you.

 GIFMaker.org_jy_Ayj_O


Too many models to build, not enough time in a lifetime!!

  • Member since
    July 2010
  • From: Tempe AZ
Posted by docidle on Wednesday, November 4, 2015 8:24 PM

Well, I FINALLY buttoned everything up and there are no more cracks to patch. If anyone decides to build this after I do, then realize that you have to be very careful when handling the deck after the structures are glued down and filled. I cracked the charthouse seam at least four times.

The light patches you see in the pictures are where I lightly sanded some paint splotches.

Now the big Gray thing is a big Black thing! Next comes the white mottling and after that it will become a big Green thing.

Steve


  • Member since
    June 2003
  • From: Cavite, Philippines
Posted by allan on Thursday, November 5, 2015 7:30 PM

Nice! What are those stick-looking thingies on the foreground?

No bucks, no Buck Rogers

  • Member since
    July 2010
  • From: Tempe AZ
Posted by docidle on Thursday, November 5, 2015 8:32 PM

Thanks Allan! I believe thay are stabilizing rods for the torpedo tubes. One of the resident experts could hopefully either verify or let us know what the heck they are.

Steve


  • Member since
    May 2003
  • From: Greenville, NC
Posted by jtilley on Friday, November 6, 2015 12:41 AM

They look to me like the spars of either the Nina or the Pinta, the two beautiful models Steve is also working on.

Mighty good to see you working again, Steve. If these models are any indication, your manual dexterity is just fine.

Youth, talent, hard work, and enthusiasm are no match for old age and treachery.

  • Member since
    July 2010
  • From: Tempe AZ
Posted by docidle on Friday, November 6, 2015 6:54 PM

John,

Thank god they aren't that small! If you look over at the Nina and Pinta thread, I posted some finished, yes, finished photos of the Nina. 

It is nice to be able to build some models again, but after todays marathon, I think I'll be taking a break for a bit. Thanks for checking up on me.

Steve


  • Member since
    July 2010
  • From: Tempe AZ
Posted by docidle on Friday, November 6, 2015 8:13 PM

Okay, I'm a tad slow........ Yes Allan, John is right, those are the spars for the Nina that I finished today. Again, thanks John!

Steve


JOIN OUR COMMUNITY!

Our community is FREE to join. To participate you must either login or register for an account.

SEARCH FORUMS
FREE NEWSLETTER
By signing up you may also receive reader surveys and occasional special offers. We do not sell, rent or trade our email lists. View our Privacy Policy.