SEARCH FINESCALE.COM

Enter keywords or a search phrase below:

Revell 1/72 Type IXC U-boat Completed

11870 views
106 replies
1 rating 2 rating 3 rating 4 rating 5 rating
  • Member since
    July 2014
Revell 1/72 Type IXC U-boat Completed
Posted by modelcrazy on Monday, August 1, 2016 10:24 AM

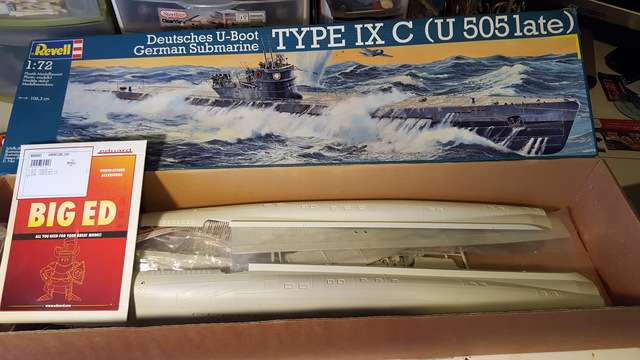
I am starting the Revell 1/72 Type IXC U-boat. It will be displayed out of the water, which is odd, for those who know me.

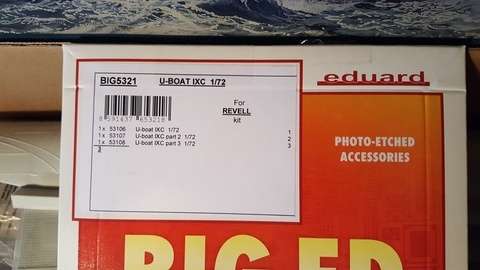
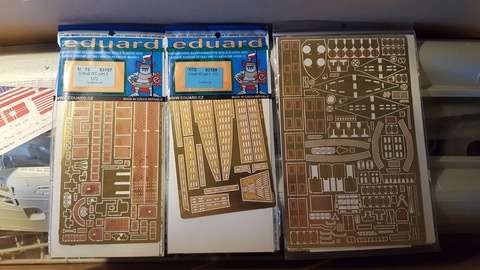
The kit was purchased a few years back by my daughter on Father's Day and I received the PE Big Ed set last Christmas. The removal of the box from the stash sure leaves a huge hole Confused I need to fill the void.

Well here it is. I'm sure most everyone is familiar with the kit, built one yourself or watched a few WIP builds. The hull comes in 4 pieces and is going to require some surgery to open the limber holes and flood hatches. I will also build a representation of the pressure hull which can be seen through the limber holes.


After some serious research, mainly using Douglas Martindale’s writings on the 505 on the Accurate Model Parts site, and looking up other papers, I decided to go with the 515.

It seems that the 507, 527 and 557 which were my original choices, would have had the Turm-II (tower (a single 20 on the upper platform and a single 20 on the Wintergarden) as the Turm-IV (two single 20 on either side of the tower on the upper platform) would have come around after the start of 1943. The 507 was sunk in Jan 43, 527 was sunk in May 43, so it may have had the Turm-IV, no telling. But the 527 would have surly had the quad 20 Vierling on the Wintergarden as the single auto 37, in the kit, wasn’t available in numbers yet. The 557 was sunk Dec 41 so there’s no way it has the Turm-IV. The Turm-IV wasn’t even conceived of yet.

So where did that leave me? Searching for another subject to reproduce.
Enter the 515. More searching reviled a survivor’s report after it’s sinking in Apr 44 by rockets and DC’s. After interviewing the survivor’s, it was reviled that the 515 had 2 single 20s, an auto 37 and was missing the 10.5 cm deck gun, which was removed after its first 3 patrols, just like the Revell kit.
From the survivor’s interrogation report
 New bridge including Platform II fitted August 1943 at Lorient.  Armor plate around forward part of bridge about 16-mm. thick.  New structure incorporated so-called “air raid shelter”.
(a)  On first 3 patrols:  One 105-mm. gun forward of conning tower;  One single 20-mm. cannon on Platform I;  One 37-mm. gun on after deck.
(b)  On 4th patrol:  One 37-mm. gun forward of bridge; Two single 20-mm cannons on Platform I;  One quadruple 20-mm. mount on Platform II.
(c)  On fifth patrol:  One 37-mm. gun forward of bridge; Two twin 20-mm. cannons on Platform I;  One twin 20-mm. cannon on Platform II.
(d)  On 6th and last patrol:  Two twin 20-mm. cannons on Platform I;  One new automatic 37-mm. gun on Platform II.
Platform II appears to be the Wintergarden.
The 515 had a pretty illustrious career, sinking 25 ships and damaging 2. It was apparently one of the top scoring boats of the 10th Flotilla. The emblems she wore, from the little info I can find, were a hammer on either side of the tower and the 10th Flotilla emblem on the front. This is all just speculation as finding a closeup of the tower though Google images is impossable. But U-Boats.net does indicate the use of the hammer and further digging indicated the use of the flotilla emblem as well. 
A picture of the 515 during patrol 4 or 5.
   
So there you have it, join me if you want to watch yet another 1/72 U-boat build.


Steve

Steve

Building a kit from your stash is like cutting a head off a Hydra, two more take it's place.


http://www.spamodeler.com/forum/

  • Member since
    December 2002
  • From: Bury St Edmunds, Suffolk, England
Posted by Bish on Monday, August 1, 2016 1:04 PM

Attention grabbed. Got the kit but not seen one built yet. Will you be doing anything to replicate the pressure hull.

But, i must say, you have me worried. You might want to consider a trip to the doctor. That's 2 builds without water, and one of those is a floaty thing. Something is very wrong.

I am a Norfolk man and i glory in being so


On the bench: Airfix 1/72nd Harrier GR.3/Fujimi 1/72nd Ju 87D-3

  • Member since
    July 2014
Posted by modelcrazy on Monday, August 1, 2016 1:41 PM

LOL, don't worry Bish, I'm working a watter build to keep me from going into withdraws.

A sunken Zero I'm doing for the Pearl Harbor and Japanese GB's

I just need to add more resin.

Steve

Building a kit from your stash is like cutting a head off a Hydra, two more take it's place.


http://www.spamodeler.com/forum/

  • Member since
    July 2014
Posted by modelcrazy on Monday, August 1, 2016 2:08 PM

Bish,


Using the U-534 example located over in your part of the world (I would LOVE to visit England by the way), I will be using aluminum to make the rounded section of the pressure hull and the flat section for the walkway?? The gussets holding the walkway will be made from styrene. I won't go too crazy here as I don't think you will be able to see much through the Limber holes.

Steve

Building a kit from your stash is like cutting a head off a Hydra, two more take it's place.


http://www.spamodeler.com/forum/

  • Member since
    December 2002
  • From: Bury St Edmunds, Suffolk, England
Posted by Bish on Monday, August 1, 2016 2:20 PM

I wouldn't mind getting up to see the 534 myself.

I have heard you can't see much in there. One of the guys at the model club i go to is big into U-Boats. He said any rounded object painted black will do. I have even herad of people useing the cardborad centre from a toiliet roll. I am not sure i would even worry about the walkway to be honest.

I am a Norfolk man and i glory in being so


On the bench: Airfix 1/72nd Harrier GR.3/Fujimi 1/72nd Ju 87D-3

  • Member since
    July 2014
Posted by modelcrazy on Monday, August 1, 2016 10:02 PM
I started grinding off the plastic behind the limber holes, vents and scuppers. This is a messy time consuming process but should help immensely in opening them up. I have read of grinding them completely to open them, halfway and drilling the front and not at all and just using a drill. I’m choosing the middle one.

Steve

Building a kit from your stash is like cutting a head off a Hydra, two more take it's place.


http://www.spamodeler.com/forum/

  • Member since
    December 2002
  • From: Bury St Edmunds, Suffolk, England
Posted by Bish on Tuesday, August 2, 2016 12:38 AM

That makes sense. If you can reduce the thickness you have to drill through, that will make it a little easier.

I am a Norfolk man and i glory in being so


On the bench: Airfix 1/72nd Harrier GR.3/Fujimi 1/72nd Ju 87D-3

  • Member since
    February 2011
Posted by Hokey on Tuesday, August 2, 2016 7:06 AM
In my last u-boat I used dremmel wire brush to remove a lot of plastic inside and then a sharp hobby knife to "drill" out the thin layer remaining in the holes needed to open. Worked great.
  • Member since
    February 2011
Posted by Hokey on Tuesday, August 2, 2016 5:26 PM
modelcrazy - i hope you'll post lottsa work in process! I need motivation to get back to my "shipyard" of unbuilt u-boats!
  • Member since
    July 2014
Posted by modelcrazy on Tuesday, August 2, 2016 9:41 PM
I did some work on the starboard stern and installed the PE. I realized that removing the precise amount of plastic before installing the PE pieces wasn’t necessary. For the port side I’m first drilling some locating holes. I will glue the PE on first then grind the inside. Once this is ground down I’ll cut out the holes with an Exacto.

Steve

Building a kit from your stash is like cutting a head off a Hydra, two more take it's place.


http://www.spamodeler.com/forum/

  • Member since
    November 2008
  • From: Central Florida
Posted by plasticjunkie on Saturday, August 6, 2016 2:24 PM

Steve

You can use rolled cardboard for the pressure hull. I used the cardboard tube from a paper towel roll when I made my 1/144 VII/C. Paint the cardboard and insides black and you will be good to go.

I have this one too and have some of the pe but still want to get a few more things before I dive into it. 

 GIFMaker.org_jy_Ayj_O


Too many models to build, not enough time in a lifetime!!

  • Member since
    November 2008
  • From: Central Florida
Posted by plasticjunkie on Saturday, August 6, 2016 2:26 PM

Bish

That makes sense. If you can reduce the thickness you have to drill through, that will make it a little easier.


That plus will make the hull thickness closer to scale.

 GIFMaker.org_jy_Ayj_O


Too many models to build, not enough time in a lifetime!!

  • Member since
    December 2002
  • From: Bury St Edmunds, Suffolk, England
Posted by Bish on Saturday, August 6, 2016 4:59 PM

plasticjunkie
 
Bish

That makes sense. If you can reduce the thickness you have to drill through, that will make it a little easier.


That plus will make the hull thickness closer to scale.


Thats true. I have read one build review a while back where the guy says he broke lots of drill bits doing those holes. I don't think he thinned it down before hand. Doing that will no doubt make the drilling easier.

I am a Norfolk man and i glory in being so


On the bench: Airfix 1/72nd Harrier GR.3/Fujimi 1/72nd Ju 87D-3

  • Member since
    July 2014
Posted by modelcrazy on Saturday, August 20, 2016 12:20 AM
It’s taking a while and I thought I finished the drilling, grinding, filing and trimming, but the flood holes near the fore torpedo tubes need drilling. I was going to leave them undrilled at first but that was bothering me. I worked so hard on the rest of the limber holes, flood plates and drain holes, I just need to get it done. I also installed some of the PE and still have more to add to the hull including the rest of the flood plates.
I wanted to get something up picture wise so here it is. I’ll probably have the exterior hull done this weekend than on to the torpedo tubes.

Steve

Building a kit from your stash is like cutting a head off a Hydra, two more take it's place.


http://www.spamodeler.com/forum/

  • Member since
    July 2013
Posted by steve5 on Saturday, August 20, 2016 12:24 AM

very nice modelcrazy , you must have put a few hour's into drilling and sanding , don't know if I could do it lol , but I love watching your buildBig Smile


  • Member since
    November 2008
  • From: Central Florida
Posted by plasticjunkie on Saturday, August 20, 2016 9:53 AM

Steve

All the drilling, grinding etc may be a PITA but it makes one heck of a difference. Anything you can improve will pay huge dividends at the end.

 GIFMaker.org_jy_Ayj_O


Too many models to build, not enough time in a lifetime!!

  • Member since
    July 2014
Posted by modelcrazy on Saturday, August 20, 2016 11:26 AM
Thanks Steve and PJ

plasticjunkie

Steve

All the drilling, grinding etc may be a PITA but it makes one heck of a difference. Anything you can improve will pay huge dividends at the end.


Yeah, it was bothering me when I noticed I missed the tube flood holes. I installed the PE anyway but regretted it. I now have to carefully grind behind them. I know it will be worth it.

Steve

Building a kit from your stash is like cutting a head off a Hydra, two more take it's place.


http://www.spamodeler.com/forum/

  • Member since
    July 2014
Posted by modelcrazy on Sunday, August 21, 2016 7:59 PM
An update. I cut out the torpedo flood holes and finished the hull PE then I decided to add a whole lot more work to my build and try some oil canning. This is the first time to try this method and I think it’s turning out alright. Maybe not so deep on the rest of the hull. It’s too late to stop now, but it should add a really nice effect.

Steve

Building a kit from your stash is like cutting a head off a Hydra, two more take it's place.


http://www.spamodeler.com/forum/

  • Member since
    November 2008
  • From: Central Florida
Posted by plasticjunkie on Monday, August 22, 2016 1:09 PM

Looks very good Steve. Are using a Dremel set on low speed?

 GIFMaker.org_jy_Ayj_O


Too many models to build, not enough time in a lifetime!!

  • Member since
    June 2014
  • From: New Braunfels , Texas
Posted by Tanker - Builder on Monday, August 22, 2016 1:23 PM

Oh My !

 Please ! Don't do all that beautiful oilcanning and hide it in water . Do a drydock stand ! Beautiful work so far . ! T.B.

  • Member since
    July 2014
Posted by modelcrazy on Monday, August 22, 2016 1:23 PM

Thanks PJ, no I'm using a #22 curved carving blade.

Steve

Building a kit from your stash is like cutting a head off a Hydra, two more take it's place.


http://www.spamodeler.com/forum/

  • Member since
    July 2014
Posted by modelcrazy on Monday, August 22, 2016 1:24 PM

LOL TB, don't worry, she's going on a stand.

Steve

Building a kit from your stash is like cutting a head off a Hydra, two more take it's place.


http://www.spamodeler.com/forum/

  • Member since
    July 2014
Posted by modelcrazy on Thursday, August 25, 2016 10:12 AM

Well I’m about half way done with the oil canning……on one side of the hull. I’m becoming more confidant with this process and less worried about messing it up. If there is a mistake, it can easily be fixed and will mold right into the weathered U-boat after a patrol scheme. I can also use this project to practice some weathering technics I wanted to try for chipping, rust and faded paint. I wanted to get some pictures last night but decided to wait until I done with the first half of the hull.

Steve

Building a kit from your stash is like cutting a head off a Hydra, two more take it's place.


http://www.spamodeler.com/forum/

  • Member since
    February 2011
Posted by Hokey on Thursday, August 25, 2016 5:14 PM

modelcrazy

Well I’m about half way done with the oil canning……on one side of the hull. I’m becoming more confidant with this process and less worried about messing it up. If there is a mistake, it can easily be fixed and will mold right into the weathered U-boat after a patrol scheme. I can also use this project to practice some weathering technics I wanted to try for chipping, rust and faded paint. I wanted to get some pictures last night but decided to wait until I done with the first half of the hull.


This process sounds soooo cool but when I watch U-Boat videos I cant' really see much of it. What am i missing?

  • Member since
    July 2014
Posted by modelcrazy on Thursday, August 25, 2016 10:45 PM
Nothing, in reality it's subtle if at all. Once I get the flat paint on, which will tone it down, some faded paint, chipping and rust it should be subdued. It's kinda like pre-shading panel lines on aircraft. In reality you rarely see the panel lines but looks great on a scale model.

Steve

Building a kit from your stash is like cutting a head off a Hydra, two more take it's place.


http://www.spamodeler.com/forum/

  • Member since
    July 2014
  • From: Franklin Wi
Posted by Bakster on Thursday, August 25, 2016 10:59 PM

Excellent work, MC. I am enjoying this WIP. Way to go on the oil canning!

  • Member since
    July 2014
Posted by modelcrazy on Thursday, August 25, 2016 11:27 PM
I'm hoping to duplicate this level of weathering. This a type VII I found on Google images. Builder is unknown, unless some knows him. Almost looks like the rust chipping and barnicals would cut your hand if you picked it up.

Steve

Building a kit from your stash is like cutting a head off a Hydra, two more take it's place.


http://www.spamodeler.com/forum/

  • Member since
    November 2008
  • From: Central Florida
Posted by plasticjunkie on Thursday, August 25, 2016 11:34 PM

Hokey

This process sounds soooo cool but when I watch U-Boat videos I cant' really see much of it. What am i missing?


The stress on the metal skin causes this very subtle effect that is visible when viewed at different angles. Most pictures will not show this effect unless they were taken at close range and at the right angle to show the oil canning waving effect.

 GIFMaker.org_jy_Ayj_O


Too many models to build, not enough time in a lifetime!!

  • Member since
    July 2014
  • From: Franklin Wi
Posted by Bakster on Friday, August 26, 2016 8:48 AM

Hey MC,  the example you are working to build to is pretty darn cool. The weathering is incredible.  

  • Member since
    November 2008
  • From: Central Florida
Posted by plasticjunkie on Friday, August 26, 2016 9:49 AM

Steve

The German black anti fowling paint on the teak deck eventually turned brownish on high foot traffic areas. I see where some modelers apply rust stains to the wood deck which is incorrect. Only the small areas at the stern and bow that were metal should be rust stained. Any kind of streaking below the waterline  would be restricted only to the anchor storage area otherwise the anti fowling paint would have been discolored from the salt in the sea water. Rust streaks would have been found on the vertical metal areas above the waterline, specially the hand railings, conning tower and flood holes. You can use artists oils in orange, red to brown range to sterak over the flat paint for very realistic rust staining. The deck can receive a reddish/brown oil wash to get the discoloration.  

For the props, use a green oil wash to tarnish and stain them. This is an excellent referece source that I used when I built my Type VII/C: http://amp.rokket.biz/

 GIFMaker.org_jy_Ayj_O


Too many models to build, not enough time in a lifetime!!

JOIN OUR COMMUNITY!

Our community is FREE to join. To participate you must either login or register for an account.

SEARCH FORUMS
FREE NEWSLETTER
By signing up you may also receive reader surveys and occasional special offers. We do not sell, rent or trade our email lists. View our Privacy Policy.