SEARCH FINESCALE.COM

Enter keywords or a search phrase below:

Revell 1:96 USS Constitution build

15773 views
47 replies
1 rating 2 rating 3 rating 4 rating 5 rating
  • Member since
    September 2012
Posted by GMorrison on Tuesday, December 13, 2016 5:22 PM

If you are interested, this is how I installed lights in my Victory.

Lower gun deck exposed.

Underside of the middle gun deck.

I have a supply of copper tape in various widths from a stained glass supplier. I use it to copper some of my hulls. It is self adhesive and burnished down nicely over the leads to a series of amber LEDs. I've attached the leads from the battery pack to the ends, a real minimum of wiring.


 Modeling is an excuse to buy books.


  • Member since
    September 2012
Posted by GMorrison on Tuesday, December 13, 2016 5:38 PM

Very nice effects. I'd stop at this point. It looks just right to me.

Should shave off those little stand locator lugs. You'll be putting a nice stand together for this beauty.

 Modeling is an excuse to buy books.


  • Member since
    January 2012
  • From: Atlanta Metro, Georgia
Posted by fright on Wednesday, December 14, 2016 9:28 AM

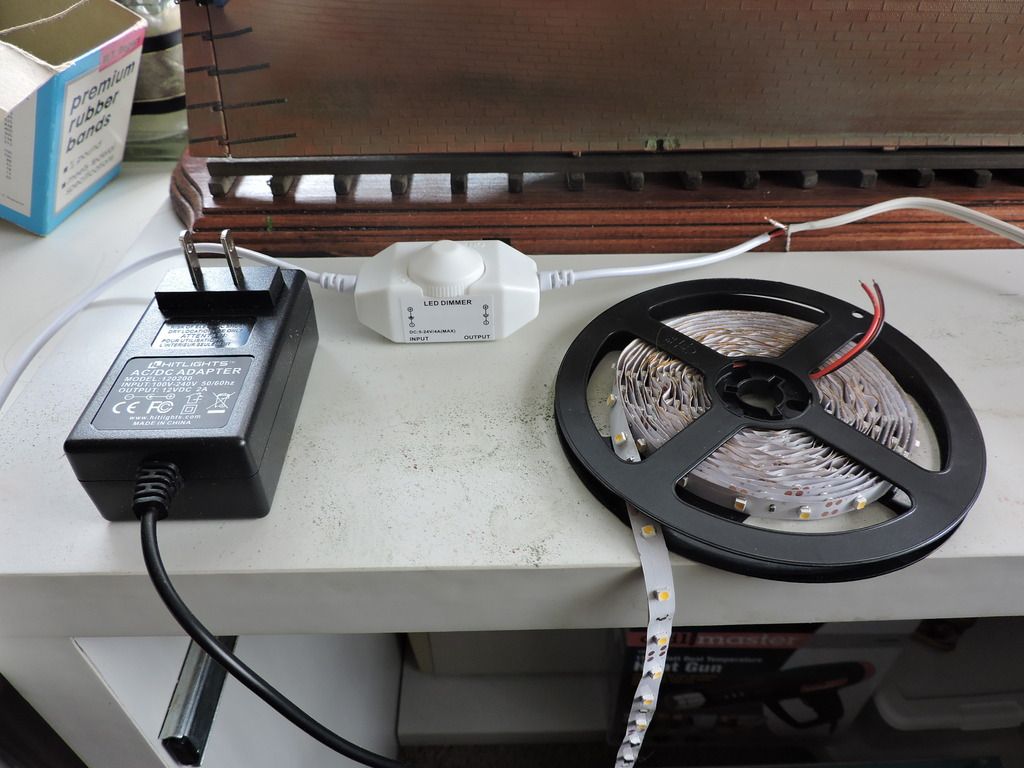
GMorrisson - the way you did your lights looks pretty easy. Is your battery pack simply wired to the copper tape? With no diodes? I did not want to use a battery system on mine and, an article I looked at was telling me I would need to add diodes to change voltage depending on the number of lights, volts, amps etc. Over my head! So I went with a LED ribbon kit from HiLights that included a power outlet and dimmer switch. blackened out most of the lights so they wouldn't saturate the hull with light by covering most of lights with black acrylic paint. I now have to decide if I will bring the ribbon up through the bow or stern of gun deck to attach to underside of the spar deck. 

Thank you for letting me know about the locator lugs on hull. I couldn't figure out what they were for. Dunce I'll get rid of them. As for the weathering powders, I'll go along with your advice to stop where I am. I just wanted to dull down the brilliance of the copper paint. I have no plans for doing any weathering on the rest of ship. Thanks for following this post and taking the time to give me your opinion Toast I'm very grateful to these forums for the assistance and help they provide to other modelers. Cheers!


Robert O

  • Member since
    January 2012
  • From: Atlanta Metro, Georgia
Posted by fright on Thursday, December 15, 2016 10:48 AM
Bill - your method of running lights looks clean and simple. Is that a simple battery pack holder that is soldered to the copper strips? Up to how many lights will that battery pack run? I looked at 4mm drop led drop lights but, not having any experience in wiring, it started mentioning diodes were needed to in between lights and power source etc. and it went right over my head. LOL Bottom line is, that sure looks pretty simple setup on your kit. Thanks for showing me these photos! Good Holidays to you and loved ones!

Robert O

  • Member since
    January 2012
  • From: Atlanta Metro, Georgia
Posted by fright on Tuesday, December 20, 2016 1:12 PM

Sending a warm HaPpY HoLiDaYs to all of the FSM members. I thank everyone who has followed my progress in modeling; for all of your contributions in this group; sharing your knowledge and talents with others; and hopefully finding peace and comfort in the New Year that lies ahead. Cheers to everyone!!!

Robert O

  • Member since
    January 2012
  • From: Atlanta Metro, Georgia
Posted by fright on Wednesday, January 18, 2017 9:58 PM

Alrighty then - finally got back to working on my ship. Finished installing electrical wiring in the hull. Not pretty but it will be hidden and it WORKS! Attached LED light strip to the underneath side of spar deck. Lights came from HiLights and included roll of LED strip lights, dimmer switch and power transformer for wall outlet. Blacked out some of the lights along the strip. Did a sample run to see what it will look like. Last photo is close up showing my added '3rd deck' through hatch. I can live with the results and can adjust lower  or raise the light output with the dimmer! Next step is to get the gun deck mounted into the hull so I can move on with installing the long guns. 

Robert O

  • Member since
    September 2012
Posted by GMorrison on Wednesday, January 18, 2017 11:25 PM

That looks really good.

 Modeling is an excuse to buy books.


  • Member since
    January 2012
  • From: Atlanta Metro, Georgia
Posted by fright on Thursday, January 19, 2017 11:11 AM

Thanks GM - I have zilch electrical skills, but you gave me the motivation to get this finished. Your lighting system looks far neater than mine! ** CORRECTION: this lighting kit is from HitLights, not HiLights.


Robert O

  • Member since
    January 2012
  • From: Atlanta Metro, Georgia
Posted by fright on Sunday, January 22, 2017 3:08 PM

Thanks to my wife Chris, we got the gun deck mounted into ship's hull.It needs to be glued and clamped, but she's in and I can start working on getting the long guns installed!

Robert O

  • Member since
    December 2010
  • From: Salem, Oregon
Posted by 1943Mike on Sunday, January 22, 2017 10:51 PM

Robert,

You're doing very nice work indeed.

I'm very impressed with the boats you've made and I'm following along with interest.

Mike

"Le temps est un grand maître, mais malheureusement, il tue tous ses élèves."

Hector Berlioz

  • Member since
    January 2012
  • From: Atlanta Metro, Georgia
Posted by fright on Sunday, January 22, 2017 11:02 PM

Thanks so much, 1943Mike - it's been 10 months since I first started this model. I'm pretty happy with what I've done so far, but I wish I could pick up the pace a bit.Time I want to thank everyone so far for following my steps, stumbles and ocasional left turns with this. I'm going to try to add some vertical styrene strips along my bulwarks that will have the eyebolts for the gun tackle to attach toinstead of the thin hull. Have a good week coming up!

Robert O

  • Member since
    January 2012
  • From: Atlanta Metro, Georgia
Posted by fright on Thursday, March 23, 2017 9:53 PM

Just checking in to say I've not gone down with the ship. I started work on a Bluenose model and that has taken up all of my time lately. I'm nearing the masting and rigging and hope to return soon to my Constitution. Only so many hours for fun!

Robert O

  • Member since
    December 2003
  • From: 37deg 40.13' N 95deg 29.10'W
Posted by scottrc on Friday, March 24, 2017 1:00 PM

Hi Fright,

Your Connie is really looking nice, the lights are a really cool touch.  Don't worry about straying away from this build, the Bluenose is also coming along really nice and you seem to really be learning a lot from it.  I started my Connie on 2007 and only seem to work on it in spurts, then go off and work on something else of interest.  

Scott

  • Member since
    January 2012
  • From: Atlanta Metro, Georgia
Posted by fright on Monday, March 27, 2017 1:45 PM

Scott- thanks for taking a look and for your comments! I had no idea how involved the Connie would be for a plastic model. I do not want to rush in what I'm doing, but I needed to step away for a bit. I'm at the stage where I am trying to do gun tackle for about 8 of the long guns that could be viewed through the open hatch. The rest will only have breech line to bulwarks.Beer Cheers!

Robert O

  • Member since
    March 2010
Posted by Bocks Suv on Wednesday, April 5, 2017 3:51 PM

I prefer to use modeling cement or Shoe Goo for strengthening inside joints. CA has some weird properties so dumping it on my not really stengthen a joint and you runt he risk of getting it where you dont want it. As a filler, it's a disaster, since it doesnt sand like plastic.

  • Member since
    January 2012
  • From: Atlanta Metro, Georgia
Posted by fright on Tuesday, May 29, 2018 10:02 AM

Wow! Time has really gone by with no work on this kit. My Bluenose is almost complete and I need to make an effort to move on with my Connie. I went through 3 surgeries at the end of 2017 and this really slowed me down for a while. It's taken me six months to feel like myself again. 

* Bocks Suv - I did use both CA glue and Testors modeling cement to strengthen the inside of thhe hull seam. I very good idea on this. The hull needs that strength when installing the decks. Cheers! Yes


I'm trying to finish the gun tackle so I can attach the long guns and install the upper deck. Hope to get some photos posted soon! Pirate

Robert O

  • Member since
    December 2010
  • From: Salem, Oregon
Posted by 1943Mike on Tuesday, May 29, 2018 12:20 PM

Robert,

Looking forward to your resuming work on the USS Constitution.

Surgery is no fun at all and, yes, it took me several months before I was hiking again after a tumor was removed from the thigh area of my right leg a little over four years ago. I'm very happy to note you say you feel " ..like myself again."

Any chance you'll post some photos of your Bluenose?

Mike

"Le temps est un grand maître, mais malheureusement, il tue tous ses élèves."

Hector Berlioz

  • Member since
    January 2012
  • From: Atlanta Metro, Georgia
Posted by fright on Tuesday, May 29, 2018 4:08 PM

1943Mike - I'm currently trying to figure out how to get my cut material attached to the boom(s). I cut out the sail patterns (using about 1/2 the size to reduce bulkness on boom) and used 50/50 mix white glue around the edges of sails to prevent frailing. It's hardeer than I thought it would be! ;)

p.s. I'm glad to hear of your good results from surgery. Cheers to that !!!


Robert O

JOIN OUR COMMUNITY!

Our community is FREE to join. To participate you must either login or register for an account.

SEARCH FORUMS
FREE NEWSLETTER
By signing up you may also receive reader surveys and occasional special offers. We do not sell, rent or trade our email lists. View our Privacy Policy.