SEARCH FINESCALE.COM

Enter keywords or a search phrase below:

USS Essex 1:350 Trumpeter Build

20496 views
135 replies
1 rating 2 rating 3 rating 4 rating 5 rating
  • Member since
    March 2012
  • From: Louisville, KY
Posted by Builder 2010 on Wednesday, June 6, 2018 6:56 PM

Thanks for the encouragement! I too sometimes feel that the ship looks more "lived in" when things aren't perfect, but that's not my goal. I'm always trying to get it right. Having a second set of PE really helps: one for practice, one for the ship. I generally get it right the second time. Only building the Missouri's catapults took three tries with four sets of PE (2-Eduard, 1 Tom's and 1 Alliance). I would be very impressed indeed if there are modelers out there who can nail all the PE on these ships with just one set without losing any or screwing them up. So far, both Eduard and GMM have been very kind in getting me replacements. In fact, Loren Perry and I are developing a professional relationship.

Today, I only had an hour so I started the floater net basket task. I got a full set from one fret cut out and started bending and installing them. Handling the PE chips off the paint so there will be some minor touch up needed when this is done.

I measured the width of the end cap which folds up to close it off, and found it to be 0.070" or thereabouts, and found a piece 1/16th (0.0625") rod to use as a mandrel. I held the rod over the PE putting pressure on it and then bent each edge up and around with a single-edged razor blade. The basket has a high side and low side as can be seen by the end caps not being on the center-line. I made sure I set the rod to account for this and it worked pretty well.

The upfolded ends are secured by a dab of thin CA and then with a tooth pick with accelerator to cure it fast. I use gel CA to adhere the baskets to the railings. It's touch and go since the railings themselves are not particularly robust.

I took the following image before I started putting on the baskets, but I wanted to see about using some big sheets of paper as a backdrop for picture taking. It's impressing even me. Sometimes it nice to step back and admire your work. 

I'll continue building and applying baskets tomorrow.

  • Member since
    March 2012
  • From: Louisville, KY
Posted by Builder 2010 on Friday, June 8, 2018 8:51 PM

I was really unhappy gluing the floater net baskets (FNBs) directly to the ship's handrails. They were popping off as fast as I could get them on, and it took way too long to what essentially was a simple task. I did wrestle all the FNBs that were shown in my broadside picture of the actual ship, but wanted to find a more secure method.

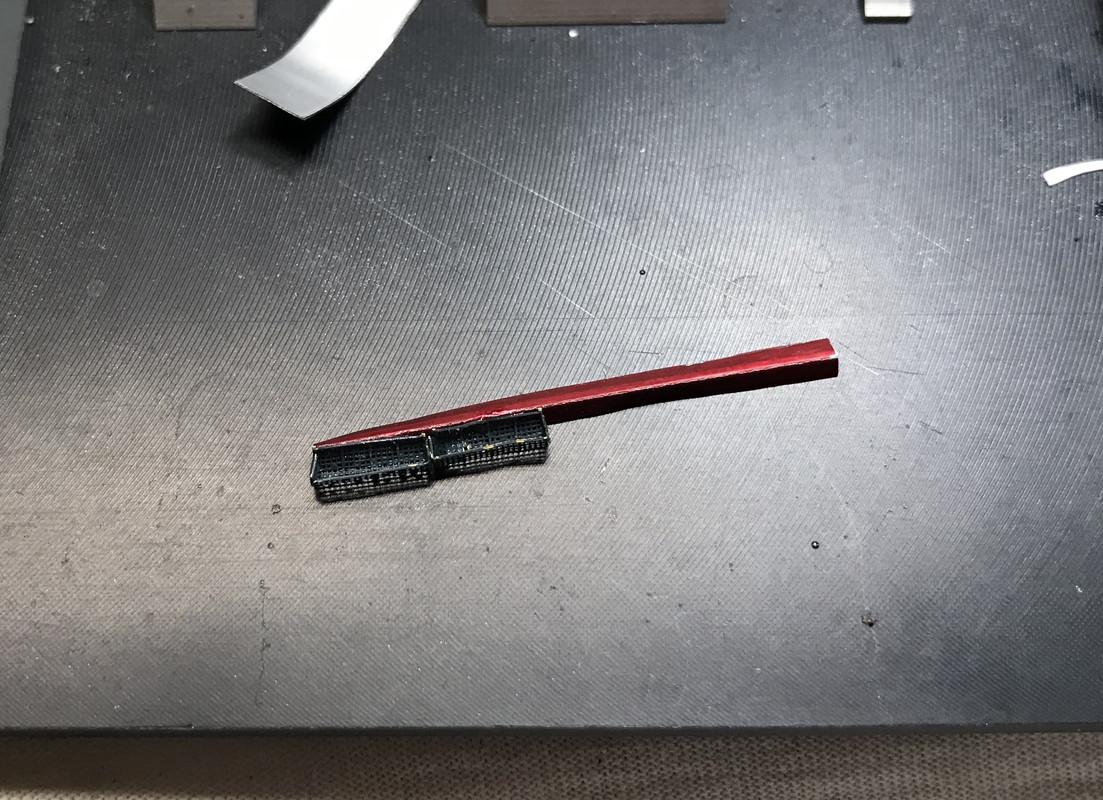
I woke up this morning thinking about gluing the FNBs to foil and then wrapping the foil over the rail and gluing it to itself making essentially a sandwich with foil as the bread and the rail as the bologna. The foil I was using is wine bottle seal foil which has some body and I use it for all sorts of detail work. I first tried Microscale's foil adhesive, but it didn't have enough strength in such a small surface area. That left me doing it with thick CA. 

I measured both the amount of foil needed for the FNB interface and then the depth of foil that would fold over the rail. I cut off a strip and measured the width of one FNB, and folded it in my PE folding tool so the fold was nice and square. I glued the high side of the FNB to the foil and then glued this assembly to the rail. Here is the foil measured to hold four FNBs together. This also made gluing mulitples easier... not a lot easier, but easier all the same.

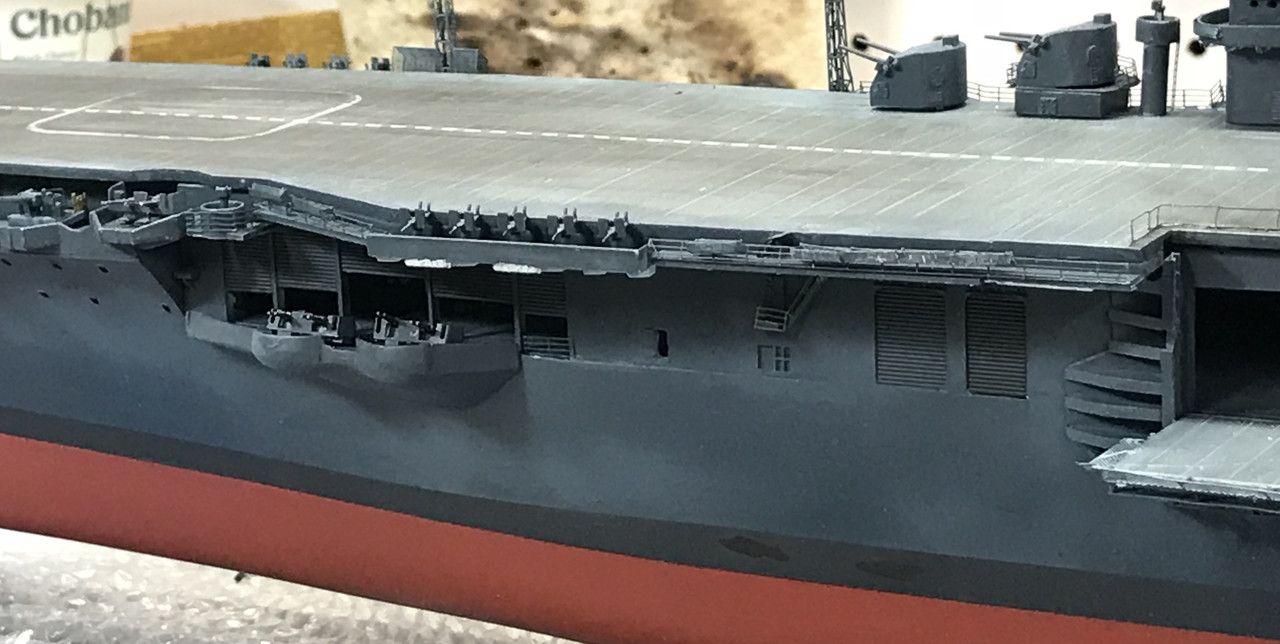
The idea actually worked, and the connection between the FNB and foil, and the foil to the rail was much, much stronger. I glued up singles, doubles and four-in-a-row and completed the entire port side. I toyed with the idea to remove the starboard side's FNBs and redo them with this method, but decided against it leaving well enough alone. So there is a visual difference between the two sides. I surmised that going back and attempting removal would result in some rails coming loose and I didn't want to deal with that.

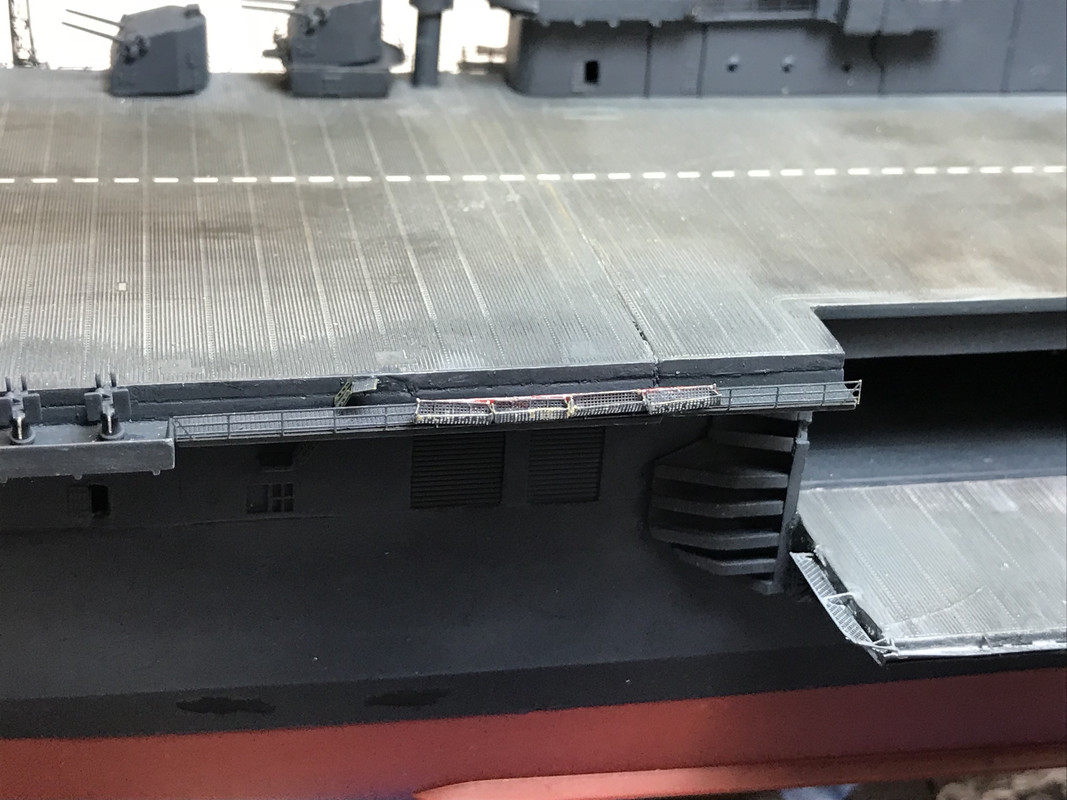
On the starboard side I attempted to brush paint Navy Blue to clean up all the mess, but this resulted in some FNBs falling off creating more mess. So I stopped that and decided that I would airbrush all of them when finished. I did some selective masking to keep the  spray off the flight deck and did the touch up painting. But, before doing this I did add the two tiny missing railings buried in the port side; one to the boat deck and the other on a ladder platform next to an access manway. You can see this railing in the below.

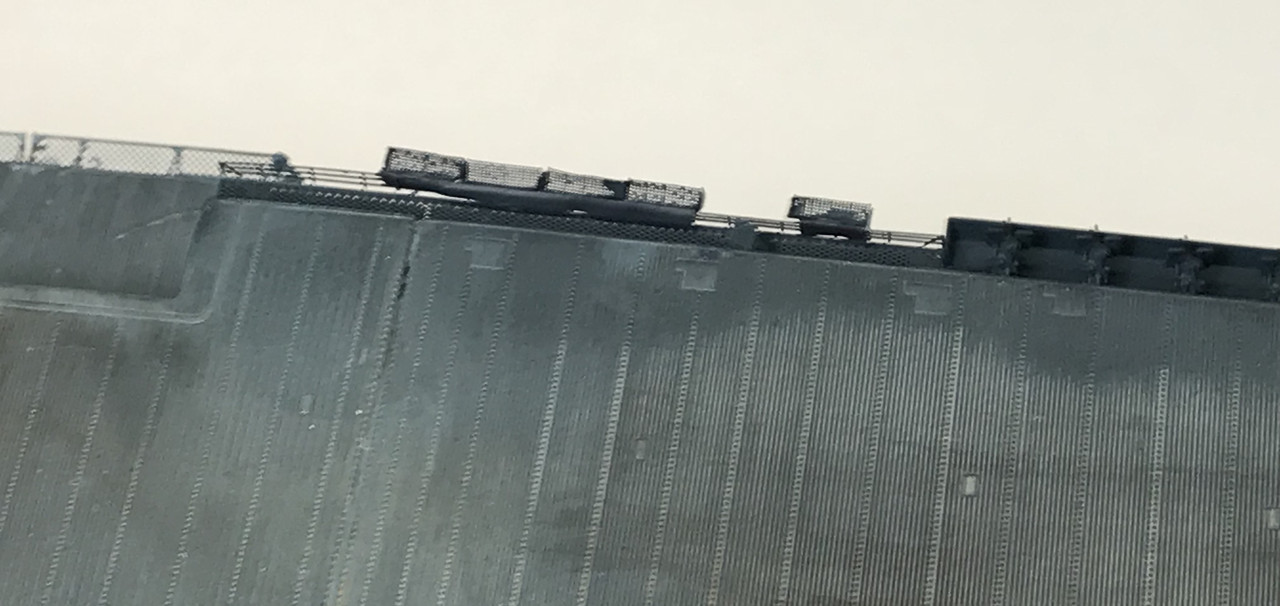
This reverse angle view shows what you can see of the foil. I think it's a decent solution to an annoying problem and, while not prototypical (I actually don't have a clue how the FNBs were hung from the rails) it does not look too obtrusive and at least the port side's FNBs won't fall off. Can't say the same for the starboard's. I would think that the real ship probably had some form of framing behind the baskets that actually tied them to the ship. I can imagine that they would be quite heavy especially if awash in seawater spray.

The last thing I did today was locate a single bar railing and put it on the FD to guard the elevator opening. This railing was pretty messed up and I fiddled with it until I had a stretch of railing that would cover the distance. Again, it's not really pretty, but it works. The other method would have been to drill the deck, use some guitar string rods for stanchions and string it with E-Z Line, or fine copper wire. My first choice worked. In this image you can also see the small rail on the boat deck on the right side of the picture.

I really not happy with the whole FNB exercise. I don't like how they come out when folded and glued since there's a lot of variation between them. And as careful as I tried to be, they're sitting at all kinds of angles and don't look very shipshape. I thought about leaving them off, by AMS set in and I was compelled to do it.

What's left? Putting on some end-of-catwalk railings which are simulated with a chain top string, and then rigging the long-range radio antennas. Finally, putting the planes on deck. A very fine modeler, David Koeleiski, says he glues his with CA. I suppose that's how I'm going to have to do it too.

The plexiglass should be getitng here soon. General Plastics and Rubber's router broke and the part was supposd to arrive yesterday. My work is on the top of list. Regardless, I have a Ford GTA to finish and a half-built structure for the railroad, so I won't get bored waiting.

  • Member since
    March 2012
  • From: Louisville, KY
Posted by Builder 2010 on Monday, June 11, 2018 7:07 PM

Well, dear readers, we are on the home stretch. Speaking of home stretch, how about that Justify? Being a Louisville resident, we're very attentive to great horses. He's going to spend some time at the stables at Churchill Downs. I got the long-range radio antenna rigged, added a few of those little end railings (pain in the butt), added two inclined ladders to go up some minor elevations in the port side catwalk system, weathered the area around the anchors and, finally, started adding the air wing and the little people. The model will be done TOMORROW!

Rigging the antenna towers started by running the horizontal lines (4) from one end to the other. For the aft towers this was just two. For the foreward towers the lines led through the middle one to each end. I simulated insulators with a drop of Bondic. It worked very, very well for this purpose. In fact, I would recommend it. After curing it for a couple of seconds I colored it with a touch of Tamiya clear green. The lines are just CA'd directly to both sides of the towers for the up and down lines and to the outriggers for the athwartships lines. 

For the downrunning lines, I first belayed the lines to the bottom rungs of the towers and then just touched them with thin CA where the two lines touched. As noted before, once the CA hits the E-Z Line, it will cure almost instantly. That's a blessing and a curse. If the lines accidentally touch they will stick there too.

Here's what the front set looks like rigged.

The aft towers came out the same. Whew! This was one of those steps that could go very, very well or very, very badly.

I then attempted to add some rust around the anchors. I'm not happy with the result and will redo it tomorrow. It's too much. I just want a touch of rust where the anchor would naturally bump the ship.

It was time to install the air wing. I decided to just put a dab of thick CA onto the landing gear and set them down. I first laid them all out in a logical arrangement, then started in the front and worked to the back.

I then put the first little person on the deck, the plane starter.

I have to decide how I'm going to arrange the folks. They're all deck people with different colored shirts. With plane ops underway, many of the armorers, fuel guys would be in the catwalks and out of the action. The deck would be full of yellow shirts. I don't have any brass. There's another fret with officers types that I don't have.

Of course I couldn't leave well enough alone and decided to jiggle one of the planes to see how the thick CA is holding. The plane I touched was the last Avenger. One side was not attached, and when I attempted to remove it to add more CA, the landing that was stuck was really stuck and unglued itself from the air plane. So I had to get it off the deck and reglue it to the plane. Then the other gear came off. And lastly, I dropped the darn thing on the floor and one of the horizontal stabs came off and the prop. The more I messed with it the worse it got. Tomorrow I will rebuild it and get it back on the deck...one way or the other.

Lastly, I treated myself to a new lab coat. The last one served well, but it was so gross, my wife insisted that I get a new one. Here's me with it.

  • Member since
    May 2008
  • From: Wyoming Michigan
Posted by ejhammer on Monday, June 11, 2018 7:54 PM

This has been an amazing build to follow. Your trials and tribulations are similar to mine. I sometimes think it would be easier to do my builds on the floor, as I spend a lot of time down there looking for stuff I dropped. Your perseverance and humor has been fun to follow, plus, I picked up a few tricks along the way. The build has turned out very nice. Thanks for posting everything.


PS - nice jacket!


 EJ

Completed - 1/525 Round Two Lindberg repop of T2A tanker done as USS MATTAPONI, USS ESSEX 1/700 Hasegawa Dec 1942, USS Yorktown 1/700 Trumpeter 1943. In The Yards - USS ESSEX 1/700 Hasegawa 1945, USS ESSEX 1/700 Dragon 1944, USS ESSEX 1/700 Trumpeter 1945, USS ESSEX 1/540 Revell (vintage) 1962, USS ESSEX 1/350 Trumpeter 1942, USS ESSEX LHD-2 as commissioned, converted from USS Wasp kit Gallery Models. Plus 35 other plastic and wood ship kits.

  • Member since
    December 2010
  • From: Salem, Oregon
Posted by 1943Mike on Monday, June 11, 2018 10:49 PM

Builder, Your perserverance, skill, and determination to get it right has already served you well on this build. I can only commiserate since we (modelers) - certainly me and I would imagine most of us - have taken three steps forward and two back more than a few times in the building of complex kits.

It's looking very good and I'm always in awe of the amount of work a project like yours requires.

Mike

"Le temps est un grand maître, mais malheureusement, il tue tous ses élèves."

Hector Berlioz

  • Member since
    March 2012
  • From: Louisville, KY
Posted by Builder 2010 on Tuesday, June 12, 2018 5:08 PM

Thanks guys! I think I have one more monster boat build in me: either Gallery or Trumpeter LHD ship (Wasp, Iwo Jima, etc.). After that I really don't want to struggle with micro-PE stuff flying in and out of another dimension.

Had just a few moments in the shop today after exercising and doing errands, so I fixed that semi-wrecked Avenger and got it back on the flight deck. Now I'm not touching any of them. I tipped the boat 90 degrees and nothing fell off so I'm good to go. Tomorrow, I'll add all the folks that makes sense to.

I fixed the landing gear using Bondic. Bondic has an advantage where you can cure it instantly without having to touch it. I find sometimes using accelerator on a toothpick to set the CA, that the CA sticks itself to the toothpick which then pulls it off the work piece and pulls the part out of position. With Bondic, if you can hold it still while shining the light on it, you're good to go.

  • Member since
    May 2008
  • From: Wyoming Michigan
Posted by ejhammer on Wednesday, June 13, 2018 9:33 AM

I too have the Gallery LHD-2 kit. I've collected some stuff to convert her to ESSEX LHD-2.

 Reasoning, She is part of our organization,

 USS ESSEX Association,CV/CVA/CVS-9/LHD-2. 

 I've done the CV, Not done a CVA with a SCB-27A, working on a CVA/CVS SCB-125 (thats when I served on her), and the Gallery Wasp conversion to Essex LHD-2 in the wings waiting it's turn.

 Would love to follow your build of an LHD.


EJ

Assistant Treasurer, USS ESSEX Association

Completed - 1/525 Round Two Lindberg repop of T2A tanker done as USS MATTAPONI, USS ESSEX 1/700 Hasegawa Dec 1942, USS Yorktown 1/700 Trumpeter 1943. In The Yards - USS ESSEX 1/700 Hasegawa 1945, USS ESSEX 1/700 Dragon 1944, USS ESSEX 1/700 Trumpeter 1945, USS ESSEX 1/540 Revell (vintage) 1962, USS ESSEX 1/350 Trumpeter 1942, USS ESSEX LHD-2 as commissioned, converted from USS Wasp kit Gallery Models. Plus 35 other plastic and wood ship kits.

  • Member since
    December 2003
  • From: 37deg 40.13' N 95deg 29.10'W
Posted by scottrc on Wednesday, June 13, 2018 10:34 AM

This has been a very informative build and it turned out very nice.  

  • Member since
    March 2012
  • From: Louisville, KY
Posted by Builder 2010 on Thursday, June 14, 2018 6:12 PM

Well... I'll just have to get that ship and get started. Won't be for awhile since I've got other stuff in the queue. Finished completely yesterday and took the beauty shots. I used the Canon EOS and mulitple exposures for great depth of field followed by image stacking software (ZerenStacker) to blend all those various focal point pictures into a cohesive whole. Here's the lineup.

Here's Essex sitting with another great ship that served in the Pacific. Both ships are configured in Late WW2 dress. I'm still waiting for the Plexiglass to finish up the case. I don't like all that detail being exposed to dust and spiders.

This was a heck of a build. It took about 6 months and thanks to all for following along with the highs and lows. To build Out of Box would have taken a couple of weeks. Once you add all the enhancements you're in for a much longer ride. The results are truly worth the effort.

So what new did I learn on this project. 
  • First of all, I continued to advance my skills in soldering PE and developing more secure ways to fasten stuff onto the model. 

  • I continued building skill in making my own decals. 

  • I further developed fabricating techniques including cutting the island and repositioning the flag bridge without screwing anything up. 

  • I discovered Bondic and found it very successful for things that I hadn't thought of. 

  • I discovered 3D printed tiny guns that saved many hours of work (and frustration). 

  • I also found that using a fine-line Sharpie made reasonable canopy frames for tiny canopies. 

  • And lastly, I learned a ton about the Essex Class in doing the research to make an updated model.

After I cleaned up the shop a bit, I got back to work on the Ford Fairlane GTA which I blog on another thread here at FSM Forum. So thank you all for following along and making terrific comments!

  • Member since
    December 2003
  • From: 37deg 40.13' N 95deg 29.10'W
Posted by scottrc on Friday, June 15, 2018 9:01 AM

Looks wonderful my friend!

Lots a good work done on this build, espeically your metal working.

Hope to see more on the Fairlane build.  That is a beautiful car.

Now I need to get off my duff and start the Lexington.  Like the Essex, everything is blue on the ship.  

Scott

  • Member since
    January 2015
Posted by PFJN on Friday, June 15, 2018 12:19 PM

Your build looks great.  Expecially the aircraft.  All the effort you put into them really paid off.Smile

1st Group BuildSP

  • Member since
    March 2012
  • From: Louisville, KY
Posted by Builder 2010 on Friday, June 15, 2018 5:50 PM

Thanks guys! The only problem with the "all navy blue" scheme is that it hides the details you work so hard to create (it also hides all the screwups). Haze gray is much more revealing. Are you going to post the Lex build? If so, I'll be watching.

  • Member since
    March 2012
  • From: Louisville, KY
Posted by Builder 2010 on Wednesday, June 20, 2018 6:00 PM

Yesterday I picked up the cut Plexiglass and today built the case. While the case was setting I attempted to add some call sign signal flags. "Attempt" is the action word here. I aborted the plan after trying to fit the first flag and didn't like how it was turning out.

I found signal flags on the Internet, imported the JPG into Corel PhotoPaint and then scale them to about 1/8" high matching the flag decals that were on my Missouri. I printed them out on white decal paper in multiple sets since I was planning on putting the same flags on both sides of the island.

I placed the decals onto aluminum foil which is what I was told to do so it would give them some body and enable you to put some furl in them. 

But, as I tried to put the first flag in place on the port side signal halyards it wasn't going well. It didn't fold in the center and I was fussing with it too much. My hand was bumping into things and I was afraid that this minor detail addition could lead to big troubles so I pulled off the flag and quit the process. Sometimes you have to know when to quit.

The Plexiglass was cut on a router so it didn't have obvious saw marks, but it did have edge chipping which didn't make me happy. I have a sanding fixture that I built to sand square edges on balsa sheeting to make wing skins on large scale RC planes. I put this to use to finish up the edges. You're supposed to sand with the length so the groove trap the solvent cement by capillary action and don't leak out.

You tape the box together and then run a bead of liquid acrylic solvent (Methyl Chloride and some kind of alcohol) using a squeeze bottle with a very narrow metal nozzle. 

You're supposed to remove the adhesive poly wrap off all the surfaces accept the one resting on the work table. I had a problem applying the solvent. The darn bottle was leaking at the screw top and every time I tipped it over to apply glue to the seams drops were pouring out on the interior surface of the top. It was a mess. I let them dry without touching them so they're visible, but not when looking at the case from the side.

I also got leakage around the masking tape and this was much more noticeable, and made a mess. After it dried I worked with my multi-grit finishing system and got them so they're less obvious. They're still there, but don't smack you in the face.

I was very, very pleased to see that all my dimensions worked and the case both fit the base plank AND cleared all the ship's extenditures. (word?)

Unlike the Missouri case, where I used 1/8" material (a bit flimsy), I used 3/16" plexiglass and it's much sturdier. The case is good enough for what it's intended to do which is keep the model in a pristine condition. I cut the opening in the back for the LED light power cord so it can be illuminated with the cover on. Here it is all protected with the Missouri. I feel much better knowing it's under cover and I can't bump into it and break something I can't fix.

Man! Was I lucky in my sizing of the base. Another inch and it wouldn't have fit the shelving and that's the only good place to display it in the house. While I was testing the case fit in the basement, I then got worried that it was too high. It measured 11-1/2", and I got the tape and went upstairs to measure the space. It was 13" so I dodged another bullet. I set up the base and case dimensions just to fit the model, not fit the space. So it was just luck that it worked out okay. I could have made the case lower, but I was uncomfortable how close the case top came to the Missouri's radar and didn't want that to happen again. When I measured all the case dimensions the island was not yet built so I had to guess. Better to have a littlle too much clearance than not enough. You get lucky sometimes.

  • Member since
    December 2010
  • From: Salem, Oregon
Posted by 1943Mike on Wednesday, June 20, 2018 11:54 PM

Wonderful work! It's supercalifragilisticexpialidocious. Just brimming with the fine building that you've let us watch for a while now.

I look forward to whatever your next project is.

Mike

"Le temps est un grand maître, mais malheureusement, il tue tous ses élèves."

Hector Berlioz

  • Member since
    April 2003
  • From: USA
Posted by keavdog on Thursday, June 21, 2018 3:18 AM

I know nothing about ship models, but that is a really nice looking model.  Well done!

Thanks,

John

  • Member since
    July 2013
Posted by steve5 on Thursday, June 21, 2018 3:47 AM

incredible work builder , I can't use that many letter's , so what mike said .


JOIN OUR COMMUNITY!

Our community is FREE to join. To participate you must either login or register for an account.

SEARCH FORUMS
FREE NEWSLETTER
By signing up you may also receive reader surveys and occasional special offers. We do not sell, rent or trade our email lists. View our Privacy Policy.