SEARCH FINESCALE.COM

Enter keywords or a search phrase below:

The building of the HMS Beagle

8069 views
46 replies
1 rating 2 rating 3 rating 4 rating 5 rating
  • Member since
    March 2020
  • From: South Florida
The building of the HMS Beagle
Posted by Having-fun on Monday, February 20, 2023 7:03 PM


I received today the box containing Occre HMS Beagle, I opened the package and it looks like it that there are no missing parts, but, is to early to tell, in any case it comes with an order form to order any part that may be missing.


I looked at the documentation and they look pretty good, a lot better than the one that comes with Artesania Latrine. Part of the documentation is a listing of Youtube films ( over 140 of them ) that supposedly goes step by step on how to build the model. The actual paper instructions has a lot of clear photos and what looks like a very clear schematic on how to do the rigging. There is minimal written instructions, but, with all the photos and Youtube films, there may not be a need for written instructions.


I will try to keep every one up to day with the construction.


Until next time.


Joe

Open box

PD: Started on February 20 2023

  • Member since
    December 2022
  • From: Canada
Posted by Tcoat on Monday, February 20, 2023 7:12 PM

Very cool and I must follow. I have never been brave enough to tackle one of these before.

fox
  • Member since
    January 2007
  • From: Narvon, Pa.
Posted by fox on Tuesday, February 21, 2023 10:10 PM

I'll be hanging in here too Joe. Looking forward to seeing this build.

Tcoat, If you've had any experience with working with wood, I think you'd have no problems building one of these kits. From what I've seen of your building skills I'd say "Try it, you'll like it". Wink Start small and work your way up.

Stay Safe.

Jim Captain

 Main WIP: 

   On the Bench: Artesania Latina  (aka) Artists in the Latrine 1/75 Bluenose II

I keep hitting "escape", but I'm still here.

  • Member since
    March 2020
  • From: South Florida
Posted by Having-fun on Wednesday, February 22, 2023 5:56 PM


Hello!

I have attached the decks and also plank them, the ship is coming along fine thanks to the Youtube step by step instructions together with the printer photos, when together makes it relatively easy to follow and do what needs to be done. The written instructions are simply an overview, if there were no other Youtube and or photos and diagrams, it would be very difficult to build this model.

So far the instructions that came with this model are 90 to 95% helpful, better than those that come with some of the plastic models.

Next is to prepare the hull to start the planking.

Until them

Joe

Top decks

  • Member since
    January 2010
Posted by rob44 on Wednesday, February 22, 2023 6:09 PM

You may want to visit and join the Ships of Scale site.

https://shipsofscale.com/sosforums/

The have multiple build logs and sections of helpful tutorials on things such as planking and rigging.

  • Member since
    March 2020
  • From: South Florida
Posted by Having-fun on Thursday, February 23, 2023 6:26 AM

Good site, thanks, I have saved the link.

Joe

  • Member since
    August 2021
Posted by lurch on Thursday, February 23, 2023 11:45 AM

I will be checking that out as well. Thanks for the info.

  • Member since
    November 2005
  • From: Formerly Bryan, now Arlington, Texas
Posted by CapnMac82 on Friday, February 24, 2023 1:55 PM

Having-fun
Occre

Occre has a pretty good reputaion out there in the wood-building community.

Because of the curves in the bow. you may want to get some softer balsa or some closed-cell foam to fill them in for laying the planks over.

You will need to taper the forward end of the planks to get the geometry right.

But both of those are likely covered in the videos.

  • Member since
    September 2012
Posted by GMorrison on Friday, February 24, 2023 3:35 PM

Theres a product I like called "Balsa-Foam". It's a bit spendy but nice to work with, its extruded polystyrene.

Blick sells it. Amazon too.


Bill

 Modeling is an excuse to buy books.


  • Member since
    March 2020
  • From: South Florida
Posted by Having-fun on Saturday, February 25, 2023 2:34 PM


Here is today's update

I have started to add the first level of planking, yesterday I spend some time bending the planks to fit the hull. The instructions tell you to put the planks over the canon windows, then cut them open, I decided that is is easier to simply cut the planks to fit between the windows so it will be easier and less material to cut. I am using crazy glue for the first plank then wood glue for the rest as per instructions. So far so good, Following is the photo showing the progress made.

Until next time

Joe

first plank

  • Member since
    March 2020
  • From: South Florida
Posted by Having-fun on Sunday, March 12, 2023 4:40 PM


Hot from the presses! Another update:


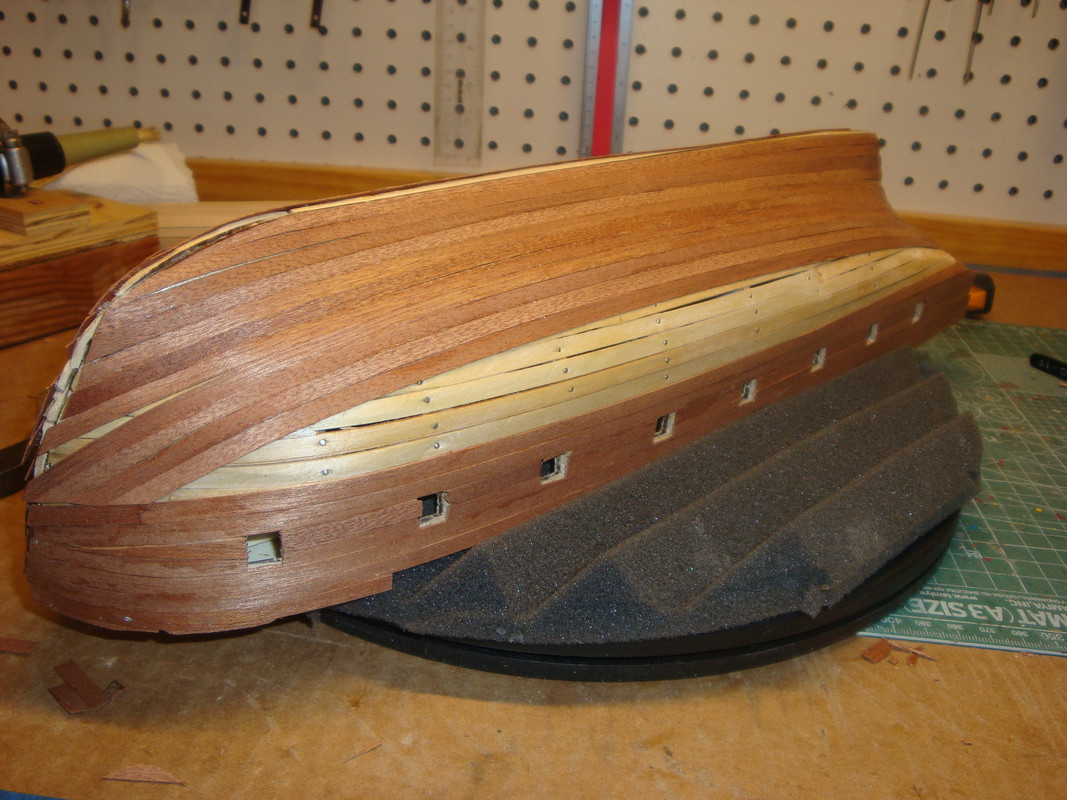
I finished installing the first plank level and I am very advanced on the second level, ( see photo) I continue to follow the instructions provided by Occre and their You Tube short videos. These videos show, with a lot of details, what and how the steps are to be done, I have learned a lot on the proper way and tricks in laying out the planks.


I do have a question regarding the glue, Occre indicates that contact cement is to be used to put the second course of planking, so, I went ahead and used it, but, I have run into a problem. The instructions that comes with the cement indicates that the planks are to be "painted" with the cement and so the side of the hull, and to wait  about 15 minutes, then start mating the items, and for the most part this work fine, but for some reason some areas do not stay glued, they separate the moment I release the pression of the part.


Thinking that I may not be putting sufficient glue on both parts, the second time I made sure that they both had plenty of glue, and instead of waiting 15 minutes, I waited 10 minutes. This time it worked better, but I still had several areas were the glue will not hold. Any ideas why?


Well until next time


Joe

second plank


  • Member since
    March 2020
  • From: South Florida
Posted by Having-fun on Friday, March 17, 2023 12:53 PM


Hello

I have completed the planking on the ship, I also added the "strakes" and the "chaffing boards" to both sides of the hull ( first photo ). I also added the decorations inside the hull as per instructions ( second photo ) Next step is to do some painting with clear polyurethane to seal and protect the outside of the hull.

Once the paint is dry, the next step is to mask the null as per instruction and add the black and white paint.

The model is coming up nice, the fact that the instructions are good allows me to continue with the project and to concentrate in making it as good as possible.

Until next time

Joe.

Ship side

ship top

  • Member since
    March 2020
  • From: South Florida
Posted by Having-fun on Tuesday, March 21, 2023 12:26 PM


Me again!

Well I have finished painting the hull, I also started to add deck items including the anchor posts and some of the railings. It is coming along nicely, At this rate I may finish the model in about 2 months.

See photo of the progress.

Joe.

ship progress

  • Member since
    March 2020
  • From: South Florida
Posted by Having-fun on Saturday, April 1, 2023 6:13 PM


I have added several small things to the boat, including the front decorations which includes the installation of a wire detail. Right now I have completed the installation of the dead eyes on one side of the ship, tomorrow I will try to complete the other size, the progress is slow since everything has to be manufacture. Well I can not complaint, after all, I wanted to build wooden ships! (Be careful what you wish for )

Next is a photo of the progress, enjoy!

Joe

Deadeyes

fox
  • Member since
    January 2007
  • From: Narvon, Pa.
Posted by fox on Saturday, April 1, 2023 9:39 PM

Joe, you're doing great work on the ship! Yes You'll have a 1st rate ship if you keep going this way.

Stay Safe.

Jim Captain

 Main WIP: 

   On the Bench: Artesania Latina  (aka) Artists in the Latrine 1/75 Bluenose II

I keep hitting "escape", but I'm still here.

  • Member since
    October 2019
  • From: New Braunfels, Texas
Posted by Tanker-Builder on Sunday, April 2, 2023 7:36 AM

Yo Joe!

 Thassa Nicea Boat! My Goodness, did you say you had never worked in wood before? Looking at these pics I have to say you fibbed to us! A beautiful Job so far. Wait til you get to the the rigging though!

  • Member since
    October 2019
  • From: New Braunfels, Texas
Posted by Tanker-Builder on Sunday, April 2, 2023 7:39 AM

Hi Joe! On this subject!

 I have had that problem crop up sometimes. Contact Cement is like Super Glue in that regard. Sometimes it has no torsional strength!. Then Epoxy is my choice or actual ship nails for model ships.

  • Member since
    March 2020
  • From: South Florida
Posted by Having-fun on Sunday, April 2, 2023 10:58 AM

Tanker-Builder

Yo Joe!

 Thassa Nicea Boat! My Goodness, did you say you had never worked in wood before? Looking at these pics I have to say you fibbed to us! A beautiful Job so far. Wait til you get to the the rigging though!


This is my third wooden boat, I first build a Dapper Tom, which is supposed to be for beguines. and it would have been a relatively easy build if the instructions would have been better, then I did La Pinta by Artesania Latina, were I encounter same problem with the instructions. I have build logs for both of these, finally I am doing this HMS Beagle by Occre, although it is a more difficult vessel to build, the instructions that come with it are very good which makes the construction a pleasure, they are not perfect, but, a lot better than AL of the other one. I also have build several plastic ships including the Le Solei Royal by Heller.


With every build I am learning more and more on how to build these type of ships, working my way up to the more complex warships of the era. Thanks for your comments.


Joe


  • Member since
    January 2011
Posted by Bugatti Fan on Wednesday, April 12, 2023 2:57 PM

Looking good so far.

At least it will probably be an accurate model, unlike a certain plastic Beagle that used the same manufacturer's Bounty hull.

  • Member since
    March 2020
  • From: South Florida
Posted by Having-fun on Sunday, April 16, 2023 10:49 AM

Bugatti Fan

Looking good so far.

At least it will probably be an accurate model, unlike a certain plastic Beagle that used the same manufacturer's Bounty hull.


Well, I am trying to make it as accurate as possible withing the kit and my skills ( rather limited) limitations.


Attached are 2 photos of the front showing the progress so far, it is a slow progress since just about all the parts has to be manufacture, but, I guess that is part of the fun of building models.


It looks that this model will be the most accurate I have build since I started building sailing ships.


enjoy.


Joe


side of prow

front

  • Member since
    July 2015
Posted by MR TOM SCHRY on Sunday, April 16, 2023 11:35 AM

Stunning work!  That deck is just outstanding.  Can't wait to see more progress.

tjs

TJS

fox
  • Member since
    January 2007
  • From: Narvon, Pa.
Posted by fox on Sunday, April 16, 2023 2:53 PM

Looking great Joe! Yes

Stay Safe.

Jim Captain

 Main WIP: 

   On the Bench: Artesania Latina  (aka) Artists in the Latrine 1/75 Bluenose II

I keep hitting "escape", but I'm still here.

  • Member since
    March 2020
  • From: South Florida
Posted by Having-fun on Thursday, April 20, 2023 2:05 PM


Well, here is another report. I have installed most of the "appliances" on the deck of the ship, there are some more to do, but, I am getting there. So far it is coming along nicely, but I have discovered that building this ship can not be rush, I have to look at the You Tube instructions 2 or 3 times and look at the printed diagrams to make sure there is not mistakes, It is very easy to make mistakes with this build because of its complexity. Well here is the photo with the latest progress made:


Top of deck

Joe

  • Member since
    April 2023
Posted by Tonyfromoz on Wednesday, April 26, 2023 7:18 AM

This is looking great. Really enjoying watching the progress of the Beagle.

And your obvious skill and care.


fox
  • Member since
    January 2007
  • From: Narvon, Pa.
Posted by fox on Wednesday, April 26, 2023 4:01 PM

Very nice work Joe! Toast

Stay Safe.

Jim Captain

 Main WIP: 

   On the Bench: Artesania Latina  (aka) Artists in the Latrine 1/75 Bluenose II

I keep hitting "escape", but I'm still here.

  • Member since
    March 2020
  • From: South Florida
Posted by Having-fun on Thursday, May 4, 2023 9:52 PM


Well, it is time for another update.


I have added more items to the deck, then I started doing the life boats, they look to be an easy assembly, I found out very quickly how much of a pain is doing the planking on the boat, just to do the first one took me over a week. The reason being that the boat is very small but the plank has to bend in at least 2 points and there is not way to clamp them, so you have to hold the plank with you fingers until the glue sets. I followed the instructions and used crazy glue instead of wood glue to speed the construction, and it was still a pain, I got crazy glue all over my fingers in the process.


The attached photo shows a completed boat together with the other 3 still waiting to be plank. If I were to be a drinking man, I probably would have to get very drunk to be able to finish these boats, but, I do not drink, so I will have to suffer trough it. LOL


Joe

Life boats


  • Member since
    May 2009
  • From: Poland
Posted by Pawel on Friday, May 5, 2023 3:55 AM

Hello!

I like your ship a lot, looks very good to me. One thing I'm not so sure about are the belaying pins - they look overscale to me. It might also look better if you took at least some of the shine away from the brass parts - but I guess if you wait like 10 years it will take care of itself... I'm not sure but I think I read about moistening the brass parts with vinegar or something like that to corrode them slightly to make them look more realistic... don't try it on the model first, that's for sure.

I read about your problems with glue - did you try applying white glue on the planks and then using superglue/CA just in tiny spots, kinda "instead of nails"? That worked great for me on my wooden ship, CA sets much faster this way.

Good luck with your build and have a nice day

Paweł

All comments and critique welcomed. Thanks for your honest opinions!

www.vietnam.net.pl

  • Member since
    October 2019
  • From: New Braunfels, Texas
Posted by Tanker-Builder on Friday, May 5, 2023 5:56 AM

Hi!

       Nice looking ship! Good Work! BUT! I do have to point ot one thing and I hope you won't mind. You have Belaying Pins that are way out of scale. The size of those pins in scale are not as big as baseball bats.

       Belaying pins are to secure or belay working lines for the sails.They would have to be big enough to do that but also allow one handed release in an emergency, similiar to a Quick release tow Strap on a cargo.

       Surely you have heard the term"Belay that for now" That applies to any working line that is loose! Other than the pins she is looking good. I bet you got the pins in the OCCRE kit, right? That's your problem, get your scale and call Bluejacket Shipcrafters in Maine and they will sell you Pins that are in scale.

       I hope you don't thing I am downing your model or work. In  OCCRE and MAMOLI Kits this happens more times than I can remember. I had one where the pins were so small they would fall through the holes in the pinrails!


  • Member since
    March 2020
  • From: South Florida
Posted by Having-fun on Friday, May 5, 2023 1:22 PM

I most do appreciate your advises and critique, being a novice and not having any knowledgeable of the ships of the era, you guys comments are welcome.

I do agreed that the belaying pins appears to big for the ship, but, those are the ones that came with the kit, and, not knowing what size they are supposed to be and even if I knew, I would not know were I could buy a set of the proper size, I have little choice but to use them. I do believe that there are several items that are either to big or are of a incorrect scale for the size of the ship, for example the ladders, I do not think that the ladders are correct, but I build them following the instructions.

As for the glue, I only used crazy glue because that was what the instruction called for. I personally do not like to use it, but, due to fact that is almost impossible to clamp the planks, I did not see another choice but to use crazy glue.

Again, thanks for the comments, I always welcome them.

Until next time

Joe

  • Member since
    March 2020
  • From: South Florida
Posted by Having-fun on Thursday, May 18, 2023 4:36 PM


Well, I am back with an updated report:


I have finished building the 4 lifeboats, they were a chore to build due to their size and not being able to clamp anything. Attached is a photo of the completed lifeboats.


ship with lifeboats


I will not mount them in the proper location, which is what the instruction tells you to do, because, I believe that if I were to do so I will have a problem later when is time to run the shroud lines. Here is another photo of the progress.


lboats


Joe


JOIN OUR COMMUNITY!

Our community is FREE to join. To participate you must either login or register for an account.

SEARCH FORUMS
FREE NEWSLETTER
By signing up you may also receive reader surveys and occasional special offers. We do not sell, rent or trade our email lists. View our Privacy Policy.