SEARCH FINESCALE.COM

Enter keywords or a search phrase below:

Lindberg HMS Bounty - WIP

27395 views
34 replies
1 rating 2 rating 3 rating 4 rating 5 rating
  • Member since
    May 2010
  • From: Berwick, La.
Lindberg HMS Bounty - WIP
Posted by Tnonk on Saturday, August 6, 2011 10:42 PM

I have to admit, I wasn't really into the smaller scale sailing ships. 

I prefer  1/130 like my Lindberg Jolly Roger / La Flore or 1/96 Revell Constitution.  The smaller scales didn't appeal to me, partially for the fact that I've lost enough in the eyesight andeahand departments to make the little ships more of a challenge.

However, I began corresponding with Rob & saw his small scale HMS Bounty and I was looking for a ship to build just to have fun with.  I had a Lindberg Bounty in the stash so I said, What the hell and dove in.

This started off as a Just for fun build and it has been one of my most enjoyable builds in quite a while.  It started getting a little more complicated than I thought, but it's all good.

I used this version of the Pyro, Lifelike, Lindberg vintage kit.

Started by masking the waterline and prep work on the sprue on some parts. I used a flat black primer for the deck to bring out some deatil.

Painted the deck tan and lightly sanded to bring out the black on the raised lines.

Added the black strips to the hull and masked off the water line to prep for the hull paint.

Unfortunately, in my haste to just have fun & do it, I didn't wash the parts very well - just rinsed them actually.  I guess the result was predictable.

An easy fix, but an avoidable mistake.

C'est la vie, it's a fun build anyway. A little white touched it up just fine.


  • Member since
    May 2010
  • From: Berwick, La.
Posted by Tnonk on Saturday, August 6, 2011 11:00 PM

I'm curious to what scale this Bounty actually is.  I've read that it was around a 1/200 but I really don't know.

I did a little scratch work on the wheel, not great but this scale is a little more challenging than what I'm used to.

Trimmed it up and added some steerage ropes for the tiller.  I drilled the deck and glued in some small copper wire eyebolts

Worked on the wench (?) and added some anchor rope through the deck.  Also added a couple ropes on copper eyes to lash the lifeboat down with.

I also decided early on not to have the 'molded billowing sails' on my ship.  I cut off the sails and trimmed down the spars.

I also did some work on modifying the nonexisting pin rails.  I used the smallest styrene stock I had.  Its a little overscale but I can live with it.  I thought about using wire but I decided against it.

I did some work and rigged up the lifeboat also.


  • Member since
    May 2010
  • From: Berwick, La.
Posted by Tnonk on Saturday, August 6, 2011 11:19 PM

I used eyes to add ropes to the cannons.  I tied one line for each cannon before I closed up the hull. I figured correctly it was going to be tricky tying off those lines once the cannons were installed.

I used Mr. Surfacer 1000 to close up the gap on the join.

Test fit of the oversized pinrail.  Most of the pinrail will be hidden by the ropes tied off to it. Plus the large size will give me a better shot at being able to tie off to them anyway.

I mounted a few of my copper eyes on the bow (Stem & catheads)for the bowsprit rigging and added a lrger piece for a gammoning (?) hole.  I decided early on not to fix the bows mishappen shape.  I know it's not right but it didn't really offend me so I left it like it was.

I also used copper eyes on the bowsprit to use to run the forestay.

I finished up the lifeboat with some cut down oars from my Jolly Roger & a little thread.


  • Member since
    May 2010
  • From: Berwick, La.
Posted by Tnonk on Saturday, August 6, 2011 11:37 PM

I installed the lifeboat & lashed it down.  Installed the pinrails and ran the anchor cables.  I drilled a hole through the forward bulkhead of the ship for a hawse hole and mounted an eye on each side of the bow.

I lashed black thread around the bowsprit and through the lower eye of the copper eyes to help hold the tension of the forestays. 

Deck shot showing the cannons mounted and rigged.  I also have the bowsprit mounted.

Scratch built bilge pump.  Not great but its passable.

Bilge Pump painted and mounted.

Thanks for looking.  More tomorrow.


Adrian


  • Member since
    May 2008
  • From: UK
Posted by Billyboy on Monday, August 8, 2011 2:44 AM

That is really neat work- and greatly enhances this simple kit. Are you using proprietary etched eyes, or winding them yourself?

Will

  • Member since
    May 2010
  • From: Berwick, La.
Posted by Tnonk on Monday, August 8, 2011 11:30 PM

Thanks Will, I appreciate it.  You are right, a little tweaking goes a long way on this kit.

I'm making my own eyes out of small copper wire and twisting them on my needle nose tweezers.  I'm also using the double twisted ones like I have mounted on the bow as 'rigging' blocks for the running rigging that I'll be doing.


Just a few pics tonight to keep things rolling a bit.  I haven't worked on her since Saturday.


First up is the figurehead painted.  Lindberg didn't give much or anything in the color scheme so I just winged it as I've done with a few other things & colors.

I added styrene deadeye supports

Opposite side on the deadeyes supports.  The deadeyes are the smallest and next smallest from the Jolly Roger kit.  According to the rigging layout on my Revell kit, these deadeyes seem to be nearly exactly the right size.

I drilled out the deadeye supports for the deadeyes.  The Revell Kit calls for a 5 deadeye setup on the fore & main mast but all I had available was the 4's from the JR.

Last shot tonight is the spars I have completed so far.  Clean up, sanded painted and foot-ropes  added.


Thanks for looking.  More tomorrow or so.


Adrian


  • Member since
    September 2005
  • From: Illinois: Hive of Scum and Villany
Posted by Sprue-ce Goose on Monday, August 8, 2011 11:36 PM

Really nice work !

The kit is going to be an eye-catcher when complete.

  • Member since
    May 2008
  • From: UK
Posted by Billyboy on Tuesday, August 9, 2011 2:49 AM

Comin along nicely.

I do wonder whether thread will work that well for the footropes?

It is very difficult to get it to 'sag' effectively (same is true of ratlines in this scale). I have used very thin annealed wire in the past with some degree of success. You can tease it to shape and it stays that way. I either blacken it beforehand chemically or simply pull it through a tip of a black permanent ink pen which was pressed down on a small block of wood.

Will

  • Member since
    March 2009
  • From: brisbane australia
Posted by surfsup on Tuesday, August 9, 2011 4:30 AM

I love what you have done so far. Very nice work.....Cheers mark

If i was your wife, i'd poison your tea! If Iwas your husband, I would drink it! WINSTON CHURCHILL

  • Member since
    July 2009
  • From: Jacksonville, Florida
Posted by Vagabond_Astronomer on Tuesday, August 9, 2011 5:56 PM

This is a great little build! I agree; a few tweaks, a world of improvement.

I've been looking at that kit as a basis for a model of the brig HMS Ontario. Seriously, look at the hulls; very similar.

But, friend, great work (and sorry it took so long to comment; busy and sick).


RL

"I have loved the stars too dearly to be fearful of the night..."
  • Member since
    May 2010
  • From: Berwick, La.
Posted by Tnonk on Tuesday, August 9, 2011 9:11 PM

Thanks for the kind words Sprue-ce, I appreciate it.

Thanks Will, I was concerned with the hang of the foot-ropes myself.  I have those glued and trimmed now.  I plan on staking each one out on a sheet of waxed-papered over balsa board & try to stiffen them up with a bit of white glue to see how that works out.  I have another set to do for the main mast, I'll try a wire set-up on them to see how it looks.

Thanks Mark, i appreciate it.

Thanks Rob, I appreciate it. I really like this little kit, it turned (or is turning) out to be a jewel of a kit for me.  I certainly wouldn't mind doing another myself down the road - an HMS Ontario sounds interesting - might redo the bow on her tho.  No worries on the comments.


First pic up tonight shows after I drilled out the top of each deadeye and mounted them to the supports.  I also drilled out the hull beneath the supports to add in an extra touch with some wire.

I added some bits of wire from the undersides of the deadeye supports through the hull.  Notice that I left the last rung on the JR deadeyes.  Made it a bit easier to glue them up and trim it out with it still together.  I tried it seperately at first and it didn't want to work as well.

A shot of all of the wires in place and the deadeyes trimmed down.  I cut one of the eyes off and had to replace the deadeye on the mizzen mast.

My original intention on rigging the Bounty was to use 3 different sizes of both black thread for standing rigging and brown thread for running rigging.  With that in mind I drilled out the top ends of the deadeyes to accept the larger diameter thread.  I know it's to to spec but ANYTHING is better than the ones that come in the kit.

Well ALMOST anything.  After running the large threads for the shrouds and fighting it every single step of the way, it came out something  like this.

I wasn't happy with it but I decided to finish it out.  It simply didn't work.  After a couple of days of frustration, fixing & re-fixing it, I concluded that it was just to large for what I was trying to do.  I wanted to run a needle thru each shroud for the ratlines with a small thread but knew that wouldn't work either.

I cut it all off and started over with a smaller diameter thread.

This is my first 'real' rigging job & I figured I have a stumble or two trying to work it out.

Thanks for looking, I'll have more pics to follow.


Adrian


  • Member since
    July 2009
  • From: Jacksonville, Florida
Posted by Vagabond_Astronomer on Tuesday, August 9, 2011 9:45 PM

Adrian,

Ratlines are a chore in scales smaller than 1/120; that's why my modified McCaffery rig is set up the way it is. Once you get past 1/200, I find that wire makes better rigging, if non-traditional. Still, I am blown away by the work you've done, especially on the deadeyes and chainwales. 

Also, my estimates are that this old kit is around 1/180, close if not the same as the Airfix Victory.

"I have loved the stars too dearly to be fearful of the night..."
  • Member since
    May 2010
  • From: Berwick, La.
Posted by Tnonk on Wednesday, August 10, 2011 9:25 PM

Thanks for the comment  Rob, I appreciate it.

I considered going with wire after the large thread wouldn't work but I wasn't able to get the contrast I wanted, the several sizes of wire I have are either much to small in relation to the other rigging I am doing - or it is too large and hard to manipulate into where it need to go.  I tried a couple different sizes then went back to thread.


The first pic of the night shows Bounty with her masts stepped and glued.

While the masts set, I started on one of the mast tops.  I wanted to tweak the tops just a bit to draw some attention to them.  Because of the sails being removed, I knew it was going to be a bit bare up top.

This pic shows the parts involved in each top.  The rail is a scrap piece from when I cut up the JR's ratlines.  The wire 'blocks' still have their tails, I leave them on because it makes them easier to handle.

The blocks are roped on beneath the top.  These will be used for the running rigging lift lines.

Railing, deadeyes and support lines added.

Nearly complete fore mast top.


  • Member since
    May 2010
  • From: Berwick, La.
Posted by Tnonk on Wednesday, August 10, 2011 9:44 PM

I rigged the bowsprit next.

As I mentioned on an earlier post, I am going to follow the Revell rigging for the most part.  Revell shows a single spar on the bowsprit so I went with that instead of the two on the Lindberg sheet.

Overhead shot -

Started rigging the shrouds again.  This time I am using a smaller diameter thread than my first try.  It's better diameter wise but a little stiffer to wok with.

Foremast shrouds (is that the correct term BTW?) rigged.

All three masts rigged - with the exception of the deadeye on the mizzen that was cut off.  Forgot to fix it and got the point where I had to fix it to continue. Don't you just hate it when that happens?

Thanks for looking.

More tomorrow or so.


Adrian

  • Member since
    July 2009
  • From: Jacksonville, Florida
Posted by Vagabond_Astronomer on Wednesday, August 10, 2011 10:26 PM

Yup. Shrouds are the true standing rigging. Ratlines cross them, converting them into ladders. Looking forward to the finished product.

"I have loved the stars too dearly to be fearful of the night..."
  • Member since
    May 2010
  • From: Berwick, La.
Posted by Tnonk on Thursday, August 11, 2011 11:45 PM

Thanks Rob, I figured as much.

Couple of pics for tonight -

I added two eyes to the bowsprit for the pole stay and for topgallent stay.

I'm lucky the old Revell instructions tell you what all the standing rigging lines are. (Except for the shrouds/ratlines - which is a bit odd)

I used heavy thread to run the forestay.  I made a rigging 'block' (?) out of a couple of brown eyes from the spares box (from the Revell 1/96 Connie kit) and some tan thread.  It's a little bit out of scale but  think it looks better than a single smaller thread.

I ran the rest of the stays for the fore mast and trimmed them up.

Thanks for looking, More tomorrow or so.


Adrian


  • Member since
    September 2003
  • From: AandF in the Badger State
Posted by checkmateking02 on Friday, August 12, 2011 12:06 AM

Outstanding work!  I didn't realize how small the ship was until the pictures with your thumb.  You're doing really well with all the rigging.


  • Member since
    September 2005
  • From: Illinois: Hive of Scum and Villany
Posted by Sprue-ce Goose on Friday, August 12, 2011 11:08 AM

checkmateking02

Outstanding work!  I didn't realize how small the ship was until the pictures with your thumb.  You're doing really well with all the rigging.

Indeed, outstanding !

Give me hope for that old Life Like Charles W. Morgan whaler in my stash.

  • Member since
    February 2007
  • From: Brunswick, Ohio
Posted by Buckeye on Friday, August 12, 2011 11:31 AM

Awesome build there.Yes

  • Member since
    September 2005
  • From: Groton, CT
Posted by warshipguy on Saturday, August 13, 2011 2:39 AM

It's amazing just what a good modeler can accomplish with a toy of a kit. Rob is proving it with his Constitution and Shannon, and Tnonk is doing the same with his Bounty!

Bill

  • Member since
    May 2010
  • From: Berwick, La.
Posted by Tnonk on Saturday, August 13, 2011 10:39 PM

Thanks for all the comments guy's, I appreciate it.

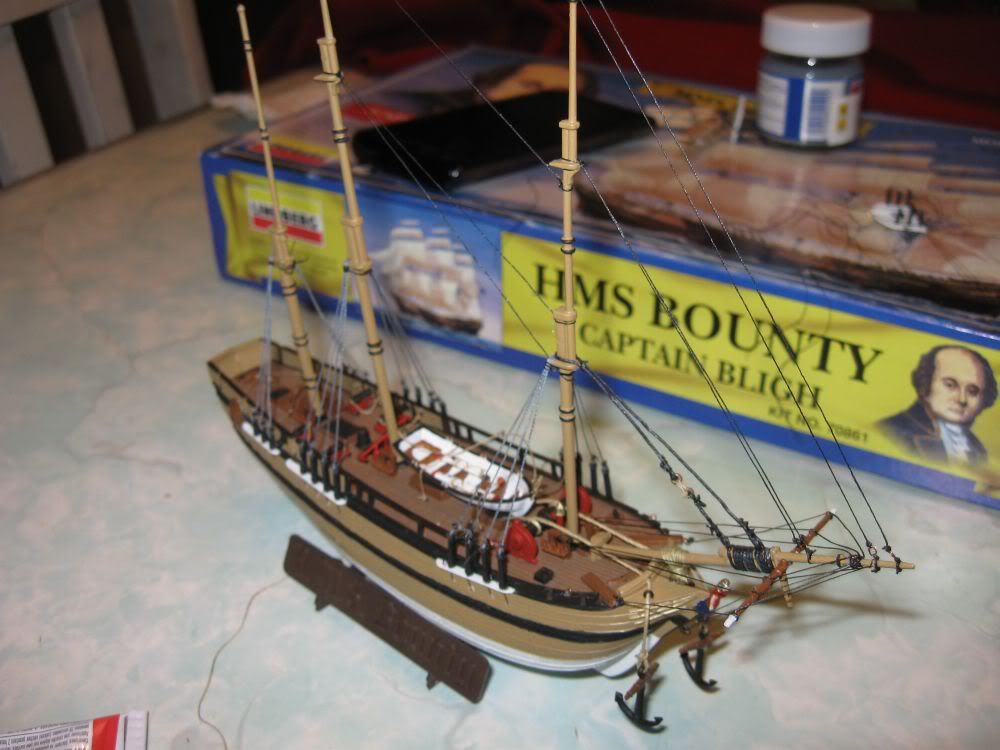
@ checkmateking02 - This is a small ship for sure.  It's the smallest sailing ship I've built since slapping together the 'Half Moon' in the early 70's.  I think Rob is dead on when he said it's 1/180 scale.  I had guessed about a 1/200 myself.  The hull measures a little under 6 1/2".

@ Spru-ce Goose - Thanks!  The C.W.Morgan is on my list also.  I almost picked up the Academy New Bedford Whaler, but I'm holding out for an actual Charles W. Morgan.  My wife says why not just buy the New Bedford Whaler if it's the same ship.  Ahhh...she just doesn't understand, so I told her it's because of the nameplate.  She got that.

@ Buckeye - Thanks! Much appreciated!  Don't think my meager skills have every garnered an awesome description. C'est Bon!

@ warshipguy - Thanks Bill! You know, when I first got this little Lindberg kit, I felt the same way - it's a toy.  I originally got it in a package deal with a Revell kit and tried to sell it on ebay afterwards because I just didn't want it.  Like another member said on another thread - 'you can only build so many..' Bounty's.  But.. I was looking for a 'fun build' and said why not.

Unfortunately (or fortunately for the Bounty) my AMS kicked in pretty quick and just couldn't let a few things slide.  I didn't feel like correcting the bow - it's a fun build right? But those molded sails had to go, as did the molded ratlines.  Then I stepped back and said, with a little more work I could have a pretty decent model (AND I would actually FINISH one!) 

I've got 40 hours into Bounty and I have to say I've thoroughly enjoyed all but about an hour of that.  The shrouds are/were the most challenging portion of this build for me. If I had something (a vise or ?) to hold the ship while I rigged it, it would be soooo much easier for me.  I'm doing this rigging freehand on it's Lindberg base.  It don't take much to move it, knock it over or whatever.


Anywho, back to rigging the HMS Bounty.

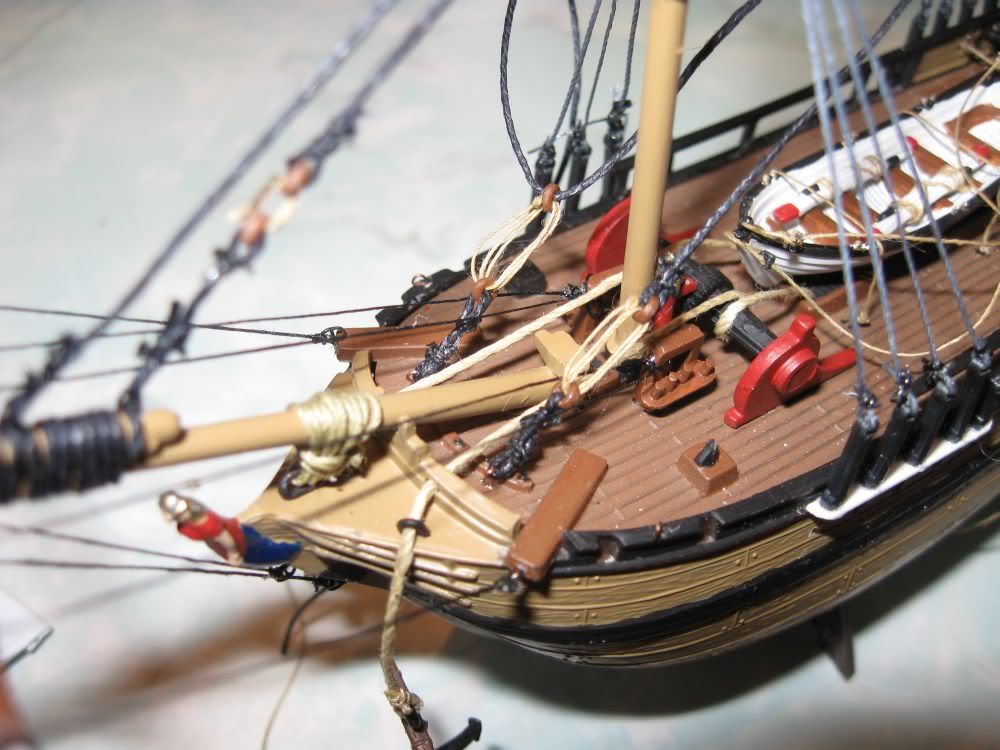
First pic tonight shows the added main topmast stays and main topgallant stay.  I started rigging this ship from the bow back.  I don't know if that's the correct or accepted method but it seems to be working OK for me.

Next, I put together the mainstay.  I tied it off completely except for one line to add tension after the glue has set.  I used the same brown eyes from the 1/96 Connie kit that I used on the forestay, and I used some copper eyes to mount it to the deck.

Mounted the eyes in the holes drilled in the deck.

I put a little tension on it, so the glue will set as close to the right position as possible.

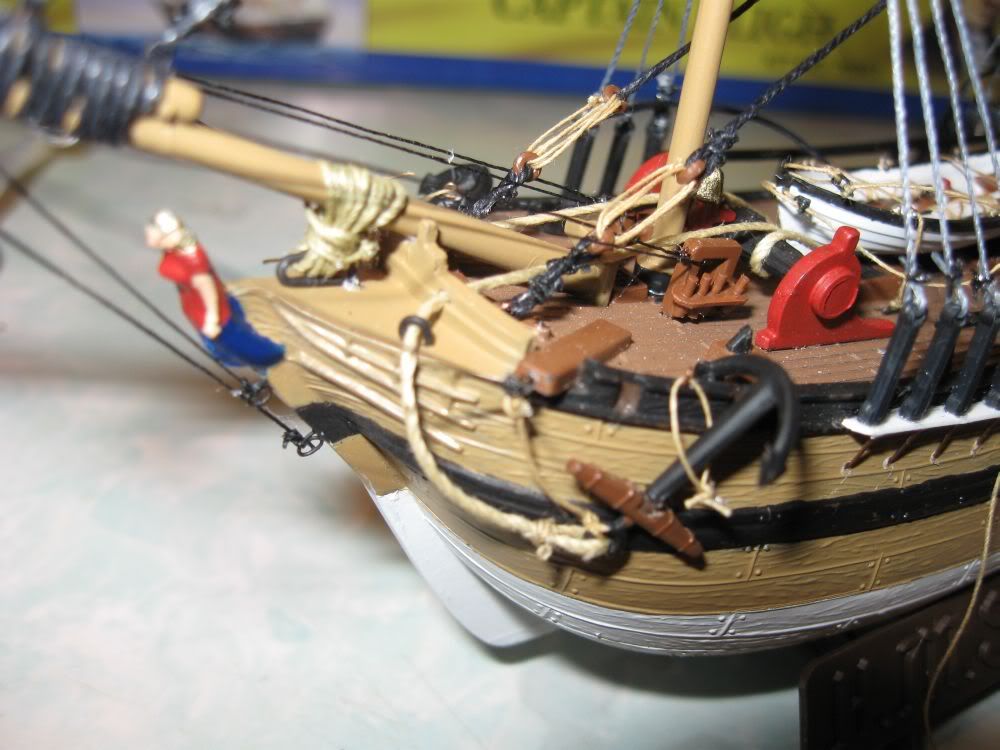
I tied the anchors off with a couple of lines.  I'm not real satisfied with this look, I'll probably change it after mounting the swivel guns.

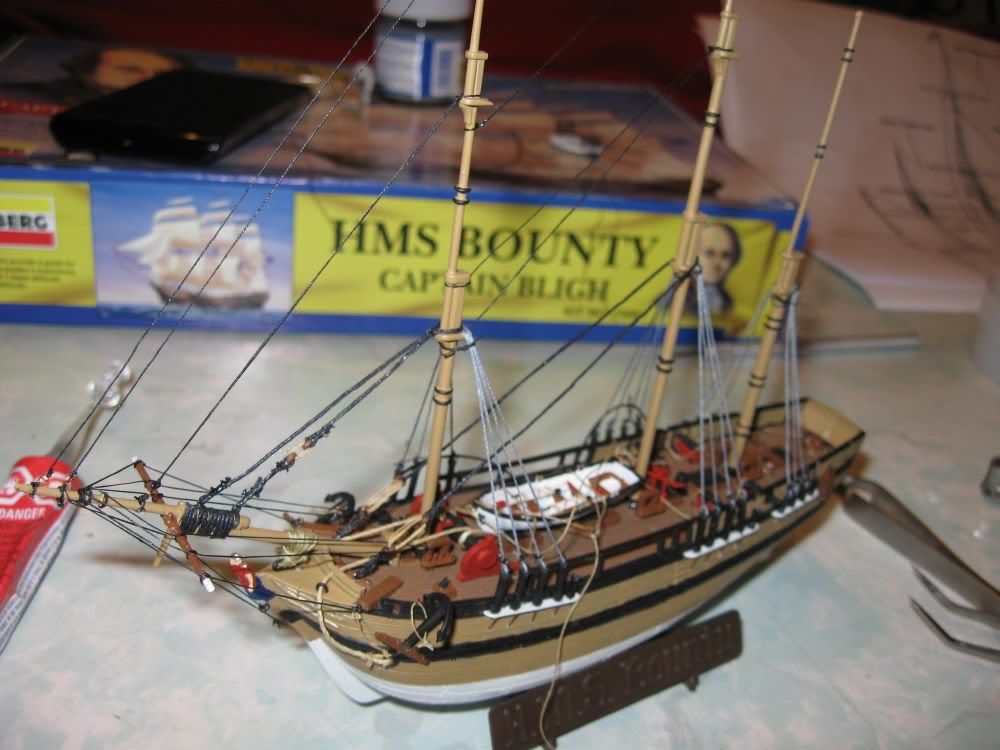
Last pic for tonight shows the rigging so far and the newly mounbted deadeyes for the backstays.


Thanks for looking.  More tomorrow or so.


Adrian


  • Member since
    July 2009
  • From: Jacksonville, Florida
Posted by Vagabond_Astronomer on Sunday, August 14, 2011 8:24 AM

Great work there, Adrian! The rigging is looking great!

"I have loved the stars too dearly to be fearful of the night..."
  • Member since
    May 2010
  • From: Berwick, La.
Posted by Tnonk on Sunday, August 14, 2011 11:31 PM

Thanks Rob, I appreciate it. 

The rigging is going better than I anticipated, just cruising along now. I guess the key is just not to get in a hurry.  And, of course, I've learned that thread is cheap - cut a piece more than long enough and cut of the rest when your done.  I had a few where I had left JUST enough to tie it off.  I don't like having to fight it like that.


I tightened up the main stay and tied it off.  Trying to use the seizing method with so little space was a chore.  I'm glad I had everything except the one to do.

I staked out the spars on my waxed balsa board, I was going to use white glue to stiffen them up a bit but I think I'll try hitting it with a bit of Future wax - I've had some success with it on my aircraft models.  And, if it doesn't work, it comes off easier than white glue.

Added the backstays to the fore mast.

Backstays on the main mast.

And a profile shot with the mizzen backstays in place also.

Frontal shot .

Last shot of the night is of the fore mast top in place.  After the glue sets the upper shrouds and the lower (futtock shroud ?) will be tied off.


Thanks for looking, more soon.


Adrian


  • Member since
    May 2010
  • From: Berwick, La.
Posted by Tnonk on Wednesday, August 24, 2011 11:40 PM

It's been a while since I posted any pics on this build.  Time sure gets away from you sometimes.

I've only worked on her off and on over the past couple of weeks, something always seems to come up.

I was a bit disappointed in the way the pictures came out sideways when i posted last time.  I don't know why photobucket turns them like that. And that's after I had them rotated and resized to boot.  Kinda odd.

I hope the pictures come out right on this post, if not I sure don't know how to turn them back.

Any way, I left off with mounting the fore mast top.  After the glue set, I ran the futtock shrouds first.

I then ran the upper shrouds. I used a smaller diameter thread on the uppers than I used on the lower shrouds.

Wrapped up work on the main mast top.

Glued the main mast top in position and let it set.

Thanks for looking in.  More soon.


Adrian

  • Member since
    September 2005
  • From: Illinois: Hive of Scum and Villany
Posted by Sprue-ce Goose on Thursday, August 25, 2011 6:58 AM

Thanks for the new photos !

After looking at the spacing between the masts, it occurred to me that you don't have very much room for fingers

Are you now exclusively using tweezers to attach rigging to masts or are you still able to use your hands?

  • Member since
    May 2008
  • From: UK
Posted by Billyboy on Thursday, August 25, 2011 9:13 AM

The skill to manipulate threads in this sort of restricted space is very impressive. Unfortunately, it is also something that is impossible to photograph in order to show us how you do it! I enjoy the photos of the results though- very interesting and useful build log.

Will

p.s.-don't dismiss the Academy Bedford Whaler kit- it really is quite nice. With fairly minimal modifications it can represent a whole host of ships- almost everything from a West-Indiaman to an English north-coast collier.

Will

  • Member since
    September 2005
  • From: Illinois: Hive of Scum and Villany
Posted by Sprue-ce Goose on Thursday, August 25, 2011 9:17 AM

Billyboy

The skill to manipulate threads in this sort of restricted space is very impressive. Unfortunately, it is also something that is impossible to photograph in order to show us how you do it! I enjoy the photos of the results though- very interesting and useful build log.

Will

p.s.-don't dismiss the Academy Bedford Whaler kit- it really is quite nice. With fairly minimal modifications it can represent a whole host of ships- almost everything from a West-Indiaman to an English north-coast collier.

Will

Thanks for the info. !

  • Member since
    August 2011
  • From: Earth, for now
Posted by BashMonkey on Thursday, August 25, 2011 3:54 PM

Talk about making a Silk Purse out of the proverbial Sow's ear.

Nice, these smaller kits are often so badly made that they are not worth a second look, this is showing that if you try they can turn out really well..

Yes

 ALL OF YOUR BASE ARE BELONG TO US!

  • Member since
    September 2005
  • From: Illinois: Hive of Scum and Villany
Posted by Sprue-ce Goose on Thursday, August 25, 2011 8:13 PM

BashMonkey

Talk about making a Silk Purse out of the proverbial Sow's ear.

Nice, these smaller kits are often so badly made that they are not worth a second look, this is showing that if you try they can turn out really well..

Yes

Ditto

  • Member since
    March 2004
  • From: Spartanburg, SC
Posted by subfixer on Thursday, August 25, 2011 10:06 PM

Where's the mutiny? There's supposed to be a mutiny on the Bounty.  Is this the right ship?

Super Angry


Wink

I'm from the government and I'm here to help.

JOIN OUR COMMUNITY!

Our community is FREE to join. To participate you must either login or register for an account.

SEARCH FORUMS
FREE NEWSLETTER
By signing up you may also receive reader surveys and occasional special offers. We do not sell, rent or trade our email lists. View our Privacy Policy.