SEARCH FINESCALE.COM

Enter keywords or a search phrase below:

"Rite of Passage" the 1/96 Constitution

60930 views
155 replies
1 rating 2 rating 3 rating 4 rating 5 rating
  • Member since
    March 2006
Posted by TD4438 on Sunday, April 6, 2014 11:50 PM

What a work of art.

  • Member since
    November 2012
Posted by abishag98 on Monday, April 7, 2014 5:37 PM

Awesome job, as always Randy!

  • Member since
    June 2010
  • From: Irvine, CA
Posted by Force9 on Wednesday, April 9, 2014 11:12 PM

Looking very good for a first timer!  It is clear that you are focused on the details - even if you are your own harshest critic.  

The deadeyes look great - where did you source yours?

Keep on keeping on!

Evan

  • Member since
    June 2012
Posted by arnie60 on Thursday, April 10, 2014 11:58 AM

Thanks for the Kudos everyone.

Evan... the deadeyes are walnut and are actually model shipway products, which fortunately a relatively close by hobby ship carries a decent supply of. My experience w/ ordering from Model Expo has often ended up w/ me often getting a " on back order" notice instead of what I ordered. Granted, none of those items were from model shipways. I have a considerable amount of cordage that I ordered from BJ which has been working out fine for the standing rigging, but all my blocks and running rigging are from Syrene. (BJ supplies totally white cordage for that, which a lot of is pre- waxed, so even if I were up to dying it all, the pre-waxed lines won't take the dye. Syrene is a bit spendy, but so totally worth the money to me.

  • Member since
    June 2012
Posted by arnie60 on Saturday, May 3, 2014 6:57 PM

Shake, shake, shake yer booty.

I have had little to no time to work on my build this past month and a half, and w/ my shaky hands keeping me from working quicker, things are moving at a snails pace just now. I am hoping to get more time coming up soon.

Anyway...here is the progress since my last post. 

This is the starboard side and my first run on doing the shrouds and chainplates which did not come out as nice as I would have liked. You can see that in spite of using a jig for the deadeyes that they did not come out perfectly even, but pretty close, and the tie offs are rather sloppy and uneven as well. The port side came out much cleaner. I guess that I will be staging the model so that it is viewed from the port side.

I also added the BlueJacket airports. It looks so crisp and finished w/ the brass that I doubt that I am going to paint them and fall back on my argument that I am staging her after her 1858 overhaul. New airports seem reasonable enough.

The above is the port side (much cleaner - by the time I get to the portside mizzen mast, they should be nearly perfect) and I have begun running the rat lines. I ran w/ a clove hitch for the first two courses, but fell back on a simpler overhand knot. Looking at them, I can't tell the difference and it goes considerably quicker. Still, it is quite tedious and my palsy slows me down even more. Meh...no hurry.

I also managed to rig the topmast shrouds on the starboard side. You can see the port side is just tacked for now. The running rigging that you see above the jeers are the lifts for the main jack. I will only be adding the braces and halyards and no clew or bunt lines as these pertain to the sails which I am also leaving off. I figure I have definitely exceeded my skill and ego on this one and am calling it a win just to finish w/. only that much done.

This is a shot of the futtock and betnick shrouds that are rigged on the starboard. These proved to be quite challenging. Addding the futtock stave made from brass rod was actually really quick and easy which led me into a false sense of ease. Attaching the futtock shrouds to the stave and then the tails to the thimble was an interesting puzzle in vector calculus so as to get all of them to have the right tension on them. Note that the port side is not done yet. I am saving it for a day when I am already frustrated and angry (joke).

Okay

That''s all I have for now. Hopefully I am freeing up some more time to work on her this month.

Until then.

  • Member since
    July 2010
  • From: Tempe AZ
Posted by docidle on Sunday, May 4, 2014 2:46 AM

Arnie,

She is coming along nicely and I love the chains; how many links per inch did you use?  I know how frustrating it can be when doing rigging and it is not coming out as well as you would like.  Heck, I have taken down rigging that I was not happy with.  It can be a major pain but I know that it would be bugging me until I did something about it.  Just my two cents worth.  You are doing a bang up job that you can be proud of.  Thanks for posting the pictures since I, like so many others, have this kit in their stash and I am learning a great deal from your WIP.

Steve


  • Member since
    June 2012
Posted by arnie60 on Sunday, May 4, 2014 4:09 AM

Thanks Steve;

The chain is 21 links per inch. .

From what I could discern from various resources is that chainplates varied from ship to ship, in part based on what was available in the area where they would be fitted or re-fitted. The use of single flat or round iron bars (as she is currently configured) came into popular use around the late 1830's.

I seriously thought about redoing the starboard, but once you have set the shrouds and the fighting platform and jeers, it is pretty much a done deal and there is no going back w/ out trashing a whole lot of good work as well. Hind sight tells me I should have rigged the deadeyes before I ever attached the main jack and platform..The upside of making mistakes like this is that the lesson is usually painful enough that you are going to do your damnedest not to repeat it.

  • Member since
    March 2012
  • From: Marysville, WA
Posted by David_K on Sunday, May 4, 2014 9:59 AM

Looks awesome, Arnie!

I'm about to try making chainplates in a similar way for my current build...hope they look as good as yours!

Well done!

        _~
     _~ )_)_~
     )_))_))_)
     _!__!__!_         
     (_D_P_K_)
   ~~~~~~~~~~~~~
    ~~~~~~~~~~~

Current Project:  Imai/ERTL Spanish Galleon #2

Recently Finished: Revell 1/96 Cutty Sark

Next Up:  ???


  • Member since
    June 2012
Posted by arnie60 on Wednesday, May 7, 2014 12:36 AM

Another brief update.

I think I have finally broken out of my funk on this build and am getting all excited again.

I decided to try and use the kit spar for the fore topsail yard, but w/ some modification

I drilled holes all the way through and epoxied in some brass pins to which I then attached brass stun'sail booms which worked quite well to stiffen up the yard. Attaching the boom to the pins was a bit more of a challenge than I really had figured. Two tiny points of attachment like that w/ my shaky hands! I finally managed it w/ CA and a spray of zip kicker (never could have done it w/ out it). It makes me seriously consider learning how to braze, which I believe is definitely the saner way to go on this.

Here it is w/ the halyards in place. I went w/ the BlueJacket plans on this one and ran a single block from the center of the yard. Marquardt calls for two blocks, very similar to the fore jack below, but I have been following the BJ plans pretty closely and did not see any reason to depart from that, especially since it is the easier rig.

I did screw up a bit on the parells. When I did a dry fit, there seemed to be the perfect number of them to hub the mast. [BTW... I used the parells from BlueJacket, but they just look too big to me] Somehow the actual fit left some gaps. Also, the BJ plans calls for two courses, one above the other, the bottom one which I had a senior moment on and forgot to add. Ah me.

Here it is done w/ the halyards and lifts all done and tied off at the deck.

The halyards have an interesting tie off to the channel rather than the deck.

The plans call for the eye bolt its attached to, to be set a little farther aft, but I set it here, part for aesthetics, part for ease. The final tie off is to a bulwark pin rail.

K. I hope you are all getting some heads up from my mistakes and can save your self some woe somewhere down the line. I will try to finish up the spars for the fore mast this week and get the results posted then. No promises though.

  • Member since
    July 2010
  • From: Tempe AZ
Posted by docidle on Wednesday, May 7, 2014 5:15 PM

You are doing great and thanks for posting even the mistakes, I know I learn from them.

Steve


  • Member since
    March 2012
  • From: Marysville, WA
Posted by David_K on Thursday, May 8, 2014 6:45 PM

Love it!

She's coming along well, Arnie...

I want to mention that, for whatever reason, I like the way lift rigging looks when the yards are lowered...is that weird?

Also, there's nothing like breaking through a funk!  That renewed sense of ambition and purpose!

WooT!

        _~
     _~ )_)_~
     )_))_))_)
     _!__!__!_         
     (_D_P_K_)
   ~~~~~~~~~~~~~
    ~~~~~~~~~~~

Current Project:  Imai/ERTL Spanish Galleon #2

Recently Finished: Revell 1/96 Cutty Sark

Next Up:  ???


  • Member since
    June 2012
Posted by arnie60 on Thursday, May 8, 2014 7:28 PM

Thanks David;

I am pretty sure that I may have mentioned this before, but the amazing geometry and symmetry that comes out in all that goes into these ships just thrills the mathematician in me as well as my esoteric appreciation.

  • Member since
    July 2010
  • From: Tempe AZ
Posted by docidle on Saturday, May 10, 2014 12:58 AM

I am with Dave on the look of the lowered yards, but I would add that I love the way rigging looks period.  For me, when the rigging starts after I have finished the hull and masts, is when the transformation from model to sailing ship take place.

i also wanted to ask, are you serving any of your lines?

Steve


  • Member since
    June 2010
  • From: Irvine, CA
Posted by Force9 on Sunday, May 11, 2014 7:17 PM

Arnie - A masterpiece in the making.  Your rigging looks terrific and it looks to me like any shaky handedness is not impairing your result.

Wonderful!

Evan

  • Member since
    June 2012
Posted by arnie60 on Friday, May 16, 2014 2:28 AM

Thank you for the compliments gentlemen.

Steve - I served the first pair of lower shrouds and then just bagged it. It really does not show w/ out getting in real close, so to save some time and work I just left off doing it henceforth.

The fine break in the weather here made long un-attended yard work take first priority, so I haven't done anything new, but, I did manage to get a run in to the local JoAnn's and found some goodies.

Left to right: thing-a-majig which is a plastic peg board with different sized pegs for bending and shaping wire and whatever else I can think of. Crimping tubes in four sizes (more on that in a sec). A nice pair of really sharp seamstress scissors. Twirl a ring which is a mandrel for making connecting rings a dozen of more at a time 3mm, 5mm, and 7 mm which I am using to make rope loops.super fast and easy. A 100 ft roll of black 26 guage wire. Some connector rings (more on that as well) and to the far right a super thin and point pearl corer. I haven't been able to find a rat tail file this thin before.

Note the little eyelets on the rings. I was thinking bentnick shrouds when I picked them up. They are a bit large but are easily cut and downsized to meet my needs.

You can see my thinking on the crimping tubes. I saw where this guy uses a mandrel to make what he calls "zip seizings" wraps it for about 5 inches, glues the string, slides what is now a string tube off and cuts seizings to size as needed. I think this goes one better and they do in fact blacken very nicely, and again, you have to get nose close after its done to see that they are fake. I left them silver in the pic so you could easily see the contrast.

The grand total came to less than $40. Gotta love JoAnn's!

  • Member since
    May 2014
Posted by mdkboggle on Friday, May 16, 2014 7:39 AM

Hi Arnie

I have had a look over your build log and i will say i think you are doing a fantastic job,well done sir.

Tim

  • Member since
    June 2014
Posted by Charles_Purvis on Sunday, June 22, 2014 12:16 PM

I love BOTH of these ideas for creating "zip" or instant seizings.  I can see instances where either would be a better fit, depending on size, placement, etc.  Brilliant!  

Congrats on what is a lovely build.  

  • Member since
    June 2012
Posted by arnie60 on Monday, November 17, 2014 8:53 PM

Well it has been quite some time since my last post. I make no apologies as the summer here in Oregon was exceptionally warm and sunny and I spent every possible moment outside till long after dark instead of inside working on my build. But, summer has definitely come to an end here and I have managed to get a bit more done.

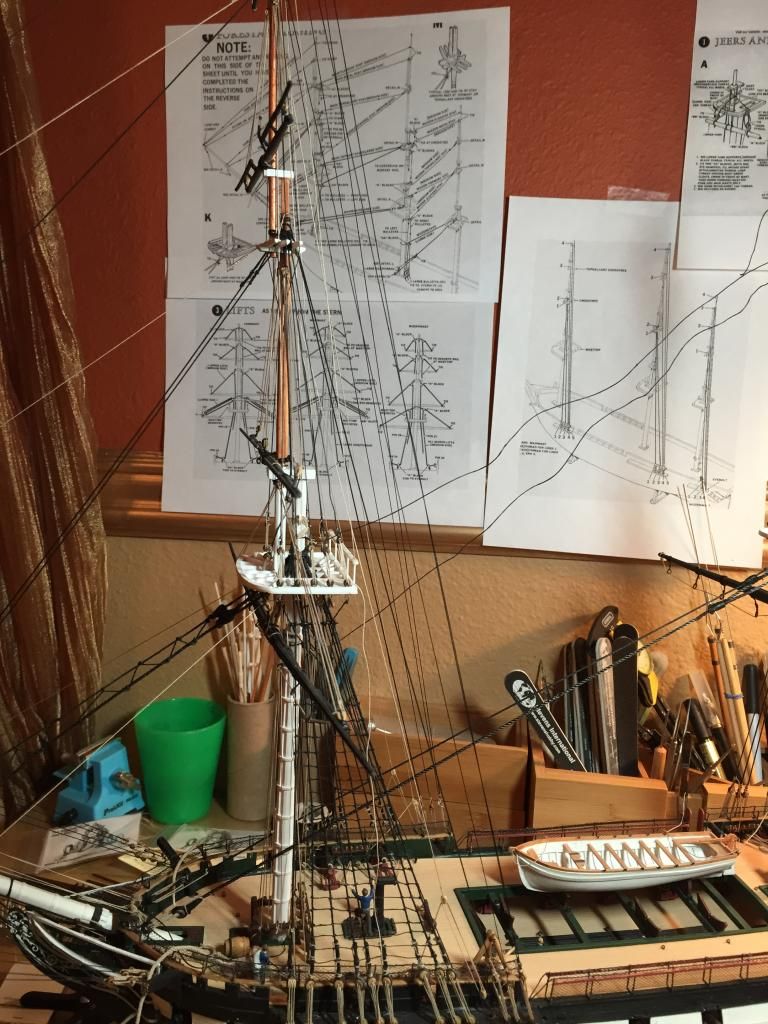
The foremast is nearly complete, about all I need to do is run the rest of the ratlines and braces for the yards. All fore stays and back stays are complete, along w/ the futtock and bentnick shrouds. ( I will have more on that shortly).

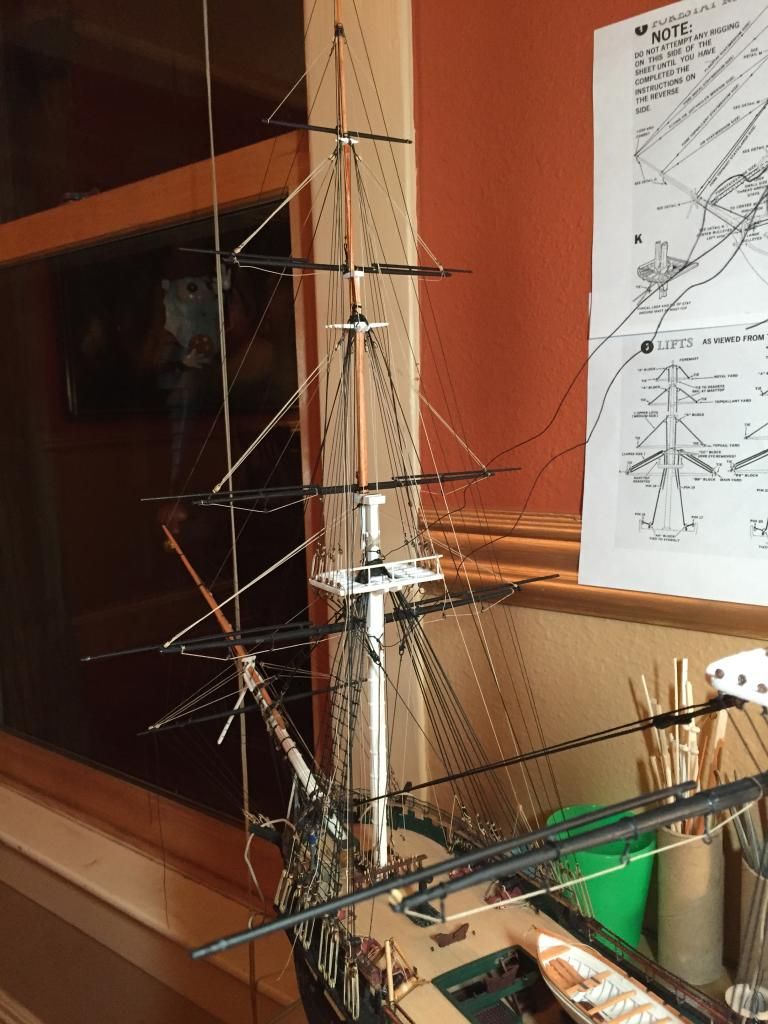
I will try to get some better pics posted later.

I also have the main mast stepped, shrouds placed, fore stays, main yard, futock and bentnick shrouds done.

A few notes on construction:

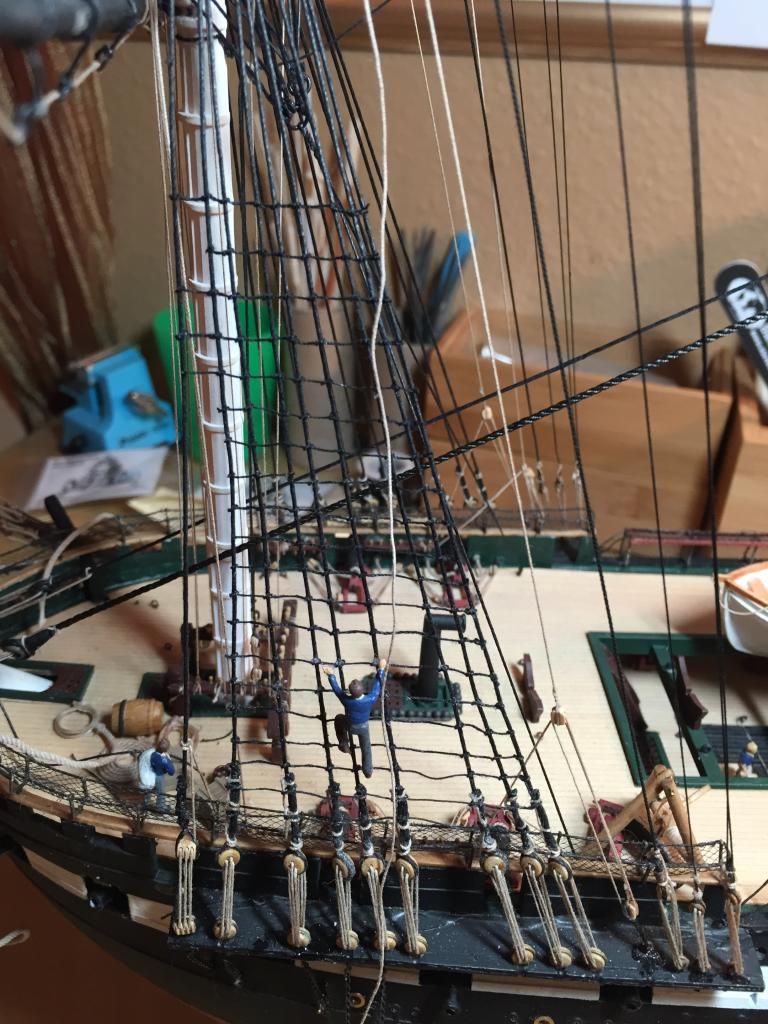
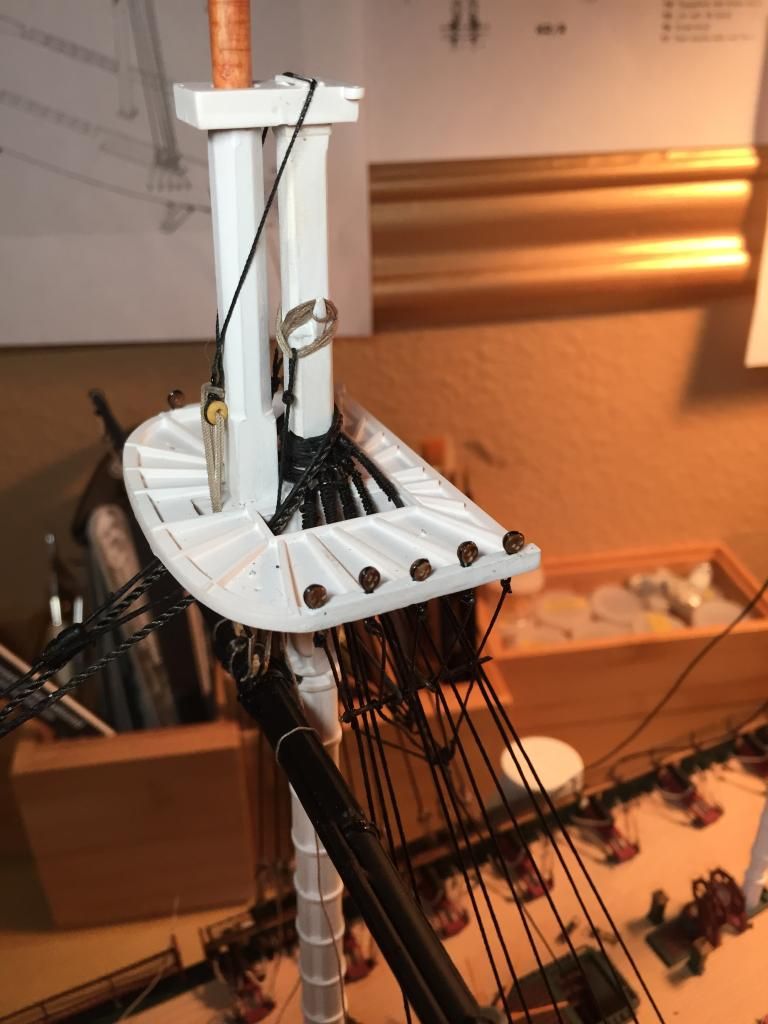
The evenness of the deadeyes is my best effort so far. Although I used a jig, I still had issues w/ getting them all the same height. I realize now that this is in part due to the fact that some of the aft shrouds have a greater angle than the forward shrouds. Since I rigged them from aft to fore (which eliminated the slack problems that I was having w/ the fore shrouds ) I made my jig based on the longest aft shroud which made the forward deadeyes end up a bit higher than the aft. Still, much better results, and I won't make that mistake w/ the mizzen shrouds.

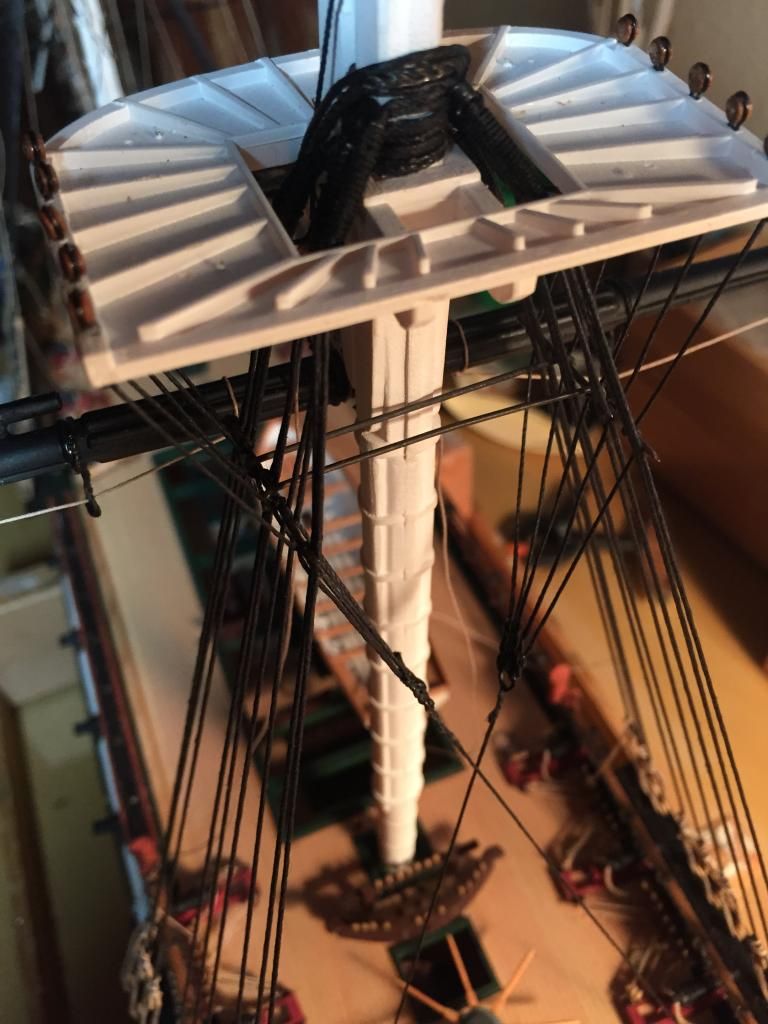
Now, back to the bentnick and futock shrouds. When I rigged the ones for the foremast, well...it was a biotch to put it mildly. I spent a lot of time thinking about what I had done and how I might do it better (easier) this time. So this time rather than doing the futock and bentnicks individually I ran them as a single line by rigging them to the ring before attaching.

Here's the pre rigging.

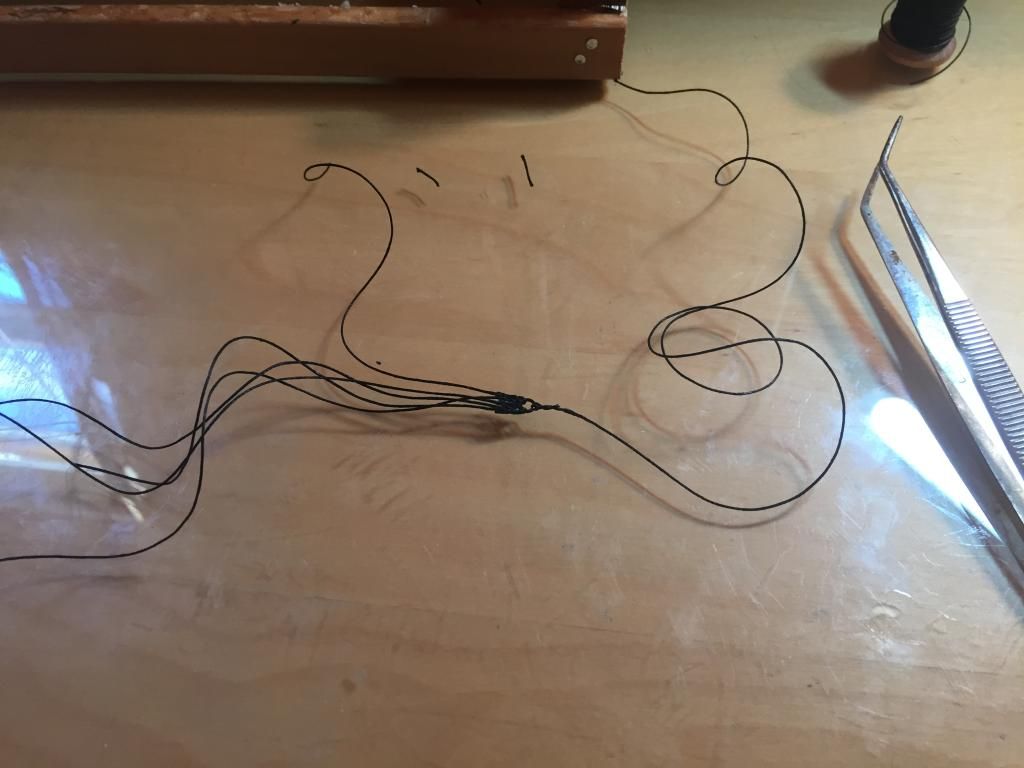
This went together really quickly.

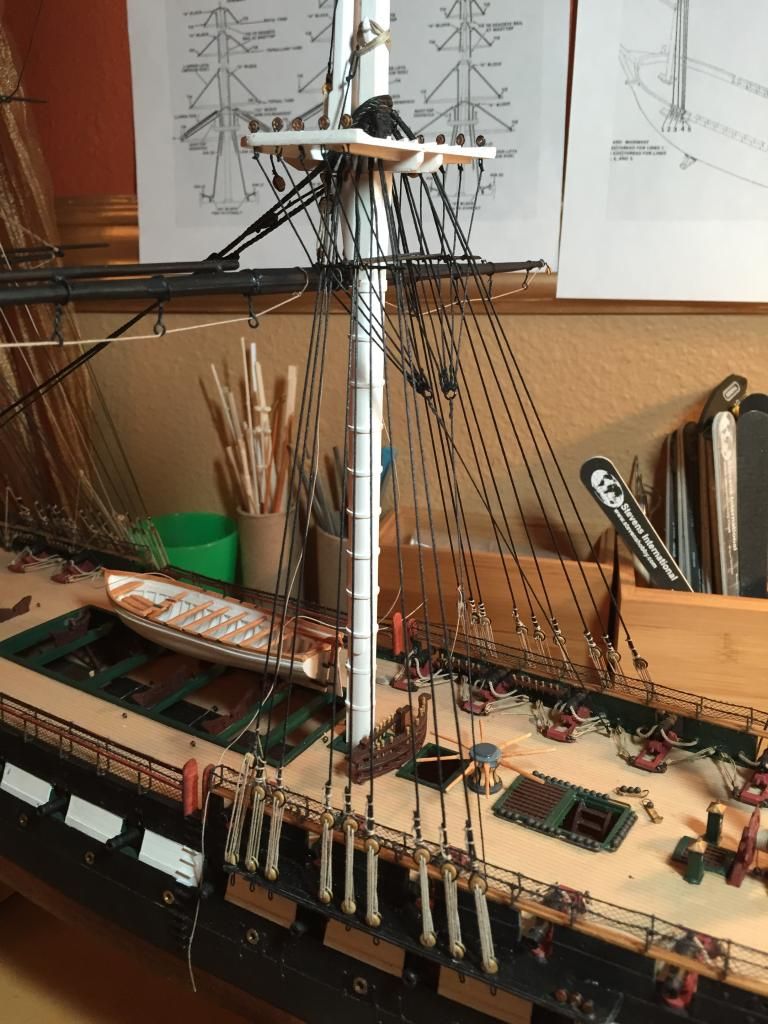
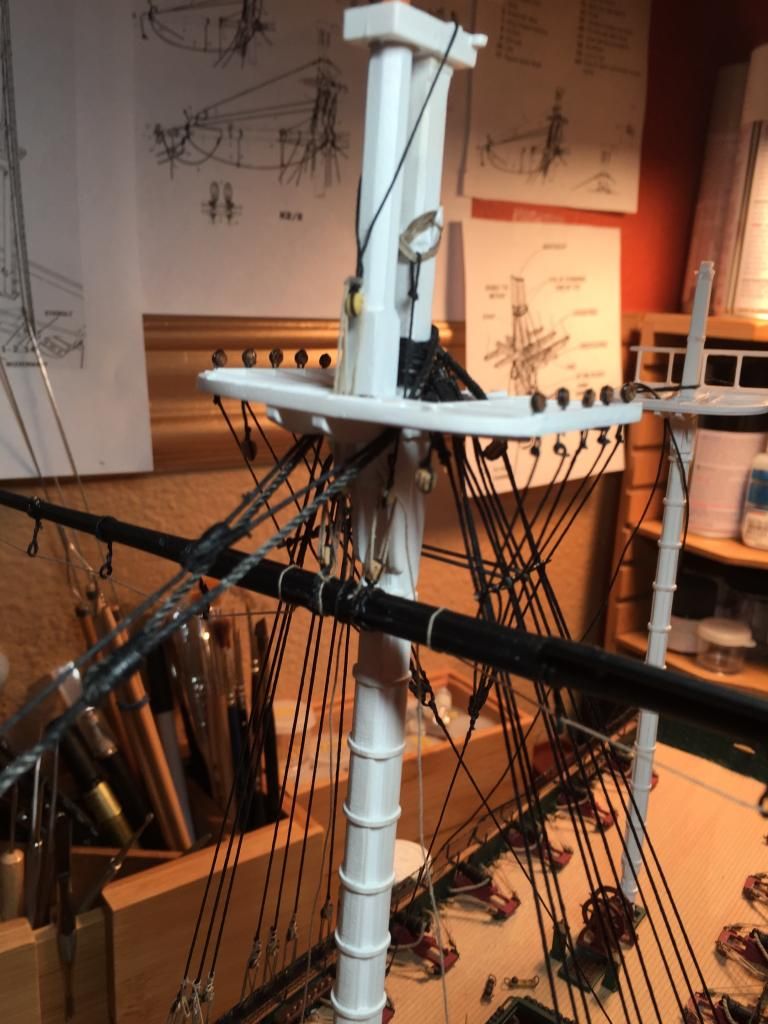
The long single line was then run through an eye bolt on the deck and a clamp hung off the end over the side to provide tension. I attached the middle shroud to the futock stave first, then up to the middle deadeye.

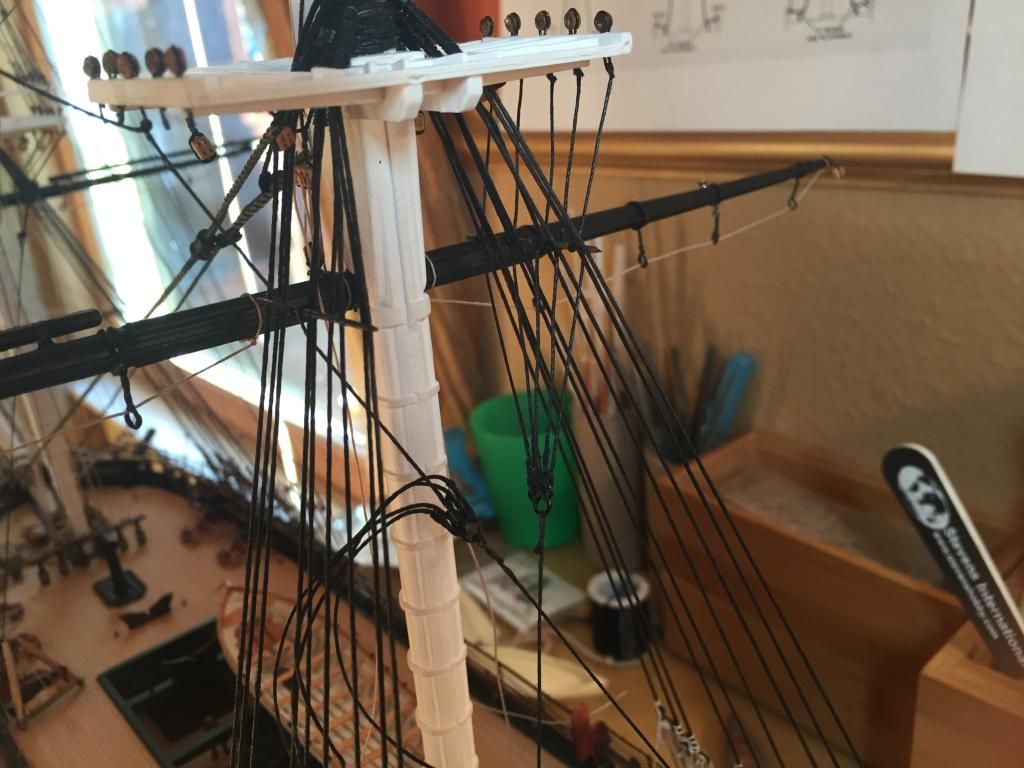
(My biggest headache in attaching the fore mast bentnicks was trying to get the right tension for each shroud.) Then alternately attached the shrouds working out from the middle. This proved to be surprisingly easy and maintained the proper tension on each line. Any slack I had at the end was easily taken up by tightening the belay point at the deck which I glued in place once I was happy w/ the results. Adding the catharpins was the final step to complete them. 

[note: I did not use "hooks" to attach the futock shrouds to the deadeyes. This could be problematic using my reverse method, but not by any means insurmountable. I still think this is a much easier way to to this even if you want to use the hook attachment.]

Thats it for the moment.

As an aside, if you are in the Portland Oregon area, you might want to check out our clubs new website ( for which I am the webmaster). You can also download our newsletter/minutes if you are interested.

http://nsomspdx.com/

  • Member since
    July 2010
  • From: Tempe AZ
Posted by docidle on Tuesday, November 18, 2014 10:39 AM

She is looking sweet Arnie, nice work.

Steve


  • Member since
    June 2014
Posted by Charles_Purvis on Tuesday, November 18, 2014 3:48 PM

Love it!  Very nice work, Arnie, and a great update!

  • Member since
    June 2012
Posted by arnie60 on Friday, November 21, 2014 6:27 PM

I was going to upload some better pics, and w/ that goal in mind was going back over the ones I recently posted. I hadn't realized before that clicking on the pic takes you to my photo bucket cache, at which point you can click on the + icon to enlarge the pic. So... given how nice the detail comes out w/ the enlargement, I do not feel the need to post other pics than the ones I have up now. My new Iphone 6's camera is waaay better than I realized. Now I won't have to go out and buy a camera to take those close ups that I couldn't get into focus before. Yeah!

WhisperI also noticed by looking at them how much touch up and dull coating I need to do, not to mention the "typos" (so to speak). When mentioned at our club meeting, the overwhelming response was, "once its in a case, no one is going to be able to get close enough to see them".Zip it!  Amen for pragmatism!Stick out tongue

  • Member since
    March 2012
  • From: Marysville, WA
Posted by David_K on Friday, November 21, 2014 8:07 PM

Fantastic stuff, Arnie!  I think I need to go back through and read this thread from the beginning again!

Dave

        _~
     _~ )_)_~
     )_))_))_)
     _!__!__!_         
     (_D_P_K_)
   ~~~~~~~~~~~~~
    ~~~~~~~~~~~

Current Project:  Imai/ERTL Spanish Galleon #2

Recently Finished: Revell 1/96 Cutty Sark

Next Up:  ???


  • Member since
    June 2012
Posted by arnie60 on Sunday, November 23, 2014 3:30 PM

Anchors - "A Way" 

Thought I would put together the anchors at long last. Taking a look at the kit pieces, I thought I could do better, so I spent some time browsing the net looking for some replacement, with really no luck in finding anything that looked better than the kit anchor. However, the stock definitely needed to be chucked.

I laminated the four strips together using good old Elmers, using the haft of the anchor to set the spacing in the middle. I had originally thought to just use some square stock, but doubted my ability to carve out the opening for the anchor haft. 

I then filed down the wood to match the tapers as close as possible (not perfect by any means) and then stained the wood w/ min-wax sedona red.

I then cut a very thin strip from a  .01 styrene sheet to simulate the bandings and attached them using CA and then painted them. I had originally tried a thin strip of masking tape, but it would not stick well and didn't have quite the heft I wanted. Glued all the pieces together and attached a ring to the haft from a bag of assorted size rings that I got from JoAnnes jewelry dept. 

I used Marquardt as a referance to secure the anchor. 

Marquardt shows two possible configurations. I opted for the forward rigging. It is not quite the same, as Marquardt shows the belay points at cleats outside. I will be belaying to inside cleats.

So, here's how it came out. 

Before anyone descries my use of dark grey for the anchor instead of black, I did originally paint it flat black, but it disappeared when up next to the hull. I tested the grey and found I liked the contrast and as it was iron or possibly steel (Bessemer perfected the steel process in 1856, but it had been around for something like 3 or 4 thousand years. Who would have thunk it huh?) it seemed a reasonable color to use. I don't know if they painted their anchors in those days or not. If someone knows, please share.

until next time then....

  • Member since
    June 2012
Posted by arnie60 on Tuesday, December 2, 2014 12:00 AM

Constructing rope coils:

I know this has been done ad-nauseum, but I am very self impressed w/ my easy system for making loops to hang from pin rails etc., and I don't recall ever having seen any one do it w/ out using glue except to tack it to the rail, so I am going to give it a walkthrough here.

After much experimenting, I have found that this will only work w/ a quality linen or cotton cordage. Any line w/ any percent synthetic fiber will not give you the same results. I am using cordage from Syrene and highly recommend it to one and all.

I first use a mandrel to form the loop (I have found 4 turns to be just right for me) applying the smallest amount of CA possible to bind it.

You will have to experiment to find the right mandrel size as well.

After prying the loop off the mandrel and trimming it, I drop it into a glass of water.

 I use my tweezers to rough shape the loop once it is thoroughly soaked, then hang them from a false pinrail.

I do some further reshaping (mainly just pulling down w/ my tweezers) while it is still dripping wet.

Ironically, the hardest part of this process is hanging them on the rails. Once you get it hung over a pin, you can shape it a bit more if needed/wanted, but it does not need to be perfect at this stage.

Leave it set until it dries, then come back and tack it to the pin rail w/ CA. Once the CA sets, you can come back w/ a soaking wet paint brush and re wet the line for any final shaping.

Takes me about 20 minutes to do 4 loops.

Here's what the results look like.

The really nice thing I like about this process is that since no glue was used to hold the loops shape, there is no discoloration or sheen or un-natural stiffness as a result. 

  • Member since
    December 2003
  • From: 37deg 40.13' N 95deg 29.10'W
Posted by scottrc on Tuesday, December 2, 2014 8:48 AM

Hello Arnie,

I just read your whole build log and am quite impressed with your work.  I am in the middle of setting up and installing the yards on the main mast of my model and have sworn I will never build and rig plastic masts and yards again.  

Wood makes the build and rig so much more enjoyable.  

I have a Revell Alabama that the cat dismasted a few years ago and your build gave me some good ideas to resurrect that model.

Scott

  • Member since
    June 2012
Posted by arnie60 on Tuesday, December 2, 2014 12:35 PM

Thanks Scott;

I actually have the CSS Alabama in line for my next build. I would be interested in seeing yours, and your Connie as well. Glad my log was a help to you. I think you will find that making the masts and yards from wood is actually quite easy. Let me know if there is anything I can help you with.

  • Member since
    May 2003
  • From: Greenville, NC
Posted by jtilley on Tuesday, December 2, 2014 1:09 PM

Those wanting to model the C.S.S. Alabama should be warned that Bluejacket is going to release a solid-hull wood kit pretty soon. As I understand it, the scale will be 1/8"=1' (1/96). It undoubtedly will cost several hundred bucks, but it's virtually guaranteed to be a whole lot better than the ancient Revell kit. (That one is more than fifty years old now. It and the Kearsarge kit were released in conjunction with the Civil War centennial. We're now in the midst of the 150th anniversary.) To make that old plastic kit look like the real ship would be an enormous project. I personally wouldn't attempt it.

If you do build the Revell kit, and you have the version reissued by Revell Germany a few years ago, for heaven's sake beware of the instructions. The rigging diagrams in it are utter nonsense - and the person who built the model in the photo on the front of the booklet couldn't even figure out where the sails were supposed to go.

Youth, talent, hard work, and enthusiasm are no match for old age and treachery.

  • Member since
    June 2012
Posted by arnie60 on Tuesday, December 2, 2014 3:23 PM

I just bought a copy of " CSS ALABAMA ANATOMY OF A CONFEDERATE RAIDER" by Bowcock. (which I managed to get for a mere $50) which I will be using to guide me in making some modifications and the correct rigging. I am well aware of all the "problems" that the Revell kit has. I won't be able to do anything about the length, but I can correct the stern and gun ports. I am also hoping to correct the rake on the masts, which may not be feasible, and John from Scale Decks is working on a veneer deck, replete w/ corrected brass sweeps, and I have the two back issues of FSM w/ Joseph Bossert's mods to draw upon as well. So, I anticipate ending up w/ a fairly decent "representation" of her.Whistling

  • Member since
    June 2012
Posted by arnie60 on Thursday, December 11, 2014 11:04 PM

Small progress post

Running the Mizzen Stay, Mizzen preventer, Topmast stay, and Topmast preventer turned out to be rather interesting. All but the mizzen stay was pretty straight forward. The mizzen stay actually straddles the main mast and is belayed via a strop to eye bolts just forward of the main mast. What was not clear to me was the exact way the strop belayed to the mizzen stay. The Bluejacket plans call for the strop to pass through a thimble behind the main mast, and that connected w/ lanyards a thimble attached to the stay, as shown in this picture I took from the BJ manual.(which coincidentally is what the Revell plans show as well)

However, looking at pics of the Hull model I found one that shows an open heart, but was unable to find a shot any farther up the stay.

So I compromised and did both. I used one of the open hearts that I just got in from Syrene (assembly required, but worth it) . 

Anywho.... all I have for now. Nearly done w/ mizzen shrouds. More soon.

  • Member since
    June 2014
Posted by Charles_Purvis on Friday, December 19, 2014 7:24 AM

Looks terrific Arnie!  

JOIN OUR COMMUNITY!

Our community is FREE to join. To participate you must either login or register for an account.

SEARCH FORUMS
FREE NEWSLETTER
By signing up you may also receive reader surveys and occasional special offers. We do not sell, rent or trade our email lists. View our Privacy Policy.