SEARCH FINESCALE.COM

Enter keywords or a search phrase below:

Another 1/96 USS Constitution - third time's a charm (I hope)

20905 views
175 replies
1 rating 2 rating 3 rating 4 rating 5 rating
  • Member since
    March 2019
  • From: Post Falls, Idaho
Posted by Sigep Ziggy on Monday, November 11, 2019 7:38 PM

Glad to see you back at it! Love your build and will use it when I get around to building my 'Connie'.

your shipmate,

Ziggy


  • Member since
    July 2013
Posted by steve5 on Monday, November 11, 2019 11:22 PM

nice work on the carronades jose . enjoying your build .


  • Member since
    March 2019
  • From: San Diego, CA
Posted by Jose Gonzales on Friday, January 3, 2020 12:09 AM

This update is long overdue. Carronades are complete, as are the pinrails.

 _DSD7423 by Jose Gonzales, on Flickr


The BlueJacket kit came with a pair of cathead carvings. I trimmed them to fit the Revell catheads and glued them on. I also added a cleat on each cathead for the stopper cable, and drilled holes through the end for rigging the cathead blocks:

 _DSD7420 by Jose Gonzales, on Flickr

I chose to use the BlueJacket Fore and Main bitts and fiferails, as the ones from the Revell kit were damaged beyond repair. Here are the fore fiferail and bitts:

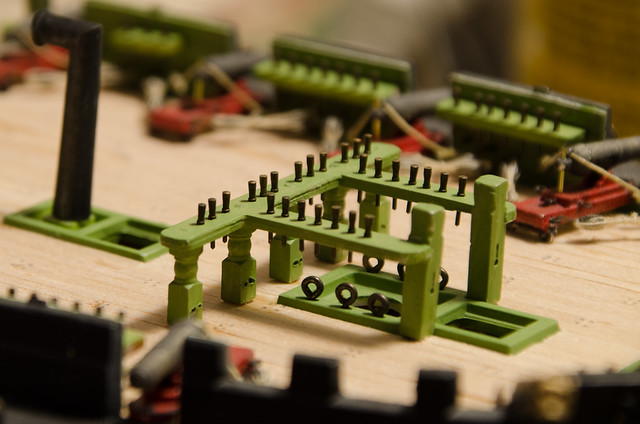
 _DSD7419 by Jose Gonzales, on Flickr.

The BlueJacket main fiferails seemed too large and out of scale. I chose to exclude the bottom stanchion sections and just glue the bottom rail directly to the deck. I also chose to use the BlueJacket capstain, visible behind the fiferail:

 _DSD7418 by Jose Gonzales, on Flickr

I chose to use the Revell wheel, with the supports modified a la Force9 (Evan) though I did not do nearly as good a job. I've pictured the installed wheel along with the pieces from the BlueJacket wheel assembly for comparison:

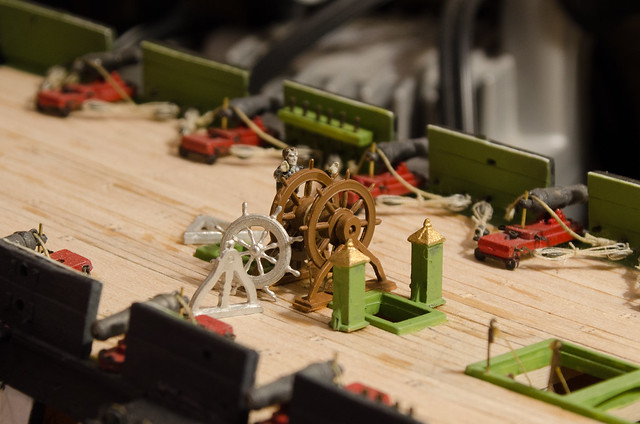
 _DSD7417 by Jose Gonzales, on Flickr

 I found the BlueJacket wheel too small relative to the crewmen's size, and perhaps too stocky. Compare these to the real thing:

 kdk_0493-1024x768 by Jose Gonzales, on Flickr

Note that the original has 10 spokes, but both Revell and BlueJacket offer only 8 spokes.


  • Member since
    March 2018
  • From: Chicago suburbs
Posted by Luvspinball on Friday, January 3, 2020 12:31 AM

fabulous work as always, Jose.

I am also struggling with the wheel, as many of my pins are broken.  Tried to get one from ModelMonkey, but again, many of the pins were broken.  I am modifying the one from ModelMonkey by removing the remaining pins and replacint with the top portion of 8mm brass belaying pins.  Slow work - can only do one per day and need to add 20 pins.  About half way home, but will look much better and be much sturdier.

Bob


Bob Frysztak

Luvspinball

Current builds:  Revell 1/96 USS Constitution with extensive scratch building

  • Member since
    March 2019
  • From: San Diego, CA
Posted by Jose Gonzales on Friday, January 3, 2020 12:41 AM

Hi Bob, 

Thanks for the complement (still can't get which one, compliment or complement, to use straight Smile ). Your solution sounds brilliant, can't wait to see how the wheel turns out. I love your work too - a lot of what we do is slow work - between waiting for paint to dry, waiting for glue to dry, and the modifications, it took me 3 days to complete and mount my wheel. Eagerly awaiting your next update!

Jose


  • Member since
    March 2019
  • From: San Diego, CA
Posted by Jose Gonzales on Tuesday, January 28, 2020 12:20 AM

Hi all, 

I'm nearly finished with the spar deck fittings, but I need to plan how im going to rig the ship, so I started working on a belaying pin diagram, in case I need to add cleats or pin rails. 

I want to base my rigging on the famous Isaac Hull model in the Peabody Essex Museum in Salem, MA so I'm keeping the steps to the bowsprit, and not running a pin rail across the front of the bow on the spar deck. 

I traced the belaying diagram at the bottom of the Revell rigging plan minus the number assignments and made several photocopies. I then wrote in the names of the lines being belated. I did this for the original revell diagram, and then did an "adapted" version based on the Bluejacket plans. Here are the original belaying diagrams 

 20200127_213125 by Jose Gonzales, on Flickr

 20200127_213155 by Jose Gonzales, on Flickr

 20200127_213205 by Jose Gonzales, on Flickr

  • Member since
    March 2019
  • From: San Diego, CA
Posted by Jose Gonzales on Tuesday, January 28, 2020 12:26 AM

Here are my written out diagrams

 20200127_213956 by Jose Gonzales, on Flickr

 20200127_214004 by Jose Gonzales, on Flickr

  • Member since
    March 2019
  • From: San Diego, CA
Posted by Jose Gonzales on Tuesday, January 28, 2020 12:38 AM

I then started making comparison tables, separated by mast:

 20200127_213231 by Jose Gonzales, on Flickr

I am making comparisons. A lot of the lines belay to similar places but there are some glaring differences. I will need to make decisions for each line as to which ones make best sense, make some choices, and generate a final diagram. I will use as my additional sources the Lennarth Peterson's "Rigging Period Ship Models", the much maligned Marquardt AOTS Constitution book, and the fantastic photos of the Hull model that Force 9 (Evan) shared with us.

  • Member since
    March 2019
  • From: San Diego, CA
Posted by Jose Gonzales on Saturday, February 8, 2020 9:06 AM

I have a problem.

 20200208_062640 by Jose Gonzales, on Flickr


Can you see what's missing from this picture?

Yes the ladders for the main hatch from the gun deck to the spar deck are missing! I completely forgot about them. Normally, per both BlueJacket and Revell instructions, there would be 2 ladders, one on each side, at the forward end of the hatch. Unfortunately, the space normally occupied by those ladders is now occupied by the anchor cables and messenger cable on either side. 

If I had noticed this earlier, I would have tried to accomodate this somehow. I probably would have put the ladders leading up from the berth deck to the gun deck on the forward half of the hatch on the gun deck, then built a platform of some sort over the rear half of the hatch on the gun deck to accomodate the ladders leading up to the spar deck. Or I might have shrunk the hatch to a smaller size to give more space for the ladders. Revell did not plan on having the cables depicted, so they made the forward hatch too wide.

As it is, I have a few options.

1. Put the ladders in, the feet straddling the cables; alternatively, perhaps add a platform over the cables, then install the ladder

2. Push the cables away from the hatch, then put in the ladders. I would have to put some sort of barricade or guide to keep the cable spread - the force on the ladders while the anchors were being raised or lowered would be too much without the spreaders.

3. Place the ladders somewhere else around the main hatch.

Number 1 - not a good idea. The cables would lift under the tension when manipulating the anchors - the ladders would never be placed over the cables. Number 2 - I don't like the idea of adding spreaders when I have never seen any evidence of them. Number 3 seems most feasible, but where should they go?

Any suggestions?

Cheers,

Jose

  • Member since
    September 2012
Posted by GMorrison on Saturday, February 8, 2020 10:00 AM

No.s 1 and 2- no bueno.

No. 3- sure why not?

No. 4- put the cable over the top of the forward hatch on the gun deck. During raising, it's going to be off the deck by a distance roughly equal to the height of the midpoint of the capstan.


Bill

 Modeling is an excuse to buy books.


  • Member since
    October 2019
  • From: Cape Cod, Mass
Posted by Rick Sr on Saturday, February 8, 2020 2:16 PM

When I visited the Constitution back in the 60s, I seem to remember support pillars at each corner of the hatch beside the ladders. That is if my memeory isn't fading on me. If my memeory is correct, then you could make use of those pillars or columns as spreaders.

  • Member since
    March 2019
  • From: San Diego, CA
Posted by Jose Gonzales on Monday, February 10, 2020 7:49 AM

Thanks for the suggestions.  Unfortunately with the spar deck already installed, I am limited regarding the kind of modifications I can make.

I have purchased from Bluejacket some very narrow ladders. I will try playing with these to see if I can work something out.

Jose

  • Member since
    December 2006
  • From: Jerome, Idaho, U.S.A.
Posted by crackers on Monday, February 10, 2020 12:28 PM

Are these the support pillars you are referring to ? I never know these pillars existed on that ship.

Anthony V. Santos

  • Member since
    September 2012
Posted by GMorrison on Monday, February 10, 2020 12:49 PM

Those are quite common on 18th- 19th C warships. They are removable, and part of what would be "cleared for action.

As for the ladders in place now, as per museum ships they are sized and placed to get tourists in and out.

 Modeling is an excuse to buy books.


  • Member since
    October 2019
  • From: Cape Cod, Mass
Posted by Rick Sr on Tuesday, February 11, 2020 7:34 AM

compliment is what you were paid...the I is correct for receiving accolades.

  • Member since
    October 2019
  • From: Cape Cod, Mass
Posted by Rick Sr on Tuesday, February 11, 2020 7:37 AM

Yes they are. I seem to recall some at the hatch corners though that may be a "mismemory".

  • Member since
    March 2019
  • From: San Diego, CA
Posted by Jose Gonzales on Tuesday, February 11, 2020 8:12 AM

Hi all, 

I did add these "stanchions " to the model, see my previous post from 4-1-2018, the last pic in the post. The stanchions are visible through the main hatch on my May 20, 2018 post and March 26, 2019 post, as are the anchor cable and messenger.

As Bill noted, these are removed during battle, and are probably too flimsy to support the stress presented by the anchor cable and messenger during the raising of the anchors. 

Also, the messenger and anchor cable should not be separated by the ladder, since during anchor raising the two are lashed together.

I have decided to use the narrow ladders I ordered and received from BlueJacket. They are made of white metal and I'm having difficulty trimming off the flash. I will post pics shortly.

Jose

  • Member since
    October 2019
  • From: Cape Cod, Mass
Posted by Rick Sr on Tuesday, February 18, 2020 6:41 PM

I think the Constitution went from hemp to chain anchor cables in the 1830s. They had the route to the orlop deck just forwardof the hatch, dropping down through what looked like mini hausers in the gun deck, through the berth deck down to storage in the orlop deck.

If you haven't fixed the cable and ladder problem yet, that might be a solution.

I messed up my second Connie. I got my dremel out and routed out where the pin rails were going, then without a second thought, painted the bulwarks. Now I will have to follow Bill Morrisons suggestion and pin them using wire. The glue isn't holding. I think Revell should have put a warning about glue and paints in there right up front, but it probably would not have done any good!

My first Conni is going well, installing guns now. Waiting on anchor rope as the kit doesn't provide enough if you are planning on rigging the cables and messengers.

  • Member since
    March 2018
  • From: Chicago suburbs
Posted by Luvspinball on Tuesday, February 18, 2020 11:49 PM

Rick Sr

I got my dremel out and routed out where the pin rails were going, then without a second thought, painted the bulwarks. Now I will have to follow Bill Morrisons suggestion and pin them using wire. The glue isn't holding. I think Revell should have put a warning about glue and paints in there right up front, but it probably would not have done any good!


Rick,

I had also previously painted my bulwarks before trying to add the pinrails.  I knew the glue wouldn't hold AND I had created the bolt pattern by adding a thin layer of styrene which I had pushed a dulled T-pin into, creating a raised bolt pattern on the other side.  So I had to scrape off the paint and the "raised bolts" before gluing.  Never trusting the CA to hold forever, I also pinned them all through the hull with wire.  Documented it all in my thread.  So I feel your pain.  Luckily I have lots of surgical tools at my disposal, so I was able to find an 1/8th inch cuvette which easily did the trick of scraping down to bare plastic. 

Good luck with yours!  Pinning is the way to go.  Doing it also for all the channels as well.

Bob


Bob Frysztak

Luvspinball

Current builds:  Revell 1/96 USS Constitution with extensive scratch building

  • Member since
    October 2019
  • From: Cape Cod, Mass
Posted by Rick Sr on Thursday, February 20, 2020 7:39 PM

I got a copy of Constitution plans, must have been for the 1830s or later as the plans show chain anchor cable. There is the gun deck, spar deck, rigging, transom, cannons and hull.

It shows two stern bulkheads, for the Commodore as well as the captain, shot storage on the spar and gun decks. The last two long guns were in the Commodores quarters.

I will put pix on Fotki and see if I can send tham to FSC. I dnot know how clear they will be.

  • Member since
    September 2012
Posted by GMorrison on Thursday, February 20, 2020 8:05 PM

Rick Sr


It shows two stern bulkheads, for the Commodore as well as the captain, shot storage on the spar and gun decks. The last two long guns were in the Commodores quarters.


Probably they weren't when the Commodore was on board. It was also common in the era of Nelson to have a big piece of canvas stretched on the deck with some type of floor pattern painted on it.

 Modeling is an excuse to buy books.


  • Member since
    September 2012
Posted by GMorrison on Thursday, February 20, 2020 8:07 PM

Rick Sr

... dropping down through what looked like mini hausers in the gun deck, through...

Useless piece of knowledge- those are spurling pipes.

 Modeling is an excuse to buy books.


  • Member since
    October 2019
  • From: Cape Cod, Mass
Posted by Rick Sr on Friday, February 21, 2020 2:33 AM

These plans show 15 25 pounders on each side of the gun deck. 

I went to bed, today I will try to post them on fotki. 

They are to big for one pic so there will be a couple of pix for the spar deck and gun deck.

The rigging sheet is massive. 

I think I'll see if Minute Man Printing can do anything with them. There is no copyright date on them. 

 They are from an old Model Expo kit. 

  • Member since
    October 2019
  • From: Cape Cod, Mass
Posted by Rick Sr on Friday, February 21, 2020 7:41 AM

still can not get pix from album into FSM. Can not find reply window in FSC.

Model Expo plans are in album in Fotki.

These are posted in my fotki forum to share with anyone who wants them.

They are  not Model Expo plans, they are Model Shipways plans, my bad.

They are old.

I am not a pc guru. Sorry about that. I'm lucky I can thurn this thing on!

  • Member since
    October 2019
  • From: Cape Cod, Mass
Posted by Rick Sr on Friday, February 21, 2020 12:50 PM

Looking up spurling pipes!

I can not believe how dumb I am regarding things nautical. Looking up names and terms...sculley, galley, scuttle...a scuttle refers to a hold? Good grief!

I have the Model Shipways Constitution plans. They are nothing like Revell plans.

Revell shows 16 guns per side on the gun deck, Model Shipways shows 15. Where the 1st gun on each side on Revell plans, is water closets for warrant officers, etc,on both sides in place of the guns. On the farm our water closets were called "outhouses";they were tough in the winter, you would stick to them! I can only imagine what using them was like for the seaman ordinary on the bowsprit!

We bought our farm in 1947 after WWII. We had no plumbing or electric until 1953. The farm house was 12 rooms and was built 1n 1842. The biggest body of water we had was two creeks that ran through the lower (southern) fields through 40 acres of woods we had bordering our farm and the one next to us. We had a 10 foot skiff for fishing the creeks and to us that was a "big boat!" powered by two oars.. The creeks were 80 feet to 150 yards wide, 8 feet deep at the deepest spot, trout fishing was amazing.

So what you have here is a die- in- the- wool bewildered landlubber trying to build the USS Constitution. Learning the nautical terms is like learning a new language. I am building (or attempting to build) the Constitution because I love American History, my country, and that ship has always been special to me.

Working with wood in no stranger to me. I built the house I am in now with my own hands because we couldn"t afford to purchase one. But about all I know about ships is that they float in water...God willing!

  • Member since
    March 2019
  • From: San Diego, CA
Posted by Jose Gonzales on Monday, February 24, 2020 1:42 AM

Hi all!

I've installed ladders for the main hatch at the forward end. A couple of adjustments - 1. I used narrower BlueJacket ladders that I ordered to replace the Revell-provided ladders; 2. I ran the ladders from the aft side of the gun-deck hatch rather than on either side of the gun-deck hatch.

 20200223_223833 by Jose Gonzales, on Flickr

 20200223_223845 by Jose Gonzales, on Flickr

 20200223_223941 by Jose Gonzales, on Flickr

I temporarily placed the cutter into the boat cradle to make sure the boat wouldn't interfere with the ladder access, since the ladders are a little closer together because of the anchor cable and messenger cable. 

I also added rope rails and brass stanchions made from 1/32 diameter brass tubing topped with brass eyelets.

Cheers,

Jose

  • Member since
    May 2006
  • From: Chapin, South Carolina
Posted by Shipwreck on Monday, February 24, 2020 10:39 AM

Rick Sr


Revell shows 16 guns per side on the gun deck, Model Shipways shows 15. Where the 1st gun on each side on Revell plans,


The placement of the guns on the gun deck is a major problem with the Revell kit. They are not spread out enough; the result is an extra gun on each side. You can see this at the midship position (between the bulwarks on the main deck); Revell has 4 guns on the gun deck. According to the Hull model, there should only be 3 guns at that position. The Revell lay out is all wrong, and just about impossible to fix! On my Connie, I refused to use 16 guns per side; so I installed 15 guns and closed the front port on each side!

On the Bench:

Revell 1/96 USS Constitution - rigging

Kinetic 1/48 YF-104A 5+2957

Trumpeter 1/350 USS Hornet CV-8

Revell 1/48 B-1B Lancer Prep & Reasearch


  • Member since
    October 2019
  • From: Cape Cod, Mass
Posted by Rick Sr on Monday, February 24, 2020 12:06 PM

That is what I have done too. I considered altering the bulwarks but do not think that is a practical option. I Glued the kits gunports in the closed position and filled with putty, then extended the gun stripe to hide the alteration.

On the Model Shipway plans where the number 1 guns are on the Revell kit, MS shows two water closets for Warrant Officers and Midshipmen. RHIP!


  • Member since
    September 2012
Posted by GMorrison on Monday, February 24, 2020 12:19 PM

You can add a sty up forward of the bitts as well.

 Modeling is an excuse to buy books.


  • Member since
    October 2019
  • From: Cape Cod, Mass
Posted by Rick Sr on Monday, February 24, 2020 12:42 PM

A sty? As in  hog sty???

JOIN OUR COMMUNITY!

Our community is FREE to join. To participate you must either login or register for an account.

SEARCH FORUMS
FREE NEWSLETTER
By signing up you may also receive reader surveys and occasional special offers. We do not sell, rent or trade our email lists. View our Privacy Policy.