SEARCH FINESCALE.COM

Enter keywords or a search phrase below:

1/96 Cutty Sark WIP (Revell H-399)

29807 views
293 replies
1 rating 2 rating 3 rating 4 rating 5 rating
  • Member since
    December 2003
  • From: 37deg 40.13' N 95deg 29.10'W
Posted by scottrc on Sunday, February 4, 2018 12:27 PM

Hi Dave,

I got a chair pulled up and will watch your build with interest.  Your RL build had so much great information.  You are very talented with your use of color and presentation of details.  This is going to be fun. 

Scott

  • Member since
    December 2012
Posted by rwiederrich on Sunday, February 4, 2018 2:06 PM

I'm on board Dave.

Rob

  • Member since
    April 2016
  • From: Russia, St.Peterburg
Posted by kirill4 on Sunday, February 4, 2018 3:38 PM

Hi Dave,

This is nice kit, and

I know -it will be very interesting building, if You decided to do it ! 

Wish You Luck! :)

Kirill

  • Member since
    September 2005
  • From: Groton, CT
Posted by warshipguy on Sunday, February 4, 2018 7:29 PM

Dave,

After your outstanding build of the Le Soleil Royal, I will watch this with great interest!

Bill

  • Member since
    July 2013
Posted by steve5 on Sunday, February 4, 2018 8:41 PM

looking forward to it dave


  • Member since
    July 2010
  • From: Tempe AZ
Posted by docidle on Sunday, February 4, 2018 10:21 PM

Dave,

I'm aboard so pull up the ladder! This will be a pleasure to follow to say the least. 

Got a question for you. You probably already answered it in the other thread but are you going to use a deck from Scaledecks.com? I have mine for this and the Alabama builds and cannot say enough about them.

Anyway, wishing you luck bud.

Steve


  • Member since
    March 2012
  • From: Marysville, WA
Posted by David_K on Monday, February 5, 2018 5:07 PM

Thanks to everyone for the warm regards!

I hope you all enjoy the show!!...and I hope I can do it justice.  I actually got my first Cutty Sark kit as a lot from a guy on CL several years ago, when I first started building ships (I got the Cutty Sark, the Revell Constitution, and the Imai Chebec for 100 bucks total), but I knew I would need to wait on the CS and the Constitution until I honed my shipmodeling chops a bit.

I recently happened across an open-box Cutty Sark on OfferUp for 20 bucks, and bought it toot-sweet since it was a good deal and I figured it wouldn't hurt to have extra parts.

I have a pretty good idea of how I'll proceed with the build (enough to get started, anyway)....though I still have some ?? about installing lower deadeyes to the deck/bulwarks/pinrails.  I may need to do some dry-fitting of parts to see how it all sits and figure out where to put *chainplates* (for lack of a better term)...I may drill holes in the deck and run annealed wire up through it near the bulwarks and fix the deadeyes to the caprail/pinrail that way.  Again, I need to get a bit further in before I make the decision.

And speaking of deck (docidle), yes, I do intend to order the Scaledecks Cutty Sark deck set.  I hear lots of good things, and I'm glad you share in the rave reviews!  Question:  Will I need to paint the kit deck parts, or do you think it better to leave them bare plastic?  Also, has anyone had issues with fixing deck furniture to the wood?  Are there special considerations for installing the material and using it with plastic?  What about staining the wood some way?

These are some of the things that pop into my head while I imagine the possibilities! Suppose I'll figure it out as I go.

Thanks again, I'll have some progress to share pretty soon.

Dave

        _~
     _~ )_)_~
     )_))_))_)
     _!__!__!_         
     (_D_P_K_)
   ~~~~~~~~~~~~~
    ~~~~~~~~~~~

Current Project:  Imai/ERTL Spanish Galleon #2

Recently Finished: Revell 1/96 Cutty Sark

Next Up:  ???


  • Member since
    December 2012
Posted by rwiederrich on Tuesday, February 6, 2018 7:38 AM

Dave...I found my copy of the 1985 Scale Model mag that has a remarkable build of the Cutty Sark.  The man who built it did so in 6 months and with full sails(included in the kit).

His job was spectacular!  I will try and provide some images tonight when I get home.

Rob

  • Member since
    September 2012
Posted by GMorrison on Tuesday, February 6, 2018 11:37 AM

The way you describe fixing the deadeyes is the right one.

You can see that there's a long rod which is an extension of the lower deadeye strop, and it goes down through the waterway at the edge of the deck. 

The lower end is attached somehow internally to the ships frames, which are iron.

The kit pin rails are just so oversized and clunky that this detail will hardly show, unless you decided to replace them or cut them down.

 Modeling is an excuse to buy books.


  • Member since
    December 2012
Posted by rwiederrich on Tuesday, February 6, 2018 1:18 PM

Indeed this is true about the oversized rails where the deadeyes are afixed.  this is done to accomodate the bulky two sided deadeye assemblies.  One could easily cut them down and make them flush with the odd placed (Or normal sized) rails.

There are braces that support the rails as well that extend down and these can compete for space and room to work them when you add the Deadeye iron braces at this scale.

I opted to fix all my deadeyes to a seporate piece of wood(Off model), then glued the entire arrangement in the place of the plastic molded kit ones.  Then I ran lanyards in the typical fasion.  I found this easier then if I had first glued the rails to the bullworks and then ran the braces up and through the rail to secure the deadeyes.

Setting the deck would have damaged the pre-set rails with their installed deadeyes.

I chose this easier process..because I had lots of other (More important IMV)rigging details to focus on.

Rob

  • Member since
    September 2005
  • From: Groton, CT
Posted by warshipguy on Tuesday, February 6, 2018 1:24 PM

Dave,

I am using the ScaleDecks CSS Alabama set, which is terrific!  I did paint the plastic deck under it flat black because of the coal scuttles and vents that were on deck.  The decks do not come with any fixative, you must actually glue the wood deck onto the plastic.  The directions come with a discussion of which glues work best. I used Gorilla Glue. The directions are quite clear about all aspects of glueing and protecting.

Bill

  • Member since
    December 2012
Posted by rwiederrich on Tuesday, February 6, 2018 6:02 PM

I was able to rustle some images from that article on the Cutty with Kit sails.

The images are poor but the skill used to create the look is amazing.


Rob


  • Member since
    December 2012
Posted by rwiederrich on Tuesday, February 6, 2018 6:03 PM

Another

  • Member since
    December 2012
Posted by rwiederrich on Tuesday, February 6, 2018 6:03 PM

Another

  • Member since
    December 2012
Posted by rwiederrich on Tuesday, February 6, 2018 6:04 PM

Lastly a centerfold image.

Rob

  • Member since
    December 2010
  • From: Salem, Oregon
Posted by 1943Mike on Wednesday, February 7, 2018 8:11 PM

Dave,

I've no doubt whatsoever that you'll not just do it justice .. you'll do it proud!

This should be a fun ride. Looking forward to your using the noteworthy skills you've acquired in this hobby on another of the great plasitc sailing ship kits.

I've no doubt about Rob's skills either but I have a question on the pictures of the model of the CS he's posted - wouldn't the crew try to have the deadeyes be parallel along the length of the ship? Perhaps that was, if not impossible, then impractical while under full sail? Just curious.

Mike

"Le temps est un grand maître, mais malheureusement, il tue tous ses élèves."

Hector Berlioz

  • Member since
    May 2006
  • From: Chapin, South Carolina
Posted by Shipwreck on Wednesday, February 7, 2018 8:35 PM

David, 10 years ago I started researching the Cutty Sark. I did so much research I never built the kit. Now I am trying to start the Constitution. The CS is great kit; maybe someday I will get back on board? For now I will enjoy following your build. Good luck!

On the Bench:

Revell 1/96 USS Constitution - rigging

Kinetic 1/48 YF-104A 5+2957

Trumpeter 1/350 USS Hornet CV-8

Revell 1/48 B-1B Lancer Prep & Reasearch


  • Member since
    May 2017
  • From: Asheville, NC
Posted by LIVIT on Wednesday, February 7, 2018 11:29 PM

Dave, looking forward to your build. CS is on the Bucket list. I just recently did scale decks on my Connie build. I used regular elmers water based white glue to adhere deck to plastic deck.  You can change the tone of the Scale decking by painting the OOB deck. Also found that alot of glues do not easily adhere to the scale deck. Myself and Gene are both big fan of the 560 canopy glue. It may take a few xtra minutes to set, but it cleans up with water and once dry it adheres brass eyebolts to scale deck or plastic and good luck getting them back out. I had orginally used ca to adhere my cannons down with and they came loose, went back used the 560 and no more probs. Plus it dries clear without glossy appearance.  Dale

  • Member since
    July 2013
Posted by steve5 on Wednesday, February 7, 2018 11:46 PM

rob

would love to see that model , look's superb .

dave , livit

never heard of 560 glue , who make's it , where can I get it ??

anyone , able to help in australia ?


  • Member since
    May 2017
  • From: Asheville, NC
Posted by LIVIT on Thursday, February 8, 2018 4:41 AM

Steve, ZAP & Pacer industries makes it. Been using it on RC Plane and Boat canopies for years. Proper name is "Formula 560 canopy glue" You should not have any probs finding it. Local hobby shop or any on line rc dealer will carry it.

I have electric Radio controlled boats that reach speeds in excess of 100mph/160 kph and  electric RC planes that I have achieved speeds almost double that and the 560 glue held the canopy in place. It is a very good product and not that expensive. Dale

  • Member since
    December 2012
Posted by rwiederrich on Thursday, February 8, 2018 8:20 AM

Shrouds were living things and they stretched with the motion of the masts..and at times the lanyards needed to be tightened..that's why they are there...to tighten the shrouds and backstays, so if they are not even that is not far from accurate.  Typically the length of the lanyard binding was 3 times the width of a deadeye.  That helped measurment deficient crewmen keep things lined up and sharp.

However, unevenness is part of normal on a sailing ship.....unless you are an inspecting admiral.Indifferent

Rob

  • Member since
    September 2012
Posted by GMorrison on Thursday, February 8, 2018 10:24 AM

Here's a picture of the wreck of the Ambassador, another composite tea clipper built in the same year as Cutty Sark.

She was sold and sent to the breakers in 1896. Currently the frame sits on the beach in Tierra del Fuego, Chile.

I think this can help see why the Cutty Sark is so different from all timber ships that came before.

 Modeling is an excuse to buy books.


  • Member since
    September 2005
  • From: Groton, CT
Posted by warshipguy on Thursday, February 8, 2018 10:47 AM

Bill,

Do you know of any preservation efforts for the Ambassador?  She makes a remarkable study!

Bill

  • Member since
    September 2012
Posted by GMorrison on Thursday, February 8, 2018 11:20 AM

Yes she is as National Landmark. I don't know what the preservation effort might be. Certainly she's in a pretty in accessible location.

It would make a great model.

 Modeling is an excuse to buy books.


  • Member since
    September 2005
  • From: Groton, CT
Posted by warshipguy on Thursday, February 8, 2018 12:04 PM

Bill,

Her frames look remarkably intact.  She looks as if she could be rebuilt!

Bill

  • Member since
    September 2012
Posted by GMorrison on Thursday, February 8, 2018 12:10 PM

Dave, I noticed in the earlier photo of the pin rail I posted, and you can see on the Ambassador as well, the CS bulwarks are iron plate.


 Modeling is an excuse to buy books.


  • Member since
    December 2012
Posted by rwiederrich on Thursday, February 8, 2018 12:48 PM

NOPE Bill ....she has since collapsed since this image was taken.

A rusty collapsed mess..what was once a living moving vessel.


Rob

  • Member since
    September 2005
  • From: Groton, CT
Posted by warshipguy on Thursday, February 8, 2018 1:17 PM

Rob,

It's a real shame. What an unfortunate loss!

Bill

  • Member since
    September 2012
Posted by GMorrison on Thursday, February 8, 2018 1:27 PM

Here's a photo of Dave's ship. You can see a lot of useful detail, including the rods to which the shrouds were attached, at left and right up on the weather deck level.

They appear to be over the frames, perhaps it's as simple as a shackle through the top of a frame.

A major benefit of the composite ships was the much larger and open hold space.

What an unholy mess.

 Modeling is an excuse to buy books.


  • Member since
    September 2012
Posted by GMorrison on Thursday, February 8, 2018 1:33 PM

David,

If I may be so bold, a suggestion. Looking at that dreadful photo I just posted, one of the prettier aspects of it is the deck camber.

I haven't built this kit since when, but i guess the plastic decks are flat.

Since/ if you are using a scaledeck type of deck finish, it might not be too difficult to make a new subdeck with some thinnish styrene. Put that down over simple arched beams, maybe six in all.

Apologies, just a thought.

 Modeling is an excuse to buy books.


  • Member since
    December 2012
Posted by rwiederrich on Thursday, February 8, 2018 3:30 PM

This looks like the Cutty Sark just after the fire that gutted her.Huh?

Good example for the Deadeye braces.


Rob

  • Member since
    March 2012
  • From: Marysville, WA
Posted by David_K on Thursday, February 8, 2018 7:07 PM

I'm loving all the great info, and the enthusiasm of the subject here :)

Rob, I'm still working on my plan for the rails/deadeyes, but I can already tell what you mean about pre-assembling them to make it easier.  My current plan is to drill out the hull at the edge of the deck, and the pinrails, where the deadeyes should sit.  Then I'll run some length of wire up through both holes when I install the rails....I definitely think the deadeyes will need to go in at that time, concurrent with the positioning of the rails...and BEFORE anything else gets in the way!  Maybe even before the deck, if I can swing it. BTW, great pics of that CS model!

Dale, thanks for the info for the 560 glue....I'll be sure to get some for the adhesion of parts the wooden deck.

GM, I really like that pic of the Ambassador...a literal skeleton, derelict on a beach!  What a trip.

I don't mind the *boldness* of any suggestions lol, and I bet adding camber to the deck would be totally doable...not sure if it's in my list of mods...though I think you're right, some simple "underlayment" of styrene sheet could make a nicely convex surface to which the deck could be attached.

I've spent a little time this week with part prep for painting (pulling flash, filing down EP marks, etc.) and it got me into more planning and drilling for deadeyes...it'll be difficult to explain it all clearly, but here's my attempt:

I had to remove the pinrails and deadeye parts from the sprue, and dry fit them to get exact locations for the deadeyes.

 20180208_150719 by Dave Kump, on Flickr

I then marked the rails where each deadeye would sit (note that some deadeyes sit directly above the slot where locator pins fit the deadeye piece into the rail piece, so no mark was necessary at these points)

 20180208_155136 by Dave Kump, on Flickr

I also marked the scupper (?) area at the edge of the deck/hull in the same locations, directly below the marks on the rails.

Then I drilled out an oversized hole in the railing where the deadeye sits (I want the holes a bit big, to hopefully reduce extra stress and allow some play on the pinrail when the shrouds get tightened...don't want to pull off a rail!)...

 20180208_160928 by Dave Kump, on Flickr

Note that the deadeyes for the Mizzen mast do not lead through a pinrail, but just some caprail molded into the hull, so those areas needed to be drilled out, as well...BUT, there are 2 more locator slots for the deadeye parts back there, with nothing below them to fix a wire....so I put a couple pieces of styrene to fill the gap below, and I'll drill those out tomorrow and use the holes for my wire on the mizzen deadeyes.

 20180208_154040 by Dave Kump, on Flickr

Once I get the hull painted (still a ways off) and get ready to put in the rails, I'll run wire up through the hull holes, and through the pinrail holes (for fore and main) and strop the deadeyes thusly.  *crosses fingers*

I probably have a week before some semi gloss white paint comes in the mail (couldn't find it at the LHS) so I have some time for more prep before the paint starts to fly....

Thanks for watching!

Dave

        _~
     _~ )_)_~
     )_))_))_)
     _!__!__!_         
     (_D_P_K_)
   ~~~~~~~~~~~~~
    ~~~~~~~~~~~

Current Project:  Imai/ERTL Spanish Galleon #2

Recently Finished: Revell 1/96 Cutty Sark

Next Up:  ???


  • Member since
    September 2012
Posted by GMorrison on Thursday, February 8, 2018 7:12 PM

Our pleasure! Beats the heck out of cable news lol.

"Scupper", or "waterway".

Looks like the situation is under control. It's well documented there, always interesting to see where theory encounters reality.

I don't think the CS had wire shrouds, but they came in around that time. I think USN ships had them at that time.

 Modeling is an excuse to buy books.


  • Member since
    May 2017
  • From: Asheville, NC
Posted by LIVIT on Friday, February 9, 2018 2:39 AM

Dave your welcome, if it happens that you cannot get it down under let me know. I would have no problem with posting you some. I can already see this is going to be an impressive build. Going to be nice to have when I eventually do one. I too enjoy the community joining in with suggestions and pics.  

  • Member since
    December 2012
Posted by rwiederrich on Friday, February 9, 2018 8:03 AM

Dave..if you are going to be so precise in your modification for realism, why not do it accurately as you can.  The rail that supports the plastic deadeyes has been widened for fabricational and practical assembly purposes.  On the actual ship the rail the deadeyes pass through is just bearly wider.   They are all nearly the same width and the space were the deadeye sits, there is no pin.  So why not simply reduce the width of your rail to within a mm of all the other rails and then place your deadeyes were they go(removing pins in the way)? You won't miss them anyway.

Second thought, because the rail is so wide and your deadeyes are placed father back on the rail to accomodate the design...your deadeye bars will go nearly un-noticed being back so far and due to the rails proximity to the deck house.  A lot of work for no visual reason.  That is why I chose for myself not to go that route, but simply afix the deadeyes to a styrene plate and then glue that to the rail.  I'm not suggesting you do what I did...but I reasoned out that some mods are just not as necessary in this scale...plus, I thought the addition of real deadeyes and lanyards to this kit was a significant *Upgrade* to the kit supplied deadeyes.

Good luck.

Rob

  • Member since
    September 2012
Posted by GMorrison on Friday, February 9, 2018 9:44 AM

Real dead eyes will eliminate that nasty bar at the bottom of the kit part that ties them together as well.


 Modeling is an excuse to buy books.


  • Member since
    March 2012
  • From: Marysville, WA
Posted by David_K on Saturday, February 10, 2018 8:06 AM

Yes, there's no question....I'll be using real deadeyes and lanyards.  I stopped using fake deadeyes and shrouds on my 3rd kit, and I'll never go back :) Not sure if that was clear already or not?

The holes in the rails and scuppers are to accommodate black wire that will be my chainplate/strop for the lower deadeyes.

Rob, do you have a couple pictures of your CS with the deadeyes fixed to the railing? I'd like to have a better idea of how you did it....the more I consider what I'm planning, I fear the strain of the shrouds will put my pinrails in danger of popping off, just from the angle toward the masttop.

Thanks!
Dave

        _~
     _~ )_)_~
     )_))_))_)
     _!__!__!_         
     (_D_P_K_)
   ~~~~~~~~~~~~~
    ~~~~~~~~~~~

Current Project:  Imai/ERTL Spanish Galleon #2

Recently Finished: Revell 1/96 Cutty Sark

Next Up:  ???


  • Member since
    February 2016
  • From: Western No. Carolina
Posted by gene1 on Saturday, February 10, 2018 9:59 AM

Dave, you are an artist with ships & you don't need any luck as good as you are. Like everyone else I am anxious to see your build. I have been using the Formula 560 glue for over 30 years & it is the best all around glue you can use for most anything in model building. One thing, it won't ruin a painted finish because you just wipe it off with a wet Q Tip. It even holds well on painted surfaces.

   Like Dale says, once it sets you won't pull it apart. I use it for glueing decks down, cannons on , shroud tables on & now I will use it for eyebolts too/. I don't know why i didn't use it for them before. I still use CA for a lot of bare plastic to bare plastic glueing, because CA will not hold on painted parts

  • Member since
    December 2012
Posted by rwiederrich on Saturday, February 10, 2018 12:13 PM

Dave..I knew you were intending to use deadeyes and lanyards..I was making the reference *IF you do* as a general point to any and all who may try them.

Now..I don't have any images of what I did on my CS..but I do have some images of how I did it on the Ferreira..which is in all intense and purposes the CS..just in a reduced fasion.

Here you can see that I added tail pieces to the transition between the main deadeye rail and the general pin rail.  The blunt *stop*in width was unpleasant to me to I tapered them.  Then of course I heavely weathered everything.

Rob

  • Member since
    December 2012
Posted by rwiederrich on Saturday, February 10, 2018 12:21 PM

Hear is an image that shows the deadeyes are glued to a piece of styrene and then fixed to the rail.  It was far easier to do it this way(IMV), and once painted, they blended in nicely to the rail. And once rope coils are added to the pins they completely un-noticed.

This is how I did it on my CS version.  Same process, different ship.

Rob

  • Member since
    December 2012
Posted by rwiederrich on Saturday, February 10, 2018 12:25 PM

In this image you can see some shrouds and such being added..again you can see the fixed deadeyes to the rails.  I never had any issues of rails popping off the whales...and I use CA activated with Monomer.  Monomer is an exellerant not unlike CA excellerant, but I drop it on with a needle applicator.  It hold magnificently.

Rob

  • Member since
    December 2012
Posted by rwiederrich on Saturday, February 10, 2018 12:29 PM

OH, and when I mentioned the issue of not being able to see the deadeye chainplate rods under the extended rail...its because you just wont see them, evidenced by this image that shows the deep shadows behind the pins..and coupled with hanging rope coils, and the proximity to the house ...well you get the picture.

Rob

  • Member since
    December 2012
Posted by rwiederrich on Saturday, February 10, 2018 12:43 PM

Lastly...the reason my model is so heavely weathered is because the vessel I was modeling was extremely weathered and neglected.  I'm showing you this because of the artistic value and the modeling challenge it posed.

Good luck with your build.....I'll be watching.


Rob

  • Member since
    March 2012
  • From: Marysville, WA
Posted by David_K on Sunday, February 11, 2018 8:43 AM

Very helpful pics, Rob...Thanks!

        _~
     _~ )_)_~
     )_))_))_)
     _!__!__!_         
     (_D_P_K_)
   ~~~~~~~~~~~~~
    ~~~~~~~~~~~

Current Project:  Imai/ERTL Spanish Galleon #2

Recently Finished: Revell 1/96 Cutty Sark

Next Up:  ???


  • Member since
    March 2012
  • From: Marysville, WA
Posted by David_K on Saturday, February 24, 2018 9:54 AM

Hi All-

Figured I could post a couple pics and show the slight progress since last time.

I'm basically still in the preparatory stage, gathering materials and *getting ready*.

I ordered some brass pedestals, and bought a piece of Red Oak for the display base...cut and routered the wood, drilled it, and I'll stain it once the sanding is done.  BUT, when the pedestals came, I went to drill out the holes (I'm using #10 screws to mount into the hull, but the pedestals come tapped for like 3mm screws or something) the second piece slipped in the vise and my drill bit went wonky and tore through the side of the brass...ordered a new set from Model Expo, hopefully be here next week.

Also in this picture, you can see the hardware I'm using to mount the model; the wooden blocks will be epoxied within the hull so the screws can have a sturdy material to bite into and help stabilize everything.

 20180224_072556 by Dave Kump, on Flickr

Here are the PE decorations, flags, and draft decals from Radek/HisModel...they look great!  Flags are printed on both sides, the decals look robust and should work well (I actually contacted Revell and they sent me a replacement set of the kits decals, since I knew my 30-some year old kit decals would be useless...they arrived the other day, but the stuff from Radek is far superior)...

 20180224_072733 by Dave Kump, on Flickr

Here's a close-up of the Photo-Etch...it's awesome!  the resolution is tight, very smooth lines...can't wait to see how they look installed!

 20180224_072806 by Dave Kump, on Flickr

Here's the Scaledecks wooden deck parts...looks really nice!

They recommend spraying it with dullcote or some such to protect it from smudges, etc., while working with it, so I'll take their advice.  I'm also going to cut some of the excess area from the outside and practice with adhesives, workability, trimming, stuff like that before I dig into the actual parts. Worth noting that the kit deck parts still need to be painted to match, because there are some small areas where the plastic part will show through (hole for bowsprit, for example)...

 20180224_072405 by Dave Kump, on Flickr

 20180224_072437 by Dave Kump, on Flickr

All in all, the aftermarket stuff looks really, really nice.  I'm happy these add-ons are available. 

Waiting for a day with a bit warmer temps so I can primer the parts...don't want to jump the gun and have frozen, fuzzy primer for my basecoat!

Thanks for looking!

Dave


        _~
     _~ )_)_~
     )_))_))_)
     _!__!__!_         
     (_D_P_K_)
   ~~~~~~~~~~~~~
    ~~~~~~~~~~~

Current Project:  Imai/ERTL Spanish Galleon #2

Recently Finished: Revell 1/96 Cutty Sark

Next Up:  ???


  • Member since
    September 2012
Posted by GMorrison on Saturday, February 24, 2018 10:47 AM

Say Dave, that’s pretty exciting stuff.

If you’ve not worked with wood decks before, be aware that it can’t be pressed down when installing it.

I have fit problems in general between objects like deck houses or gun turret bases.

Not so much overall fit.


 Modeling is an excuse to buy books.


  • Member since
    March 2012
  • From: Marysville, WA
Posted by David_K on Saturday, February 24, 2018 10:56 AM

Hmmm...what do you mean, it can't be pressed down?

As in, it is delicate and will break if I put pressure on it?

        _~
     _~ )_)_~
     )_))_))_)
     _!__!__!_         
     (_D_P_K_)
   ~~~~~~~~~~~~~
    ~~~~~~~~~~~

Current Project:  Imai/ERTL Spanish Galleon #2

Recently Finished: Revell 1/96 Cutty Sark

Next Up:  ???


  • Member since
    September 2012
Posted by GMorrison on Saturday, February 24, 2018 11:02 AM

Sometimes they won't lay flat because there a bind somewhere and they are buckled up a little. The temptation is to press down with something rounded like the end of an Xacto, to get it to stick to the plastic deck.

I've found that in time it will always pop back up.


 Modeling is an excuse to buy books.


  • Member since
    May 2017
  • From: Asheville, NC
Posted by LIVIT on Saturday, February 24, 2018 11:11 AM

Dave, that scale deck is going to really look great. I used regular water based elmers white glue to adhere mine. I painted on a thin coat, half the deck at a time, this allowed more than enough working time to get it all to lay flat. I did not do anything to protect the surface, I think the little smudges give it a more realistic look.

  • Member since
    December 2003
  • From: 37deg 40.13' N 95deg 29.10'W
Posted by scottrc on Sunday, February 25, 2018 8:10 AM

GMorrison

Sometimes they won't lay flat because there a bind somewhere and they are buckled up a little. The temptation is to press down with something rounded like the end of an Xacto, to get it to stick to the plastic deck.

I've found that in time it will always pop back up.

I've learned also, with using the wooden deck on an aircraft carrier, that the deck would warp and curl if exposed to humidity and sunlight and after staining. I work in a basement in front of a skylight. After experiencing this, I gave the decks a coat of thinned sanding sealer and pinned them to my building board to cure before working with them. I did both sides and sanded the glue side for the adhesive to get a good bite.  It seemed to help a lot.


  • Member since
    March 2012
  • From: Marysville, WA
Posted by David_K on Tuesday, February 27, 2018 5:37 PM

Hopefully I can get a decent result with the scaledeck...if I can get the glue to hold it down, I'll be happy.

Meanwhile, I got anxious and decided to break out the airbrush.  Instead of my typical spraying marathon, I'm doing it in several-day stages, since I need certain layers to dry before I move to the next section.

After priming a lot of the kit parts to get a consistent base (still not sure why the crosstrees that will be white were molded with the brown sprues, and the crosstrees that will be brown were molded with the white sprues?) , I sprayed the white stripe for the wale on the exterior hull, and the inner bulwarks...

 20180226_162914 by Dave Kump, on Flickr

I also painted all the other white parts white, but I didn't take a picture of those.

Today, I sorta masked off for the lower hull, just to keep overspray from getting on the white, and painted the sheathing.  I have always had trouble with getting a quality representation of metallic colors with Testors Model Master (my go-to paint), so when it comes to metallics, I like Tamiya.  I went with a 50/50 mix of copper and gold for this effect, I think it looks pretty close to the *muntz metal* or whatever that is on the bottom of the ship (at least from the pictures I've seen)...

 20180227_151346 by Dave Kump, on Flickr

Next, I'll have to do a REAL masking job and make the line across the sheathing AND below the white wale so I can lay down the black for the hull exterior.  I'll use Parafilm M and some masking tape to help with the curve of the lines for masking (love that Parafilm)...

Anyway, I should have most of the airbrushing down in a few days.  After that, there's really nothing to stop me from building some momentum.

Thanks for stopping by!

Dave

        _~
     _~ )_)_~
     )_))_))_)
     _!__!__!_         
     (_D_P_K_)
   ~~~~~~~~~~~~~
    ~~~~~~~~~~~

Current Project:  Imai/ERTL Spanish Galleon #2

Recently Finished: Revell 1/96 Cutty Sark

Next Up:  ???


  • Member since
    September 2012
Posted by GMorrison on Tuesday, February 27, 2018 5:43 PM

Damn gorgeous. Don't forget to paint the rudder before you run out of your magic mixture!

Muntz Metal is what usually is called "brass' in architectural stuff. I've got gobs of it around the office. You've nailed the look. Not at all gold, but fairly yellow.


 Modeling is an excuse to buy books.


  • Member since
    March 2012
  • From: Marysville, WA
Posted by David_K on Tuesday, February 27, 2018 5:57 PM

Thanks, GM!  Glad it turned out well...the coat went down very easily, which is a reminder of why I primed the hull first...otherwise it would have taken a ton of paint to get an even coat over black plastic.

Here's a question I haven't settled on an answer for:

Flat Black, or Semi-Gloss Black for the upper hull?  Doesn't seem like it would matter too much, but the choice keeps nagging me.  I don't feel like the black part of the hull would actually be shiny, but if I go with flat black, it may be too contrasted against the lower hull...so I figure maybe semi-gloss would be a good call?

Dave

        _~
     _~ )_)_~
     )_))_))_)
     _!__!__!_         
     (_D_P_K_)
   ~~~~~~~~~~~~~
    ~~~~~~~~~~~

Current Project:  Imai/ERTL Spanish Galleon #2

Recently Finished: Revell 1/96 Cutty Sark

Next Up:  ???


  • Member since
    September 2012
Posted by GMorrison on Tuesday, February 27, 2018 6:07 PM

I'd say semi-gloss would look best. Considering it took one hundred days to sail from China to England, you've got a range of options.

Are you using enamels? I haven't used any black enamels in a while except for real black. 


 Modeling is an excuse to buy books.


  • Member since
    November 2009
  • From: Twin Cities of Minnesota
Posted by Don Stauffer on Wednesday, February 28, 2018 6:58 AM

Testors used to make a semi-gloss enamel called Black Chrome.  Hard to find now, though still in some racks.  They make a new one just called Semi-gloss Black, but that is hard to find too.  Just getting added to racks.  Comes in both bottles and spray cans.


Don Stauffer in Minnesota

  • Member since
    September 2012
Posted by GMorrison on Wednesday, February 28, 2018 10:07 AM

That last one does come as a Tamiya  Acrylic color.

 Modeling is an excuse to buy books.


  • Member since
    December 2003
  • From: 37deg 40.13' N 95deg 29.10'W
Posted by scottrc on Wednesday, February 28, 2018 1:04 PM

It kinda also depends on how glossy the lower hull and the rest of the ship will be.  I would say the semi-gloss would help balance the contrast of what could be a glossy copper lower hull and the flat natural wood deck.  

I generally will punt at the end and give the whole ship a coat of artist satin clear before I step the masts.  Then its all the same level of contrast.  Then again, I'm a "dull" person.  Smile

  • Member since
    April 2016
  • From: Russia, St.Peterburg
Posted by kirill4 on Wednesday, February 28, 2018 3:02 PM

Good day Dave,

follow your building with great interest ... in far - far future ...have plan to assemble the same kit :))) may be...:)))

regatding black color... I could suggest start with flat black...but it shouldn't  be" mono" black color... various" dark gray/ brown" may be???..." gloss " You can add any time you want....

and bottom part, color of" munz" metal ... shouldn't be " shiny"... too much...?

I mean., there shouldn' t be too much contrast in shining...?

  • Member since
    December 2012
Posted by rwiederrich on Wednesday, February 28, 2018 4:32 PM

Brand new Muntz metal was known as Yellow metal.

I think Dave's color is probably what it looked like brand new without any oxidization.


But as soon as it was put in salt water it tuned a brownish metalic color.  I think it is highly subjective actually.  Dave's looks smart.

I tend to weather my ships so I chose a brownish metalic color.

Rob

  • Member since
    December 2010
  • From: Salem, Oregon
Posted by 1943Mike on Wednesday, February 28, 2018 8:14 PM

Dave,

After having read what the fine modelers on this site say regarding colors for the hull - both above and below the waterline, just do what you think is going to satisfy #one - you.

I'm a little embarrassed to view the up close pictures of my CS now. Heck, I have her in my living room on a side table positioned so it's difficult to view from closer than 7 or 8 feet Big Smile. At that distance it still seems attractive to me.

I experimented with a weathering technique that probably has no basis in reality but that I thought might look "cool". I think it was Big Jake who made reference to the technique involved for which I am grateful but again, not convinced it would ever happen. My attempt at this technique was just so-so but at 7 or 8 feet ... it's OK.

I thought I'd post one picture of the hatch that the anchor chains go around just to give you a heads up. At least the way mine turned out the chains would be rubbing on the framing for the hatch each time the anchors were raised or lowered. I couldn't figure a way to solve that problem. Maybe it's not much of a "problem" but it bothered me.

Anyway, your thread is going to be better than most of the entertainment on TV so I'll be following along on your build as I usually do for any of your Works In Progress.


Mike

"Le temps est un grand maître, mais malheureusement, il tue tous ses élèves."

Hector Berlioz

  • Member since
    September 2012
Posted by GMorrison on Thursday, March 1, 2018 3:38 PM

It is wrong. Here's a little conjecture on my part.

The windlass that raises the anchors is forward under that little anchor deck. I don't remember if it comes with the kit. Campbell's drawing shows the windlass without the chain on it, I think.

But the chain should go into a "spurling" pipe as close behind the windlass as possible, and down into the chain locker. There'd be no good reason, and lots of bad ones, to have it running around the deck. Once the chain comes off the windlass the only force that will stow it below is gravity on the vertical part of the chain between the spurling hole and the top of the stack of chain in the locker. Including a long horizontal run, and the friction of the chain on the deck, only confounds that. Toward the end of raising the hooks, when the stack of chain in the locker gets up towards the underside of the deck, you'd be defeated and the windlass would be piling chain up all over that fore deck.

The spurling pipe usually has a quarter dome scuttle over it, open end facing forward.

I cannot for the life of me find a photo of that part of the deck. Perhaps tourists aren't allowed up there.

Looking at models, FWIW, the closest I could find to what Revell says to do is one where the chains run back past those two companionway covers, and the spurling pipes are sort of to either side of that hatch, spread apart far enough that the chain misses the hatch coaming. 

Without a clear copy of the drawings, I cant see what that hatch is over. If it's a cargo hold, those chains would be in the way down below.

If I were to build the model, I'd set the spurling pipes a short distance behind the windlass and have the chains disappear into them.


 Modeling is an excuse to buy books.


  • Member since
    September 2012
Posted by GMorrison on Thursday, March 1, 2018 3:40 PM

Here's a photo I came across for you, Dave.

 Modeling is an excuse to buy books.


  • Member since
    December 2010
  • From: Salem, Oregon
Posted by 1943Mike on Thursday, March 1, 2018 4:31 PM

GM.

Here are the Revell instructions and another shot of my build with the chain problem. Please tell me (and Dave) how one would correct this issue. All I did was follow the instructions. Revell does provide the windlass. Even with the chain at the farthest points starboard and port on the windlass, still no joy.


Mike

"Le temps est un grand maître, mais malheureusement, il tue tous ses élèves."

Hector Berlioz

  • Member since
    September 2012
Posted by GMorrison on Thursday, March 1, 2018 5:02 PM

You've got the spurling pipe covers. Those are Part 102.

It's hard to see, but that looks like the anchor windlass up there at the underside rear edge of the little anchor deck.

The apparatus in step 17 is a winch for handling cargo.

I'd like to see a photo a little further forward. From the instructions you can see a T shaped device on the forecastle (anchor) deck. That's the lever set for turning the anchor windlass.

Again I can't find a photo of this part of the ship, but the search continues.

The question is where to position those Parts 102. It has to be somewhere forward, paired up behind the rollers of the windlass in between the heads or companionways or whatever those two things are.

 Modeling is an excuse to buy books.


  • Member since
    December 2010
  • From: Salem, Oregon
Posted by 1943Mike on Thursday, March 1, 2018 5:40 PM

"I'd like to see a photo a little further forward. From the instructions you can see a T shaped device on the forecastle (anchor) deck. That's the lever set for turning the anchor windlass."

GM, Your wish is my command.

Mike

"Le temps est un grand maître, mais malheureusement, il tue tous ses élèves."

Hector Berlioz

  • Member since
    September 2012
Posted by GMorrison on Thursday, March 1, 2018 6:17 PM

Here's what I can find.

The anchor chains were not reinstalled on the ship after the fire. I found a few pictures looking forward in the fore part of the hold, and there are no chains dropping through, or signs of a chain locker or pipes.

There 's a few photos up on deck, showing the windlass, and a companionway behind it that's been installed for a tourist stair. No chains in sight.

There is a short piece of chain in one picture kind of laying againt this other new companionway, and a short piece draped over the freight winch.

If I were building the model, I'd follow this example, correct or not. It makes pretty good sense.


 Modeling is an excuse to buy books.


  • Member since
    September 2012
Posted by GMorrison on Thursday, March 1, 2018 6:34 PM

 Modeling is an excuse to buy books.


  • Member since
    May 2006
  • From: Chapin, South Carolina
Posted by Shipwreck on Thursday, March 1, 2018 7:36 PM

1943Mike


Mike, you almost have it right. You just have to place the chains on the drum ends of the cargo winch. The capstan transferes the chain to the winlass, from there it is hauled across the deck by the cargo winch, and feed it into the nave pipe down to the cable locker below deck.


On the Bench:

Revell 1/96 USS Constitution - rigging

Kinetic 1/48 YF-104A 5+2957

Trumpeter 1/350 USS Hornet CV-8

Revell 1/48 B-1B Lancer Prep & Reasearch


  • Member since
    May 2006
  • From: Chapin, South Carolina
Posted by Shipwreck on Thursday, March 1, 2018 7:43 PM

Shipwreck
 
Mike, you almost have it right. You just have to place the chains on the drum ends of the cargo winch. The capstan transferes the chain to the winlass, from there it is hauled across the deck by the cargo winch, and feed it into the nave pipe down to the cable locker below deck.


I think the problem is that something is out of scale. I would guess that the scutttle hatch is too close to the winch.

On the Bench:

Revell 1/96 USS Constitution - rigging

Kinetic 1/48 YF-104A 5+2957

Trumpeter 1/350 USS Hornet CV-8

Revell 1/48 B-1B Lancer Prep & Reasearch


  • Member since
    September 2012
Posted by GMorrison on Thursday, March 1, 2018 8:29 PM

Here's Longridge on the subject:

"Chain pipes-two small chain pipes must be made, they go through the deck on each side of the chain locker hatch., but far enough apart for the cable to clear the sides of the fore hatch."


 Modeling is an excuse to buy books.


  • Member since
    November 2005
  • From: Formerly Bryan, now Arlington, Texas
Posted by CapnMac82 on Thursday, March 1, 2018 8:50 PM

There's a very real possibility that Revell put the spurlings in the wrong location.  Or got the hatch dimension wrong.

Found this photo:

Which may give a clue as to where this went sideways.

The anchor deck is a fascinating cubby space.  Ref:

Thw capstan and windlass are not connected.  The capstan is served by bars racked on the house for the heads.  The windlass is driven using T-bar handles in the rocking head up on the anchor deck.

Now, when sailing vessels started using chain for rodes (chain lockers being very much smaller than cable tiers, allowing more cargo) that created a problem.  A chain locker is a compartment is rather a large weight in a ship.  And being out by the bow it has a considerable moment arm to the ship's CG.  So, it's in the deisgner's interest to get the locker as far aft as possible.

Now, what may have happened is that, for setting the anchor, where the windlass is only needed for its pawl, is to flake out on deck the amount of rode required.  Considering it's stowed in a compartment below the waterline, the chani is likely rusted and wanting attention before being set out.

Browsing the intertuubs, it appears to be a question that has nagged many modelers; with a variety of solutions.  Which seem to split between, ignore it, and move the spurlings to a fair lead.

  • Member since
    September 2012
Posted by GMorrison on Thursday, March 1, 2018 9:11 PM

The overhead taken before the fire. I did have a reference I now can't find, but I will. It suggested that the chain couldn't be run out over the gypsy head on the windlass, so when dropping the anchor it had to be run around. The cargo winch, perhaps one further aft than the foremast, could be used to warp a long length of chain down the deck and back.

 Modeling is an excuse to buy books.


  • Member since
    April 2016
  • From: Russia, St.Peterburg
Posted by kirill4 on Friday, March 2, 2018 8:08 AM

Good day,

this is interesting questing , abt anchor chain... have somewhere Campbell's drwngs... need to find it...

  • Member since
    April 2016
  • From: Russia, St.Peterburg
Posted by kirill4 on Friday, March 2, 2018 8:14 AM

Aha...here is it... not Cutty Sark, but proposed tea clipper... deck plan 

...removed...

  • Member since
    April 2016
  • From: Russia, St.Peterburg
Posted by kirill4 on Friday, March 2, 2018 8:20 AM

but for Cutty Sark he( Campbell) has different chain pipes location... 

removed...Mike posted fragment of the same foto

  • Member since
    April 2016
  • From: Russia, St.Peterburg
Posted by kirill4 on Friday, March 2, 2018 9:22 AM

Sorry if it is against the low... to post his drwngs here ...than if somebody need some drwngs from his book ,China Tea Clipper, in high resolution, pls ask kirill4_66@mail.ru , I will give the link to download it in private mode :) ...

  • Member since
    September 2012
Posted by GMorrison on Friday, March 2, 2018 9:28 AM

You probably should take them down. Nice resolution...

 Modeling is an excuse to buy books.


  • Member since
    December 2010
  • From: Salem, Oregon
Posted by 1943Mike on Friday, March 2, 2018 12:09 PM

I'm not sure why it would be necessary to take down part of the set of plans Kirill has. We paid for them and should be able to share part of them with fellow modelers. A copyright lawyer should chime in here.

Anyway, what Kirill shows is part of the same set of plans I have. I still don't see how the chain could be kept from rubbing the hatch frame - even after having looked at these plans.

For what it's worth here's a slightly closer view of what Kirill posted (from my set of plans).

I'm certain I don't have the skills to have altered/scratch built parts for this kit when I was working on it. Dave probably does and may choose to follow the Campbell plans or work out a solution of his own.


Mike

"Le temps est un grand maître, mais malheureusement, il tue tous ses élèves."

Hector Berlioz

  • Member since
    September 2012
Posted by GMorrison on Friday, March 2, 2018 12:40 PM

Because, and I speak from some experience; a partial plan and a full plan are two completely different things.

I once asked Blue jacket about this, and that was their answer.

 Modeling is an excuse to buy books.


  • Member since
    May 2006
  • From: Chapin, South Carolina
Posted by Shipwreck on Friday, March 2, 2018 1:45 PM

I think that I figured out how to post a Flicker photo? I tried doing this in and earlier post. It shows how the anchor chain is hauled across the deck by the cargo wench and feed into the chain pipe.


 CS Winch:Chain by Benjamin Zabriskie, on Flickr

On the Bench:

Revell 1/96 USS Constitution - rigging

Kinetic 1/48 YF-104A 5+2957

Trumpeter 1/350 USS Hornet CV-8

Revell 1/48 B-1B Lancer Prep & Reasearch


  • Member since
    May 2006
  • From: Chapin, South Carolina
Posted by Shipwreck on Friday, March 2, 2018 2:16 PM

Another angle may help! Compliments of John Richardson's Cutty Sark Ferreira, p185.


 CS Winch:Chain:Hatch by Benjamin Zabriskie, on Flickr

On the Bench:

Revell 1/96 USS Constitution - rigging

Kinetic 1/48 YF-104A 5+2957

Trumpeter 1/350 USS Hornet CV-8

Revell 1/48 B-1B Lancer Prep & Reasearch


  • Member since
    September 2012
Posted by GMorrison on Friday, March 2, 2018 2:20 PM

Nice! Ben.

It also looks like the coaming around the base of that hood/ companionway has rivets at the corner (?) and a flange on the deck. If it was an  iron "L" I guess the chain could just run against/ over it.


Bill

 Modeling is an excuse to buy books.


  • Member since
    April 2016
  • From: Russia, St.Peterburg
Posted by kirill4 on Friday, March 2, 2018 3:25 PM

Thank You very much ! - very informative foto! :)))

  • Member since
    December 2010
  • From: Salem, Oregon
Posted by 1943Mike on Friday, March 2, 2018 3:39 PM

Ben thank you for those photos! To me it looks like they show what GM suggested might be the case - an iron flange around the bottom corners of the hatch. If that's the case then my concern was totally unfounded.

GM - thanks for the edification regarding what you've been told by BlueJacket. I guess it would be better to err on the side of caution regarding posting complete plans. Kirill did only post 1 of 3 pages but it's a complete page so probably best to adhere to your suggestion.

Mike

"Le temps est un grand maître, mais malheureusement, il tue tous ses élèves."

Hector Berlioz

  • Member since
    September 2012
Posted by GMorrison on Friday, March 2, 2018 3:43 PM

Mike, now you need to add an iron angle that's 1/16" x 1/1/16" around the base of that hatch!

 Modeling is an excuse to buy books.


  • Member since
    April 2005
  • From: Roanoke, Virginia
Posted by BigJim on Saturday, March 3, 2018 3:36 PM

A close look at this photo may be of some help with the anchor chain.

  • Member since
    December 2012
Posted by rwiederrich on Sunday, March 4, 2018 2:03 PM

For anyones edification

  • Member since
    December 2012
Posted by rwiederrich on Sunday, March 4, 2018 2:04 PM

  • Member since
    December 2012
Posted by rwiederrich on Sunday, March 4, 2018 2:05 PM
  • Member since
    March 2012
  • From: Marysville, WA
Posted by David_K on Monday, March 19, 2018 5:22 PM

Quick progress update...

Got the wire installed in the hull for the lower deadeye strops/chainplates, and glued the hull halves together.

 20180315_161621 by Dave Kump, on Flickr

I'm a little bummed about the molding of the hull parts....the wales don't line up at the stern, even though the upper edge and keel are aligned....I don't have a picture of that yet, but they look uneven, and I'll have to do something to try and fix it.  Good ol' Revell!

lol

Here's another pic of the hull, during test-fit of the base.  I used 3/4" Red Oak, and pedestals from Model Expo.

 20180316_144457 by Dave Kump, on Flickr

You'll notice the inner bulwarks are *weathery*....I can't help but apply some texture, I feel like bare paint just looks fake, so I went ahead with some thinned oils to help fill in the shadows and add some character....The oil actually darkened the lower hull so much that it now looks more like copper than the original paint I laid down...no biggie to me, but it's worth mentioning.

And finally, here's another pic after I stained the wood for the base....it's installed and levelled out (I go through great pains to make sure everything is level at this point...even if there's a minute *list*, by the time the upper masts and yards are on, it will be exxagerated!)....the bolts are tightened, tomorrow I'll apply a bunch of epoxy down in the hull to keep the hardware from ever coming loose later (which happened on my Soleil Royal, and it was a *royal* pain to re-stabilize the pedestals after the deck was in!)

 20180319_145515 by Dave Kump, on Flickr

The instructions say that mast assembly is next, so I guess that's what I'll be doing for awhile.

Thanks for looking!

Dave


        _~
     _~ )_)_~
     )_))_))_)
     _!__!__!_         
     (_D_P_K_)
   ~~~~~~~~~~~~~
    ~~~~~~~~~~~

Current Project:  Imai/ERTL Spanish Galleon #2

Recently Finished: Revell 1/96 Cutty Sark

Next Up:  ???


  • Member since
    December 2010
  • From: Salem, Oregon
Posted by 1943Mike on Monday, March 19, 2018 5:54 PM

Looking great Dave. Your weathering technique looks right on as usual.

What gauge wire and of what material did you use for attaching the strops/chainplates?


Mike

"Le temps est un grand maître, mais malheureusement, il tue tous ses élèves."

Hector Berlioz

  • Member since
    February 2016
  • From: Western No. Carolina
Posted by gene1 on Tuesday, March 20, 2018 10:39 PM

David, your work is just flawless looking. Everything you do looks perfect. Your posts are a joy to watch.      Gene

  • Member since
    March 2012
  • From: Marysville, WA
Posted by David_K on Wednesday, March 21, 2018 4:35 PM

Thanks for the compliments, guys!

Mike, the wire I used is 28 gauge annealed dark wire, the brand is Hillman.  I've used it before for deadeye strops, and other various uses in shipmodeling....I like it because it's dark in color, and it's flexible, so it can be bent and twisted several times before it will break.  Pretty cheap, too...you can find it on eBay or Amazon for a couple bucks per 50 feet.


Dave

        _~
     _~ )_)_~
     )_))_))_)
     _!__!__!_         
     (_D_P_K_)
   ~~~~~~~~~~~~~
    ~~~~~~~~~~~

Current Project:  Imai/ERTL Spanish Galleon #2

Recently Finished: Revell 1/96 Cutty Sark

Next Up:  ???


  • Member since
    July 2006
Posted by Michael D. on Wednesday, March 21, 2018 10:02 PM

Nice start on the Cutty Sark DaveYes. No doubt I'll be appling some of your tecniques when the time comes for me to do mine when I eventually get my Victory back dating project done..


Michael D.

  • Member since
    May 2017
  • From: Asheville, NC
Posted by LIVIT on Wednesday, March 21, 2018 10:37 PM

Hi Dave, looking great bud. So the deadeyes for the CS go on the inside of the hull ? I have never built a CS, so will be following your build closely.  Thanks for info on that wire, I am ordering some now, should be a help on my Connie or a future build.    Dale

  • Member since
    December 2010
  • From: Salem, Oregon
Posted by 1943Mike on Wednesday, March 21, 2018 11:09 PM

Dave,

I had a feeling it looked like the stuff I have. It is. I have a box of 10 of those 50ft. reels. Lord knows if or when I'll ever use them all but that stuff has come in handy more than once on ships and aircraft. 

If I ever rig another Cutty Sark I'll use your method.

Mike

"Le temps est un grand maître, mais malheureusement, il tue tous ses élèves."

Hector Berlioz

  • Member since
    July 2013
Posted by steve5 on Friday, March 23, 2018 5:19 AM

beautiful as always dave , could you tell me where you got those pedestals , from please .


  • Member since
    December 2010
  • From: Salem, Oregon
Posted by 1943Mike on Friday, March 23, 2018 10:22 AM

Steve,

Dave, in his post at the top of this page, said:

"Here's another pic of the hull, during test-fit of the base.  I used 3/4" Red Oak, and pedestals from Model Expo."

Mike

"Le temps est un grand maître, mais malheureusement, il tue tous ses élèves."

Hector Berlioz

  • Member since
    July 2013
Posted by steve5 on Friday, March 23, 2018 3:08 PM

thank's mike , sorry dave . it pay's to read everything , instead of being mesmerised by the build


  • Member since
    March 2012
  • From: Marysville, WA
Posted by David_K on Saturday, March 24, 2018 8:49 AM
Really cool video, Rob! THX
        _~
     _~ )_)_~
     )_))_))_)
     _!__!__!_         
     (_D_P_K_)
   ~~~~~~~~~~~~~
    ~~~~~~~~~~~

Current Project:  Imai/ERTL Spanish Galleon #2

Recently Finished: Revell 1/96 Cutty Sark

Next Up:  ???


  • Member since
    December 2012
Posted by rwiederrich on Saturday, March 24, 2018 9:29 AM

Thought it was quite informative.

  • Member since
    December 2010
  • From: Salem, Oregon
Posted by 1943Mike on Saturday, March 24, 2018 1:29 PM

Rob,

Thank you for posting that video.

I wasn't sure if I'd heard the narrator correctly when he referred to "the iron hull" in one section of dialogue but a few seconds on the internet got me the information I needed. Even though the script in that video may not have been 100% accurate as far as "the iron hull" is concerned, I found out (thanks to my ignorance and the video) that sections of the hull were indeed made of iron.

From: Royal Museums Greenwich:

"Cutty Sark’s hull was innovative for its composite design, which combined wooden planks with an iron 'skeleton' of frames, beams and cross bracing. The result was a very strong, rigid ship, with more room for cargo, because the iron framework took up substantially less space than a wholly wooden hull.

Originally the hull was covered in Muntz metal, a composite that was developed in Birmingham. The current sheathing has the same appearance, but is more readily available today."


Live and learn.

Mike

"Le temps est un grand maître, mais malheureusement, il tue tous ses élèves."

Hector Berlioz

  • Member since
    September 2012
Posted by GMorrison on Saturday, March 24, 2018 1:43 PM

Here's the iron part, Mike. (Different ship).

Then the entire hull was planked with oak. Over that is the Muntz metal, replacing what would have been copper on a warship or anti-fouling paint on commercial ships.

 Modeling is an excuse to buy books.


  • Member since
    March 2012
  • From: Marysville, WA
Posted by David_K on Sunday, April 8, 2018 10:46 AM

Hey Everyone-

Thought I would stop in for a quick post.

Not a lot of especially exciting developments...I've been detail painting mast parts and applying some texture via oil washes.  I also started putting together lower deadeyes for the crosstrees so they're in place before mast assembly...using 3.5mm walnut deadeyes from Model Expo and some annealed black wire, I drilled holes in the cross trees (using the plastic deadeye parts as spacing gauges)....then I wrapped a short piece of wire around the deadeyes, twisted it around itself once, snipped off one end and pushed the remaining end down through the crosstree hole. Bent it over like a hook, and CA'd it in place...Boom!

 20180408_080459 by Dave Kump, on Flickr


Regarding my wood deck from Scaledecks...

I cut out all the pieces and decided to try a test fit of the main deck...to my surprise, it didn't quite fit.  The wooden part seemed to be too long (by about an 1/8")...if I fit it on one end it would line up, but it gradually grew more misaligned along the length, to the point that the holes for the foremost hatch were off by 1/8".

I was concerned, and considered that maybe I'd trimmed too much material from kit plastic parts (it's 3 large plastic deck parts cemented together to make the main weather deck)...but 1/8" is a lot of material to have taken off with a sanding stick.  I decided to reach out to Scaledecks to see if they'd heard of any other similar issues.

John at Scaledecks is a great guy, very communicative and helpful.  He told me this issue had occured rarely with their previous cutting instrument (they've since gotten a new cutter).  He graciously offered to send me a replacement, which I received quickly, and the fit is MUCH BETTER!

Additionally, there is a new design of the Cutty Sark deck kit that they offer, with a darker, richer teak coloration, and with some mismatched planks and other little nuances to give it a more realistic aspect.  It's a beautiful set.  In fact, I'd hate to say I'm glad the first set was faulty...but if it wasn't then I would not be using the new design, so there's that!

Anyway, here's a pic of the original deck, and the new style deck from Scaledecks...some may prefer the clean lines of the lighter colored deck, but for me, I really dig the new one.

 20180408_080400 by Dave Kump, on Flickr

*Oops, I posted the same pic twice...it's edited to display the correct pic now :)

Once I finish the masts, I guess I'll be installing the deck and putting eyebolts into it...I'll bring some notes and pics to the next update.

Thanks!

Dave


        _~
     _~ )_)_~
     )_))_))_)
     _!__!__!_         
     (_D_P_K_)
   ~~~~~~~~~~~~~
    ~~~~~~~~~~~

Current Project:  Imai/ERTL Spanish Galleon #2

Recently Finished: Revell 1/96 Cutty Sark

Next Up:  ???


  • Member since
    March 2012
  • From: Marysville, WA
Posted by David_K on Sunday, April 8, 2018 11:33 AM

Might as well add a few more pics...

Here's how I'm stropping my deadeyes (as described in the previous post)....these pics are of the t'gall deadeyes, which are super-tiny (2.5mm)...

 20180408_090555 by Dave Kump, on Flickr

I'm using the same gauge wire, so it's a bit burly compared to these tiny deadeyes

I wrapped the wire to loop around the deadeye and make it a snug fit

 20180408_090638 by Dave Kump, on Flickr

Then I bring one end of the wire over the other to loop it

 20180408_090724 by Dave Kump, on Flickr

Trim off the end, and tuck it up snugly behind the deadeye, and Ta-Da!

 20180408_090851 by Dave Kump, on Flickr


        _~
     _~ )_)_~
     )_))_))_)
     _!__!__!_         
     (_D_P_K_)
   ~~~~~~~~~~~~~
    ~~~~~~~~~~~

Current Project:  Imai/ERTL Spanish Galleon #2

Recently Finished: Revell 1/96 Cutty Sark

Next Up:  ???


  • Member since
    December 2003
  • From: 37deg 40.13' N 95deg 29.10'W
Posted by scottrc on Monday, April 9, 2018 11:47 AM

Great update David, that new deck does have more appeal than the older one.  

  • Member since
    March 2012
  • From: Marysville, WA
Posted by David_K on Sunday, April 15, 2018 11:57 AM

I agree, Scott.

I actually made some more progress this week...got most of the deck parts glued down, and even started on some shading/weathering of the scaledecks.

One point I want to make is the means of adhesive for the scaledecks.

I started out with contact cement....big mistake!  It makes a strong bond, but it grabs instantly once the parts touch each other, leaving zero time for adjustment/alignment...it was stressful, and I wasn't able to get the large deck section lined up perfectly.  I switched to regular testors liquid styrene cement for the last few pieces, and it worked great!  nice bond, plenty of time to get it all lined up before it set.  Anyway, I needed to share that point :)

Once I got the parts on, I did a little trimming on the edges, installed the brass (blackened) eyebolts and then set about some texturing.  John at Scaledecks recommended against using anything *wet* for weathering (oil paint, regular paint, washes, etc.) so I used some artist pastels I had from years ago (basically earthy-colored chalk sticks)....I used them with a gentle application and shaded the areas using a stump, or tortillon (another tool artists use for shading)...it worked pretty well, though I could use some more practice.

Here's a few pics....some of the deck parts after they were cemented, and some with shading for comparison...I may go a couple more passes with the pastels to even out the shading, but I think it looks *okay*...

Thanks for watching!
Dave

 20180409_171128 by Dave Kump, on Flickr

 20180410_150603 by Dave Kump, on Flickr

 20180411_154830 by Dave Kump, on Flickr

 20180411_154841 by Dave Kump, on Flickr

 20180415_092144 by Dave Kump, on Flickr

 20180415_092204 by Dave Kump, on Flickr


        _~
     _~ )_)_~
     )_))_))_)
     _!__!__!_         
     (_D_P_K_)
   ~~~~~~~~~~~~~
    ~~~~~~~~~~~

Current Project:  Imai/ERTL Spanish Galleon #2

Recently Finished: Revell 1/96 Cutty Sark

Next Up:  ???


  • Member since
    December 2012
Posted by rwiederrich on Sunday, April 15, 2018 7:02 PM

Dave..looking very good.

I'm quite sure your model will be exceptional.

Personally I'm not a fan of the multi-color plank deck..but that is irrelevant.

Here are some images of the CS deck for reference...during her long life.

  • Member since
    December 2012
Posted by rwiederrich on Sunday, April 15, 2018 7:05 PM

Dave..if you are going to add some of your weathering details...will these be applied to the deck as well?

Your hull is spectacular. 

Rob

  • Member since
    March 2012
  • From: Marysville, WA
Posted by David_K on Monday, April 16, 2018 5:01 PM

Thanks for the compliment, Rob, and thanks for the pics!  I always love getting some good views of ships!

I've actually already applied a good amount of my weathering...though, it's more of a shading technique, meant to add a little more texture than actual weathering.  If you look at the first two pics of my previous post, those are images of the wood decks glued down as-is...the next two pics show the main deck without any shading, but with a forecastle(?) deck having had some shading applied...the two last pics show the main decks (and pretty much all of them) having all been treated with shading, via the artist pastel chalks.

I'm going for a subdued, but still shaded and slightly weathered look, both for the decks, and for the rest of the model...even the mast and deck furniture are really only getting a mild treatment, to add just a touch of *weather* and mostly for shading and texture....

I wonder if I went too subtle with the decks, if it's not really noticeable?  Maybe I'll go over them with a little more vigor one more time.

I got the main deck glued in, and when I removed the clamps this afternoon, nothing popped open, so that's a good sign!  lol  The hull was slightly warped and need to be held tight to the deck while the glue dried...I'm glad it held.

Dave

        _~
     _~ )_)_~
     )_))_))_)
     _!__!__!_         
     (_D_P_K_)
   ~~~~~~~~~~~~~
    ~~~~~~~~~~~

Current Project:  Imai/ERTL Spanish Galleon #2

Recently Finished: Revell 1/96 Cutty Sark

Next Up:  ???


  • Member since
    December 2012
Posted by rwiederrich on Monday, April 16, 2018 6:52 PM

Looking forward to your progress.

Rob

  • Member since
    July 2013
Posted by steve5 on Monday, April 16, 2018 9:38 PM

dave your build is looking wonderful , looking forward to seeing more

steve5


  • Member since
    March 2012
  • From: Marysville, WA
Posted by David_K on Sunday, May 6, 2018 1:59 PM

So I've been on hold with this build, because of an impasse.

Early on, I decided on a means to install the lower deadeyes...any who've built this kit know the kit-supplied deadeye assemblies are meant to be glued to the inboard pinrails, and used with the coated thread shroud/ratline assemblies included.  Those threaded shroud/ratline mesh parts don't apply much in the way of tension (if at all) to the pinrails, so for those who use them, there's no issue.

For me, I prefer to use wooden deadeyes, and rig my shrouds and ratlines.  This means I needed to find another way to fasten the deadeyes, because the tension of the shrouds would quickly pop the pinrails off, no matter how well they were glued to the bulwarks.

So....I pre-installed some annealed wire through drilled holes below the waterways, drilled adiditional holes in the pinrails, and led the wire through when I installed the pinrails.  When I made this plan months ago, I foolishly assumed it would work without a hitch, and even if any trouble came up, I'd find a way to make it work.

Boom.

Once I started trying to install the lower deadeyes using the wire, I quickly realized I had little control over the finished height of the deadeyes.  With so little room to work between the pinrails and the bulwark, and the stiffness of the wire, I couldn't after many tries, get the deadeyes to sit at a consistent level.  It was terribly frustrating.

I finally figure out a way that I think will work.  And it means more or less abandoning the wire for stropping.  I've done a few with the *new* method, and I think it will hold up and allow me finer control of deadeye height.  PHEW!

Anyway, the point of this long-winded post is that I've been absent for awhile, trying to get around an obstacle, and I wonder how many others have dealt with the frustration of the lower deadeyes on this kit?

...but I may have gotten past it!

I'll take some pics of the process and include them with my next post, to help it all become more clear.

It's unusual for me, because all my previous builds involving replacing kit deadeyes with wooden parts and tied shroud/ratlines have been pretty easy, using channels, chainplates and brass pins/eyes in the hull....with no channels, it makes the Cutty Sark a real departure.

Thanks!

        _~
     _~ )_)_~
     )_))_))_)
     _!__!__!_         
     (_D_P_K_)
   ~~~~~~~~~~~~~
    ~~~~~~~~~~~

Current Project:  Imai/ERTL Spanish Galleon #2

Recently Finished: Revell 1/96 Cutty Sark

Next Up:  ???


  • Member since
    December 2012
Posted by rwiederrich on Sunday, May 6, 2018 9:16 PM

The pin rail IS the channel in this application.  That is why I fixed all the lower deadeyes to a thin wood strip then glued that to the rail..painting it the same color...so it would blend in.  What else are you gonn do that works well?  They never are even noticed.  Good shrouds and ratlines make up for the necessity of the mod.

You could always add the deadeyes to the rail prior to its install..by drilling small holes that the wire pass through...the same wire used to strop the deadeye....or you can band the deadeye with fine copper strips (Paint white)then drill small holes through the mating ends and thread wire through, secure and then run that through the holes in the pin rail.Huh?

I still prefered my easiest/earlier method as you might find out for yourself.

Move on to what is really noticed....yards and thier rigging.

Good luck in what ever you do.

Rob

  • Member since
    March 2012
  • From: Marysville, WA
Posted by David_K on Tuesday, May 8, 2018 8:17 PM

Interesting you would suggest that, Rob, because that was one of my ideas for them...to install the deadeyes to a piece of flat material, and then attach that to the rail...but I was afraid of the tension of the shrouds pulling the pinrail off.

I also considered making a flat piece (same as above) and trying to put some kind of angled brace on it and attaching via the inner bulwarks, thus avoiding the perilous pinrail pulling.

Once I've gotten a few more installed, I'll take some pics of my hybrid technique, and post it here...not that I would recommend this way to anyone, since I'm really just using what's necessarily left from my original idea, and salvaging it with an easier, more consistent method.

Thanks!
Dave

        _~
     _~ )_)_~
     )_))_))_)
     _!__!__!_         
     (_D_P_K_)
   ~~~~~~~~~~~~~
    ~~~~~~~~~~~

Current Project:  Imai/ERTL Spanish Galleon #2

Recently Finished: Revell 1/96 Cutty Sark

Next Up:  ???


  • Member since
    September 2012
Posted by GMorrison on Tuesday, May 8, 2018 8:55 PM

You've got to cut yourself some slack too. These kinds of projects seem feasible "all else being equal", but it never is.

The bulwarks may be too low, the pinrail is too thick, the pins are baseball bats.

Whatever you come up with Maestro, the results will be so much superior to the original.

 Modeling is an excuse to buy books.


  • Member since
    March 2012
  • From: Marysville, WA
Posted by David_K on Tuesday, May 8, 2018 9:31 PM

"Baseball Bats."

lol. Yes, it seems that way sometimes, Bill!

I am going to have to cut myself some slack on this one...at this point, I'm desperate to move on....

So I got one pinrail section of deadeyes installed, not my prettiest work, but it'll do and hopefully they won't stand out too much later.  Here's the deal:

My original plan was to run these wires up through the waterways in drilled-out holes, then through holes in the pinrail, install the deadyes by wrapping the wire around and twist, snip, done.

 20180508_182501 by Dave Kump, on Flickr

I soon realized the wire wasn't going to be forgiving enough, and I couldn't keep them uniform in height (the deadeyes, that is)....so I decided to trim the wire, curl it into a little hook, and use black line as my strop/chainplate

 20180508_182512 by Dave Kump, on Flickr

Using the line as my new strop, I feed one end under the wire *hook*

 20180508_182613 by Dave Kump, on Flickr

And using a sweet little styrene jig with a notch cut out of it, I pulled the line up to bring the deadeye to a prescribed height, clipped the line to the jig, and tied it snug...

 20180508_182622 by Dave Kump, on Flickr

 20180508_182717 by Dave Kump, on Flickr

 20180508_182750 by Dave Kump, on Flickr

 20180508_182826 by Dave Kump, on Flickr

 20180508_182903 by Dave Kump, on Flickr

 20180508_182946 by Dave Kump, on Flickr

This last pic is of the entire pinrail (12 deadeyes, all 3.5mm except the middle two, which are 4mm)...they look pretty messy and uneven, but that's mostly (!) becasue they are now free to settle onto the wire hooks. Once the shrouds are on, the deadeyes will be pulled back up the original height that they were tied at (all things being equal)...

 20180508_190549 by Dave Kump, on Flickr

Anyway, I've got 54 more to install to the hull...with luck I'll be a pro by the end of the starboard side, and the port will be my default display side! 

Again, I don't think this is the best way...it's just what I ended up with...I'm sure if I tangle with the Cutty Sark again, I'll devise some other plan....I like Rob's idea of pre-installing them and then affixing the whole assembly as one piece.


Thanks for watching!
Dave


        _~
     _~ )_)_~
     )_))_))_)
     _!__!__!_         
     (_D_P_K_)
   ~~~~~~~~~~~~~
    ~~~~~~~~~~~

Current Project:  Imai/ERTL Spanish Galleon #2

Recently Finished: Revell 1/96 Cutty Sark

Next Up:  ???


  • Member since
    December 2012
Posted by rwiederrich on Wednesday, May 9, 2018 8:21 AM

Interesting approach Dave.  I never had any issues of the rail popping off due to stress from the shrouds...because, along with good glue...I also reinforced under the rail with blocking..joining the bottom of the rail with the side of the bullwark, forming a much larger glueing surface.  There is ample room beneath the rail to hide this additional blocking..because of the depth and shallowness of the rail and the close proximity of the deck house...you will never see beneath the rail as you can in your photograph.  Plus if you set/glue your deadeyes to a thin piece of stryrene you have all that surface to bond to  the rail that you already reinforced. Paint the styrene.

Or you can simply attach the deadeyes directly to the rail(skipping the styrene) prior to glueing the entire rework to the bullwark

Plus your deadeyes will be below the monkey rail as they should be.

I did this technique on both my CS and the Ferriera..and I had no issues of seporation or pulling off of the rail from the bullwark.

Your painting and deck look wonderful...I can't wait to see more.


Rob

  • Member since
    March 2012
  • From: Marysville, WA
Posted by David_K on Saturday, June 2, 2018 8:29 AM

Finally got the lower deadeyes all installed, and I've been able to move onto assembly/install of deck furniture.  Very happy to be able to proceed, at last!  Those deadeyes gave me a serious case of *builder's block*....lol

I do have to say, even after installing the *forecastle* deck with the windlass, there are more fit issues.  I had to perform dramatic reshaping of the focsl deck to get it even close to snugging up between the fore waterways of the hull parts, and then the windlass didn't want to line up.  Seems like it's been one thing after another with this kit...maybe it's a Revell thing, maybe it's just "one of those builds", you know?  Maybe I got spoiled with all the Imai kits I built before :)

Anyway, I've got some deckhouses, pumps, and ladders to detail, then hopefully the install goes smoothly.  No pics this time, but once I get the next 4 steps (21-24) completed, I'll share some thoughts and images.

Thanks, wish me luck!

Dave

        _~
     _~ )_)_~
     )_))_))_)
     _!__!__!_         
     (_D_P_K_)
   ~~~~~~~~~~~~~
    ~~~~~~~~~~~

Current Project:  Imai/ERTL Spanish Galleon #2

Recently Finished: Revell 1/96 Cutty Sark

Next Up:  ???


  • Member since
    July 2010
  • From: Tempe AZ
Posted by docidle on Tuesday, June 5, 2018 12:22 AM

Getting those deadeyes lined up sounds like a bear. I’m glad to know you ”got her done!”

So far you have done an outstanding job on her bud. I can hardly wait to see the next set of pics.

Steve


  • Member since
    March 2012
  • From: Marysville, WA
Posted by David_K on Sunday, June 24, 2018 10:00 AM

I spent the last couple of weeks installing deck furniture...

Happy to report the fit of most of these parts is pretty good, so I may not have to abandon the build, after all! lol (the hull and the decks offered crummy fit in all the wrong places, very frustrating, and I'm glad to be past that stage!)


Here's a couple of pics...

Full-length deck view...

 20180624_072614 by Dave Kump, on Flickr

Funny, the *slight* weathering I applied to the decking doesn't show up in the photos very well...here's an aft-deck picture, if you look around the hole where the mizzen mast will step, you can make out some darker shading, and also further forward, at the borders of the deckhouse...in reality it's a bit more obvious, but I may go over the entire deck again before masts go in.  The chalk pastels are a great way to weather over the scaledecks wood, the effect can be very subtle.

 20180624_072646 by Dave Kump, on Flickr

I made sure to only cement the pump parts to hold the structure together, but left the rotational parts free, so the handles can be turned and the rods will move up and down!

 20180624_072722 by Dave Kump, on Flickr

I still have several areas in which to install furniture, boats, etc., but it won't be long before I'm putting blocks on the masts and getting started on rigging.  Always surprises me how the rigging steps seem so far away until *BOOM*...it's time to wax some thread!

A couple of things I haven't gotten figured out yet, and would appreciate some advice on:

-Soon the railings will be installed that call for "thread wrapped around the stanchions"...the handrail.  Anyone have pointers on how they approached these?  I feel like thread could easily start looking hokey, but I don't know what others have done.

-Anchor chain.  I didn't plan ahead, and it looks like the instructions say to connect chain to the anchors, then run it through the hawseholes, under the forecastle deck, and leading to the *ports* (?) below the foredeck windlass?  It looks like a funky setup, and also, the foreward hatch seems too wide, like the chain would rub on it?

Any insight on these areas would be appreciated.

Thanks again for watching!

Dave


        _~
     _~ )_)_~
     )_))_))_)
     _!__!__!_         
     (_D_P_K_)
   ~~~~~~~~~~~~~
    ~~~~~~~~~~~

Current Project:  Imai/ERTL Spanish Galleon #2

Recently Finished: Revell 1/96 Cutty Sark

Next Up:  ???


  • Member since
    September 2012
Posted by GMorrison on Sunday, June 24, 2018 10:46 AM

http://cs.finescale.com/fsm/modeling_subjects/f/7/p/177929/2000193.aspx?page=3

This is looking sharp, Dave. 

There was a discussion here about the anchor arrangement. I'll look for the link and add it to this reply. 

The conclusion was that the anchor chain is raised by a windlass under the fore deck, then runs across the deck to a second windlass and goes down into the chain lockers. The chains run around the sides of that hatch, and rub against the sides. The sides of the hatch coaming are reinforced with iron angles to run the chain against.

 Modeling is an excuse to buy books.


  • Member since
    December 2012
Posted by rwiederrich on Sunday, June 24, 2018 11:04 AM

Dave...I hand laid the rails with styrene..NO string.  I'll look for more images.

  • Member since
    December 2012
Posted by rwiederrich on Sunday, June 24, 2018 11:06 AM

Another

  • Member since
    December 2012
Posted by rwiederrich on Sunday, June 24, 2018 11:09 AM

Stern rail

  • Member since
    December 2012
Posted by rwiederrich on Sunday, June 24, 2018 7:03 PM

Another aft rail image.  I had to cut each lower rail and bend to appropriate curve before glueing.  T hen weathering.

  • Member since
    December 2012
Posted by rwiederrich on Thursday, July 5, 2018 12:20 PM
David, how is the CS build coming along. I can't wait to see what solutions you have devised for your next step. Rob
  • Member since
    March 2012
  • From: Marysville, WA
Posted by David_K on Saturday, July 7, 2018 10:17 AM

Thanks, you guys...and thanks for the railing pics, Rob.

My current position is step 38 from the instructions...boats and davits.

I still have anchors, bumkins, and a little more railing, deck furniture and figurehead to install before I switch gears to rigging.  It's interesting to note that there are several steps in the instructions that show a particular assembly detail, but it is stated to wait and perform a step later (after standing rigging, or after head gear rigging, for example)...so I have LOTS of notes and highlighted sections in the instruction sheet margins reminding me to go back later and revisit sections, so I can complete steps from before.

Rob, the styrene you used for the handrailing looks great!  Once I get everything else on deck, I'm going to go back address the railing, but not sure if I'll use styrene or what...maybe some fine wire, or something...i'll experiment a little and see what I like.

The caprail around the stern and foredeck areas was another area that gave me fit-trouble, and the starboard fore bulwark was molded low, so the cathead protruded above it, I had to dremel off a LOT of material to keep the cathead low so the caprail would lay down over it...

All in all, it's going pretty good.  I have had to fight with the kit in a few places during the journey this far, and I'll need to perform a bit of touch-up to clean up some areas that became messy during the *battle*  lol

Dave

        _~
     _~ )_)_~
     )_))_))_)
     _!__!__!_         
     (_D_P_K_)
   ~~~~~~~~~~~~~
    ~~~~~~~~~~~

Current Project:  Imai/ERTL Spanish Galleon #2

Recently Finished: Revell 1/96 Cutty Sark

Next Up:  ???


  • Member since
    December 2012
Posted by rwiederrich on Saturday, July 7, 2018 10:40 AM
As I recall the junctions between the cap rail at the stern and forecastle was problematic at best and I did have to recontour and add filler to make it seamless. One point I was making in my build was to replicate years of minor blemishes and defects that are present in wathered ships(Not to mention the entire rudder thing). I'm looking forward to some images of updates and how you tackle other issues. The davits are extremely flimsy and rigging them will require ingenuity. I opted to swing one outboard as would be done when a boarding ladder was pressed into service....I'm using it to haul gear. Good luck. Rob
  • Member since
    December 2012
Posted by rwiederrich on Saturday, July 7, 2018 11:21 AM

I'm trying to remember about any cathead issues with my build...was your kit an older or newer kit?  Mine was one from the original early issues.

Here is an image of the forecastle and the cathead area before I layed down the rail...did yours appear like mine?  And what did you have to cut down exactly...the bulward or the cathead?

  • Member since
    March 2012
  • From: Marysville, WA
Posted by David_K on Saturday, July 7, 2018 2:06 PM

The Port fore bulwark is ~3/16", and the stbd bulwark is more like 1/8"...so it was substantially lower to stbd, but only in the forecastle area.  My kit is an older one, as well, box says 1974.  I can clearly see that your bulwarks were quite even in height.

When I tes-fit the stbd cathead, it protruded a good way above the bulwark, so the caprail would not lie flat across it. Here's a pic of both catheads....hopefully you can see the starboard cathead has been ground flat, while the port still has the U-shaped profile at the underside....it's because I had to remove so much material for the starboard side so it would sit flush with the bulwark.

 20180707_114524 by Dave Kump, on Flickr

Super-close image makes it obvious there's some overglue present.  lol

There have been so many misalignment fubars that I'm going to have to spend a few hours before rigging starts just cleaning up the glue, paint mishaps, etc. in several spots.

Also in the pic you might be able to see to misalignment of the fore deck piece (though it's mostly cropped out)...I couldn't get the edges to line up with the hull, and after sanding for so long, it was finally beginning to cause the deck to sit too far forward so that the windlass wasn't going to fit in its place....so I had to give up on reshaping the foredeck and just live with it....with some shading/weathering applied later, I'm hoping to minimize the conspicuousity (word?) of the gap.

Don't even get me started on ejector pin marks, seam flash, etc...I'll say it again, I must have been spoiled by Imai and Zvezda!  :)


BTW, I noticed you must have scratchbuilt that pump/apparatus on the port deckhouse side?  Looks much better than the molded-on silhouette.  Nice touch!

Dave

        _~
     _~ )_)_~
     )_))_))_)
     _!__!__!_         
     (_D_P_K_)
   ~~~~~~~~~~~~~
    ~~~~~~~~~~~

Current Project:  Imai/ERTL Spanish Galleon #2

Recently Finished: Revell 1/96 Cutty Sark

Next Up:  ???


  • Member since
    December 2012
Posted by rwiederrich on Monday, July 9, 2018 8:33 AM

Cleaning up alignment issues makes you a better adapter...not only that, but more flexible to scratch building.  It will be a testemenant to your skill when all the *Issues* of the kit have been masked behind clever corrections.  Sometimes a minor out of character correction  can be masked by additions of layered details....such as coiled ropes, stored spars and supplies....tools of the sailors craft. You want to distract from errors or modifications with other details (This principle will be addressed later).

As you have noticed, I did indeed scratch build the pump on the head cabin..like you also noticed the molded one was too indistinct.  Throughout my build I added pleanty of such minor details...such as I cut out all the molded bullwark braces and replaced them with scaled wire ones...along with painting the iron red cement waterways as she was originally fitted out with.

You're doing a magnificent job...I'm impressed.

If I was to have any chriticism of your progress, it would be your attachement of the lower deadeyes to the rail.  Your method allows the deadeyes to be elevated far above the finished rail..where they need to be set below the rail.

I don't wish to disrespect your fine efforts..but I believe this blemish will detract from what in all other descriptions is, a magnificent representation of the Cutty Sark.

I know you are guided by a pressing perfection and I just don't want you to look back and say you could have done something different or better...when there is pleanty of time to correct it now before the correction is past feasability.

I can make suggestion if you wish...if not, I can keep my opinions to myself and simply enjoy your wonderful build.

Best wishes,

Rob

  • Member since
    March 2012
  • From: Marysville, WA
Posted by David_K on Monday, July 9, 2018 6:44 PM

Your work on the Revell Cutty Sark (and the variants thereof) are examples of mastery, Rob....having seen some of them in person, I can say that the details you impart are top-notch.  I did notice the bulwark braces in your picture...another terrific subtlety. :)

Other notable effects of your builds include the realistic *sag* of certain rigging lines to simulate the actual weight of the full-scale rope...also, I recall the hooks on the ends of line that connect to eyebolts in the deck....not to mention the water dioramas!  Each of these examples are in my memory as testament to your artistry.

You're correct about the lower deadeyes...I struggled with them for a very, very long time...to the point that I was close to giving up the project entirely (which is not something I've done before).  Long story short, I had a plan for the lower deadeyes at the beginning of the build, and when I reached the point of installing the deadeyes it wouldn't work the way I envisioned it.

What I ended up with is not ideal....they are indeed much too high.  But I've moved on.  Every kit won't turn out to be a home-run, and I guess I can live with this one.

It's my hope that, once complete, the finished model may still have an overall aspect of glory, or majesty, or some other really cool adjective!

I'll know about the deadeyes, I'll look back and remember how I felt frustrated that they wouldn't work out the way I intended...and I'll forgive myself for *making it work*...and I hope you will, too.

By the way, just wait until I get to the part where I'm making set sails out of silkspan....and let's hope I get a good result from that!  lol

Thanks for your input, Rob...it's nice to share this project with someone who has such experience working with the source kit.

Dave


        _~
     _~ )_)_~
     )_))_))_)
     _!__!__!_         
     (_D_P_K_)
   ~~~~~~~~~~~~~
    ~~~~~~~~~~~

Current Project:  Imai/ERTL Spanish Galleon #2

Recently Finished: Revell 1/96 Cutty Sark

Next Up:  ???


  • Member since
    December 2012
Posted by rwiederrich on Tuesday, July 10, 2018 7:57 AM

Dave..there is nothing to forgive...you have done what you did based upon an outcome you wrestled with.  I can't fault anyone who realizes, *enoughs is enough*, and can move on.  Regardless...I've watched you for some time and I am fully confident this model will supercede all your expectations for it.

Your attention to your paint, weathering and its effect is stunning IMV. Your build is warm and satisfying.  And the best part is....each model is left up to the builders own interpretation...were paint and small details are concerned.

My own attempt at these deadeyes left a mark....a piece of thin strip wood beneath the deadeyes.  but I, like you had to decide this mod will have to do to overcome an even greater issue....the funky kit provided deadeyes/lanyards.

You went the extra mile...as is evident in all your builds.

I myself thought of using silk span...however the translucensy of the material convinced me it was not the material for me.  Others have mastered or have accepted this shortcoming and have amply reproduced wonderful sails with it.

I have decided, through much experimentation, that I will be using paper set sails for the Great Republic. I used paper for furled and weathered sails on my Ferreira...it stains and works well IMV, plus you can add scale details with sharp pencils. Very convincing at this scale.

About sails...I purposely left them off my CS because she was in for repairs and I could hyper detail her yards with jackstays and all the hidden rigging sails can mask.

Your  thread is one of my favorites..because it concerns a clipper ship....so I'll be monitering it attentively.

Keep up the magnificent work Dave.


Rob

  • Member since
    March 2012
  • From: Marysville, WA
Posted by David_K on Thursday, July 26, 2018 9:51 AM

I may go with paper for sails, or some other material....I suppose when the time comes, I'll get some silkspan, and a few other materials to perform some experiments, and see what works best for me.  I like the paper technique I've seen on your models, Rob.

I have made some progress...got the draft decals on, but made a mistake and didn't realize that Radek sells his draft scales as a universal set that goes up to 25 feet, for the Cutty Sark it only needs 22 feet and the rest of the decal should be trimmed off...ships like Constitution or Victory use the entire scale.  Not a huge deal to me, but simply something I didn't learn until after they were applied :)

I also put on the Photo Etch parts...yikes.  I wasn't prepared for the delicacy of those parts, nor did I really know what I was doing.  After some trial and error (and some damage to a part or two) I got them on with an *okay* result.  HiSmodel.com has some tutorial workflow PDFs that will help anyone who is looking to work with his PE.

Pretty much all the deck furniture is on now, I basically only have a few parts that go on after standing rigging, and a bunch of yards and spankers or gaffs or whatever.

Here's a couple pics:

Decided to dry fit the masts, to get an idea of the overall aspect of the model

 20180721_172914 by Dave Kump, on Flickr

Here's some PE on a couple of boards (don't know what these parts are called, but they go on the bow of the ship after headgear rigging)...the PE looks better than the decals would, I warrant.  Still needs a little touch up and slight weathering.

 20180726_065621 by Dave Kump, on Flickr

Picture of the draft scale decals, and some PE...the model has a lot of dust accumulating on it so far!  Again, the PE will get some touch up and weathering.

 20180726_065709 by Dave Kump, on Flickr

Stern view.  You can see the PE scrollwork back here is very ornate.  But the fit issues with the hull halves and the railing are also evident.  Once I go back and touch up the gaps with some black paint, it will hopefully even out pretty well.  You can also see I went ahead with fine sewing thread for the railing...I think it turned out pretty well....I was just planning to give it a try and it went so smoothly I kept going, got all the railing for the whole ship done in about 30 minutes :)

 20180726_065825 by Dave Kump, on Flickr

So, now the instructions tell me to step the masts...guess it's about rigging time!

Before I do that, though, this is my chance to go through the entire model, perform some corrections, apply some touch-up paint, more weathering, dust everything off, etc.

Then I'll start tying blocks on to the masts...the instructions specify block installation after stepping masts and during rigging steps, but I think anyone who's waited to install blocks knows better!  Then it's off to head rigging, and shrouds and stays....

Thanks for watching!

Dave


        _~
     _~ )_)_~
     )_))_))_)
     _!__!__!_         
     (_D_P_K_)
   ~~~~~~~~~~~~~
    ~~~~~~~~~~~

Current Project:  Imai/ERTL Spanish Galleon #2

Recently Finished: Revell 1/96 Cutty Sark

Next Up:  ???


  • Member since
    July 2010
  • From: Tempe AZ
Posted by docidle on Friday, July 27, 2018 1:01 AM

From where I’m sitting it is looking awesome bud. Beautiful work as usual.

Steve


  • Member since
    March 2012
  • From: Marysville, WA
Posted by David_K on Friday, July 27, 2018 9:01 AM

Thanks, Steve!

I hate to admit it, but I feel like I've done a lot of complaining about this kit, and my ability to make it look nice. :(

*NOTE*...before submitting this reply, I realized I kinda went off on a rant...if any readers don't want to tolerate my rambling opinion, please feel free to skip this post.  I almost deleted the following paragraphs...

When I was young, I started modeling by building car kits, from Revell/Monogram, AMT, etc...as my skills improved, I began to realize the quality of the kits was lacking, and no matter how *good* I was at building them, the detail, mold quality, and part fit was always going to get in my way.  I finally gave up on modeling for many years...until I met a friend who was building a Tamiya motorcycle kit.  That changed everything!  Tamiya showed me a level of quality and detail (and solid engineering design) that inspired me to start building models again!  Plus they offered some really cool subjects...I built most of their 1/20 F1 kits, and lots of race car kits (Mercedes CLK-GTR, Nissan r390, NSX, Porshe, Supra, et.al)...the point is, I trusted the quality and I grew as a modeler because I wasn't fighting against mold lines, flash, injector pin marks, sloppy detail, etc.

When I decided to try out sailing ships, my first kit was Revell's Bonhomme Richard...I may not have to tell you that the quality there was similar to what I'd come to expect from Revell.  Being my first ship model, I didn't care much.  Then I built the Revell Vasa....acually, it was a nice kit!  Clean molding, solid detail, and it went together pretty well!  Remember, the Vasa is new tooling and design from just a few years ago, and the advances in technology show up in it. :)

Next up was Zvezda's Back Swan....another really well-made kit!  Loved it!  Then...I found Imai.

Imai offered several ships from a period and style that I really liked...I built several, and thrilled at the quality and detail.  Can't say enough about Imai.

Then I decided to tackle the Soleil Royal, by Heller (though it was an Imai boxing, meaning better instructions, and maybe better plastic?)...I did struggle a little with part fit, especially in the aft galleries and stern area, but for the most part, it was very well-made.

The Revell Cutty Sark is a tremendous kit, lots of parts and detail, and very ambitious, especially for its time.  But it does (in my opinion) have its flaws.  Nevertheless, many people consider Revell's Cutty Sark, and the Constitution (which I also have, but have not opened the box) to be among the great sailing ship model kits.  But for me, I feel a bit disappointed by it.  But I'll persevere, and do my best to get the best out of it....it's interesting to note that people have made terrific finished models from it (Rob has a talent for the Cutty Sark kit, and his many variations on it), and many of the Revell Constitution builds I've seen here are amazing!  I think there's a certain amount of *kit-correction* and *scratch-building* that needs to be accepted as part of building these kits, and plenty of modelers see that as an integral part of the challenge.

For my part, I enjoy adding a few *extras* to a model, but not to such an extent.

Just realized I went off on a longwinded rant there....that's what I get for having a second cup of coffee and sitting in front of the keyboard! lol  Sorry guys!  I'll end it here...

Once I get into standing rigging, I may look back at the assembly stages and forget all about the things I said today.

Thanks again!

Dave


        _~
     _~ )_)_~
     )_))_))_)
     _!__!__!_         
     (_D_P_K_)
   ~~~~~~~~~~~~~
    ~~~~~~~~~~~

Current Project:  Imai/ERTL Spanish Galleon #2

Recently Finished: Revell 1/96 Cutty Sark

Next Up:  ???


  • Member since
    December 2010
  • From: Salem, Oregon
Posted by 1943Mike on Friday, July 27, 2018 7:24 PM

Dave,

I understand your "rant" completely. That's because you have the talent to make any kit shine and you want to know that the detail, fit, and engineering that the manufacturer put into the product will not hold back the skill and effort you contribute to the build. All understandable.

You're making this kit another of your works of art. I'm constantly impressed with your WIP.


Mike

"Le temps est un grand maître, mais malheureusement, il tue tous ses élèves."

Hector Berlioz

  • Member since
    July 2013
Posted by steve5 on Saturday, July 28, 2018 1:04 AM

what mike said , dave . your build is beautiful mate , love following your WIP . your ability , really is beyond comparison , and can see why you get so frustrated , but the rest of us mere mortal's , learn from people like you and rob and steve , so please keep perservering mate .


  • Member since
    December 2012
Posted by rwiederrich on Saturday, July 28, 2018 9:12 AM

 Dave. I am not totally familiar with the other kits you mentioned..since my car, motorcycle and armor modeling stage was brief and when I was much younger. One thing to be noted is that the Revell CS and Conni kits are over 50 years old...or at least molded on 50 year old tooling. My first CS build was done around 1975 and even then I found myself having to scratch build corrections. This didn't bother me because I was also building my first scratch version of the CS at the same time(I'll provide a crude B/W image). Anyway, it was the sheer scale of the kit that drew me to it.....I needed a big model for my space. Back to your issues......I've found that study, study, study is the modelers friend...because you can then correct any issues you may have with the inaccuracies of the kit. I was a scratch builder before I was a kit builder...so it was only natural for me to add and or correct the kits I built. I feel this experience for you is exactly what the DR ordered. The meaning of this, is, you become a far better modeler when you can skillfully modify or correct issues with your kits...making them more accurate and or presentable. You are becoming a better modeler...when you can easily tackle problems that would otherwise stop your build. A good modeler is never *stumped* by issues, he/she is actually strengthened by them as they fabricate solutions You then become familiar with many media to use for your disposal. You have already mastered a great painting and weathering technique...this in of itself can establish an average or superior looking model. It is true...I have used the CS hull to fashion 3 other vessels...but that is because I was able to make the mods to them and I am generally a lazy builder...so I used the kits engineered hulls for my purposes. I then scratched built the entire rest of the ship. As far as the Ferreira is concerned....she is in essence the CS with heavy mods and additions/subtractions....not to mention extremely heavy weathering to mask loads of defects..... I think you are tackling this new CS WIP with much skill and precision as your level of skill has afforded. It is who you are at this stage of your modeling career...and I'm confident you will adapt and incorporate new skills into your bag of tricks and become an even greater modelers for it. I've seen you come a long ways and you have not left me wanting for words to describe your modeling.....FANTASTIC...AWESOME..... Your friend, Rob

  • Member since
    September 2012
Posted by GMorrison on Saturday, July 28, 2018 9:58 AM

You all are better modelers than the kit. I think the hull halves are the two best parts, after that most of the rest of it isn't too swell. In particular the deck furniture.

It's great to see all of the improvements that are being made.

 Modeling is an excuse to buy books.


  • Member since
    March 2012
  • From: Marysville, WA
Posted by David_K on Wednesday, August 1, 2018 6:19 PM

Sorry for the delayed response to your comments, all....I normally get an email notification when the thread is bumped, but I think the settings must be on the fritz.

Anyway, thanks for your kind words of encouragement!  I've gone through periods of frustration with this build, but it's turning a corner and I think the worst of it is behind me.  Sally forth, and all that!  :)

I was going over the rigging plans, getting ready to strop blocks for the masts...I expected a lot of blocks to be called out, on the masttops, crosstrees, etc., but it really only show me a couple of blocks each on the lower masts for the mainsail lifts....the tops and royals don't sbhow any block for those lines, they just tie from the mast itself, to the yard, back up and then down to the pinrails....seems weird.  I'm going to have to check Longridge to see if the rigging plans are even close to accurate?  Rob, off the top of your head, do the masts carry blocks all over, or are there just a couple on the lower?

This a totally *new* time period of rigging than what I'm used to, so I guess I need to do some research!

Thanks again, excellent peers!

Dave

        _~
     _~ )_)_~
     )_))_))_)
     _!__!__!_         
     (_D_P_K_)
   ~~~~~~~~~~~~~
    ~~~~~~~~~~~

Current Project:  Imai/ERTL Spanish Galleon #2

Recently Finished: Revell 1/96 Cutty Sark

Next Up:  ???


  • Member since
    July 2013
Posted by steve5 on Wednesday, August 1, 2018 7:37 PM

looking forward to your next pic's mate , the e-mail thing , is not only you my friend . 


  • Member since
    December 2012
Posted by rwiederrich on Thursday, August 2, 2018 7:57 AM

Off the top of my head I believe there are a few.  I think this image will help.

https://www.facebook.com/photo.php?fbid=10200238684582942&set=a.10200182948909585.1073741826.1027512645&type=3&size=2048%2C1536


Rob(feel free to poke around the images)

  • Member since
    April 2016
  • From: Russia, St.Peterburg
Posted by kirill4 on Thursday, August 2, 2018 12:00 PM

Good day Dave,

Nice to see how much progress You have in building your CS, unfortunately I have seldom oportunity to watch your building report due to my working scedule, but when I can do it, always have pleasure of seen your work.

By the way, I ' m thinking/making plans in mind and read books abt clipper ship, say, collecting information abt clippers... even bouth CS and Sea Witch kits , want to assemble one of them in the future...as soon, as current galleon project will be completed :)))

What I wanted to say, I saw you abt to start rigging...and said , not very familiar with this, modern rigging... same me... 

A few moths ago I bouth , lets say, one of the briliant book of the subject( at least for me :)), this is HAROLD A. UNDERHILL "MASTING &RIGGING THE CLIPPER SHIP & OCEAN CARRIER" book...

https://www.skipper.co.uk/catalogue/item/masting-and-rigging

there are each rope of standing and running rigging is ..."followed from sail to pin,describing in detail the type and position of every block and rigging fairlead trough which it reeves.Full belaing pin and fairlead diagrams are given for each mast, together with largeflding plate,showing the position and use of every pin in the Ship"...

Same author wrote a few more exelent books abt " modern " sailing vessel, and prepaired a lot of plans for building models... 

May be You will be interested in such book ,being busy with clipper model building , such book just priceless , by my opinion :))) , and it is very nice addition to Campbell book/ plans  abt CS and China Clipper.

I saw Campbell CS  plans, those famous of 3 A1 plans, they are available in Greenwhich museum/ regarding actual position of various blocks on real CS. .https://shop.rmg.co.uk/collections/cutty-sark-gifts/products/cutty-sark-rigging-plan-a1-print

All the Best!!!

Kirill


  • Member since
    December 2012
Posted by rwiederrich on Thursday, August 2, 2018 3:45 PM
I agree..that book is an essential member of any library. My library is extensive. Rob
  • Member since
    April 2016
  • From: Russia, St.Peterburg
Posted by kirill4 on Thursday, August 2, 2018 4:56 PM

rwiederrich
I agree..that book is an essential member of any library. My library is extensive. Rob

Good day Rob,

Do you know this book ?may be happend  Kept it in your hand?.... would be nice to know your opinion...one of the author of this book - famous Cyril L. Hume...

Cutty Sark" and "Thermopylae" Era of Sail

Armstrong, Malcolm C.

 
 0 ratings by Goodreads
ISBN 10: 0851745008 / ISBN 13: 9780851745008
  • Member since
    March 2012
  • From: Marysville, WA
Posted by David_K on Thursday, August 2, 2018 9:00 PM

Thanks for the reply, guys!

Rob, I was unable to access the pics, so I sent you a facebook friend request, maybe the pics are unavailable otherwise?

Kirill...I have the Longridge book, but not underhill....but I totally forgot I have the Campbell plans!  I rolled them up and put them away some time ago....they should be a perfect reference material...I will look at them to plan out my rigging!  Thanks for reminding me!

Also, by the way, I LOVE you work on the Spanish Galleon!  Impeccable work!  I built that kit a few years ago, and I very much enjoyed it (will probably get another someday)...but the work you've done with yours is truly outstanding.

Thanks!

Dave

        _~
     _~ )_)_~
     )_))_))_)
     _!__!__!_         
     (_D_P_K_)
   ~~~~~~~~~~~~~
    ~~~~~~~~~~~

Current Project:  Imai/ERTL Spanish Galleon #2

Recently Finished: Revell 1/96 Cutty Sark

Next Up:  ???


  • Member since
    December 2012
Posted by rwiederrich on Friday, August 3, 2018 7:19 AM

Yes Kirill4 I have that book and it covers much more then the two clippers in the title.  It focuses on British clippers after the 1860's.  Still a book worth having in any library if you are a clipper fan.

Rob

  • Member since
    December 2012
Posted by rwiederrich on Friday, August 3, 2018 7:21 AM

Dave....sometimes I can pull pics from my FB account to use here and other times I just can't (for some unknown reason).  I'll accept you as a friend so you can view through my images.

Rob

  • Member since
    April 2005
  • From: Roanoke, Virginia
Posted by BigJim on Tuesday, August 14, 2018 10:10 PM

I was going through my reference books and found that I had an extra copy of: "Masting and Rigging the Clipper Ship & Ocean Carrier". 
It is in very good condition. If anyone here is interested in it drop me a line.

  • Member since
    April 2016
  • From: Russia, St.Peterburg
Posted by kirill4 on Wednesday, August 15, 2018 2:20 PM

Thank You very much  Rob,

I think, need to buy this book... want/ need to have  more detailed info abt Thermopylae...

All The Best!!!

Kirill

  • Member since
    August 2018
Posted by Flint on Saturday, August 18, 2018 11:24 AM

That's looking great! She's a beautiful ship in the flesh (wood), and has one of my favourite figureheads. Would like to do this build myself one day.Yes 

  • Member since
    August 2018
Posted by Flint on Sunday, August 19, 2018 9:34 AM

That's looking great! She's a beautiful ship in the flesh (wood), and has one of my favourite figureheads. Would like to do this build myself one day.Yes 

  • Member since
    March 2012
  • From: Marysville, WA
Posted by David_K on Sunday, August 19, 2018 6:29 PM

Lol, guess they fixed the reply notifications...just got about 40 emails from various threads on the ship forum!

        _~
     _~ )_)_~
     )_))_))_)
     _!__!__!_         
     (_D_P_K_)
   ~~~~~~~~~~~~~
    ~~~~~~~~~~~

Current Project:  Imai/ERTL Spanish Galleon #2

Recently Finished: Revell 1/96 Cutty Sark

Next Up:  ???


  • Member since
    July 2010
  • From: Tempe AZ
Posted by docidle on Sunday, August 19, 2018 11:31 PM

I don't even want to look at my email until tomorrow morning. 

Anyway, your CS is looking awesome bud. I’m loving it!

Steve


  • Member since
    February 2003
  • From: Lacombe, LA.
Posted by Big Jake on Tuesday, August 21, 2018 3:42 PM

Dave, You may know of this, but Amazon is listing a new book on the Cutty Sark.

Cutty Sark: The Last of the Tea Clippers

https://www.amazon.com/Cutty-Sark-Last-Tea-Clippers/dp/1591141826/ref=sr_1_1?ie=UTF8&qid=1534883931&sr=8-1&keywords=the+cutty+sark


  • Member since
    March 2012
  • From: Marysville, WA
Posted by David_K on Saturday, August 25, 2018 9:39 AM

Thanks, Guys!

Jake, I'll keep an eye out for that book....though I have to say with the Campbell plans and Longridge's book, there's a lot of good info!

Here's a couple of pictures...

This is the installation of blocks on the foremast before stepping....I was actually suprised at the small number of blocks for the masttops...most of the rigging blocks go on the yards or the stays.

 20180811_121850 by Dave Kump, on Flickr

Starboard view...got all the shrouds looped, and I'm working my way up on the foremast...adding temp forestays to keep the mast upright while tensioning the shrouds, then installing the actual stays before repeating for the topstays, tgall, etc....it's a tricky business, keeping the tension even whilel working upward.  By the way, the lower deadeyes, while they are riding pretty high, are working well and they are pretty even...I was a bit concerned!

 20180825_071730 by Dave Kump, on Flickr

Closer shot of the fore shrouds and stay....

 20180825_071807 by Dave Kump, on Flickr

Anyway, it's going pretty smoothly, once I finish the fore standing rigging, I'll rig up the headgear and bowsprit stuff.  Then I have some more deckwork to attend to (headboards, boat tiedowns, davit rigging)....I'll do that stuff before the main shrouds go in, I think.

Thanks for watching!

Dave

        _~
     _~ )_)_~
     )_))_))_)
     _!__!__!_         
     (_D_P_K_)
   ~~~~~~~~~~~~~
    ~~~~~~~~~~~

Current Project:  Imai/ERTL Spanish Galleon #2

Recently Finished: Revell 1/96 Cutty Sark

Next Up:  ???


  • Member since
    July 2013
Posted by steve5 on Saturday, August 25, 2018 4:09 PM

as usual , beautiful work david . really enjoying tjis build .


  • Member since
    December 2010
  • From: Salem, Oregon
Posted by 1943Mike on Saturday, August 25, 2018 9:02 PM

Great attention to detail and a handsome outcome so far.

Dave, don't forget to put some iron/steel flanges toward the bow corners of the hatch where the anchor chain rubs ... Wink.

Mike

"Le temps est un grand maître, mais malheureusement, il tue tous ses élèves."

Hector Berlioz

  • Member since
    December 2012
Posted by rwiederrich on Monday, August 27, 2018 8:00 AM

WinkComing along nicely Dave...it apears your blocks have gone adrift on your stepped foremast...from the previous image of the mast in the vise.Confused

Dave I fashioned hooks for all my blocks that mounted to the masts..saving eons of time...I used the supplied blocks..and after they received paind and the hooks looked pretty convincing.


Robhttps://www.facebook.com/photo.php?fbid=10200268553969658&set=a.10200182948909585&type=3&size=960%2C720

  • Member since
    July 2010
  • From: Tempe AZ
Posted by docidle on Tuesday, August 28, 2018 1:11 AM

Dave,

I know that I’m sounding like a broken record, but you are doing beautiful work on her! Love the posts.

Steve


  • Member since
    March 2012
  • From: Marysville, WA
Posted by David_K on Tuesday, August 28, 2018 7:12 PM

LOL Steve, thanks....I feel the same way sometimes....I look at people's progress pics on here, and it seems like all I ever say is "wow, looking good!"....but it's true, I see so many updates that amaze and impress me.

Dave

        _~
     _~ )_)_~
     )_))_))_)
     _!__!__!_         
     (_D_P_K_)
   ~~~~~~~~~~~~~
    ~~~~~~~~~~~

Current Project:  Imai/ERTL Spanish Galleon #2

Recently Finished: Revell 1/96 Cutty Sark

Next Up:  ???


  • Member since
    March 2012
  • From: Marysville, WA
Posted by David_K on Tuesday, August 28, 2018 7:19 PM

Rob, the mast shown in the vise was the mainmast...it had more blocks.  For whatever reason, even though the mastcap had those eyes to accommodate some blocks, they aren't called for in my plans?  In fact, I think the mastcap parts are identical for the fore and main mast, same with the tops....wonder if they molded them the same to save time ro money in tooling?

I remember seeing your hooks when I was at your place....made for a really nice touch, and I bet they did save some time!  Great work!

Dave

        _~
     _~ )_)_~
     )_))_))_)
     _!__!__!_         
     (_D_P_K_)
   ~~~~~~~~~~~~~
    ~~~~~~~~~~~

Current Project:  Imai/ERTL Spanish Galleon #2

Recently Finished: Revell 1/96 Cutty Sark

Next Up:  ???


  • Member since
    December 2012
Posted by rwiederrich on Wednesday, August 29, 2018 2:58 PM

I recently came across all the individual plans for many of the CS's I've built over the years and it is clear there are some changes made fron the earliest to the newest plans, especially with the rigging...it has been made simpler it appears.

Rob

  • Member since
    December 2012
Posted by rwiederrich on Friday, September 14, 2018 8:47 AM

How's things coming along David....Haven't heard from you in a while.


Rob

  • Member since
    March 2012
  • From: Marysville, WA
Posted by David_K on Saturday, September 15, 2018 9:28 AM

Hi Rob-

Thanks for checking in.

I haven't made a ton of progress lately (busy, busy!), but I have completed the head gear rigging and fore stays....here's a couple of pctures:

 20180908_110831 by Dave Kump, on Flickr

 20180908_110824 by Dave Kump, on Flickr

 20180907_143859 by Dave Kump, on Flickr

Before I install the fore backstays, I'm going to finish fastening the anchors and other deck work (boat davits, tie-downs, etc.)...feel like I should get as much of that remaining stuff done before I block myself out with the rigging.

All in all, it's going pretty smoothly these days...slow, but smooth!
Thanks!

Dave

        _~
     _~ )_)_~
     )_))_))_)
     _!__!__!_         
     (_D_P_K_)
   ~~~~~~~~~~~~~
    ~~~~~~~~~~~

Current Project:  Imai/ERTL Spanish Galleon #2

Recently Finished: Revell 1/96 Cutty Sark

Next Up:  ???


  • Member since
    July 2006
Posted by Michael D. on Saturday, September 15, 2018 4:16 PM

Looking very nice there Dave, those photo etched parts really stand out, great workYes!!. I hope to start mine next year.


Michael D.

  • Member since
    December 2010
  • From: Salem, Oregon
Posted by 1943Mike on Saturday, September 15, 2018 9:26 PM

Dave,

Absolutely lovely, crisp, detailed work!

Is that dolphin striker the kit part? Mine was so bent I could never get it to be straight. Yours looks perfect! Where'd you get the chain you used for the bow sprit rigging? Should it not have been blackened? I'm probably off base here but just curious.

Mike

"Le temps est un grand maître, mais malheureusement, il tue tous ses élèves."

Hector Berlioz

  • Member since
    March 2012
  • From: Marysville, WA
Posted by David_K on Sunday, September 16, 2018 9:12 AM

Thanks, guys!

Yeah, the photo etch turned out okay...glad I used it instead of decals or painting for the scrollwork.

The dolphin striker wasn't bent or anything so I didn't have any trouble using it....I am building this model with the use of 2 separate kits, and there have been a few parts that I've needed to swipe from the 2nd kit because they were misshapened or warped...

As far as the chain, I think it should be black, but I like the way it looks uncoated (especially with the photoetch brass nearby!), so I decided to leave it shiny....just another artistic liberty I've taken lol :)

Thanks again!

Dave

        _~
     _~ )_)_~
     )_))_))_)
     _!__!__!_         
     (_D_P_K_)
   ~~~~~~~~~~~~~
    ~~~~~~~~~~~

Current Project:  Imai/ERTL Spanish Galleon #2

Recently Finished: Revell 1/96 Cutty Sark

Next Up:  ???


  • Member since
    March 2012
  • From: Marysville, WA
Posted by David_K on Sunday, September 30, 2018 3:53 PM

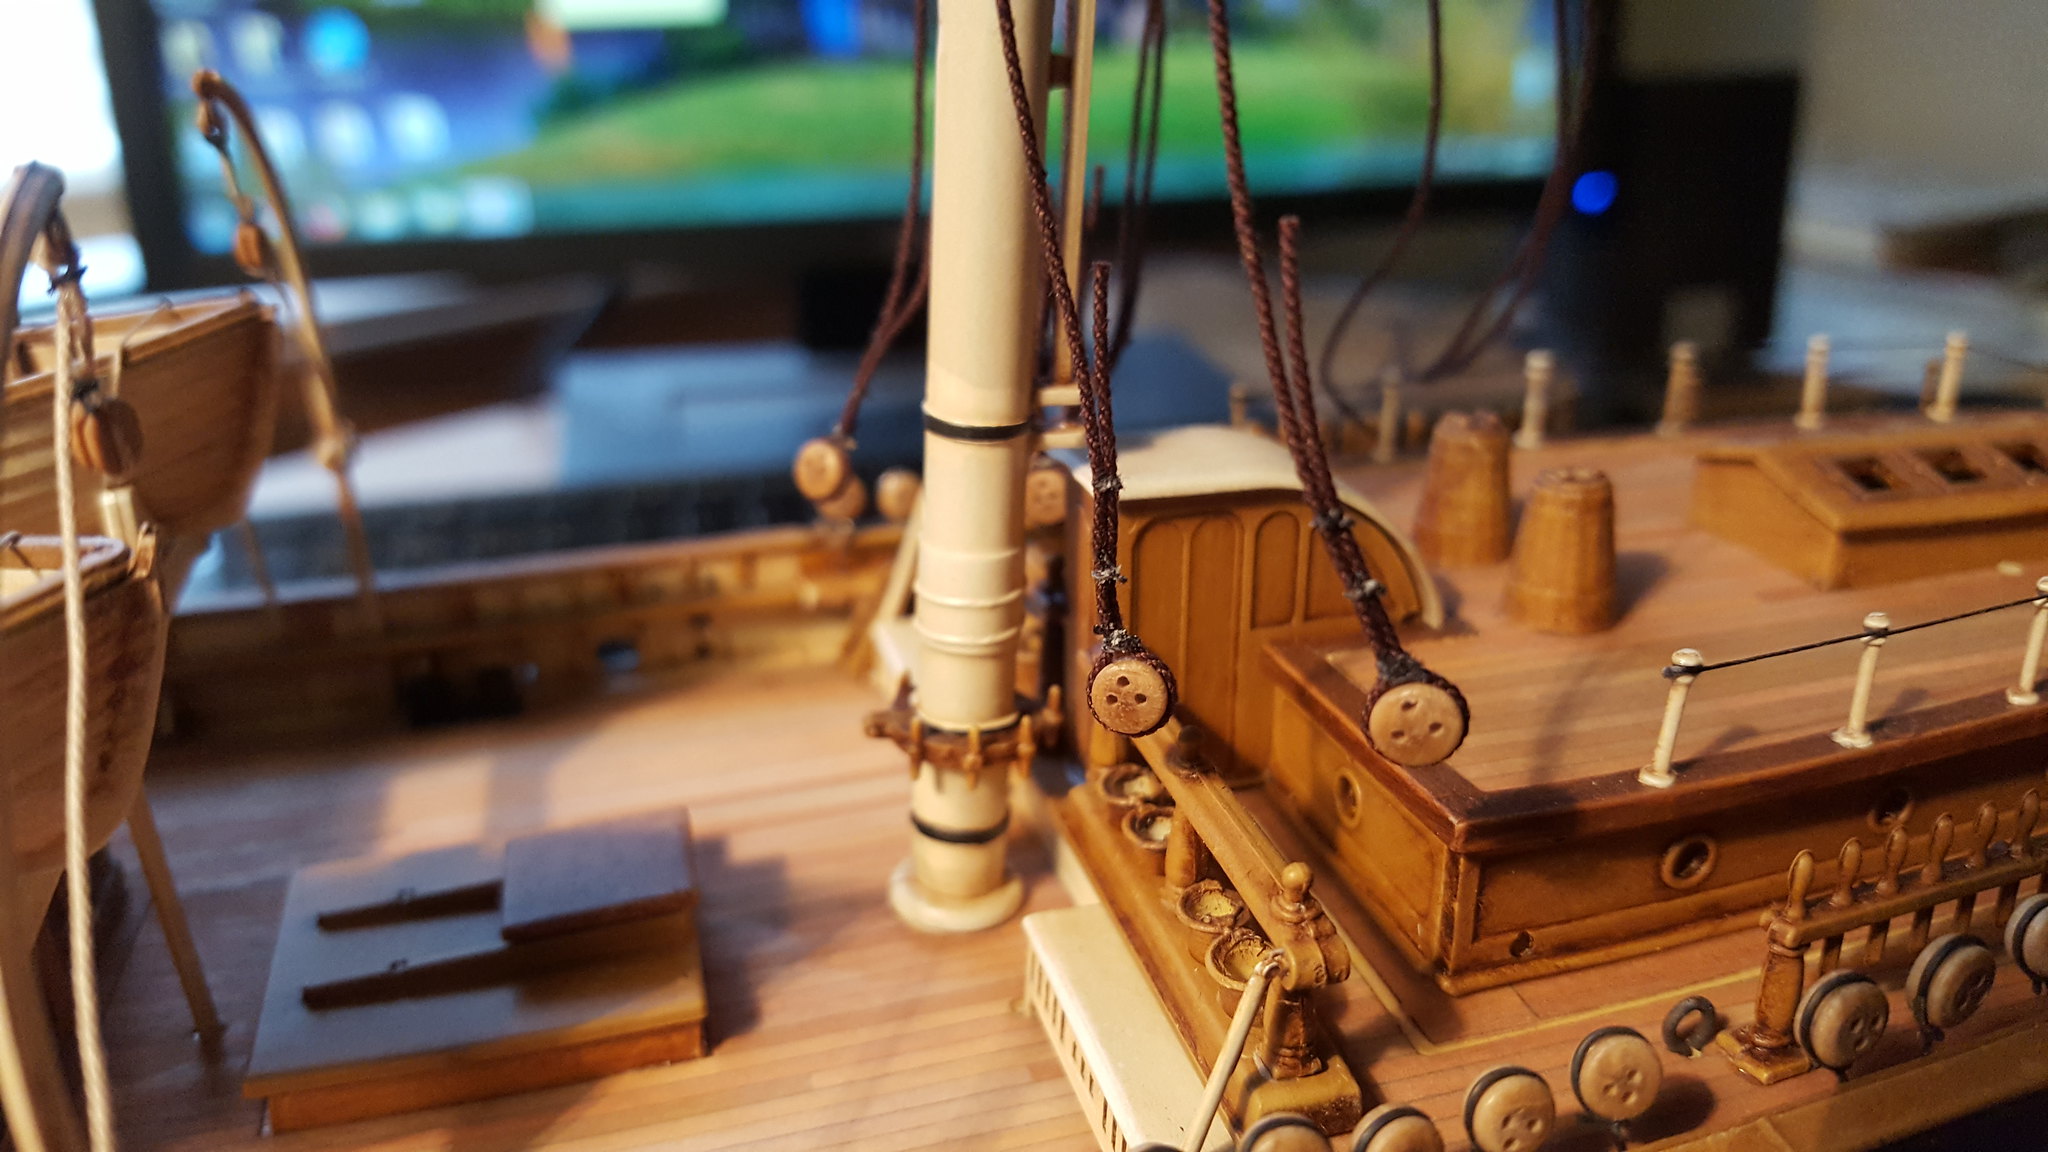
Had some time this week to get the rest of the lower shrouds installed.

Figured I would share some pictures....not because my results are out-of-this-world or anything, but mostly because I don't know what method others use for spacing their deadeyes when they install shrouds....maybe the jig I use is typical for everyone?

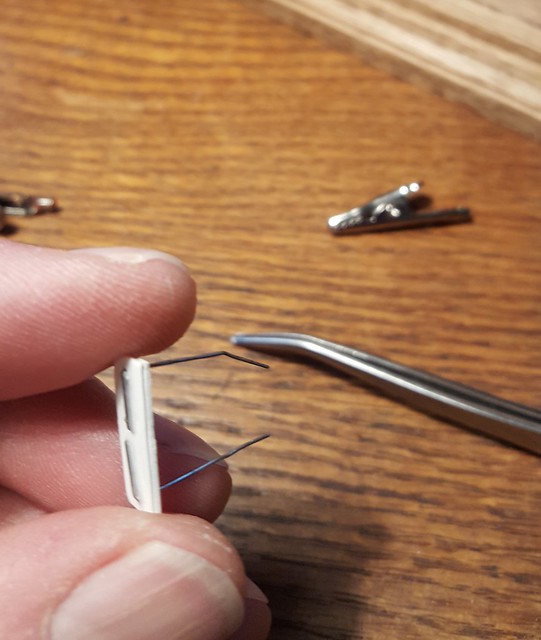
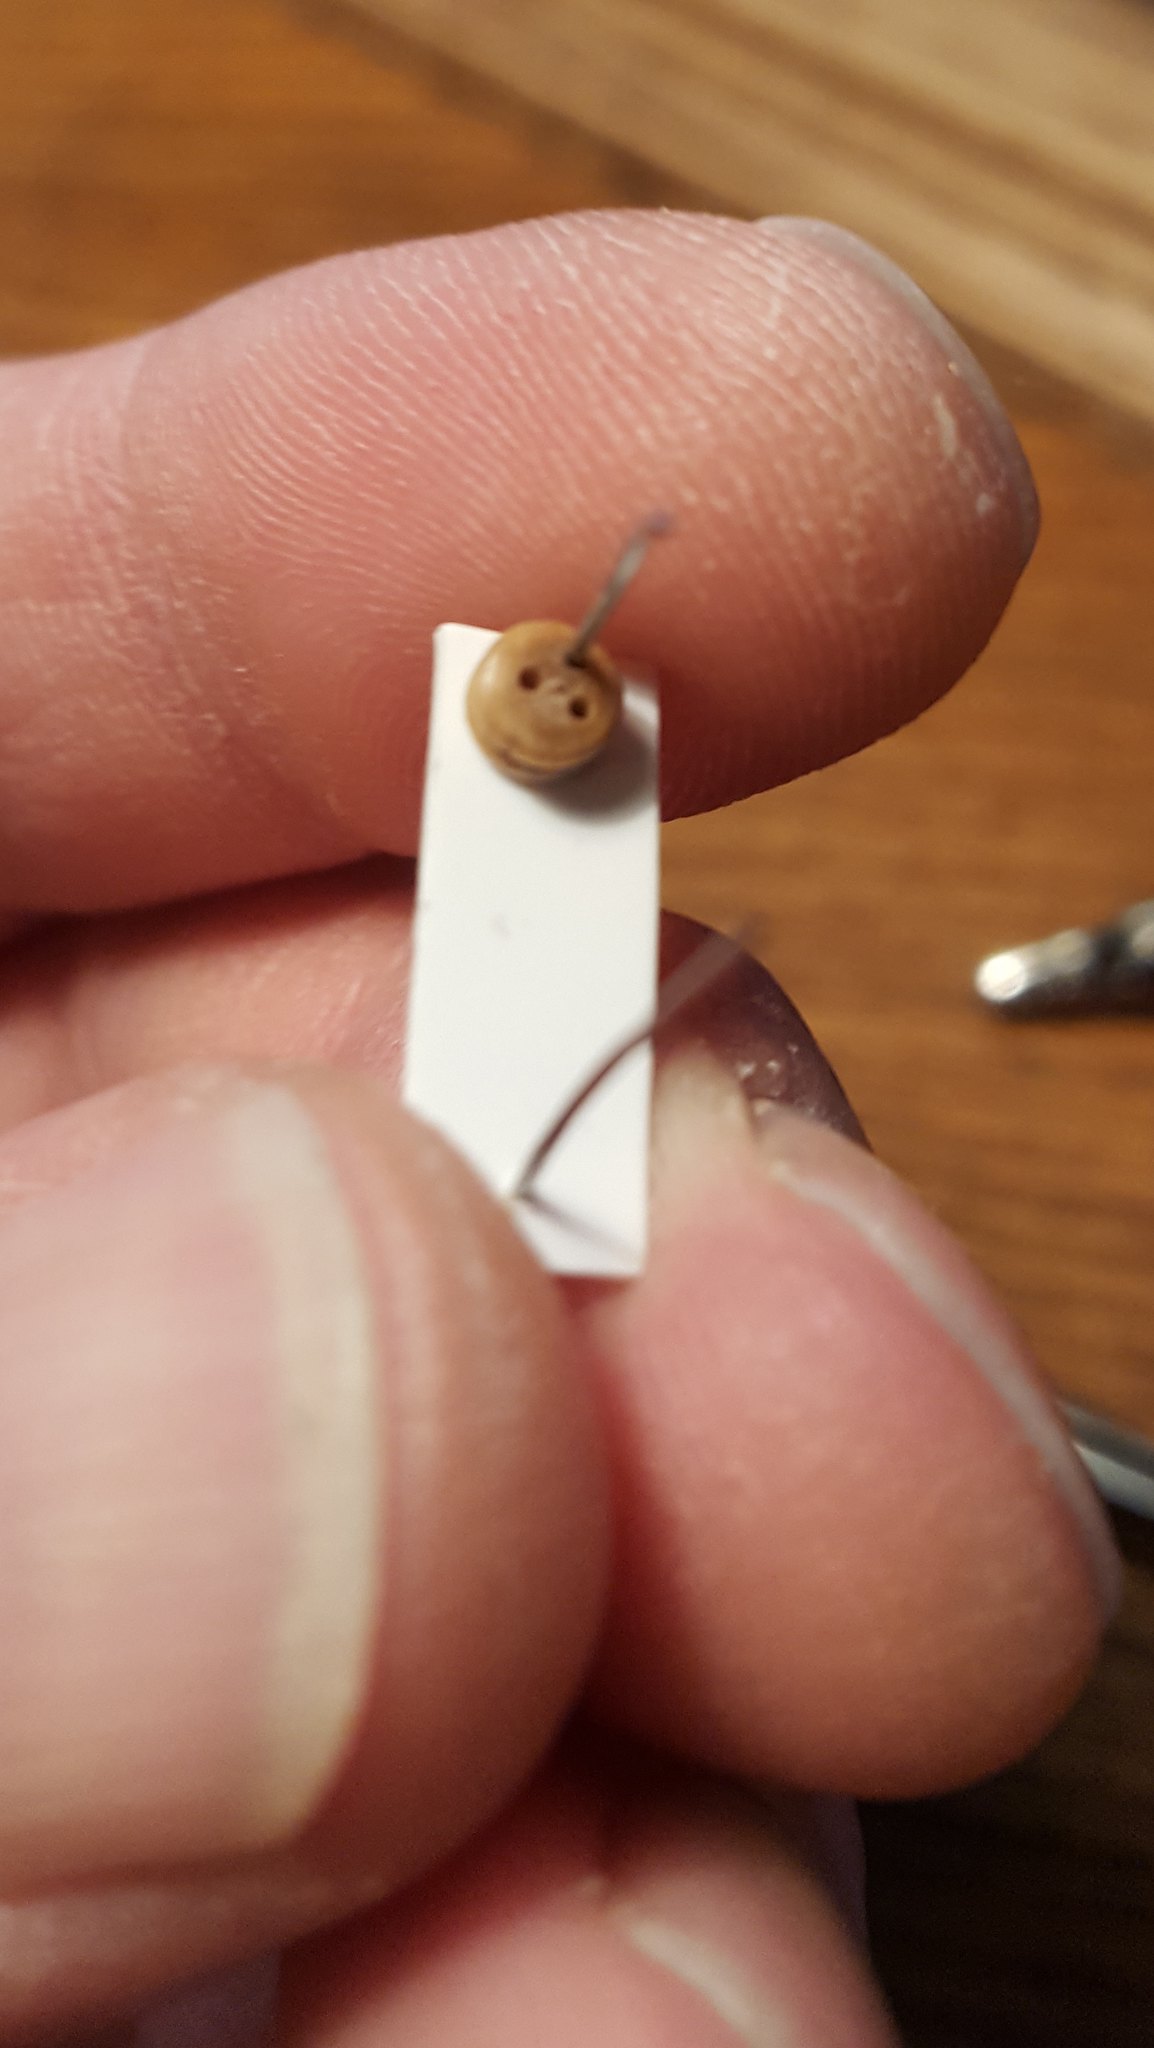
Anyway, I take a little strip of styrene, drill two holes in in at the correct spacing (usually 3x the deadeye diameter) and put some thin wire through each hole (I use staples for this size of lanyard hole)...bend them, and CA glue them to the styrene...

 20180930_095200 by Dave Kump, on Flickr

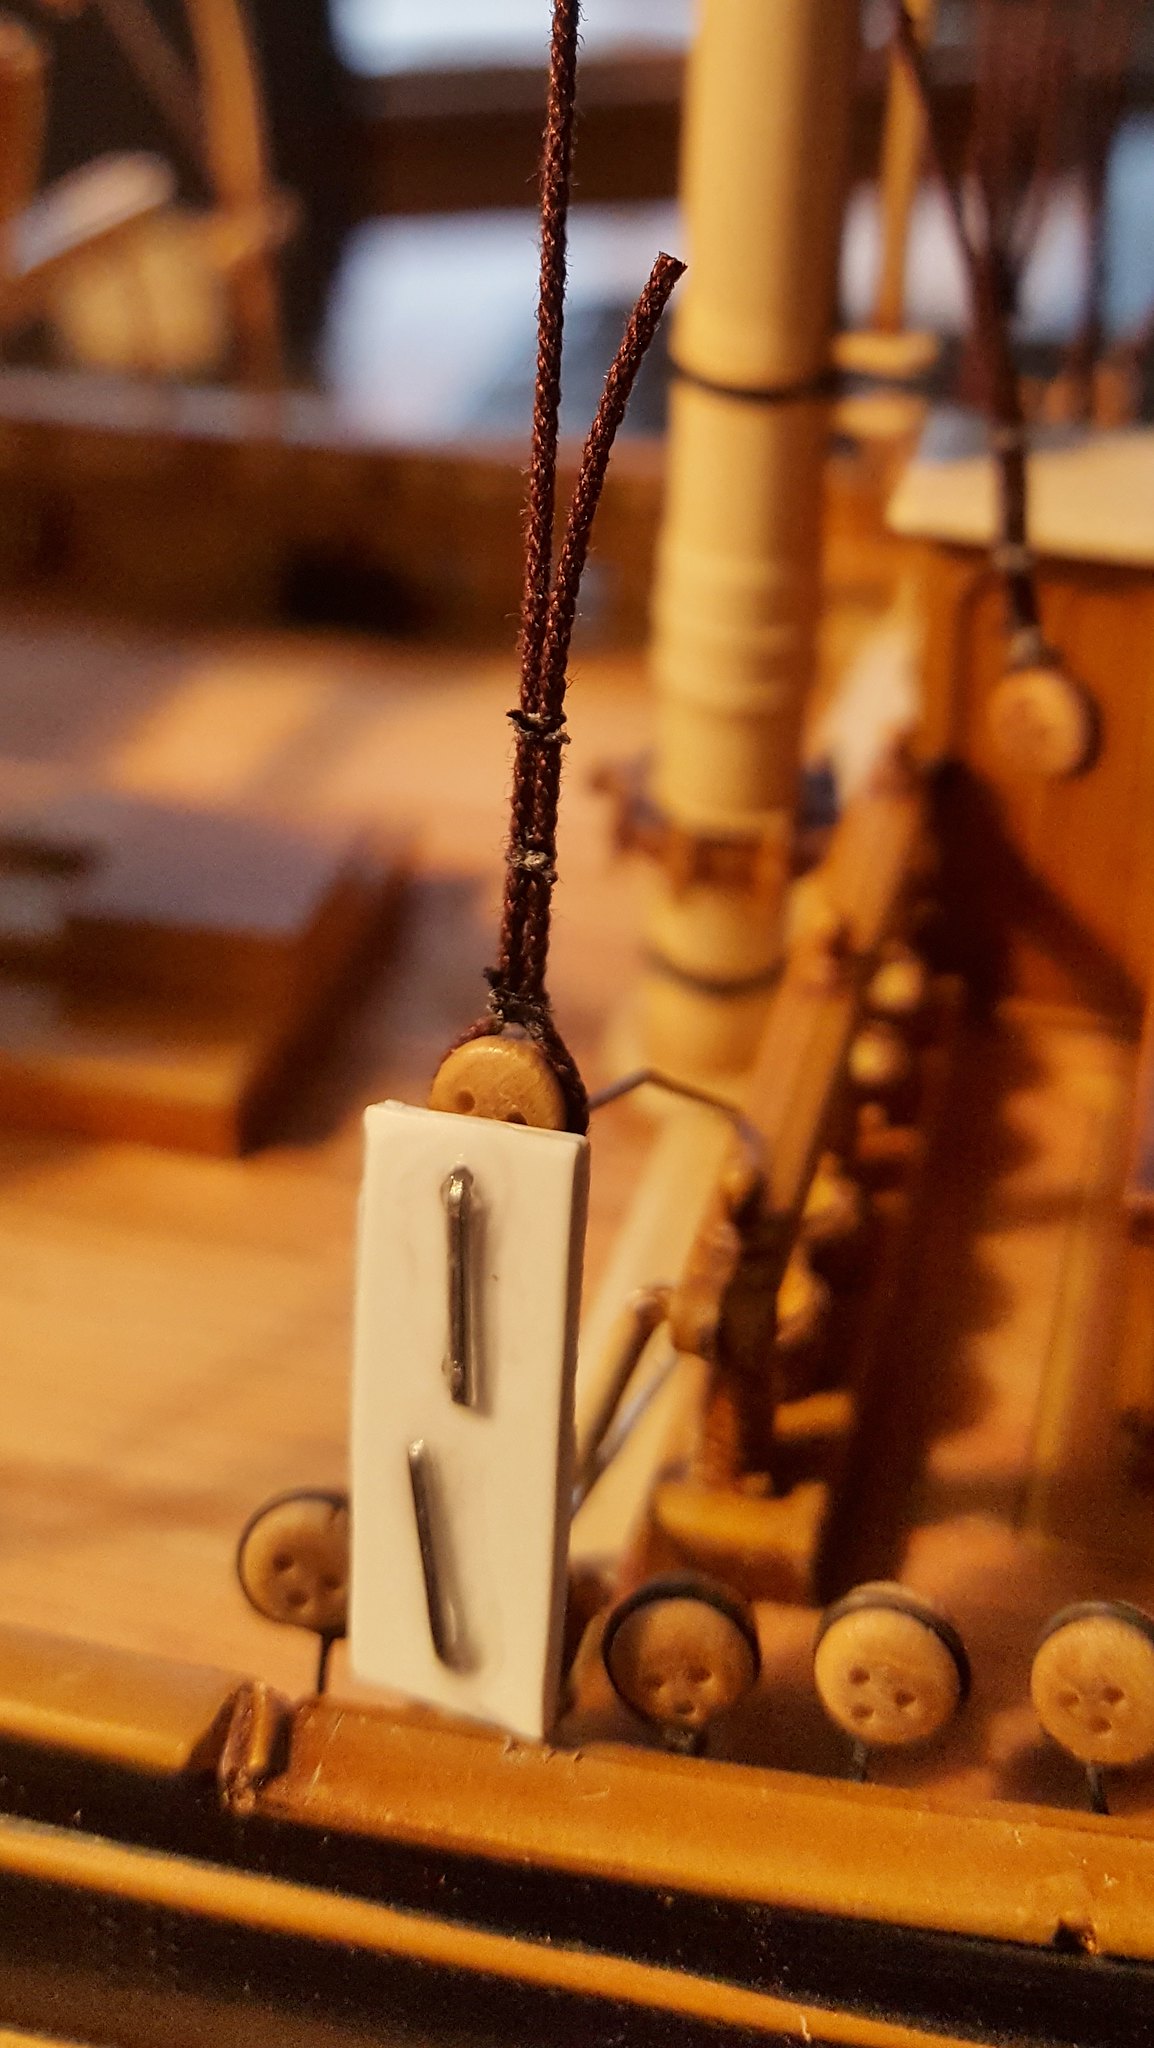
Then I insert a jig wire into the center hole of the upper deadeye...

 20180930_095242 by Dave Kump, on Flickr

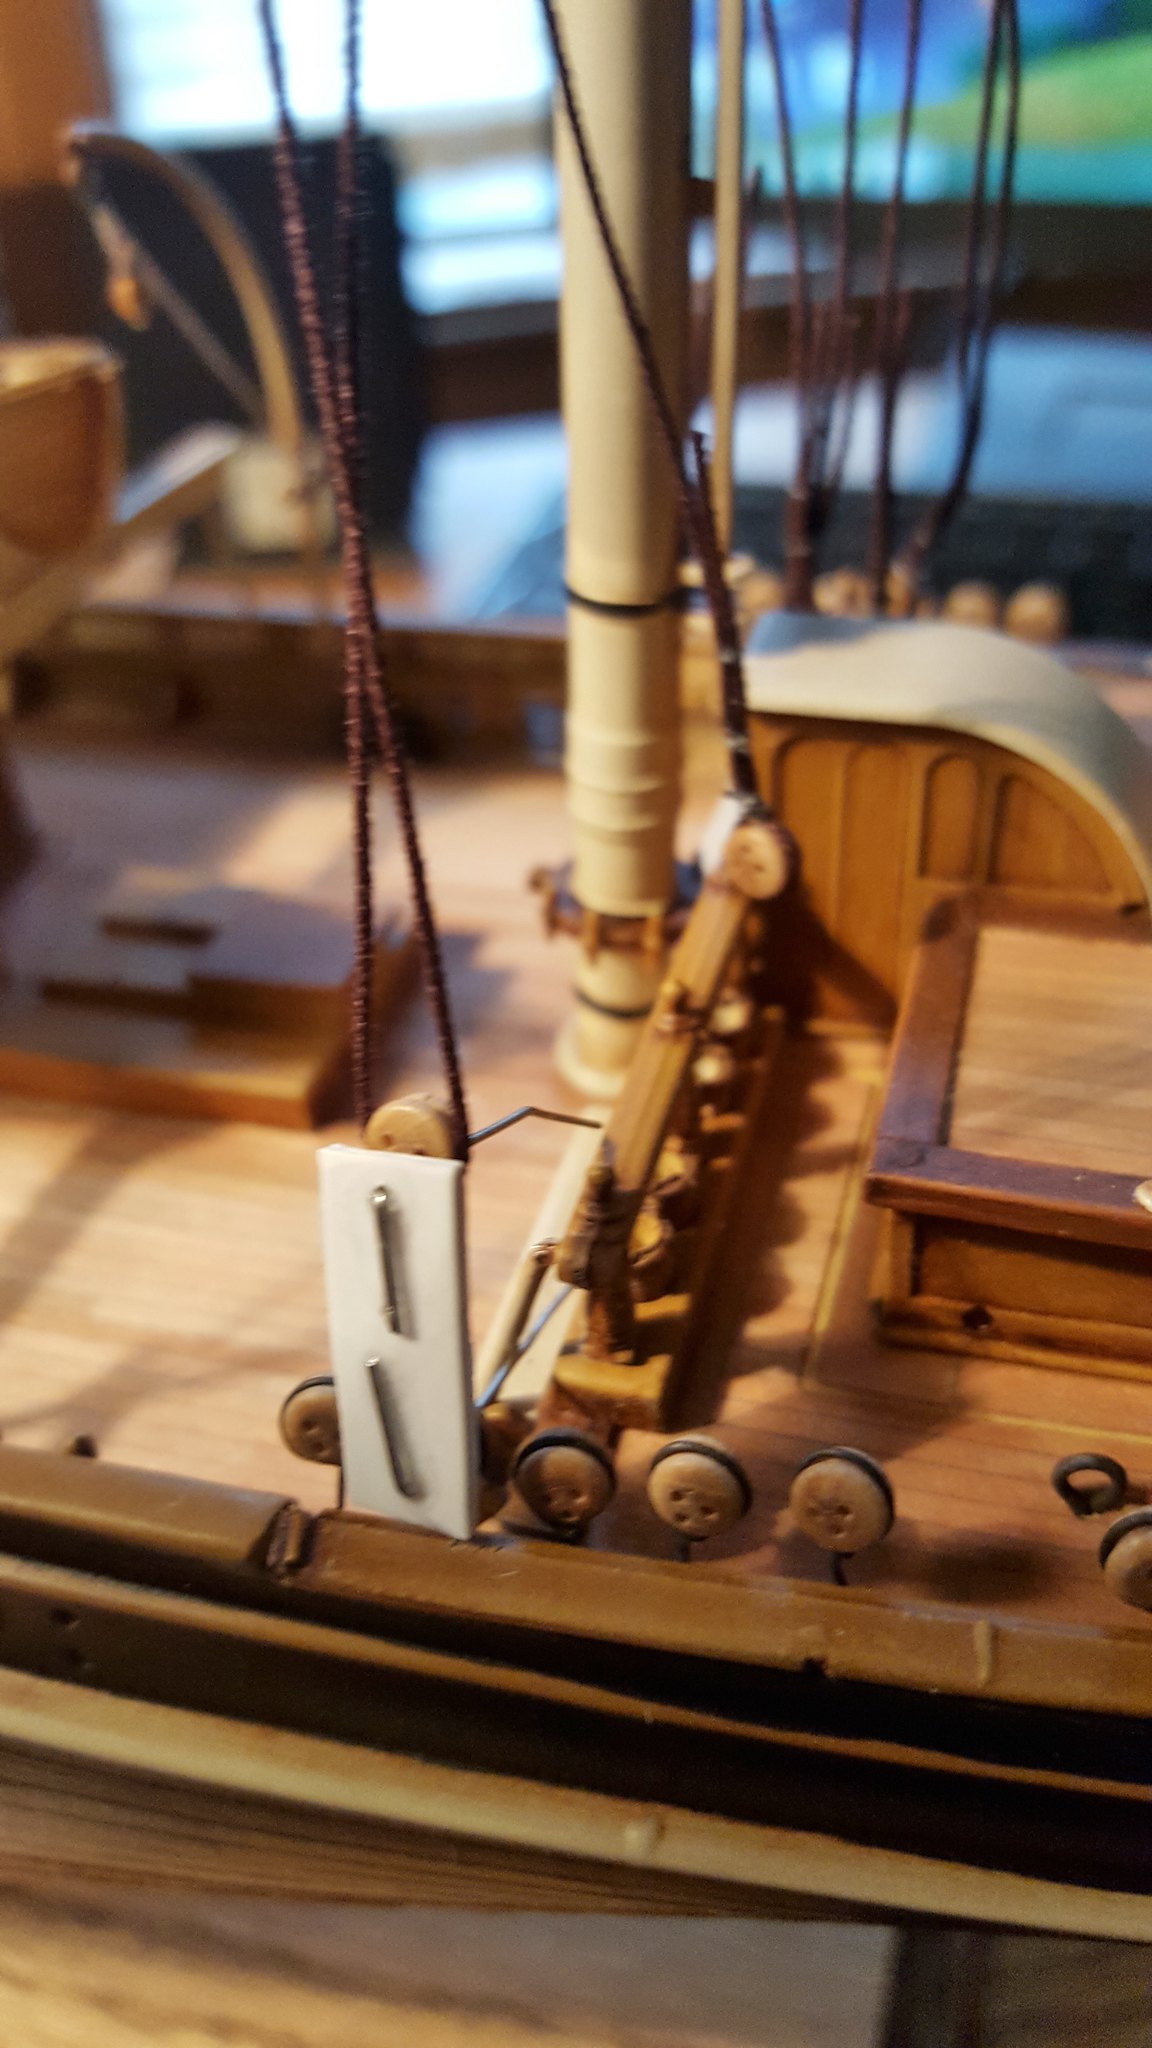
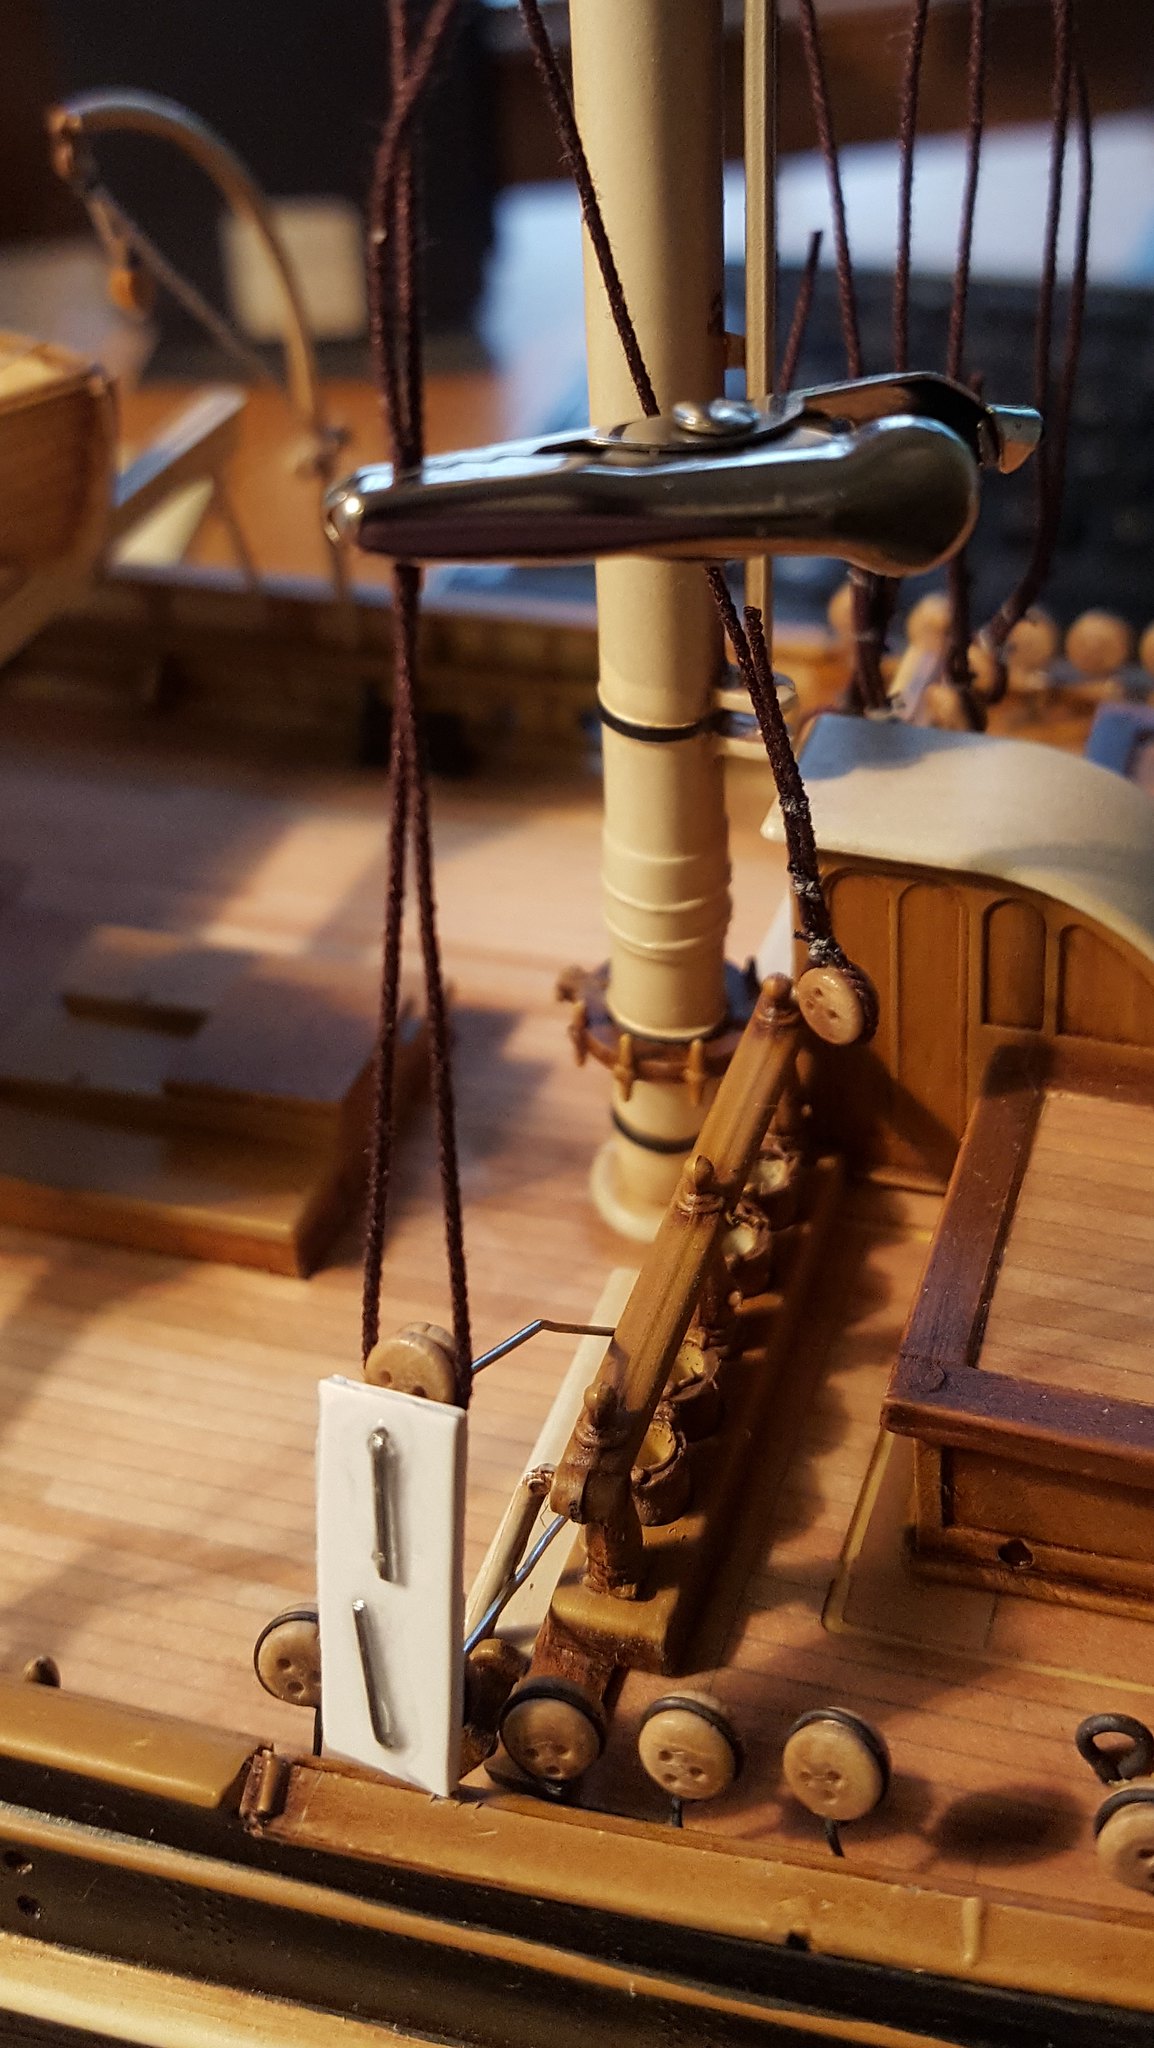
The other wire of the jig goes into the center hole of the lower deadeye, and then I run the shroud around the upper deadeye to hold it at the correct spacing

 20180930_095323 by Dave Kump, on Flickr

 20180930_095350 by Dave Kump, on Flickr

Alligator clip to keep the shroud tension on (just enough tension so it doesn't sag at this point, the deadeyes are easier to install with low tension, and the lanyards will get everything tight later)

 20180930_095350 by Dave Kump, on Flickr

Then I put another clip just above the deadeye, so I can tie it with black thread and minimize the gap...

 20180930_095409 by Dave Kump, on Flickr

Sometimes there is still a slight gap above the deadeye, but once I have the knot tied, I remove the clip and add a second knot for strength, and also to cinch the shroud tighter to the deadeye

 20180930_095445 by Dave Kump, on Flickr

Add a couple seizings for the shroud, and voila.

 20180930_095649 by Dave Kump, on Flickr

Then I pull the jig off and go on to the next shroud/deadeye.

 20180930_095726 by Dave Kump, on Flickr

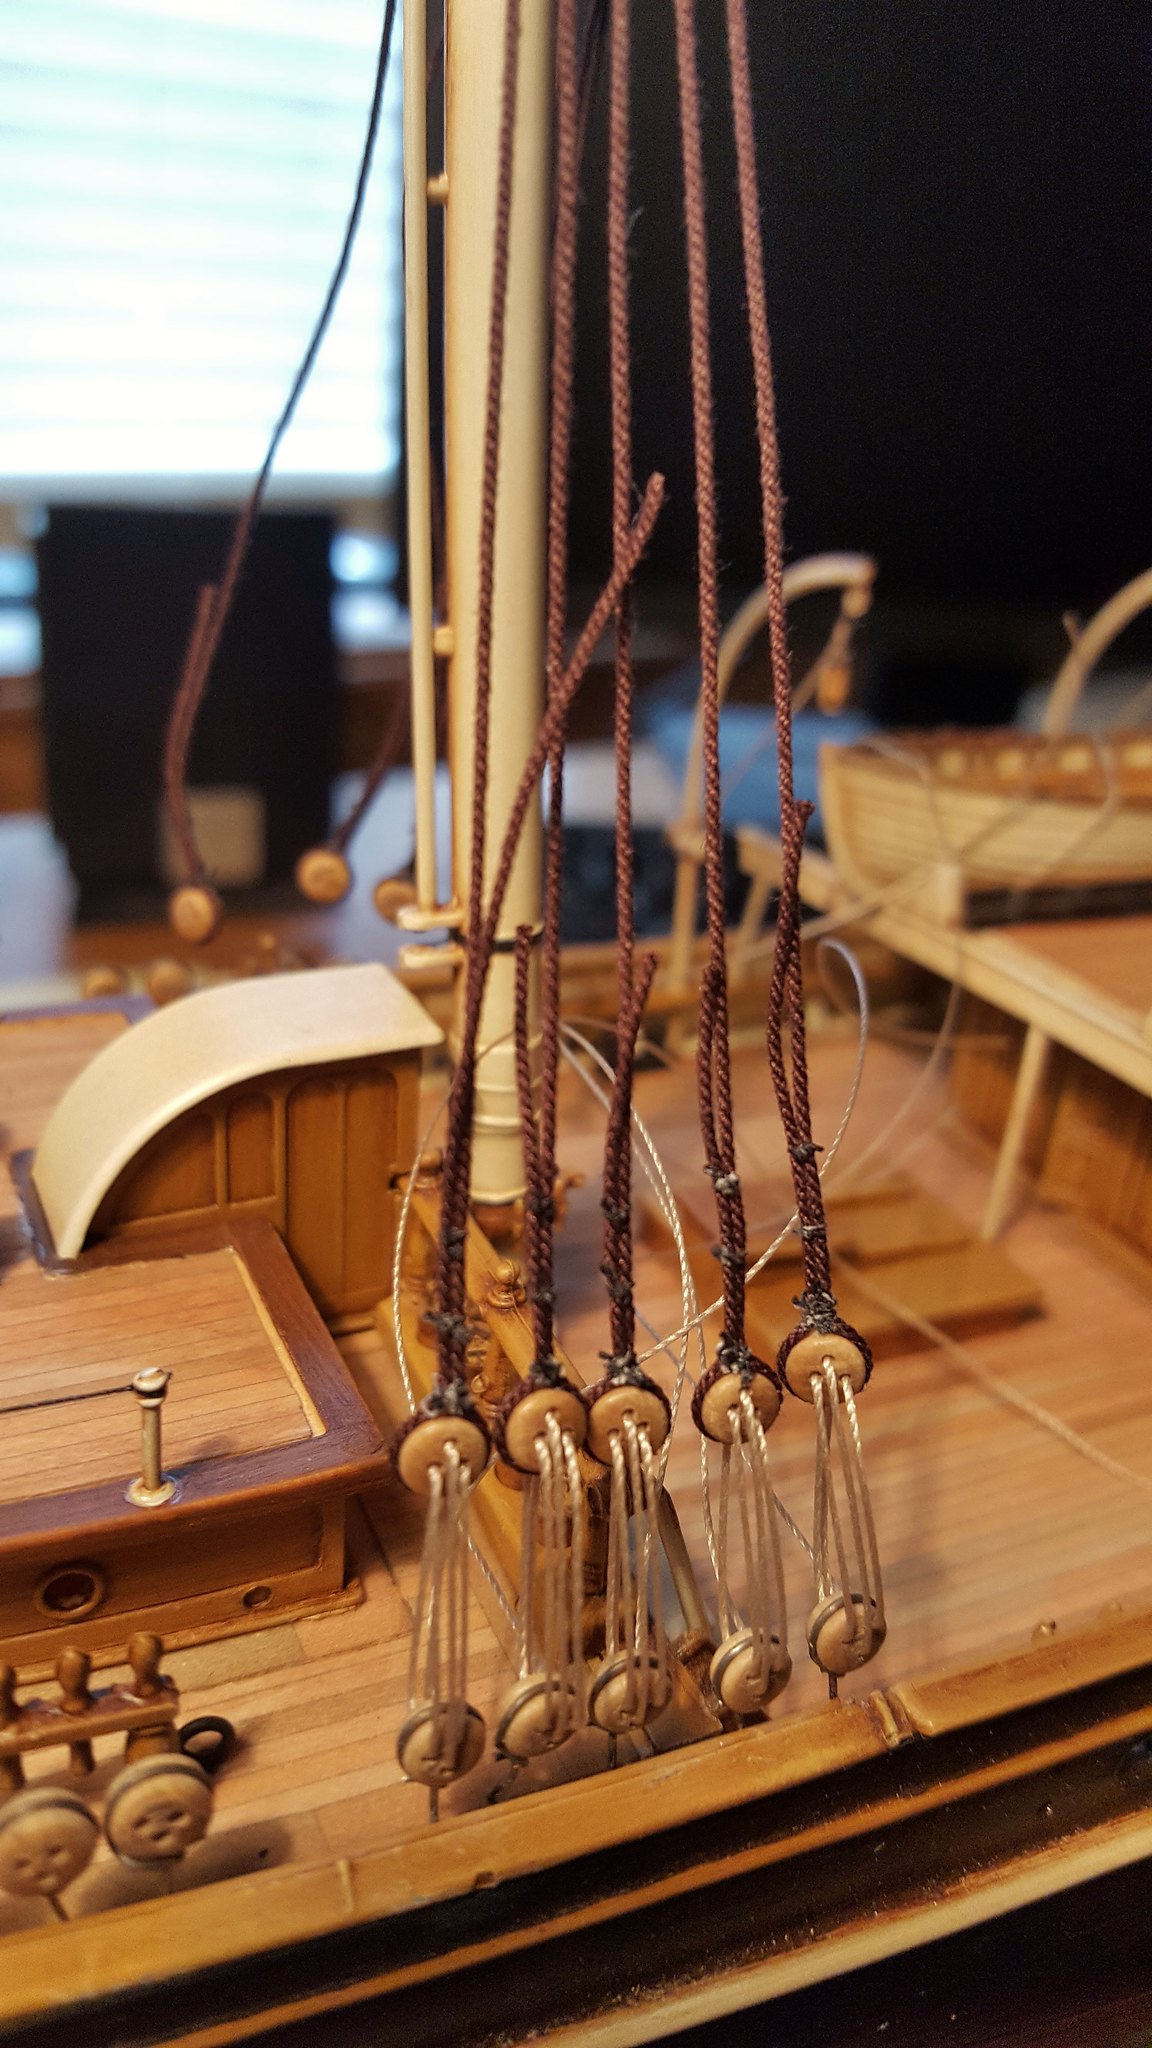
I used to tie each pair of shrouds and finish the lanyards as I went, but I found that as I worked aft, no matter how careful I was to keep the tension even, the foremost shrouds would end up slacking off slightly.  Now I run all the lanyards without tying them, and then I work from aft to fore as I add tension and hold them temporarily with alligator clips until I have the correct tension along the set (and it helps me keep the mast lined up).

 20180930_103614 by Dave Kump, on Flickr

It's also worth noting that I put the stays on after the shrouds, so I always tie on temporary stays to keep the masts from being pulled back while I tension the shrouds.

Anyhow...the topmast and tgall shrouds will be quick and easy (only a few on each side), so I should have those done soon, then I can get all the Main and Mizzen stays on....there are a LOT of backstays on this model, each with deadeyes at the deck, so I'll be working on that for a while yet...but I'm a good deal into the standing rigging now...figure I'll be ready to start thinking about sails before too long....might go with a silkspan material, but I really like what Rob W does with paper...might need to bug him for some pointers.

Thanks again for reading!
Dave


        _~
     _~ )_)_~
     )_))_))_)
     _!__!__!_         
     (_D_P_K_)
   ~~~~~~~~~~~~~
    ~~~~~~~~~~~

Current Project:  Imai/ERTL Spanish Galleon #2

Recently Finished: Revell 1/96 Cutty Sark

Next Up:  ???


  • Member since
    July 2013
Posted by steve5 on Sunday, September 30, 2018 4:23 PM

very nice dave , now you show me LOL , will have to remember this , if I ever do another ship .


  • Member since
    December 2010
  • From: Salem, Oregon
Posted by 1943Mike on Sunday, September 30, 2018 10:21 PM

What Steve just said .. +1.

Mike

"Le temps est un grand maître, mais malheureusement, il tue tous ses élèves."

Hector Berlioz

  • Member since
    December 2012
Posted by rwiederrich on Monday, October 1, 2018 12:48 PM
Great job Dave...really. I'm glad you brought up the spacer for the lanyards. Yes, it is a common thing for discriminating modelers to use some form of a spacer..be it a single piece of wire(what I use) or with some apparatus of their own doing(like yours) . I generally rig shrouds in pairs...unless you have 5 shrouds...then you have an odd man out. What glue are you using for this process? Yes...I'll be more then happy to discuss my paper sail process, if you want to go that route. Much more to scale IMV. Looking good. Rob
  • Member since
    September 2012
Posted by GMorrison on Monday, October 1, 2018 1:13 PM

That's a better system than I've been able to come up with. Thanks for taking the time to make a visual toot.

I suppose in theory the spacing between the deadeyes gets longer as the angle of the shroud increases, but for all practical purposes that's not really an issue here.

That's the kind of stuff I get myself hung up on.

 Modeling is an excuse to buy books.


  • Member since
    May 2006
  • From: Chapin, South Carolina
Posted by Shipwreck on Monday, October 1, 2018 2:07 PM

Dave, I am really interested in your rigging process. It seems that you are rigging the shrouds before the standing and running rigging? I am asking because in a year I hope to be able to rig a 1:96 USS Condition (never been there)!

On the Bench:

Revell 1/96 USS Constitution - rigging

Kinetic 1/48 YF-104A 5+2957

Trumpeter 1/350 USS Hornet CV-8

Revell 1/48 B-1B Lancer Prep & Reasearch


  • Member since
    March 2012
  • From: Marysville, WA
Posted by David_K on Monday, October 1, 2018 5:04 PM

Rob, I use CA to set the knots on my shrouds (and a lot of other rigging lines)...it dries fast, and strong.  The only problem really for me is that it sometimes discolors the line (especially light colored line for running rigging) where I apply it, so I do so sparingly.

I keep a toothpick and some little squares of shiny cardboard (like cereal box material)...when I need to apply some CA, I put a few drops on the cardboard and apply it with a toothpick.


GM, I have the fortunate position of not begin too hung up on the little stuff lol...I love the work I've seen of yours, your attention to details is incredible!

Shipwreck, I install the shrouds (as part of the standing rigging) first, because they are the first lines piled onto the foot of the mast.  I install them, and then move on to the stays, since they are piled above the shrouds...this way, I can keep the loops stacked up correctly and keep everything tight as I work my way up...I don't know if my method is different from other people?

Thanks!

Dave

        _~
     _~ )_)_~
     )_))_))_)
     _!__!__!_         
     (_D_P_K_)
   ~~~~~~~~~~~~~
    ~~~~~~~~~~~

Current Project:  Imai/ERTL Spanish Galleon #2

Recently Finished: Revell 1/96 Cutty Sark

Next Up:  ???


  • Member since
    April 2016
  • From: Russia, St.Peterburg
Posted by kirill4 on Monday, October 1, 2018 11:26 PM

Good day Dave,

Your model looks very good! and will look better and better with all this rigging growing up....

Read your last posts with great interest,I have plan to assemble same kit someday in the future :)))... the only thing I doubt - your choice to leave brass chains unblackened( in my opinion ,which is not realistic and "contradict"-"shadowing",if I could say that,  with gilded scrolworks, ....but I understood very well that You like how it looks ! :)))

Wish You all the best and Good Progress in rigging ( part of modeling I like most of all :)))

Kirill

  • Member since
    December 2012
Posted by rwiederrich on Wednesday, October 3, 2018 1:29 PM

I wanted to say I think your build is coming along extremely nicely Dave and wanted to encourage you as you work out the rigging.  I know you focus on detailing the model with a superior paint technique and such...but I also encourage you to detail her in her rigging as well....do your do-dilligence when it comes to studying of her rigging...it will make the model that more impressive...and will cause your own knowledge of clipper ship rigging to grow.

I have been working on my scratch build 1/128 Great Republic and I finished up all the top shrouds for her masts.  I'm focusing on working up the paper sails currently and how to work out all the rigging accociated with them.

Here is an image of her currently.

  • Member since
    July 2010
  • From: Tempe AZ
Posted by docidle on Wednesday, October 3, 2018 11:56 PM

Great work bud! I’ve used the jig approach with deadeyes and it does make life more enjoyable to say the least. Your CS is just so dadgum pretty!

Steve


  • Member since
    March 2012
  • From: Marysville, WA
Posted by David_K on Monday, October 8, 2018 6:40 PM

Thanks all for the words of encouragement!

Rob, your Great Republic is awesome...that thing is scratchbuilt?!  Impressive!

Please document your paper sail technique somewhat so I can have some basis to consider when I get to my attempt at sailmaking.

Steve, broken record time....dude, your Catalan is something else!  So many little details that make it pop....I can't wait to see your hull after some masterful paint shading!

And of course, Kirill's Galleon is yet another example of intricate detail and dedication to the art.

Here's a good one...while attaching deadeyes and main topmast shrouds today, I went to snip off a trailing end of a line, got a little closer than I meant to...and severed the adjacent shroud!!  Whaaaaa?!  Yeah, so it set me back an hour or so...no biggie, but it's been awhile since I inadvertently cut a line.  Replaced the severed line, finished the other 3 shrouds, and decided to walk away for the night.  I'll try some more tomorrow after work!

Dave

        _~
     _~ )_)_~
     )_))_))_)
     _!__!__!_         
     (_D_P_K_)
   ~~~~~~~~~~~~~
    ~~~~~~~~~~~

Current Project:  Imai/ERTL Spanish Galleon #2

Recently Finished: Revell 1/96 Cutty Sark

Next Up:  ???


  • Member since
    July 2010
  • From: Tempe AZ
Posted by docidle on Tuesday, October 9, 2018 12:04 AM

Smart move Dave. I inadvertently cut lines all the time so you’re doing better than me!

I’m planning on posting some painting pictures, just not sure when.

You’re doing a most excellent job on your CS.... broken record...

Steve 


  • Member since
    December 2012
Posted by rwiederrich on Wednesday, October 10, 2018 1:10 PM

Yes Dave she is 1/128...fully scratch built from the keel to to weather deck...to the masts and their ironwork.  Currently I am fitting out the metal gin-blocks and double sheet- blocks.


I'll post some images and my process for paper sails in another post.


Rob

  • Member since
    December 2012
Posted by rwiederrich on Thursday, October 11, 2018 12:47 PM

Dave here is a nice video on how to make convincing sails....I simply substitute paper.

I begin with a piece of paper that has the panel lines drawn on it(make a copy( of the paneled line paper and then simply use it as your base sail material.  then make your bands and such like the video.....

Good luck

Rob(press that black X)

  • Member since
    March 2018
  • From: Chicago suburbs
Posted by Luvspinball on Thursday, October 11, 2018 3:23 PM

No video attached Rob.


Bob Frysztak

Luvspinball

Current builds:  Revell 1/96 USS Constitution with extensive scratch building

  • Member since
    December 2012
Posted by rwiederrich on Friday, October 12, 2018 7:05 AM

Interesting...I just pressed it and it takes me to the Youtube video......

Not sure what's up

Rob

  • Member since
    March 2018
  • From: Chicago suburbs
Posted by Luvspinball on Friday, October 12, 2018 2:19 PM

Sorry Rob, but I don't see a black X to press:

black X

Bob Frysztak

Luvspinball

Current builds:  Revell 1/96 USS Constitution with extensive scratch building

  • Member since
    July 2013
Posted by steve5 on Friday, October 12, 2018 3:52 PM

came through for me bob , try this

www.youtube.com/watch?v=YUd2xSarmhM&feature=youtu.be

thank's for posting rob .


  • Member since
    December 2012
Posted by rwiederrich on Friday, October 12, 2018 4:04 PM

Sorry everyone for the inconvience.


Rob(Thanks Steve)

  • Member since
    November 2005
  • From: Formerly Bryan, now Arlington, Texas
Posted by CapnMac82 on Friday, October 12, 2018 6:16 PM

As a link (the chain icon 4th from left, bottom row)

Oops, link is disabled

As embedded video (use the film icon, 6th from left, bottom row):

  • Member since
    November 2005
  • From: Formerly Bryan, now Arlington, Texas
Posted by CapnMac82 on Friday, October 12, 2018 6:18 PM

Well, that's annoying, kalmbach apparently limits hotlinking external references--sorry about that.

  • Member since
    March 2018
  • From: Chicago suburbs
Posted by Luvspinball on Saturday, October 13, 2018 11:58 PM

Thanks Steve.

Appreciate the link.  Just wish I could work that fast!

Bob

Bob Frysztak

Luvspinball

Current builds:  Revell 1/96 USS Constitution with extensive scratch building

  • Member since
    November 2018
Posted by Captain Ahab on Monday, November 5, 2018 3:26 PM
Ahoy Dave !
 
I can't thank you enough for sharing your building of Revell's Cutty Sark. I started mine in 1985 after it became clear that I would be hospitalized at different points in my life. I'm very healthy and active now. I knew I would need something to do when was layed up so I picked Revell's 1:96 Cutty Sark. I'm in the position to finish this winter and your posts are valuable and encouraging. There was no internet imagined when I started, now, today, I ordered the CNC lazer cut wooden deck and CNC cut and sewn full suit of sails.
 
Wow ! What an age we live in !
 
  • Member since
    March 2012
  • From: Marysville, WA
Posted by David_K on Thursday, November 8, 2018 11:07 AM

Thanks, Ahab!

I'm glad you have enjoyed this thread, and that you're working your way through the Cutty Sark build, as well.

Admittedly, I've been working on this model very leisurely, and I haven't given much attention to the thread here in terms of sharing every step of the way.  You're right, without the internet, it would be very hard for someone to learn and develop the skills and techniques that are so helpful for building model ships...I thank the members of this forum for much of my *education* and inspiration. :)

The Scaledecks wooden decks are great!  Please check them for correct fit, however, before you begin installation...I had an issue with my first set (it was printed with an incorrect reference point, and ended up about 4mm short, with impossible fit around the hatches)...John was terrific, and sent me a replacement immediately.  Also, whichever type of glue you use for the wooden decks,  I strongly recommend against contact cement...it sets instantly, and there is no time for adjustment.  I tried contact cement for the forecastle deck and regretted it...for the rest, I used regular liquid model cement and it worked perfectly, and gave me plenty of time to shift the deck parts into perfect position before it dried.  $0.02

We've just returned from vacation last night (Maui!), and I expect I'll have some time this weekend to continue with standing rigging.  All the shrouds, stays and backstays are on, next I'll be installing the ratlines (which don't extend across all shrouds all the way up), and then futtock shrouds.  She's beginning to look like a ship model now.

I'll be sure and post some pictures after my next work session.

Thanks again!

Dave

        _~
     _~ )_)_~
     )_))_))_)
     _!__!__!_         
     (_D_P_K_)
   ~~~~~~~~~~~~~
    ~~~~~~~~~~~

Current Project:  Imai/ERTL Spanish Galleon #2

Recently Finished: Revell 1/96 Cutty Sark

Next Up:  ???


  • Member since
    December 2012
Posted by rwiederrich on Friday, November 9, 2018 8:13 AM

Nice to have you back Dave.

Personally I tend to document nearly every step.  Even more so with my Cutty Sark build, since I wanted to demonstrate my technique for setting foot ropes and sheets.  And with my extensive scratch built *Ways* and rudder refit...it was expected.

Glad you'll be back in the shipyard soon.

I'm beginning to add sails to my Great Republic.https://www.facebook.com/photo.php?fbid=10214890669473407&set=a.10213013998917816&type=3&size=512%2C768

Rob

  • Member since
    November 2018
Posted by Captain Ahab on Monday, November 12, 2018 8:34 PM

Ahoy Dave, I'm trying to get the 6 sheet set of Cutty Sark plans by George Campbell but the Cutty Sark museum store website is disabled. Does anyone have a set of plans that they want to sell?

  • Member since
    December 2012
Posted by rwiederrich on Monday, December 17, 2018 8:46 PM

Dave..have you picked up another hobbie?

Wondering where you might have gotten off at...Miss ya and thinking of you.

Rob

  • Member since
    March 2012
  • From: Marysville, WA
Posted by David_K on Saturday, December 22, 2018 8:47 AM

Rob, I have always been a man of many hobbies...between playing guitar, baking sourdough bread, video games, brewing beer, etc., I do sometimes find myself pulled into different directions!

I have been unable to log in to Finsecale for a couple weeks, I guess due to some web-hosting IT snafu with the site.  Looks like I'm back in now, so that's good...

It's true this thread has become less of a demonstration for the Revell Cutty Sark, and more of a leisure log for my updates.  I'm currently still in the ratline phase, but I'm nearly there...all the lower ratlines are on, and most of the topmast ratlines.

I'm off work for the holidays, and I've included "CS Progress" on my to-do list for the upcoming week, so I fully hope to begin pulling out yards and directing my plan for running rigging, at least the preliminary steps, during the break.

I'll post pics of the standing rigging (with completed ratlines) in a day or two, before I move any further.

Happy Holidays, All!

Dave

        _~
     _~ )_)_~
     )_))_))_)
     _!__!__!_         
     (_D_P_K_)
   ~~~~~~~~~~~~~
    ~~~~~~~~~~~

Current Project:  Imai/ERTL Spanish Galleon #2

Recently Finished: Revell 1/96 Cutty Sark

Next Up:  ???


  • Member since
    March 2018
  • From: Chicago suburbs
Posted by Luvspinball on Saturday, December 22, 2018 10:29 AM
Dave, Had the same issue with logging in. I could see all the threads, just couldn't reply to them without an endless login loop. Ended up having to clear the browser cache - something in there causing trouble. Worked fine after that. Maybe try that next time you get caught in the "login loop." Bob P.S. Waiting for some update pics - love your work and I am getting close to standing rigging for my Connie.

Bob Frysztak

Luvspinball

Current builds:  Revell 1/96 USS Constitution with extensive scratch building

  • Member since
    September 2012
Posted by GMorrison on Saturday, December 22, 2018 11:25 AM

David_K

I have been unable to log in to Finsecale for a couple weeks, I guess due to some web-hosting IT snafu with the site.  Looks like I'm back in now, so that's good...

I'm glad you are. I agree with you too, I had the same problems, attempted the same solutions and then suddenly one lorning I was back on.

I'm completely convinced it was a site problem.

Love to see those shrouds.

 Modeling is an excuse to buy books.


  • Member since
    March 2012
  • From: Marysville, WA
Posted by David_K on Saturday, December 22, 2018 12:27 PM

Well, here's a couple of sneak preview pics:

 20181222_101833 by Dave Kump, on Flickr

 20181222_101927 by Dave Kump, on Flickr


        _~
     _~ )_)_~
     )_))_))_)
     _!__!__!_         
     (_D_P_K_)
   ~~~~~~~~~~~~~
    ~~~~~~~~~~~

Current Project:  Imai/ERTL Spanish Galleon #2

Recently Finished: Revell 1/96 Cutty Sark

Next Up:  ???


  • Member since
    March 2012
  • From: Marysville, WA
Posted by David_K on Wednesday, December 26, 2018 10:59 AM

Rob, the sails are looking great!

Are you rigging them fully, or just specific lines?  I'm trying to decide how comeplete I want my running sail rigging when I get there....I kinda figure I should take it easy with such a large number of sails, being my first attempt at a clipper....plus I only prepped blocks on the masts for the basics, i.e., lifts, braces, halyards, clews.

        _~
     _~ )_)_~
     )_))_))_)
     _!__!__!_         
     (_D_P_K_)
   ~~~~~~~~~~~~~
    ~~~~~~~~~~~

Current Project:  Imai/ERTL Spanish Galleon #2

Recently Finished: Revell 1/96 Cutty Sark

Next Up:  ???


  • Member since
    November 2005
  • From: Formerly Bryan, now Arlington, Texas
Posted by CapnMac82 on Wednesday, December 26, 2018 1:26 PM

GMorrison
I had the same problems, attempted the same solutions and then suddenly one lorning I was back on. I'm completely convinced it was a site problem.

Concur.

I found, eventually, the pinned "Having problems logging on" post and followed those instructions.  To no avail.  Sent an email in as directed to the IT person, and bam, next day, all was good.  Which probably had more to do with the site fix than my email.

  • Member since
    December 2012
Posted by rwiederrich on Thursday, December 27, 2018 12:38 PM

Dave the sails are rigged fully......even the reef points too...

Your build is coming along very nicely.

Thanks for the compliment.

Can't wait to see more of your work.

Rob

  • Member since
    February 2016
  • From: Western No. Carolina
Posted by gene1 on Saturday, December 29, 2018 8:53 AM

Dave, Your work is absolutely superb. I have seen some very great model builders & you are right with them. How did you get so good so fast?When I get old, I hope I can build like you. I was 88 yesterday & it is still fun.

  • Member since
    March 2012
  • From: Marysville, WA
Posted by David_K on Saturday, December 29, 2018 10:59 AM

Thanks, Gene!

I guess I've been building model ships for over 6 years now, and I think I've built about 10 in that time.  I still have several in my stash, and I learn something new with every project.  In fact, I'm about to attempt constructing set sails on the Cutty Sark, if even just a simplified rig version...a little nervous about it, but we'll see what happens!

I appreciate your compliment.  I also realize there are different types of modelers out here...my projects won't win any serious competitions (not that I'd enter them in a serious competition) because I take certain liberties that often don't fit with authenticity, scale, or even the laws of physics sometimes! lol

But I do enjoy building ship models, and I like the overall effect of an old sailing ship, it hearkens back to the era of an expanding world, when long-distance travel suddenly offered the ability to learn more about the planet, its people, etc....sailing ships represent (to me) mankind's first steps into the future.

Anyway, I'm getting carried away here...

I'm very glad you enjoy seeing my work, Gene!  You have impressed me with your work on the Heller Victory! It's a thing of beauty!  (I have that kit in my stash, but I'm intimidated by it....it'll wait until I'm at the top of my game before I even begin to plan that build)

I've just finished the last of the ratlines last night on the Cutty Sark, so I'll get a few more pics taken and posted today, then I will get the yards out of the box, and start experimenting with material for sails...wish me luck!

Dave


        _~
     _~ )_)_~
     )_))_))_)
     _!__!__!_         
     (_D_P_K_)
   ~~~~~~~~~~~~~
    ~~~~~~~~~~~

Current Project:  Imai/ERTL Spanish Galleon #2

Recently Finished: Revell 1/96 Cutty Sark

Next Up:  ???


  • Member since
    December 2010
  • From: Salem, Oregon
Posted by 1943Mike on Saturday, December 29, 2018 10:44 PM

Dave,

Exemplary work as usual.

You're far enough up the ladder in this "game" that starting the Heller HMS Victory would just fine. You just have to commit the time.

Yes, we can all learn a bit from Rob - he's one guy who gave me encouragement when I was attempting my build of the CS. He's also one of the most gifted modelers around.

I think you're stepping into another realm of modeling skills when you build a ship kit with set sails - sails that look more to scale than the plastic that comes with most kits. That said I've seen models using the plastic sails that look pretty darn good! To each his own.

It's a real inspiration to watch your works in progress. I always look forward to catching your next post.

To Gene: A belated Happy Birthday!

Mike

"Le temps est un grand maître, mais malheureusement, il tue tous ses élèves."

Hector Berlioz

  • Member since
    July 2013
Posted by steve5 on Saturday, December 29, 2018 10:57 PM

dave , you did a great job on the soleil royal , if you can do that beast , you can do a wonderful job on the victory . 

steve5


  • Member since
    July 2010
  • From: Tempe AZ
Posted by docidle on Saturday, December 29, 2018 11:01 PM

Dave,

I love the rigging so far on your CS. It will be interesting to see how you are going to rig the sails up and I’m looking forward to it.

I hope you and your family have had a wonderful holiday seas n this year.

Steve


  • Member since
    March 2012
  • From: Marysville, WA
Posted by David_K on Monday, December 31, 2018 5:56 PM

Oh, thanks for the words of encouragement, you guys!

I've been busy getting the final blocks in place, and test-fitting the yards before I begin experimenting with sails.

Hey Rob, if you're reading this, would you mind sharing some pics of where you installed the blocks for the upper fore and main braces?  I'm trying to figure out where they should be placed, my Campbell plans are very blurry, and the Revell instructions show the blocks on the stays, but they will get in the way of the yard/sail when it's bent...if you understand which blocks I mean, they're are the ones that the braces reeve through on the aft mast before they head down to the pinrails?

Anyway, still chugging away, it should get interesting pretty soon!

Have a great holiday, everyone!

Dave

        _~
     _~ )_)_~
     )_))_))_)
     _!__!__!_         
     (_D_P_K_)
   ~~~~~~~~~~~~~
    ~~~~~~~~~~~

Current Project:  Imai/ERTL Spanish Galleon #2

Recently Finished: Revell 1/96 Cutty Sark

Next Up:  ???


  • Member since
    March 2009
  • From: brisbane australia
Posted by surfsup on Monday, December 31, 2018 8:04 PM

I love the rigging work. So much better than the kit supplies.....Cheers mark

If i was your wife, i'd poison your tea! If Iwas your husband, I would drink it! WINSTON CHURCHILL

  • Member since
    December 2012
Posted by rwiederrich on Monday, December 31, 2018 9:54 PM
  • Member since
    December 2012
Posted by rwiederrich on Monday, December 31, 2018 9:56 PM
  • Member since
    January 2012
  • From: Atlanta Metro, Georgia
Posted by fright on Tuesday, January 1, 2019 10:17 AM

Wow - you have done some absolutely beautiful work on this ship. Realy clean and yur attention to detail is superb! Thank you for showing some of the steps you used on your rigging. 

Robert O

  • Member since
    March 2012
  • From: Marysville, WA
Posted by David_K on Tuesday, January 1, 2019 11:09 AM

Thanks, Rob.

I think my blocks are a little low, I'm going to remove them and install in a position above where the (raised) yards will sit.

THX!

        _~
     _~ )_)_~
     )_))_))_)
     _!__!__!_         
     (_D_P_K_)
   ~~~~~~~~~~~~~
    ~~~~~~~~~~~

Current Project:  Imai/ERTL Spanish Galleon #2

Recently Finished: Revell 1/96 Cutty Sark

Next Up:  ???


  • Member since
    March 2012
  • From: Marysville, WA
Posted by David_K on Sunday, January 6, 2019 1:42 PM

Well, here's an interesting consideration:

After a few hours of fiddling with various materials and techniques to experiment with sail material (paper, coffee filters, cloth), nothing was really coming together as a *eureka* plan for me...

I was showing some of the trials to my wife, and I had one of the vacuum-formed sails sitting there as a template for tracing, etc....she said,

"I think that one looks the best."  (pointing at the vac-formed sail)

"No, that's the kit sail, I'm just using that for a pattern."

"Oh, well, I think it looks like a sail, and couldn't you paint it and shade it?"

"Uh, I guess I could."

So, the moral of the story is I'm going to explore the option of using the kit sails.  I'll try a full mock-up with one sail, and see how it comes out.

Anybody ever have luck using them?  I've never even tried.

Dave


        _~
     _~ )_)_~
     )_))_))_)
     _!__!__!_         
     (_D_P_K_)
   ~~~~~~~~~~~~~
    ~~~~~~~~~~~

Current Project:  Imai/ERTL Spanish Galleon #2

Recently Finished: Revell 1/96 Cutty Sark

Next Up:  ???


  • Member since
    March 2012
  • From: Marysville, WA
Posted by David_K on Wednesday, January 23, 2019 7:49 PM

Okay, well...here's an initial rig-up of a vacu-formed sail.

The color for the shading is a bit darker than I'd hoped, but the effect is meant to seem like the sail is somewhat translucent in the center...as if light can be seen through it.

 20190123_164657 by Dave Kump, on Flickr

 20190123_164705 by Dave Kump, on Flickr

My phone camera was having trouble getting the exposure right from the rear...I can assure you, the back of the sail is actually much lighter in color than the front...the rigging lines I'm using include clews, downhaul/sheets, braces, and of course halyards and lifts...the fore royal sail doesn't have as many blocks for all the lines, but the lower sails will.

 20190123_164713 by Dave Kump, on Flickr

 20190123_164719 by Dave Kump, on Flickr

Again, the exposure is way off, and the color doesn't look anywhere near the reality.

 20190123_164733 by Dave Kump, on Flickr

 20190123_164742 by Dave Kump, on Flickr

Anyways, I'm not perfectly satisfied with it, but it works...

I think as I get more sails and yards installed, it will (hopefully) come together and have a *harmonious* overall affect.

Dave

        _~
     _~ )_)_~
     )_))_))_)
     _!__!__!_         
     (_D_P_K_)
   ~~~~~~~~~~~~~
    ~~~~~~~~~~~

Current Project:  Imai/ERTL Spanish Galleon #2

Recently Finished: Revell 1/96 Cutty Sark

Next Up:  ???


  • Member since
    December 2012
Posted by rwiederrich on Thursday, January 24, 2019 7:55 AM

David...the color is warm and gentle..very similar to the entire color theme of your build.  It does appear to be a bit dark...but as you say it isn't a true representaion of the actual model sail.

Keep plugging away and as more sails are set the effect will become less stark and more harmonious.  Your weathering technique definately translates to the sails as well...bringing a harmony to the model....good job.

I have several B/W images of the Cutty and her aging sails do represent a much darker appearance then new sails.

Rob

  • Member since
    December 2012
Posted by rwiederrich on Thursday, January 24, 2019 8:15 AM

Translucency is one of the hardest things to replicate...you are very good at shading and simulating depth with your paint technique...good luck and I'm looking forward to your wonderful progress.

Here are the mainmast sails for my Great Republic....one reason why I prefer paper sails.

Rob    [/URL]

  • Member since
    July 2006
Posted by Michael D. on Thursday, January 24, 2019 10:39 AM

Funny how we're never really satisfied with our work!. The last picture to me looks like it represents the shading you're after?, I like it!!.

Do you plan on highlighting the bunt and leech lines with paint or overlaying them with thread?, of course that would require additional rigging to get the full effect, just a thought. Your build is moving along very nicely and well done thus far David.

Michael D.


  • Member since
    March 2012
  • From: Marysville, WA
Posted by David_K on Thursday, January 24, 2019 4:51 PM

Thanks for the kind words, you guys.

Rob, your Facebook links often don't work when I click on them here?

The one thing that I'm contemplating now, and it's something I haven't dealt with before, is the sag of the lifts with a set sail.  Are they supposed to be sort of draping down the back (or front?) of the yard?  I wonder if I should tie the lengths of line as if the yard were lowered, and then raise the yards up and allow that to dictate the length...but the real concern is getting a realistic drape of the line...without the actual weight of rope, I'll need to form the lines somehow.

Anyway, I'll come up with something.

Also, as I continue, I'll actually be starting from the foresail, and then attaching more yards and sails upward (lower top, upper top, tgall, etc.) to help ease the installation of rigging lines (lifts and sheets, for example, are easier when I don't have to work around the adjacent yard above)...

Thanks again for your encouragement....I hope to have some more progress soon.

Dave

        _~
     _~ )_)_~
     )_))_))_)
     _!__!__!_         
     (_D_P_K_)
   ~~~~~~~~~~~~~
    ~~~~~~~~~~~

Current Project:  Imai/ERTL Spanish Galleon #2

Recently Finished: Revell 1/96 Cutty Sark

Next Up:  ???


  • Member since
    March 2009
  • From: brisbane australia
Posted by surfsup on Thursday, January 24, 2019 8:07 PM

Even with colour problem they do look very good.....Cheers mark

If i was your wife, i'd poison your tea! If Iwas your husband, I would drink it! WINSTON CHURCHILL

  • Member since
    December 2012
Posted by rwiederrich on Friday, January 25, 2019 7:39 AM

Dave..here is a pic of what I did.   I used wire to form the correct sag arc..then painted black after installed....

I think the lifts are very convincing in my scale of 1/128th.

Don't be afraid to use material that would otherwise not be used....everything we do is a REPRESENTATION anyway.

Good luck on how you tackle this.

Rob " target="">

  • Member since
    March 2012
  • From: Marysville, WA
Posted by David_K on Sunday, January 27, 2019 2:09 PM

Looks awesome, Rob!  Well done.

        _~
     _~ )_)_~
     )_))_))_)
     _!__!__!_         
     (_D_P_K_)
   ~~~~~~~~~~~~~
    ~~~~~~~~~~~

Current Project:  Imai/ERTL Spanish Galleon #2

Recently Finished: Revell 1/96 Cutty Sark

Next Up:  ???


  • Member since
    March 2009
  • From: brisbane australia
Posted by surfsup on Sunday, January 27, 2019 11:01 PM

Ditto. Beautifully done so far.....Cheers Mark

If i was your wife, i'd poison your tea! If Iwas your husband, I would drink it! WINSTON CHURCHILL

  • Member since
    March 2012
  • From: Marysville, WA
Posted by David_K on Saturday, February 16, 2019 11:26 AM

Hi all-

Here's an update to share some pics of current status vis-a-vis sails.

I'm still working leisurely on this project, lots of other things keeping me occupied, but I've made at least some progress.

I've got the fore sail, and lower top sail *built*, and here they are, partially installed.  The foresail has the lines run and held temporarily in place with clips until I'm ready to pull them to final tension and glue the terminals in place.

 20190213_145944 by Dave Kump, on Flickr

I think I'm going to go ahead and assemble all the sails for the foremast (already working on the upper top foresail) before I start permanently attaching them.  Of course, I'll wait and install the braces for ALL sails at the very last, or I'll never be able to access the pins.

My method so far is to install blocks/line on a yard for whatever rigging is called for a particular sail, then install blocks on the sail corners, as needed (clews mostly).  Then I bend the sail to the yard, and then measure the length of the lines needed to run through the blocks to their terminal, install the lines, and reave as much as I can through blocks on the sail before I will move to install the yard.  I'm also planning to work from lower to upper sails for the final install, so I can try to maintain line tension, while also being able to access blocks during installation without being obstructed by the next sail up.  Sheets and downhauls, however, will still need to be run through blocks on the sail below.  Sheesh, that paragraph sounds confusing even to me!

Here's a slightly closer pic

 20190213_145953 by Dave Kump, on Flickr

I'm satisfied with the vacuum-formed sails for the most part.  Most of my reference materials advise against displaying set sails on a model, for lots of different reasons...and I would tend to agree.  Aside from obscuring a lot of deck (and rigging) detail, the biggest challenge I'm facing with sails is their flexibility.

Using a flexible material, whether it's vac-formed plastic, cloth, silkspan, or paper, in order to impart any tension on the rigging lines, I can't avoid pulling the sail material out of its *natural* shape.  Clews are the worst offenders.  In order to preserve the shape of the sail, I've been fighting to keep the lines from looking slack.  It's not keeping me up at night, it's just one factor that adds a certain difficulty.

However, for the Cutty Sark, it seems like displaying sails gives it a more purposeful look, and I like it!  Not sure if I'll go for full sails on any future models, but this one, for me, benefits from it.


I'm seeing some really terrific work on the forum lately, it's impressive and admirable!

Dave


        _~
     _~ )_)_~
     )_))_))_)
     _!__!__!_         
     (_D_P_K_)
   ~~~~~~~~~~~~~
    ~~~~~~~~~~~

Current Project:  Imai/ERTL Spanish Galleon #2

Recently Finished: Revell 1/96 Cutty Sark

Next Up:  ???


  • Member since
    December 2012
Posted by rwiederrich on Saturday, February 16, 2019 12:46 PM

Oh boy....sails.  Nice work.....I'm glad to see you using the preformed ones...in your capable hands they will look wonderful.

I myself just added the top stay sail on my GR...what a test of endurance and good eye sight.

Nice to see you at work on your CS.


Rob

  • Member since
    July 2006
Posted by Michael D. on Saturday, February 16, 2019 1:19 PM

Very nice work on those sailsYes! The rigging for the clews look a little different than what I'm used to seeing, the standing part at the block instead of the yard, then again I know nothing about rigging a clipper, overall a masterpiece in the making.


Michael D.

  • Member since
    March 2012
  • From: Marysville, WA
Posted by David_K on Saturday, February 16, 2019 10:11 PM

Thanks, guys!

Rob, I'm very glad you have built a number of clippers, and more than a couple Cutty Sarks (with exceptional skill, I'll add)...it's nice to be able to browse over some of your WIPs or facebook photos to get a reference!

Michael, I agree, the rigging of this clipper is not what I'm used to seeing...most of my projects have been 17th century or older, and there are some stark differences as rigging has evolved, not to mention the particulars of a clipper.  In the Cutty Sark, there are many sails in which the standing end of the clewline is in fact held on a becket on the yard-block, before reaving in a manner more familiar to me. 

In truth, it seems like almost every sail on a particular mast has its own rules for what's included, or omitted...some have no lifts, or no halyards, or a variation of the clew and downhaul...it's interesting.  I reference Longridge and Campbell for the more confusing parts, and I've found that the Revell instructions are really not terribly inaccurate, though perhaps a bit simplified, which is fine by me.

Anyway, it's been an educational journey so far...with luck, I'll have the two final sails for the foremast pre-assembled in a week or so, and then once I get them all installed and rigged (except for the braces) we should have a good idea of the overall aspect.  It'll be interesting to see.

Thanks again, hope you guys are enjoying the weekend :)

Dave


        _~
     _~ )_)_~
     )_))_))_)
     _!__!__!_         
     (_D_P_K_)
   ~~~~~~~~~~~~~
    ~~~~~~~~~~~

Current Project:  Imai/ERTL Spanish Galleon #2

Recently Finished: Revell 1/96 Cutty Sark

Next Up:  ???


  • Member since
    July 2013
Posted by steve5 on Monday, February 18, 2019 2:39 AM

doing some lovely work david . 


  • Member since
    December 2010
  • From: Salem, Oregon
Posted by 1943Mike on Monday, February 18, 2019 9:24 PM

David,

Hope you and yours are enoying the weekend as well.

You're doing very fine work indeed!

Two questions:

1. when you get near the bottom of a "top" or crosstree, how did you afix the ratlines to the shrouds? Did you find you had enough room to tie the knots? Or did you "fake" it somehow?

2. What painting technique did you use on the vacuum formed sails? Very curious about that ... you've made it look very good and, I would imagine, with slightly more favorable lighting/camera conditions it would look even better.

Mike

"Le temps est un grand maître, mais malheureusement, il tue tous ses élèves."

Hector Berlioz

  • Member since
    March 2012
  • From: Marysville, WA
Posted by David_K on Tuesday, February 19, 2019 3:46 PM

Hi Mike!

I usually install ratlines up the the point at which the shrouds are about 1mm apart.  I don't go all the way up to the top or crosstrees.  I use clove hitch knots, and by using a large sewing needle with a notch cut out of the eye, it works like a very skinny hook, so I can get it through pretty small gaps in the shrouds.  But even so, and especially at this scale, once the shrouds are that close, I can barely tell if the ratlines go all the way up.  However, the Cutty Sark should have futtock shrouds installed (with ratlines) that would connect to the tops/trees.  I did not install them on my model.

As far as the sails, my method is to cut the sail out from the sheet, then I punch holes in the sail with a little sharpened awl (a thumbtack would work) at all the places where I'll be installing line or blocks.  In this case, the lower clew corners get a hole, and I put holes along the head of the sail for robands to bend it to the yard.  I also took a shortcut here, a real ship would have robands attached at every vertical *strip* of canvas, I am placing robands with wider spacing.

Once the sails are cut out and the holes made, I used pins to hold the sails down flat on a large piece of styrofoam, and airbrushed them all over with Tamiya Deck Tan paint.  Let it dry, flipped them over and sprayed the other side.  Once that was dry, I started adding shade to the curved parts of the sails, and near the edges, using Tamiya Flat Earth....I tried to go very sparingly with the shading as I sprayed, but I think now that I should have used a lighter color for it.  It came out pretty good, the sails have a look and finish of a cloth material that has been stained and sunbleached, and the light is able to shine through them in the right places.

Hope that helps!

Dave


        _~
     _~ )_)_~
     )_))_))_)
     _!__!__!_         
     (_D_P_K_)
   ~~~~~~~~~~~~~
    ~~~~~~~~~~~

Current Project:  Imai/ERTL Spanish Galleon #2

Recently Finished: Revell 1/96 Cutty Sark

Next Up:  ???


  • Member since
    December 2010
  • From: Salem, Oregon
Posted by 1943Mike on Tuesday, February 19, 2019 8:44 PM

Dave,

That's exactly what I wanted to know!! Thanks so much!

Mike

"Le temps est un grand maître, mais malheureusement, il tue tous ses élèves."

Hector Berlioz

  • Member since
    July 2010
  • From: Tempe AZ
Posted by docidle on Friday, February 22, 2019 11:12 PM

Dave,

Dang, repeat, DANG! I think you’re the only one I know who can pull off using the kit sails and make them look awesome. I would love to see see them in better light, but they are weathered beautifully.

Steve


  • Member since
    March 2012
  • From: Marysville, WA
Posted by David_K on Saturday, February 23, 2019 9:08 AM

Thanks, Steve!

I'm working on setting up the last fore sail/yard this weekend.  Once I have that one done, I'll go through and run all the lines ane belay everything.  After I have the foremast rigged, that will be a good time for me to get some better pictures to share...I'll make sure I've got some decent light and we can see the overall sail effect.

Have a great weekend!

Dave

        _~
     _~ )_)_~
     )_))_))_)
     _!__!__!_         
     (_D_P_K_)
   ~~~~~~~~~~~~~
    ~~~~~~~~~~~

Current Project:  Imai/ERTL Spanish Galleon #2

Recently Finished: Revell 1/96 Cutty Sark

Next Up:  ???


  • Member since
    March 2012
  • From: Marysville, WA
Posted by David_K on Saturday, February 23, 2019 5:45 PM

Here's something interesting...

I was rigging up the topgallant sail and yard for the foremast (happened to be the last sail of the foremast, since I rigged the royal as a mockup earlier in the build), and I noticed the yard isn't wide enough.  It barely extends past the width of the sail, leaving maybe 1/8" on each side. {couple pics}

 20190223_151652 by Dave Kump, on Flickr

 20190223_151815 by Dave Kump, on Flickr

The first pic shows the fore tgall yard and sail (part 25 & sail 13, respectively)

You can see the yard is just barely wider than the sail, even the holes at the yardarm (for the downhaul of the royal) are within the tgall sail, and the braces will barely fit at the end.

The second pic shows the fore (course) sail and yard...clearly, the yard extends 3/4" beyond the width of the sail on both sides, with plenty of room for the braces, lifts, and downhaul lines.  That pic is typical of *most* of the sails and yards on the model.

The exceptions are the Fore Topgallant, and the Main Topgallant....it's worth noting that the part # for both *narrow* yards in the kit is 25.  Luckily, I have a second kit for spare parts, and I was able to find and identify both #25 yards from the spare.  They are indeed very *simililar* to each other, being identical in length and other respects, the only difference being a minor variation in the holes at the yardarms for downhaul reaving.  Still weird for two parts (on two different sprues) to be given identical part #s, yet have slight differences.

Also, the Main Topgallant sail (sail 19) is the same width as the Fore Topgallant, so it also has the same issue of being basically as wide as the yard itself.

I wonder if anyone else has noticed this issue (Rob W. probably has more experience with this kit than anyone else I know)...and I wonder if there's any logic to explain it?  I mean, I can make it work, but it seems odd.

As a precaution, I went through all the yards and sails from the spare kit, too, to make sure I didn't have any parts mixed up (it happens)....but no, there's no other combination of yards and sails that comes even remotely close to being confused....which also means I can't substitute any other kit yards for a more reasonable fit.

Not a biggie, but it did get me scratching my head, and I figured I would share it, in case anyone else has noticed it before, or so anyone building this kit in the future can keep an eye on it.

Thanks!
Dave

        _~
     _~ )_)_~
     )_))_))_)
     _!__!__!_         
     (_D_P_K_)
   ~~~~~~~~~~~~~
    ~~~~~~~~~~~

Current Project:  Imai/ERTL Spanish Galleon #2

Recently Finished: Revell 1/96 Cutty Sark

Next Up:  ???


  • Member since
    March 2009
  • From: brisbane australia
Posted by surfsup on Monday, February 25, 2019 7:31 AM

Really liking the work you are doing.....Cheers Mark

If i was your wife, i'd poison your tea! If Iwas your husband, I would drink it! WINSTON CHURCHILL

  • Member since
    March 2018
  • From: Chicago suburbs
Posted by Luvspinball on Monday, February 25, 2019 9:20 AM

Could you carefully trim back the sail to give you the room you need?  Not sure how detailed the vacuform sail is, and whether that would be obvious or not.  If others have that problem, shouldn't that mold be corrected?

Other option is to make a new yardarm of the proper length for the sail, which is obviously a lot more work, but might be more satisfying in the end.  Bummer to find something like that this far into the build.  Knowing the quality of your work, you will undoubtedly find a more than satisfactory solution.  Good luck.

Bob

Bob Frysztak

Luvspinball

Current builds:  Revell 1/96 USS Constitution with extensive scratch building

  • Member since
    December 2012
Posted by rwiederrich on Tuesday, February 26, 2019 8:18 AM

Yes Dave I've noticed that too on several of my own builds.  My solution was to trim the sail to fit within the sheet sheaves of the yard...making it slightly more angular, but bearly noticable.

Making sure the clue ends up right over the sheet sheave(Or close by) of the lower yard was always my concern.

You're doing a great job....learning as you go is fun...ain't it?

Rob

  • Member since
    January 2012
  • From: Atlanta Metro, Georgia
Posted by fright on Tuesday, February 26, 2019 8:31 AM

Your work that you have done on this vessel is very nice indeed. I am always in awe of the craftsmanship and time taken to create such wonderful treasures such as yours. Congratulations!

Robert O

  • Member since
    March 2012
  • From: Marysville, WA
Posted by David_K on Monday, March 4, 2019 5:26 PM

Thanks, as always, for the words of encouragement, guys!  I'm sure if it wasn't for the community and support on this forum, I would likely never have learned so much, nor given as much effort to the hobby...

Welp, I got the last of the foremast sails rigged up...everything but the braces (learned a long time ago they should be saved for the last touch!)

I didn't end up making any corrections to the topgallant sail...those of you who know me might not be surprised that I *let it slide*, but I wonder if it will nag me in the future! lol

Here's some pictures....again, the lighting gives a false look to the whole thing, and my phone camera seems to try auto-adjusting something, so that the pictures seem to all come out differently...but anyway, here's the basic idea:

 20190304_150022 by Dave Kump, on Flickr

 20190304_150055 by Dave Kump, on Flickr

 20190304_150216 by Dave Kump, on Flickr

 20190304_150229 by Dave Kump, on Flickr

The third image actually has a pretty close representation of the color....

I'm pretty happy with it so far...now it'll be a bit while I pre-rig and bend the sails for the mainmast, all 7 of them (including the Spencer, a type of sail I've never rigged)...

Maybe I'll post a few WIP pics of my process for setting up the sails...

Anyway, thanks for looking, I hope you enjoy it!
Dave

        _~
     _~ )_)_~
     )_))_))_)
     _!__!__!_         
     (_D_P_K_)
   ~~~~~~~~~~~~~
    ~~~~~~~~~~~

Current Project:  Imai/ERTL Spanish Galleon #2

Recently Finished: Revell 1/96 Cutty Sark

Next Up:  ???


  • Member since
    December 2012
Posted by rwiederrich on Tuesday, March 5, 2019 7:53 AM

Great job Steve.  Revell made a mistake making the main courses too short by about an inch.  Not sure why they did that.  Your treatment of the sails is wonderful.  Will you be adding the buntlines and their blocks to the sails?

She will look magnificent when fully canvased....

Great job for sure.

Rob

  • Member since
    May 2017
  • From: Asheville, NC
Posted by LIVIT on Thursday, March 7, 2019 9:53 AM

Beautiful build bud !

  • Member since
    December 2012
Posted by rwiederrich on Thursday, May 2, 2019 7:38 AM

Well...I've become worried...either Dave is so procupied with digging the pool in his back yard....or he wants to spring the finished build on us and he is taking this last month to finish her up.

No updates in over a month...I can hardly stand it.  What's up Dave...are you all right?


Rob(Concerned)

  • Member since
    March 2012
  • From: Marysville, WA
Posted by David_K on Thursday, May 2, 2019 6:02 PM

LOL

No need for concern, Rob, though I appreciate the sentiment.

It's true, I've been remiss with regard to this build.  Just returned from a vacation in Wyoming, and other hobbies/duties/entertainments have kept me distracted.

I have sandbagged a little on my progress...at this time, I have all the fore and mainmast sails installed (except for the brace lines), and I've gotten the mizzen and mizzen lower top sail pre-rigged. Here are a couple pictures as proof I've actually touched her in the past month!

 20190502_153612 by Dave Kump, on Flickr

 20190502_153629 by Dave Kump, on Flickr

All in all, it's coming along nicely.  I decided early on that I would not install fore-and-aft staysails, with the logic that they would A)obscure much of the deck detail and rigging; and B) cause sag in the stays that I didn't want to deal with.

Now I wonder if the ship as a whole will look okay without them...as the main mast sails went on, I started to notice the *empty* area between the masts...oh, well...

Hard to believe I'm this far along, and I still need to order another 80 feet of line for the mizzen rigging and braces...I should check my order history with Syren, but a quick estimation is that I've already bought over 300 feet of line for this project....keeping in mind that several inches are trimmed off the ends of a belayed line...but still!  It's a lot of line!

Already looking at materials for the display case to build for it....now, if I can just find a place in the house where my wife will let me display it! lol

The remainder of this project will consist of largely the same steps I've performed for the first two masts....stropping blocks, tying the blocks to the yards (and sail corners, for clews), pre-rigging lines to the sails and yards for sheets, lifts, halyards, clews, etc., bending the sails to the yards, and then installing the yards/sails, and belaying the lines...I have considered documenting my process for these steps, but they're not very exciting, and I'm quite sure my method falls short of some of the meticulous artistry I've seen elsewhere on the forum.

Anyway, yes I'm indeed still working on the Cutty Sark, albeit slowly...and I've been lurking among the forum, admiring some of the sweet projects in motion....really good stuff!

I'll be sure to post some more as I near completion of this kit, and perhaps I'll document the building of the dispaly case, as well?  I think I may have shared some pics while I built the case for the Soleil Royal, but maybe not.

Thanks for checking in, Rob, I hope things are well!

Dave


        _~
     _~ )_)_~
     )_))_))_)
     _!__!__!_         
     (_D_P_K_)
   ~~~~~~~~~~~~~
    ~~~~~~~~~~~

Current Project:  Imai/ERTL Spanish Galleon #2

Recently Finished: Revell 1/96 Cutty Sark

Next Up:  ???


  • Member since
    July 2014
  • From: Philadelphia Pa
Posted by Nino on Friday, May 3, 2019 10:41 AM

David_K

"...

Hard to believe I'm this far along, and I still need to order another 80 feet of line for the mizzen rigging and braces...I should check my order history with Syren, but a quick estimation is that I've already bought over 300 feet of line for this project....keeping in mind that several inches are trimmed off the ends of a belayed line...but still!  It's a lot of line!

Already looking at materials for the display case to build for it....now, if I can just find a place in the house where my wife will let me display it! lol

The remainder of this project will consist of largely the same steps I've performed for the first two masts....stropping blocks, tying the blocks to the yards (and sail corners, for clews), pre-rigging lines to the sails and yards for sheets, lifts, halyards, clews, etc., bending the sails to the yards, and then installing the yards/sails, and belaying the lines...I have considered documenting my process for these steps, but they're not very exciting, and I'm quite sure my method falls short of some of the meticulous artistry I've seen elsewhere on the forum.

Anyway, yes I'm indeed still working on the Cutty Sark, albeit slowly...and I've been lurking among the forum, admiring some of the sweet projects in motion....really good stuff!

...

Dave


  I am proud to be #12,700 for your Views total.  This is another magnificent looking model you have underway.

Dave, that is a lot of Syren Line.  You should be a candidate for a discount.

And Slowly or not you provide Instruction and Entertainment at the same time.,Thanks.

    Great Work Dave!

            Jim.


  • Member since
    December 2012
Posted by rwiederrich on Friday, May 3, 2019 12:44 PM

First off Dave..so good to hear from you....glad you are moving along in so many ways.

Second, what size of line are you ordering?  I need some line as thin as sewing thread, but NOT thread. Maybe Syren has it.

Thirdly, stay sails on static models always hang and without the force of the wind to elevate them and fill them, they can look limp and as you pointed out, *sag* the stay.

I tackled this problem with my paper sails and I think I achieved a reasonably convincing look with my stay and jib sails.  You are nearly at the same stage I am on my build.

Here are a couple of pics.


https://i1070.photobucket.com/albums/u488/rwiederpsihxbnpvv.jpg.html]rich/IMG_8824_JPG_ad484009eed31a13f4cc418d54225795_zpsihxbnpvv.jpg[/IMG]

  • Member since
    September 2005
  • From: Groton, CT
Posted by warshipguy on Saturday, May 4, 2019 7:40 AM

Outstanding job, David!  Also, I really like Rob's paper stays'ls.

Bill

  • Member since
    March 2012
  • From: Marysville, WA
Posted by David_K on Saturday, May 4, 2019 8:44 AM

Bill, Rob, and Jim-

Thanks for your kind words of support!

Indeed, it takes a lot of rigging line to build a ship, even with the somewhat simplified rigging I'm performing.  Syren provides the best miniature rope I've seen, and though it can get expensive throughout the course of a build, I usually order in small batches so it doesn't hurt so much at once!

Rob, the line I'm using for reeving through blocks on this kit is Syren's original tan .008 (.2 mm)

I believe it's the thinnest line they offer.  It's also the only size available that will reeve through the very small 1/8" (3mm) blocks I'm using, and only after I dip the last 1/4" of line in CA to stiffen it so it will go through the block.

Syren line is used *almost entirely* on all of my builds now, but I do use sewing thread for a few applications.  Ratlines, for example...I used Gutermann 1001 (CA 02776) black thread.  With a little beeswax on it, it performs great for ratlines and tying off stropped blocks.  Gutermann also has other colors, and I often use a tan color for ratlines on other ships.  It's available at local sewing and craft stores.

I think your paper sails look really good, too!

Wish I could say I've got some modeling on my to-do list for the weekend, but it's unlikely...Gardening, oil changes, and some fence rebuilding are in my future!  Maybe I'll get a handful of blocks tied this evening :)

Have a great weekend, you guys!

Dave


        _~
     _~ )_)_~
     )_))_))_)
     _!__!__!_         
     (_D_P_K_)
   ~~~~~~~~~~~~~
    ~~~~~~~~~~~

Current Project:  Imai/ERTL Spanish Galleon #2

Recently Finished: Revell 1/96 Cutty Sark

Next Up:  ???


  • Member since
    December 2012
Posted by rwiederrich on Monday, May 6, 2019 7:43 AM

Thanks for the info Dave....I'll check their sizes out, but I think I already have some of their small stuff.

I too haven't spent much time on my build...  building a shed and finishing up the deck portion of my 30X6 front porch...too many summer jobs right now...myself.

Have a great week and hope to see more from you soon...

Also Dave...do you use the line that comes with your Cutty Sark model?

If not...do you think I can get some from you? I'll trade you several coils I have of the Syran original tan.


Rob

  • Member since
    September 2005
  • From: Groton, CT
Posted by warshipguy on Monday, May 6, 2019 11:01 AM

Rob,

I have extra line from the CS kit.  What do you need?

Bill

  • Member since
    December 2012
Posted by rwiederrich on Monday, May 6, 2019 12:57 PM

Bill...I'm looking for the smallest spooled tan thread...generally there is 3 sizes of tan and black and a roll of black thread and tan thread.  I keep coming across the small spool of line that is greenish in color (NO GOOD).

I just need the small tan thread...if you have some of that I'll gladly trade you for a coil of the smallest line I have from Syren... I believe it is .008 original tan.  What Dave suggested...it is still too large for my needs.

Rob

  • Member since
    November 2018
Posted by oldermodelguy on Monday, May 6, 2019 2:39 PM

I just want to say the ship looks awesome to me !

  • Member since
    September 2012
Posted by GMorrison on Monday, May 6, 2019 2:47 PM

Caldercraft sells 0.10 mm natural line. I buy mine through Jotika online.

http://www.jotika-ltd.com/Pages/1024768/Fittings/82010.htm

I don't mean to undermine Syren as they have a great product, but the smallest line they sell is 0.20 mm (0.008 in).


 Modeling is an excuse to buy books.


  • Member since
    December 2012
Posted by rwiederrich on Tuesday, May 7, 2019 7:23 AM

GMorrison

Caldercraft sells 0.10 mm natural line. I buy mine through Jotika online.

http://www.jotika-ltd.com/Pages/1024768/Fittings/82010.htm

I don't mean to undermine Syren as they have a great product, but the smallest line they sell is 0.20 mm (0.008 in).


GMorrison...is the line fuzz free?  They provide no images..so, I'm not good at using mind reading.

Rob

  • Member since
    September 2005
  • From: Groton, CT
Posted by warshipguy on Tuesday, May 7, 2019 8:06 AM

Rob,

I'll send you all that I have.  Please send me your address.

Bill

  • Member since
    September 2012
Posted by GMorrison on Tuesday, May 7, 2019 8:19 AM

rwiederrich


GMorrison

Caldercraft sells 0.10 mm natural line. I buy mine through Jotika online.

http://www.jotika-ltd.com/Pages/1024768/Fittings/82010.htm

I don't mean to undermine Syren as they have a great product, but the smallest line they sell is 0.20 mm (0.008 in).


GMorrison...is the line fuzz free?  They provide no images..so, I'm not good at using mind reading.

Rob


It is very smooth, almost shiny. I don't consider Syren entirely fuzz free either, but it is very good looking.

 Modeling is an excuse to buy books.


  • Member since
    December 2012
Posted by rwiederrich on Wednesday, July 24, 2019 7:32 AM

Dave....haven't heard from you in a couple of months...it can only be assumed you are engulffed in many summer home projects.

Just wondering were you are on the CS and if you had progressed much.

Have a warm and safe summer.

Rob

  • Member since
    August 2015
  • From: the redlands Fl
Posted by crown r n7 on Wednesday, July 24, 2019 10:04 AM

nice rigging ,a beautiful model.


 Nick.

  • Member since
    March 2012
  • From: Marysville, WA
Posted by David_K on Wednesday, July 24, 2019 5:17 PM

Thanks for checking in, guys!

You nailed it, Rob....so busy with a bunch of house projects, it's been slow-going on the modeling bench.  But I think I'm pretty much done with the projects and now I can enjoy some vacay and leisure time!!  Yay!

I have made progress since my last update.  All the sails are now in place, and most of the rigging is done.  All that remains are the braces...saved the best for last.  I'm also already beginning work on the display case for it.

Maybe I mentioned it before, but I sorta regret (just kinda) not putting in the stay sails....I still think it looks good as-is, but for a clipper, the staysails and even the studding sails would have added a certain amount of fullness.  Anywho, I'm not planning to go back and put them in now, so this is where we ended up!

Here's a few pics.

 20190724_145446 by Dave Kump, on Flickr

 20190724_145437 by Dave Kump, on Flickr

Once the braces are on, it should have a more balanced look, and I'll get some better quality photos with good lighting and angles....she really does look impressive up close.

Here's a snap of the base for the case.  Got the molding installed, and I'm probably gonna rip down some pine planks into 3/4" square strips tonight so I can start building the frames and stanchions.  This will be my 3rd case, I'm getting pretty good at it by now!

 20190720_142928 by Dave Kump, on Flickr


Thanks again for bumping the thread, with any luck I'll have the model finished by Labor Day, and of course I'll have some pics to share.

Enjoy the summer!!

Dave

        _~
     _~ )_)_~
     )_))_))_)
     _!__!__!_         
     (_D_P_K_)
   ~~~~~~~~~~~~~
    ~~~~~~~~~~~

Current Project:  Imai/ERTL Spanish Galleon #2

Recently Finished: Revell 1/96 Cutty Sark

Next Up:  ???


  • Member since
    March 2012
  • From: Marysville, WA
Posted by David_K on Thursday, August 29, 2019 10:13 AM

At Last!

'Tis Done!

One and a half years later, I finished the Cutty Sark this week...

Here are some pics:

 20190824_145135 by Dave Kump, on Flickr

 20190824_145144 by Dave Kump, on Flickr

 20190824_145152 by Dave Kump, on Flickr

 20190824_145210 by Dave Kump, on Flickr

 20190824_145221 by Dave Kump, on Flickr

I really had a fun time with this build, learned some new stuff, and I'm feeling pretty good about it!

The display case is ready, too, and I'll probably get it mounted and on display today...I'll take some more pics of up close areas for detail.

Thanks to everyone for their encouragement, support, and advice during this project...I know I haven't been as *regular* of a contributor lately, but I hope to be on the forum more often once the Summer passes and I have more leisure time around the house.

Not sure where I'll tack for my next build, but I have a couple ooptions in mind:

I recently picked up a Midwest Products Sakonnet Daysailer wooden ship kit at a swap meet, it looks very simple, so I might give that a whirl as my first all-wood kit.

Or, I just happened to get an alert from Ebay this morning about a listing for an Imai Spanish Galleon....I've built one before (probably my 3rd ship model?) and I've learned much since then, so I'm going to build another one soon, with a few new techniques (maybe not as elaborate and mindblowingly-detailed as Kirril's!!! lol)....anyway, the Spanish Galleon was only 30 bucks on ebay (which is unheard of), but the hull halves have been glued together....for that price, I figured I could manage the hull assembly and it wouldn't cause me too much trouble, so I bought it. 

Anyway, that's where I'm at....I'd like to express my admiration for all the great work I've seen on various threads among the forum, very impressive stuff!

Thanks for tuning in,

Dave

        _~
     _~ )_)_~
     )_))_))_)
     _!__!__!_         
     (_D_P_K_)
   ~~~~~~~~~~~~~
    ~~~~~~~~~~~

Current Project:  Imai/ERTL Spanish Galleon #2

Recently Finished: Revell 1/96 Cutty Sark

Next Up:  ???


  • Member since
    October 2016
  • From: Louisiana Gulf South
Posted by Mrchntmarine on Thursday, August 29, 2019 2:54 PM

Very nice indeed!  Tks for the time to post.....

Keep on modeling!

All the best,

William

  • Member since
    December 2010
  • From: Salem, Oregon
Posted by 1943Mike on Thursday, August 29, 2019 6:37 PM

Dave,

It looks just fabulous!

Congratulations on having completed this modeling icon ... and having done it proud!

If and when you start your second Spanish Galleon I'll certainly be along for the ride. I just hope I still have time to build mine!

Mike

"Le temps est un grand maître, mais malheureusement, il tue tous ses élèves."

Hector Berlioz

  • Member since
    March 2015
  • From: Close to Chicago
Posted by JohnnyK on Thursday, August 29, 2019 7:16 PM

Holy cannoli !!!! I don't build ships, but your build is outstanding! A real masterpiece.

Your comments and questions are always welcome.

  • Member since
    December 2003
  • From: 37deg 40.13' N 95deg 29.10'W
Posted by scottrc on Friday, August 30, 2019 8:45 AM

Nice work Dave.  You captured the look of the heavy weather sails.  Nice balance of color overall.  You really have a talent.

  • Member since
    December 2012
Posted by rwiederrich on Friday, August 30, 2019 1:12 PM

Dave.....fine job for sure...the sail color came out smoothly and uniform...nice work with your shading technique.

I saw your model on another site as well......

You're moving along nicely...and another fine model launched.

I see in addition to the stay sails..you opted to eliminate the Jib sails as well....any particular reason for this move.

Amazing looking model my friend.

Rob

  • Member since
    March 2012
  • From: Marysville, WA
Posted by David_K on Sunday, September 1, 2019 9:36 AM

Thanks, everyone!

Rob, I wonder what other site you may have seen my model on?  I don't recall posting anything about it elsewhere....

The staysails and the jibs seemed like they would create sag on the rigging, so I thought leaving them off would be a safe bet.  I think it's okay, but in the future if I build another clipper (or anything with set sails) I'll include them in entirety.

Dave

        _~
     _~ )_)_~
     )_))_))_)
     _!__!__!_         
     (_D_P_K_)
   ~~~~~~~~~~~~~
    ~~~~~~~~~~~

Current Project:  Imai/ERTL Spanish Galleon #2

Recently Finished: Revell 1/96 Cutty Sark

Next Up:  ???


  • Member since
    December 2012
Posted by rwiederrich on Thursday, September 5, 2019 12:53 PM

Dave....I think your images were simply posted to my Facebook account.....and they popped up there.

Hay....would you consider making me a case for my Great Republic?

Yours are so beautiful and you've perfected your craft....


Rob

  • Member since
    March 2018
  • From: Chicago suburbs
Posted by Luvspinball on Thursday, September 5, 2019 11:47 PM

Incredible, mate.  Love your work, including the case.

I will seriously have to think about a case for my Connie (if I ever get her finished).

Again, FABULOUS! Yes

Bob

Bob Frysztak

Luvspinball

Current builds:  Revell 1/96 USS Constitution with extensive scratch building

  • Member since
    July 2013
Posted by steve5 on Thursday, September 5, 2019 11:53 PM

lovely work dave , beautiful and clean as alway's . I really love the weathering on those kit sails , I've never been able to do kit sails justice , but you made them sing mate .


  • Member since
    March 2012
  • From: Marysville, WA
Posted by David_K on Saturday, September 7, 2019 9:30 AM

Thanks for the nice words, you guys!  It means a lot coming from such talented folks as you :)

Rob, building a case is really not as tough as I thought it would be.  If you've looked around, you probably found that buying a case for a model ship is pretty spendy (I found online sellers charging 400, 500 or more for a large case-and without glass!)...

There's an ebook available online that details the process for making a case....I bought it for 25 bucks several years ago and downloaded, it looks like it's only 11 now:

https://modelshipcases.com/

It's basically written by a man who didn't want to spend so much on a case and decided to build his own.  I followed his method for the most part, but found some more practical ways to achieve certain construction elements.  For my Cutty Sark case, material was about 100 dollars, and glass was about 100 dollars.  If you have a table saw, an electric miter/chop saw, a drill and some sandpaper, you can build one for a decent price.  It does take time, though, and it's a labor of love.  I think this one took me about 3 weeks.

 20190830_080042 by Dave Kump, on Flickr

After building 3 of them (for the Soleil Royal, Catalan, and Cutty Sark), I still don't get absolutely perfect miters, but it's nothing a little wood putty can't fill!

Anyway, if anybody here decides to build a case for their model, I'd be happy to offer some insight and advice for the project to help get them through it....some of the instructions in the book confused me at first, but like the instructions for a model ship, I have it memorized by now!


Thanks!

Dave

        _~
     _~ )_)_~
     )_))_))_)
     _!__!__!_         
     (_D_P_K_)
   ~~~~~~~~~~~~~
    ~~~~~~~~~~~

Current Project:  Imai/ERTL Spanish Galleon #2

Recently Finished: Revell 1/96 Cutty Sark

Next Up:  ???


  • Member since
    July 2013
Posted by steve5 on Saturday, September 14, 2019 1:07 AM

dave , I really like the way you did your preformed sails , for something a bit quick , I dug out my revell 1/83 mayflower & decided to do it OOB .could you give me some details, on how you painted your sails , what colours you used etc , please .


  • Member since
    March 2012
  • From: Marysville, WA
Posted by David_K on Saturday, September 14, 2019 11:19 AM

Hi Steve-

I've heard good things about the Revell Mayflower (is it somewhat rare?), I hope you'll post a build log!

There really weren't any special tricks to the sail painting.  I have seen vacuum-formed sails that are molded in a sort of cartoonish way  (super-billowy), but the Cutty Sark sails are molded with a much more natural-looking sag, which makes the end result just a bit more realistic.

I cut the sails out from the sheets with scissors, and then punched holes along the top for the gaskets or robands or whatever, and also holes in the corners for clew and sheet lines.  I used a sort of awl that I made from a tiny screwdriver that I ground to a point.  It did a good job of stretching the holes into a nice round opening without tearing them.

Then I took some large pieces of styrofoam and laid the sails out on it, and pinned the sails to the foam using sewing needles (through the previously-made holes) to keep them in place during painting.

The colors I used are Testors Model Master Acrylic Radome Tan and Dark Tan.

I basically just airbrushed the entire surface of both sides of each sail with Radome Tan.

Then I loaded up the Dark Tan and airbrushed it on, but only around the edges and the *recessed* areas, both to create a shadow effect and to hint at weathering.

Applying the Dark Tan for the shadows is a matter of using a light touch, only a little here and there, and anywhere that the sail looks like it curves around (where the light wouldn't be hittting it and reflecting directly off), that's where I would add a little.

After doing that for both sides, I let it dry for a couple hours, and that's it.

Hope that helps!

Dave

        _~
     _~ )_)_~
     )_))_))_)
     _!__!__!_         
     (_D_P_K_)
   ~~~~~~~~~~~~~
    ~~~~~~~~~~~

Current Project:  Imai/ERTL Spanish Galleon #2

Recently Finished: Revell 1/96 Cutty Sark

Next Up:  ???


  • Member since
    July 2013
Posted by steve5 on Saturday, September 14, 2019 3:38 PM

thanks dave , I'm of to brisbane today for supplies , only a 400 K round trip . will pick up some MM paints there , just hope they still sell them .

your right about the sails , they don't look too bad , I was going to paint them on the sheet , but I can see the difficulties their now . I don't know how rare it is , I honestly forgot I even had it , till I was scratching around looking for some stuff , this should be a quick , fun build , I will do a build log , thank's again mate .


  • Member since
    March 2009
  • From: brisbane australia
Posted by surfsup on Sunday, September 15, 2019 1:25 AM

steve5

thanks dave , I'm of to brisbane today for supplies , only a 400 K round trip . will pick up some MM paints there , just hope they still sell them .

your right about the sails , they don't look too bad , I was going to paint them on the sheet , but I can see the difficulties their now . I don't know how rare it is , I honestly forgot I even had it , till I was scratching around looking for some stuff , this should be a quick , fun build , I will do a build log , thank's again mate .


Steve you should stop in and say Hi as I live in Brisbane. Besides the thread Hijack for a Minute, that is one of the Cutty Sark Builds I have seen in a long time and set off beautifully by the Display Case. You must be one very happy Modeller.....Cheers mark 

If i was your wife, i'd poison your tea! If Iwas your husband, I would drink it! WINSTON CHURCHILL

  • Member since
    July 2013
Posted by steve5 on Sunday, September 15, 2019 3:13 AM

thank's mark , wish I had of known , went to hobbyrama , great shop , 


  • Member since
    July 2010
  • From: Tempe AZ
Posted by docidle on Monday, September 30, 2019 9:03 PM

Darth Dave,

When you last talked to me you were but a learner. But now you are the Master.

A Master ship builder Darth.

Anyway my former Padawan, you are strong with the Force.

All kidding aside bud, that is one dadgum beautiful model! So what is next on the building stocks?

Steve


  • Member since
    September 2012
Posted by GMorrison on Monday, September 30, 2019 10:49 PM

Gorgeous. A model of a ship named after a negligee.

 Modeling is an excuse to buy books.


  • Member since
    February 2003
  • From: Lacombe, LA.
Posted by Big Jake on Tuesday, October 1, 2019 7:38 AM

Dave,  On the main mast of the ship at one time they had a Mast Vane in the shape of the 'Cutty Sark'. A replica is on display 'between decks' of the ship itself. I added one to my mainmast and get a kick out of explaining it.  

Once gilded, this vane would have been fitted to the top of Cutty Sark’s main mast whenever the ship was in port. It depicts a ‘cutty sark’—the namesake for Clipper Ship Cutty Sark, after the undergarment worn by the witch Nannie in Robert Burns’ poem Tam O’Shanter.

In London’s East India Docks, Willis gave the vane to senior apprentice Robert Andrewes who sprang onto the ratlines and quickly made his way up the main mast amidst a burst of cheers from deck.

The vane was reportedly lost when the ship was severely damaged in a storm in 1916, but incredibly it turned up in a London saleroom in 1960 with a letter of authentication from the Portuguese captain.

Today, a gilded replica can be seen on the ship’s main truck, while the original mast head vane is displayed on board, on the ’tween deck.

Scrool down in the article and you will see the images.

https://www.rmg.co.uk/discover/behind-the-scenes/blog/ship%E2%80%99s-blog-mast-head-vane


  • Member since
    March 2012
  • From: Marysville, WA
Posted by David_K on Tuesday, October 1, 2019 5:33 PM

Many thanks to Steve, Bill, and Jake!  you guys have helped me so much on my journey in this hobby!

Steve, speaking of Obi-Wan and Vader, I hope you've seen the *reimagined* fight scene between them?  Super, super exciting!  here's a link to the youtube clip:

https://www.youtube.com/watch?v=to2SMng4u1k

I'm actually already getting started on my next kit....it's Imai's Spanish Galleon.  I did their Pirate Ship version of this kit way back when (think it was my 3rd or 4th ship) and while I very much enjoyed the quality of the kit (and everything they made), my training was incomplete.  I found this one on eBay recently for 40 bucks (!), but it had a bunch of the sprues (still intact) brush painted in garish gloss colors and the hull halves were glued together.  I bought it anyway, and was able to pry the hull and stern pieces apart, and hit all the parts with Tamiya primer...Boom!  Just like new!  I know that kit, if you can find it, goes for over 100 bucks most of the time, so I feel pretty lucky.  I've already ordered deadeyes, chainplate strops, and eyebolts for it, blocks and line will be coming soon, but my next step is to airbrush all the base coats.

I'm excited about it, thinking I can do a pretty good job...though not as elaborate at Kirill is doing with his! Lol

Bill, I'm a sucker for a witch in lingerie!

Jake, that's a pretty cool bit o' history about the Cutty Sark, never heard about that vane...

Anyway, thanks again you guys for your kind words and advice and support!  You rock!

Dave

        _~
     _~ )_)_~
     )_))_))_)
     _!__!__!_         
     (_D_P_K_)
   ~~~~~~~~~~~~~
    ~~~~~~~~~~~

Current Project:  Imai/ERTL Spanish Galleon #2

Recently Finished: Revell 1/96 Cutty Sark

Next Up:  ???


  • Member since
    March 2019
  • From: Post Falls, Idaho
Posted by Sigep Ziggy on Tuesday, October 1, 2019 8:27 PM

Dave, you have done a stellar job on this build! I will be using your build as a guide to build my own 'Cutty' soon. I hope it can measure up to yours.

your shipmate,

Ziggy


  • Member since
    September 2012
Posted by GMorrison on Wednesday, October 2, 2019 9:49 AM

A pleasure.

The figurehead is of Nannie holding Meg’s tail and sort of wearing her cutty sark.

I cant post the picture here without irritating the bosses, but it’s easy to find.


 Modeling is an excuse to buy books.


  • Member since
    July 2008
Posted by Est.1961 on Saturday, October 5, 2019 8:52 AM

Sigep Ziggy

Dave, you have done a stellar job on this build! I will be using your build as a guide to build my own 'Cutty' soon. I hope it can measure up to yours.


I'll second that, I have a Cutty sark also but will have to build myself up to it. When I do I'll be referring back to this thread. Enjoyed looking in

  • Member since
    March 2019
  • From: Post Falls, Idaho
Posted by Sigep Ziggy on Saturday, December 14, 2019 2:02 PM

I wanted to see this build at the front of the forum where it belongs.

your shipmate,

Ziggy


  • Member since
    December 2012
Posted by rwiederrich on Wednesday, January 29, 2020 1:24 PM

Sorry to bring this up now Dave.....but what are the dimensions of your CS case....I'm getting ready to plan out my case build for my Great Republic


Rob

  • Member since
    October 2019
  • From: New Braunfels, Texas
Posted by Tanker-Builder on Wednesday, January 29, 2020 1:50 PM

Hi;

 In reply; When I do Restos,I advise the owners to invest in a case. The man that does them for me leaves 3 inches forward of the Bowsprit and 3 inches aft of the Spanker Boom. He also leaves 2 inches outside the tip of the widest Yardarm,( Both Sides.).

  • Member since
    July 2010
  • From: Tempe AZ
Posted by docidle on Saturday, February 1, 2020 10:58 PM

David_K

Many thanks to Steve, Bill, and Jake!  you guys have helped me so much on my journey in this hobby!

Steve, speaking of Obi-Wan and Vader, I hope you've seen the *reimagined* fight scene between them?  Super, super exciting!  here's a link to the youtube clip:

https://www.youtube.com/watch?v=to2SMng4u1k

I'm actually already getting started on my next kit....it's Imai's Spanish Galleon.  I did their Pirate Ship version of this kit way back when (think it was my 3rd or 4th ship) and while I very much enjoyed the quality of the kit (and everything they made), my training was incomplete.  I found this one on eBay recently for 40 bucks (!), but it had a bunch of the sprues (still intact) brush painted in garish gloss colors and the hull halves were glued together.  I bought it anyway, and was able to pry the hull and stern pieces apart, and hit all the parts with Tamiya primer...Boom!  Just like new!  I know that kit, if you can find it, goes for over 100 bucks most of the time, so I feel pretty lucky.  I've already ordered deadeyes, chainplate strops, and eyebolts for it, blocks and line will be coming soon, but my next step is to airbrush all the base coats.

I'm excited about it, thinking I can do a pretty good job...though not as elaborate at Kirill is doing with his! Lol

Bill, I'm a sucker for a witch in lingerie!

Jake, that's a pretty cool bit o' history about the Cutty Sark, never heard about that vane...

Anyway, thanks again you guys for your kind words and advice and support!  You rock!

Dave


Dave,

I finally watched the fan art (?) segment you posted. That is the first time I’ve seen it but I’m sure my boys have seen it! It’s kinda cool but I’m a Kenobi fan so seeing Darth fling him around was weird. It was nicely done though! I’d like to hear what you think of the last three films but would probably be better through email, otherwise we might start a revolution and it would take away from your most excellent build.

Steve


  • Member since
    March 2022
Posted by PeterE on Tuesday, March 15, 2022 4:22 AM

The deck plan is from 1870. She was rebuilt in 1930. The anchor chain in the model is in idle position in 1870. In working condition the anchor chain runs clear over the hatchcover. (so elevated). From the anchor, around anchor winch, over deckwinch, chain locker. It saw some pictures from 1915.


  • Member since
    September 2005
  • From: Groton, CT
Posted by warshipguy on Sunday, April 17, 2022 3:25 PM

Dave,

Your Cutty Sark is magnificent! It stands up as well as your Soleil Royal.  These kits to me are every bit as good as wood models.

Bill Morrison

  • Member since
    March 2012
  • From: Marysville, WA
Posted by David_K on Sunday, May 1, 2022 9:33 AM

Thanks, Bill!  I had a great time building the Cutty Sark, it was my favorite Revell kit.

I haven't been modeling much the last couple of years, other hobbies and responsibilities have claimed much of my free time....I have a partially-built Imai Spanich Galleon that I need to get rigged, someday I'll get back to work on it! 

Dave

        _~
     _~ )_)_~
     )_))_))_)
     _!__!__!_         
     (_D_P_K_)
   ~~~~~~~~~~~~~
    ~~~~~~~~~~~

Current Project:  Imai/ERTL Spanish Galleon #2

Recently Finished: Revell 1/96 Cutty Sark

Next Up:  ???


  • Member since
    March 2009
  • From: brisbane australia
Posted by surfsup on Sunday, May 1, 2022 9:17 PM

You have done a superb job on the Sark. I love it.....Cheers mark

If i was your wife, i'd poison your tea! If Iwas your husband, I would drink it! WINSTON CHURCHILL

JOIN OUR COMMUNITY!

Our community is FREE to join. To participate you must either login or register for an account.

SEARCH FORUMS
FREE NEWSLETTER
By signing up you may also receive reader surveys and occasional special offers. We do not sell, rent or trade our email lists. View our Privacy Policy.