SEARCH FINESCALE.COM

Enter keywords or a search phrase below:

1/96 Cutty Sark WIP (Revell H-399)

29837 views
293 replies
1 rating 2 rating 3 rating 4 rating 5 rating
  • Member since
    September 2012
Posted by GMorrison on Thursday, February 8, 2018 1:33 PM

David,

If I may be so bold, a suggestion. Looking at that dreadful photo I just posted, one of the prettier aspects of it is the deck camber.

I haven't built this kit since when, but i guess the plastic decks are flat.

Since/ if you are using a scaledeck type of deck finish, it might not be too difficult to make a new subdeck with some thinnish styrene. Put that down over simple arched beams, maybe six in all.

Apologies, just a thought.

 Modeling is an excuse to buy books.


  • Member since
    December 2012
Posted by rwiederrich on Thursday, February 8, 2018 3:30 PM

This looks like the Cutty Sark just after the fire that gutted her.Huh?

Good example for the Deadeye braces.


Rob

  • Member since
    March 2012
  • From: Marysville, WA
Posted by David_K on Thursday, February 8, 2018 7:07 PM

I'm loving all the great info, and the enthusiasm of the subject here :)

Rob, I'm still working on my plan for the rails/deadeyes, but I can already tell what you mean about pre-assembling them to make it easier.  My current plan is to drill out the hull at the edge of the deck, and the pinrails, where the deadeyes should sit.  Then I'll run some length of wire up through both holes when I install the rails....I definitely think the deadeyes will need to go in at that time, concurrent with the positioning of the rails...and BEFORE anything else gets in the way!  Maybe even before the deck, if I can swing it. BTW, great pics of that CS model!

Dale, thanks for the info for the 560 glue....I'll be sure to get some for the adhesion of parts the wooden deck.

GM, I really like that pic of the Ambassador...a literal skeleton, derelict on a beach!  What a trip.

I don't mind the *boldness* of any suggestions lol, and I bet adding camber to the deck would be totally doable...not sure if it's in my list of mods...though I think you're right, some simple "underlayment" of styrene sheet could make a nicely convex surface to which the deck could be attached.

I've spent a little time this week with part prep for painting (pulling flash, filing down EP marks, etc.) and it got me into more planning and drilling for deadeyes...it'll be difficult to explain it all clearly, but here's my attempt:

I had to remove the pinrails and deadeye parts from the sprue, and dry fit them to get exact locations for the deadeyes.

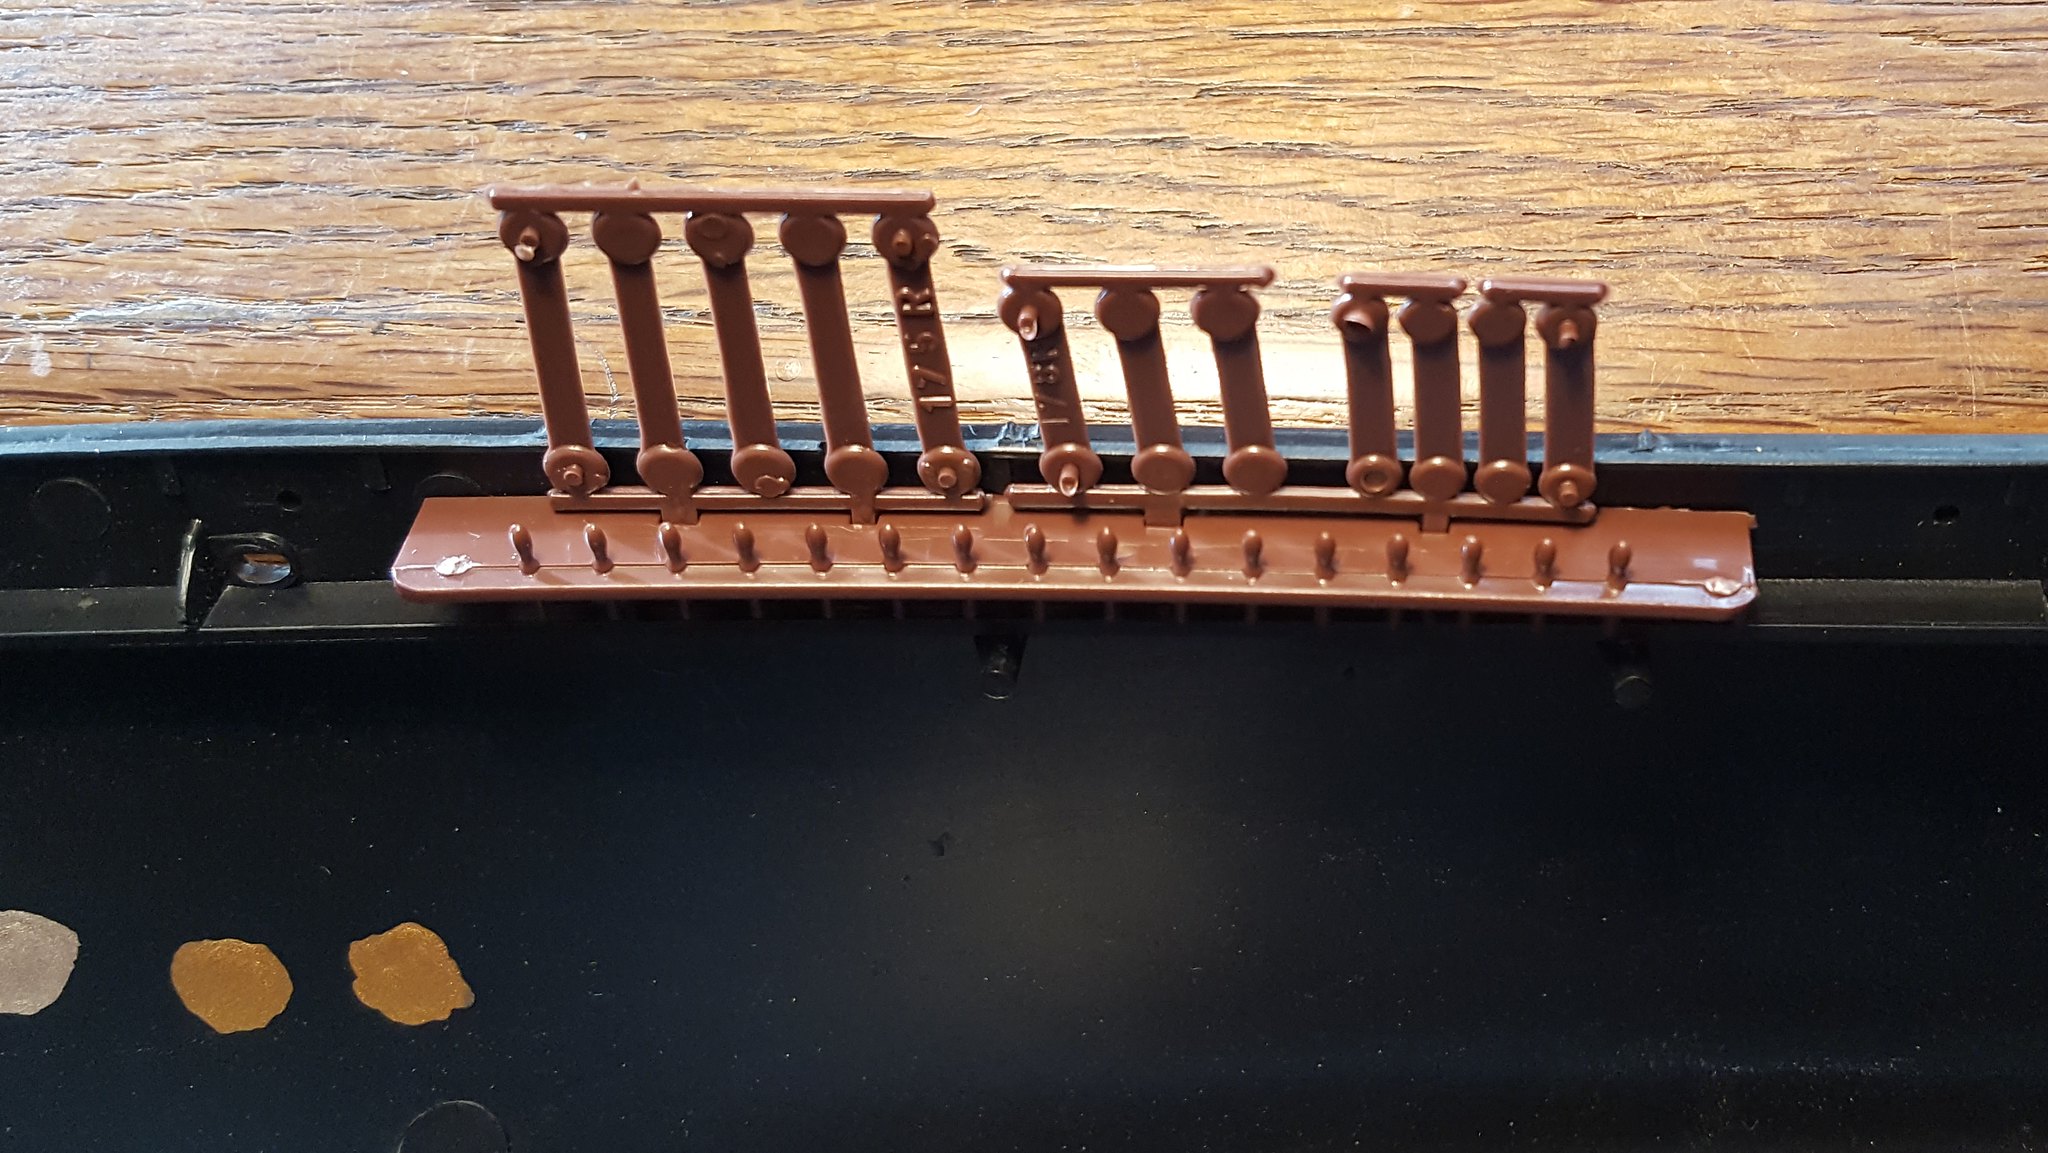
 20180208_150719 by Dave Kump, on Flickr

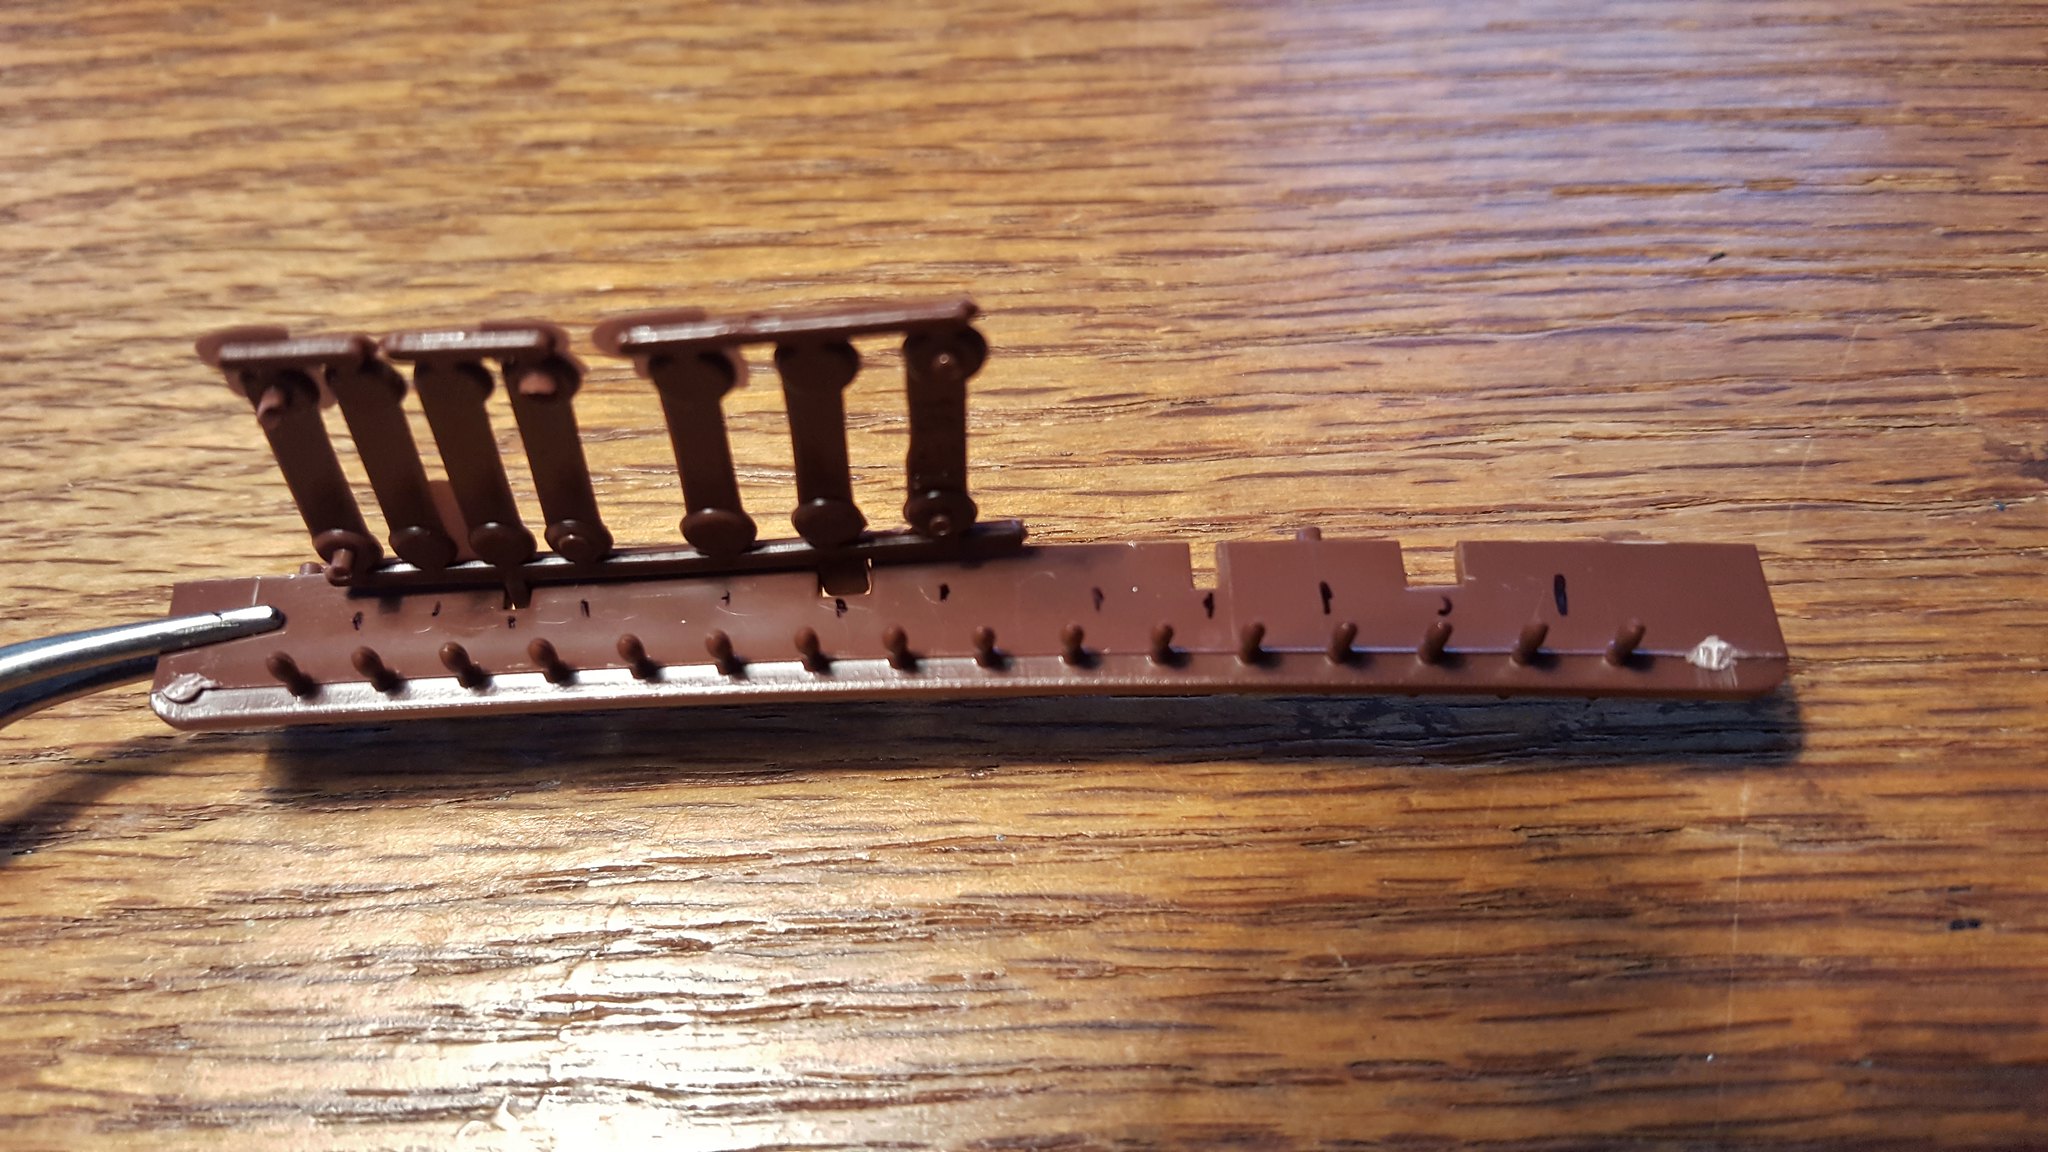
I then marked the rails where each deadeye would sit (note that some deadeyes sit directly above the slot where locator pins fit the deadeye piece into the rail piece, so no mark was necessary at these points)

 20180208_155136 by Dave Kump, on Flickr

I also marked the scupper (?) area at the edge of the deck/hull in the same locations, directly below the marks on the rails.

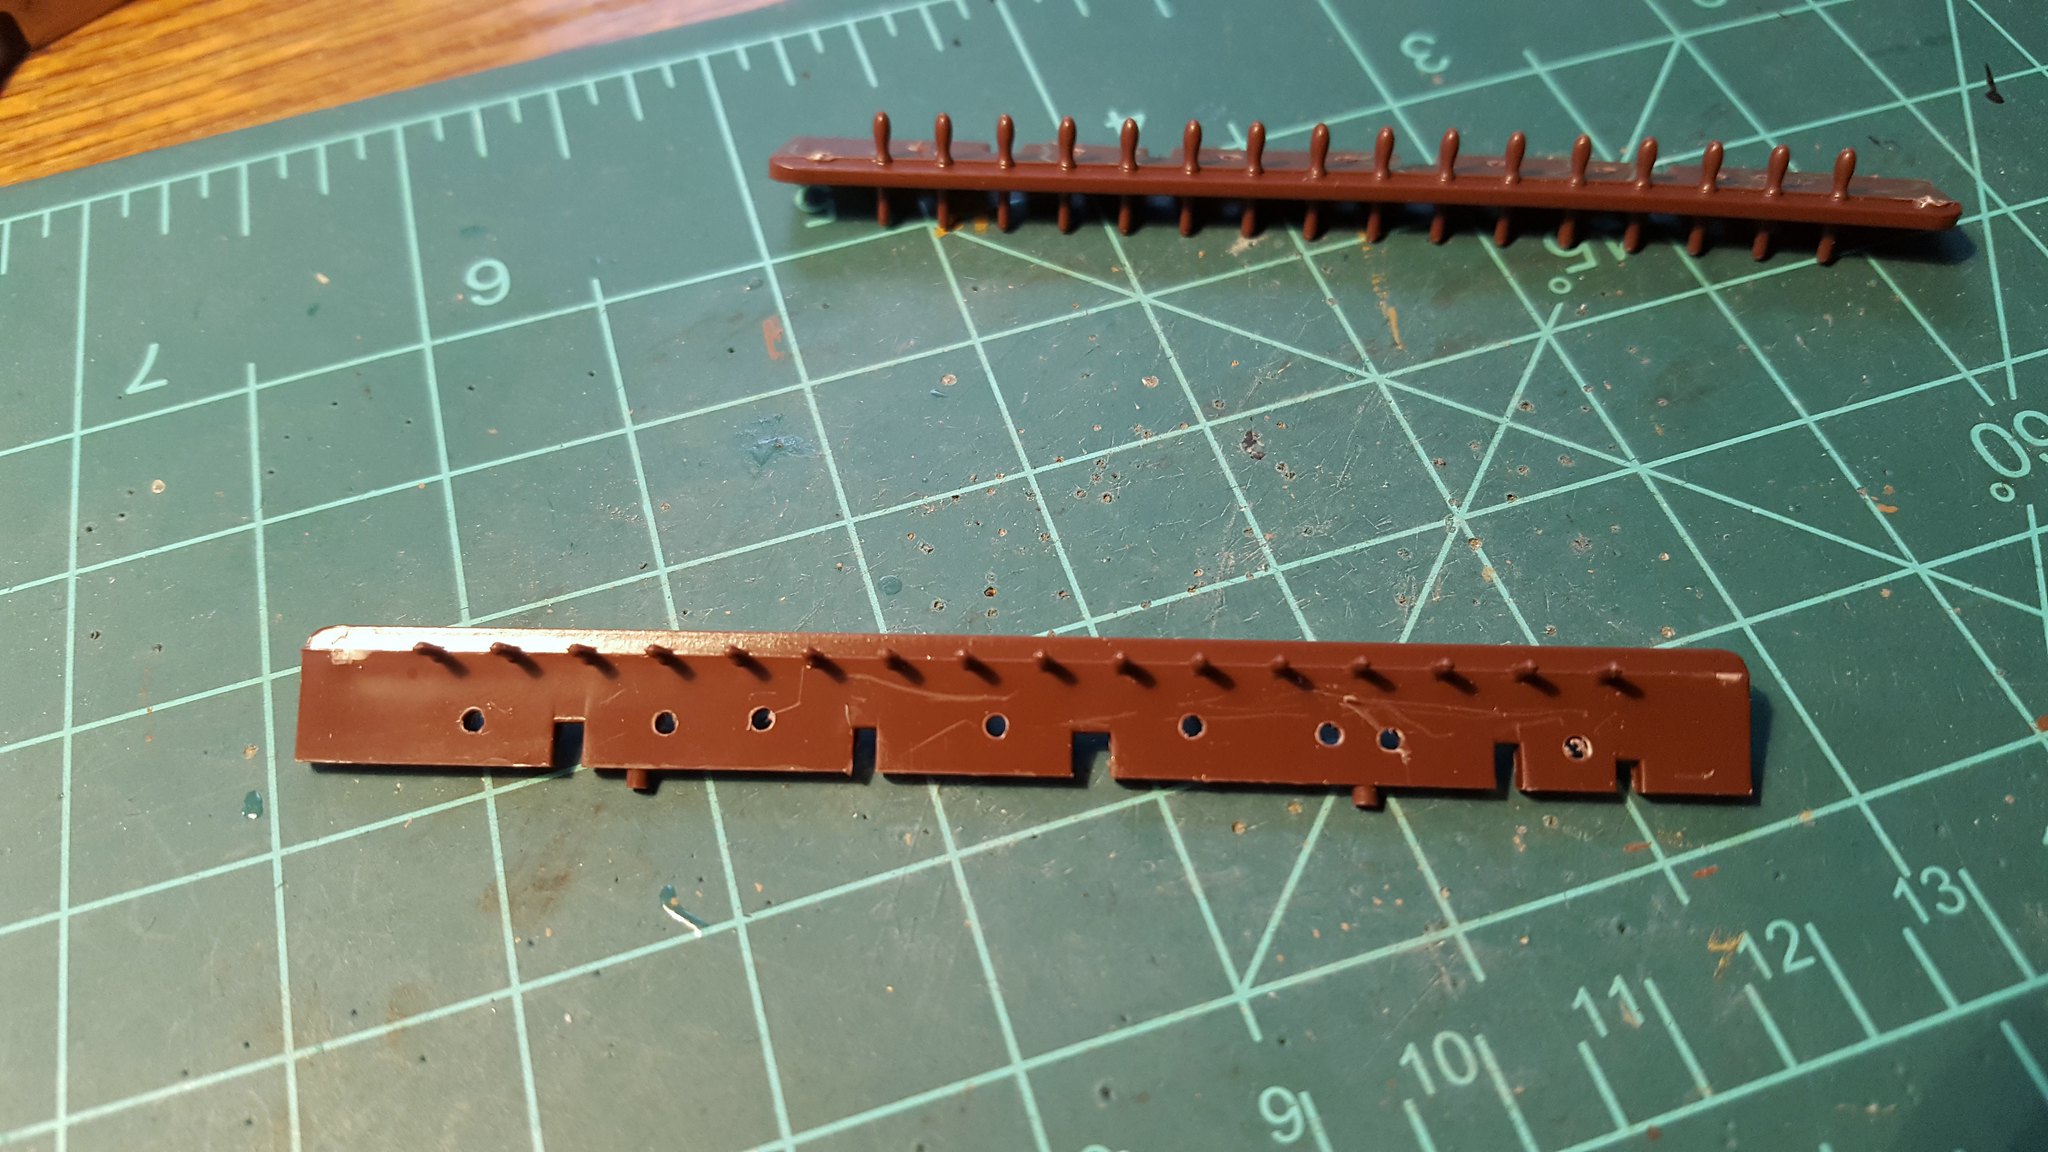
Then I drilled out an oversized hole in the railing where the deadeye sits (I want the holes a bit big, to hopefully reduce extra stress and allow some play on the pinrail when the shrouds get tightened...don't want to pull off a rail!)...

 20180208_160928 by Dave Kump, on Flickr

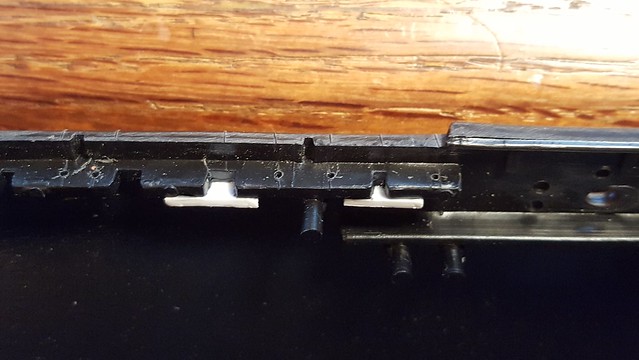
Note that the deadeyes for the Mizzen mast do not lead through a pinrail, but just some caprail molded into the hull, so those areas needed to be drilled out, as well...BUT, there are 2 more locator slots for the deadeye parts back there, with nothing below them to fix a wire....so I put a couple pieces of styrene to fill the gap below, and I'll drill those out tomorrow and use the holes for my wire on the mizzen deadeyes.

 20180208_154040 by Dave Kump, on Flickr

Once I get the hull painted (still a ways off) and get ready to put in the rails, I'll run wire up through the hull holes, and through the pinrail holes (for fore and main) and strop the deadeyes thusly.  *crosses fingers*

I probably have a week before some semi gloss white paint comes in the mail (couldn't find it at the LHS) so I have some time for more prep before the paint starts to fly....

Thanks for watching!

Dave

        _~
     _~ )_)_~
     )_))_))_)
     _!__!__!_         
     (_D_P_K_)
   ~~~~~~~~~~~~~
    ~~~~~~~~~~~

Current Project:  Imai/ERTL Spanish Galleon #2

Recently Finished: Revell 1/96 Cutty Sark

Next Up:  ???


  • Member since
    September 2012
Posted by GMorrison on Thursday, February 8, 2018 7:12 PM

Our pleasure! Beats the heck out of cable news lol.

"Scupper", or "waterway".

Looks like the situation is under control. It's well documented there, always interesting to see where theory encounters reality.

I don't think the CS had wire shrouds, but they came in around that time. I think USN ships had them at that time.

 Modeling is an excuse to buy books.


  • Member since
    May 2017
  • From: Asheville, NC
Posted by LIVIT on Friday, February 9, 2018 2:39 AM

Dave your welcome, if it happens that you cannot get it down under let me know. I would have no problem with posting you some. I can already see this is going to be an impressive build. Going to be nice to have when I eventually do one. I too enjoy the community joining in with suggestions and pics.  

  • Member since
    December 2012
Posted by rwiederrich on Friday, February 9, 2018 8:03 AM

Dave..if you are going to be so precise in your modification for realism, why not do it accurately as you can.  The rail that supports the plastic deadeyes has been widened for fabricational and practical assembly purposes.  On the actual ship the rail the deadeyes pass through is just bearly wider.   They are all nearly the same width and the space were the deadeye sits, there is no pin.  So why not simply reduce the width of your rail to within a mm of all the other rails and then place your deadeyes were they go(removing pins in the way)? You won't miss them anyway.

Second thought, because the rail is so wide and your deadeyes are placed father back on the rail to accomodate the design...your deadeye bars will go nearly un-noticed being back so far and due to the rails proximity to the deck house.  A lot of work for no visual reason.  That is why I chose for myself not to go that route, but simply afix the deadeyes to a styrene plate and then glue that to the rail.  I'm not suggesting you do what I did...but I reasoned out that some mods are just not as necessary in this scale...plus, I thought the addition of real deadeyes and lanyards to this kit was a significant *Upgrade* to the kit supplied deadeyes.

Good luck.

Rob

  • Member since
    September 2012
Posted by GMorrison on Friday, February 9, 2018 9:44 AM

Real dead eyes will eliminate that nasty bar at the bottom of the kit part that ties them together as well.


 Modeling is an excuse to buy books.


  • Member since
    March 2012
  • From: Marysville, WA
Posted by David_K on Saturday, February 10, 2018 8:06 AM

Yes, there's no question....I'll be using real deadeyes and lanyards.  I stopped using fake deadeyes and shrouds on my 3rd kit, and I'll never go back :) Not sure if that was clear already or not?

The holes in the rails and scuppers are to accommodate black wire that will be my chainplate/strop for the lower deadeyes.

Rob, do you have a couple pictures of your CS with the deadeyes fixed to the railing? I'd like to have a better idea of how you did it....the more I consider what I'm planning, I fear the strain of the shrouds will put my pinrails in danger of popping off, just from the angle toward the masttop.

Thanks!
Dave

        _~
     _~ )_)_~
     )_))_))_)
     _!__!__!_         
     (_D_P_K_)
   ~~~~~~~~~~~~~
    ~~~~~~~~~~~

Current Project:  Imai/ERTL Spanish Galleon #2

Recently Finished: Revell 1/96 Cutty Sark

Next Up:  ???


  • Member since
    February 2016
  • From: Western No. Carolina
Posted by gene1 on Saturday, February 10, 2018 9:59 AM

Dave, you are an artist with ships & you don't need any luck as good as you are. Like everyone else I am anxious to see your build. I have been using the Formula 560 glue for over 30 years & it is the best all around glue you can use for most anything in model building. One thing, it won't ruin a painted finish because you just wipe it off with a wet Q Tip. It even holds well on painted surfaces.

   Like Dale says, once it sets you won't pull it apart. I use it for glueing decks down, cannons on , shroud tables on & now I will use it for eyebolts too/. I don't know why i didn't use it for them before. I still use CA for a lot of bare plastic to bare plastic glueing, because CA will not hold on painted parts

  • Member since
    December 2012
Posted by rwiederrich on Saturday, February 10, 2018 12:13 PM

Dave..I knew you were intending to use deadeyes and lanyards..I was making the reference *IF you do* as a general point to any and all who may try them.

Now..I don't have any images of what I did on my CS..but I do have some images of how I did it on the Ferreira..which is in all intense and purposes the CS..just in a reduced fasion.

Here you can see that I added tail pieces to the transition between the main deadeye rail and the general pin rail.  The blunt *stop*in width was unpleasant to me to I tapered them.  Then of course I heavely weathered everything.

Rob

  • Member since
    December 2012
Posted by rwiederrich on Saturday, February 10, 2018 12:21 PM

Hear is an image that shows the deadeyes are glued to a piece of styrene and then fixed to the rail.  It was far easier to do it this way(IMV), and once painted, they blended in nicely to the rail. And once rope coils are added to the pins they completely un-noticed.

This is how I did it on my CS version.  Same process, different ship.

Rob

  • Member since
    December 2012
Posted by rwiederrich on Saturday, February 10, 2018 12:25 PM

In this image you can see some shrouds and such being added..again you can see the fixed deadeyes to the rails.  I never had any issues of rails popping off the whales...and I use CA activated with Monomer.  Monomer is an exellerant not unlike CA excellerant, but I drop it on with a needle applicator.  It hold magnificently.

Rob

  • Member since
    December 2012
Posted by rwiederrich on Saturday, February 10, 2018 12:29 PM

OH, and when I mentioned the issue of not being able to see the deadeye chainplate rods under the extended rail...its because you just wont see them, evidenced by this image that shows the deep shadows behind the pins..and coupled with hanging rope coils, and the proximity to the house ...well you get the picture.

Rob

  • Member since
    December 2012
Posted by rwiederrich on Saturday, February 10, 2018 12:43 PM

Lastly...the reason my model is so heavely weathered is because the vessel I was modeling was extremely weathered and neglected.  I'm showing you this because of the artistic value and the modeling challenge it posed.

Good luck with your build.....I'll be watching.


Rob

  • Member since
    March 2012
  • From: Marysville, WA
Posted by David_K on Sunday, February 11, 2018 8:43 AM

Very helpful pics, Rob...Thanks!

        _~
     _~ )_)_~
     )_))_))_)
     _!__!__!_         
     (_D_P_K_)
   ~~~~~~~~~~~~~
    ~~~~~~~~~~~

Current Project:  Imai/ERTL Spanish Galleon #2

Recently Finished: Revell 1/96 Cutty Sark

Next Up:  ???


  • Member since
    March 2012
  • From: Marysville, WA
Posted by David_K on Saturday, February 24, 2018 9:54 AM

Hi All-

Figured I could post a couple pics and show the slight progress since last time.

I'm basically still in the preparatory stage, gathering materials and *getting ready*.

I ordered some brass pedestals, and bought a piece of Red Oak for the display base...cut and routered the wood, drilled it, and I'll stain it once the sanding is done.  BUT, when the pedestals came, I went to drill out the holes (I'm using #10 screws to mount into the hull, but the pedestals come tapped for like 3mm screws or something) the second piece slipped in the vise and my drill bit went wonky and tore through the side of the brass...ordered a new set from Model Expo, hopefully be here next week.

Also in this picture, you can see the hardware I'm using to mount the model; the wooden blocks will be epoxied within the hull so the screws can have a sturdy material to bite into and help stabilize everything.

 20180224_072556 by Dave Kump, on Flickr

Here are the PE decorations, flags, and draft decals from Radek/HisModel...they look great!  Flags are printed on both sides, the decals look robust and should work well (I actually contacted Revell and they sent me a replacement set of the kits decals, since I knew my 30-some year old kit decals would be useless...they arrived the other day, but the stuff from Radek is far superior)...

 20180224_072733 by Dave Kump, on Flickr

Here's a close-up of the Photo-Etch...it's awesome!  the resolution is tight, very smooth lines...can't wait to see how they look installed!

 20180224_072806 by Dave Kump, on Flickr

Here's the Scaledecks wooden deck parts...looks really nice!

They recommend spraying it with dullcote or some such to protect it from smudges, etc., while working with it, so I'll take their advice.  I'm also going to cut some of the excess area from the outside and practice with adhesives, workability, trimming, stuff like that before I dig into the actual parts. Worth noting that the kit deck parts still need to be painted to match, because there are some small areas where the plastic part will show through (hole for bowsprit, for example)...

 20180224_072405 by Dave Kump, on Flickr

 20180224_072437 by Dave Kump, on Flickr

All in all, the aftermarket stuff looks really, really nice.  I'm happy these add-ons are available. 

Waiting for a day with a bit warmer temps so I can primer the parts...don't want to jump the gun and have frozen, fuzzy primer for my basecoat!

Thanks for looking!

Dave


        _~
     _~ )_)_~
     )_))_))_)
     _!__!__!_         
     (_D_P_K_)
   ~~~~~~~~~~~~~
    ~~~~~~~~~~~

Current Project:  Imai/ERTL Spanish Galleon #2

Recently Finished: Revell 1/96 Cutty Sark

Next Up:  ???


  • Member since
    September 2012
Posted by GMorrison on Saturday, February 24, 2018 10:47 AM

Say Dave, that’s pretty exciting stuff.

If you’ve not worked with wood decks before, be aware that it can’t be pressed down when installing it.

I have fit problems in general between objects like deck houses or gun turret bases.

Not so much overall fit.


 Modeling is an excuse to buy books.


  • Member since
    March 2012
  • From: Marysville, WA
Posted by David_K on Saturday, February 24, 2018 10:56 AM

Hmmm...what do you mean, it can't be pressed down?

As in, it is delicate and will break if I put pressure on it?

        _~
     _~ )_)_~
     )_))_))_)
     _!__!__!_         
     (_D_P_K_)
   ~~~~~~~~~~~~~
    ~~~~~~~~~~~

Current Project:  Imai/ERTL Spanish Galleon #2

Recently Finished: Revell 1/96 Cutty Sark

Next Up:  ???


  • Member since
    September 2012
Posted by GMorrison on Saturday, February 24, 2018 11:02 AM

Sometimes they won't lay flat because there a bind somewhere and they are buckled up a little. The temptation is to press down with something rounded like the end of an Xacto, to get it to stick to the plastic deck.

I've found that in time it will always pop back up.


 Modeling is an excuse to buy books.


  • Member since
    May 2017
  • From: Asheville, NC
Posted by LIVIT on Saturday, February 24, 2018 11:11 AM

Dave, that scale deck is going to really look great. I used regular water based elmers white glue to adhere mine. I painted on a thin coat, half the deck at a time, this allowed more than enough working time to get it all to lay flat. I did not do anything to protect the surface, I think the little smudges give it a more realistic look.

  • Member since
    December 2003
  • From: 37deg 40.13' N 95deg 29.10'W
Posted by scottrc on Sunday, February 25, 2018 8:10 AM

GMorrison

Sometimes they won't lay flat because there a bind somewhere and they are buckled up a little. The temptation is to press down with something rounded like the end of an Xacto, to get it to stick to the plastic deck.

I've found that in time it will always pop back up.

I've learned also, with using the wooden deck on an aircraft carrier, that the deck would warp and curl if exposed to humidity and sunlight and after staining. I work in a basement in front of a skylight. After experiencing this, I gave the decks a coat of thinned sanding sealer and pinned them to my building board to cure before working with them. I did both sides and sanded the glue side for the adhesive to get a good bite.  It seemed to help a lot.


  • Member since
    March 2012
  • From: Marysville, WA
Posted by David_K on Tuesday, February 27, 2018 5:37 PM

Hopefully I can get a decent result with the scaledeck...if I can get the glue to hold it down, I'll be happy.

Meanwhile, I got anxious and decided to break out the airbrush.  Instead of my typical spraying marathon, I'm doing it in several-day stages, since I need certain layers to dry before I move to the next section.

After priming a lot of the kit parts to get a consistent base (still not sure why the crosstrees that will be white were molded with the brown sprues, and the crosstrees that will be brown were molded with the white sprues?) , I sprayed the white stripe for the wale on the exterior hull, and the inner bulwarks...

 20180226_162914 by Dave Kump, on Flickr

I also painted all the other white parts white, but I didn't take a picture of those.

Today, I sorta masked off for the lower hull, just to keep overspray from getting on the white, and painted the sheathing.  I have always had trouble with getting a quality representation of metallic colors with Testors Model Master (my go-to paint), so when it comes to metallics, I like Tamiya.  I went with a 50/50 mix of copper and gold for this effect, I think it looks pretty close to the *muntz metal* or whatever that is on the bottom of the ship (at least from the pictures I've seen)...

 20180227_151346 by Dave Kump, on Flickr

Next, I'll have to do a REAL masking job and make the line across the sheathing AND below the white wale so I can lay down the black for the hull exterior.  I'll use Parafilm M and some masking tape to help with the curve of the lines for masking (love that Parafilm)...

Anyway, I should have most of the airbrushing down in a few days.  After that, there's really nothing to stop me from building some momentum.

Thanks for stopping by!

Dave

        _~
     _~ )_)_~
     )_))_))_)
     _!__!__!_         
     (_D_P_K_)
   ~~~~~~~~~~~~~
    ~~~~~~~~~~~

Current Project:  Imai/ERTL Spanish Galleon #2

Recently Finished: Revell 1/96 Cutty Sark

Next Up:  ???


  • Member since
    September 2012
Posted by GMorrison on Tuesday, February 27, 2018 5:43 PM

Damn gorgeous. Don't forget to paint the rudder before you run out of your magic mixture!

Muntz Metal is what usually is called "brass' in architectural stuff. I've got gobs of it around the office. You've nailed the look. Not at all gold, but fairly yellow.


 Modeling is an excuse to buy books.


  • Member since
    March 2012
  • From: Marysville, WA
Posted by David_K on Tuesday, February 27, 2018 5:57 PM

Thanks, GM!  Glad it turned out well...the coat went down very easily, which is a reminder of why I primed the hull first...otherwise it would have taken a ton of paint to get an even coat over black plastic.

Here's a question I haven't settled on an answer for:

Flat Black, or Semi-Gloss Black for the upper hull?  Doesn't seem like it would matter too much, but the choice keeps nagging me.  I don't feel like the black part of the hull would actually be shiny, but if I go with flat black, it may be too contrasted against the lower hull...so I figure maybe semi-gloss would be a good call?

Dave

        _~
     _~ )_)_~
     )_))_))_)
     _!__!__!_         
     (_D_P_K_)
   ~~~~~~~~~~~~~
    ~~~~~~~~~~~

Current Project:  Imai/ERTL Spanish Galleon #2

Recently Finished: Revell 1/96 Cutty Sark

Next Up:  ???


  • Member since
    September 2012
Posted by GMorrison on Tuesday, February 27, 2018 6:07 PM

I'd say semi-gloss would look best. Considering it took one hundred days to sail from China to England, you've got a range of options.

Are you using enamels? I haven't used any black enamels in a while except for real black. 


 Modeling is an excuse to buy books.


  • Member since
    November 2009
  • From: Twin Cities of Minnesota
Posted by Don Stauffer on Wednesday, February 28, 2018 6:58 AM

Testors used to make a semi-gloss enamel called Black Chrome.  Hard to find now, though still in some racks.  They make a new one just called Semi-gloss Black, but that is hard to find too.  Just getting added to racks.  Comes in both bottles and spray cans.


Don Stauffer in Minnesota

  • Member since
    September 2012
Posted by GMorrison on Wednesday, February 28, 2018 10:07 AM

That last one does come as a Tamiya  Acrylic color.

 Modeling is an excuse to buy books.


  • Member since
    December 2003
  • From: 37deg 40.13' N 95deg 29.10'W
Posted by scottrc on Wednesday, February 28, 2018 1:04 PM

It kinda also depends on how glossy the lower hull and the rest of the ship will be.  I would say the semi-gloss would help balance the contrast of what could be a glossy copper lower hull and the flat natural wood deck.  

I generally will punt at the end and give the whole ship a coat of artist satin clear before I step the masts.  Then its all the same level of contrast.  Then again, I'm a "dull" person.  Smile

  • Member since
    April 2016
  • From: Russia, St.Peterburg
Posted by kirill4 on Wednesday, February 28, 2018 3:02 PM

Good day Dave,

follow your building with great interest ... in far - far future ...have plan to assemble the same kit :))) may be...:)))

regatding black color... I could suggest start with flat black...but it shouldn't  be" mono" black color... various" dark gray/ brown" may be???..." gloss " You can add any time you want....

and bottom part, color of" munz" metal ... shouldn't be " shiny"... too much...?

I mean., there shouldn' t be too much contrast in shining...?

  • Member since
    December 2012
Posted by rwiederrich on Wednesday, February 28, 2018 4:32 PM

Brand new Muntz metal was known as Yellow metal.

I think Dave's color is probably what it looked like brand new without any oxidization.


But as soon as it was put in salt water it tuned a brownish metalic color.  I think it is highly subjective actually.  Dave's looks smart.

I tend to weather my ships so I chose a brownish metalic color.

Rob

JOIN OUR COMMUNITY!

Our community is FREE to join. To participate you must either login or register for an account.

SEARCH FORUMS
FREE NEWSLETTER
By signing up you may also receive reader surveys and occasional special offers. We do not sell, rent or trade our email lists. View our Privacy Policy.