SEARCH FINESCALE.COM

Enter keywords or a search phrase below:

Nantucket Lightship by Lindberg - 1:95 scale build

10992 views
141 replies
1 rating 2 rating 3 rating 4 rating 5 rating
  • Member since
    December 2003
  • From: 37deg 40.13' N 95deg 29.10'W
Posted by scottrc on Tuesday, March 12, 2019 8:15 AM

Fright, let there be fair winds and calm seas on your next build.  I look forward to sharing the adventure.

Scott

  • Member since
    May 2008
  • From: Wyoming Michigan
Posted by ejhammer on Monday, March 11, 2019 3:17 PM
Very nice work. I love those little working boats. EJ

Completed - 1/525 Round Two Lindberg repop of T2A tanker done as USS MATTAPONI, USS ESSEX 1/700 Hasegawa Dec 1942, USS Yorktown 1/700 Trumpeter 1943. In The Yards - USS ESSEX 1/700 Hasegawa 1945, USS ESSEX 1/700 Dragon 1944, USS ESSEX 1/700 Trumpeter 1945, USS ESSEX 1/540 Revell (vintage) 1962, USS ESSEX 1/350 Trumpeter 1942, USS ESSEX LHD-2 as commissioned, converted from USS Wasp kit Gallery Models. Plus 35 other plastic and wood ship kits.

  • Member since
    January 2012
  • From: Atlanta Metro, Georgia
Posted by fright on Sunday, March 10, 2019 6:21 PM
ScottRC - Many thanks for taking the time to leave a comment. Here's to new adventures!

Robert O

  • Member since
    January 2012
  • From: Atlanta Metro, Georgia
Posted by fright on Saturday, March 9, 2019 11:30 AM

GMorrison - thank you for following along with this one and for your help and advice along the way. Cheers! Beer

Shipwreck - many thanks for the kind words Wink

Robert O

  • Member since
    May 2006
  • From: Chapin, South Carolina
Posted by Shipwreck on Saturday, March 9, 2019 7:34 AM

Great model. Thanks for sharing. It brought back memories of when I built it OOB about sixty years ago.

On the Bench:

Revell 1/96 USS Constitution - rigging

Kinetic 1/48 YF-104A 5+2957

Trumpeter 1/350 USS Hornet CV-8

Revell 1/48 B-1B Lancer Prep & Reasearch


  • Member since
    January 2012
  • From: Atlanta Metro, Georgia
Posted by fright on Friday, March 8, 2019 8:20 PM

I've come to end of the line on my Nantucket Lightship LV-112. I got my feet wet with using LED lighting and creating my 1st diorama water scene. Build time, approximately 6 months. I want to thank everyone for following along and provoding me with some helpful information. On to bigger and better builds BeerBeer

Robert O

  • Member since
    December 2003
  • From: 37deg 40.13' N 95deg 29.10'W
Posted by scottrc on Friday, March 8, 2019 10:45 AM

Wonderful job on this Lightboat project Fright.  

  • Member since
    September 2012
Posted by GMorrison on Wednesday, March 6, 2019 10:28 PM

That's awesome. What a nice job you've done.

I would suggest you drop anchor though.

This has been enjoyable to follow.

 Modeling is an excuse to buy books.


  • Member since
    January 2012
  • From: Atlanta Metro, Georgia
Posted by fright on Wednesday, March 6, 2019 4:38 PM

My progress over the weekend. My small craft advisory flag is now flying on the forward beacon tower. I glued the ship to it's base and begin filiing three layers with plaster of Paris, aloowing each layer to set and dry. I then broke out my acrylic paints and started to paint in my base colors for my ocean. To help create better ocean swells, I used vallejo Atlantic Blue gel. Once this has dried, I will start doing some blending and white caps followed up with Liquitex Gloss Varnish. I'm almost there!

Robert O

  • Member since
    January 2012
  • From: Atlanta Metro, Georgia
Posted by fright on Thursday, February 28, 2019 1:06 PM

Shipwreck - Thanks and, yes, a big difference. Here's the video that I followed in making my flags:

https://www.youtube.com/watch?v=I7bjEkFDqAs 


Robert O

  • Member since
    May 2006
  • From: Chapin, South Carolina
Posted by Shipwreck on Thursday, February 28, 2019 5:35 AM
Flag looks great. Vast improvement over the kit part. Could you post the video for us. Thanks!!

On the Bench:

Revell 1/96 USS Constitution - rigging

Kinetic 1/48 YF-104A 5+2957

Trumpeter 1/350 USS Hornet CV-8

Revell 1/48 B-1B Lancer Prep & Reasearch


  • Member since
    January 2012
  • From: Atlanta Metro, Georgia
Posted by fright on Wednesday, February 27, 2019 7:30 PM

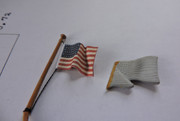
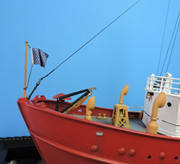
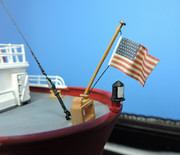
My wife came to my rescue once again. She works with miniatures so she was kind enough to reduce two images of a US Navy Jack flag and the American flag onto some paper. She used photos of actual worn flags to copy.

The plastic flags with staff were too thick and out of proportion. I removed the flags from their staffs with my #11 blade and then sanded down the staffs for a thinner look. I then drilled two holes thru the staff and ran line thru these to attach the flag .

After watching a video on creating flags, I cut out my reduced sized images and then glued a slightly smaller piece of tinfoil to the inside of one half of flag. I then inserted my line and folded and glued the two halves together. While still damp from the white glue mix, I bent my flags to create the wind blowing on them. 

I'm still waiting for my EZ line to arrive so I can add the radio wires to the beacon towers and complete the rigging of the ship.


Robert O

  • Member since
    January 2012
  • From: Atlanta Metro, Georgia
Posted by fright on Monday, February 25, 2019 4:18 PM

Bob - thank you for this info and this link! Your Constitution is FaNTaSTiC !!!


Robert O

  • Member since
    March 2018
  • From: Chicago suburbs
Posted by Luvspinball on Monday, February 25, 2019 2:25 PM

I'm now watching and reading some articles on water effects for dioramas so I can finish up with this model. I'm really happy with the way this model has turned out and I'm hoping my 1st attempt at creating the ocean effect will go smoothly. Keeping fingers crossed!

Check out Woodland Scenics water effects collection.  Have everything from a muddy puddle to white capped oceans.

https://woodlandscenics.woodlandscenics.com/show/category/Water

Videos on site are very helpful.  Going to use it on one of my old pinball projects.


Bob Frysztak

Luvspinball

Current builds:  Revell 1/96 USS Constitution with extensive scratch building

  • Member since
    January 2012
  • From: Atlanta Metro, Georgia
Posted by fright on Monday, February 25, 2019 12:44 PM

Here are a some pictures with most of my rigging in place. I'm waiting for my EZ Line to arrive so I can add the radio wires to the beacon towers. I still need to add the Union Jack flag on the bow and the American flag on the stern of the ship.  I'm now watching and reading some articles on water effects for dioramas so I can finish up with this model. I'm really happy with the way this model has turned out and I'm hoping my 1st attempt at creating the ocean effect will go smoothly. Keeping fingers crossed! 


Robert O

  • Member since
    September 2012
Posted by GMorrison on Saturday, February 2, 2019 9:35 PM

Fright- you've been talking to my 6. It sits in the window. Well taken care of, but yes it needs to be finished.

Bill- don't even get me started on lighthouses! I have a nice book on lighthouses of the New England coast I can recommend.

You guys are to be applauded for building these little ships.

 Modeling is an excuse to buy books.


  • Member since
    December 2002
  • From: Derry, New Hampshire, USA
Posted by rcboater on Saturday, February 2, 2019 9:00 PM

GM, 

Thanks for posting that link. I just ordered a copy!

-Bill

Webmaster, Marine Modelers Club of New England

www.marinemodelers.org


  • Member since
    January 2012
  • From: Atlanta Metro, Georgia
Posted by fright on Saturday, February 2, 2019 10:31 AM

GMorrison - Once again, I thank you for sharing this info with me. I just purchased this book online to add a little history lesson for me on these ships. Thanks again and, speaking of ships, how is your America yacht coming along? All of your extra work that you are doing with this plastic kit is superb! 

Robert O

  • Member since
    September 2012
Posted by GMorrison on Friday, February 1, 2019 4:39 PM

https://www.amazon.com/Lightships-Cape-Cod-Frederic-Thompson/dp/0961132000

I keep meaning to post this Robert. It's a very good book. There are a fair number of good b/w photos in it which show detail.


 Modeling is an excuse to buy books.


  • Member since
    January 2012
  • From: Atlanta Metro, Georgia
Posted by fright on Friday, February 1, 2019 4:13 PM

Sharkbait - I saw that this ship is up for sale. I guess the non-profit group couldn't keep up the funds neccessay to keep her going. $5.2 million is all we need!!!! LOL Thanks for dropping in and taking a look. Cheers!

Robert O

  • Member since
    January 2012
  • From: Atlanta Metro, Georgia
Posted by fright on Friday, February 1, 2019 4:10 PM

Wilbur Wright - I'm having a lot of fun building this kit and a lesson in electronics as well! The price is right and it makes a great RC kit as well. A gentleman by the name of rcboater has his RC version of this ship on youtube. Be prepared for a lot of clean up and sanding on every part with this kit! Thanks for taking a look Pirate


Robert O

  • Member since
    February 2006
  • From: Boston
Posted by Wilbur Wright on Friday, February 1, 2019 12:43 PM

You've done a nice job here. The rigging should really make it.

This is a great looking model available at a very reasonable price.  I'm tempted to get one of these.

  • Member since
    October 2003
  • From: Canada
Posted by sharkbait on Friday, February 1, 2019 8:56 AM

Had to paste this.

apparently a 1:1 scale model is available!

http://realestate.boston.com/news/2019/01/31/nantucket-lightship/?fbclid=IwAR3lapfnb2u8MhUjxPslcoAGwVYFXGDYGLIM6z1F0jHt0jduOpIeJu5EbJI

You have never been lost until you've been lost at Mach 3!

  • Member since
    January 2012
  • From: Atlanta Metro, Georgia
Posted by fright on Thursday, January 31, 2019 1:04 PM

Robert O

  • Member since
    January 2012
  • From: Atlanta Metro, Georgia
Posted by fright on Tuesday, January 22, 2019 10:26 AM

Bill - It's been a little time consuming but I didn't like how the kit's pulley system was suppose to glue to the boats. I do know one thing and that is, if and when you work on yours, it will look outstanding. Your Cutter build was fantastic!

Robert O

  • Member since
    December 2002
  • From: Derry, New Hampshire, USA
Posted by rcboater on Monday, January 21, 2019 7:02 PM

Robert,

Great move on replacing the boats’ falls with scratchbuilt replacements! (The kit parts are truly awful.)

On my model, I only did the first part of the job- the tossing out of the bad parts! Now that I’ve seen yours, I may have to take a shot at making similar replacements!

-Bill

Webmaster, Marine Modelers Club of New England

www.marinemodelers.org


  • Member since
    January 2012
  • From: Atlanta Metro, Georgia
Posted by fright on Monday, January 21, 2019 11:41 AM

Two boats down and one to go!


Robert O

  • Member since
    January 2012
  • From: Atlanta Metro, Georgia
Posted by fright on Tuesday, January 15, 2019 8:14 PM

I decided not to go with the rope and pulley parts that came with the kit. Instead, I drilled fine holes into the tops of the davits and into the bow and stern of boats for my light ship. I made eye rings and hooks with pliers and wire. I used some spare blocks that I had and some black thread to finish attaching the davits to the whaleboat on the starboard side. 

In hindsight, I should have used a light tan thread instead of the black. I may paint this thread to match the tan lines I will use on the port side boats.

Robert O

  • Member since
    July 2013
Posted by steve5 on Monday, December 31, 2018 3:10 PM

coming together nicely fright .


JOIN OUR COMMUNITY!

Our community is FREE to join. To participate you must either login or register for an account.

SEARCH FORUMS
FREE NEWSLETTER
By signing up you may also receive reader surveys and occasional special offers. We do not sell, rent or trade our email lists. View our Privacy Policy.