SEARCH FINESCALE.COM

Enter keywords or a search phrase below:

Heller 1:150 Amerigo Vespucci

5293 views
20 replies
1 rating 2 rating 3 rating 4 rating 5 rating
  • Member since
    March 2004
  • From: Belgium
Posted by DanCooper on Friday, January 7, 2022 2:37 PM

Hello Spitfire, I just found your treat here, and since I have this very same kit in my stash for in a not so distant future, I was wondering how your Vespucci is coming along.

Another "funny" anekdote is that I also have 1/144 Wasa waiting for a breakfluidbath... I just hope I won't screw that up because that kit is a birthdaypresent from my wife...

On the bench : Revell's 1/125 RV Calypso

  • Member since
    March 2009
  • From: brisbane australia
Posted by surfsup on Thursday, February 28, 2019 9:08 PM

Ditto on the Deck. Will have to try that one day. Really looks well weathered.....Cheers mark

If i was your wife, i'd poison your tea! If Iwas your husband, I would drink it! WINSTON CHURCHILL

  • Member since
    February 2019
  • From: Peoria, Illinois
Posted by jadowning17 on Thursday, February 28, 2019 2:34 PM
The decks look great! Thanks for sharing and for the tip. I have that model in my stash, might have to use a similar technique.
  • Member since
    September 2012
Posted by GMorrison on Thursday, February 14, 2019 5:46 PM

It looks dirty, but I suppose that's the point. Since she's a training ship, she's kept up well. The decks are teak and get replaced a lot. They have the characteristic color after a year of aged teak- gray.

Don't give up on wood. Balsa has no place in modeling unless it has to fly. Basswood is a readily available hardwood that is sold in thin strips and is easy to work with.

Don't see this kit built too often, it's looking good.

 Modeling is an excuse to buy books.


  • Member since
    December 2003
  • From: 37deg 40.13' N 95deg 29.10'W
Posted by scottrc on Thursday, February 14, 2019 4:11 PM

The deck is looking real good.  A lot of work paid off.  

  • Member since
    February 2019
  • From: Yes
Posted by Hirnsausen on Thursday, February 14, 2019 12:09 PM

If it comes to aging and wood, I will use a matt (flat) vanish, transparent. In my earlier days, I used a mix of mostly transparent matt vanish with a small amount of matt (flat) black in it. What this would do is, to settle in bigger amounts inside niches (lowered areas) and this way also give a darkened, aged effect to the deck or other surfaces, while higher areas stayed almost unchanged clear (transparent). Sometimes, to make this vanish even more flowable, I added also some thinner into this mix. But this mix can be used only on painted surfaces where the paint has been fully dried since weeks or even months, to avoid a cracking effect on the paint layer below (the thinner would cause this). I used a brush for that technique.

  • Member since
    August 2015
Posted by Spitfire4sergi on Wednesday, February 13, 2019 10:17 AM
Thanks Don, I'll have to test it.. The deck was all done with graphite (mechanical pencil / rubbing w/ my hand), curious to see what a gloss coat will do to it! The Amerigo Vespucci is still sailing and in amazing shape, so maybe a nice varnish will really help it stand out!
  • Member since
    November 2009
  • From: Twin Cities of Minnesota
Posted by Don Stauffer on Wednesday, February 13, 2019 9:32 AM

Very nice work on the deck painting.

You have a choice between beauty and authenticity.  Most wooden ship decks were not varnished or anything- just plain wood. I coat wood decks with Testors dullcoat when done painting.

Don Stauffer in Minnesota

  • Member since
    August 2015
Posted by Spitfire4sergi on Tuesday, February 12, 2019 9:06 PM

I’ve never sealed a deck before, any suggestions? I reckon it will fade over time like all of my old letters written in pencil!

  • Member since
    August 2015
Posted by Spitfire4sergi on Tuesday, February 12, 2019 8:17 PM

Here’s some more pictures!  Glad I took them, it’s a nice way to see where some touch ups are needed.  Let me know if thep pencil technique works for you.. I’m curious to see if I just happened to get lucky with this kit (just happened to be the right plastic tan?).      

  • Member since
    June 2018
  • From: Ohio (USA)
Posted by DRUMS01 on Tuesday, February 12, 2019 6:27 PM

I too want to thank you for sharing your technique on the wood decks. It sounds like it is a very forgiving way to add the depth and detail. And if you want more simply add more in the recesses; for less effect use an eraser on the high spots. When you get it how you want it, do not forget to seal it.

Nice job with the paint pens too. Looking gret so far, keep it up. 

v/r,

Ben

"Everyones the normal until you get to know them" (Unknown)

LAST COMPLETED:

1/35 Churchill Mk IV AVRE with bridge - DONE

NEXT PROJECT:

1/35 CH-54A Tarhe Helicopter


  • Member since
    February 2019
  • From: Yes
Posted by Hirnsausen on Tuesday, February 12, 2019 6:05 PM

Big thanks for the hints! Can you do me one more favor, and make some close-up photos of the deck? I will do it the same way on my ship!

  • Member since
    August 2015
Posted by Spitfire4sergi on Tuesday, February 12, 2019 1:34 PM

Thanks, really appreciate it!  

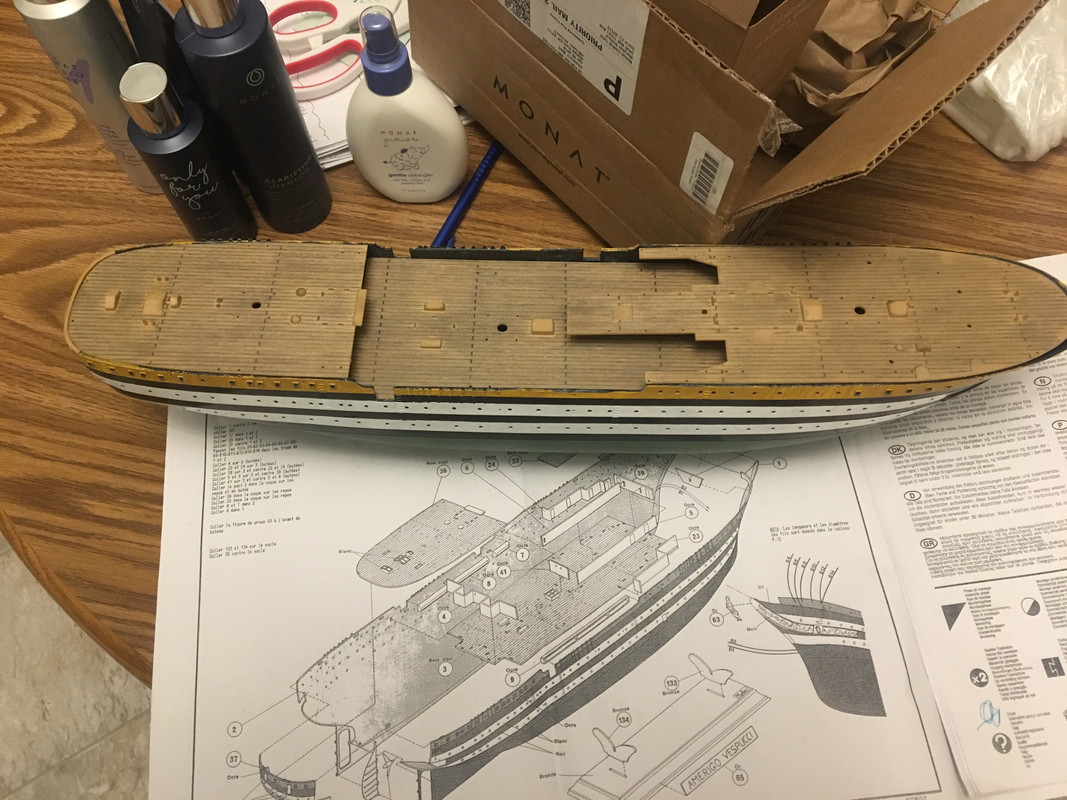
There's an unconventional story behind the decks as well.. I really wanted to make these decks something special, so at first I looked into buying a sheet of 1:150 scale wood decks with no luck.  I then thought, 'I'll take the time to cut individul planks out of balsa wood!  It will be worth the effort!'  Went to Michael's, got the thinnest piece of balsa wood I could find, was so excited experiment with it... And in 5 seconds realized it was a bust..I have zero experience with wood cutting tools, thought I could use an exacto, instantly said 'NOPE!'  So out of sheer frustration I started painting the decks in different shades of brown, and realized it would just look like every other 'meh' deck I've ever made.  So after even WORSE frustration while getting the paint off, I just picked up a mechanical pencil and started filling in the seams.  There was ZERO method to the madness, just started randomly while cursing perfusely.  I got up from my chair, and my thumb smudged across the pencil lines.. 

EUREKA!!!

I've never done anything with so much excitement in my modeling life.. After filling in every seam with a plain ol' mechanical pencil from the dollar store, I took a deep breath, and just started smudging horizontally with the planks to pull the graphite out of the seams and across the grain molding with my thumb and palm.  After 5 minutes with my hand pretty much black, my jaw was dropped.. It turned out to be the best deck I've ever made!  It's so easy to 'even out' the appearance of weathering, just need to fill the seams a little more, or just use the eraser (I'll probably touch them up before I install them into the hull).  Apologies for the long reply, but I just couldn't believe how lucky I got out of pure frustration!  Thanks again, definitely reccomendy trying it on plastic kits.Pure luck!

  • Member since
    February 2019
  • From: Yes
Posted by Hirnsausen on Monday, February 11, 2019 6:41 PM

I like how your main deck looks! How did you manage to weather (age) it so well? Please describe your procedure to me, I have to work on the main deck of another ship right now...

  • Member since
    December 2003
  • From: 37deg 40.13' N 95deg 29.10'W
Posted by scottrc on Monday, February 11, 2019 1:04 PM

Spit,

I sent you two PMs.

Best regards,

Scott

  • Member since
    August 2015
Posted by Spitfire4sergi on Sunday, February 10, 2019 1:29 PM
I’ll send you scans of the instructions! They’re in French unfortunately (lovely Heller problem I suppose), I can have them to you by Wednesday.
  • Member since
    August 2015
Posted by Spitfire4sergi on Sunday, February 10, 2019 1:27 PM

Thanks guys!  I purchased this kit in 2014, completely destroyed the paint job with terrible masking and impatience.. I ended up nuking the entire hull in a brake fluid bath.. TWICE! And didn’t touch her until recently.  The waterline was ‘airbrushed,’ as in my first ever attempt to airbrush with a cheap starter kit. It was a fight to say the least.. I’ll never be able to duplicate that color because it’s so many random shades of unintentional green!  The pressure ran out just when I finished, so my confidence to finish the hull with an airbrush was gone.  So the white / black stripes and gold detail?  All paint pens!!!!!! Just coat after coat.  I’m hoping to work on her this week, will hopefully have progress pics with plenty of questions.  

  • Member since
    December 2003
  • From: 37deg 40.13' N 95deg 29.10'W
Posted by scottrc on Friday, February 8, 2019 2:49 PM

I'll be watching as well.

I have this kit, and have been wanting to start it, but had lost the instruction book in a move.  

Your painting is fantastic.  This kit has very little raised detail so its hard to make everthing line up and look good.  

Scott

  • Member since
    March 2009
  • From: brisbane australia
Posted by surfsup on Thursday, February 7, 2019 10:59 PM

Pulling up a Chair and getting some Popcorn. off to a good start.....Cheers Mark

If i was your wife, i'd poison your tea! If Iwas your husband, I would drink it! WINSTON CHURCHILL

fox
  • Member since
    January 2007
  • From: Narvon, Pa.
Posted by fox on Wednesday, February 6, 2019 7:38 PM

Looks like you're doing OK. She's shaping up well. Keep the photos coming so we can see how you make out with the build. 

Like your use of the organic weight. After using it you just eat it.Wink Just remember that it gets lighter after each use(unless you don't like pickles).

Jim  Captain

 Main WIP: 

   On the Bench: Artesania Latina  (aka) Artists in the Latrine 1/75 Bluenose II

I keep hitting "escape", but I'm still here.

  • Member since
    August 2015
Heller 1:150 Amerigo Vespucci
Posted by Spitfire4sergi on Tuesday, February 5, 2019 8:21 PM

Hi everyone!

I’m expecting my first child in June (a boy!) and I’d love for him to look at this kit some day and ignite a passion for ships and modeling that we all have.  As of right now, I’m in the process of re-gluing the bow. The kit has warped so bad (probably from my horrible brake fluid bath a few years ago, lovely story there.) that she split with just one deck dry-fitting.  I still have to touch up the hull quite a bit, but then the true challenge of deck fitting begins.  I‘d love to hear feedback and tips/tricks from everyone here.. Like I said before, I want my son to be amazed someday!  Thanks in advance, appreciate any feedback or advice!In ‘drydock’  Praying the bow seam will hold!

JOIN OUR COMMUNITY!

Our community is FREE to join. To participate you must either login or register for an account.

SEARCH FORUMS
FREE NEWSLETTER
By signing up you may also receive reader surveys and occasional special offers. We do not sell, rent or trade our email lists. View our Privacy Policy.