SEARCH FINESCALE.COM

Enter keywords or a search phrase below:

Dimpled Deck Plating

1806 views
11 replies
1 rating 2 rating 3 rating 4 rating 5 rating
  • Member since
    September 2012
Posted by GMorrison on Tuesday, July 23, 2019 5:00 PM

Not as accurate as the Grandt/ NWSL stuff, but I’ve used straight pin heads.

just playing with numbers in my head, if the pin head is 1/32” dia., that’s a scale 3/4”.


 Modeling is an excuse to buy books.


  • Member since
    July 2019
  • From: Nebraska
Posted by Larry_B on Tuesday, July 23, 2019 4:39 PM

Just checked in at Walthers on the rivets.  Kinda as I suspected - status is 'Out of Stock' and Availability is 'No Infor From Vendor'.


So I think this is a bust Boo Hoo

  • Member since
    July 2019
  • From: Nebraska
Posted by Larry_B on Tuesday, July 23, 2019 4:15 PM

OK I'll look at a different picture hosting site.  I am compiling an album in Google Photos of this project.  Not sure if there is a way to allow FSM members to view.  I'm not interested in paying for a hosting site so cheap/free comes with baggage.  What is everyone else using??

Here are a couple pics of my model, so far.  Keep in mind a lot of painting is coming real soon and will make a huge change...

This boat has three hull frame sizes.  The 'Small' frames, the majority, are basically 3" angle iron.  This is 1/8" Evergreen Styrene heated and bent in a mold.  Frame spacing is about 18". The Intermediate frames are the angel iron with additional plating and angle iron riveted to them forming a 'C' channel.  For this I'm using 1/16" birch ply to get the bulk. The port side of the boat has the viewing port/opening.  You will see some wood and unfinished areas on the port side above the fore/aft stringer.  Since these areas will not be visable through the view port I did not finish it.  If you noticed wires ahead of the forward bulkhead I am lighting the boat.  Just above the view port is an LED light strip to illuminate the interior.  In addition I will be running wiring for navigation lights and perhaps flood lighting on the tower and illuminating pilot house.  Also in the photo are openings in the lower deck.  This is where the pumps will go and connect to the sea chests in the hull.  The heavy midship frame is missing in this photo.  If you look to the upper right of the boat in the picture yo can get a view of all the 3D printed parts, engines, pumps, monitors and valves.

This is the view from the aft bulkhead looking forward.
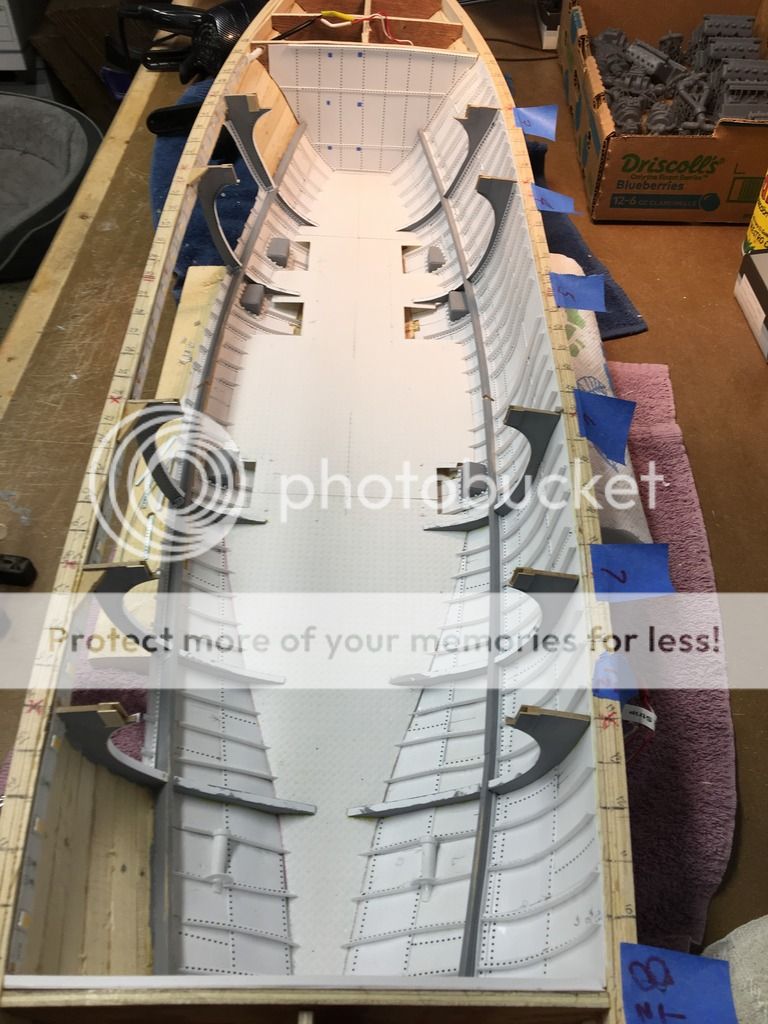
Frames

I am working on the 'heavy' midships frame now and will have it installed tomorrow.

Here is a picture from the outside of the boat looking at the port side.  I have an opening in the hull from just above fore/aft stringer to just under the upper fender and just inside the fore and aft bulkheads.  From this view you can see the small and intermediate frames and all the Archer Transfer rivets (black dots) throughout the hull interior. 
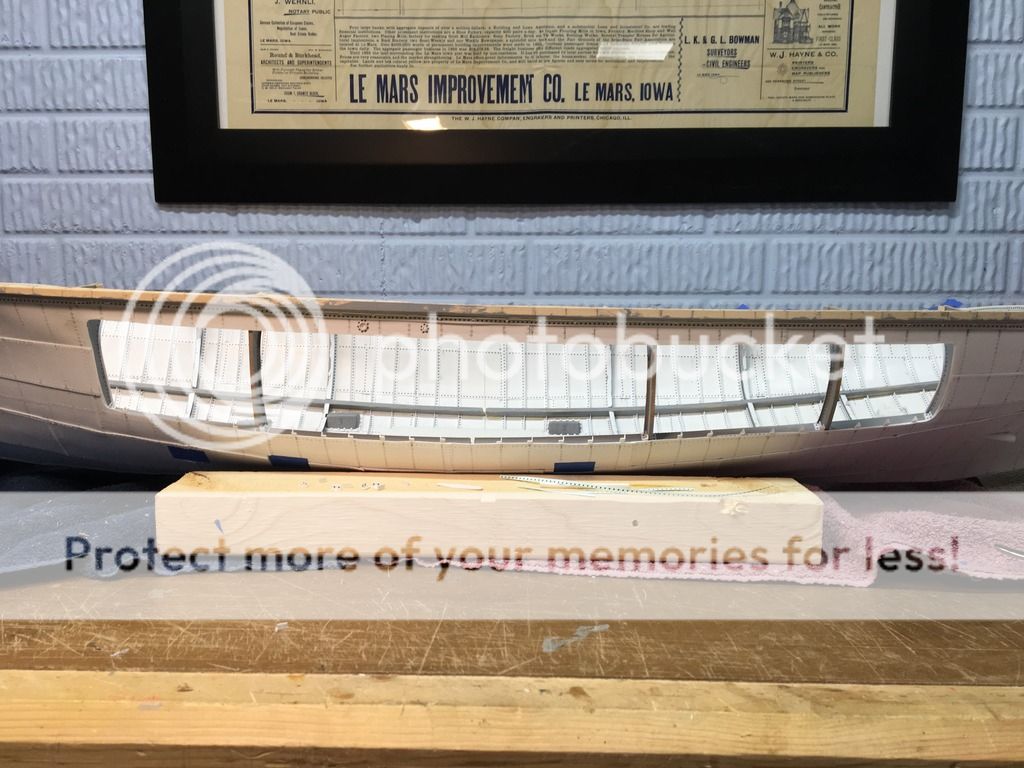
hull exterior


If you can zoom in on the hull you will see the simulated flat rivets on the outside.  So far just north of 300 hours in the hull.  I cheated a bit and formed a thin wood 'shell' over bulkheads to give me a base to glue the .5 mm Evergreen styrene sheets too (the hull plating).  So the thickness of the hull is not quite right.  But who will know??

The period that my father served on the boat was during WWII.  The boat was stationed in San Pedro harbor, the port to Los Angles.  Next door is Long Beech and the US Naval Yard.  Because of this the fire boat was under US Navy command and was painted the traditional battleship colors as well as assigned a USN hull number.  So I will be modeling the boat in this state, quite different that typical red and white colors of a fire boat.

I'm really please at how this is turning out.  I estimate it will take about 1,000 hours total to complete.  I've been researching this boat since last summer including a site visit and started construction in early March.  My goal is to have it done by next May and take it to a model boat exibition and show in Manitowoc, Wisconsin, then a road trip to LA after that.  My wife just shakes her head and I don't dare tell her how much I have invested in it!!

  • Member since
    July 2014
  • From: Philadelphia Pa
Posted by Nino on Tuesday, July 23, 2019 12:04 PM

Oh Yea!  Pictures would be Good.

Post away!


    Very interesting Thread. Thanks for starting it. 

    Wish I could assist with your dimple-dilema  but I am at a loss for Ideas...   

EDIT: Okay, 1 idea: Run a tracing wheel over a .010 Evergreen sheet to "dimple" it and glue the sheet to you model.  The wheels come in different sizes or just file down the points not needed for the scale.


    Yes, that was some great detective work GM.

            Nino.


P.S.   Gmorrison is right. Switch off Photobucket. There are plenty of MUCH BETTER free hosting sites that don't have a HUGE "Watermark". 


  • Member since
    July 2019
  • From: Nebraska
Posted by Larry_B on Tuesday, July 23, 2019 10:46 AM

Wow, good detective work on the boat I'm building.  The LA FD No 2 was renamed the 'Ralph J Scott' in the early 1960's.  It was retired in 2003 and has been under restoration near the fireman's muesum.  They will be done in the next 12 months.  The harbor authority is building a building to house the boat for display.

I got a good tour of the boat last summer when researching it for this model.  I'm not sure it's open to the public.

Building this is a challange.  There are no drawings of the actual boat as built in 1925.  I am working from a couple concept drawings from the boat builder, but that is not what was built.  The drawings I'm working from have it at 95'.  The actual boat is 99'6".  If it was 100' long harbor regulations meant additional engineering crew would be required for operation and the fire dept didn't want to add crew so it was 6" short of the 100' limit.

I have some drawings from a 1978 refit, but they really dont help a lot.  My father served on the fireboat during World War II so I'm modeling the boat from that period.  I'm going off a lot of historical photos which the muesum has been helping me with.  The harbor authority will not allow the public on the boat so I offered to build a cut away boat for them so they can see what is beneath the deck.

So far I'm about 300+ hours into is.  I have the hull exterior completed and am working on the hull interior (frames and bulkheads).  Once that's done I will paint the interior and exterior and mount it in a cradle for the remained of construction.

The next big milestone will be modeling the equipment details below deck.  The engines and pumps were a real challange.  The engines were Winton gas engines.  Low and behold I found the physical specs at a GM Diesel muesum.  I built a master and then used a local university's 3D scanner and resin printers to make multiple copies.  Same with the water pumps.  Also used the 3D printer to make the various size gate valves and old style fire monitors.

I can post some photos if anyone is interested.

Thanks

Larry


  • Member since
    July 2019
  • From: Nebraska
Posted by Larry_B on Tuesday, July 23, 2019 10:27 AM

Ahh, I used the Grandt Line rivets for a model of the USS Monitor Ironclad i made about 15 years ago.  Used about 8,000 of them!  That's how I spaced the holes on that project.  So that's possible.  I looked into those rivets late last year when gearing up for this project, but I found that the rivet line was sold to a company in Colorado. I tried contacting them via email but never responded.  So I went on to plan 'B' and am using Archer Transfer decal rivets.  I custom ordered about 1200 inches of rivets to match the size and spacing used on the boat.  I've gone through about 2/3's of the decals so far and might need to order another 600 inches....

Those decal rivets have been an experience.  It's a challange to cut and place a three inch strip at a time (anything longer just is to cumbersom).   So using them for the dimpled deck effect would be an issue for me.  Like the glue/dot suggestion above any deavation from the pattern (size or alignment) will be easily seen by the naked eye.  Thus my search for a machine embossed/engraved version.

This model will be opened on one side to expose the inner workings of the lower deck with the seven engines, six pumps, various gatevalves and all the associated plumbing and piping.  The interior hull and bulkheads are where the Archer Transfer decals are being used.  And will be used on the deck structures too.  I'll post a picture of the interior in the next day or two.

Since the outside of the hull was a flat rivet I used a 1/16" brass tube in a pencil soldering iron to make donut shaped flat rivets.  Got about 13,000 rivet inpressions in the hull.

I'll check out Walthers and see what they got.  Thanks for the lead.


Larry


  • Member since
    September 2012
Posted by GMorrison on Tuesday, July 23, 2019 9:33 AM

I like the project a lot. I assume it's of the retired No. 2 from LAFD.

That ship is still with us, I believe. Can you go see her?

Wiki says she's 99 feet long, your model will be over 4 feet long.


 Modeling is an excuse to buy books.


  • Member since
    August 2005
  • From: Mansfield, TX
Posted by EdGrune on Tuesday, July 23, 2019 9:22 AM

Larry_B

I'm building a 1:24 scale model of a 1925 fire boat for a fireman's museum in Los Angles.

...

Plastruct has a dimple plating, but the sheets are rather small and dimple spacing is not right.  Any ideas on a source or perhaps a method to make repeatable and realistic dimples.  Maybe in Evergreen Styrene sheets??

Since you're working in a larger scale and getting consistent dabs of white glue may be problematical,  you may want to look at Grandt Line rivets.

They are available in plastic in multiple sizes.   They also have Nut/Bolt/Washer (NBW) sets in multiple sizes.   These can come in handy detailing bulkhead fittings.   Check the Walther's model railroad catalog or other model railroad supplier.

Make a drill template of your hole pattern.   Since it repeats you don't need the whole surface.   Drill a set of holes, slide the fixture over and index the old holes with marks/pins on the template.  Drill a new set.  Repeat until complete.  Insert the rivets into the holes.  Glue from underneath.  Trim flush

  • Member since
    November 2009
  • From: Twin Cities of Minnesota
Posted by Don Stauffer on Tuesday, July 23, 2019 8:32 AM

To make the rivet heads, I use a drop of white glue applied with a toothpick.  You need to do some practice first in getting a uniform drop size.  Practice on a scrap sheet of plastic.

Apply the drops after all the sanding and filling is done, of course.


Don Stauffer in Minnesota

  • Member since
    September 2012
Posted by GMorrison on Monday, July 22, 2019 1:24 PM

I suggest you not use photobucket. Lot's of better options available. I use fotki.

It's kind of a special pattern. If those dimples are say 12" apart, a 1/4" spacing would do it. You could probably sit down with a baseball game on tv and make it.

Sorry I can't suggest anything OTS.


That project sounds great Do post your photos.


 Modeling is an excuse to buy books.


  • Member since
    July 2019
  • From: Nebraska
Posted by Larry_B on Monday, July 22, 2019 12:41 PM

It appears I need to upload photos to a service so here is my photobucket link....


dimpled deck - this is underside

  • Member since
    July 2019
  • From: Nebraska
Dimpled Deck Plating
Posted by Larry_B on Saturday, July 20, 2019 9:28 AM

New member and first post....

I'm building a 1:24 scale model of a 1925 fire boat for a fireman's museum in Los Angles.

The decking on this boat has a dimpled texture - this is a photo but from the underside.

dimpled decking from the underside

Plastruct has a dimple plating, but the sheets are rather small and dimple spacing is not right.  Any ideas on a source or perhaps a method to make repeatable and realistic dimples.  Maybe in Evergreen Styrene sheets??

Thanks


Larry

JOIN OUR COMMUNITY!

Our community is FREE to join. To participate you must either login or register for an account.

SEARCH FORUMS
FREE NEWSLETTER
By signing up you may also receive reader surveys and occasional special offers. We do not sell, rent or trade our email lists. View our Privacy Policy.