SEARCH FINESCALE.COM

Enter keywords or a search phrase below:

From Sailing Ships to 1869 Trains

1230 views
12 replies
1 rating 2 rating 3 rating 4 rating 5 rating
  • Member since
    February 2016
  • From: Western No. Carolina
Posted by gene1 on Friday, June 26, 2020 4:31 PM

Thanks Doc, I wish I could, but I will be 90 this year & I'm a little slow. I found a couple more building pictures so I will put them on. One thing about me , I have more leftover parts & pieces lke my little plastic tubes I used on the railings. That's thanks to 40 years of model railroading & general model builing.I'll have 80 years of model building this year.


  Darnit I sent the wrong picture again. 

This is how I added the front half of the smokebox. I ran the big dowel right out to the front so i could glue on it. I cut the smokebox front castingout & had a small piece for the back section & the round front out front. I made a 3 piece extensiona little smaller than the kit part to leave room for 2 layers of plastic wrap.

 You can see where I cut out the nameplate backing & filled.

 Neat little chopper for small things. Blade lasts a long time, but I get 100 at Lowes for about $8.

  • Member since
    October 2019
  • From: New Braunfels, Texas
Posted by Tanker-Builder on Friday, June 26, 2020 12:50 PM

Jumpin Jehosephat!

 Gene,This is the stuff of legends. Gosh I wish you could be a member of my Museum!

  • Member since
    February 2016
  • From: Western No. Carolina
Posted by gene1 on Friday, June 26, 2020 10:01 AM

 I will post some pictures, as I find them of things I did in building these 3. I now concider myself an expert in General construction because I have built 3.

             Here is something I just made up to do this. I used 3/64 brass rods for the handrails. I polished the brass first & did not lacquer it so my plastic tube would fit over it.

I use a brass eye bolt & a plastic tube that fit over the 3/64 rod. I cut the tube short & CA glued it in place I then found a small plastic tube to go over the eyebolt & cut it to length from the kit rail part. They set in place in holes in kit parts. 

 On the 119 I extended the raill all around the light & made corner fom the plastic tube CA glued at 90degrees . It worked & I drilled out each piece so my rail fit easily. I brass painted it all when done. I also cut the trim end off the kit rail & glued it on the Jupiter rail as it is shorter.

           Another thing I did was made a raised base in the tender to use less wood or coal. I did not do this on the General & I was cutting wood for hours.

 The top one is a paper pattern & the bottom is my raised plastic base. Cut it the same size as the inside tender as the raised center does not change it that much.

Sorry for the double pictures.???? If It wasn't for nino, Jim, I would need a live in Computer teacher. Jim stayed on the phone for 3 hours helping me get the size right to print the picture he sent me for my decals. I have never done that & it worked beautifully.I coated the decals I made with some Rustoleum clear & used Rustoleum Stone spray for my ballast on my roadbed. That really works great, but shake it for 3 minutes before you ise it. They recomend 1 minute, But I did 3. My first spray with it , I did not shake it much & it did not work.

  • Member since
    February 2016
  • From: Western No. Carolina
Posted by gene1 on Thursday, June 25, 2020 10:01 AM

Thanks to all you guys for the nice comments, I really appreciate them. I told Bill that I have a shortage of words anymore, it is one of the nice things about getting real old. I can still build any model or draw a plan for houses with every thing & all the demensions & details, but words & names leave & come back. 

         Don the General is on ebay all the time & I have bought 3 all for around $60 shipped. $45 + 15 shipping. They vary a lot, one guy wants $735.00. He has been there forever. The kit fits great & is very clean of flash.

                                                  Gene

  • Member since
    September 2005
  • From: Groton, CT
Posted by warshipguy on Thursday, June 25, 2020 9:21 AM

Gene,


OUTSTANDING as usual!

Bill

  • Member since
    November 2009
  • From: Twin Cities of Minnesota
Posted by Don Stauffer on Thursday, June 25, 2020 8:55 AM

Gene, I have been looking for that kit for years.  Saw one at a meet last year, but I always set myself a budget and what he wanted wouldn't fit the budget.  Still looking :-)

I have built several locomotives over the years.  There was a brand- forget it now, that offered kits- something like AHC or AH something.


Don Stauffer in Minnesota

  • Member since
    July 2010
  • From: Tempe AZ
Posted by docidle on Wednesday, June 24, 2020 10:05 PM

steve5

your like a fine wine gene , getting better with age mate .


I completely agree.


  • Member since
    July 2013
Posted by steve5 on Wednesday, June 24, 2020 9:37 PM

your like a fine wine gene , getting better with age mate .


  • Member since
    February 2016
  • From: Western No. Carolina
Posted by gene1 on Wednesday, June 24, 2020 8:44 PM

Thank you guys, Steve, Steve , & Jim. This site is a lot of fun & after nearly 80 years of building models I learn more with every model I build & a lot from this site. I got the idea for building these 2 from a fellow named Frank Leidek on another site He did a great job & his post was a real help.

                          I learned a lot on building the General from Popeye on another site. FSM is my favorite tho.

  • Member since
    July 2010
  • From: Tempe AZ
Posted by docidle on Wednesday, June 24, 2020 7:32 PM

Gene,

Those are some seriously great models! I have to get busy, you’re making me look like a slacker here...

Steve


  • Member since
    August 2007
  • From: back country of SO-CAL, at the birth place of Naval Aviation
Posted by DUSTER on Wednesday, June 24, 2020 3:27 PM
WOW three great models. Send those other pictures I gotta see more.

Steve

Building the perfect model---just not quite yet  Confused

  • Member since
    July 2014
  • From: Philadelphia Pa
Posted by Nino on Wednesday, June 24, 2020 1:29 PM

You've been choppin' some serious wood

  These are a treat to behold.  Beautiful painting.


(You sure the wife didn't help on the delicate parts? 


These models are inspiring.

Send us more pics!   Inside the Locomotive please as I love levers and knobs.


     Jim.

  • Member since
    February 2016
  • From: Western No. Carolina
From Sailing Ships to 1869 Trains
Posted by gene1 on Wednesday, June 24, 2020 11:16 AM

 I have been completely busy for the last 6 or 7 years with mostly sailing ships & some steel warships, like this & I loved them.

But I needed a break & here is where I went.
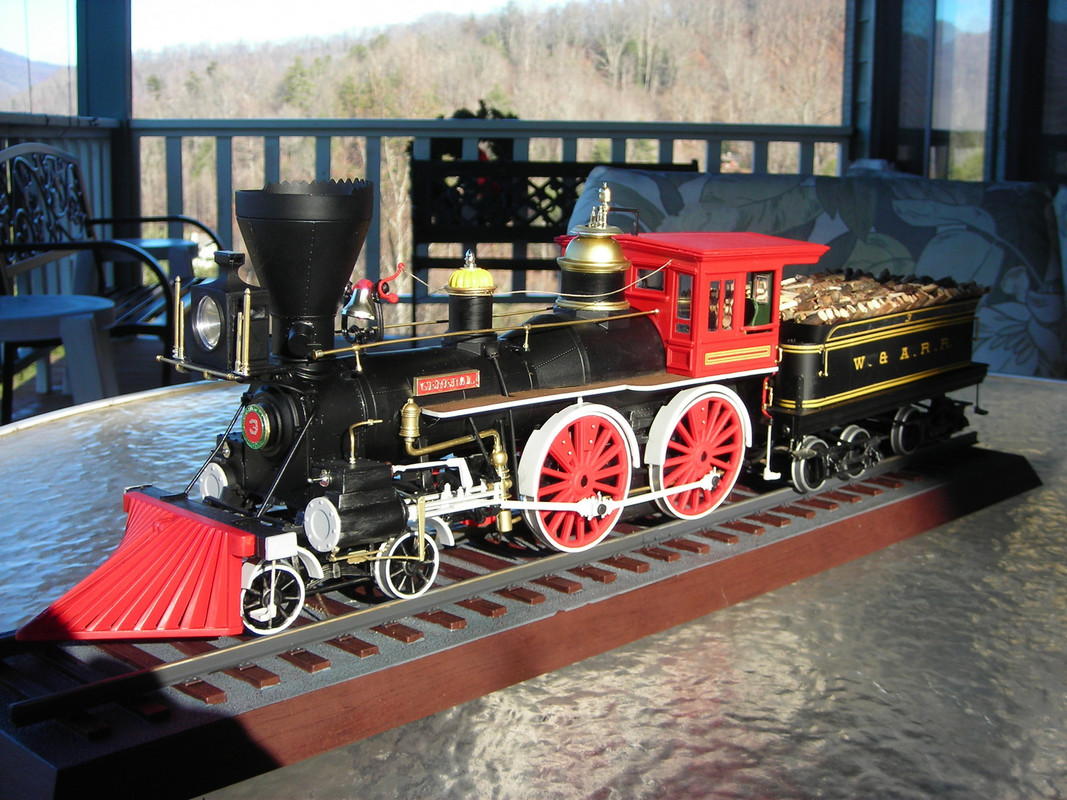
 This is the 1/25, about 24" long old MPC General kit of a locomotive that still exists down in Kene


saw, Ga. in a museum. It stil looks just like this. I had so much fun with this, & NO rigging, & I saw a post by a man named Frank Leimbek who used this same kit to build the 2 loco's from the 1869 Meeting of the Rails in Promontory, Utah. His were Beautiful & spurred me on to build them too.

  There were a lot of changes to make on the General kit & I got 2 of them on ebay.Here is my start with the changes.

I always get some wood inside my models & in this case it was a big piece of wood dowel & I used it to nail the 1/8" x 1/64" brass bands because they were springy. I had to get  this size from England & wished they were thinner & easier to work, but they do make the model. I had bought some 1/8" plastic strips & sprayed the with M&M brass lacquer, but the real brass looked beter. The kits fit perfect in everything & even the flash on these old kits was very light. The kits are from the 1980's. & I paid about $60 shipped for each one. They vary up over $100. Mine were all in great sha pe & all there except the glass & light lens in the last one.

                                    I had to make an extension for the Union Pacific  119 as she was a coal burner. I carefully cut 3 round discs sized to fit the existing smoke box & cut the General name plate backing off & fill the hole. This took some time. I also filled the spoked front wheels & this was another time spender. 

 I luckily found a wooden thread roll that just about fit the wheels & used it to cut around my circle & cut the center out.

I mixed all my colors up with all Tamiya paint. At my age, 89, I am not changing my paint. I have had great luck with Tamiya.

                    I will post 2 pictures of my finished models to keep you interested. It took me about 5 months to finish all 3 locos & I am pretty fast.

              The paint colors are pretty correct as they just refinished the2 engines in 2015 & Walt Disney helped with finally getting the correct  colors. The front smoke box was a dull black, The Boiler was all Russian Iron Blue & the 119 was a deep maroon Tender Cowcatcher ,light & sand dome. It had a red brown cab. & gold trim & bands. I used M&M Brass lacquer on all that I painted & reworked the kit brass castings.

               The Central Pacific, from Sacremento , Ca. , was the Jupiter. & it was a wood burner & all the wood came from my front yard & 2 Oak trees.They were really proud of there engines so they were trimmed up to a super degree. I saw them back in 1980 & they were painted in Red because they did not have the correct colors then.

  Here are a few of the 2 & I love them.


  I will be back as I did take pictures as I built for anyone that is interested. Hope you like them as much as me. I would like to leave them posted here because this is where I have posted on ships for years.             Best to you all,, Gene

I forgot this one of the coal & wood tenders. They were a lot of work.


JOIN OUR COMMUNITY!

Our community is FREE to join. To participate you must either login or register for an account.

SEARCH FORUMS
FREE NEWSLETTER
By signing up you may also receive reader surveys and occasional special offers. We do not sell, rent or trade our email lists. View our Privacy Policy.