SEARCH FINESCALE.COM

Enter keywords or a search phrase below:

1/35 Italeri M108 105mm SP Howitzer, WIP, 05/30/11 Finished

51189 views
154 replies
1 rating 2 rating 3 rating 4 rating 5 rating
  • Member since
    July 2006
  • From: New Jersey
1/35 Italeri M108 105mm SP Howitzer, WIP, 05/30/11 Finished
Posted by redleg12 on Sunday, January 16, 2011 10:52 AM

Fire Mission

1/35 Italeri M108 105mm Self Propelled howitzer.

Introduction

I was commissioned for this build to be used at the 1 BN 40 Field Artillery reunion later this year. Only two units served in Vietnam with an M108. First the 3/6 FA in June 0f 1966 followed by the 1/40 in October of 1966. During the time the 1/40 served in Vietnam, they fired in excess of 165,000 rounds and have the distinction of being one of the few Army units to have a Marine Corps citation, for their support of the Marines in the Dong ha area.

here are a few shots. First is an M108 from the 3/6. Te last two are the 1/40 M108s.

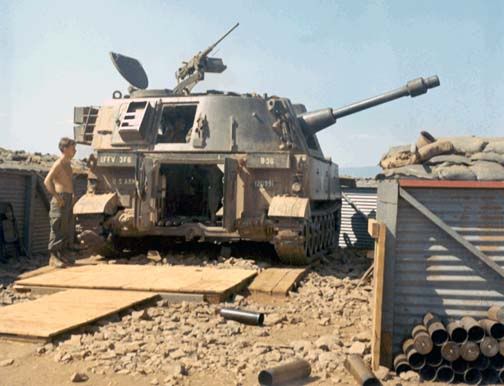
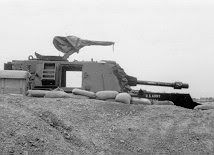
Photos above are taken from each unit’s respective web site. I would like to credit not only the photographer but all the members of each unit!!

The build

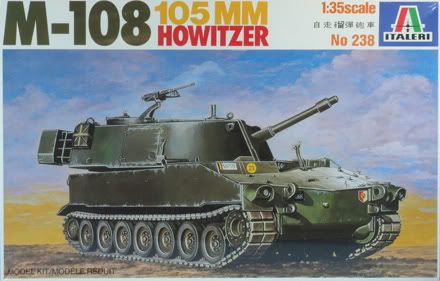
I will be using the Italeri kit # 238 M108 which is OOP but available from time to time on eBay. The kit is very straight forward and simple from an assembly stand point. I will be switching out the kit supplied “rubber band” tracks with the AFV M108/109 individual link kit.

Warning in general, this kit suffers from what most Italeri kits do….excessive sink holes, injector pin marks and poor alignment.  I will be using plenty of Mr. Liquid Putty and Mr. Surfacer to get this close.

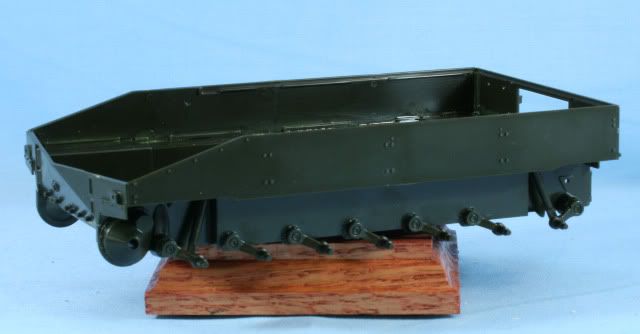
The first two steps are assembling the lower hull and adding all the suspension elements. The road wheels are left off for ease of painting.

The side panels and rear require “clamping” to hold in place for the best gluing results. This is the lower hull after the first two assembly steps

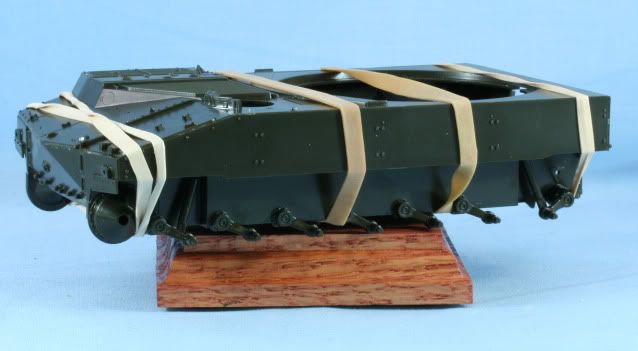
Step 3 includes adding the top of the lower hull. After some sanding to fit, rubber bands are required to hold the top in place while gluing. It is best to make sure everything is in place, glue well and allow overnight to set up well.

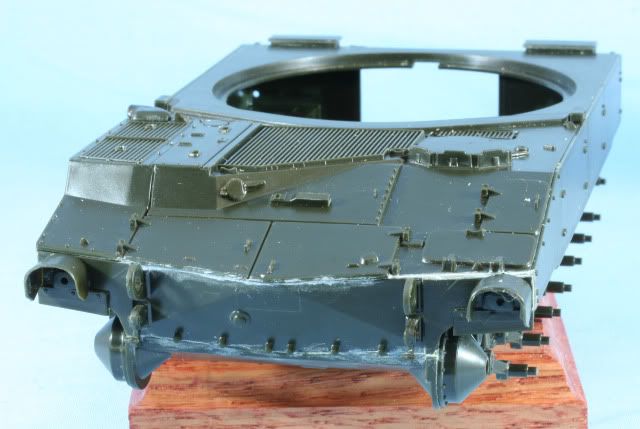
Step four has some rear details added like the lifting hooks. I left the lower rear door off at this point. I will not have an interior but may leave the door cracked open….Undecided at this point


Steps 5 & 6 add details to the front and deck. Some of these like the barrel travel lock I left off to facilitate painting. The front (and back) lights are left off for ease of detail painting. You can see the remnants of seam work also. I used multiple coats of Mr. Putty and Surfacer to close minor seams and major holes.

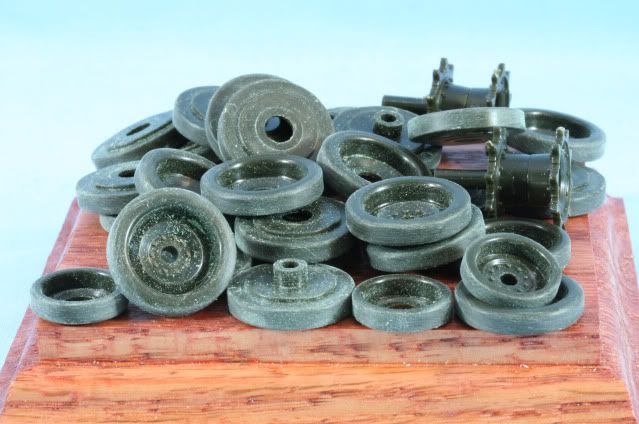
All the road wheels were removed from the sprue cleaned up and the rubber areas sanded wit a scotch brite pad to create more realistic wear.

That’s it for now. I am in the middle of a major putty job on the barrel and mounting.

As always thanks for stopping by. Your comments good or bad are always appreciated.

Rounds Complete!!

"The Moral High Ground....A Great Place to Emplace Artillery."

  • Member since
    August 2008
  • From: S.W. Missouri
Posted by Pvt Mutt on Sunday, January 16, 2011 11:36 AM

Thunder Turtle to the rescueBig Smile

I'll be watching Mike

Tony LeeSmile

Shoot Low Boys They're Ridin Ponys

  • Member since
    June 2005
  • From: Massachusetts
Posted by minimortar on Sunday, January 16, 2011 11:40 AM

'ave at it Mike! I'm sure that the 1/40 guys will be thrilled to have one of your builds! Despite the kit's flaws (in general), they do build up nicely. I know that you've done one previously as well as have I and they turn out a-ok. Besides, the M108/M109 is the puritiest AFV chassis (IMHO) ever made... well... a close second to the trusty old M113. Both are FMC products anyway.

Now, if we could ony get you to add a Verlinden or Hobby Fan VN figure (or more) to round out this project...

Yeah

Thanks,
Kevin Keefe

Mortars in Miniature
A Scale Model (Plus!) Collection of the Infantryman's Artillery

  • Member since
    July 2004
  • From: Texas
Posted by wbill76 on Sunday, January 16, 2011 11:45 AM

Woohoo, Mike's building an SPG! Looking forward to the usual arty magic work on this one Mike. Beer

  • Member since
    December 2002
  • From: Valrico, FL
Posted by HeavyArty on Sunday, January 16, 2011 12:30 PM

It looks like it is off to a great start.  I'll be watching you do your usual magic.

Gino P. Quintiliani - Field Artillery - The KING of BATTLE!!!

Check out my Gallery: https://app.photobucket.com/u/HeavyArty

"People sleep peaceably in their beds at night only because rough men stand ready to do violence on their behalf." -- George Orwell

  • Member since
    May 2003
  • From: Ft. Sill, OK
Posted by beav on Sunday, January 16, 2011 1:12 PM

Saw this on the other site, was wondering when I would see it here!  Looking good

"First to Fire!"

Steven

  • Member since
    July 2006
  • From: New Jersey
Posted by redleg12 on Sunday, January 16, 2011 1:40 PM

Tony – Tighten your chin strap and come along for the ride!! Thanks

Kevin – I totally agree. The M108/109 carriage and the M113 carriage set the tone for the 60s thru today. The kit is enjoyable….just needs some TLC….otherwise known as modeling!! Thanks again……Figures…..that would be after I figure all the other “stuff”!!

Bill – I’m back in position and ready to fire!! Thanks

Gino – Thanks…..it’s an oldie but goodie….one that everyone forgets!!

Beav – Thanks, I am like SNL…..I do a Weekend Update!!

Thanks again guys for peeking in and taking the time to comment

Rounds Complete!!

"The Moral High Ground....A Great Place to Emplace Artillery."

  • Member since
    May 2009
  • From: Poland
Posted by Pawel on Thursday, January 20, 2011 2:20 AM

Mike,

I'm thrilled to see you building this one! I want to build a Vietnam M109 for some time now but I have problems with getting at the Italeri kit. I'm sure your build will be a great reference, at least in the areas where M108 and M109 are similar. Good luck building and have a nice day

Paweł

All comments and critique welcomed. Thanks for your honest opinions!

www.vietnam.net.pl

  • Member since
    July 2006
  • From: New Jersey
Posted by redleg12 on Thursday, January 20, 2011 10:23 PM

Pawel - Thanks. If you are looking for reference, you can pick up Steve Zaloga's book on the M109 which the beginning details the weapon both M108 and M109 use in VN. It is a great reference.

Glad to have you looking on and look forward to your comments.

Rounds Complete!!

"The Moral High Ground....A Great Place to Emplace Artillery."

  • Member since
    April 2005
  • From: Piscataway, NJ!
Posted by wing_nut on Friday, January 21, 2011 6:57 AM

Nice Mike.  Knowing what you will do with that those guys are in for a treat.  Are you going to it in the revetment form the fist pics?  That would look so cool.

Marc  

  • Member since
    July 2006
  • From: New Jersey
Posted by redleg12 on Friday, January 21, 2011 4:12 PM

Marc - Thanks.....on the revetment, yes, still working out the details and going thru some of my old manuals.

Thanks again

Rounds Complete!!

"The Moral High Ground....A Great Place to Emplace Artillery."

  • Member since
    November 2008
  • From: Jefferson City, MO
Posted by iraqiwildman on Friday, January 21, 2011 4:55 PM

I look forward to following this build.

The M108 looks funny to me after spending 11 years in a M109 unit. It looks like someone broke half the tube off. Such a tiny tube on such a big chassis.

I have to agree with the durability of the M109 and M113/m577/m548 chassis. They have been in active service for almost 50 years. And it looks like the M109 Paladins will be around for 20 more years since the Crusader project was cancelled. I don't think there is a replacement for the M577 in the works either.

Tim Wilding

  • Member since
    July 2003
  • From: On my kitchen counter top somewhere in central North Carolina.
Posted by disastermaster on Friday, January 21, 2011 8:47 PM

This is gonna look great.

http://th7.photobucket.com/albums/y298/treded_scarz/Icons/th_supersquirrel.jpg   You all know what this nut is capable of..........

http://i20.photobucket.com/albums/b232/gluetank/Decorated%20images/th_T1-4-copy.jpg

 https://i.imgur.com/LjRRaV1.png


  • Member since
    July 2006
  • From: New Jersey
Posted by redleg12 on Friday, January 21, 2011 9:58 PM

Iraqwildman - Thanks, Yep, alot of steel around a small gun!

Steve - Thanks for the vote of confidence.....as for the picture....watchout for the nuts.....they are like kryptonite! Big Smile

Thanks!!

Rounds Complete!!

"The Moral High Ground....A Great Place to Emplace Artillery."

  • Member since
    June 2008
  • From: Iowa
Posted by Hans von Hammer on Saturday, January 22, 2011 8:09 AM

iraqiwildman

I look forward to following this build.

The M108 looks funny to me after spending 11 years in a M109 unit. It looks like someone broke half the tube off. Such a tiny tube on such a big chassis.

Ditto... I crewed and chiefed  M109A3s and always giggle a bit when I see the '108...  It's like someone lost a bet...

 However...  I could have dealt with the 108's "looks" after the years I did on towed 105s and standing around in the open...   Having a roof and a heater, ya know... Beats hell outta a poncho and bunny-boots...

So, you gonna be using that resin interior set you sniped from me on Ebay a couple years ago, Redleg? Wink

  • Member since
    July 2006
  • From: New Jersey
Posted by redleg12 on Saturday, January 22, 2011 8:31 AM

Hans - You should know....towed artillery truly brings out the artilleryman (who after being outdoor wants to run inside) Hey.....at least on a M109 you did not have to climb to get to the weapon. Try an M110/107, especially in the winter with a little snow and ice. Sad

There is nothing like a towed weapon with the spade in a mud puddle and every time you fire everybody is splashed with mud!! Surprise

As for the interior, That set is for an M109. The interior of an M108 is a bit different, Much smaller breech, trays a different.....lots more room.  No this won't have an interior....but I will do a fire base emplacement for the exterior....just working those detail out.

Rounds Complete!! 

"The Moral High Ground....A Great Place to Emplace Artillery."

  • Member since
    June 2008
  • From: Iowa
Posted by Hans von Hammer on Saturday, January 22, 2011 10:58 AM

Yeah, nothin' like driving spikes through a couple dead men into frozen ground to hold the M101 spades in the middle of a Ft Carson Winter, lol...

(Betcha that last'll  freak out some non-arty types)...Whistling

  • Member since
    July 2006
  • From: New Jersey
Posted by redleg12 on Sunday, January 23, 2011 9:39 PM

This week I moved on to the turret.  In step 7 the gun and mantlet are assembled. The mantlet requires a fair amount of filling as it has a seam down the middle and is very uneven due to sinking. The barrel itself has a seam which requires work. After putty, and Mr. Surfacer I mounted the elbow telescope and here is the view.

Next was the turret itself. The turret on the kit was made to mount the M109 and M108. The mounting for the 105mm gun does not fit correctly and requires a shim at the top side. A small strip of .020 styrene does the trick.

Some minor touch up on the sprue removal points and with the howitzer mounted this is the completed step 7

Steps 8 adds the lifting hooks and bustle racks. The storage bins and a number of tools were left off for ease of painting. Step 9 adds the hatches and I will come back later after painting with a better Ma Duce.

At this point here is the turret

Next up is some detailing, fixing the back door to a split door, replacing some kit blobs for handles and fixing the hollow storage boxes. Time to start warming up the spray booth!!

As always thanks for stopping by. Your comments good or bad are always appreciated.

Rounds Complete!!

"The Moral High Ground....A Great Place to Emplace Artillery."

  • Member since
    May 2003
  • From: Ft. Sill, OK
Posted by beav on Sunday, January 23, 2011 10:26 PM

Wouldn't be able to tell the difference between that one and the one thats on display here!

"First to Fire!"

Steven

  • Member since
    May 2009
  • From: Poland
Posted by Pawel on Monday, January 24, 2011 7:06 AM

Hello!

That gun is lookin' good! Is that "ladder thingy" on top of the turret, on the left side, supposed to represent the cleaning rod?

Good luck with your build, have a nice day

Paweł

All comments and critique welcomed. Thanks for your honest opinions!

www.vietnam.net.pl

  • Member since
    March 2007
  • From: New york
Posted by JEFFB on Monday, January 24, 2011 11:56 AM

Lookin good so far redleg!!!   I can't believe the spg is large, with such a tiny barrel tube.  you've done a great job reviving an older kit

  • Member since
    July 2004
  • From: Texas
Posted by wbill76 on Monday, January 24, 2011 1:07 PM

Lots of putty/elbow grease being put in on this latest round Mike but will look great I'm sure once you get it painted. Yes

Moderator
  • Member since
    April 2006
  • From: my keyboard dreaming of being at the workbench
Posted by Aaron Skinner on Monday, January 24, 2011 1:16 PM

Nice work as always!

Aaron Skinner

Editor

FineScale Modeler

  • Member since
    July 2006
  • From: New Jersey
Posted by redleg12 on Monday, January 24, 2011 7:05 PM

Beav – Thanks, the one “down there” (Fort Sill artillery museum) is an early test version of the M108. Some minor differences like the headlights mounted on the turret and the barrel has no brake…..but generally the same. Thanks again

Pawel – Thanks, as I write this I am having a brain cramp Confused and forget what that item is on the front of the turret. The ramming staffs are on the top of the turret…..when the light comes back on I will get you an answer…..for now thanks

Jeff – Thanks, yep small tube……big butt…..ok, I won’t go there. That was exactly the reason the discontinued the M108 and the 105mm only became a towed weapon used by light divisions. The 155mm M109 gave them more punch and range for almost the same $$$$. Thanks again

Bill – Yep…as I said in the beginning this will be a putty dream. With what I am working on now, I will really be going for the putty…..removing the molded M109 tool boxes on the turret roof which the M108 did not have Bang Head. I will be using the holy trinity of modeling….the Dremel, Putty and Sandpaper……amen Angel.   Thanks again

Aaron – Speaking of heavenly bodies, it is always great to hear from Mt Olympus Bow Down. I deeply appreciate you stopping in. Thank you

Rounds Complete!!

"The Moral High Ground....A Great Place to Emplace Artillery."

  • Member since
    May 2003
  • From: Ft. Sill, OK
Posted by beav on Monday, January 24, 2011 7:20 PM

Redleg, see i wasn't able to tell the difference.

couldn't those rod things be the red white pole things you guys haul everywhere?

"First to Fire!"

Steven

  • Member since
    July 2006
  • From: New Jersey
Posted by redleg12 on Monday, January 24, 2011 7:36 PM

The red and white poles are aiming posts....the items on top are tools and maintenance items.....the aiming posts you need to take out and use at every position. The are usaull in a case and would be stored down below.

Page 26 lists much of the stuff we carry...  http://redleg2scale.com/RBMI%20Info/Artillery%20Modeling.pdf

The picture shows a "candy cane" set

Rounds Complete!!

"The Moral High Ground....A Great Place to Emplace Artillery."

  • Member since
    March 2010
  • From: Buffalo, NY
Posted by macattack80 on Monday, January 24, 2011 7:42 PM

Redleg12, great job so far.  Keep up the good work sir.  Yes

Kevin

[


  • Member since
    July 2006
  • From: New Jersey
Posted by redleg12 on Tuesday, January 25, 2011 5:48 AM

Kevin - Thanks for stopping in and for leaving a comment!!

Rounds Complete!!

"The Moral High Ground....A Great Place to Emplace Artillery."

  • Member since
    May 2009
  • From: Poland
Posted by Pawel on Tuesday, January 25, 2011 6:46 AM

I meant the detail from this picture:

The five rods in front of the hatch, on top of the turret. Wouldn't it be good to replace it, if it's a cleaning rod? Good luck with your build, have a nice day

Paweł

All comments and critique welcomed. Thanks for your honest opinions!

www.vietnam.net.pl

  • Member since
    July 2006
  • From: New Jersey
Posted by redleg12 on Tuesday, January 25, 2011 7:09 PM

This week the surgeon goes to work on the molded on blobs.......I am working on it!!

Rounds Complete!!!

"The Moral High Ground....A Great Place to Emplace Artillery."

JOIN OUR COMMUNITY!

Our community is FREE to join. To participate you must either login or register for an account.

SEARCH FORUMS
FREE NEWSLETTER
By signing up you may also receive reader surveys and occasional special offers. We do not sell, rent or trade our email lists. View our Privacy Policy.