SEARCH FINESCALE.COM

Enter keywords or a search phrase below:

1/72: B-36 delivers a B-58. Anyone else done this?

11829 views
18 replies
1 rating 2 rating 3 rating 4 rating 5 rating
  • Member since
    September 2011
  • From: North Texas
1/72: B-36 delivers a B-58. Anyone else done this?
Posted by lajntx on Tuesday, September 27, 2011 11:25 PM

http://www.youtube.com/watch?v=Pxrwpur_Op8&feature=results_video&playnext=1&list=PL88E97FBC529A2C42

Has anyone attempted or completed this project before? Ive decided I want to abuse myself and take up the task. 

Photos courtesy Don Pyeatt

Thus far I have aquired the B-36 & B-58 kits and am in research mode. Thus far I`ve noticed the following changes to the kits must be done:

B-36:

Delete

Fwd lower radome, nose & tail turrets, bombay doors, both inner props

Replace

APG-32 tail radome with an earlier APG-3 single dome - Part Aquired from: http://www.click2detail.com/

Cut open bombay to replicate a B36F bombay

Stock landing gear with  aftermarket kit for better strength http://www.scaleaircraftconversions.com/moreinfo.cfm?KIT=140

B-58:

Delete - Tail section

Replace - Kit is designed to by build with landing gear down, use pieces as a guide to fabricate landing gear covers

Photos courtesy Don Pyeatt

Today, I reviewed both kits, and temporarily put the fuselages together with painters tape to get a better idea of the size, scale, & scope I will be dealing with for the next 6-9 months

Any tips or pointers from those that have built either of these kits in any configuration would be greatly appriciated. :)

B-36 Peacemaker Builds 

On the Bench: B-36 paint test  fusealge & RB-36E assembly test build

In Que: YB-36 Conversion Build & B-36 carries B-58 Airframe to Wright Patterson

Conceptual Planning: RB-36 X-15 Mothership

  • Member since
    January 2003
  • From: 40 klicks east of the Gateway
Posted by yardbird78 on Tuesday, September 27, 2011 11:38 PM

That will be quite a challenging project.  I have seen several photos of the B-36 - B-58 combination, but never seen the two modeled together.

Darwin, O.F. Alien


 ,,

The B-52 and me, we have grown old, gray and overweight together.

  • Member since
    March 2007
  • From: Carmel, CA
Posted by bondoman on Wednesday, September 28, 2011 12:25 AM

The one major problem with the B-36 kit, IMO fatal, is the way the wings come together. On real thing, the wing top surfaces join together barely.

On the kit there's a really long join. I tried to correct that in the one shot I took at that kit, by grinding plastic on the top of the fuse. It worked out ok, but seen from the side there's a hump.

  • Member since
    December 2002
  • From: Canada / Czech Republic
Posted by upnorth on Wednesday, September 28, 2011 4:04 AM

I remember the B-36 being a bit of a bear in some ways. If I had it to do again, I would deffinitely do something to strengthen the wing/fuselage joints as the brace included in the kit wasn't enough to support the joint in my model.

Being as how you're still in the dry fitting stages, you might want to epoxy a length or two of brass or steel rod across the floor of the wing brace before cementing the fuselage together around it. Alternately, using the brace as a template, you could also cut a block of wood just slightly smaller to fit inside it.

Some people will tell you the kit supplied brace is strong enough on it's own, I'm just letting you know that myself and some other modelers I've known have had contrary experiences with that aspect of the kit.


As for the Italeri B-58; I've not built it myself, but going by several reviews and forum postings I've seen, it seems to be a model people have a "love it" or "hate it" feeling about. Some say it's very nice, others say it's an outright pig.

From the standpoint of your project, I think you might run into a problem fitting the two aircraft together. I've seen a couple of reviews out there that stated the B-58 is a bit short in scale, so you might have some creative fettling to do between them if you're concerned about getting them to look just right together.


Good luck, I'm looking forward to seeing how this project comes out.

  • Member since
    September 2009
  • From: Frisco, TX
Posted by B17Pilot on Wednesday, September 28, 2011 8:59 AM

Looks like an interesting project you're taking on.  Looking forward to seeing the results!


  • Member since
    October 2007
  • From: Scotland
Posted by Milairjunkie on Wednesday, September 28, 2011 9:22 AM

Great idea - I've seen plenty of info on the combo, but it hadn't crossed my mind to model it...

I for one found the Italeri B-58 to be a bit on the nasty side, apart from some pretty bad warping which only some suffer from, the worst bits were ill-fitting cockpit lids & upper wing roots - I couldn't get either anywhere near as good as I wanted. Lucky for you that both these areas will be unseen!

  • Member since
    September 2011
  • From: North Texas
Posted by lajntx on Wednesday, September 28, 2011 5:40 PM
yardbird78 wrote:
That will be quite a challenging project. I have seen several photos of the B-36 - B-58 combination, but never seen the two modeled together.

Darwin, Yes it will be quite a challenging project, I did it because I have never seen anyone else complete it. To be honest with you, I probably wont begin any major building until after the first of the year due to time restraints and such. For now I am in "research mode" and acquiring parts & supplies.

bondoman wrote:

The one major problem with the B-36 kit, IMO fatal, is the way the wings come together. On real thing, the wing top surfaces join together barely. On the kit there's a really long join. I tried to correct that in the one shot I took at that kit, by grinding plastic on the top of the fuse. It worked out ok, but seen from the side there's a hump.


Hi bondoman,  I`m very familiar with the wing issue you pointed out. Alas, there really isn't much any of us can do other than build it "as is" - or - spend hours re-fabricating the fuselage wings. If I had the time and expertise... I`d be off making a nice living in professional model building and not running a pizza shop. LOL! You`re right, those joint lines all across the board are going to be a bear. I've never seen a B-36 build that was able to hide all of them completely to the trained eye.

upnorth wrote:

I remember the B-36 being a bit of a bear in some ways. If I had it to do again, I would deffinitely do something to strengthen the wing/fuselage joints as the brace included in the kit wasn't enough to support the joint in my model. Being as how you're still in the dry fitting stages, you might want to epoxy a length or two of brass or steel rod across the floor of the wing brace before cementing the fuselage together around it. Alternately, using the brace as a template, you could also cut a block of wood just slightly smaller to fit inside it. Some people will tell you the kit supplied brace is strong enough on it's own, I'm just letting you know that myself and some other modelers I've known have had contrary experiences with that aspect of the kit. As for the Italeri B-58; I've not built it myself, but going by several reviews and forum postings I've seen, it seems to be a model people have a "love it" or "hate it" feeling about. Some say it's very nice, others say it's an outright pig. From the standpoint of your project, I think you might run into a problem fitting the two aircraft together. I've seen a couple of reviews out there that stated the B-58 is a bit short in scale, so you might have some creative fettling to do between them if you're concerned about getting them to look just right together. Good luck, I'm looking forward to seeing how this project comes out.

Hi upnorth, and thank you. I`ve seen many posts online concerning the strength of the brace and how it doesn't hold up over time. I was off today and was looking at what as available to use in the local arts & crafts, and hobby shops for things that could be used to add strength to that piece. I havent decided on what to use specifically, but I am looking....

Up to how much weight do you think can safely be added using the aftermarket landing gear from Scale Aircraft Conversions since they will also have to support the weight of two modlels?

http://scaleaircraftconversions.com/moreinfo.cfm?KIT=140

Also, concerning the Italeri B-58 kit... Yes it is a little "short". I`m probably going to have to use some of the nose section to get it to the right lenght...see the reply for Milairjunkie for more comments on this kit and the pics below ;)

B17Pilot wrote:

Looks like an interesting project you're taking on. Looking forward to seeing the results!

Hi B17Pilot, and me too, Want to build it, and I`ll just watch? Just kidding. As I mentioned before, I probably wont be progressing on it much for the rest of the year other than a small item here and there. I`ll keep pics and progress posted on this thread throughout the life of the project.

Milairjunkie wrote:

Great idea - I've seen plenty of info on the combo, but it hadn't crossed my mind to model it... I for one found the Italeri B-58 to be a bit on the nasty side, apart from some pretty bad warping which only some suffer from, the worst bits were ill-fitting cockpit lids & upper wing roots - I couldn't get either anywhere near as good as I wanted. Lucky for you that both these areas will be unseen!

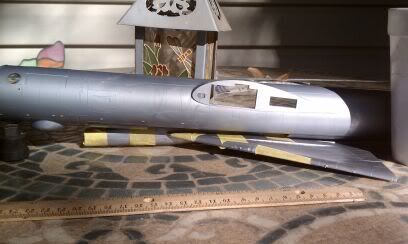
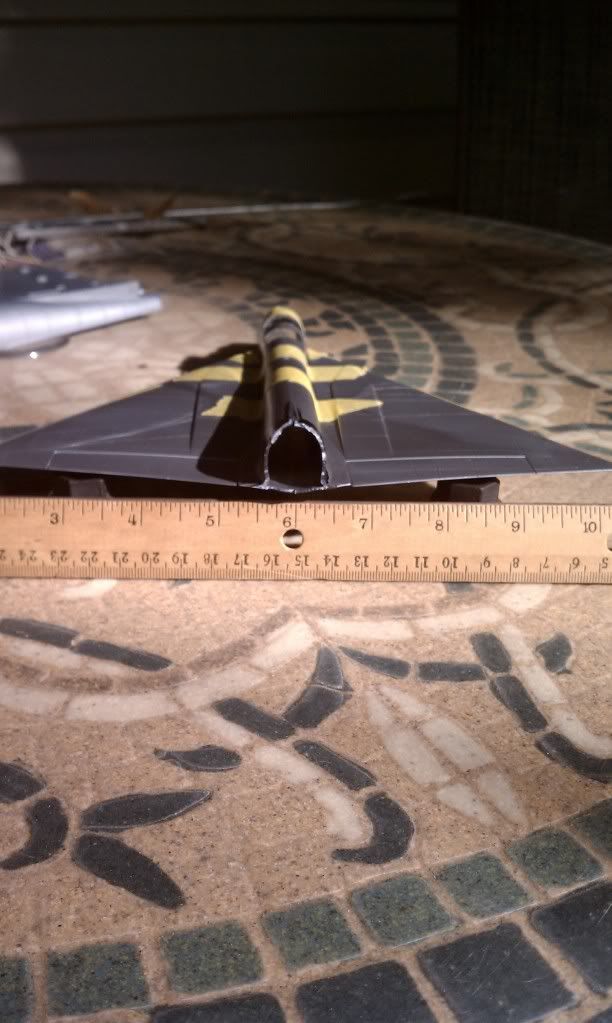
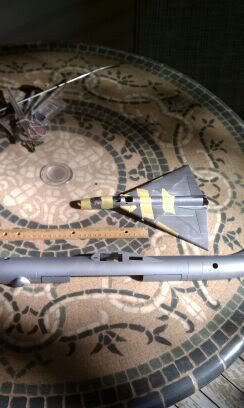
Hi Milairjunkie, I noticed just how hard that top area was going to be just by trying to put it together with tape yesterday, then I realized none of that applied to me. You are going to love this though since you had so many issues.... Today since I had a few hours with nothing to do, I decided to remove the tail section of the Italeri B-58. Out came the trusty hacksaw and away it went. Then I grabbed my X-acto knife and did some mild whittling on the now jagged edge and removed the little spear tips on the wings. I still have areas to remove ( the areas colored black ) to which I`ll do later. Also here are some pics to give an idea on how the 58 will be mated up with the 36

B-58 with tail section removed, areas still needing finshing work are colored black

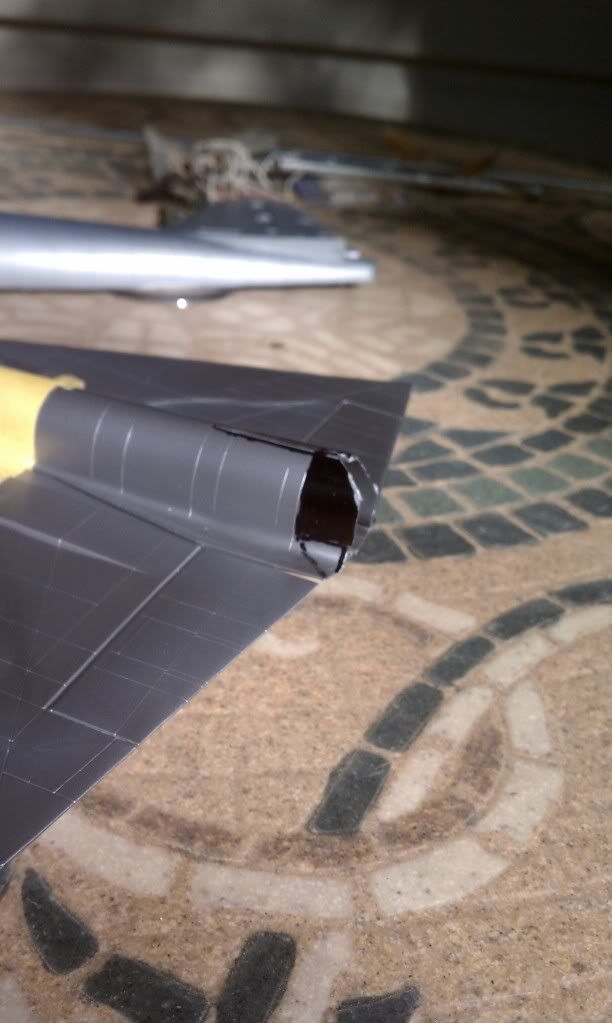
Now to get an idea on how it will mate up. I havent cut out the B-36 bombay fully yet, but the areas to be removed are outlined in black:
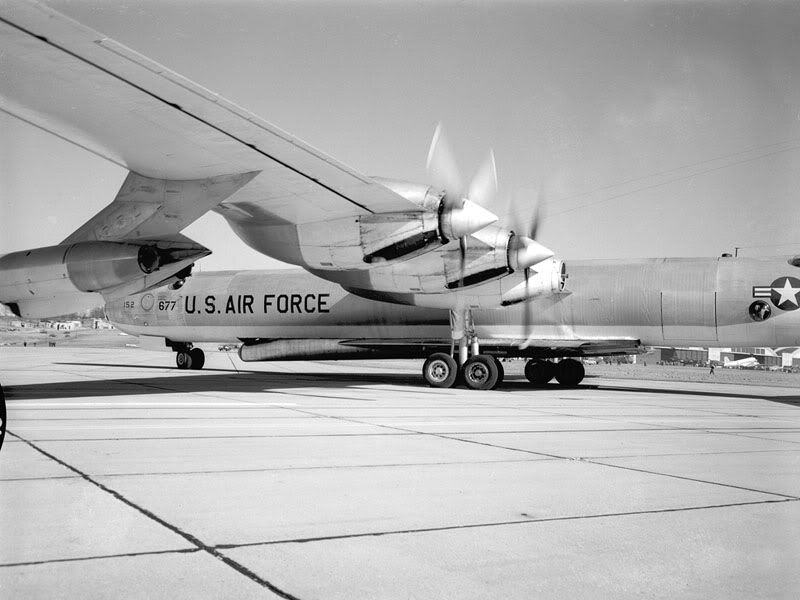
The real thing:

Photo courtesy Don Pyeatt


B-36 Peacemaker Builds 

On the Bench: B-36 paint test  fusealge & RB-36E assembly test build

In Que: YB-36 Conversion Build & B-36 carries B-58 Airframe to Wright Patterson

Conceptual Planning: RB-36 X-15 Mothership

  • Member since
    February 2010
  • From: Maine
Posted by Stage_Left on Wednesday, September 28, 2011 8:24 PM

Most interesting.....looking forward to your progress.

  • Member since
    September 2011
  • From: North Texas
Posted by lajntx on Wednesday, September 28, 2011 10:55 PM

Hi Stage_Left, and thanks. I`ll keep progress updated on here, but just to give you a heads up, most of the major work will not begin until after the first of the year when the holidays are over.

Here is a question for everyone. What would be the best way to fill in the gaps on this build. The stock model has openings for the nose & tail turrets. However this B-36 had neither.

Photos courtesy Don Pyeatt

Nose

tail

Stock model : 1957 meets 1967.

B-36 kit in 1/72, 1966 Ford Mustang GT in 1/67 & 1967 Mustang GT Fastback in 1/67

B-36 Peacemaker Builds 

On the Bench: B-36 paint test  fusealge & RB-36E assembly test build

In Que: YB-36 Conversion Build & B-36 carries B-58 Airframe to Wright Patterson

Conceptual Planning: RB-36 X-15 Mothership

  • Member since
    January 2003
  • From: Washington, DC
Posted by TomZ2 on Wednesday, September 28, 2011 11:28 PM

Popular Science Article - June 1957

Fastest Bomber gets a ride from the world's biggest.
The supersonic B-58 Hustler takes the air here under the belly of a B-36 in a remarkable transport operation.  Minus its four jet engines and other equipment the delta-winged Hustler was partly tucked into the B-36 bomb bay and flown and flown nonstop from Fort Worth, Texas to Wright-Patterson Air Force Base in Dayton, Ohio for extensive tests of air frame strength under extreme temperatures.  To make room for the load, inboard propellers were removed and it flew unable to retract landing gear on four piston and four jet engines.  Both Convairs, the B-58 has a 55 foot wingspan, the B-36, 230 feet.

Occasional factual, grammatical, or spelling variations are inherent to this thesis and should not be considered as defects, as they enhance the individuality and character of this document.

  • Member since
    September 2011
  • From: North Texas
Posted by lajntx on Wednesday, September 28, 2011 11:42 PM

Photo courtesy Don Pyeatt


From B-58.com  :

http://67.189.28.191/b-58/history_operations.cfm

One engineless B-58 airframe (never assigned a serial number but built between 55-663 and 55-664) was allocated to long-term fatigue testing. The airframe was delivered to the Wright Development Center Structures Test Laboratory at Wright-Patterson AFB in Ohio by adapting B-36F 49-2677 as a transport, carrying the airframe underneath its fuselage in much the same manner as had been intended in the original parasite program. In order to do this, the B-36's inboard propellers had to be removed and a temporary shackle system was attached to the bomb hoist mechanism. The ground clearance for the suspended B-58 airframe was only 22 inches. This delivery took place on March 12, 1957. After delivery, four engines were added to the airframe to make the fatigue tests more realistic. The photographs released of the B-36/B-58 airframe combination were misunderstood by some who imagined that the B-36 actually launched the B-58 in mid-air!

B-36 Peacemaker Builds 

On the Bench: B-36 paint test  fusealge & RB-36E assembly test build

In Que: YB-36 Conversion Build & B-36 carries B-58 Airframe to Wright Patterson

Conceptual Planning: RB-36 X-15 Mothership

  • Member since
    December 2002
  • From: Canada / Czech Republic
Posted by upnorth on Thursday, September 29, 2011 1:19 PM

Re:Your question about nose weight and the SAC metal landing gear set.

I've never used a SAC landing gear set so I can't speak for it's strength. However, I do recall the actual kit landing gear as being pretty robust as they were from the box.

I don't recall how much nose weight I put in my B-36 when I built it, but considering that most of the B-58 seems to be ahead of the main landing gear, I doubt you'd need any more weight than if you just built it as a straight B-36.

  • Member since
    September 2011
  • From: North Texas
Posted by lajntx on Thursday, September 29, 2011 6:30 PM

Hi upnorth,

I`m thinking I might leave the hole in the aft fuselage open just in case I need to use that clear prop provided. The one issue with this build is that in required the removal of the forward lower radome which is generally used to place counter weights when building this model. One work around I am thinking about is to attach a washer to the backside of the fwd bulkhead of the pressurised cabin

B-36 Peacemaker Builds 

On the Bench: B-36 paint test  fusealge & RB-36E assembly test build

In Que: YB-36 Conversion Build & B-36 carries B-58 Airframe to Wright Patterson

Conceptual Planning: RB-36 X-15 Mothership

  • Member since
    March 2005
  • From: Lancaster, South Carolina
Posted by Devil Dawg on Thursday, September 29, 2011 7:07 PM

Wow! Too bad the engines weren't left on the B-58. They could've lit 'em up while in the air, and seen how fast a B-36 could REALLY fly!!

That is definitely gonna be a one-of-a-kind project! Good Luck with it! Bow Down  Yes  Beer


Devil Dawg

On The Bench: Tamiya 1/32nd Mitsubishi A6M5 Model 52 Zeke For Japanese Group Build

Build one at a time? Hah! That'll be the day!!

  • Member since
    September 2011
  • From: North Texas
Posted by lajntx on Friday, September 30, 2011 11:00 PM

Devil Dawg

Wow! Too bad the engines weren't left on the B-58. They could've lit 'em up while in the air, and seen how fast a B-36 could REALLY fly!!

That is definitely gonna be a one-of-a-kind project! Good Luck with it! Bow Down  Yes  Beer


Hi Devil Dawg... you mean you didnt see the video where they actually did? LOL

http://www.youtube.com/watch?v=OqOT-wEUDL8

Yes it is an interesting project . I must say, there is a lot of work.... just to get started. lol

Anyways, due to tonights baseball playoff rainout I was able to start the next step and begin the process of modifying the bomb bay... pics to soon follow.......

B-36 Peacemaker Builds 

On the Bench: B-36 paint test  fusealge & RB-36E assembly test build

In Que: YB-36 Conversion Build & B-36 carries B-58 Airframe to Wright Patterson

Conceptual Planning: RB-36 X-15 Mothership

  • Member since
    September 2011
  • From: North Texas
Posted by lajntx on Saturday, October 1, 2011 12:28 AM

With tonight`s rainout, I made use of the time by pushing forward with the project. Yesturday I killed an hour by doing more extracting on the B-58 tail with a X-acto knife.....

Next time I get some free time, I`ll use the Dremel to finish out those edges so I will be ready to begin contruction of the B-58, and construct some "filler" for the hole in the aft fuselage.

Moving on to the main event : ............. The first thing to do is to elongate the bombay to resemble a late model B-36 which can be seen begining at 1:09 in this video for those not aware of how they look. The B-36 for this build had the piece of under carriage between the front and aft bombays removed in order to load the B-58. In the stock build of the model, it would have been located where the stock bombay is, thus its an already deleted detail not needing to be addressed in this build. For those that are building a bomber version with this late style door, simply save the removed pieces to reconstruct that detail.

http://www.youtube.com/watch?v=ePwEPVgZpEA&feature=related

The surgery table is ready.....

Items... metal ruler to use as a guide for cutting, a rectangular object to attach to the fuselage half to brace the metal ruler ( I used an empty jewlers necklace case ). electrical tape, X-acto knife ( or other fine cutting device ), and some Play-Doh --- Yes, Play-Doh!... You can buy this in single cans for around $1 a can at Walmart, Target, Toys-R-Us. etc

Step 1:

Attach rectangular brace to the fuselage with eclectrical tape through the stock bomb bay opening half so it will support the metal ruler. Hint: Its best to take the rectangle brace, ruler, and fuselge and manipulate it by hand first to see what area taping down the regtangular brace would work best for you.


Step 2:

Insert Play-Doh into fuselage in areas to be cut. This allows for support while you cut, and a filler material that is easy to remove and will not damage you cutting utinsil once you "cut through". Also, attach your ruler to the rectangular brace with electrical tape through the stock bomb bay. Ensure you are attaching it so the ruler is "flush" with the stock bomb bay opening

Step 3:

Tape the ruler at the top & bottom so it is positioned this will be a guide on where you will want to cut.

Step 4:

Using the lines on the fuselage as a guide, do the 2 cuts at the top and bottom ( as you see them in the picture above. Its best to do those first so when you do the long cuts, the piece will remove easier. Once those cuts are made, move on to the long cuts. First using the metal ruler as a guide, do a light "scoring cut" as a guide. Carefully cut through on both ends. DO NOT EXERT ANY FORCE. This is where using the Play-Doh will save you from snapping the thing in two. Make light cuts, it will take what seems like forever, but it will save you from making "the big mistake" and ending this project before if begins.

Step 5:

Remove ruler, rantangular box, and play-doh. Use cutting tool to make any necessary triming, and a dremel to sand the fresh cut as needed.

Step 6:

Remove the lower Radome just aft of the cabin area. Fill cabin area all the way back to where you cut out your new bomb-bay with play-doh. this will add support and prevent you from breaking any of the fine support pins used to hold the completed *** pit area in. Using your X-acto knife ( or other cutting tool ) making a "scoring cut". Use a sharp jagged blade or small hack-saw to remove the radome. Use your X-acto to whittle down the small area left to make it flush with the fuselage.  Sand as needed

Step 7:

Repeat process with other half of fuselage

Stock fuselage on top, modified on bottom

B-36 Peacemaker Builds 

On the Bench: B-36 paint test  fusealge & RB-36E assembly test build

In Que: YB-36 Conversion Build & B-36 carries B-58 Airframe to Wright Patterson

Conceptual Planning: RB-36 X-15 Mothership

  • Member since
    September 2011
  • From: North Texas
Posted by lajntx on Saturday, October 1, 2011 10:38 PM

Here are some updated pics from todays work.

Bombay cut out complete, lower radome removed.....

Testing the fit of the B-58 Hitchhiker


B-36 Peacemaker Builds 

On the Bench: B-36 paint test  fusealge & RB-36E assembly test build

In Que: YB-36 Conversion Build & B-36 carries B-58 Airframe to Wright Patterson

Conceptual Planning: RB-36 X-15 Mothership

  • Member since
    September 2011
  • From: North Texas
Posted by lajntx on Wednesday, October 5, 2011 8:52 PM

First mistake corrected.

The last few days I learned that I had made a mistake and did not cut open the bomb bay long enough, and had to go back and correct it.

Notice on the picture of the actual plane just before unloading at Wright Patterson AFB. Notice how the nose plug of the B-58 is almost touching where the patch of the removed Radome on the B-36`s lower fuselage

Photo courtesy Don Pyeatt

Model build, almost same angle:

Notice that is there too much space between the removed radome hole and where the bombay begins

In order to find the correct placement of the bomb bay I used B-36 in action by Meyers K. Jacobsen & Ray Wagner, illustrated by Don Greer. Published by Squadron/Signal Publications, Aircraft #42. Carrollton , Texas, 1980, ISBN 0-89747-101-6. This book is no longer in publication, and I got mine from ebay for about $10.

Notice from the illustrations from the book that the bombay is located just aft of the lower radome:

With the placement confirmed, it was time to make the correction:

By taking off more the lower fuselage, this now requires making changes to the B-58 by using the nose cone provided to add the additional lenght needed.

B-36 Fuselage now corrected. Doesnt leave much room between the bombay and radome hole opening


B-36 Peacemaker Builds 

On the Bench: B-36 paint test  fusealge & RB-36E assembly test build

In Que: YB-36 Conversion Build & B-36 carries B-58 Airframe to Wright Patterson

Conceptual Planning: RB-36 X-15 Mothership

  • Member since
    September 2011
  • From: North Texas
Posted by lajntx on Wednesday, October 5, 2011 10:30 PM

upnorth

I remember the B-36 being a bit of a bear in some ways. If I had it to do again, I would deffinitely do something to strengthen the wing/fuselage joints as the brace included in the kit wasn't enough to support the joint in my model.

Being as how you're still in the dry fitting stages, you might want to epoxy a length or two of brass or steel rod across the floor of the wing brace before cementing the fuselage together around it. Alternately, using the brace as a template, you could also cut a block of wood just slightly smaller to fit inside it.

Some people will tell you the kit supplied brace is strong enough on it's own, I'm just letting you know that myself and some other modelers I've known have had contrary experiences with that aspect of the kit.

You can check that one off the list. In order to keep the additional weight to a bare minumum, I  used #2 pencils as the brace rods.

B-36 Peacemaker Builds 

On the Bench: B-36 paint test  fusealge & RB-36E assembly test build

In Que: YB-36 Conversion Build & B-36 carries B-58 Airframe to Wright Patterson

Conceptual Planning: RB-36 X-15 Mothership

JOIN OUR COMMUNITY!

Our community is FREE to join. To participate you must either login or register for an account.

SEARCH FORUMS
FREE NEWSLETTER
By signing up you may also receive reader surveys and occasional special offers. We do not sell, rent or trade our email lists. View our Privacy Policy.