SEARCH FINESCALE.COM

Enter keywords or a search phrase below:

The Bullion Express--Boot Hill Express (Reboot 10-4-22)

80866 views
919 replies
1 rating 2 rating 3 rating 4 rating 5 rating
  • Member since
    August 2021
Posted by goldhammer88 on Monday, November 15, 2021 11:30 AM

Nice work.

Question....you mentioned the foil backing on the stones.  How is that going to affect the light transmission through them?

Might look at a dab of either clear epoxy or one of the canopy glues, just in case the CA fogs the stones, unless your tests show it won't.

  • Member since
    July 2014
  • From: Franklin Wi
Posted by Bakster on Monday, November 15, 2021 11:20 AM

All the wheels are attached. Last night I started aligning the engine and rear wheel assembly. I must have spent an hour trying to find the best angles to work with. You can see in the image that the engine and driveshaft go at an angle. This is how the kit was designed, but their design is ca-ca. Angling the differential/drive shaft causes the lantern mounts to dip. This then will make the lanterns angle downward. I will need to fix that.

Speaking of lanterns.

I drilled a hole through the face of the lantern making a path for light to shine through. I also countersunk the opening. On the face of the lantern, I will mount a colored lens. More on that later.

On the backside an opening was made for the LED, the light facing towards the face of the lantern. I'll be using a chip LED. 

On the bottom I cut a trench for wiring, and from that trench a hole is drilled upwards to where the LED will rest.

Using rhinestones that I purchased from Michaels, I fashion the lenses. I don't want them faceted though. These come with a sticky back but it is not strong enough to hold them as I work. I used a small amount of CA to secure the stone, and when done, I can detach it. Because of the foil backing, there is no damage to the backside of the stone.

I round the facets with a sanding stick, turning the piece into a dome. I then follow up with a polishing stick, ending the process by brushing Future to smooth and bring out a high gloss. 

I was initially leaning towards using green but because my plans are to use a lot of green on this build, I thought red will give it some contrast and pop. In terms of tail lights, this carriage is before the advent of cars and brake lights, so that does not play into it all. I could do clear, but again, red will pop. Kind of waffling. I suppose one could look at it as Nemo is setting the standard for future vehicles and everything that comes later follows his design. Wink

That is all for today.

  • Member since
    July 2014
  • From: Franklin Wi
Posted by Bakster on Sunday, November 14, 2021 8:49 PM

steve5

great work steve , looking forward to seeing more progress . that's what modeling should be , fun .


Thanks Steve. And yes, modeling SHOULD be fun.

Today I have the rear wheels mounted as well and I began work on the rear lanterns. I should have some pics in the next few days. 

  • Member since
    July 2014
  • From: Franklin Wi
Posted by Bakster on Sunday, November 14, 2021 8:43 PM

CapnMac82


Bakster
I will be lighting the rear lanterns, so I need to run wiring before closing up the huge voids that the manufacturer left for us to lament over.


Axle void got me to thinking about underbody lighting along the axle.

Which then shifted to just under-body lighting.  And just fillign the axle in.

The tape strip LED color emit based on voltage, as memory serves--so a person might be able to give a nice radio-isotope glow to the rig, were a person of a mind to do so.

Not a bad idea. I will give it some thought.

  • Member since
    November 2005
  • From: Formerly Bryan, now Arlington, Texas
Posted by CapnMac82 on Sunday, November 14, 2021 5:56 PM

Bakster
I will be lighting the rear lanterns, so I need to run wiring before closing up the huge voids that the manufacturer left for us to lament over.

Axle void got me to thinking about underbody lighting along the axle.

Which then shifted to just under-body lighting.  And just fillign the axle in.

The tape strip LED color emit based on voltage, as memory serves--so a person might be able to give a nice radio-isotope glow to the rig, were a person of a mind to do so.

Or not.

I probably ought not spend so much time fiddling with its of LED tap and watch batteries and coppor foil tape (other than they are just sitting on my desk askign to be fiddled with).  So many distraction, so little time . . .

  • Member since
    July 2013
Posted by steve5 on Saturday, November 13, 2021 8:11 PM

great work steve , looking forward to seeing more progress . that's what modeling should be , fun .


  • Member since
    July 2014
  • From: Franklin Wi
Posted by Bakster on Saturday, November 13, 2021 7:48 PM

Dodgy

Oh so cool. This is going to look awesome.


Thanks Dodgy. It's starting to get fun again.

  • Member since
    July 2014
  • From: Franklin Wi
Posted by Bakster on Saturday, November 13, 2021 7:46 PM

goldhammer88

Those look fantastic.  But you're right about painting them attached, going to be a little bit of a challenge.

But you'll get it done.


Thanks GH!

Yeah some careful masking should carry me through on the paint.

It sure feels good to be assembling again. 

  • Member since
    August 2021
Posted by goldhammer88 on Saturday, November 13, 2021 6:23 PM

Those look fantastic.  But you're right about painting them attached, going to be a little bit of a challenge.

But you'll get it done.

  • Member since
    August 2020
  • From: Lakes Entrance, Victoria, Australia.
Posted by Dodgy on Saturday, November 13, 2021 3:36 PM

Oh so cool. This is going to look awesome.

I long to live in a world where chickens can cross the road without having their motives questioned

  • Member since
    July 2014
  • From: Franklin Wi
Posted by Bakster on Saturday, November 13, 2021 3:20 PM

Two wheels are on and I used 5 minute epoxy to secure them. I am happy with the look. 

Circling back to before the wheel saga, I had decided to shorten, narrow, and align the wheelbase. That has been done, accomplished by some cutting here and some cutting there. The kit, as it comes, has the wheels in an odd configuration, no doubt to create a coolness factor appealing to kids. For my project, not so much.

In the photo, the rear axile is not yet secured, and it is just for reference. I guess the next thing on the list is to start dealing with that assembly. I will be lighting the rear lanterns, so I need to run wiring before closing up the huge voids that the manufacturer left for us to lament over.

That is it for today.

  • Member since
    July 2014
  • From: Franklin Wi
Posted by Bakster on Saturday, November 13, 2021 12:12 PM

Dodgy
So now when I want something molded, I'll just hop on the PM and "Bako, old mate, I was wondering if you could give me a hand......."

Hey, if you do need something, please let me know. If it seems feasable to me, I am happy to help. I mean that.

And thanks for the kind words.

Btw. Though I finished one casting project, I am experimenting with another. If it works, it will be a cool thing. More on that in the weeks to come. 

For now, I am working on attaching the wheels to the frame. I should probably paint the wheels first, but after all this time of researching, I am dying to assemble something. I am throwing caution and reason to the wind so I can scratch that itch. I may live to regret it but sometimes you just have to scratch. Stick out tongue


  • Member since
    August 2020
  • From: Lakes Entrance, Victoria, Australia.
Posted by Dodgy on Saturday, November 13, 2021 2:53 AM

Well Bako old mate, I too have learnt something from this. Don't mess around with making molds, it's way too complex for a simple bloke like me. You however are a star! Well done mate, I love your determination and I have no doubt that your skills have increased significantly! So now when I want something molded, I'll just hop on the PM and "Bako, old mate, I was wondering if you could give me a hand......." Just joking. Top result fella. 

I long to live in a world where chickens can cross the road without having their motives questioned

  • Member since
    July 2014
  • From: Franklin Wi
Posted by Bakster on Thursday, November 11, 2021 7:50 AM

Gamera

Yeah it's a matter of learning new techniques. Thanks for writing this up Bakster- I'm learning with each post!!! 


You are welcome, Cliff! 

  • Member since
    November 2009
  • From: SW Virginia
Posted by Gamera on Wednesday, November 10, 2021 4:56 PM

Yeah it's a matter of learning new techniques. Thanks for writing this up Bakster- I'm learning with each post!!! 

"I dream in fire but work in clay." -Arthur Machen


  • Member since
    July 2014
  • From: Franklin Wi
Posted by Bakster on Wednesday, November 10, 2021 2:57 PM

steve5

I was like TB , then l thought of all the new techniques Steve has learnt , well do e mate , as l said in an earlier post , your a tenacious son of a gun mate . Big Smile


Thanks Steve O.

  • Member since
    July 2013
Posted by steve5 on Wednesday, November 10, 2021 1:28 PM

I was like TB , then l thought of all the new techniques Steve has learnt , well do e mate , as l said in an earlier post , your a tenacious son of a gun mate . Big Smile


  • Member since
    July 2014
  • From: Franklin Wi
Posted by Bakster on Wednesday, November 10, 2021 12:26 PM

mustang1989

The imagination that's going into this build is mind blowing and I like all the gadgets and techniques that you're using along the way.


Thank you, Joe. 

  • Member since
    March 2012
  • From: Corpus Christi, Tx
Posted by mustang1989 on Wednesday, November 10, 2021 11:27 AM

The imagination that's going into this build is mind blowing and I like all the gadgets and techniques that you're using along the way.


 Forum | Modelers Social Club Forum (proboards.com) 

  • Member since
    July 2014
  • From: Franklin Wi
Posted by Bakster on Wednesday, November 10, 2021 9:29 AM

Tanker-Builder
I NEVER would have gone to this amount of trouble. I would've gone to ACE hardware in the next town and Bought something I could use.

Hey TB--I want what I want-- and what I want won't be found in a hardware store, not even close. If it were, I surely would have gone there. Truly, if I wanted to settle on this, I could have used the big ugly greenies that I ordered. I don't like settling, and I came out of this journey a much better modeler. That is always my goal. Maybe you are a more advanced modeler, I am still learning.

  • Member since
    October 2019
  • From: New Braunfels, Texas
Posted by Tanker-Builder on Wednesday, November 10, 2021 7:22 AM

Well!

   I have to give it to you. I NEVER would have gone to this amount of trouble. I would've gone to ACE hardware in the next town and Bought something I could use.

  • Member since
    July 2014
  • From: Franklin Wi
Posted by Bakster on Tuesday, November 9, 2021 10:33 PM

Part 2, The Extended Version, Casting My Wheels

Well, hopefully, after this post you won't have to see more from me regarding casting.

Below: The master is set onto Sculpey Clay, the pour spout and vent mounted, undercuts filled prior. The worst part of the whole process is:

1. Kneading the clay to a soft and pliable state. The stuff stiffens as it sits. It's a major workout making my hands strong. Now, I can crush rocks with a simple squeeze. Wink

2. Making these undercuts are a PITA. It is time consuming business.

I should mention that I used hot glue to mount the vent and the pour spout. Previously, I used CA, and I found that the silicone remained tacky in the areas where I used CA. I suspect the CA hindered the cure. The hot glue worked perfectly. 
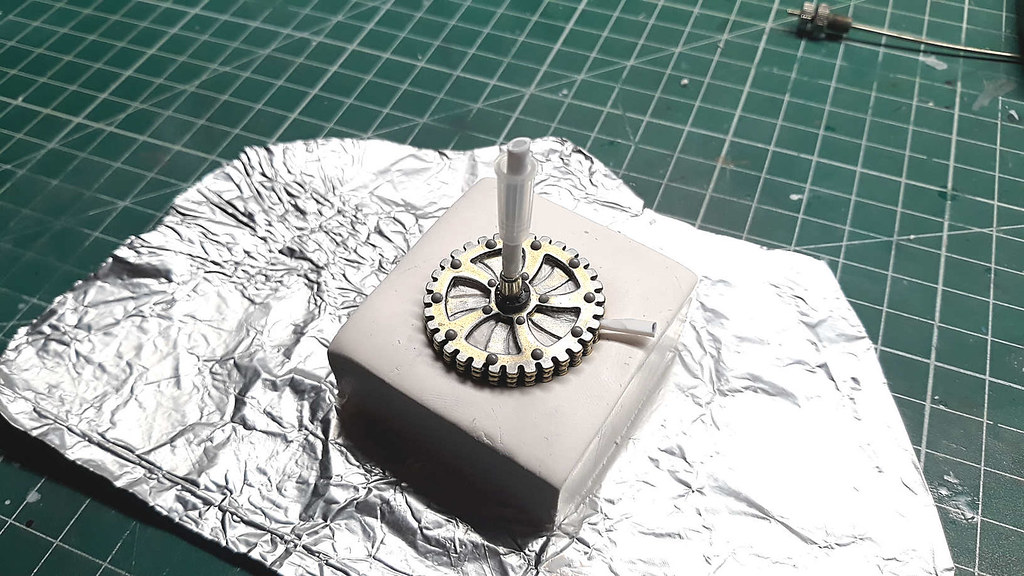
Below: The walls are made from foam board. A trick I learned from YouTube is to not score the foam all the way through. It works great to score the paper on the outer side, then bend the foam to make the corner. The advantage of this is that the inner paper layer remains intact, and this keeps silicone from leaking out. In short, you don't have to hot glue those corners. In the end, you need to seal only one corner.
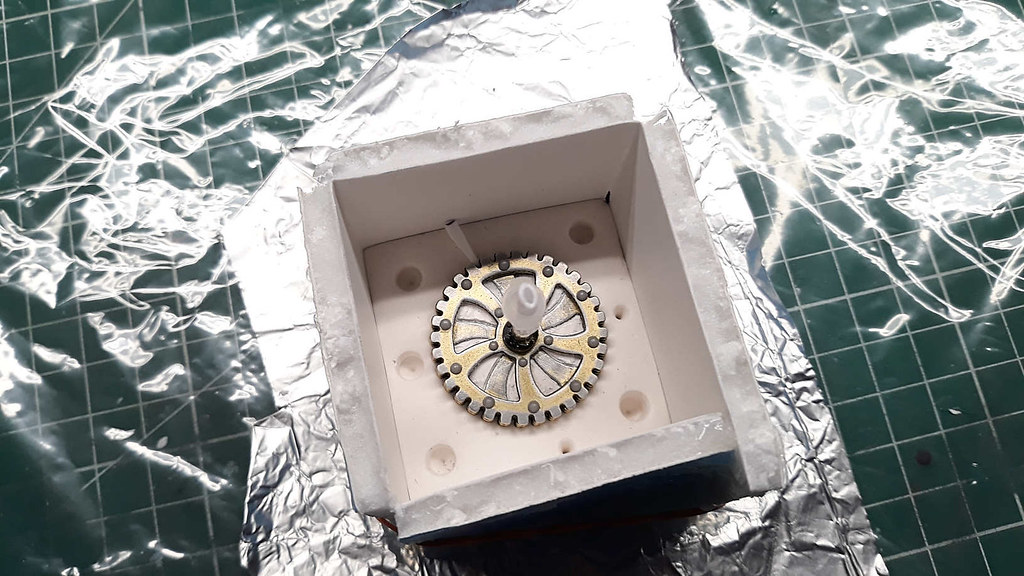
 Below: Side 1 of the mold is poured.

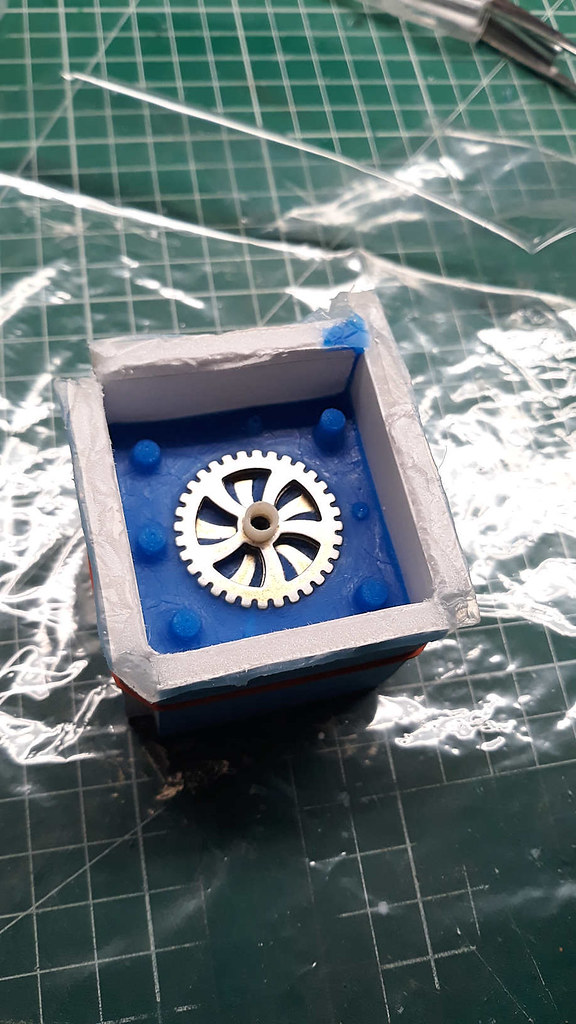
Below: The mold is flipped, the clay base is removed, and including removal of the undercuts. This step is a pita too because the clay is crumbly, and it takes time to clean it all out. Then a thin layer of vaseline is applied to all areas silicone.
Below: Sammie CAT at the Vet for checkup. Turns out he has thyroid issues. Nothing too serious, YET.
 

 I learned some things with regarding the PBJ method, and using the low viscosity resin:

1. It is best to make the syringe spout on the deeper side of the mold. You can fill that side of the mold with the mold facing up, as shown. Notice the syringe is attached from below. I press the plunger filling the mold from below. This forces any air to the surface that may have been in the spout, and it gets vented before closing the mold. I then pour a small amount from the mixing cup into the other mold. I then flip that mold onto the deeper side. You lose less material doing it this way. I also find that there are less issues with air pockets this way because the deeper side is full, and nothing is lost in the flipping process. I learned this the hard way.

Then you band the mold, and I inject more resin into the mold until the resin comes out of the vent. Then it's ready for the PP. I have three minutes to do all this, from mixing all the way to clamping and pressurizing the pot. It's quite the race, and there is no room for error.

2. Whatever you do, do not remove and reinsert the syringe and inject more resin into the mold after it is closed. You will be forcing air into the mold. There will always be an air pocket ahead of that syringe and you'll force that air into the cast. I also learned this the hard way.
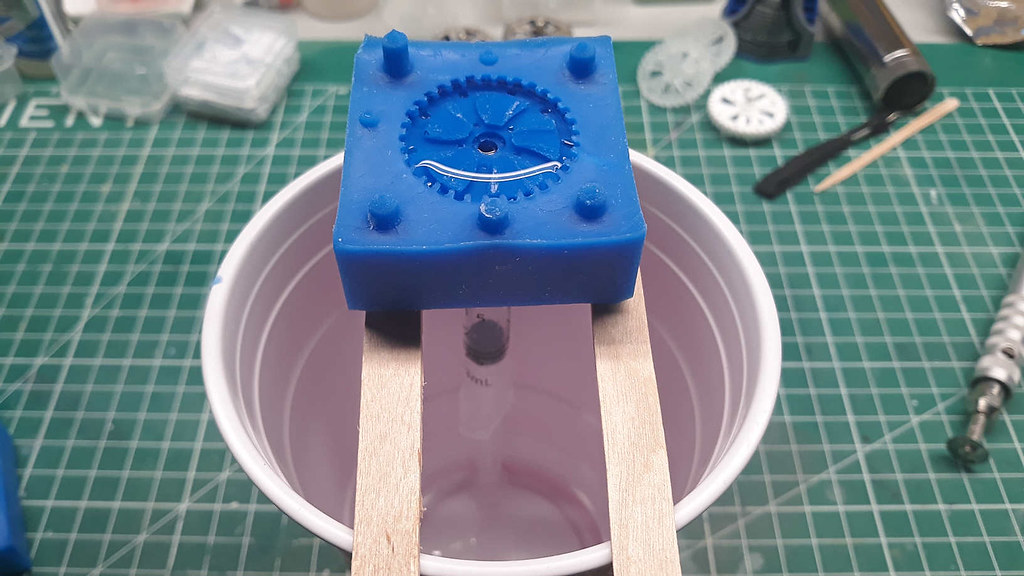
Below: The mold is split open.
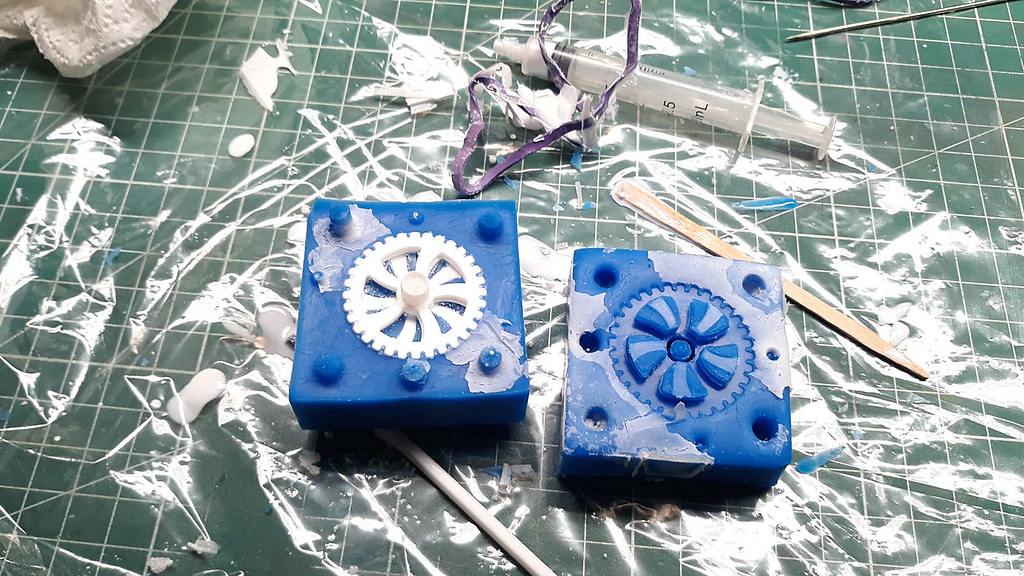
Below: And done.

Finally--I can move on!  Jeez. 

  • Member since
    July 2014
  • From: Franklin Wi
Posted by Bakster on Sunday, November 7, 2021 8:30 PM

Speaking of wheels, I think it was Capn that mentioned 3d printing. There are a few videos out there on making 3D wheels, but I happened to watch this one. It shows the potential of this technology. It could have made quick work of wheels, if I had the equipment, and the knowledge to make it happen. Maybe someday and it when it gets easier.


I should have an update this week on the other casts.


  • Member since
    August 2020
  • From: Lakes Entrance, Victoria, Australia.
Posted by Dodgy on Wednesday, November 3, 2021 4:15 AM

Keep shakin mate cos we're a watchin........... No pressure mind youBig SmileBig SmileWhistling

I long to live in a world where chickens can cross the road without having their motives questioned

  • Member since
    July 2014
  • From: Franklin Wi
Posted by Bakster on Tuesday, November 2, 2021 11:47 AM

Gamera
Bakster: Please get a move on - I don't want to see you vaporized!!! I like the wheels, looks like she's coming along well for me. 

I'm shakin the tree boss. I'm shakin it. Wink

Progress goes fast when you know what to do. The mold is in process. The first half of the mold was poured last night. Sadly, it looks like I need to order more silicone. I used up too much with all the redos! 

Update. Oh and making the pressure pot gasket didn't help. That sucked up a bunch.

  • Member since
    November 2009
  • From: SW Virginia
Posted by Gamera on Monday, November 1, 2021 9:07 PM

CapnMac82


Gamera
I was going with BAA-KOO since it sounds like Baka which is Japanese for silly or foolish person!


In Nihongo romanji "baka" ( バカ ) is "bah KAH" although sometimes used as a BAh KAh, with equal emphasis on the leading part of both syllables.

There is a reflex with native English speakers to render it as BAHK ah, and that is not quite right, a bit like rendering "thorough" as "thor ohw" instead of "thur oh."


Thanks Captain! I took a few courses in Japanese but I kinda sucked at it... Dunce


Bakster: Please get a move on - I don't want to see you vaporized!!! I like the wheels, looks like she's coming along well for me. 

"I dream in fire but work in clay." -Arthur Machen


  • Member since
    July 2013
Posted by steve5 on Sunday, October 31, 2021 7:12 PM

That doesn't sound pleasant , better get a move on Big Smile


  • Member since
    July 2014
  • From: Franklin Wi
Posted by Bakster on Sunday, October 31, 2021 6:09 PM

I

steve5

Powering along Steve. 


I am on a mission to get past this wheel business. Nemo is threatening to particle beam me if I dont get moving on this. 

  • Member since
    July 2014
  • From: Franklin Wi
Posted by Bakster on Sunday, October 31, 2021 6:04 PM

goldhammer88

I like it... directional wheels.  Here's hoping the tread teeth are directional too.EmbarrassedBig Smile


Oh no. Pretty sure the teeth are all weather, no direction...Wink 

  • Member since
    August 2021
Posted by goldhammer88 on Sunday, October 31, 2021 4:10 PM

I like it... directional wheels.  Here's hoping the tread teeth are directional too.EmbarrassedBig Smile

JOIN OUR COMMUNITY!

Our community is FREE to join. To participate you must either login or register for an account.

SEARCH FORUMS
FREE NEWSLETTER
By signing up you may also receive reader surveys and occasional special offers. We do not sell, rent or trade our email lists. View our Privacy Policy.