SEARCH FINESCALE.COM

Enter keywords or a search phrase below:

Tamiya 1:48 Pacific P-51D Mustang (Complete)

28122 views
69 replies
1 rating 2 rating 3 rating 4 rating 5 rating
  • Member since
    June 2013
Tamiya 1:48 Pacific P-51D Mustang (Complete)
Posted by bvallot on Friday, July 26, 2013 11:42 PM

I'm putting my Phantom on the side for one more build while I try to learn a few more tricks about this Alclad. I had originally picked Hasegawa's Mustang for this build since they offer Harry Crim's P-51 but truthfully I think Tamiya's kit provides a more accurate and nicer build.  Not to steal the show from Hasegawa...they certainly tend to pour in more detail in areas of the cockpit and any other special interest area of whatever aircraft you're comparing it to.  It seems Tamiya leaves the door open for these aftermarket middle-men to support their kits.  I'm sure the big whigs at Tamiya find it cost effective as well. =]

So I ended up just buying both to compare the two.  Mostly because I think Hasegawa's Decal sheet of the nude pin-ups are a little better than Superscales'.  The lettering and donkey are also better.  So I'm pulling the decal sheet from here to use on the Tamiya Mustang. =D

I'm dropping Aires' cockpit in here as well.  It's just too beautiful not to I think sometimes.  Also, I feel kind of hurried to complete this build because it won't be long till i'm too busy with work to do any of this.  

I started this build by placing the rivets into the surface.  I am hoping to get the surface to warp slightly around all these dots so that it resembles something akin to light bending around the metallic surface of the these aircraft.  I want for it to be large enough visually to make an impact.  I had a happy accident along the way where as I was smoothing the tops of all these dots they did exactly what I was looking for before I actually meant to do it.  My only concern here is after my primer...will it last?  Here's what I've come up with.
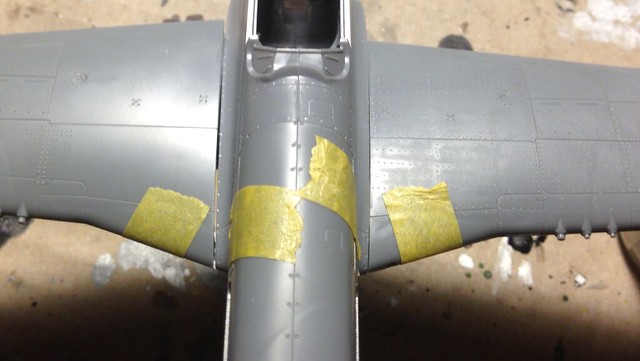

2013-07-26 16.46.47 by brittvallot, on Flickr
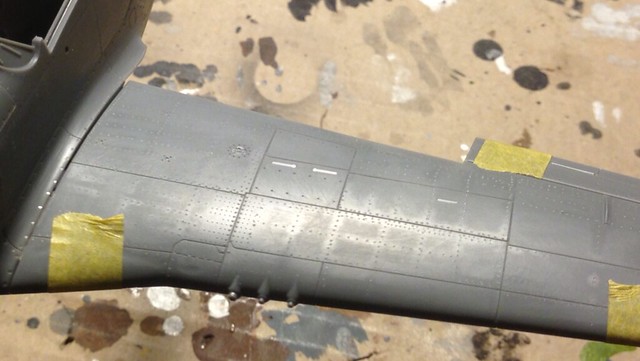

2013-07-26 16.46.32 by brittvallot, on Flickr
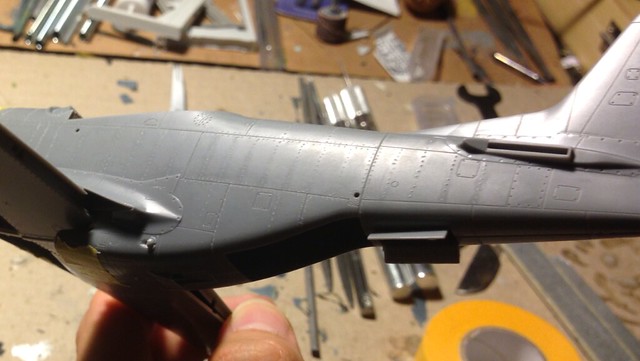

2013-07-26 16.46.20 by brittvallot, on Flickr

Here is the cockpit.

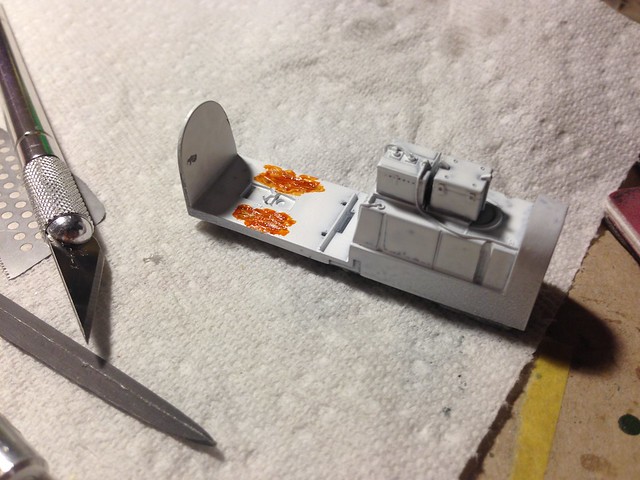
I've somewhat haphazardly ground into the floor with my rotor tool's sander.  I'm trying to create a wood grain texture from the plywood floor.  The Erection and Maintenance Manual called for silica sand mixed with matte black paint to be put down as a skid surface, but these would eventually wear out like everything else.  I personally wanted to see some of the wooden characteristics of the cockpit and opted to include it.  I painted it a Tamiya Clear Orange which i find works real well as a wood color.  The deeper crevices will appear darker.  I'll come back over this with a flat khaki to lighten it up some afterwards.
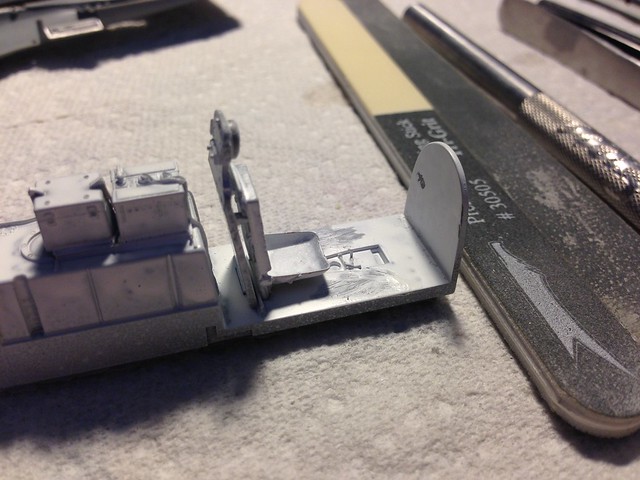

2013-07-25 12.53.18 by brittvallot, on Flickr

2013-07-25 23.03.43 by brittvallot, on Flickr
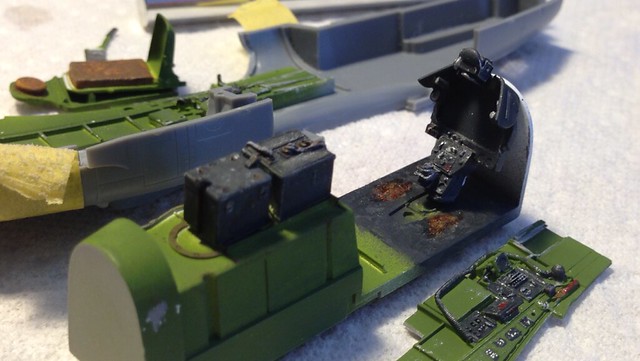

2013-07-26 15.13.24 by brittvallot, on Flickr
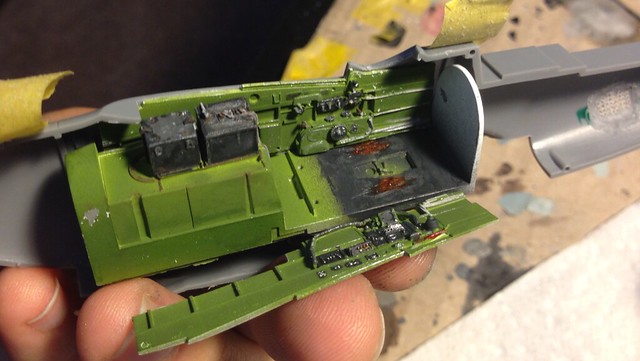

2013-07-26 15.46.55 by brittvallot, on Flickr

For the black surfaces I'm trying something new.  Instead of just a plain flat black paint, I'm mixing it with Medium Blue [XF-18] to give it some wear of it's own.  I had a color in mind that's like the black plastic vinyl you see on the exterior of cars and trucks that fade with the sun and oxidation.  That color! =]  How much of this was present on the batteries and misc equipment visible from the cockpit you ask....?  Eh.  I have to think it's there to some extent.  Either way I think it's giving the cockpit a little more love than just dry brushing Flat Aluminum around all the corners and edges.

I still have a few things to touch up here. 

On the bench:  

Tamiya F4U-1  Kenneth Walsh


  • Member since
    November 2003
  • From: State of Mississippi. State motto: Virtute et armis (By valor and arms)
Posted by mississippivol on Saturday, July 27, 2013 8:04 AM

Looking really good. One thing about metallic finishes, they show everything, scratches, glue runs, etc., so take the extra time prepping the body.

Glenn

  • Member since
    June 2013
Posted by bvallot on Saturday, July 27, 2013 11:40 AM
Absolutely they do. No doubt about it. I had one small finger print somehow on that Wildcat I just finished. Thought I had it licked and smoothed out but nope! Luckily I had two other coats of acrylic on top it. =]

Keeping this surface smooth is probably the one thing that worries me most about painting with this. I'm already doing so much on top. I'd really hate to ruin everything. Definitely not rushing that part. =]

On the bench:  

Tamiya F4U-1  Kenneth Walsh


  • Member since
    June 2013
Posted by bvallot on Saturday, July 27, 2013 12:15 PM

I've got a question for anybody that knows.  What's the deal with the two toned seat for the mustang in some cockpits?  I've noticed some are all interior green while some are green on bottom and flat black on top. Was this a theater specific variation?  Everything I find shows it should be all green.  I've even read that the seat & anti glare surface were to be done in dark green I think it was but more often the seat was bronze green and the cowl was OD Green.

Is the two toned seat just one of those things that happened that way?

On the bench:  

Tamiya F4U-1  Kenneth Walsh


  • Member since
    October 2010
  • From: Chambersburg, Pa.
Posted by Bob H. on Monday, July 29, 2013 1:56 PM

I'm wondering about that. Maybe I'm mistaken but the possibility exists that there are two different colors for the seat, like OD for the frame and the Interior Green for the seat itself. Maybe I'm mixing that up with another Aircraft. Someone out there probably will be able to verify.                Bob

  • Member since
    February 2012
  • From: Olmsted Township, Ohio
Posted by lawdog114 on Monday, July 29, 2013 7:48 PM

Very nice work.  They are both great kits, each with pros and cons.  On the Hasegawa kit, you need to scribe and rivet the panel line on the top of the cowl (windscreen to spinner).  Also,the gear bay is too shallow.  You can close the inner doors to hide this.  On the Tamiya kit, you should get an aftermarket canopy because their example, a two piece affair, is awful.  You could also use the extra canopy from the Hasegawa kit here too.  

Reference the cockpit,  depending on how accurate you want to be of course, the fuselage gas tank (under the batteries) should be dark grey or black. These were rubber coated on combat  p-51's.  Good question about the seat.  I've seen them both ways too.  I  usually paint the armor plate/ headrest black and the rest of the seat interior green and the cushion olive or khaki drab.  

Joe  

 "Can you fly this plane and land it?...Surely you can't be serious....I am serious, and don't call me Shirley"


  • Member since
    June 2013
Posted by bvallot on Monday, July 29, 2013 8:39 PM

Duly noted Joe! I haven't even looked at how the canopy is going to fit yet.  I've never had much of a problem with a Tamiya canopy yet.  I'll be looking into it tonight now I guess.  I have been noticing the tanks being painted black in several diagrams.  This is the first Mustang I'm doing so I'm new to researching this particular aircraft.  So I'm really looking forward to any help I can find here on the Finescale forum.  

I usually disregard the kit instructions on painting for the most part because I'm going by actual photos when I can.  Just today I thought I'd actually take a peek at the Hasegawa's manual since it was specific to the aircraft Bob.  And what do you know...it calls for the top of the seat to be in flat black.  So I thin out some Flat Black and painted a wash over the green I have on there now.  I allowed some of the green to show on the corners and edges to show the black being painted over like it likely would've been. 


photo-1 by brittvallot, on Flickr


photo-2 by brittvallot, on Flickr

These aren't the best photos but I'll fix it all up and show how it turns out.

Joe, you mentioned the gas tanks were coated in a rubber?  Would it be safe to assume this rubber would have a sheen to it?  Do you think a semi-gloss coat would do it justice? 

On the bench:  

Tamiya F4U-1  Kenneth Walsh


  • Member since
    February 2012
  • From: Olmsted Township, Ohio
Posted by lawdog114 on Monday, July 29, 2013 10:31 PM

Glad I can help.  Its a subject I love to talk about (I've built 8 Tamiya D's (3 on comission) and 2 Hasegawa versions) so I hope I can be of some help.  Personally, having built both, I prefer the Tamiya kit with a True Details cockpit.  In case your interested, here's my WIP thread on a Tamiya P-51D I did back in October of last year. It may be of some assistance to you in your endeavor.  

http://cs.finescale.com/fsm/modeling_subjects/f/2/t/150182.aspx?sort=ASC&pi240=1

....and I would go with a flat dark grey on the rubber coating, like a tire if you will. 

Joe

 "Can you fly this plane and land it?...Surely you can't be serious....I am serious, and don't call me Shirley"


  • Member since
    June 2013
Posted by bvallot on Monday, July 29, 2013 11:16 PM

=] Roger that!  I know just what you're getting at. =]

On the bench:  

Tamiya F4U-1  Kenneth Walsh


  • Member since
    June 2013
Posted by bvallot on Tuesday, July 30, 2013 2:47 PM

Here's what I touched up on the cockpit.


photo-5 by brittvallot, on Flickr


photo-7 by brittvallot, on Flickr


photo-6 by brittvallot, on Flickr

On the bench:  

Tamiya F4U-1  Kenneth Walsh


  • Member since
    June 2013
Posted by bvallot on Tuesday, July 30, 2013 3:15 PM

Lawdog, I tried out my canopy and found it to be a real nice fit.  Is there something I'm missing on the shape? The only part I'm having trouble getting to squeeze in is the Aires dashboard top.  Otherwise, everything looks pretty good.

On the bench:  

Tamiya F4U-1  Kenneth Walsh


  • Member since
    June 2013
Posted by bvallot on Tuesday, July 30, 2013 10:51 PM

Began building up some of the radiator while I'm waiting for some mesh I ordered to come in through the mail.


2013-07-30 19.19.24 by brittvallot, on Flickr


2013-07-30 19.47.11 by brittvallot, on Flickr
There's a piece here that's a little shorter. It was making it poke out funny. I've since fixed it after I saw this photo.


2013-07-30 21.47.09 by brittvallot, on Flickr
All of this is just a rough fit. I can't put any of this together yet until I paint the inside surfaces....and double check some things.

On the bench:  

Tamiya F4U-1  Kenneth Walsh


  • Member since
    June 2013
Posted by bvallot on Wednesday, July 31, 2013 2:41 PM

I have a question for all you Mustang experts out there.  I've seen several instances where the scoop and radiator door are left in the natural metal finish and some with the interior green.  Question is:

Which was it? Was one a practice during a certain time period? What's the skinny here?

On the bench:  

Tamiya F4U-1  Kenneth Walsh


  • Member since
    September 2005
  • From: North Pole, Alaska
Posted by richs26 on Wednesday, July 31, 2013 3:10 PM

I've somewhat haphazardly ground into the floor with my rotor tool's sander.  I'm trying to create a wood grain texture from the plywood floor.  The Erection and Maintenance Manual called for silica sand mixed with matte black paint to be put down as a skid surface, but these would eventually wear out like everything else.  I personally wanted to see some of the wooden characteristics of the cockpit and opted to include it.  I painted it a Tamiya Clear Orange which i find works real well as a wood color.  The deeper crevices will appear darker.  I'll come back over this with a flat khaki to lighten it up some afterwards.

Actually your plywood floors wouldn't be Orange, they would be a blonde color just like your workbench surface which looks to be particle board.  The plywood used would have been fir and pine plywood from the Pacific Northwest, not a teak color.

WIP:  Monogram 1/72 B-26 (Snaptite) as 73rd BS B-26, 40-1408, torpedo bomber attempt on Ryujo

Monogram 1/72 B-26 (Snaptite) as 22nd BG B-26, 7-Mile Drome, New Guinea

Minicraft 1/72 B-24D as LB-30, AL-613, "Tough Boy", 28th Composite Group

  • Member since
    June 2013
Posted by bvallot on Wednesday, July 31, 2013 5:57 PM

Yeah, I'd actually been considering lightening it up a bit still.  I started with the orange to provide the base color while dry-brushing a lighter color over it.  I do think it needs a little more attention before i call it done.  I'm also trying to consider the dirt and grime that would work itself into the wood as well.  That's how I reached the outcome you see so far.

I do appreciate the input.  =]

On the bench:  

Tamiya F4U-1  Kenneth Walsh


  • Member since
    June 2013
Posted by bvallot on Sunday, August 4, 2013 10:33 PM

After a busy week, I took a some time last night to work on the radiator a bit more.  It's starting to come together.  Still needs a little tweaking and fitting.  I'm beginning to think that I will leave it all in a NMF.  


photo-1 by brittvallot, on Flickr

On the bench:  

Tamiya F4U-1  Kenneth Walsh


  • Member since
    February 2012
  • From: Olmsted Township, Ohio
Posted by lawdog114 on Wednesday, August 7, 2013 8:26 PM

Looking great.  I usually leave this area in NMF too.  

Joe

 "Can you fly this plane and land it?...Surely you can't be serious....I am serious, and don't call me Shirley"


  • Member since
    June 2013
Posted by bvallot on Friday, August 9, 2013 1:14 AM

Thanks Joe!  Yeah, it's the been the subject of some debate for me lately.  I need to get this part finished up so I can marry these two fuselage halves together finally.  I added a few more odds and ends to build up this radiator section and set a couple of holes for later pieces to follow.  Then, I put a coat of Alclad's Gloss Black down. 


photo-2 by brittvallot, on Flickr


photo-3 by brittvallot, on Flickr


photo-4 by brittvallot, on Flickr

This pic is a little difficult to see.  I included it here anyway since it was a view to the scoop and radiator


photo-5 by brittvallot, on Flickr

On the bench:  

Tamiya F4U-1  Kenneth Walsh


  • Member since
    June 2013
Posted by bvallot on Friday, August 9, 2013 1:26 AM

Quick question! I've been looking ahead to consider other parts that need some thinking about and stumbled on to this along the tail of this mustang.  They appear to be antenna.  I'm guessing that since there is no radio line running to the cockpit that this is possible something to replace it.

Anybody out there a mustang expert on this?

Screen shot 2013-08-09 at 12.29.48 AM

by brittvallot, on Flickr

Screen shot 2013-08-09 at 12.30.11 AM

by brittvallot, on Flickr

If you're looking at the top 1/3 of the tail, then you'll see what I'm talking about. This one here obviously has the line so it's got me thinking it was just one kind of bandwidth...?

On the bench:  

Tamiya F4U-1  Kenneth Walsh


  • Member since
    June 2013
Posted by bvallot on Saturday, August 10, 2013 1:55 AM

No worries guys.  After a few ways of changing my search, I happen to come across it.  I'm posting what I come up with here to help any future Mustang builders looking to find out too. =]  Here's an excerpt:

AN/APS-13 Tail Warning Radar Antenna

Radio Set AN/APS-13 is a lightweight radar set which gives an airplane pilot, or any other aircrew member who can see or hear it, a visible and audible warning that a hostile airplane is behind or approaching from the rear.

The usable range of this set is from 200 to 800 yards, and within an area extending up to 30° on both sides of the airplane and from 45° above it to 45° below it. The set doesn’t work above 50,000 feet or below 3100 feet. Ground reflections determine the lower limit.


aps-13-ant1-70 by brittvallot, on Flickr


aps-13-components1-70% by brittvallot, on Flickr


P-51DK_05 by brittvallot, on Flickr

On the bench:  

Tamiya F4U-1  Kenneth Walsh


  • Member since
    June 2013
Posted by bvallot on Tuesday, August 20, 2013 5:25 PM

The latest on my mustang WIP.  Finally got the fuselage halves together.  I test fitted like I was OCD and still happen to have some trouble.  I would eventually discovery it to be the fat part of the Aires cockpit tub.  I left it thinking it wouldn't be a problem, buuuuut...it happened to me.  Maybe next time I'll be luckier.

Mostly just some surface attention...taking care of seams...and I set a place up to anchor my brass tube that receives the rod to mount it.  I decided to place it aft of the radiator instead of in it so there isn't any room for the landing gear.  No worries...cause it's getting closed up. =]


photo 1 by brittvallot, on Flickr


photo 3 by brittvallot, on Flickr


photo 2 by brittvallot, on Flickr

Now that I've gotten to this point I can start moving this thing along. =]

On the bench:  

Tamiya F4U-1  Kenneth Walsh


  • Member since
    February 2011
  • From: Bent River, IA
Posted by Reasoned on Thursday, August 22, 2013 8:39 PM

Looking good and interesting info on the antenna.

Science is the pursiut of knowledge, faith is the pursuit of wisdom.  Peace be with you.

On the Tarmac: 1/48 Revell P-38

In the Hanger: A bunch of kits

  • Member since
    June 2013
Posted by bvallot on Friday, August 23, 2013 12:23 AM

Thanks Reasoned. =]  I've only just recently got into modeling scale aircraft.  So I do my best to learn everything I can and pay it forward when possible.

I happened to get a few more things moving.  This is my first mustang I'm building and I can't say enough how happy I am to be building this Tamiya.  Save for the aftermarket cockpit that gave me a few worries, this has been such a joy to build.  Simple, smart construction.  Here's just a few photos.  Nothing special going on here.  Just sharing a sweet build. =D


2013-08-21 20.30.45 by brittvallot, on Flickr

Here I cut off the tabs off the flaps that are received by the wings.  Drilled out some holes, glued some brass rod for some added strength (lessoned learned from my corsair), and refit the tabs a little higher to deploy them in the up position.


2013-08-22 21.39.31 by brittvallot, on Flickr

I did decide not to place all the hoses and such like I normally would.  It's getting covered and I'm in a bit of a rush to get this done.


2013-08-22 23.13.21 by brittvallot, on Flickr

I've closed the wheel bay up here as this will be set up in flight.  Honestly, the best fit I have ever seen here.  Normally this part takes a LOT of modification and headache.  But here...beautiful. =]


2013-08-22 23.15.24 by brittvallot, on Flickr

And that's all for now.  I am a bit stumped as to whether or not I should paint the wings and fuselage my gloss black coat now....and then mate them after, or just glue everything in clean up my seams and paint after.

Any thoughts...?

On the bench:  

Tamiya F4U-1  Kenneth Walsh


  • Member since
    February 2011
  • From: Bent River, IA
Posted by Reasoned on Friday, August 23, 2013 9:23 PM

It is usually best to get it put together and seams cleaned up before paint.  I think I see some Alclad in the background, doing a NMF w/it?  If so, you don't need me to tell you how important it is to get the surface as smooth as silk.  At least with the Tamiya 51, my recollection from building it was the wing roots required no fill/sanding and the fuselage went together real well.

Science is the pursiut of knowledge, faith is the pursuit of wisdom.  Peace be with you.

On the Tarmac: 1/48 Revell P-38

In the Hanger: A bunch of kits

  • Member since
    June 2013
Posted by bvallot on Friday, August 23, 2013 10:56 PM

You'd be correct sir! This is my first NMF so I'm a little anxious to see how it turns out.  I have been told to make it perfect and I'm not taking it lightly.  This is the most I've ever fretted about the surface of anything before.  I'm still obsessing about certain spots and how they'll turn out.  But you're right about the Tamiya 51, it practically builds itself. =]

On the bench:  

Tamiya F4U-1  Kenneth Walsh


  • Member since
    February 2012
  • From: Olmsted Township, Ohio
Posted by lawdog114 on Tuesday, August 27, 2013 10:08 PM

bvallot

This is my first NMF so I'm a little anxious to see how it turns out.  I have been told to make it perfect and I'm not taking it lightly.  This is the most I've ever fretted about the surface of anything before.  I'm still obsessing about certain spots and how they'll turn out.  

Hey Bvallot.   I don't know if you've started your NMF, but It sounds like your going to use Alclad.  Here's how I do my NMF's with Alclad.  Once I discovered this stuff I never looked back.  Scroll down to the bottom of Page 1 and I have a step-by-step tutorial in there.

 http://cs.finescale.com/fsm/modeling_subjects/f/2/t/151736.aspx?sort=ASC&pi240=1

......and its looking great.

Joe

 "Can you fly this plane and land it?...Surely you can't be serious....I am serious, and don't call me Shirley"


  • Member since
    June 2013
Posted by bvallot on Wednesday, August 28, 2013 10:41 AM

Thanks Joe!  Much appreciated. =]  I just finished looking through your post.  It definitely helps me to better predict how some of these different alclads are going to lay down next to each other.  I really enjoyed seeing how your anti-glare color came out.  That's pretty much what I'm aiming for too.  

I did have a few questions about fine tuning with alclad.  I understand there's no need to seal it, but what about any washes you put on it (panel lines etc).  I'm somewhat unclear on that point.  Also, I've heard that "the Detailer" is a water based wash that doesn't require you to put a seal down first with alclad but what about afterwards.  It would seem to reason that it needs something after right?  Which reminds me...the alclad clear gloss...did that detract any from the original alclad finish?

Oh! and FINE looking P-47 you got there.  I always enjoy seeing your mini dioramas you have them set on.  Definitely looking forward to making a few of those.

On the bench:  

Tamiya F4U-1  Kenneth Walsh


  • Member since
    February 2012
  • From: Olmsted Township, Ohio
Posted by lawdog114 on Friday, August 30, 2013 10:17 PM

I only use water based washes....no issues so no need to experiment with others.  They will work fine right on top of the Alclad surface.  Lately I've been using Flory washes on the panel lines.  Its clay based and wipes right off with a damp paper towel (I use round coffee filters...no lint).  I use The Detailer wash on cockpits over a dusting of Testor's Gloss coat.  I'm not sure its necesary, but it works for me and I like the results.  Alclad doesn't need the gloss coat for The Detailer wash

Thanks for the compliment.  That Jug now belongs to a relative of the original pilot.  How often do us modelers get the chance to do that....

Joe.  

 "Can you fly this plane and land it?...Surely you can't be serious....I am serious, and don't call me Shirley"


  • Member since
    June 2013
Posted by bvallot on Friday, December 13, 2013 1:31 AM

I've been away for a while mostly posting this build on the NMF Group Build V but I wanted to at least catch up this WIP to where I am now.  I'll be skipping thru some of the boring stuff so you don't fall asleep while perusing this post.  So here goes:


2013-09-06 18.06.32 by brittvallot, on Flickr

Laying down Alclad's Gloss Black.  I've noticed that you have to really keep your brush clean before putting this stuff down.  So long as I maintained my brush, I haven't had any trouble.  It goes down beautifully.


photo 1-1 by brittvallot, on Flickr


image by brittvallot, on Flickr

This is the Duraluminum put down over the wings.  I've made sweeping motions over along where the ribbing is that supports the wing.  I find less is more here.  Allowing some of the black to show through is helping this metallic color look like metal. I think it's less convincing when someone blasts away making a completely uniform colored panel.  I took my time to touch this up and make it a little more refined.


image by brittvallot, on Flickr

Here's the Polished Aluminum.  With all of Alclad's color selection, you may only need two or three for the most part to pull of many NMFs.  Maybe four depending on what you're getting into.

That being said....I actually have four I think. =]  The ailerons, elevators, and rudder are done in White Aluminum along with the one panel in the front under the cowl.  Wings are in Duraluminum.  Fuselage is in Polished Aluminum and the panel next to the exhaust stack is in Magnesium.  Come to think of it...I did the exhaust in their Exhaust Manifold and the cover in Semi Matte Aluminum.  Crap. lol.  But honestly, to pull off a convincing NMF you could really do it in about three.  By masking off the panels you're working on and carefully putting down what you need and lightly buffing the surface as you see fit based on wear and tear of your aircraft, you can create a lot of contrasting panels without spraying each one a different color.


image by brittvallot, on Flickr


image by brittvallot, on Flickr

Here's a few more pics of all the aluminum color painted and buffed.


image by brittvallot, on Flickr

I'll stop there for tonight.  More later on.

On the bench:  

Tamiya F4U-1  Kenneth Walsh


  • Member since
    August 2012
Posted by JimNTENN on Friday, December 13, 2013 7:27 AM

That's beautiful work and on a beautiful plane. I have one question that I've had for a little while and I'll go ahead and ask it now. Why do you apply the metallic paint over a gloss black undercoat? Is it something you have to do with Alclad paints or is it necessary with any brand of metallic paint? I've only done 1 or maybe 2 NMF aircraft but that was years ago when I was a kid and my overall modeling skill was nowhere near what it is now. Is that gloss black undercoat only necessary when you are painting the metallic body of an aircraft or some other vessel or would it be necessary on anything metallic, for instance, when replicating the NMF of an automobile engine? And would that procedure be used when doing any NMF, not just aluminum? And....and this is the last question, I promise.....does gloss black have to be used for the undercoat or can any color be used?

Current project(s): Hobby Boss: 1/72 F9F-2 Panther

                                  Midwest Products: Skiff(wood model)


JOIN OUR COMMUNITY!

Our community is FREE to join. To participate you must either login or register for an account.

SEARCH FORUMS
FREE NEWSLETTER
By signing up you may also receive reader surveys and occasional special offers. We do not sell, rent or trade our email lists. View our Privacy Policy.