SEARCH FINESCALE.COM

Enter keywords or a search phrase below:

Complete! 1/48 Airfix Hurricane Mk.I (new tooling)

19368 views
41 replies
1 rating 2 rating 3 rating 4 rating 5 rating
  • Member since
    September 2020
Posted by Man toys on Wednesday, September 23, 2020 11:38 AM

 Micro Mask MI-7 By microscale ind, inc

I've read people are having troble removing this stuff from there projects. Micro Mask does work "BUT" on smooth surfaces. I used it on sanded, sealed mahogany wood. With all sorts of problems, it stuck in the grain of the wood. However I did come up with a solution. Use tooth paste and a electric tooth brush and the stiffest tooth brush you can find and water. It took a while but once its wet it will come loose. Then find the stickest tape you can find. I've tried double sided 3m foam tape but you have to let it set over night, duct tape and surgical tape all with results. Best of luck G

  • Member since
    January 2015
Posted by BrandonD on Sunday, July 3, 2016 1:49 AM

Thanks for the compliments, guys!

-BD-

  • Member since
    February 2012
  • From: Olmsted Township, Ohio
Posted by lawdog114 on Monday, June 27, 2016 10:26 PM
Fantastic!....

 "Can you fly this plane and land it?...Surely you can't be serious....I am serious, and don't call me Shirley"


  • Member since
    January 2015
  • From: Katy, TX
Posted by Aggieman on Monday, June 27, 2016 9:12 AM

Great work on your Hurricane.  I love the look of the BoB-era warbirds with the dark Earth/dark green scheme.  She looks sufficiently dirty just as if she has just returned from a joust with a Bf110 or some Stukas.

  • Member since
    September 2010
  • From: California
Posted by mikeymize on Monday, June 27, 2016 1:04 AM

  Great build updates and wonderful outcome. i too have this kt and have just gotten around to building it. One thing you mentiioned the fit isssues regarding the front section; particularly the wing-fuelsge join and around the engine as well. Copious amounts of putty were needed. This was after test fitting the placement of the cocpit area and making needed sanding etc to get the fit lined up. Other than that the plane was superb. One great book for those interested is"Hurricane inside and Out" by Melvyn Hiscock. Excellent photos throughout and nice history too!

"Time you enjoy wasting is not wasted time".


  • Member since
    January 2015
Posted by BrandonD on Monday, August 24, 2015 1:54 AM

Thank you, Plastic Aviator!

Bish - Thank you! I have one going in the BoB group build, but I'll start one in here tomorrow.

-BD-

  • Member since
    December 2002
  • From: Bury St Edmunds, Suffolk, England
Posted by Bish on Sunday, August 23, 2015 2:48 PM

I hope you will be doing a WiP thread for that Stuka, you can put me down for following that one.

I am a Norfolk man and i glory in being so


On the bench: Airfix 1/72nd Harrier GR.3/Fujimi 1/72nd Ju 87D-3

  • Member since
    July 2015
  • From: Los Angeles
Posted by Plastic_Aviator on Sunday, August 23, 2015 2:27 PM

My friend!  Fantastic job as usual mate. Youre work is so smooth, organized and clean. Cannot wait to see the Stuka!

  • Member since
    January 2015
Posted by BrandonD on Friday, August 21, 2015 2:16 AM

Thank you, Joe!

As far as BoB markings for the Stuka, the Tamiya rebox of the Italeri kit comes with two sets of BoB markings (printed by Cartograf, no less). One is really nice. The other represents a plane that had black paint applied to the underside, and they tried to recreate this with the decals, but it looks too pixelated where the black coats the white with a "spray" pattern. But the markings themselves are probably salvageable if one chooses not to use the oversprayed Balkenkreuz and just use an airbrush.

-BD-

  • Member since
    January 2015
Posted by BrandonD on Friday, August 21, 2015 2:11 AM

Thanks, Jay Jay and Black Sheep.

Black Sheep - It just came with two marking options. The one I built, and the box art, which is of a plane that was flown by a pilot who used the wingtip to knock off the rear stabilizer on a 109 to bring it down. Both camouflage options are identical. The only structural difference is the propeller hub (this one is skinnier and pointier). Both are provided in the kit.

-BD-

  • Member since
    January 2013
Posted by BlackSheepTwoOneFour on Thursday, August 20, 2015 10:14 AM

Fantastic work! I'v ebeen looking for a decent Hurricane kit for awhile now. This kit is definitely one I'm going to look for. What decal choices did it come with?

  • Member since
    August 2013
Posted by Jay Jay on Thursday, August 20, 2015 10:07 AM

My, my,my !   What a ggrrrreat looking bird, fabulous job .


 I'm finally retired. Now time I got, money I don't.

  • Member since
    February 2012
  • From: Olmsted Township, Ohio
Posted by lawdog114 on Thursday, August 20, 2015 1:53 AM
Simply stunning....... I have the same kit I hope to start soon. Can't wait to see your Stuka. Good luck finding BOB decals for it as they are scarce (at least when I was looking).

 "Can you fly this plane and land it?...Surely you can't be serious....I am serious, and don't call me Shirley"


  • Member since
    January 2015
Posted by BrandonD on Tuesday, August 18, 2015 11:51 PM

Thanks for the kind words, all. Texgunner, as for your font, I'd heard everything is bigger in Texas. Didin't know it applied to the typeface, too Big Smile

-BD-

  • Member since
    February 2011
  • From: Bent River, IA
Posted by Reasoned on Tuesday, August 18, 2015 9:57 PM

Nothing at all wrong with that build Brandon, a real solid, clean example of the Cane.Yes

Science is the pursiut of knowledge, faith is the pursuit of wisdom.  Peace be with you.

On the Tarmac: 1/48 Revell P-38

In the Hanger: A bunch of kits

  • Member since
    April 2015
  • From: New Hampshire, USA
Posted by UKguyInUSA on Tuesday, August 18, 2015 11:51 AM
Great build Brandon, she's a really nice bird! This is one aircraft I don't have in my collection; I've built a Lancaster B.II, presently started on the Revell 1/32 Spitfire Mk.II, but would love a Hurricane in 1/32 scale! Keep having fun! Cheers- Martin : )
  • Member since
    June 2013
Posted by RobGroot4 on Monday, August 17, 2015 3:15 AM

Very nice build!  I really like the treatment of the exhausts and the postshade.


Groot

"Firing flares while dumping fuel may ruin your day" SH-60B NATOPS

  • Member since
    December 2002
  • From: Northern California
Posted by jeaton01 on Saturday, August 15, 2015 12:12 AM

Very nice, Brandon.

John

To see build logs for my models:  http://goldeneramodel.com/mymodels/mymodels.html


  • Member since
    January 2015
  • From: Indiana USA
Posted by BlackTulip109 on Friday, August 14, 2015 6:19 PM

An outstanding build !!!

Very glad to hear about the kit being great because I am excitedabout all these new tooled releases by AIRFIX.

They seem to be delivering on their promise to re-tool state of the art affordable kits and they are performing and creating a lot of excitement!!!


Thank you for sharing your technique on the exhaust stacks really really cool!!

Congrats on a great build

  • Member since
    November 2009
  • From: SW Virginia
Posted by Gamera on Friday, August 14, 2015 11:30 AM

Beautiful work on the camo and weathering, the mud and dirt looks perfect. 

"I dream in fire but work in clay." -Arthur Machen


  • Member since
    February 2007
  • From: Brunswick, Ohio
Posted by Buckeye on Friday, August 14, 2015 11:23 AM

Very nice work!Yes

Mike

  • Member since
    June 2013
Posted by bvallot on Friday, August 14, 2015 9:59 AM
Damn good looking Hurricane. I quite enjoyed watching your painting process. I never put much faith in Airfix kits, but you may have just given me something to think about. =]

On the bench:  

Tamiya F4U-1  Kenneth Walsh


  • Member since
    June 2014
Posted by USAFASME7 on Friday, August 14, 2015 9:08 AM

Awesome model. Man, you've got some SKILLS! Nice job on the weathering and panel shading too!

--Rob

Glue Sniffer since 1977

  • Member since
    June 2014
Posted by BrandonK on Friday, August 14, 2015 9:02 AM

Superb job. Fantastic work again. Thanks for taking us along.


BK

On the bench:

A lot !! And I mean A LOT!!

2024 Kits on deck / in process / completed   

                         14 / 5 / 2  

                              Tongue Tied

  • Member since
    February 2003
  • From: Cameron, Texas
Posted by Texgunner on Friday, August 14, 2015 8:23 AM

Wow!  Brandon, you've hit that one out of the ballpark!  That's a great looking 'Cane dude, the camo work is  fantastic.  Uh, I don't know how I did it but something happened to this font.  I didn't know how to change the size but suddenly, this happened.  Any ideas how?


"All you mugs need to get busy building, and post pics!"

  • Member since
    June 2003
  • From: Cavite, Philippines
Posted by allan on Thursday, August 13, 2015 10:18 PM

Pretty solid build!  Great work on the camo and the weathering.

No bucks, no Buck Rogers

  • Member since
    January 2015
Posted by BrandonD on Thursday, August 13, 2015 9:49 PM

And it's done in time for Eagle Day! (Finished it late last night, and it looks to have just returned from its first mission).

Overall this was a fantasic kit with great decals that provided minimal problems and a whole lot of fun. 

Without being too wordy, I'll just get to the pics.

All comments and criticisms welcome. The dirtiness on the bottom is meant to represent mud flung up on a grass runway. The exhaust streaks are airbrushed - the first time I've used the airbrush on an already-decaled model. I used the airbrush for the gunsmoke, too. The other dirt is ground up Yarka Sauce brushed on, then wiped with a damp finger.

Thanks for looking!

-BD-

P.S. Please excuse the photo lighting. I had to shoot them at lunch today, and the sun was pretty stark and threw off the white balance, and I'm not good enough with Photoshop to fix it.

  • Member since
    January 2015
Posted by BrandonD on Wednesday, August 12, 2015 2:30 AM

Thanks, everyone! I've made some more progress on the Airfix 1/48 Hurricane Mk.I.

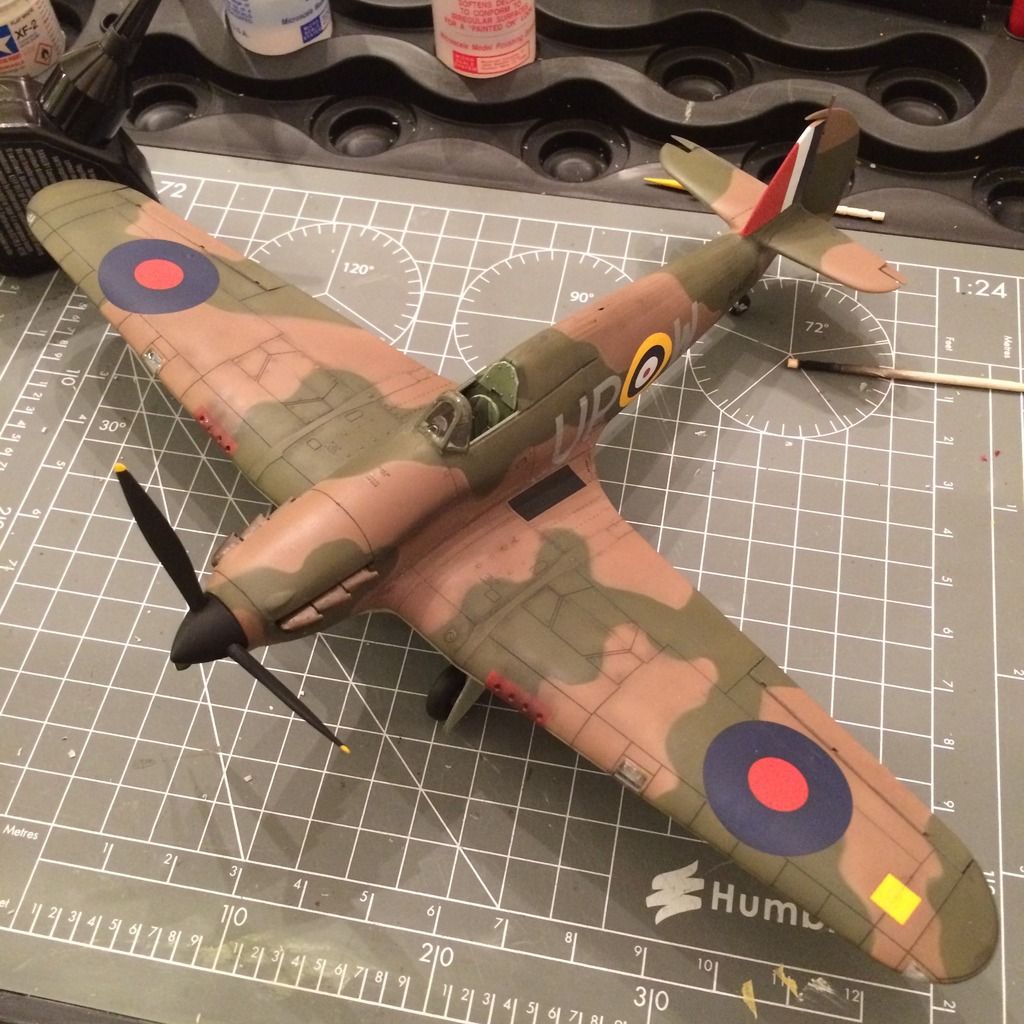
When the was done, I went to the decals. Against my natural aversion to them, I used the decals for the tail markings...and to my surprise, they worked very well. I only had to paint the leading edge, and the decals matched perfectly with Tamiya XF-7 for the red and XF-2 for the white.

The rest of the decals and stencils went down without issue. It took several dosings of Micro Sol to get them to sit over some of the raised details (the roundels on the upper wings, specifically), but they all sunk down into the panel lines quite well. I'm guessing they're printed by Cartograf.

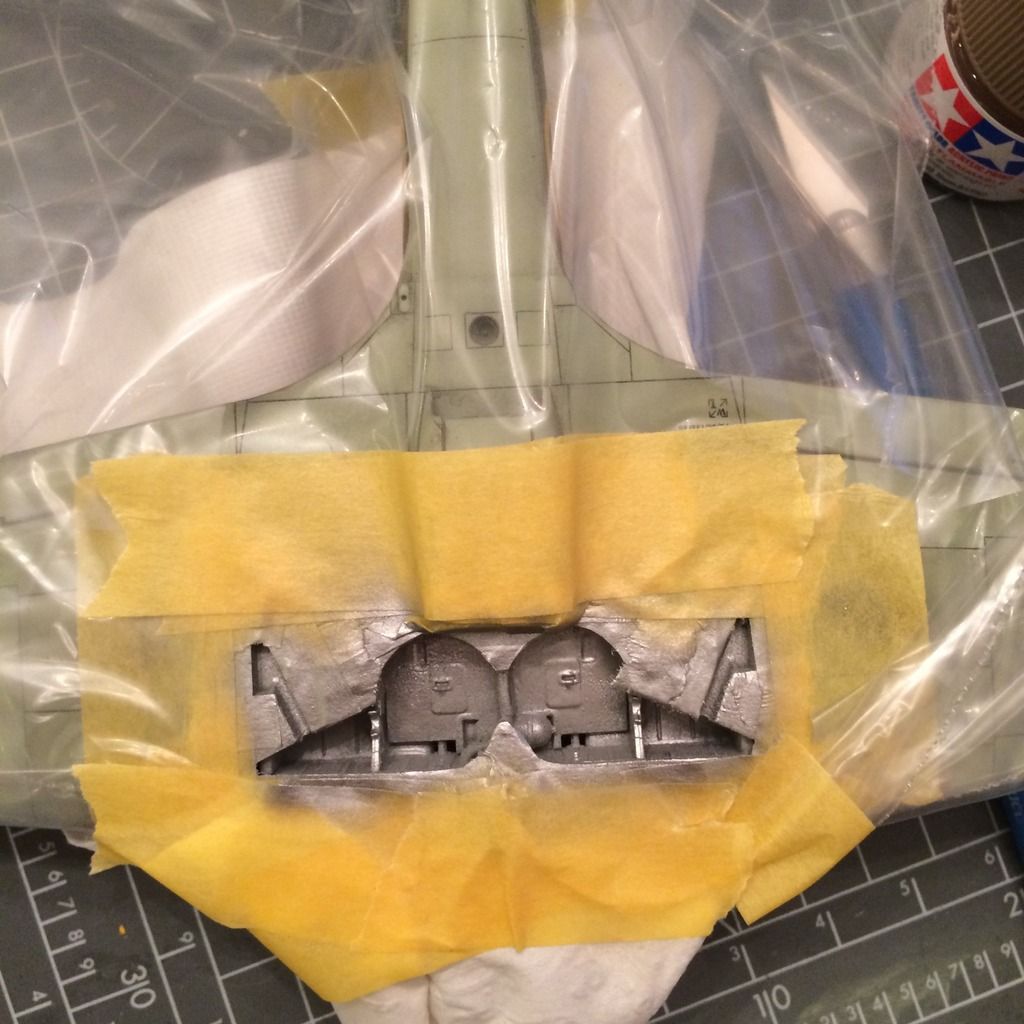
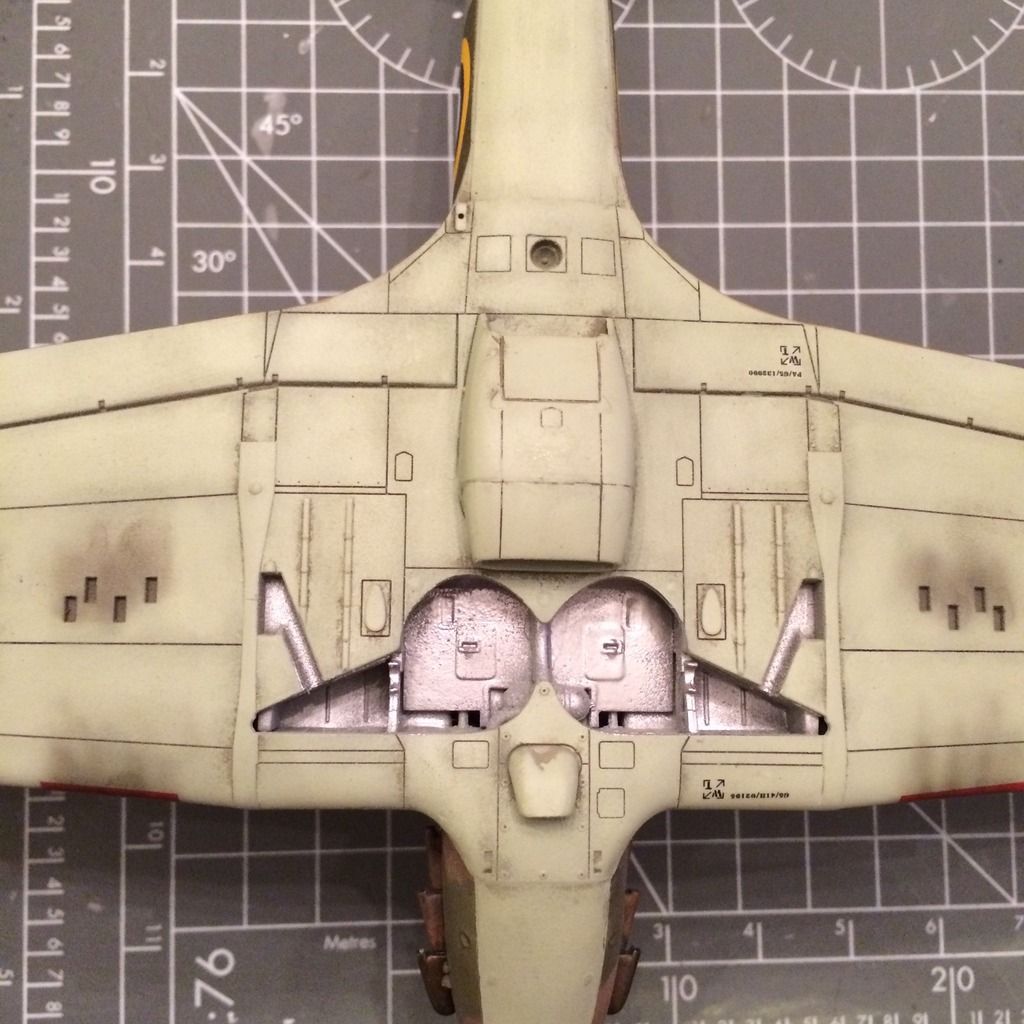
After looking at the restored aircraft this one represents, I decided that I should actually respray the wheel well aluminum. And in this week's edition of "Crap, I sound like my father," I will say that it would have been way easier and faster to do it right the first time.

For the exhaust stacks, I tried to replicate the brownish metal patina (not rust) of the Hurricanes I've seen, along with the exhaust staining on the back two exhaust stacks. I base coated them in gun metal, then gave them a wash with metallic brown before giving them a very thin coat of clear orange. Then I gave them a Flory Grime wash, and finally dull-coated them and used the Tamiya weathering kit (the one that looks like makeup) with the oil stain pigment. The exhaust streaks on the fuselage were applied with airbrushed Tamiya smoke at about 25 psi. After that, I streaked the Tamiya weathering kit's oil stain with a hint of burnt blue in it. Then I ended up wiping most of it off, so I really have no idea what the final result is made of.

I'm working on throwing some mud staining on the underside, as those grassy airfields in England in September weren't exactly dry, and I've seen that on some BoB RAF planes.

I'm hoping to have it done by Eagle Day, and then, if the votes on my Instagram page hold, it looks like I'll be doing the Stuka next.

-BD-

  • Member since
    December 2002
  • From: Bury St Edmunds, Suffolk, England
Posted by Bish on Sunday, August 9, 2015 1:27 PM

Thats looking very nice there BD. That cockpit frameing looks well detailed. And you have done a greta job on the camo.

I am a Norfolk man and i glory in being so


On the bench: Airfix 1/72nd Harrier GR.3/Fujimi 1/72nd Ju 87D-3

JOIN OUR COMMUNITY!

Our community is FREE to join. To participate you must either login or register for an account.

SEARCH FORUMS
FREE NEWSLETTER
By signing up you may also receive reader surveys and occasional special offers. We do not sell, rent or trade our email lists. View our Privacy Policy.