SEARCH FINESCALE.COM

Enter keywords or a search phrase below:

1/32 Trumpeter P-40B..Going Dark

10010 views
159 replies
1 rating 2 rating 3 rating 4 rating 5 rating
  • Member since
    June 2010
Posted by 5-high on Sunday, December 13, 2015 8:59 PM

I'll be watching this one fightnjoe ..I liked the mustang that was cool ...this will be just as cool ..5-high Yes

GAF
  • Member since
    June 2012
  • From: Anniston, AL
Posted by GAF on Sunday, December 13, 2015 10:05 PM

Joe,

Nice subject!  As I'm getting ready to do the Revellogram P-40 in 1/48, I hope you can teach me something about this aircraft.  What livery do you intend to paint her up in?

  • Member since
    June 2014
Posted by BrandonK on Sunday, December 13, 2015 10:13 PM

You had me at P-40B

BK

On the bench:

A lot !! And I mean A LOT!!

2024 Kits on deck / in process / completed   

                         14 / 5 / 2  

                              Tongue Tied

  • Member since
    September 2011
Posted by fightnjoe on Monday, December 14, 2015 9:06 AM

Many thanks for looking in.


GAF I am not sure I could teach you anything you do not already know.  Really not sure on the livery yet.  Way too early for me to think on that yet.  I do have a SuperScale decal set for the -B.  It will be one of the four off of that set.


Joe

Veterans,

Thank You For Your Sacrifices,

Never To Be Forgotten

Where you can find me:

Workbench on FaceBook  Google Plus  YouTube

  • Member since
    March 2015
  • From: Streetsboro, Ohio
Posted by Toshi on Monday, December 14, 2015 10:01 AM

Looking forward to this build.

Toshi

On The Bench: Revell 1/48 B-25 Mitchell


Married to the most caring, loving, understanding, and beautiful wife in the world.  Mrs. Toshi


  • Member since
    September 2011
Posted by fightnjoe on Monday, December 14, 2015 10:20 AM

Me too Toshi.


Joe

Veterans,

Thank You For Your Sacrifices,

Never To Be Forgotten

Where you can find me:

Workbench on FaceBook  Google Plus  YouTube

  • Member since
    April 2004
  • From: The cornfields of Ohio
Posted by crockett on Monday, December 14, 2015 2:39 PM

Built this kit as a flying Tiger a few years ago. There is an issue with the cockpit floor not being "deep" enough, but for most folks it isn't even noticed. Kit went togther well with the "usual" issues. It will be fun for you to build:


The windscreen fit up is very challenging, in that it does not align well with the canopy (closed position), make sure you test fit.

  • Member since
    September 2014
Posted by rooster513 on Monday, December 14, 2015 3:12 PM

Looking forward to the start of this! Gonna be another good one Joe, you always impress!

-Andy

GAF
  • Member since
    June 2012
  • From: Anniston, AL
Posted by GAF on Monday, December 14, 2015 4:49 PM

Crockett,

Nice looking P-40!  Do you remember what color you used for the underside?

Gary

  • Member since
    April 2004
  • From: The cornfields of Ohio
Posted by crockett on Tuesday, December 15, 2015 9:58 AM

GAF

Crockett,

Nice looking P-40!  Do you remember what color you used for the underside?

Gary


I believe it was Tamiya Acrylic RAF light grey....?


  • Member since
    September 2011
Posted by fightnjoe on Thursday, December 17, 2015 2:32 PM

Many thanks for following along.

crockett

Built this kit as a flying Tiger a few years ago. There is an issue with the cockpit floor not being "deep" enough, but for most folks it isn't even noticed. Kit went togther well with the "usual" issues. It will be fun for you to build:

The windscreen fit up is very challenging, in that it does not align well with the canopy (closed position), make sure you test fit.

Crockett many thanks.  As for the shallowness of the pit, with what I have in mind I should be able to get by that.  The windscreen is a big issue but I think I have a plan for that.  


Joe


Veterans,

Thank You For Your Sacrifices,

Never To Be Forgotten

Where you can find me:

Workbench on FaceBook  Google Plus  YouTube

  • Member since
    September 2011
Posted by fightnjoe on Monday, December 28, 2015 12:46 PM

After a couple of weeks of nothing here I am again.


Where to begin?  


First up is to mock up the firewall, cockpit floor, and bulkhead #6 which is the aft bulkhead of the cockpit.


A touch of modification as the cockpit floor is actually the top of the wing.  Trumpeter actually has this much too high in the pit.  A piece of strip on the back of the firewall will help in position.  Two strips of styrene glued as a cross section of the pit floor will help as well.  An extension is needed on the aft bulkhead to get it to match up to the floor.


Work is begun on the bulkheads aft the pit.  This begins with getting the shape with a contour guage, tracing the shape to paper, rough fitting to the interior of the fuselage side, tracing to a piece of sheet styrene, cutting it out, sanding to shape.  Easy enough.  These are just a rough cut of the bulkheads, there is much detailing to do yet to these.


They are roughed and ready.  I have now the bulkheads #7 to #14 which puts them to the tail wheel.  


Next up will be to work on the wing.  This will be the first of the cutting and reconstruction.  Have not even scratched the surface yet.


All comments, critiques, and criticism are welcome.


Joe

Veterans,

Thank You For Your Sacrifices,

Never To Be Forgotten

Where you can find me:

Workbench on FaceBook  Google Plus  YouTube

  • Member since
    June 2014
Posted by BrandonK on Monday, December 28, 2015 3:40 PM

I am enjoying this and you have just given me some ideas on two seperate builds I am doing, one of with is a P-40B. Yay !! I love this kinda stuff.

BK

On the bench:

A lot !! And I mean A LOT!!

2024 Kits on deck / in process / completed   

                         14 / 5 / 2  

                              Tongue Tied

GAF
  • Member since
    June 2012
  • From: Anniston, AL
Posted by GAF on Monday, December 28, 2015 4:21 PM

I missed the part about this being a "cut-away".  Quite ambitious!  Looks like you have your work "cut out" for you!  Wink

Okay, bad pun!  I'll leave now...

Gary


  • Member since
    February 2012
  • From: Olmsted Township, Ohio
Posted by lawdog114 on Monday, December 28, 2015 7:20 PM
Very cool. I look forward to your progress.

 "Can you fly this plane and land it?...Surely you can't be serious....I am serious, and don't call me Shirley"


  • Member since
    September 2011
Posted by fightnjoe on Tuesday, December 29, 2015 7:34 AM

Thank you all for following along.  I really do appreciate it.


Joe

Veterans,

Thank You For Your Sacrifices,

Never To Be Forgotten

Where you can find me:

Workbench on FaceBook  Google Plus  YouTube

  • Member since
    August 2013
Posted by Jay Jay on Tuesday, December 29, 2015 8:31 AM

An ambitious project for sure and one that I am anxiously following along.


 I'm finally retired. Now time I got, money I don't.

  • Member since
    September 2011
Posted by fightnjoe on Friday, January 1, 2016 11:16 AM

Many many thanks.


Joe

Veterans,

Thank You For Your Sacrifices,

Never To Be Forgotten

Where you can find me:

Workbench on FaceBook  Google Plus  YouTube

  • Member since
    June 2014
Posted by BrandonK on Friday, January 1, 2016 11:34 AM

Hey Joe, where are you getting the data for your interior bulkheads? I am pimping out this 1/48 and could use some of that. 

BK

On the bench:

A lot !! And I mean A LOT!!

2024 Kits on deck / in process / completed   

                         14 / 5 / 2  

                              Tongue Tied

  • Member since
    June 2013
Posted by bvallot on Friday, January 1, 2016 11:51 AM

Great to see this coming around again.  Are you looking to make any changes to how it will end up?  Or more or less the same build but improved where you can improve it?

On the bench:  

Tamiya F4U-1  Kenneth Walsh


  • Member since
    September 2011
Posted by fightnjoe on Friday, January 1, 2016 5:46 PM

Brandon pm sent.


Bvallot this will be just a hoped improvement.  A little more in some areas but for the most part just to try to get better.


Joe

Veterans,

Thank You For Your Sacrifices,

Never To Be Forgotten

Where you can find me:

Workbench on FaceBook  Google Plus  YouTube

  • Member since
    September 2011
Posted by fightnjoe on Friday, January 1, 2016 5:47 PM

To keep in line with how I want to present this I bring to you a small update.  


Prior to cutting any holes in the wing or fuselage I made some rough bulkheads.  One of the latest sessions saw the use of Dremmel and knives to cut away sections of the fuselage.


First uncut.


Then after a bit of time, the cuts.


Some little stuff was accomplished prior to the cutting as well.  I have some frames roughed for the wing.


Now after the cutting and grinding was done I test fit the roughed bulkheads and found that several were much too small.  So much for measure twice and cut once.  My next step is to redo the bulkheads.  I also need to work a bit on the pit floor to extend it to the back of the wing root.


All comments, critiques, and criticism are encouraged.


Joe


Veterans,

Thank You For Your Sacrifices,

Never To Be Forgotten

Where you can find me:

Workbench on FaceBook  Google Plus  YouTube

  • Member since
    January 2009
  • From: hamburg michigan
Posted by fermis on Friday, January 1, 2016 8:45 PM

Sa-weet!!!


Who's got the popcorn?!!!

  • Member since
    September 2011
Posted by fightnjoe on Friday, January 1, 2016 10:40 PM

Fermis you know you are partly responsible for this.  You and your detail work.


Joe

Veterans,

Thank You For Your Sacrifices,

Never To Be Forgotten

Where you can find me:

Workbench on FaceBook  Google Plus  YouTube

  • Member since
    January 2009
  • From: hamburg michigan
Posted by fermis on Saturday, January 2, 2016 10:29 PM

fightnjoe

Fermis you know you are partly responsible for this.  You and your detail work.


Joe


Awe shucks!


This kit was the first model I built, when I "came back", back in Jan. 09. It was also my first WIP posts here.

  • Member since
    June 2013
Posted by bvallot on Saturday, January 2, 2016 11:21 PM

Fermis, that's a good lookin' Hawk.  Nice colors and camo too. 

Joe, I'd be interested in hearing about a source you might have for the bulkheads.  

On the bench:  

Tamiya F4U-1  Kenneth Walsh


GAF
  • Member since
    June 2012
  • From: Anniston, AL
Posted by GAF on Sunday, January 3, 2016 7:17 AM

You may already have some of this information, but I'll list it here for other members of FSM.

First is this site:

http://www.outerzone.co.uk/index.asp

These are scale model plans, but some are fairly accurate in following the original design. Just type in "P-40" in the search area and you will get a couple of dozen plans.

Next is the BoxArtDen.com site:

http://www.boxartden.com/gallery/index.php/Profiles/Detail-Scale/61-Curtiss-P-40

http://www.boxartden.com/gallery/index.php/Profiles/Detail-Scale/62-Curtiss-P-40

Finally, Witold Jaworski's 3d model of the P-40 B, usuable in Blender.

Not complete, but it does show the cockpit area and rear bulkheads.

http://airplanes3d.net/index_e.html

Both the model and Blender are free.

Hope these links may be of some use.  They're certainly helping in my own build.  Smile

Gary


  • Member since
    September 2011
Posted by fightnjoe on Sunday, January 3, 2016 5:53 PM

Gary those are some good sites.  To be honest I had not seen them before.


bvallot

Fermis, that's a good lookin' Hawk.  Nice colors and camo too. 

Joe, I'd be interested in hearing about a source you might have for the bulkheads.  


Much of the reference stuff I have is from kind folks online that have helped me out.  There are many pictures and drawings in the public realm of google searches.  Once you get a solid list of components you can start to really dig into the ins and outs.  The bulkheads themselves were from Saul Garcia (sharkmouth on many forums) and the Warhawk Museum Facebook page.


Joe

Veterans,

Thank You For Your Sacrifices,

Never To Be Forgotten

Where you can find me:

Workbench on FaceBook  Google Plus  YouTube

  • Member since
    June 2003
  • From: Cavite, Philippines
Posted by allan on Sunday, January 3, 2016 7:55 PM

This is going to be one interesting build. 

Wont the open upper and lower wing panels affect structural strength?


No bucks, no Buck Rogers

  • Member since
    September 2011
Posted by fightnjoe on Saturday, January 23, 2016 8:44 PM

Allen sorry.  It should not affect them too bad.  With the interior section intact that should provide the strength needed.


Update inbound.


Joe

Veterans,

Thank You For Your Sacrifices,

Never To Be Forgotten

Where you can find me:

Workbench on FaceBook  Google Plus  YouTube

  • Member since
    September 2011
Posted by fightnjoe on Saturday, January 23, 2016 8:45 PM

Well it has been going on a month since I last updated this thread.  As for quantity there is not a lot.  However there is some progress.  


There are frames in the wing.


Now they are not fixed permanently, they are spot glued in to make sure they fit right.  


There is also some progress on my renditions of the wing guns.


Like I said it does not look like much but it is progress.  I am much happier with the wing guns now.  


Next up will be a box for the guncarriage and the guns.  Need to find a bit more on the interior of the wing as there does appear to be a whole lot of empty there.


Till the next time, 


All comments, critiques, and criticism are encouraged.


Joe

Veterans,

Thank You For Your Sacrifices,

Never To Be Forgotten

Where you can find me:

Workbench on FaceBook  Google Plus  YouTube

  • Member since
    January 2009
  • From: hamburg michigan
Posted by fermis on Sunday, January 24, 2016 1:10 AM

Yummy!Toast

  • Member since
    April 2008
  • From: Fox Lake, Il., USA
Posted by spiralcity on Sunday, January 24, 2016 6:35 PM

Progress, is progress. It looks like your going for some nice detail on this one, I cant wait to see it all done up. I have this kit sitting in my watch list on eBay, so I'm keeping a close watch on this build.


  • Member since
    September 2011
Posted by fightnjoe on Sunday, January 24, 2016 10:05 PM

Many many thanks for looking in.


Spiral the base kit is pretty good but does have some issues.  


Joe

Veterans,

Thank You For Your Sacrifices,

Never To Be Forgotten

Where you can find me:

Workbench on FaceBook  Google Plus  YouTube

  • Member since
    June 2014
Posted by BrandonK on Sunday, January 24, 2016 10:36 PM

That wing is pretty cool, but those guns are frikin' awesome!!

BK

On the bench:

A lot !! And I mean A LOT!!

2024 Kits on deck / in process / completed   

                         14 / 5 / 2  

                              Tongue Tied

  • Member since
    June 2003
  • From: Cavite, Philippines
Posted by allan on Monday, January 25, 2016 12:57 AM

Lovin what youve done so far with the wing, Joe!

No bucks, no Buck Rogers

  • Member since
    August 2013
Posted by Jay Jay on Monday, January 25, 2016 9:43 AM

Joe ,

I am amazed and fascinated with your scratch building skills. TY for posting this as it's very  inspirational to me. i'd like to try my hand at it someday. I mean , I've done a liitle scratch building but nothing on this scale.


 I'm finally retired. Now time I got, money I don't.

  • Member since
    September 2011
Posted by fightnjoe on Tuesday, January 26, 2016 7:50 AM

You are all very kind.  Thank you.


Joe

Veterans,

Thank You For Your Sacrifices,

Never To Be Forgotten

Where you can find me:

Workbench on FaceBook  Google Plus  YouTube

  • Member since
    September 2011
Posted by fightnjoe on Friday, January 29, 2016 10:26 PM

Just a quick update.


Work continued on the wing.  Frames are now installed and the gun bay as well as the ammo box.  Tonight the stringers were installed.  


Next up will be the interior of the flaps.


All comments, critiques, and criticism are encouraged.


Joe

Veterans,

Thank You For Your Sacrifices,

Never To Be Forgotten

Where you can find me:

Workbench on FaceBook  Google Plus  YouTube

  • Member since
    February 2014
  • From: Michigan
Posted by silentbob33 on Saturday, January 30, 2016 8:23 AM
I'm always amazed by your scratch work Joe! I love watching your builds.

On my bench: Academy 1/35 UH-60L Black Hawk

  • Member since
    January 2009
  • From: hamburg michigan
Posted by fermis on Saturday, January 30, 2016 8:30 AM

fightnjoe
 

All comments, critiques, and criticism are encouraged.


Joe

I was hoping to find some mess on/around your bench to criticize, but looks like your OCD is stronger than mine!!!

 Very fine work good sir!

  • Member since
    June 2014
Posted by BrandonK on Saturday, January 30, 2016 11:07 AM

You do such great work. You inspire me to try similar things on my builds. This is pretty cool to watch.

BK

On the bench:

A lot !! And I mean A LOT!!

2024 Kits on deck / in process / completed   

                         14 / 5 / 2  

                              Tongue Tied

  • Member since
    September 2011
Posted by fightnjoe on Saturday, January 30, 2016 12:21 PM

You are very kind, many thanks.  I am glad you find inspiration in my attempts.


Fermis actually not OCD, more of I did a video and had to clean up the bench a bit to be able to film it without knocking everything onto the floor.


Joe

Veterans,

Thank You For Your Sacrifices,

Never To Be Forgotten

Where you can find me:

Workbench on FaceBook  Google Plus  YouTube

  • Member since
    September 2011
Posted by fightnjoe on Friday, February 5, 2016 10:57 PM

Well it happened yet again.


Wing work volume 2.  


The ammo chute is redone, two frames are redone, and the stringers are now redone.  Seems every step forward is followed by two or ten steps back.


First was to strip out the offending parts.


Than with everything replaced.


I also had worked some on the flap interiors.


Now to move forward.  


All comments, critiques, and criticism are encouraged.


Joe

Veterans,

Thank You For Your Sacrifices,

Never To Be Forgotten

Where you can find me:

Workbench on FaceBook  Google Plus  YouTube

  • Member since
    December 2003
  • From: 37deg 40.13' N 95deg 29.10'W
Posted by scottrc on Saturday, February 6, 2016 9:01 AM

Joe, this project is really looking swell from here.  Keep up the great work, its going to be a great looking representation when finished and worth the effort.  Also, thanks for the resource of the Blender 3D model, I was looking for it a while back and somehow couldn't find it.

Scott

  • Member since
    March 2015
  • From: Streetsboro, Ohio
Posted by Toshi on Saturday, February 6, 2016 9:14 AM

This build is amazing!

Toshi

On The Bench: Revell 1/48 B-25 Mitchell


Married to the most caring, loving, understanding, and beautiful wife in the world.  Mrs. Toshi


  • Member since
    September 2011
Posted by fightnjoe on Saturday, February 6, 2016 3:37 PM

Many thanks to both of you.


Now...


Bonus material time....


As I started out today I thought why not show what I was doing.  Just a small assembly but it is worth the time.


Today I began by cleaning up the bulkheads.  Remember those....


Well I began with punching out a hole, the largest my punch set has, and then using the dremel I worked the bulkheads out to where they looked more like they do in my drawings.  I then went in with 320 sandpaper and cleaned them up.


Once that was done I was able to start on the fuel cell.  Using bulkhead #7 as a reference I sketched out the form, that was cut out, cleaned up, and then used as a master to form 3 pieces of sheet styrene.  I then cut two pieces of tube styrene, size isnt important as long as it fits.  I glued the tube to the sheet and then put them all together.


I then used .010 sheet styrene and skinned the framework.  Also using the same bulkhead I fashioned a stand to keep the fuel cell in place.


Just that simple.  


Ok next will be to continue to work the interior, most likely starting with the tail and moving forward.  I do need to add detail to most of the bulkheads as well as the fuel cell.


I hope you enjoyed the bonus.


All comments, critiques, and criticism are encouraged.


Joe

Veterans,

Thank You For Your Sacrifices,

Never To Be Forgotten

Where you can find me:

Workbench on FaceBook  Google Plus  YouTube

  • Member since
    June 2014
Posted by BrandonK on Sunday, February 7, 2016 11:02 AM

Watching you do this makes me think doing the full PE F6F would be a breeze. Your skills here are amazing.

BK

On the bench:

A lot !! And I mean A LOT!!

2024 Kits on deck / in process / completed   

                         14 / 5 / 2  

                              Tongue Tied

GAF
  • Member since
    June 2012
  • From: Anniston, AL
Posted by GAF on Sunday, February 7, 2016 9:51 PM

Joe,

Some really nice work going on here.  Glad you found the P-40 Blender file helpful.  Smile

Gary

  • Member since
    June 2013
Posted by bvallot on Monday, February 8, 2016 11:11 AM

Coming along there Joe. =]

On the bench:  

Tamiya F4U-1  Kenneth Walsh


  • Member since
    September 2011
Posted by fightnjoe on Tuesday, February 9, 2016 7:34 PM

Many many thanks.


Joe

Veterans,

Thank You For Your Sacrifices,

Never To Be Forgotten

Where you can find me:

Workbench on FaceBook  Google Plus  YouTube

  • Member since
    June 2003
  • From: Cavite, Philippines
Posted by allan on Tuesday, February 9, 2016 8:43 PM

If you dont call this "perfectionism," well....


Im very impressed with your work on this bird.

No bucks, no Buck Rogers

  • Member since
    February 2012
  • From: Olmsted Township, Ohio
Posted by lawdog114 on Tuesday, February 9, 2016 9:15 PM
Speechless...I got nothing. Just amazing work Joe

 "Can you fly this plane and land it?...Surely you can't be serious....I am serious, and don't call me Shirley"


  • Member since
    September 2011
Posted by fightnjoe on Tuesday, February 9, 2016 11:37 PM

Many many thanks.


Joe

Veterans,

Thank You For Your Sacrifices,

Never To Be Forgotten

Where you can find me:

Workbench on FaceBook  Google Plus  YouTube

  • Member since
    September 2011
Posted by fightnjoe on Tuesday, February 9, 2016 11:38 PM

Wow.  It really is amazing what can happen when we move past a stumbling block.


Just a bit of an update:


Work has commenced on the interior begining with the tail wheel assembly.  This does not represent 100% accuracy as I needed to make sure there was stability and strength as well.  


Before I go too far I really need to open up the access door on the fuselage.  For that first a template is made out of aluminium foil which is taped to an aluminium can, cut out, and cleaned up a bit.


Next is to drill out the door.  Let the drilling begin.


And drilled out.


Next will be to clean up the cut and then I can put in stringers and back plates.


All comments, critiques, and criticism are encouraged.


Joe

Veterans,

Thank You For Your Sacrifices,

Never To Be Forgotten

Where you can find me:

Workbench on FaceBook  Google Plus  YouTube

  • Member since
    September 2011
Posted by fightnjoe on Monday, February 15, 2016 10:55 PM

Moving right along with the interior work.


First up was to clean up the access door and then attach a backing plate.


Once that was completed I moved on to putting the stringers in place.  These are .020 hex rod.  


With that done the part of the builds that I truly enjoy could begin.  The interior work.


First up was to prep bulkheads 8 and 9 for radio equipment.  I took some time and set up the racks to mimic what I have seen in pictures.


The next step of course was to actually build up the radio equipment.  Now indulge me on this.  


From left to right.  Radio boxes both recieving and transmitting, dynamotor and antenna switch box, junction box, and the reciever and transmitter.


Now with that ready, before I can add the wiring, I am going to need to do some painting I think.  I may just move on and continue the construction of interior assemblies.  Thinking on this.


All comments, critiques, and criticism are encouraged.


Joe

Veterans,

Thank You For Your Sacrifices,

Never To Be Forgotten

Where you can find me:

Workbench on FaceBook  Google Plus  YouTube

  • Member since
    January 2009
  • From: hamburg michigan
Posted by fermis on Monday, February 15, 2016 11:38 PM

YesYes


If I had a third thumb...it'd be up too!

  • Member since
    January 2016
  • From: A Galaxy Far, Far Away
Posted by Hunter on Tuesday, February 16, 2016 1:31 AM

Wow Joe!!! Your build is amazing!!! I will definitely be watching every second of this build. BRAVO Sir, BRAVO Bow Down

Hunter 


  • Member since
    April 2008
  • From: Fox Lake, Il., USA
Posted by spiralcity on Tuesday, February 16, 2016 3:03 PM

Fantastic work, I cant wait for some more. Beer


  • Member since
    February 2014
  • From: Michigan
Posted by silentbob33 on Tuesday, February 16, 2016 5:57 PM
Amazing work as always Joe

On my bench: Academy 1/35 UH-60L Black Hawk

  • Member since
    September 2011
Posted by fightnjoe on Tuesday, February 16, 2016 6:09 PM

You are all very kind.  Thank you.


Joe

Veterans,

Thank You For Your Sacrifices,

Never To Be Forgotten

Where you can find me:

Workbench on FaceBook  Google Plus  YouTube

  • Member since
    June 2014
Posted by BrandonK on Wednesday, February 17, 2016 8:27 AM

So cool.

BK

On the bench:

A lot !! And I mean A LOT!!

2024 Kits on deck / in process / completed   

                         14 / 5 / 2  

                              Tongue Tied

  • Member since
    August 2013
Posted by Jay Jay on Wednesday, February 17, 2016 8:32 AM

Very impressive and wonderful scratch building job !

Thanks to your videos I understand how to build the various equipment etc.

My question is where do you find the information as to what radios, gear  etc. go into the aircraft?


 I'm finally retired. Now time I got, money I don't.

  • Member since
    September 2011
Posted by fightnjoe on Wednesday, February 17, 2016 8:47 AM

Very very kind, thank you.


Jay researching is much of the fun of these for me.  Google and Ebay can be your close friends with it.  For me it starts with something simple such as, "P-40 Hydraulic system".  If such a search is empty play with the wording.  Somewhere you will find names for equipment, at that point you are golden.  Just keep searching for the different equipment and make sure you save the searches in a folder.  


Joe

Veterans,

Thank You For Your Sacrifices,

Never To Be Forgotten

Where you can find me:

Workbench on FaceBook  Google Plus  YouTube

  • Member since
    August 2013
Posted by Jay Jay on Thursday, February 18, 2016 7:59 AM

Ok Joe,

Ty so much for easing my frustration during searches . I now know better how to do it.


 I'm finally retired. Now time I got, money I don't.

  • Member since
    November 2009
  • From: SW Virginia
Posted by Gamera on Thursday, February 18, 2016 8:16 AM

Wow, how on earth did I miss this till now- fantastic work!!! 

"I dream in fire but work in clay." -Arthur Machen


  • Member since
    September 2011
Posted by fightnjoe on Thursday, February 18, 2016 9:47 AM

Jay I am glad I could help ease your frustration a little.


Gamera you really have not missed much to this point.  Still a long road to travel.


Joe

Veterans,

Thank You For Your Sacrifices,

Never To Be Forgotten

Where you can find me:

Workbench on FaceBook  Google Plus  YouTube

  • Member since
    September 2011
Posted by fightnjoe on Thursday, February 18, 2016 10:32 PM

Just a quick update.  


Spent some time getting some of the internal details constructed.  Again they are not 100% but they will work for what I need.


The hydraulic pump.


And the landing gear/flap unit


I have also begun to frame in the cockpit.


I will be doing some crossmembers for the stringers.  These will only be there to make sure the detail has a place to anchor.


All comments, critiques, and criticism are encouraged.


Joe

Veterans,

Thank You For Your Sacrifices,

Never To Be Forgotten

Where you can find me:

Workbench on FaceBook  Google Plus  YouTube

GAF
  • Member since
    June 2012
  • From: Anniston, AL
Posted by GAF on Friday, February 19, 2016 12:11 AM

Joe,

Nice detailing!  That's going to be spectacular when finished.

I'm not sure if you've seen this, but since you're starting on the cockpit, I thought I would mention that the NAS museum has a virtual cockpit for the P-40B in their collection.

Just follow the link, scroll down to the bottom and rotate away!

http://www.navalaviationmuseum.org/attractions/aircraft-exhibits/item/?item=p-40b_tomahawk

Gary

  • Member since
    February 2012
  • From: Olmsted Township, Ohio
Posted by lawdog114 on Friday, February 19, 2016 2:02 AM
Coming along nice Joe..

 "Can you fly this plane and land it?...Surely you can't be serious....I am serious, and don't call me Shirley"


  • Member since
    September 2011
Posted by fightnjoe on Saturday, February 20, 2016 10:34 AM

Many many thanks.


GAF appreciated.  I have actually been looking for that link.  I had it but it was lost somewhere.  


Joe

Veterans,

Thank You For Your Sacrifices,

Never To Be Forgotten

Where you can find me:

Workbench on FaceBook  Google Plus  YouTube

  • Member since
    September 2011
Posted by fightnjoe on Sunday, February 21, 2016 6:05 PM

The next major construction stage is to work on the cockpit.  


This begins with framing in the pit.  Bulheads and frames.  After putting in the bulkheads each stringer was cut to fit.  I used .020 by .040 strip for the bulkhead.  I used .020 square strip for the stringers.  


And how it looks all together.  Taped of course.


Now there are a couple of major flaws in the pictures.  One I have fixed the other I will live with.  


Moving right along and actually kind of quick with this part so far.  


All comments, critiques, and criticism are encouraged.


Joe

Veterans,

Thank You For Your Sacrifices,

Never To Be Forgotten

Where you can find me:

Workbench on FaceBook  Google Plus  YouTube

  • Member since
    November 2003
  • From: Naples, FL
Posted by tempestjohnny on Sunday, February 21, 2016 7:31 PM
Awesome!!!


  • Member since
    September 2005
  • From: North Pole, Alaska
Posted by richs26 on Sunday, February 21, 2016 10:25 PM

The NAVAIR Museum's P-40B's black leather head cushion is wrong as Curtiss used brown leather as evidenced in the many LIFE color photos of the assembly line.

WIP:  Monogram 1/72 B-26 (Snaptite) as 73rd BS B-26, 40-1408, torpedo bomber attempt on Ryujo

Monogram 1/72 B-26 (Snaptite) as 22nd BG B-26, 7-Mile Drome, New Guinea

Minicraft 1/72 B-24D as LB-30, AL-613, "Tough Boy", 28th Composite Group

  • Member since
    June 2014
Posted by BrandonK on Monday, February 22, 2016 9:16 AM

You are really pouring your soul into this one. The detail is already quite impressive.

BK

On the bench:

A lot !! And I mean A LOT!!

2024 Kits on deck / in process / completed   

                         14 / 5 / 2  

                              Tongue Tied

  • Member since
    September 2011
Posted by fightnjoe on Monday, February 22, 2016 9:30 AM

Many many thanks all.  


Rich I will remember that.


Joe

Veterans,

Thank You For Your Sacrifices,

Never To Be Forgotten

Where you can find me:

Workbench on FaceBook  Google Plus  YouTube

  • Member since
    June 2013
Posted by bvallot on Monday, February 22, 2016 11:10 AM

She's starting to come together Joe. =]  Some of these parts are so tiny, I have my doubts that I'm ready to tackle that at 1:48.

Coming along nicely!

On the bench:  

Tamiya F4U-1  Kenneth Walsh


  • Member since
    March 2015
Posted by qlabs on Monday, February 22, 2016 11:22 AM

What an amazing build! I can't wait to see more.

I'm curious to see the stockpile of styrene you have?
I'm picturing either a librairy of highly organized plastic of every variety or a big box of searching Wink

  • Member since
    September 2011
Posted by fightnjoe on Monday, February 22, 2016 11:39 PM

I am most humbled by all of the kind words.  


The parts are small yes but in this scale they are needed.  In a smaller scale they may not.  My stock of styrene at the moment is being reduced a bit (obviously) but I store it in a larger tupperware type of container.  I will get a picture of it next round to show it to you.


Joe

Veterans,

Thank You For Your Sacrifices,

Never To Be Forgotten

Where you can find me:

Workbench on FaceBook  Google Plus  YouTube

  • Member since
    September 2011
Posted by fightnjoe on Saturday, March 26, 2016 10:15 PM

Its back......on the bench that is.


Joe

Veterans,

Thank You For Your Sacrifices,

Never To Be Forgotten

Where you can find me:

Workbench on FaceBook  Google Plus  YouTube

  • Member since
    September 2011
Posted by fightnjoe on Tuesday, March 29, 2016 9:50 PM

How about a long overdue, a month since the last one, update????


When last we saw our hero the framing for the cockpit had been readied and installed.  We had prepared to begin to start detailing.


This update is all about the seat frame and the port side.  


Working off of several pictures work began with the electrical panels and the throttle control.  Using strip, rod, tube, and scrap plastic the panels were fashioned.  After they were ready some little odds and ends on the port side were fashioned to match the pictures.  


The port side.


I also worked on the seat framing.  This is not 100% accurate but needed to have a bit more strength than what I could see for a plastic frame.  I canibalized a seat from the parts box and have it in place temp.


And finally just a glimpse of what this looks like, minus the port detail, with the fuselage together.


That is about all the detail seen in my pictures for the Port side.  Next up will be to work on the Starboard side.


All comments, critiques, and criticism are encouraged.


Joe

Veterans,

Thank You For Your Sacrifices,

Never To Be Forgotten

Where you can find me:

Workbench on FaceBook  Google Plus  YouTube

  • Member since
    February 2012
  • From: Olmsted Township, Ohio
Posted by lawdog114 on Wednesday, March 30, 2016 8:55 PM
One Joe to another.................speechless. You are the master of the cut away my friend.

 "Can you fly this plane and land it?...Surely you can't be serious....I am serious, and don't call me Shirley"


  • Member since
    June 2014
Posted by BrandonK on Wednesday, March 30, 2016 10:47 PM

Truly impressive to say the least.

BK

On the bench:

A lot !! And I mean A LOT!!

2024 Kits on deck / in process / completed   

                         14 / 5 / 2  

                              Tongue Tied

  • Member since
    September 2011
Posted by fightnjoe on Thursday, March 31, 2016 9:40 AM

Very kind, thank you.


lawdog114
One Joe to another.................speechless. You are the master of the cut away my friend.
 

My friend I thank you for the very kind comment, in my mind though Dan Jayne was the master.  I fall far short of his level.


Joe

Veterans,

Thank You For Your Sacrifices,

Never To Be Forgotten

Where you can find me:

Workbench on FaceBook  Google Plus  YouTube

  • Member since
    September 2011
Posted by fightnjoe on Friday, April 1, 2016 10:47 PM

On to the Starboard side of the cockpit.  A little of detail but to be honest I missed a couple of things that I will have in the next update.


Radio boxes, a light, and the canopy handle dominate this side.  


Now let me back up a bit, playing with different camera settings.  Here are a couple of shots of the Port side using a different background and different settings.


Next up will be the top of the wing/floor of the cockpit.


All comments, critiques, and criticism are encouraged.


Joe

Veterans,

Thank You For Your Sacrifices,

Never To Be Forgotten

Where you can find me:

Workbench on FaceBook  Google Plus  YouTube

  • Member since
    January 2009
  • From: hamburg michigan
Posted by fermis on Friday, April 1, 2016 11:56 PM

What can I say?!!!YesYes

  • Member since
    September 2011
Posted by fightnjoe on Saturday, April 2, 2016 5:14 PM

fermis

What can I say?!!!YesYes


I believe that spoke volumes,  Many thanks.


My friends most of the cockpit is now ready for paint.


There are a few things that I have not worked yet but they can be done at paint.  


I added a box on the starboard side, reworked the frame a bit, reworked the instrument panel to add some detail that was lacking, and added just a couple of things to the floor/top of the wing.


This section is now far enough that I can move on.  


Next up will be the firewall and the engine compartment moving into the engine.  


Many thanks all for sticking around this long.


All comments, critiques, and criticism are encouraged.


Joe

Veterans,

Thank You For Your Sacrifices,

Never To Be Forgotten

Where you can find me:

Workbench on FaceBook  Google Plus  YouTube

  • Member since
    June 2014
Posted by BrandonK on Saturday, April 2, 2016 5:28 PM

I think I am seeing another FSM article coming to life here.

BK

On the bench:

A lot !! And I mean A LOT!!

2024 Kits on deck / in process / completed   

                         14 / 5 / 2  

                              Tongue Tied

  • Member since
    November 2003
  • From: Naples, FL
Posted by tempestjohnny on Sunday, April 3, 2016 5:36 AM
This has and is one of the coolest tutorials on research and adding extras to a kit. I don't know about you but I think I'm going to buy stock in Evergreen plastics. This build should bump up the price.


  • Member since
    September 2011
Posted by fightnjoe on Monday, April 4, 2016 8:53 AM

You are both very very kind.  Many thanks.


Joe

Veterans,

Thank You For Your Sacrifices,

Never To Be Forgotten

Where you can find me:

Workbench on FaceBook  Google Plus  YouTube

  • Member since
    May 2013
  • From: Indiana, USA
Posted by Greg on Monday, April 4, 2016 9:42 AM

I am SO glad I discovered this thread this morning.

This is really something, and to be able to watch it come together in real time is a true treat, Joe.

If I might time travel back to Jan 1, how did you accomplish those wing cutouts so neatly? (and btw, thank you for explaining how you scratched those bulkheads a month or so ago. Who whould thunk...)

  • Member since
    September 2011
Posted by fightnjoe on Monday, April 4, 2016 10:39 AM

Greg to be honest it is all pretty easy.  For the wings I laid out tape on the panels I wanted to keep and then used the backside of an old exacto blade I worked next to the tape.  Scoring until I was nearly through and then sliced with a new blade.


Glad you are liking this so far.


Joe

Veterans,

Thank You For Your Sacrifices,

Never To Be Forgotten

Where you can find me:

Workbench on FaceBook  Google Plus  YouTube

  • Member since
    February 2007
  • From: Brunswick, Ohio
Posted by Buckeye on Monday, April 4, 2016 11:15 AM

That is just awesome work!  I wish I had half your ambition.Bow Down

Mike

  • Member since
    May 2013
  • From: Indiana, USA
Posted by Greg on Monday, April 4, 2016 1:56 PM

Thank you for that explanation! Bow Down

I overcomplicate tasks in my own mind. Now that you explained how you did it, I might even be able to pull such a thing off in some fashion. Geeked

  • Member since
    September 2011
Posted by fightnjoe on Friday, April 8, 2016 7:50 AM

Mike you are very kind.  Many thanks.


Greg to be honest I have no doubt you could do this, most likely you would do it much better than I.  I encourage all to give this type of thing a go.  You never know how it will turn out without giving it a shot.


Joe

Veterans,

Thank You For Your Sacrifices,

Never To Be Forgotten

Where you can find me:

Workbench on FaceBook  Google Plus  YouTube

  • Member since
    September 2011
Posted by fightnjoe on Friday, April 8, 2016 8:18 PM

The final phase of construction is to work on the firewall and the engine area.  The engine will be an entirely separate thing and will be covered while I install it permanently. 


The firewall included a couple of tanks as well as a base for some plumbing and the throttle linkages.


And with it inplace in the fuselage.


Now I have also added just a few stringers for detail on the interior of the fuselage.  Next for me will be to begin to paint.  


All comments, critiques, and criticism are encouraged.


Joe

Veterans,

Thank You For Your Sacrifices,

Never To Be Forgotten

Where you can find me:

Workbench on FaceBook  Google Plus  YouTube

  • Member since
    December 2002
Posted by 7474 on Friday, April 8, 2016 10:24 PM

Woooooooow. I'm so amazed at your work and craftmanship, I've enjoyed seeing this being built. I'm inspired to attempt this, one day.

  • Member since
    June 2014
Posted by BrandonK on Saturday, April 9, 2016 10:26 AM

This is really cool. I love watching you scratch this thing up. I gotta get back on my p-40. Keep it coming.

BK

On the bench:

A lot !! And I mean A LOT!!

2024 Kits on deck / in process / completed   

                         14 / 5 / 2  

                              Tongue Tied

  • Member since
    September 2011
Posted by fightnjoe on Sunday, April 10, 2016 7:34 AM

You are both very kind.  Thank you.


I am glad I could provide some inspiration.  


Joe

Veterans,

Thank You For Your Sacrifices,

Never To Be Forgotten

Where you can find me:

Workbench on FaceBook  Google Plus  YouTube

  • Member since
    September 2011
Posted by fightnjoe on Saturday, April 16, 2016 11:47 AM

Ok folks I have reached a point where it would be advisable to start the paint work.  


All the prep work is done, I think.  Bulkheads are installed, with the exception of the forward most as they need to be removable yet.  The little bits and pieces are prepped for paint.  The tail wheel assembly is in place.


Paint was sprayed starting with a flat black base.  I wanted to try something a bit different and changed midstream to putting a coat of Model Master Aluminium Plate on then I sprayed the interior colors.  I did however forget to take pictures of that.  I wanted to see if the Aluminium changed the Interior Green and the Yellow Zinc Chromate.  It did but not so much as you would really see it.  


I also began to paint and detail paint the interior pieces.


That is where it stands at the moment.  Now the challenge will be to work on the firewall more and on to the engine work.  I am choosing to not install the bits and pieces as of yet as they could break free during the process and I do not want to lose them.


All comments, critiques, and criticism are encouraged.


Joe

Veterans,

Thank You For Your Sacrifices,

Never To Be Forgotten

Where you can find me:

Workbench on FaceBook  Google Plus  YouTube

  • Member since
    August 2013
Posted by Jay Jay on Sunday, April 17, 2016 8:00 AM

OH My Word this is looking soooo cool !

This is my vision of scale model building and your W.I.P is very inspirational to me.  I've done a few "wham bam " kits and found little satisfaction in it.  I'm slowly working on a Accurate miniatures 1/48 TBF Avenger . I'm attempting to open up and detail the engine bay so I'm so lookng forward to your next installments. Many thanks for showing us how to do it. Bow Down


 I'm finally retired. Now time I got, money I don't.

  • Member since
    September 2011
Posted by fightnjoe on Monday, April 18, 2016 8:56 AM

You are very kind.  Thank you.


Joe

Veterans,

Thank You For Your Sacrifices,

Never To Be Forgotten

Where you can find me:

Workbench on FaceBook  Google Plus  YouTube

  • Member since
    September 2011
Posted by fightnjoe on Saturday, April 23, 2016 8:08 PM

Update time:


Engine compartment and Engine work.  


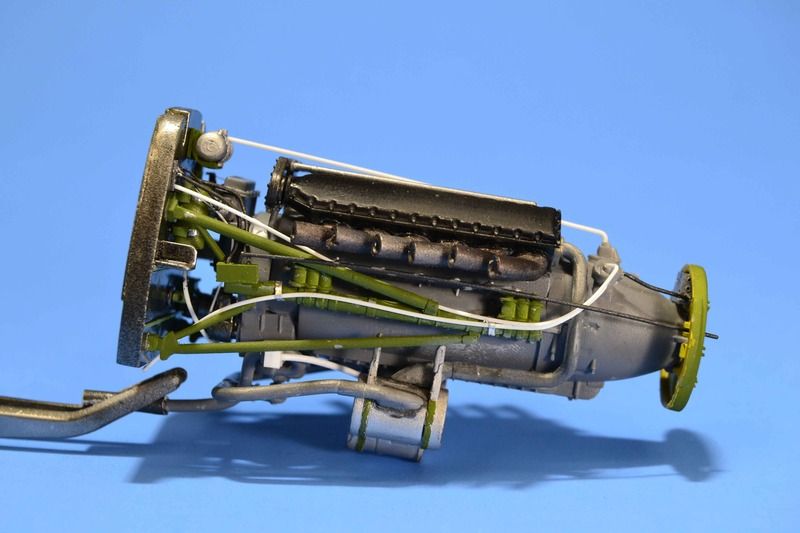
The engine is the kit parts, added are hoses and such. 


The firewall.


With some additions.


And just how much will you actually see when done???


Well not much really.  Again this is not 100% accurate.  Some issues occurred during the process and some things did not get installed.  Maybe the next time.


This took a while so my goal was not reached.  I had hoped to get this weathered but that did not happen.  Also I have not finished the exhausts yet.  That will have to wait till the next update.


All comments, critiques, and criticism are encouraged.


Joe


Veterans,

Thank You For Your Sacrifices,

Never To Be Forgotten

Where you can find me:

Workbench on FaceBook  Google Plus  YouTube

  • Member since
    June 2013
Posted by bvallot on Tuesday, April 26, 2016 4:05 PM

Coming along nicely Joe.  Don't rush a thing. =]

On the bench:  

Tamiya F4U-1  Kenneth Walsh


  • Member since
    February 2014
  • From: Michigan
Posted by silentbob33 on Tuesday, April 26, 2016 8:14 PM
That engine looks really nice, it's a pity you can't see more of it with the fuselage together.

On my bench: Academy 1/35 UH-60L Black Hawk

  • Member since
    September 2011
Posted by fightnjoe on Tuesday, April 26, 2016 8:29 PM

Many many thanks.


It is a shame but I can see something to improve upon for the next one.  And of course more things to research.


Joe

Veterans,

Thank You For Your Sacrifices,

Never To Be Forgotten

Where you can find me:

Workbench on FaceBook  Google Plus  YouTube

  • Member since
    July 2014
Posted by modelcrazy on Tuesday, April 26, 2016 8:39 PM
Sorry Joe, I just saw this post. I see you’re at it again with a cutaway, great work. I wish I had the skill to try something like this and make it plausible.

Steve

Building a kit from your stash is like cutting a head off a Hydra, two more take it's place.


http://www.spamodeler.com/forum/

  • Member since
    September 2011
Posted by fightnjoe on Thursday, April 28, 2016 4:21 PM

My friend I am sure you could do this better than I.  Many thanks for the very kind words.


Joe

Veterans,

Thank You For Your Sacrifices,

Never To Be Forgotten

Where you can find me:

Workbench on FaceBook  Google Plus  YouTube

  • Member since
    September 2011
Posted by fightnjoe on Friday, April 29, 2016 11:00 PM

An update, a rather quick moving one.


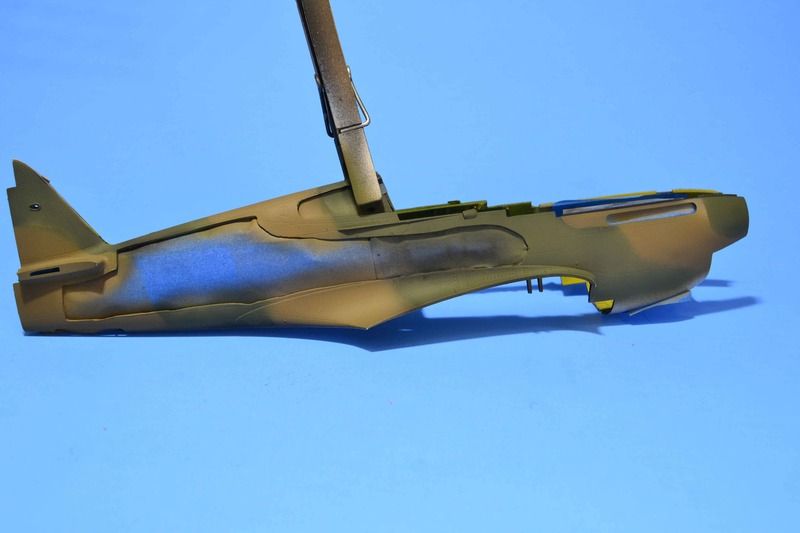
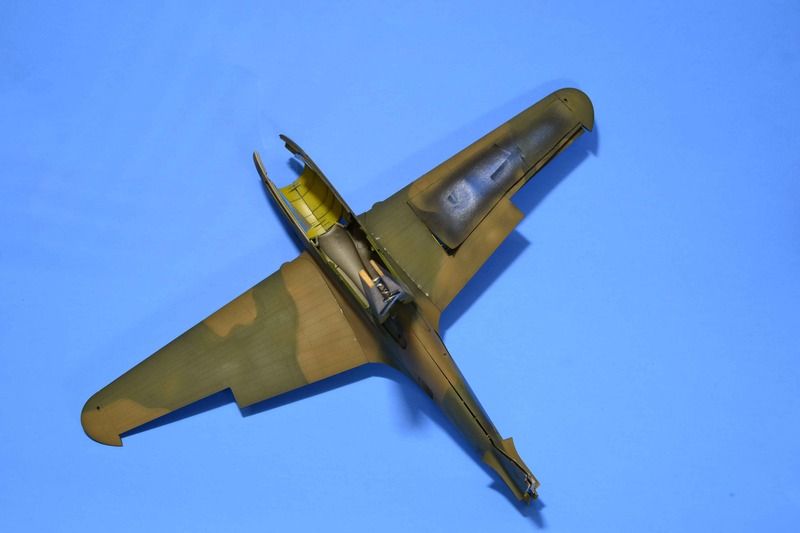
First up is finishing up the engine.  Exhausts are now added.
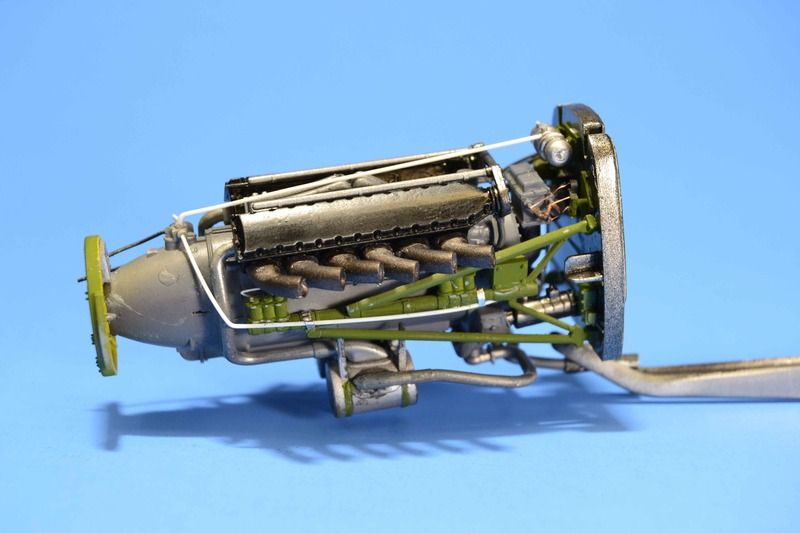


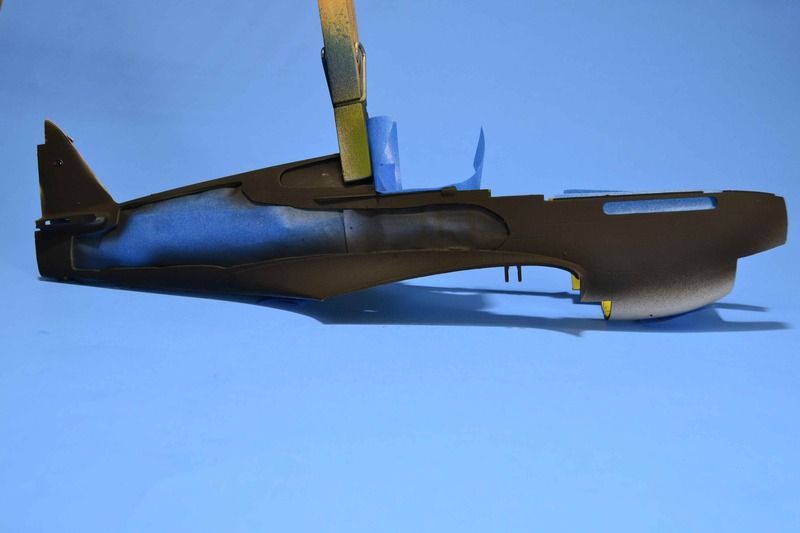
Next up is to actually begin the painting process.  Some may ask why, why do that prior to gluing all of the bits and pieces?  Well simple really.  I am a bit scared when it comes to painting around that cut away bit.  For that reason I choose to paint it now and then when I get it all together I can go back over the bits and touch up.  


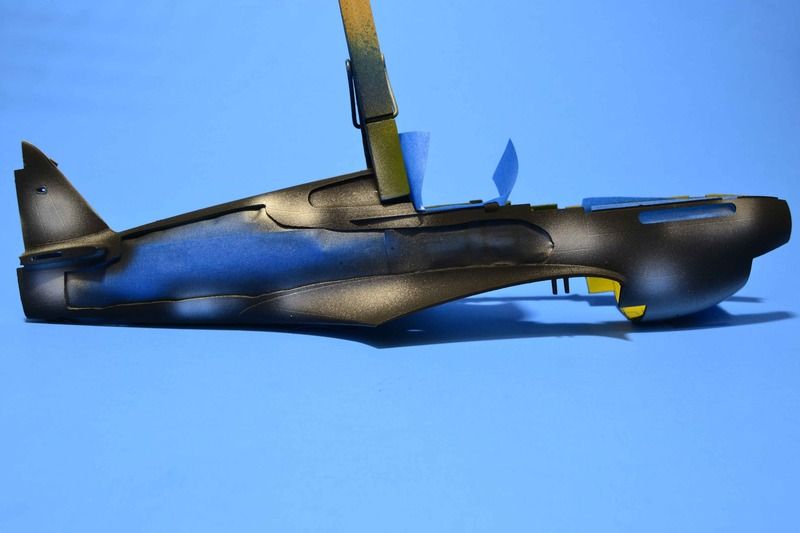
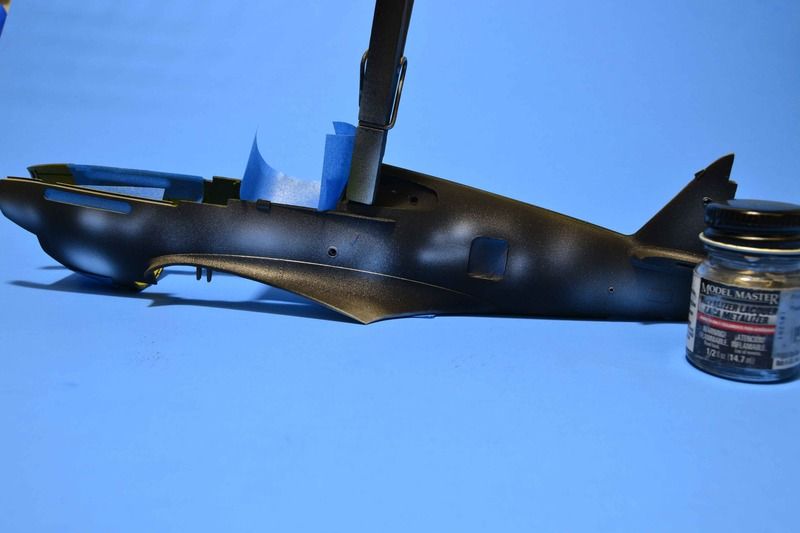
First up is my usual, a coat of Flat Black.
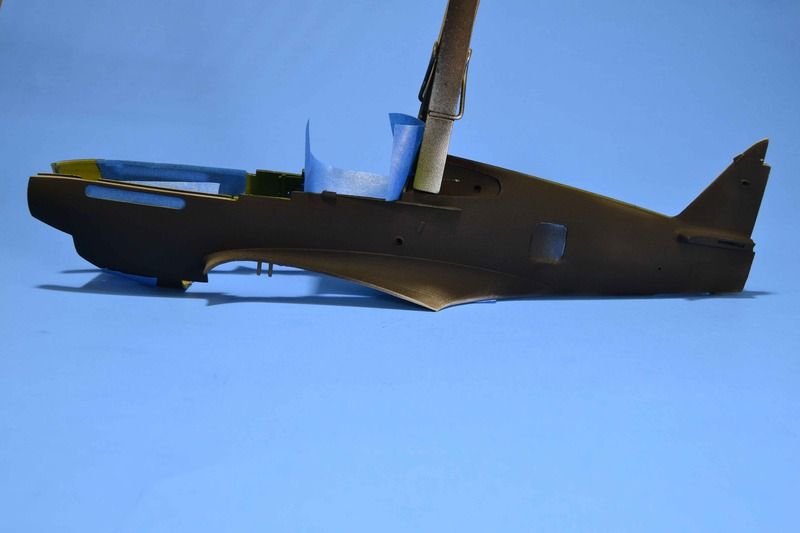


Next up is to break this up just a bit.  I choose to use Model Master Aluminium Plate.  This is sprayed on randomly.  This is to break the monotone of the top colors.


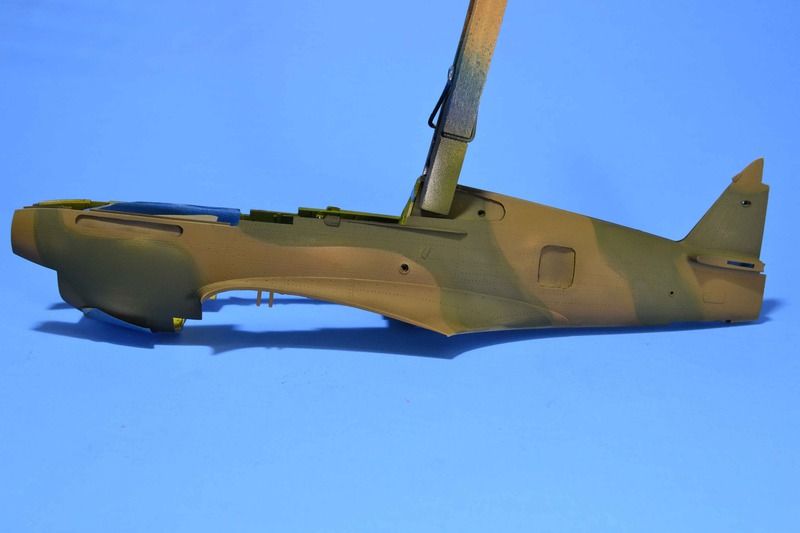
I then sprayed Pollyscale colors, Dark Earth, and Dark Green.   I used homemade paper masks.  To be honest they worked ok but they could have been so much better.  The paints on the other hand again do not impress me.  They are some of the most difficult I have used.  
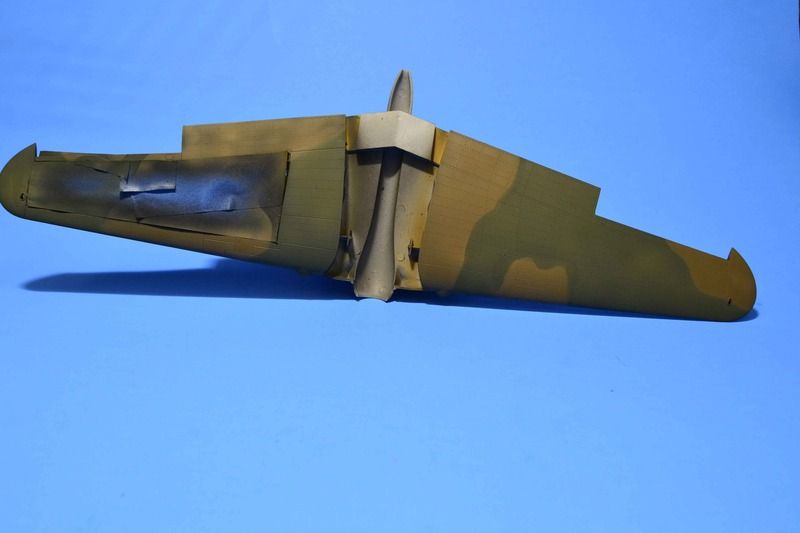


Being up front about it, any tone modulation in the paint are strictly because I either sprayed too heavy, not heavy enough, or otherwise screwed up.  It might just work for what I intend though.


Next up will be to begin the reconstruction of the interior and the permanent installation of the assorted pieces.


All comments, critiques, and criticism are encouraged.


Joe

Veterans,

Thank You For Your Sacrifices,

Never To Be Forgotten

Where you can find me:

Workbench on FaceBook  Google Plus  YouTube

  • Member since
    June 2014
Posted by BrandonK on Friday, April 29, 2016 11:04 PM

Stick out tongue

BK

On the bench:

A lot !! And I mean A LOT!!

2024 Kits on deck / in process / completed   

                         14 / 5 / 2  

                              Tongue Tied

  • Member since
    July 2014
Posted by modelcrazy on Saturday, April 30, 2016 9:48 AM

Joe,

That engine looks better than my 1/8 scale Merlin. You are doing such a great job on this project. 

Steve

Building a kit from your stash is like cutting a head off a Hydra, two more take it's place.


http://www.spamodeler.com/forum/

  • Member since
    May 2013
  • From: Indiana, USA
Posted by Greg on Saturday, April 30, 2016 10:15 AM

Still at the edge of my seat. Coming along nicely to say the least. Beautiful work on the engine and firewall.

It seems you are awfully hard on yourself at times, Joe.

Bang Head     <------- don't do that.  Smile


  • Member since
    September 2011
Posted by fightnjoe on Sunday, May 1, 2016 11:32 PM

You are all very kind.  Many thanks.


Greg you are absolutely right, I am very harsh on my own work.  Always have been.


Joe

Veterans,

Thank You For Your Sacrifices,

Never To Be Forgotten

Where you can find me:

Workbench on FaceBook  Google Plus  YouTube

  • Member since
    June 2003
  • From: Cavite, Philippines
Posted by allan on Monday, May 2, 2016 3:18 AM

Love the way you work, Joe. Clean and crisp! Looking forward to more pics.

No bucks, no Buck Rogers

  • Member since
    February 2012
  • From: Olmsted Township, Ohio
Posted by lawdog114 on Monday, May 2, 2016 9:58 PM
Looking great Joe. Diggin' the camo....

 "Can you fly this plane and land it?...Surely you can't be serious....I am serious, and don't call me Shirley"


  • Member since
    September 2011
Posted by fightnjoe on Tuesday, May 3, 2016 10:32 PM

Many many thanks.


Joe

Veterans,

Thank You For Your Sacrifices,

Never To Be Forgotten

Where you can find me:

Workbench on FaceBook  Google Plus  YouTube

  • Member since
    September 2011
Posted by fightnjoe on Tuesday, May 3, 2016 10:33 PM

Finishing up the interior work.  Everything I will show in this post is now installed.  


The port side 


And the little bit on the starboard side.


What is left on the interior is the seat, the lower section of the tail wheel assembly, and finishing off the plumbing of the starboard side of the cockpit.  Oh so close to closing up the fuselage.  Oh so close.


All comments, critiques, and criticism are encouraged.


Joe

Veterans,

Thank You For Your Sacrifices,

Never To Be Forgotten

Where you can find me:

Workbench on FaceBook  Google Plus  YouTube

  • Member since
    July 2014
Posted by modelcrazy on Tuesday, May 3, 2016 10:41 PM

Joe,

That is looking so good Yes You are doing a fantastic job!!

Steve

Building a kit from your stash is like cutting a head off a Hydra, two more take it's place.


http://www.spamodeler.com/forum/

  • Member since
    February 2007
  • From: Brunswick, Ohio
Posted by Buckeye on Wednesday, May 4, 2016 11:33 AM

Just friggin amazing work there!Bow Down

Mike

  • Member since
    September 2011
Posted by fightnjoe on Wednesday, May 4, 2016 10:52 PM

You are all very kind.  Thank you.


Joe

Veterans,

Thank You For Your Sacrifices,

Never To Be Forgotten

Where you can find me:

Workbench on FaceBook  Google Plus  YouTube

KWS
  • Member since
    May 2016
Posted by KWS on Wednesday, May 4, 2016 11:32 PM

She looks fantastic. Thats some top-notch work.

  • Member since
    March 2015
  • From: Streetsboro, Ohio
Posted by Toshi on Thursday, May 5, 2016 4:46 AM

This is a whole different level in model building.  I'm very shocked!

Toshi

On The Bench: Revell 1/48 B-25 Mitchell


Married to the most caring, loving, understanding, and beautiful wife in the world.  Mrs. Toshi


  • Member since
    October 2012
  • From: Mt. Washington, KY
Posted by Geezer on Thursday, May 5, 2016 7:39 AM

Where is my Thesaurus? Wow. Amzing. Brilliant. I quit.


What a great build.

www.spamodeler.com/forum/index.php 

Mediocraties - my favorite Greek model builder. 


  • Member since
    November 2009
  • From: SW Virginia
Posted by Gamera on Thursday, May 5, 2016 8:21 AM

Hey Joe, haven't been following as close as I should but terrific job! 

"I dream in fire but work in clay." -Arthur Machen


  • Member since
    September 2011
Posted by fightnjoe on Thursday, May 5, 2016 2:48 PM

You are all very kind, I am most humbled.  Thank you.


Joe

Veterans,

Thank You For Your Sacrifices,

Never To Be Forgotten

Where you can find me:

Workbench on FaceBook  Google Plus  YouTube

  • Member since
    April 2013
  • From: Eleva, Wisconsin
Posted by Greatmaker on Thursday, May 5, 2016 4:28 PM

I believe most of us here build model planes you sir are building and actual plane from a model simply outstanding work


  • Member since
    September 2011
Posted by fightnjoe on Thursday, May 5, 2016 4:48 PM

Most humbled by your very kind comment.


Joe

Veterans,

Thank You For Your Sacrifices,

Never To Be Forgotten

Where you can find me:

Workbench on FaceBook  Google Plus  YouTube

  • Member since
    December 2010
  • From: Salem, Oregon
Posted by 1943Mike on Thursday, May 5, 2016 8:08 PM

And I quote Mary Poppins: "Supercalifragilisticexpialidocious"!!


Mike

"Le temps est un grand maître, mais malheureusement, il tue tous ses élèves."

Hector Berlioz

  • Member since
    September 2011
Posted by fightnjoe on Tuesday, May 17, 2016 10:30 PM

Very kind.  Many thanks.


Joe

Veterans,

Thank You For Your Sacrifices,

Never To Be Forgotten

Where you can find me:

Workbench on FaceBook  Google Plus  YouTube

  • Member since
    September 2011
Posted by fightnjoe on Tuesday, May 17, 2016 10:31 PM

And yet another update.  This one is just a bit of the small stuff and then a big step forward.


First the small stuff.


The IP.


The tail wheel assembly.


And the seat.


Well then came a big step.  Closure of the fuselage.  


Next up is to go back and work on the wing some.  I have some fixes to make and some little things to install.  


Moving along but oh so slowly.


All comments, critiques, and criticism are encouraged.


Joe

Veterans,

Thank You For Your Sacrifices,

Never To Be Forgotten

Where you can find me:

Workbench on FaceBook  Google Plus  YouTube

  • Member since
    September 2011
Posted by fightnjoe on Sunday, May 29, 2016 8:33 PM

Well folks back again.  Just a brief one this time.


The wings are on and the fuselage is now completely painted.  


Decals are on and setting at the moment.  There will be pictures soon.


All comments, critiques, and criticism are encouraged.


Joe

Veterans,

Thank You For Your Sacrifices,

Never To Be Forgotten

Where you can find me:

Workbench on FaceBook  Google Plus  YouTube

  • Member since
    November 2009
  • From: SW Virginia
Posted by Gamera on Monday, May 30, 2016 8:46 AM

Oh wow, now that's really really neat! Looking forward to the next set of photos. 

"I dream in fire but work in clay." -Arthur Machen


  • Member since
    March 2015
  • From: Streetsboro, Ohio
Posted by Toshi on Monday, May 30, 2016 9:49 AM

Amazing!

Toshi

On The Bench: Revell 1/48 B-25 Mitchell


Married to the most caring, loving, understanding, and beautiful wife in the world.  Mrs. Toshi


  • Member since
    December 2002
Posted by 7474 on Monday, May 30, 2016 10:14 AM

Keep it going, looking great

  • Member since
    June 2014
Posted by BrandonK on Monday, May 30, 2016 11:39 AM

Simply mind blowing. 

BK

On the bench:

A lot !! And I mean A LOT!!

2024 Kits on deck / in process / completed   

                         14 / 5 / 2  

                              Tongue Tied

  • Member since
    February 2012
  • From: Olmsted Township, Ohio
Posted by lawdog114 on Monday, May 30, 2016 7:24 PM
Very impressive work...

 "Can you fly this plane and land it?...Surely you can't be serious....I am serious, and don't call me Shirley"


  • Member since
    September 2011
Posted by fightnjoe on Tuesday, May 31, 2016 10:13 PM

You are all very kind.  Thank you.


Joe

Veterans,

Thank You For Your Sacrifices,

Never To Be Forgotten

Where you can find me:

Workbench on FaceBook  Google Plus  YouTube

  • Member since
    September 2011
Posted by fightnjoe on Tuesday, May 31, 2016 11:16 PM

Well folks work continues on the P-40B.  


The decals are in place.  I have glossed them over to prepare for the weathering stage.  They went down a dream this time.  The subject is "White 68".


Next will be to start the weathering.  


All comments, critiques, and criticism are encouraged.


Joe

Veterans,

Thank You For Your Sacrifices,

Never To Be Forgotten

Where you can find me:

Workbench on FaceBook  Google Plus  YouTube

  • Member since
    September 2011
Posted by fightnjoe on Sunday, June 5, 2016 11:03 PM

The fun begins.


The process to bring the showroom aircraft to a well used aircraft has started.  Using artist oils the process begins with a simple dot filter.  Once the filter was blended I used mineral spirits to show some staining.  This was in a very random pattern.  I added some additional oils in places where I felt and had seen photos of the staining being heavier.


Phase one finished.  Next will be phase two, chipping and additional weathering and staining.


All comments, critiques, and criticism are encouraged.


Joe

Veterans,

Thank You For Your Sacrifices,

Never To Be Forgotten

Where you can find me:

Workbench on FaceBook  Google Plus  YouTube

  • Member since
    September 2011
Posted by fightnjoe on Monday, June 6, 2016 9:13 AM

Phase two.


For this part of the process I went back through with some oils and also with an Acrylic pin wash to pic out specific spots.  I did this after shooting a Flat Clear over the aircraft.  I also dry brushed Flat Aluminium in areas that I had seen in photos were subject to wear and tear.  I used several brushes from a fine point to a rather large soft brush.


The next stage will be the small detail work in the landing gear and such.  


All comments,critiques, and criticism are encouraged.


Joe

Veterans,

Thank You For Your Sacrifices,

Never To Be Forgotten

Where you can find me:

Workbench on FaceBook  Google Plus  YouTube

  • Member since
    September 2014
Posted by rooster513 on Monday, June 6, 2016 9:24 AM

Looking REALLY good Joe! Those decals did go down nice and after the weathering they look painted on...especially that shark mouth! Looking forward to seeing more.

-Andy

  • Member since
    June 2014
Posted by BrandonK on Tuesday, June 7, 2016 9:02 AM

A work of art. 

BK

On the bench:

A lot !! And I mean A LOT!!

2024 Kits on deck / in process / completed   

                         14 / 5 / 2  

                              Tongue Tied

  • Member since
    July 2014
Posted by modelcrazy on Tuesday, June 7, 2016 9:11 AM

Surprise

Steve

Building a kit from your stash is like cutting a head off a Hydra, two more take it's place.


http://www.spamodeler.com/forum/

  • Member since
    February 2012
  • From: Olmsted Township, Ohio
Posted by lawdog114 on Thursday, June 9, 2016 3:39 AM
Stunning...

 "Can you fly this plane and land it?...Surely you can't be serious....I am serious, and don't call me Shirley"


  • Member since
    March 2015
  • From: Streetsboro, Ohio
Posted by Toshi on Thursday, June 9, 2016 4:19 AM

A fantastic, beautiful rendition.  This is an art form and you've created a masterpiece!

Toshi

On The Bench: Revell 1/48 B-25 Mitchell


Married to the most caring, loving, understanding, and beautiful wife in the world.  Mrs. Toshi


  • Member since
    September 2011
Posted by fightnjoe on Thursday, June 9, 2016 9:57 AM

Many many thanks all.


Joe

Veterans,

Thank You For Your Sacrifices,

Never To Be Forgotten

Where you can find me:

Workbench on FaceBook  Google Plus  YouTube

  • Member since
    November 2009
  • From: SW Virginia
Posted by Gamera on Thursday, June 9, 2016 11:26 AM

Decals look great and love how the filters and chipping are going. 

"I dream in fire but work in clay." -Arthur Machen


  • Member since
    February 2014
  • From: Michigan
Posted by silentbob33 on Thursday, June 9, 2016 4:29 PM
Very cool Joe! I'm always amazed by your cutaways.

On my bench: Academy 1/35 UH-60L Black Hawk

  • Member since
    March 2003
  • From: Western North Carolina
Posted by Tojo72 on Friday, June 10, 2016 7:56 AM

Certainly up to your lofty standards Joe

  • Member since
    September 2011
Posted by fightnjoe on Friday, June 10, 2016 11:09 PM

Many many thanks.


Joe

Veterans,

Thank You For Your Sacrifices,

Never To Be Forgotten

Where you can find me:

Workbench on FaceBook  Google Plus  YouTube

  • Member since
    September 2011
Posted by fightnjoe on Friday, June 10, 2016 11:09 PM

Well folks the time has come to make the decision.  


I am going to submit this to a magazine.  With that in mind this will be the last update until I am told no or it is in print.


Now the update...


Continuing with the weathering pastels were added to show exhaust staining.  I also added some on the exhaust pipes.  I added some black pastels to the wing roots to try to tone down the look.  


Pictures..........


Thank you all for following along.  


All comments, critiques, and criticism are encouraged.


Joe

Veterans,

Thank You For Your Sacrifices,

Never To Be Forgotten

Where you can find me:

Workbench on FaceBook  Google Plus  YouTube

  • Member since
    May 2016
Posted by jsmith on Sunday, June 12, 2016 9:34 PM
that is one of the best cutaways I have seen. my 6 year old loved your choice of markings jim
  • Member since
    September 2011
Posted by fightnjoe on Monday, June 20, 2016 11:39 AM

Jim you are very kind.  Thank you.


Joe

Veterans,

Thank You For Your Sacrifices,

Never To Be Forgotten

Where you can find me:

Workbench on FaceBook  Google Plus  YouTube

  • Member since
    September 2014
Posted by rooster513 on Monday, June 20, 2016 11:49 AM

You know something Joe...your "Going Dark" post updates always sadden me b/c I know the awesome build you've been doing is coming to a close...but then I realize it could also be the start of another awesome build, so I become happy again LOL! But seriously, you have another gem here! I always admire your work. Good luck with getting it in the magazineBig Smile

-Andy

  • Member since
    November 2009
  • From: SW Virginia
Posted by Gamera on Monday, June 20, 2016 12:06 PM

Awesome! I'm crossing my fingers you make it into FSM! 

"I dream in fire but work in clay." -Arthur Machen


  • Member since
    March 2015
  • From: Streetsboro, Ohio
Posted by Toshi on Monday, June 20, 2016 1:30 PM

I know this build will definately make it into a magazine!  This is a beautiful P-40.

Toshi

On The Bench: Revell 1/48 B-25 Mitchell


Married to the most caring, loving, understanding, and beautiful wife in the world.  Mrs. Toshi


  • Member since
    September 2011
Posted by fightnjoe on Monday, June 20, 2016 2:00 PM

You are all very kind.  Thank you.  I am grateful.


Joe

Veterans,

Thank You For Your Sacrifices,

Never To Be Forgotten

Where you can find me:

Workbench on FaceBook  Google Plus  YouTube

  • Member since
    February 2012
  • From: Olmsted Township, Ohio
Posted by lawdog114 on Thursday, June 23, 2016 1:13 AM
Heck yeah you should submit that....it's outstanding....

 "Can you fly this plane and land it?...Surely you can't be serious....I am serious, and don't call me Shirley"


  • Member since
    September 2011
Posted by fightnjoe on Wednesday, June 29, 2016 9:01 AM

Very kind, thank you.


Joe

Veterans,

Thank You For Your Sacrifices,

Never To Be Forgotten

Where you can find me:

Workbench on FaceBook  Google Plus  YouTube

JOIN OUR COMMUNITY!

Our community is FREE to join. To participate you must either login or register for an account.

SEARCH FORUMS
FREE NEWSLETTER
By signing up you may also receive reader surveys and occasional special offers. We do not sell, rent or trade our email lists. View our Privacy Policy.