SEARCH FINESCALE.COM

Enter keywords or a search phrase below:

1/48 Sopwith Camel F.1*** FINISHED Pg.4

12477 views
123 replies
1 rating 2 rating 3 rating 4 rating 5 rating
  • Member since
    April 2003
  • From: USA
Posted by keavdog on Sunday, January 10, 2021 4:44 PM

I built that when I was a kid.  Looking forward to this build. 

Thanks,

John

  • Member since
    July 2004
  • From: Sonora Desert
Posted by stikpusher on Sunday, January 10, 2021 5:08 PM

Thanks John. Same here on when the last time was that I built this particular kit. It is definitely something of a “nostalgia build”.


Last night I began construction. Actually though it was mostly just paint work.


First I took a razor saw along the seat to give it some texture to suggest that of the wicker seats actually used. Once painted and with a wash it should look more the part.
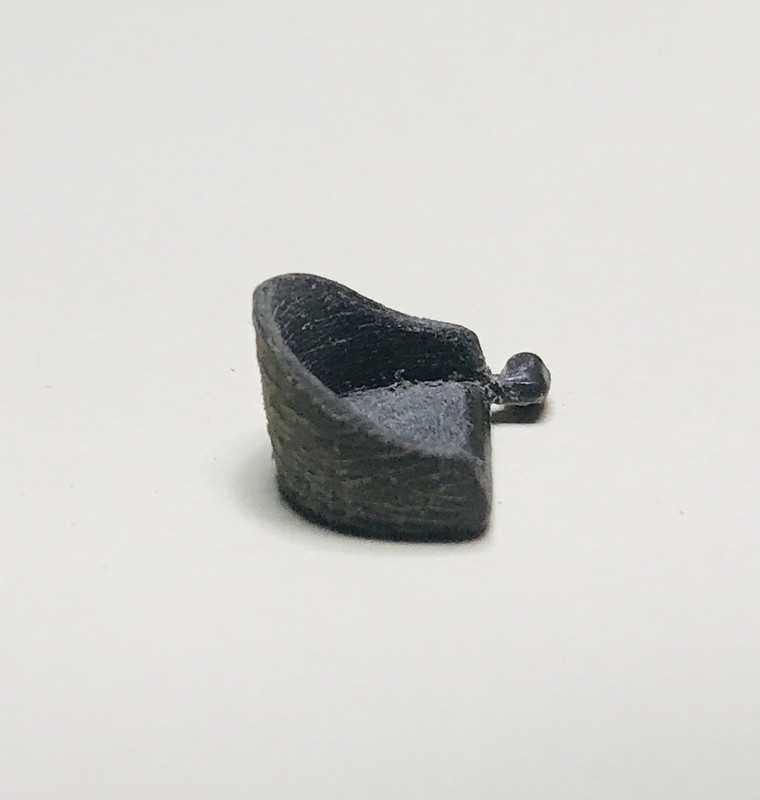


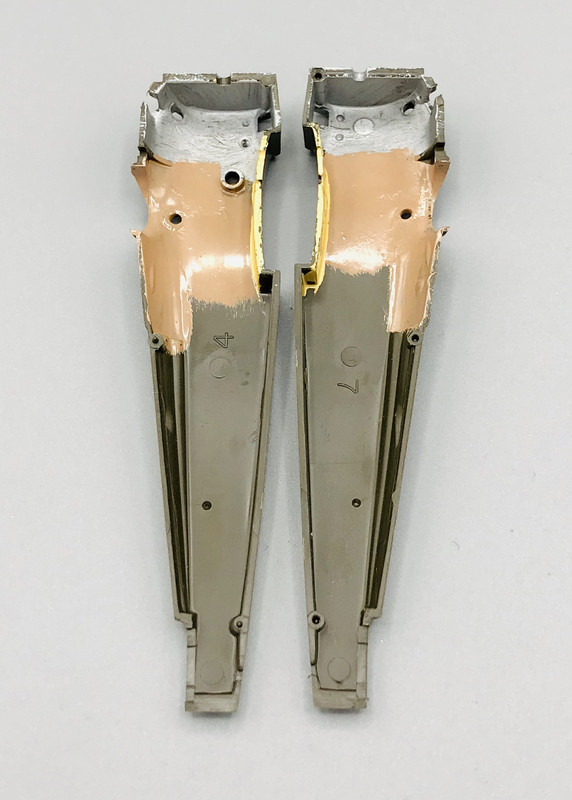
Then I painted up other cockpit components, and the interior of the fuselage halves. Just getting the base colors on for now. I’m not gonna use the kit pilot, so behind the seat is a glaring empty space. I searched thru my spares/salvaged parts and came up with a fuel tank to fill the void. It somewhat resembles the real thing. I’m not going for 100% accuracy, just stuff to suggest what should be there. I’m sure that must sound like blasphemy to some modelers.
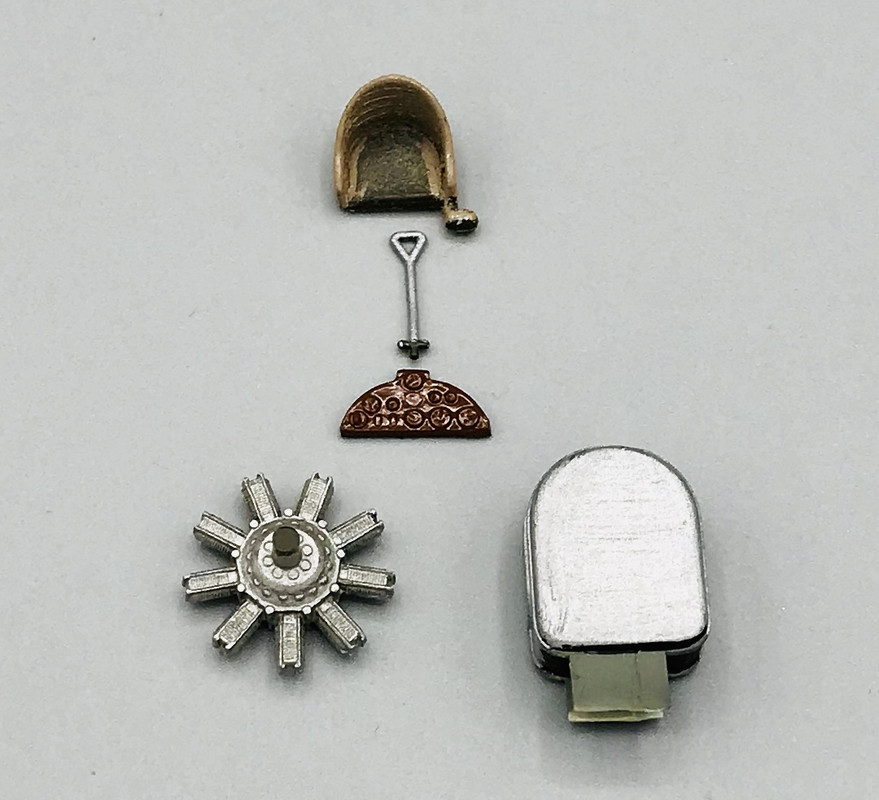


I’ll get to work on detail painting and washes over the next few days, plus whatever mods I intend to scratch up for the cockpit. 


F is for FIRE, That burns down the whole town!

U is for URANIUM... BOMBS!

N is for NO SURVIVORS...

       - Plankton

LSM


  • Member since
    November 2003
  • From: Naples, FL
Posted by tempestjohnny on Sunday, January 10, 2021 6:59 PM
I'll peek in on this


  • Member since
    July 2004
  • From: Sonora Desert
Posted by stikpusher on Sunday, January 10, 2021 7:05 PM

Good to see ya here TJ. I should have some decent progress in a couple of days. First trick will be fitting that fuel tank in there... and painting up the IP.


F is for FIRE, That burns down the whole town!

U is for URANIUM... BOMBS!

N is for NO SURVIVORS...

       - Plankton

LSM


  • Member since
    February 2011
Posted by knox on Sunday, January 10, 2021 7:20 PM

That was a cool idea on the seat.  I’m going to enjoy following along.  

  • Member since
    April 2015
Posted by Mopar Madness on Sunday, January 10, 2021 7:23 PM

Another vintage classic gets new life!  There's something satisfying about putting effort into an old kit. 

Chad

God, Family, Models...

At the plate: 1/48 Airfix Bf109 & 1/35 Tamiya Famo

On deck: Who knows!

  • Member since
    July 2004
  • From: Sonora Desert
Posted by stikpusher on Sunday, January 10, 2021 7:40 PM

Knox and Chad thanks for looking in on this project. 

Knox, it’s a nice simple old school technique to dress up an otherwise bland part.

Chad, you are quite right on that point. Giving these old kits some extra attention and TLC can really be enjoyable.


F is for FIRE, That burns down the whole town!

U is for URANIUM... BOMBS!

N is for NO SURVIVORS...

       - Plankton

LSM


  • Member since
    March 2003
  • From: Towson MD
Posted by gregbale on Monday, January 11, 2021 6:34 AM

Always great to see another Camel on the production floor!

[BTW, I have that same decal set, which I got for the USN markings; I've done 2 others off the sheet...but have yet to do the one I actually purchased the decals for! Ain't that always the way? Big Smile]

Great work so far.

Greg

George Lewis:

"Every time you correct me on my grammar I love you a little fewer."
 
  • Member since
    July 2004
  • From: Sonora Desert
Posted by stikpusher on Monday, January 11, 2021 9:17 AM

Thanks Greg. That is too funny that you have built two other subjects from the decal set, but not yet the one that you bought the set intending to use. Funny how those things happen.


F is for FIRE, That burns down the whole town!

U is for URANIUM... BOMBS!

N is for NO SURVIVORS...

       - Plankton

LSM


fox
  • Member since
    January 2007
  • From: Narvon, Pa.
Posted by fox on Monday, January 11, 2021 2:54 PM

Hey Stik, I'll be riding along on this build too. 

Know what you mean about the empty pit. Started a WIP the end of Oct. on a Monogram SBD Dauntless that had a rectangular box for a pit. Pilots seat, pilot (ugly), rear gunner (also ugly) and machine gun. That was all, not even an IP. I absolutely couldn't leave it that way. Haven't worked on it much over the holidays but I'll bring it up to date soon.


Jim Captain

Stay Safe.

 Main WIP: 

   On the Bench: Artesania Latina  (aka) Artists in the Latrine 1/75 Bluenose II

I keep hitting "escape", but I'm still here.

  • Member since
    July 2004
  • From: Sonora Desert
Posted by stikpusher on Monday, January 11, 2021 3:32 PM

Thanks for tagging along Jim. I know what you mean about the Monogram SBD. I have one of those as a sidelined build. I added a bunch of stuff mine salvaged off of a trashed TBD build. Those parts helped a lot!!!!


F is for FIRE, That burns down the whole town!

U is for URANIUM... BOMBS!

N is for NO SURVIVORS...

       - Plankton

LSM


  • Member since
    July 2004
  • From: Sonora Desert
Posted by stikpusher on Monday, January 11, 2021 8:44 PM

Today’s update. Lots of painting and drilling and sanding and measuring & cutting... and not much gluing. So here we go.


First up, I was not happy with the filler points on the top deck behind the cockpit, so I drilled those out.


Before and after


Then I repainted the cockpit floor based off some photos of preserved Camels. Different custom shade of wood that I mixed up compared to the sidewalls


Then I modified the salvaged fuel tank into the piece affair that the real one had. Not to mention lots of sanding to get it to fit into the fuselage behind the pilot seat. I also painted the seat cushion and edging, again based off of photos of Museum Camels


And lastly, base colors finished on the IP and control yoke, plus I scratch built up a rudder bar with control linkage rods, again based off of Museum Camels


A bit more stuff to do like instrument decals, washes and perhaps an attempt at wood grain before I can put it all together.


Until the next update...


F is for FIRE, That burns down the whole town!

U is for URANIUM... BOMBS!

N is for NO SURVIVORS...

       - Plankton

LSM


  • Member since
    July 2004
  • From: Sonora Desert
Posted by stikpusher on Wednesday, January 13, 2021 8:46 PM

Today’s update: I took a shot at using oils for a wood grain appearance.

First step, I mixed up a brown shade and then applied it over the interior wood surface areas


Next step I used a thinner moistened brush to remove much of the oil paint and leave a streaking that resembles wood grain


The final look... any resemblance to actual wood grain is more luck than anything else. 


This technique is actually going to take lots of practice to get a handle on it.


F is for FIRE, That burns down the whole town!

U is for URANIUM... BOMBS!

N is for NO SURVIVORS...

       - Plankton

LSM


  • Member since
    July 2004
  • From: Sonora Desert
Posted by stikpusher on Thursday, January 14, 2021 1:18 PM

One small update from yesterday’s work:

I forgot to get a better shot to show the sidewall wood grain effort


and now that the oil wash on the engine has dried and I do not need to worry about it staining my photo booth, here’s a photo of the engine


F is for FIRE, That burns down the whole town!

U is for URANIUM... BOMBS!

N is for NO SURVIVORS...

       - Plankton

LSM


  • Member since
    July 2014
Posted by modelcrazy on Thursday, January 14, 2021 2:30 PM

Ooo, how fun, a Camel. 

Steve

Building a kit from your stash is like cutting a head off a Hydra, two more take it's place.


http://www.spamodeler.com/forum/

  • Member since
    July 2004
  • From: Sonora Desert
Posted by stikpusher on Saturday, January 16, 2021 7:48 PM

modelcrazy

Ooo, how fun, a Camel. 


Right? You know me Steve, I’m a sucker for kits from the old days of Monogram.


Today’s progress report: So today I completed my intended goals for yesterday. I added instrument decals to the IP, RAF WWII type, rather than the WWI type that I had planned to use but were invisible because they needed to be applied over a white background.


Then I drybrushed and touched up the seat


And lastly, I touched up the inside colors. 


Next session I can install all the interior parts and close it all up.


F is for FIRE, That burns down the whole town!

U is for URANIUM... BOMBS!

N is for NO SURVIVORS...

       - Plankton

LSM


  • Member since
    February 2011
Posted by knox on Saturday, January 16, 2021 8:01 PM

Coming along nicely.  It’s amazing what talent and some tlc can do to old kits. It’s why I build Tamiya kits. ☺️

  • Member since
    July 2004
  • From: Sonora Desert
Posted by stikpusher on Saturday, January 16, 2021 8:46 PM

Thanks Knox. Although in all honesty, old Tamiya kits of this vintage are not that hot either. 


F is for FIRE, That burns down the whole town!

U is for URANIUM... BOMBS!

N is for NO SURVIVORS...

       - Plankton

LSM


  • Member since
    July 2014
Posted by modelcrazy on Saturday, January 16, 2021 11:35 PM

stikpusher

Thanks Knox. Although in all honesty, old Tamiya kits of this vintage are not that hot either. 


That's a fact

Steve

Building a kit from your stash is like cutting a head off a Hydra, two more take it's place.


http://www.spamodeler.com/forum/

  • Member since
    July 2004
  • From: Sonora Desert
Posted by stikpusher on Friday, January 22, 2021 11:54 AM

I was out of town and away from my bench on Tuesday and Wednesday so no progress then. But yesterday I finally got the fuselage assembled.


and unfortunately despite all the test fitting and sanding, I still have a bit of a gap behind the cockpit from the added fuel tank. But that should not be too difficult to fill.


And what can be seen of all the added detail inside up front...


Also I did a bit of grinding with my Dremel to thin outbthe cowling edges


Next up... seam filling and clean up...


F is for FIRE, That burns down the whole town!

U is for URANIUM... BOMBS!

N is for NO SURVIVORS...

       - Plankton

LSM


  • Member since
    January 2015
  • From: Tumwater, WA.
Posted by M. Brindos on Friday, January 22, 2021 12:15 PM

This is a neat project. The Camel was always one of my favorites from that conflict.

Can't wait to see how this turns out.

- Mike Brindos "Lost Boy"

  • Member since
    July 2004
  • From: Sonora Desert
Posted by stikpusher on Friday, January 22, 2021 12:36 PM

Thanks Mike. Once I have the seams fixed, I can start gettin this a bit more looking like a proper Camel and seeing some aircraft form take shape.


F is for FIRE, That burns down the whole town!

U is for URANIUM... BOMBS!

N is for NO SURVIVORS...

       - Plankton

LSM


  • Member since
    January 2015
  • From: Tumwater, WA.
Posted by M. Brindos on Friday, January 22, 2021 1:00 PM

Well so far I can see the biggest challenge after those seams is going to be that top wing and making sure it's straight and not drooping like the box art lol.

This always seems to be an issue with older string bag kits. Those dang struts are always a pain to line up because dry fitting is a PitA!

- Mike Brindos "Lost Boy"

  • Member since
    July 2004
  • From: Sonora Desert
Posted by stikpusher on Friday, January 22, 2021 2:18 PM

Oh to be 13 again when I just didn’t care... lol


F is for FIRE, That burns down the whole town!

U is for URANIUM... BOMBS!

N is for NO SURVIVORS...

       - Plankton

LSM


  • Member since
    April 2015
Posted by Mopar Madness on Friday, January 22, 2021 2:27 PM

Oh man, you do have your work cut out for you filling those seams! This is gonna look great though.

Chad

God, Family, Models...

At the plate: 1/48 Airfix Bf109 & 1/35 Tamiya Famo

On deck: Who knows!

  • Member since
    July 2004
  • From: Sonora Desert
Posted by stikpusher on Tuesday, February 2, 2021 8:02 PM

Today, it was back to work on the Camel. 


First priority, clean up the seam gap on top of the fuselage


Add some strip styrene shims


sand smooth and paint...


I also test fitted the cowling and guns... more in a couple of days


F is for FIRE, That burns down the whole town!

U is for URANIUM... BOMBS!

N is for NO SURVIVORS...

       - Plankton

LSM


  • Member since
    January 2015
  • From: Tumwater, WA.
Posted by M. Brindos on Tuesday, February 2, 2021 9:00 PM

That's not looking too bad, Carlos. Those gaps... uhg. I feel your pain lol. My Corsair ate sanding sticks like candy.

I am very much looking forward to seeing how well you get this one smoothed out 

- Mike Brindos "Lost Boy"

  • Member since
    July 2004
  • From: Sonora Desert
Posted by stikpusher on Tuesday, February 2, 2021 9:18 PM

Thank Mike. It's getting there, slow but sure. Not like the afternoon builds that I used to do of these kits as a kid.


F is for FIRE, That burns down the whole town!

U is for URANIUM... BOMBS!

N is for NO SURVIVORS...

       - Plankton

LSM


  • Member since
    January 2015
  • From: Tumwater, WA.
Posted by M. Brindos on Tuesday, February 2, 2021 9:23 PM

Lol! Tell me about it. I just CAN'T build anything without fixing something unless it a new Tamiya kit. Since I'm on a Monogram kick right now lol.

- Mike Brindos "Lost Boy"

  • Member since
    January 2015
  • From: Katy, TX
Posted by Aggieman on Tuesday, February 2, 2021 9:25 PM

Your Camel is looking good so far despite the fit issues you're encountering.

I remember building this one in about '79, but I was a kid and I just slapped it together and promptly started "flying" it around the house.

  • Member since
    July 2009
  • From: North Carolina
Posted by Back to the bench on Thursday, February 4, 2021 1:02 PM

Snoopy's steed is looking niceYes

A clinic on perseverance!

Gil

  • Member since
    July 2004
  • From: Sonora Desert
Posted by stikpusher on Thursday, February 4, 2021 2:19 PM

Mike, Aggie, Gil, thank you all for looking in and commenting. 

The gap on the fuselage was purely self inflicted. I should have trimmed that tank down more.

Anyways, I've started painting up some of the major components before I start gluing them on. I'll have more progress photos up in a day or two.


F is for FIRE, That burns down the whole town!

U is for URANIUM... BOMBS!

N is for NO SURVIVORS...

       - Plankton

LSM


  • Member since
    July 2004
  • From: Sonora Desert
Posted by stikpusher on Saturday, February 6, 2021 4:48 PM

Well I finally have some progress work worth showing. To keep in the spirit of this old kit, I’ve been painting with a brush and enamel paints, mostly Humbrol, and some Xtracolor as well. And this is where is at now.


Everything is pretty much just test fitted for this photo. I still want to work on the cockpit opening padded collar a bit, and that’s much easier to do with nothing yet attached.


I also drilled out the front of the guns


I still need to do some more clean up work there. More to follow in a few days...


F is for FIRE, That burns down the whole town!

U is for URANIUM... BOMBS!

N is for NO SURVIVORS...

       - Plankton

LSM


  • Member since
    April 2015
Posted by Mopar Madness on Saturday, February 6, 2021 7:09 PM

Just goes to show you can make something wonderful from a vintage kit. Absolutely nothing wrong going old school! In the coming weeks I'm going to tackle their old 1/48 EA-6B Prowler. I've really become dependent on perfectly scribed and fitted kits. Tongue Tied

Chad

God, Family, Models...

At the plate: 1/48 Airfix Bf109 & 1/35 Tamiya Famo

On deck: Who knows!

  • Member since
    July 2004
  • From: Sonora Desert
Posted by stikpusher on Saturday, February 6, 2021 8:40 PM

How many of us here built this same kit when we were kids. I know that I did. And it's fun to build these old kits with grown up skills and all these modern tools and techniques. Not that I'm using much of the latter... lol.


F is for FIRE, That burns down the whole town!

U is for URANIUM... BOMBS!

N is for NO SURVIVORS...

       - Plankton

LSM


  • Member since
    March 2003
  • From: Towson MD
Posted by gregbale on Sunday, February 7, 2021 7:34 AM

Excellent work so far!

BTW...as many times as I've seen this kit, I never realized its engine was the much-prized (and more powerful) Bentley BR.1 type rather than the 'traditional' Clerget. Your drybrushing beautifully highlights the characteristic 'nonagon' shape of the crankcase.

Live and learn! Smile

Greg

George Lewis:

"Every time you correct me on my grammar I love you a little fewer."
 
  • Member since
    August 2015
  • From: the redlands Fl
Posted by crown r n7 on Sunday, February 7, 2021 7:56 AM

My hats off to you that plane in 1/48! Super job so far . l've built my share but in 1/28 


 Nick.

  • Member since
    July 2004
  • From: Sonora Desert
Posted by stikpusher on Sunday, February 7, 2021 5:10 PM

Thank you Greg and Nick.
Greg, I did not know that the Camelhad different engine types, and would not know the difference. All that detail visible is just due to an oil paints wash, nothing fancier than that.

Nick, I would love to have built those 1/28 scale kits. Those are more classics.

 One step at a time. Today I finished up, cleaned up, and then painted the guns. 


F is for FIRE, That burns down the whole town!

U is for URANIUM... BOMBS!

N is for NO SURVIVORS...

       - Plankton

LSM


  • Member since
    December 2002
  • From: Northern California
Posted by jeaton01 on Sunday, February 7, 2021 7:54 PM

Looking good, Carlos.  Don't go too far, everyone will think it's an Eduard!

John

To see build logs for my models:  http://goldeneramodel.com/mymodels/mymodels.html


  • Member since
    July 2004
  • From: Sonora Desert
Posted by stikpusher on Sunday, February 7, 2021 8:11 PM

jeaton01

Looking good, Carlos.  Don't go too far, everyone will think it's an Eduard!


LOL! Thanks John, but I doubt that. Its pedigree will never be mistaken.


F is for FIRE, That burns down the whole town!

U is for URANIUM... BOMBS!

N is for NO SURVIVORS...

       - Plankton

LSM


  • Member since
    July 2004
  • From: Sonora Desert
Posted by stikpusher on Friday, February 19, 2021 9:23 PM

During this week I’ve worked on the collar padding for the cockpit. First I added some strip styrene to the inner face then sanded it all to a more rounded profile.


Once it had been sanded, I painted it in Humbrol Satin Black. I need to go back and touch up where the sanding damaged the paint on adjacent areas


then lastly I attached the lower wing


F is for FIRE, That burns down the whole town!

U is for URANIUM... BOMBS!

N is for NO SURVIVORS...

       - Plankton

LSM


  • Member since
    January 2015
  • From: Tumwater, WA.
Posted by M. Brindos on Friday, February 19, 2021 9:35 PM

I love how that pit collar turned out. 

- Mike Brindos "Lost Boy"

  • Member since
    July 2004
  • From: Sonora Desert
Posted by stikpusher on Friday, February 19, 2021 10:03 PM

Thanks Mike. It's a definite improvement over the angled ridge of the kit part.


F is for FIRE, That burns down the whole town!

U is for URANIUM... BOMBS!

N is for NO SURVIVORS...

       - Plankton

LSM


  • Member since
    July 2004
  • From: Sonora Desert
Posted by stikpusher on Tuesday, February 23, 2021 9:30 PM

More progress... tail planes on... woohoo!


F is for FIRE, That burns down the whole town!

U is for URANIUM... BOMBS!

N is for NO SURVIVORS...

       - Plankton

LSM


  • Member since
    February 2012
  • From: Olmsted Township, Ohio
Posted by lawdog114 on Monday, March 1, 2021 8:42 PM

10,20,30,40,50 or more.........


Not a subject you see everyday. Coming along nice.

 "Can you fly this plane and land it?...Surely you can't be serious....I am serious, and don't call me Shirley"


  • Member since
    July 2004
  • From: Sonora Desert
Posted by stikpusher on Monday, March 1, 2021 10:22 PM

lawdog114

10,20,30,40,50 or more.........


Not a subject you see everyday. Coming along nice.


I love that song! Lol! And thank you! These old kits do have their charms.


F is for FIRE, That burns down the whole town!

U is for URANIUM... BOMBS!

N is for NO SURVIVORS...

       - Plankton

LSM


  • Member since
    November 2008
  • From: Central Florida
Posted by plasticjunkie on Tuesday, March 2, 2021 9:05 AM

Looking good stick. I love these old bipes. Beer

I have the old 1/28 Revell one in the stash that I picked up years ago in a yard sale for a couple of bucks.

 GIFMaker.org_jy_Ayj_O


Too many models to build, not enough time in a lifetime!!

  • Member since
    July 2004
  • From: Sonora Desert
Posted by stikpusher on Tuesday, March 2, 2021 10:44 AM

plasticjunkie

Looking good stick. I love these old bipes. Beer

I have the old 1/28 Revell one in the stash that I picked up years ago in a yard sale for a couple of bucks.


PJ, that would be a FUN one to build. I remember oogling those large scale Revell WWI kits at the store when I was a boy. I'd love to see you build that one someday down the road here.


F is for FIRE, That burns down the whole town!

U is for URANIUM... BOMBS!

N is for NO SURVIVORS...

       - Plankton

LSM


  • Member since
    November 2008
  • From: Central Florida
Posted by plasticjunkie on Tuesday, March 2, 2021 2:12 PM

I have been thinking about working on it since I have IPMS convention decals and pe details. A while back I did the Revell 1/28 Fokker Tri Wing and it was a fun build and believe it made it on the FSM magazine. I have the issue somewhere in my man cave.

 GIFMaker.org_jy_Ayj_O


Too many models to build, not enough time in a lifetime!!

  • Member since
    July 2004
  • From: Sonora Desert
Posted by stikpusher on Tuesday, March 2, 2021 9:35 PM

Well then you have to build an opponent for the Fokker! It cant sit there solo.


F is for FIRE, That burns down the whole town!

U is for URANIUM... BOMBS!

N is for NO SURVIVORS...

       - Plankton

LSM


  • Member since
    November 2008
  • From: Central Florida
Posted by plasticjunkie on Tuesday, March 2, 2021 9:57 PM

stikpusher

Well then you have to build an opponent for the Fokker! It cant sit there solo.


You have a good point there stick.


 GIFMaker.org_jy_Ayj_O


Too many models to build, not enough time in a lifetime!!

fox
  • Member since
    January 2007
  • From: Narvon, Pa.
Posted by fox on Wednesday, March 3, 2021 8:49 PM

Lookin good!!! Very nice work Stik!

Jim Captain

Stay Safe.

 Main WIP: 

   On the Bench: Artesania Latina  (aka) Artists in the Latrine 1/75 Bluenose II

I keep hitting "escape", but I'm still here.

  • Member since
    December 2002
  • From: Northern California
Posted by jeaton01 on Thursday, March 4, 2021 12:00 AM

I have an even dozen of those old 1/28 kits that I've picked up over the years, Camels, Spads, 2 of the Dr.1's but one of them I built in 1967 and still have.  Fun kits, and not wanted by the young'uns for many years.  

John

To see build logs for my models:  http://goldeneramodel.com/mymodels/mymodels.html


  • Member since
    April 2003
  • From: USA
Posted by keavdog on Thursday, March 4, 2021 1:26 AM

Comming along nicely Stik - Still haven't overcome my fear of the bipes.  

Thanks,

John

  • Member since
    March 2003
  • From: Towson MD
Posted by gregbale on Thursday, March 4, 2021 4:56 AM

jeaton01
I have an even dozen of those old 1/28 kits that I've picked up over the years, Camels, Spads, 2 of the Dr.1's but one of them I built in 1967 and still have. Fun kits, and not wanted by the young'uns for many years.

And still excellent kits for their day, and great platforms for some fairly easy super-detailing of cockpits and such.  (And some of the weightiest individual parts I can recall having encountered in the hobby. The Dr.1 had wings split in top and bottom pieces, but the Camel and Spad wing were molded as single individual parts...and seemed to weigh a ton!  Big Smile)

Greg

George Lewis:

"Every time you correct me on my grammar I love you a little fewer."
 
  • Member since
    July 2004
  • From: Sonora Desert
Posted by stikpusher on Friday, March 5, 2021 9:28 PM

Thanks guys. I think I'm finally gaining some steam on this one again....

Well today ended up being a case of going ahead three stages instead of the planned two. 


First up I added the metal tubing for the fuel tanks


Then I had intended to add only the struts into place on the lower wing and fuselage, and I sure proper positioning using the top wing. But that wasn’t working as intended, so I ended up gluing the top wing in position as well. So the wings are in place, just a bit sooner than intended


Next up, adding the landing gear, tail skid, and prop...


F is for FIRE, That burns down the whole town!

U is for URANIUM... BOMBS!

N is for NO SURVIVORS...

       - Plankton

LSM


  • Member since
    January 2015
  • From: Tumwater, WA.
Posted by M. Brindos on Saturday, March 6, 2021 2:48 AM

Pardon the pun, but it's really starting to take shape lol.

- Mike Brindos "Lost Boy"

  • Member since
    July 2004
  • From: Sonora Desert
Posted by stikpusher on Saturday, March 6, 2021 8:37 AM

M. Brindos

Pardon the pun, but it's really starting to take shape lol.


Lol! Thanks! And the pun needs no pardon here. Wink


F is for FIRE, That burns down the whole town!

U is for URANIUM... BOMBS!

N is for NO SURVIVORS...

       - Plankton

LSM


  • Member since
    April 2015
Posted by Mopar Madness on Saturday, March 6, 2021 11:19 AM

Stik, I do believe you're looking at the finish line. Such a wonderful rendition of a vintage classic.

Chad

God, Family, Models...

At the plate: 1/48 Airfix Bf109 & 1/35 Tamiya Famo

On deck: Who knows!

  • Member since
    May 2013
  • From: Indiana, USA
Posted by Greg on Saturday, March 6, 2021 1:14 PM

What a fun thead!

You have done lots of cool things, and she's looking good, Stik. Couple of things that stand out to me are the cockpit padding, the seat-belt (the likes of which I've never seen before, so I presume you've done your research as usual!), and I like that you chose to hand paint her.

keavdog
- Still haven't overcome my fear of the bipes. 

Ha! I was going to say "Someday when I grow up I'd like to try a biplane", but John beat me to it. Smile

  • Member since
    July 2004
  • From: Sonora Desert
Posted by stikpusher on Saturday, March 6, 2021 11:31 PM

Chad and Greg, thank you.

Greg, yes I did do research, but that was something of a multiple choice end result. So the lap belt was basicly a situation of picking one and going with it. Hand painting is fun... and biplanes are the perfect kits to practice that skill upon.


F is for FIRE, That burns down the whole town!

U is for URANIUM... BOMBS!

N is for NO SURVIVORS...

       - Plankton

LSM


fox
  • Member since
    January 2007
  • From: Narvon, Pa.
Posted by fox on Sunday, March 7, 2021 9:18 PM

Very nice job Stik!

Jim Captain

Stay Safe.

 Main WIP: 

   On the Bench: Artesania Latina  (aka) Artists in the Latrine 1/75 Bluenose II

I keep hitting "escape", but I'm still here.

  • Member since
    July 2004
  • From: Sonora Desert
Posted by stikpusher on Thursday, March 18, 2021 5:51 PM

Thank you Jim! I'm starting to see a finish line in the not too distant future....


Today’s update:


Paint touched up on the wings where I filled the seams and marred the paint work. I still need to touch up the struts. I also assembled the landing gear struts, painted them, and test fitted them to insure proper alignment while the glue dried.


I still also need to add the fuel filler cap.... and a few other things before I can get to applying decals


F is for FIRE, That burns down the whole town!

U is for URANIUM... BOMBS!

N is for NO SURVIVORS...

       - Plankton

LSM


  • Member since
    November 2008
  • From: Central Florida
Posted by plasticjunkie on Thursday, March 18, 2021 5:57 PM

Nice! 

 GIFMaker.org_jy_Ayj_O


Too many models to build, not enough time in a lifetime!!

  • Member since
    March 2012
  • From: Corpus Christi, Tx
Posted by mustang1989 on Thursday, March 18, 2021 6:28 PM

stikpusher

How many of us here built this same kit when we were kids. I know that I did. And it's fun to build these old kits with grown up skills and all these modern tools and techniques. Not that I'm using much of the latter... lol.


First off, I just had a chance to catch up on this thread and have to say that I'm liking what I'm seeing very much. I pulled this same stunt with a Monogram Dauntless a few years back and had a great time just as you are here Carlos. Amazing work fella.


 Forum | Modelers Social Club Forum (proboards.com) 

  • Member since
    July 2004
  • From: Sonora Desert
Posted by stikpusher on Thursday, March 18, 2021 6:50 PM

Thanks Joe. And that reminds me that I have a stalled old Monogram SBD to finish up one day... one day...


F is for FIRE, That burns down the whole town!

U is for URANIUM... BOMBS!

N is for NO SURVIVORS...

       - Plankton

LSM


  • Member since
    July 2004
  • From: Sonora Desert
Posted by stikpusher on Saturday, March 27, 2021 10:51 PM

I assembled, painted, and test fitted the landing gear. In case you’re wondering about the tan tires, apparently during WWI, carbon had not started to be added to rubber, so the natural color was tan, like a gum easer.


Now it’s all ready for decals


F is for FIRE, That burns down the whole town!

U is for URANIUM... BOMBS!

N is for NO SURVIVORS...

       - Plankton

LSM


  • Member since
    March 2003
Posted by rangerj on Sunday, March 28, 2021 1:25 PM

I'm lovin' this build Stick. I built everyone of those old Aurora WWI biplane kits and have a few in my collection including a Gotha bomber. Monogram got a few of those old molds and reproduced the kits. I used to collect empty milk bottles and soda bottles to take back to the grocery store and get the deposit money to buy kits with. If I recall that Camel kit was $0.79 and the Gotha bomber was $0.99 (expensive). Those were the days.

I heard, or read somewhere a long time ago, that many of the old Aurora molds were destroyed in a train wreck. Anybody know what did happen to their molds, other than the ones Monogram has (had?).

As an aside, I had a 3 foot stuffed "Snoopy the WWI ACE" stuffed animal that my 3 year old grandson laid claim to and it is now in his bedroom. DRAT!

  • Member since
    March 2012
  • From: Corpus Christi, Tx
Posted by mustang1989 on Sunday, March 28, 2021 2:12 PM

Now see.....I didn't know that about the tire color so I would've been stumped on the color of those. Lookin' good Carlos. Can't wait to see this one with some cals on it.


 Forum | Modelers Social Club Forum (proboards.com) 

  • Member since
    July 2004
  • From: Sonora Desert
Posted by stikpusher on Monday, March 29, 2021 8:35 PM

Ranger, I do hope that Atlantis got ahold of the old Aurora/Monogram WWI kit molds. I'd love to see the ones that I did not build get reissued. I was able to find most of those kits on eBay years ago. But there were a few that I couldn't get ahold of. Just maybe we will see them again.

Joe, I had remembered reading something about the tire color, and had to look it up to confirm. And that does add a nice different splash of color on the wheels.

And the decals are now on! 


Next challenge is the one that I do not look forward to... rigging... yikes!


F is for FIRE, That burns down the whole town!

U is for URANIUM... BOMBS!

N is for NO SURVIVORS...

       - Plankton

LSM


  • Member since
    April 2003
  • From: USA
Posted by keavdog on Monday, March 29, 2021 8:52 PM

Looks great Carlos!

Thanks,

John

  • Member since
    July 2004
  • From: Sonora Desert
Posted by stikpusher on Monday, March 29, 2021 9:47 PM

Thank you John. It definitely looks better now.


F is for FIRE, That burns down the whole town!

U is for URANIUM... BOMBS!

N is for NO SURVIVORS...

       - Plankton

LSM


  • Member since
    May 2011
  • From: Honolulu, Hawaii
Posted by Real G on Tuesday, March 30, 2021 1:40 AM

I had read that the natural rubber tires used in WW I were indeed a pinkish color (like those grade school erasers!).  I also read that the Germans had synthetic rubber, which was the more familiar grey/black.

Such minutiae was never considered back when those Aurora kits came out!


“Ya ya ya, unicorn papoi!”

  • Member since
    August 2015
  • From: the redlands Fl
Posted by crown r n7 on Tuesday, March 30, 2021 5:38 AM

very sharp!


 Nick.

  • Member since
    July 2004
  • From: Sonora Desert
Posted by stikpusher on Tuesday, March 30, 2021 11:04 AM

RG, I just went with a tan that was close to those gum erasers or the sidewalls on some of my old bike tires. 

Thank you Crown. They are some good looking markings, both the squadron symbol and the aircraft code letters on the fuselage. 


F is for FIRE, That burns down the whole town!

U is for URANIUM... BOMBS!

N is for NO SURVIVORS...

       - Plankton

LSM


  • Member since
    November 2008
  • From: Central Florida
Posted by plasticjunkie on Tuesday, March 30, 2021 1:15 PM

You can make your own turnbuckles to any scale by simply stretching over a candle the hollow plastic handles from the cheap Dollar Store Q Tips. Cut them to proper length and insert the rigging and secure with a small drop of thin CA. I like using EZ line for it.

 GIFMaker.org_jy_Ayj_O


Too many models to build, not enough time in a lifetime!!

  • Member since
    July 2004
  • From: Sonora Desert
Posted by stikpusher on Tuesday, March 30, 2021 2:53 PM

plasticjunkie

You can make your own turnbuckles to any scale by simply stretching over a candle the hollow plastic handles from the cheap Dollar Store Q Tips. Cut them to proper length and insert the rigging and secure with a small drop of thin CA. I like using EZ line for it.


Oh I am going a much simpler route. Fine wire cut to proper length and super glued in place. Maybe I'll go the turnbuckle route on one of the more detailed biplane kits in my stash somewhere down the road. But I'm keeping this build simple. I still want to get a few more biplanes under my belt before I dive into the fancy stuff with my Eduard and Roden kits.


F is for FIRE, That burns down the whole town!

U is for URANIUM... BOMBS!

N is for NO SURVIVORS...

       - Plankton

LSM


  • Member since
    December 2002
  • From: Northern California
Posted by jeaton01 on Tuesday, March 30, 2021 10:24 PM

Wire has never worked for me, can't get them all tight, especially after my shaky fingers whack them a few times.  EZLine and similar for me.

John

To see build logs for my models:  http://goldeneramodel.com/mymodels/mymodels.html


  • Member since
    March 2004
  • From: Kincheloe Michigan
Posted by Mikeym_us on Tuesday, March 30, 2021 10:47 PM

stikpusher

Thanks John. Same here on when the last time was that I built this particular kit. It is definitely something of a “nostalgia build”.


Last night I began construction. Actually though it was mostly just paint work.


First I took a razor saw along the seat to give it some texture to suggest that of the wicker seats actually used. Once painted and with a wash it should look more the part.


Then I painted up other cockpit components, and the interior of the fuselage halves. Just getting the base colors on for now. I’m not gonna use the kit pilot, so behind the seat is a glaring empty space. I searched thru my spares/salvaged parts and came up with a fuel tank to fill the void. It somewhat resembles the real thing. I’m not going for 100% accuracy, just stuff to suggest what should be there. I’m sure that must sound like blasphemy to some modelers.


I’ll get to work on detail painting and washes over the next few days, plus whatever mods I intend to scratch up for the cockpit. 


Stik I would suggest drilling out the seat leaving it open save for the center making it look like a bar and using thin cut tamiya tape and making a wicker weave inside and out. It might make it look more like a wicker seat from a distance and at least give the impression of it.

On the workbench: Dragon 1/350 scale Ticonderoga class USS BunkerHill 1/720 scale Italeri USS Harry S. Truman 1/72 scale Encore Yak-6

The 71st Tactical Fighter Squadron the only Squadron to get an Air to Air kill and an Air to Ground kill in the same week with only a F-15   http://photobucket.com/albums/v332/Mikeym_us/

  • Member since
    July 2004
  • From: Sonora Desert
Posted by stikpusher on Tuesday, March 30, 2021 11:27 PM

Mikeym_us
Stik I would suggest drilling out the seat leaving it open save for the center making it look like a bar and using thin cut tamiya tape and making a wicker weave inside and out. It might make it look more like a wicker seat from a distance and at least give the impression of it.

Kinda too late for that at this point. The kit is 98% assembled and painted now. 


F is for FIRE, That burns down the whole town!

U is for URANIUM... BOMBS!

N is for NO SURVIVORS...

       - Plankton

LSM


  • Member since
    March 2012
  • From: Corpus Christi, Tx
Posted by mustang1989 on Friday, April 2, 2021 6:17 AM

That............looks KILLER with the cals on 'er Carlos!! 


 Forum | Modelers Social Club Forum (proboards.com) 

  • Member since
    November 2003
  • From: Naples, FL
Posted by tempestjohnny on Friday, April 2, 2021 6:23 AM
What's already been said. You really hit this one out


  • Member since
    July 2004
  • From: Sonora Desert
Posted by stikpusher on Friday, April 2, 2021 11:02 AM

Joe & TJ, thank you. I'll get the rigging started on this next week. No bench time this weekend.


F is for FIRE, That burns down the whole town!

U is for URANIUM... BOMBS!

N is for NO SURVIVORS...

       - Plankton

LSM


  • Member since
    July 2004
  • From: Sonora Desert
Posted by stikpusher on Wednesday, April 14, 2021 4:09 PM

Attempt 1 on the beginnings of the rigging last week was a crash and burn. Biplanes are outside my usual area, and rigging them way more so... so back off a week, got some advice elsewhere, and had another go at it.

Well, attempt 2 went far better than attempt 1. It did not turn out perfect, but I am not gonna put everything else on hold until I do get it perfect. My order of effort was: attach the EZ line to the upper front cabane strut/upper wing junction, cut a slice of tubing and thread the EZ line thru the hole in the slice, attach the EZ line to the front cabane strut/fuselage junction after achieving proper tension, adjust the position of the metal tube slice and position it. Unfortunately, due to the tension on the lines, it would not position properly, so this was the best that I could do. A better way would be to attach top ends of the line, position the tube slice and fix it in in proper place, then tension and attach the bottom ends of the lines. Live and learn. Anyways...


Now I can start working my way out from that area...


F is for FIRE, That burns down the whole town!

U is for URANIUM... BOMBS!

N is for NO SURVIVORS...

       - Plankton

LSM


  • Member since
    July 2004
  • From: Sonora Desert
Posted by stikpusher on Monday, April 19, 2021 4:48 PM

Next update on my Camel with a bit more progress. I rigged up the cross wire braces on the cabane and wing struts using some .008” steel wire. This took about and hour and 45 minutes or so over a couple of sessions.


I’m not sure how many more sessions that it will take to fully rig this Camel...


F is for FIRE, That burns down the whole town!

U is for URANIUM... BOMBS!

N is for NO SURVIVORS...

       - Plankton

LSM


  • Member since
    July 2004
  • From: Sonora Desert
Posted by stikpusher on Tuesday, April 20, 2021 5:01 PM

One step at a time here. In today’s session I finished up the wing rigging. Except for one wire on each wing that I can’t add until I have the landing gear strut assembly glued in place. Which I have left off for ease of handling up to this point. Next stage will be the tail area. Once I have that completed, I’ll add the landing gear and the final wires up there.


In the meantime...


More progress to show hopefully tomorrow...


F is for FIRE, That burns down the whole town!

U is for URANIUM... BOMBS!

N is for NO SURVIVORS...

       - Plankton

LSM


  • Member since
    July 2004
  • From: Sonora Desert
Posted by stikpusher on Wednesday, April 21, 2021 5:19 PM

Today I added the bracing wires on the stabilizers


next up, the flying surfaces control lines on the tail. That is gonna take some finesse... 


F is for FIRE, That burns down the whole town!

U is for URANIUM... BOMBS!

N is for NO SURVIVORS...

       - Plankton

LSM


  • Member since
    August 2015
  • From: the redlands Fl
Posted by crown r n7 on Wednesday, April 21, 2021 8:14 PM

That is a fine job Yes


 Nick.

  • Member since
    July 2004
  • From: Sonora Desert
Posted by stikpusher on Wednesday, April 21, 2021 9:44 PM

Thank you Nick. These rigging sessions are edging me closer to the finish line, slow but sure.


F is for FIRE, That burns down the whole town!

U is for URANIUM... BOMBS!

N is for NO SURVIVORS...

       - Plankton

LSM


  • Member since
    July 2004
  • From: Sonora Desert
Posted by stikpusher on Friday, April 23, 2021 4:29 PM

So yesterday I did a couple of small additions that I needed to do before final bits of rigging. First I added some control line horns to the ailerons that were not molded in place, but needed in order to properly add those lines. I made them up from small pieces of aluminum rod then flattened and filed them them to a more airfoil shape once glued in place.


I also attached the control line thru the rudder using EZ Line and CA.


No rigging today as my fine motor skills are toast after a long bike ride this morning... tomorrow I’ll resume the rigging, and possibly finish it. Then final touch up painting is next on the agenda.


F is for FIRE, That burns down the whole town!

U is for URANIUM... BOMBS!

N is for NO SURVIVORS...

       - Plankton

LSM


  • Member since
    July 2004
  • From: Sonora Desert
Posted by stikpusher on Saturday, April 24, 2021 11:15 PM

Today was a knuckle down session. The finish line edges ever closer. Two plus hours of gluing snipping, etc. and the rigging was done! EZ Line for the flying surfaces control cables, .008” music wire for bracing wires on the landing gear, and .010 music wire for the wings to landing gear “flying wire”.


Next up, touch up painting, flat coat, add the prop and finito! 


F is for FIRE, That burns down the whole town!

U is for URANIUM... BOMBS!

N is for NO SURVIVORS...

       - Plankton

LSM


  • Member since
    March 2012
  • From: Corpus Christi, Tx
Posted by mustang1989 on Sunday, April 25, 2021 7:21 AM

That looks really sharp Carlos. Excellent rigging and the paint work is just all that AND a whole bag of party mix. Really good work man.


 Forum | Modelers Social Club Forum (proboards.com) 

  • Member since
    October 2019
  • From: New Braunfels, Texas
Posted by Tanker-Builder on Sunday, April 25, 2021 7:35 AM

Ooh,OOh Boss!

 Da Plane ,Da Plane!!

 Now that looks downright scary. Would you want to fly in that bundle of Sticks, Mechanicals and Wires? I would'nt. BUT, This plane looks well built and painted for it to be too fragile, Hey Stik-Could I ? Could I take her for a flight? Please? Nice looking  bird my friend.

  • Member since
    July 2004
  • From: Sonora Desert
Posted by stikpusher on Sunday, April 25, 2021 9:33 AM

Joe and TB, thank you. Tanker, I would love to fly in such a machine. It's like driving in an early roadster to me, the same sort of appeal, an original machine type calling for those who will accept the challenge.


F is for FIRE, That burns down the whole town!

U is for URANIUM... BOMBS!

N is for NO SURVIVORS...

       - Plankton

LSM


  • Member since
    April 2003
  • From: USA
Posted by keavdog on Sunday, April 25, 2021 10:31 AM

Wow Stik, nice work on that ancient kit.  Looking good. 

Thanks,

John

  • Member since
    May 2013
  • From: Indiana, USA
Posted by Greg on Sunday, April 25, 2021 1:11 PM

I've managed to miss a lot of updates somehow.

Impressive work, Stik! Really looking great. Yes

  • Member since
    July 2004
  • From: Sonora Desert
Posted by stikpusher on Sunday, April 25, 2021 2:59 PM

John and Greg, thank you. Working my way up the food chain of older kits before I tackle a new tool biplane.


F is for FIRE, That burns down the whole town!

U is for URANIUM... BOMBS!

N is for NO SURVIVORS...

       - Plankton

LSM


  • Member since
    October 2019
  • From: New Braunfels, Texas
Posted by Tanker-Builder on Sunday, April 25, 2021 4:26 PM

Yeah Well:

 Let's face it Stik ! -You and I appreciate what it takes to fly. No electronics and seat of the pants. That's the real way to  feel it. You and the machine striving through the sky. The Air flowing past your Goggles!

  • Member since
    November 2008
  • From: Central Florida
Posted by plasticjunkie on Sunday, April 25, 2021 5:00 PM

stikpusher

Today was a knuckle down session. The finish line edges ever closer. Two plus hours of gluing snipping, etc. and the rigging was done! EZ Line for the flying surfaces control cables, .008” music wire for bracing wires on the landing gear, and .010 music wire for the wings to landing gear “flying wire”.


Next up, touch up painting, flat coat, add the prop and finito! 


Superb rigging job Stik. Love the attention to detail often missed with these bipes.  

 GIFMaker.org_jy_Ayj_O


Too many models to build, not enough time in a lifetime!!

  • Member since
    July 2004
  • From: Sonora Desert
Posted by stikpusher on Sunday, April 25, 2021 7:01 PM

Tanker-Builder

Yeah Well:

 Let's face it Stik ! -You and I appreciate what it takes to fly. No electronics and seat of the pants. That's the real way to  feel it. You and the machine striving through the sky. The Air flowing past your Goggles!


I guess that comes from too many times hanging in a parachute harness on the way to the ground, trying to determine wind direction by the airflow across my face. 

PJ, thanks. This build sure was a reminder that biplanes are lots of little details all bundled up into the contraption.


F is for FIRE, That burns down the whole town!

U is for URANIUM... BOMBS!

N is for NO SURVIVORS...

       - Plankton

LSM


  • Member since
    July 2010
  • From: Tempe AZ
Posted by docidle on Sunday, April 25, 2021 8:49 PM

Looks superb Stik! You have really done justice to that ancient kit. It’s funny, I have no problem rigging a ship but quake in my boots when I think about working on some of my biplane kits!!!

Steve


  • Member since
    July 2004
  • From: Sonora Desert
Posted by stikpusher on Monday, April 26, 2021 9:52 AM

Thank you Steve. I've only rigged a handful of ships, so I can't say much there in comparison. I'm sure that the basic technique of working from the center out works well for both types. 


F is for FIRE, That burns down the whole town!

U is for URANIUM... BOMBS!

N is for NO SURVIVORS...

       - Plankton

LSM


  • Member since
    July 2004
  • From: Sonora Desert
Posted by stikpusher on Tuesday, April 27, 2021 6:24 PM

Final bits of touch up and detail painting done, propellor added...


Flat coat is all that is left, and I’ll call this one done.


F is for FIRE, That burns down the whole town!

U is for URANIUM... BOMBS!

N is for NO SURVIVORS...

       - Plankton

LSM


  • Member since
    December 2002
  • From: Northern California
Posted by jeaton01 on Wednesday, April 28, 2021 12:38 AM

Got the Hisso warming up, Carlos.  Make sure those guns are armed!

John

To see build logs for my models:  http://goldeneramodel.com/mymodels/mymodels.html


  • Member since
    January 2015
  • From: Tumwater, WA.
Posted by M. Brindos on Wednesday, April 28, 2021 1:40 AM

That's a fine looking string bag you've got there. I can't hardly wait to see the final reveal.

- Mike Brindos "Lost Boy"

  • Member since
    August 2015
  • From: the redlands Fl
Posted by crown r n7 on Wednesday, April 28, 2021 5:29 AM

Yes almost there.


 Nick.

  • Member since
    November 2020
  • From: Brunswick, Ohio
Posted by Buckeye2 on Wednesday, April 28, 2021 11:05 AM

That's looking really good!  I haven't tried a biplane yet being scared of the rigging.

Mike


  • Member since
    July 2004
  • From: Sonora Desert
Posted by stikpusher on Wednesday, April 28, 2021 5:20 PM

Thanks guys, I do appreciate your kind words!

I airbrushed on the topcoat a little while ago, and I’m calling this one done. It’s not perfect, it’s not contest material, but it is finally finished.


I’ll get some better all around view photos up in awhile.


F is for FIRE, That burns down the whole town!

U is for URANIUM... BOMBS!

N is for NO SURVIVORS...

       - Plankton

LSM


  • Member since
    November 2008
  • From: Central Florida
Posted by plasticjunkie on Wednesday, April 28, 2021 5:27 PM

Hey she looks fantastic. Great job stik.

 GIFMaker.org_jy_Ayj_O


Too many models to build, not enough time in a lifetime!!

  • Member since
    July 2004
  • From: Sonora Desert
Posted by stikpusher on Wednesday, April 28, 2021 5:55 PM

Thank you PJ.


F is for FIRE, That burns down the whole town!

U is for URANIUM... BOMBS!

N is for NO SURVIVORS...

       - Plankton

LSM


  • Member since
    July 2004
  • From: Sonora Desert
Posted by stikpusher on Wednesday, April 28, 2021 9:11 PM

What is there to say about the Sopwith Camel? It is one of the iconic aeroplanes of WWI, probably the most well known from the Royal Flying Corps/Royal Air Force to even the novice aviation buff. And helped out no doubt by a certain cartoon beagle and his never ending quest to defeat the Red Baron.

This is Monogram’s 1979 retool of Aurora’s 1956 vintage kit. I added a few bits to the interior, and detailed a few exterior bits. Rigging is steel wire and EZ Line, paints are Xtracolor, Humbrol, and Testors enamels. Decals are by Eagle Strike for a Camel from 45 Squadron flown in Italy in summer 1918 by Lt. C.M. Masters.


posed with my Oeffag Albatross, my first grown up biplane build from a few years ago


And ready for the dawn patrol


Thanks for looking, comments and critiques are welcome


F is for FIRE, That burns down the whole town!

U is for URANIUM... BOMBS!

N is for NO SURVIVORS...

       - Plankton

LSM


  • Member since
    November 2003
  • From: Naples, FL
Posted by tempestjohnny on Thursday, April 29, 2021 4:49 AM

Just great. You definitely conquered the rigging


  • Member since
    July 2004
  • From: Sonora Desert
Posted by stikpusher on Thursday, April 29, 2021 8:43 AM

Thank you TJ. Now the challenge is to keep that skill current.


F is for FIRE, That burns down the whole town!

U is for URANIUM... BOMBS!

N is for NO SURVIVORS...

       - Plankton

LSM


  • Member since
    July 2014
Posted by modelcrazy on Thursday, April 29, 2021 9:10 AM

Great job Stick

Steve

Building a kit from your stash is like cutting a head off a Hydra, two more take it's place.


http://www.spamodeler.com/forum/

  • Member since
    May 2013
  • From: Indiana, USA
Posted by Greg on Thursday, April 29, 2021 9:19 AM

Excellent work, Stik, a real beauty. YesYesYes

I like the prop, how did you do that? I've never attempted a wood prop at all, let alone one with the fun patterns. I guess that pattern is lamination layers?

Only little mistake I see is you need some weight in the nose, she's a tail sitter.

Stick out tongue

  • Member since
    July 2004
  • From: Sonora Desert
Posted by stikpusher on Thursday, April 29, 2021 12:19 PM

Steve and Greg, thank you!

Greg, yes, that prop was my attempt at lamination layers. I  first painted it overall the lighter brown, then used a very fine brush to establish the darker areas and filled those in, trying to give the look of the compound curves in the laminations. I don't know how to fix the nose weight problem though... Confused


F is for FIRE, That burns down the whole town!

U is for URANIUM... BOMBS!

N is for NO SURVIVORS...

       - Plankton

LSM


  • Member since
    January 2015
  • From: Katy, TX
Posted by Aggieman on Thursday, April 29, 2021 6:10 PM

Simply superb work on a favorite subject of mine (that has twice defeated my efforts to put one together as an adult builder; I did build this exact kit back in '79 as a pre-teen without any rigging).  

  • Member since
    July 2004
  • From: Sonora Desert
Posted by stikpusher on Thursday, April 29, 2021 8:31 PM

Aggieman

Simply superb work on a favorite subject of mine (that has twice defeated my efforts to put one together as an adult builder; I did build this exact kit back in '79 as a pre-teen without any rigging).  


Thank you. You and me both on building it back then in the same manner.


F is for FIRE, That burns down the whole town!

U is for URANIUM... BOMBS!

N is for NO SURVIVORS...

       - Plankton

LSM


  • Member since
    March 2012
  • From: Corpus Christi, Tx
Posted by mustang1989 on Friday, April 30, 2021 6:10 AM

That looks really, REALLY good Carlos. Love the doggy in the dio. Yes


 Forum | Modelers Social Club Forum (proboards.com) 

  • Member since
    July 2004
  • From: Sonora Desert
Posted by stikpusher on Friday, April 30, 2021 1:09 PM

Thanks Joe. I neede to pose the plane with something on the base, but I have no WWI figures made up. He's a good dog, and I think hes gonna show up with more 1/48 aircraft builds in the future...


F is for FIRE, That burns down the whole town!

U is for URANIUM... BOMBS!

N is for NO SURVIVORS...

       - Plankton

LSM


  • Member since
    April 2015
Posted by Mopar Madness on Friday, April 30, 2021 10:37 PM

Seriously nice Stik.  The rigging, propeller, and paint came out wonderful.  You made a pearl from this classic.  I don't have the guts to try rigging.

Chad

God, Family, Models...

At the plate: 1/48 Airfix Bf109 & 1/35 Tamiya Famo

On deck: Who knows!

  • Member since
    July 2009
  • From: North Carolina
Posted by Back to the bench on Monday, May 3, 2021 9:50 AM

stikpusher
What is there to say about the Sopwith Camel? It is one of the iconic aeroplanes of WWI, probably the most well known from the Royal Flying Corps/Royal Air Force to even the novice aviation buff. And helped out no doubt by a certain cartoon beagle and his never ending quest to defeat the Red Baron. This is Monogram’s 1979 retool of Aurora’s 1956 vintage kit. I added a few bits to the interior, and detailed a few exterior bits. Rigging is steel wire and EZ Line, paints are Xtracolor, Humbrol, and Testors enamels. Decals are by Eagle Strike for a Camel from 45 Squadron flown in Italy in summer 1918 by Lt. C.M. Masters.


Very, very nice! A silk purse out of a camel's ear or something like thatBig Smile It's great to see an old kit given such new life, thanks for posting all the progress photos. Snoopy would be proud to climb aboard.

Gil

  • Member since
    July 2004
  • From: Sonora Desert
Posted by stikpusher on Monday, May 3, 2021 1:17 PM

Chad and Gil, thank you for your kind words.
Chad, try your hand at rigging sometime. It's not as difficult as you might think. I'd suggest an aircraft with less rigging such as a Fokker D. VII or Dr.I for less of an amount to do as an introduction.

Gil, yes, I think Snoopy would be quite content to climb aboard for a Dawn Patrol on this one.


F is for FIRE, That burns down the whole town!

U is for URANIUM... BOMBS!

N is for NO SURVIVORS...

       - Plankton

LSM


JOIN OUR COMMUNITY!

Our community is FREE to join. To participate you must either login or register for an account.

SEARCH FORUMS
FREE NEWSLETTER
By signing up you may also receive reader surveys and occasional special offers. We do not sell, rent or trade our email lists. View our Privacy Policy.