SEARCH FINESCALE.COM

Enter keywords or a search phrase below:

Helldiver! 2/08/09 Post Script

172164 views
878 replies
1 rating 2 rating 3 rating 4 rating 5 rating
  • Member since
    December 2002
  • From: Whidbey Island, Washington
Helldiver! 2/08/09 Post Script
Posted by chukw on Sunday, September 23, 2007 9:29 PM

I was really glad when Accurate Miniatures re-released the Monogram ProModeler SB2C kit as the -4 variant.  I had missed it the first time around, having spent many years in the stick-and-tissue world of Free-Flight Scale modeling.  I collected reference and some choice aftermarket goodies, and have cleared my bench to start a comprehensive build.  Here's my Chamber of Models:


I thought I'd start at the tailwheel, just like everybody else.  The tailwheel fairing telescoped as it compressed, and while on the deck, especially when loaded, she compressed all the way.  The kit is properly molded for an in-flight posture.

That wedge in the middle need to come out!

Since that hub is plain to the point of being offensive, the etchmasters at Eduard have come to the rescue:  Blinging Rims!!
 
Since I'm starting out by chopping stuff up, I thought it prudent to move to the bomb bay.

A lot of those structures had to go, so I whipped out mt Micro-Chisel from Mission Models and let fly. Note that I've also filled in the verdamt ejector pin marks with plastic discs.  

Is smooth like butt of baby!

Being of unsound mind I decided to lower the turtleback.  Here's the kit, and reference photo that will haunt my dreams.  Thanks, Detail and Scale!

I'm using one of those European razor-sawblades- excellent!

Result: a very different silhouette.

Here's the cut part:

Some styrene is glued over the scab- modeling first aid!  The doors themselves will be replaced with styrene copies- only the top fairing needs to be fixed up.

Well, now comes the fun part- you need to cut away the rear bulkhead on kit part, extend the floor and make a properly sized bulkhead.  But... look at the gap!  Whatever shall I do??  Stay tuned, bold readers!  

  • Member since
    February 2004
  • From: Second City
Posted by arki30 on Sunday, September 23, 2007 9:56 PM

Killer.

I await the next ish!

Building Now:

1/48 Academy Bf-109G6 - 100%

1/48 Tamiya F4U-1A - 5%

Upcoming:

1/48 Revell F-14D

  • Member since
    December 2005
  • From: Alabama USA
Posted by davew6003 on Sunday, September 23, 2007 10:13 PM
This is going to be realy cool Smile [:)] Cant wait to see more.
  • Member since
    February 2005
  • From: Cleveland, OH
Posted by RadMax8 on Sunday, September 23, 2007 10:15 PM

Same bat time, same bat channel???

The Helldiver looks fantastic so far. You're really going all out with this build. I for one will be watching this build pretty closely. You don't see a Helldiver every day, heck I didn't even know they existed til last year! I have a question... Where did you get that chisel? It looks to be supreme at getting rid of detail... 

  • Member since
    September 2003
  • From: South Central Wisconsin
Posted by Daywalker on Monday, September 24, 2007 8:53 AM

Excellent work thus far!  I will also be looking for the next installment of this build.  I really like the explanations with the clear photos- bravo!

Not sure if any of these will help, but thought I would post them for you.  I took these at Oshkosh this year.

Frank 


  • Member since
    January 2015
  • From: Katy, TX
Posted by Aggieman on Monday, September 24, 2007 10:42 AM

Wow, this looks like an awesome build in progress.  I didn't know that piece about the tail wheel, but I've already built my Pro-Modeler kit so I'll just have to pretend that I didn't read that!

Here's a few more pictures of the same aircraft shown in the post above mine.  It's based at the West Houston CAF airfield and I believe it is the only flying example of the Helldiver left.

  • Member since
    April 2005
  • From: Piscataway, NJ!
Posted by wing_nut on Tuesday, September 25, 2007 9:06 AM
Nice work so far.  Looking forward to more progress.  Hoping it will inspire me to finishing my half built Helldiver.  The canopy was a steaming heap in my kit. How is yours?  Useable?

Marc  

  • Member since
    December 2002
  • From: Whidbey Island, Washington
Posted by chukw on Wednesday, September 26, 2007 10:25 AM

Thanks, guys- I really appreciate the kind words- and the photos!  Big Smile [:D] Any and all pix will help, big time.

 Wing_nut: only the windshield is all soft, framing-wise.  I've discovered no aftermarket canopies, either.  Anyone else have any luck?

  • Member since
    April 2005
  • From: Piscataway, NJ!
Posted by wing_nut on Wednesday, September 26, 2007 11:41 AM

Here is a link to a walk around...

http://www.cybermodeler.com/aircraft/sb2c/sb2c.shtml 


Falcon Industries make a vac canopy that comes in a set of about a half dozen US Navy aircraft. They make the Squadron vac canopies.  When I was looking Squadron was out of stock and I don’t remember where I found the Flacon set, but it’s the Falcon Clear-Vax Set #7, US Navy Pt.1.

The sliding section doesn’t have any molded in framework so it can be masked and painted to match a couple of different versions.  The aft section with the turtle deck can be open or closed.

Here is the Falcon link…

http://www.falconmodels.co.nz/clearvax/set07.html 

Marc  

  • Member since
    February 2007
  • From: Bournemouth UK
Posted by Luftwoller on Wednesday, September 26, 2007 4:42 PM

Great work Chuk, Like the others im looking for ward to the next issue.

...Guy

..'Your an embarrassment to the human genus, makes me ashamed to call myself Homo'.
  • Member since
    December 2002
  • From: Whidbey Island, Washington
Posted by chukw on Sunday, October 7, 2007 8:54 PM

Thanks, Wing_Nut- that walkaround is the stuff.  As far as the Falcon set, I'm willing to bet it's for the ancient Monogram Beast, bu never fear-  I've formulated a daring plan to fix my windshield.  It may take years and cost thousands of lives, but it'll worth it!

Luftwoller, I'm a big fan of your builds- may thanks!

 That said, I've got a little done- things have been busy!  
Here's that rear bulkhead, with stiffening grooves and rear laminations cut out:

...glued, shaped and in the process of test-fitting.  Photographic proof that I am all thumbs!

Here are the new folding panels, from styrene, stretched sprue and Evergreen strip, plus the tail fillet.  Note the rudder offset- that's not making fitting the bulkhead any easier! 

Here's a detail short- this is one of the second set of upper panels.  The first set was ruined when I tried give them a mild bend using hot water to better match the ones cut from the kit.  Careful examination of photos of the rear turtledeck doesn't really show any curvature.   I think I'll leave 'em flat.

That's it for now, True Believers!

  • Member since
    December 2002
  • From: Whidbey Island, Washington
Posted by chukw on Sunday, October 14, 2007 6:51 PM
I've been super-busy at work and home lately, but I have managed to sneak a bit of modeling time in. I laid the photo-etch in the bomb bay- starting to look busy! The fit of all the little widgets is excellent- good job, Uncle Eduard! The trusses sport some excellent detail. Uh-oh! Lots of CYA "frost"- not to worry- this will disappear under a coat of primer. Lots of plumbing to be added as well! I'm still fussing with the turtledeck bits- here's the deck temporarily hinged with masking tape. I think it's gonna work. B) I did figure out a way to make those pressed stiffening ribs look less like these simple cutouts... ..just brush on a little Mr. Surfacer and let dry for 30 minutes or so. Then wipe away the excess with a q-tip dampened with laquer thinner- presto! Rounded grooves!
  • Member since
    December 2005
  • From: Alabama USA
Posted by davew6003 on Sunday, October 14, 2007 7:09 PM
Comming along very nicely. This is one of those builds that is going to be fun to follow. I have plans to build a Helldiver one day, but I doubt it will look like this one.Make a Toast [#toast]
  • Member since
    September 2003
  • From: South Central Wisconsin
Posted by Daywalker on Sunday, October 14, 2007 7:39 PM

 davew6003 wrote:
Comming along very nicely. This is one of those builds that is going to be fun to follow. I have plans to build a Helldiver one day, but I doubt it will look like this one.Make a Toast [#toast]

Sign - Ditto [#ditto] I am really enjoying this build.  Keep the progress pics coming! Thumbs Up [tup]

Frank 


  • Member since
    April 2003
  • From: Hayward, CA
Posted by MikeV on Sunday, October 14, 2007 8:48 PM

Cool! Cool [8D]

My dad was crewchief of Curtis SB2C Helldivers at the end of WWII down in El Toro, CA.


Wisdom is the right use of knowledge. To know is not to be wise. Many men know a great deal, and are all the greater fools for it. There is no fool so great a fool as a knowing fool. But to know how to use knowledge is to have wisdom. " Charles Spurgeon
  • Member since
    February 2004
  • From: Second City
Posted by arki30 on Sunday, October 14, 2007 10:50 PM

Killer. 

The bomb bay PE does make a huge difference over the kit parts, doesn't it?  Thumbs Up [tup] Keep posting, we're enjoying this.

Building Now:

1/48 Academy Bf-109G6 - 100%

1/48 Tamiya F4U-1A - 5%

Upcoming:

1/48 Revell F-14D

  • Member since
    June 2007
Posted by squeakie on Monday, October 15, 2007 12:24 AM

Nice arbor press! What brand is it? I use a K&M.

gary

  • Member since
    June 2007
Posted by squeakie on Monday, October 15, 2007 12:26 AM

nice arbor press! I use a K&M.

gary

  • Member since
    December 2002
  • From: Whidbey Island, Washington
Posted by chukw on Tuesday, October 16, 2007 10:26 AM

Thanks, guys!  Squeakie, I'm not sure I follow.  Which arbor press are you referring to?  I don't think I own one... Confused [%-)]

Whilw you're waiting for me to get off my duff and chop more plastic, check out mu updated site: http://www.chukw.com 

  • Member since
    February 2003
  • From: Medina, Ohio
Posted by wayne baker on Tuesday, October 16, 2007 11:18 AM

Thought I would add a  picture.

 I may get so drunk, I have to crawl home. But dammit, I'll crawl like a Marine.

  • Member since
    December 2002
  • From: Whidbey Island, Washington
Posted by chukw on Tuesday, October 16, 2007 11:25 AM
That's a beauty, Wayne- cheers!
  • Member since
    December 2002
  • From: Whidbey Island, Washington
Posted by chukw on Saturday, October 27, 2007 8:29 PM
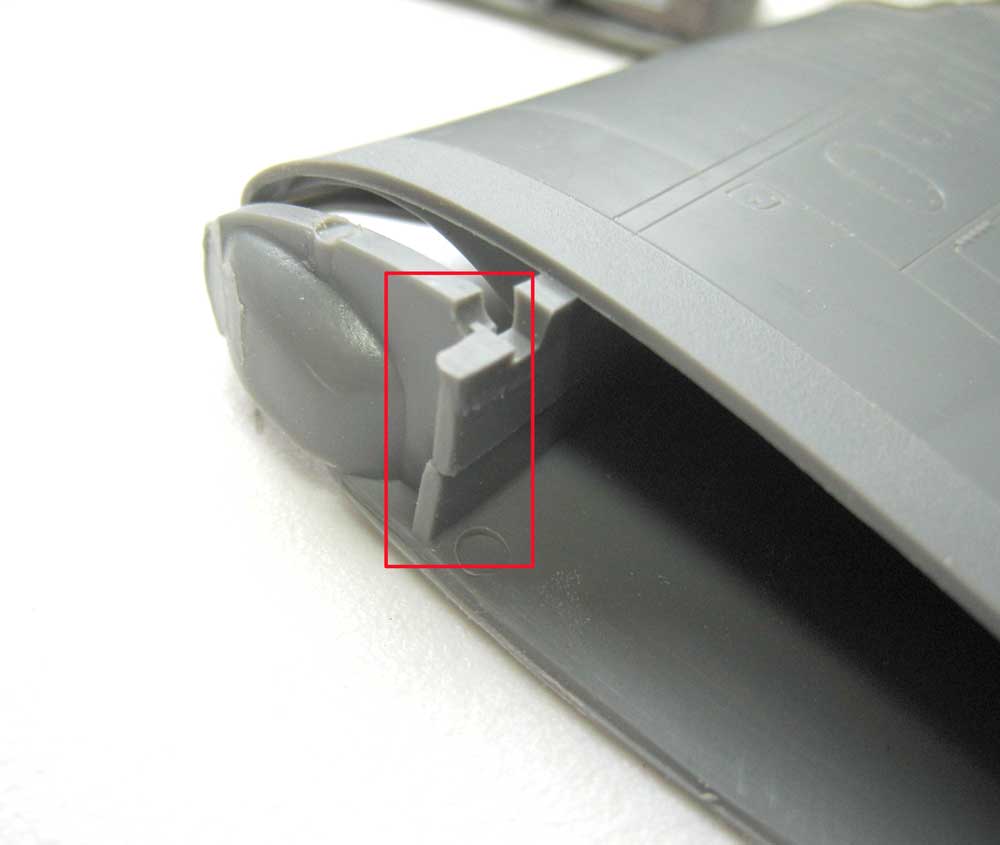
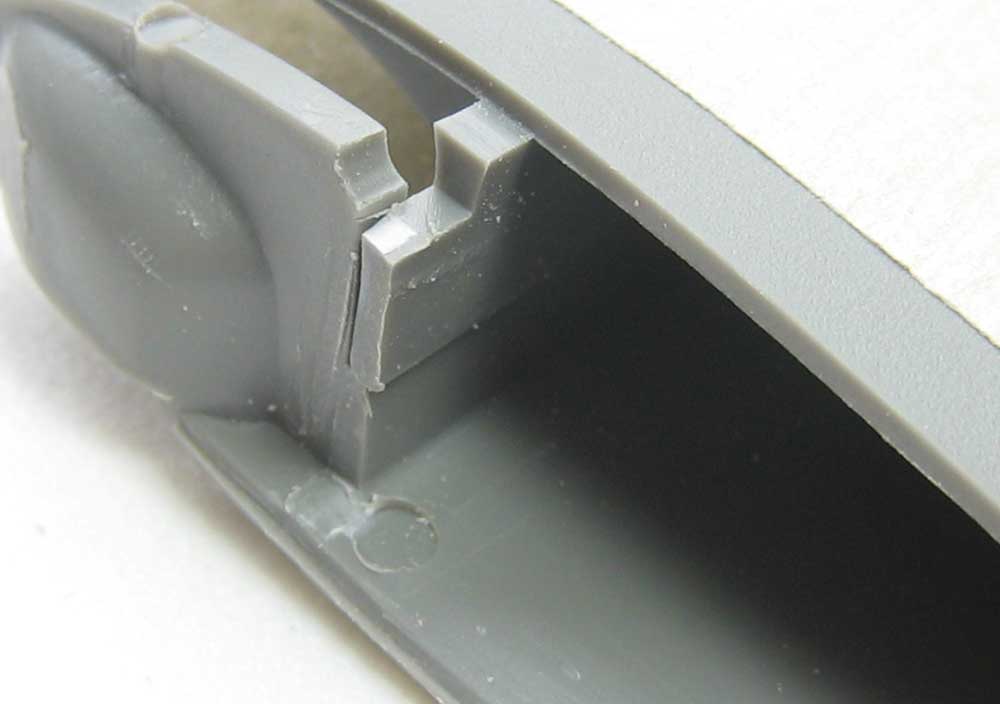
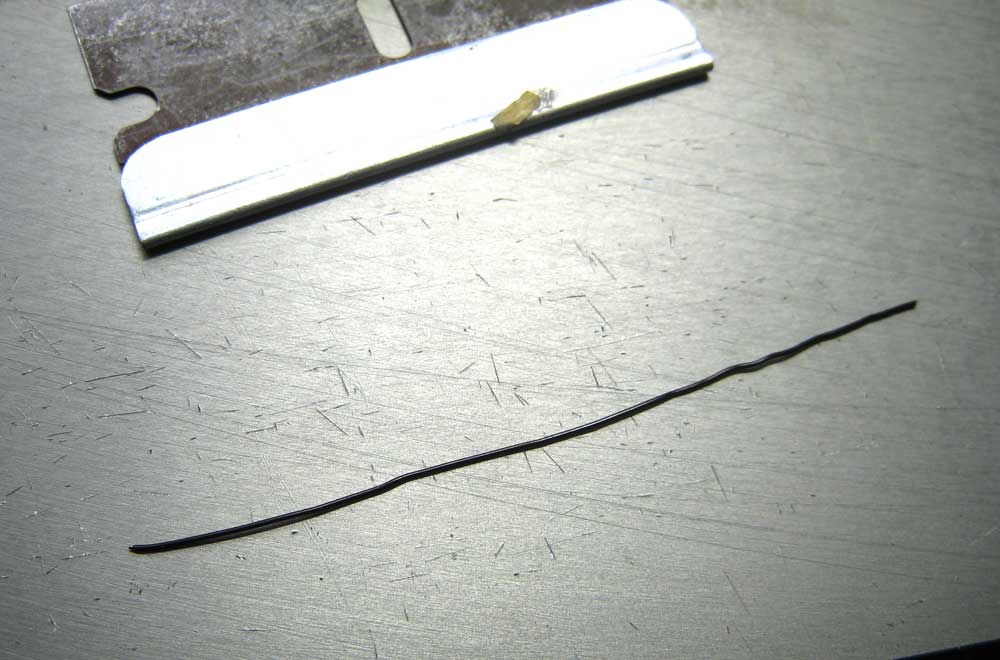
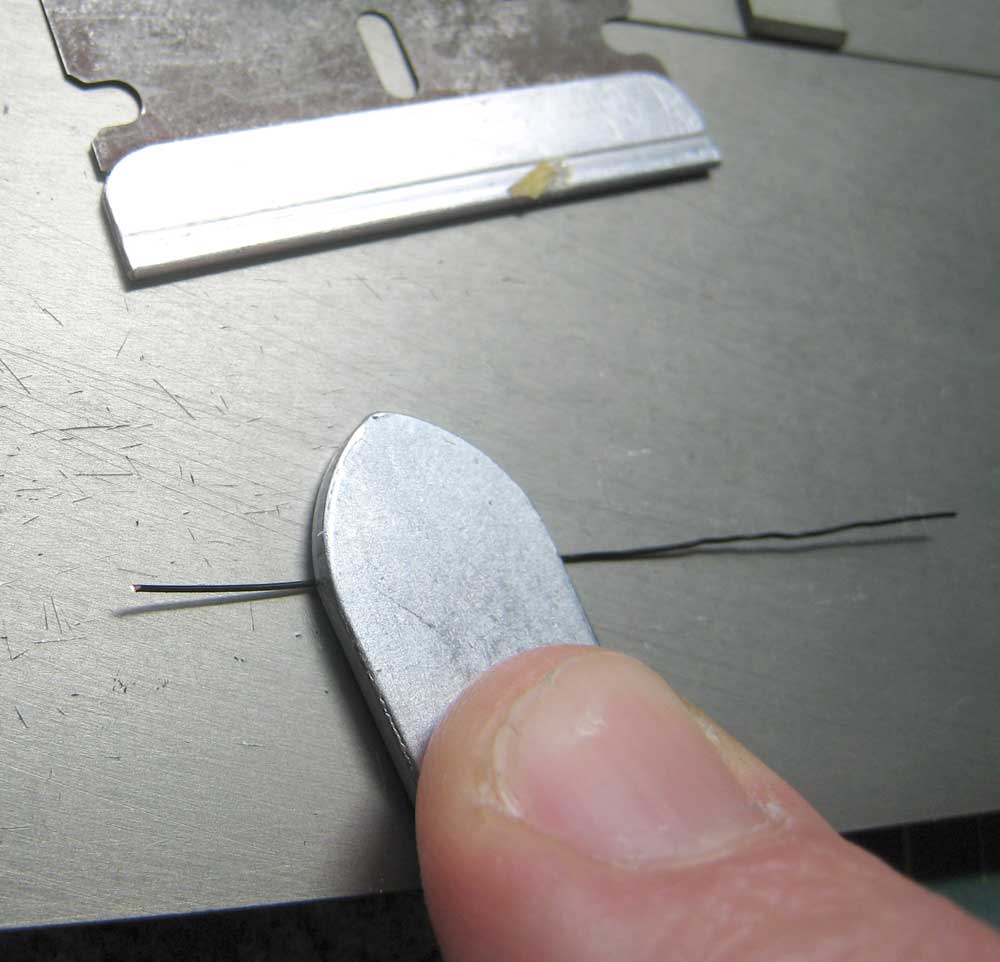
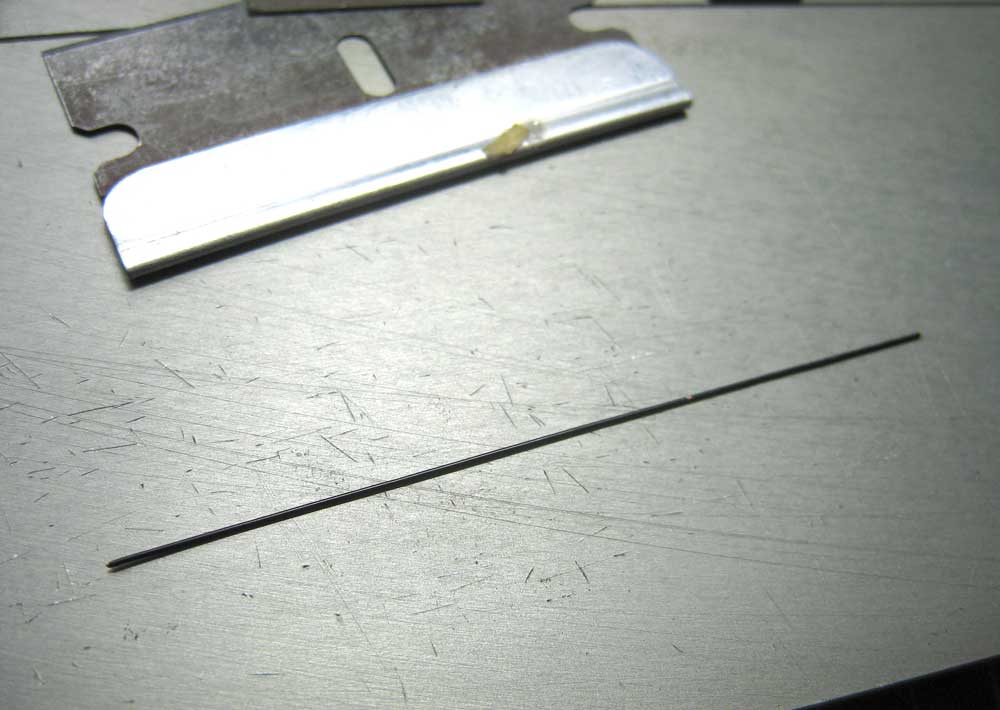
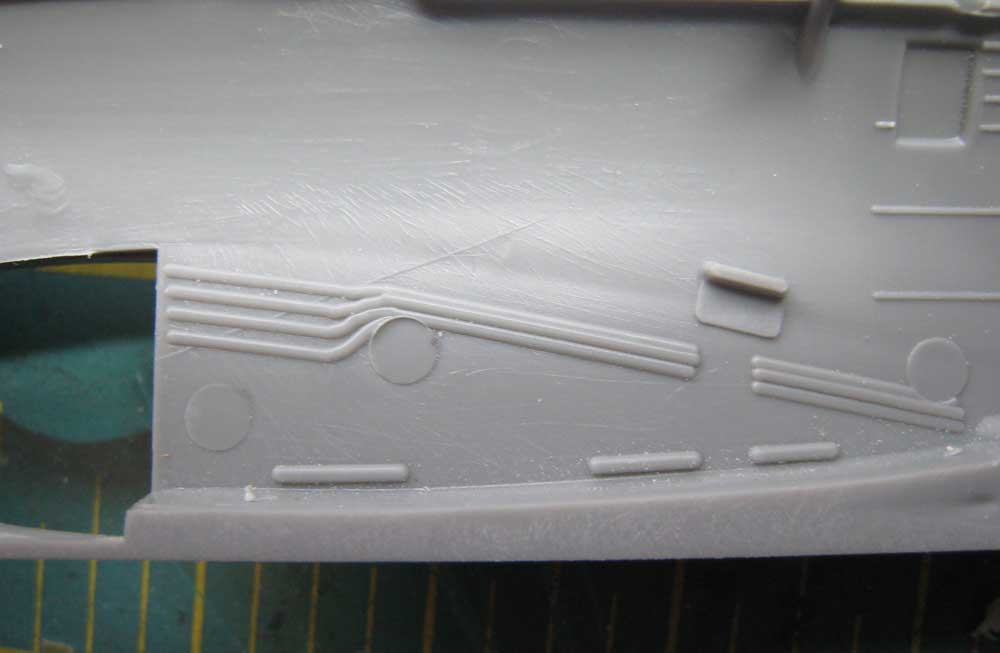
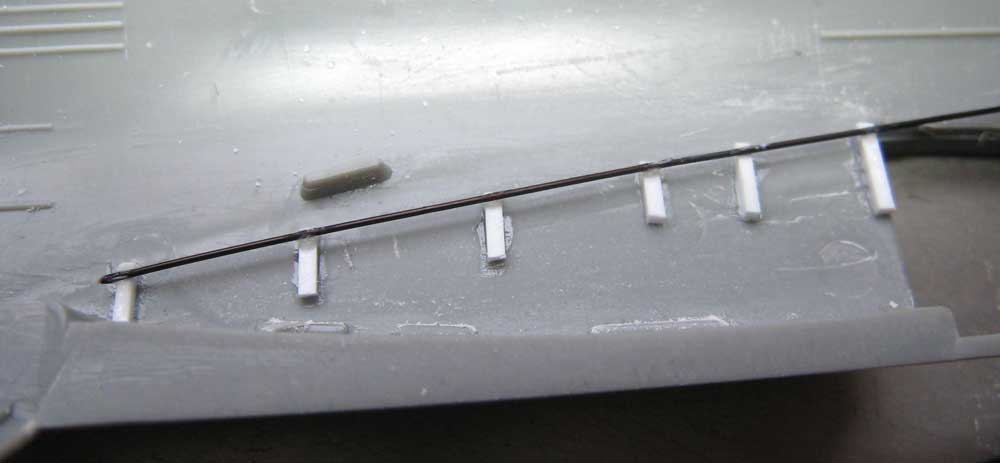
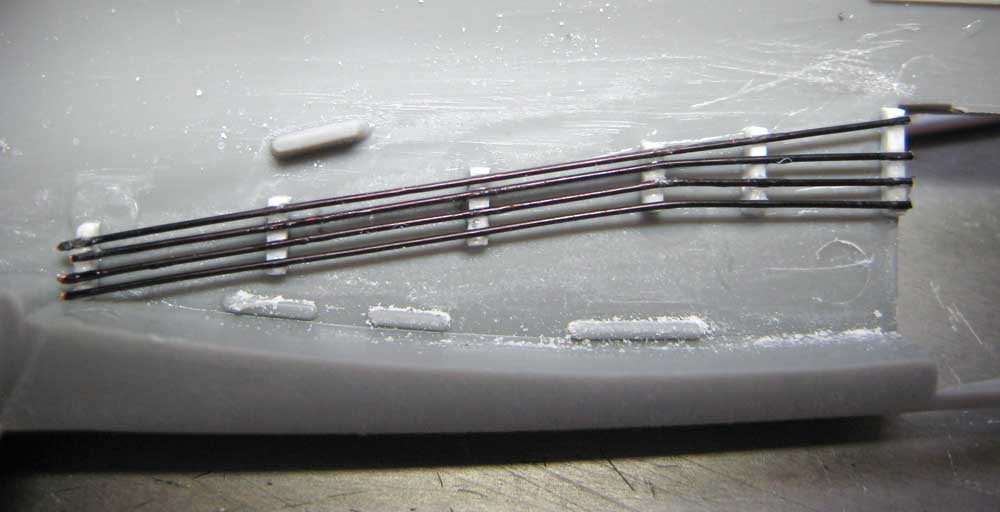
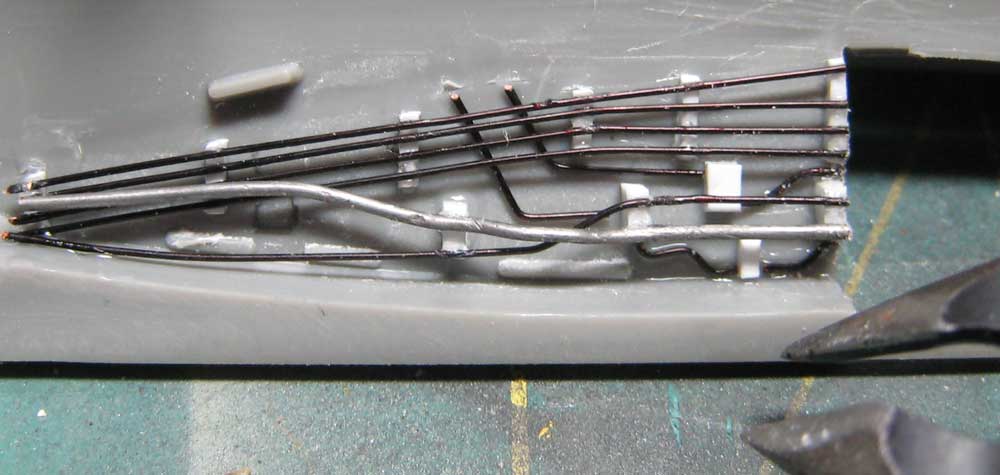
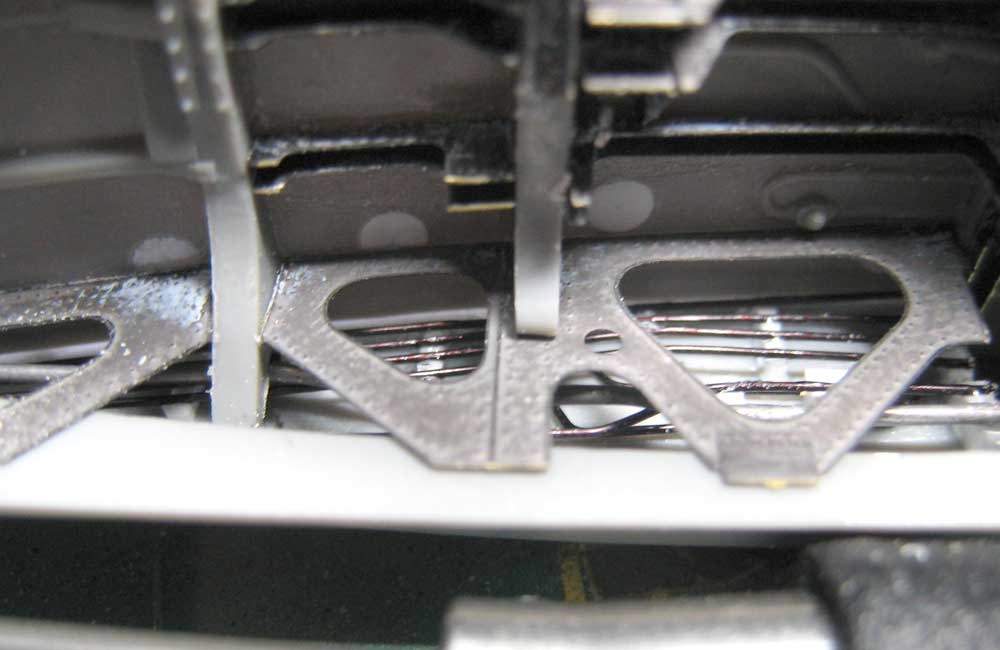
Back from my journeys- and back to that bomb bay! Here's an alert- one thing the good folks at Eduard fail to mention is this little stub spar in the wing root. Chop it out or the PE-enhanced bay won't fit! Here's what it should look like- easy! Before we go any further, here's a tip for straightening wire- even a kinked piece like this can be salvaged. Just lay it on a flat, hard surface- glass will do, but I use the base of my Mission Models Etch-Mate. Simply roll the wire with a flat tool, like the base end of a pair of tweezers. Hey, Presto! The wire is ready to become a simulated hydraulic line. The kit wing roots display some basic engraved detail- these appear to be the continuations of the hydraulic lines in the wheel well. They've got to go- scrape 'em out! Add some spacers from styrene stock and place your first wire- it's basically straight. Here the rest have been added. Using more spacers a second layer of piping has been put in place- not a thicker line form fine solder. I was having fun and this was going a lot faster than I thought it might, so I added a third layer, flush with the hull. Tiny blocks of styrene formed junction boxes which I linked together with neatly-bent lengths of scrap wire form the first two layers. Waste not, want not, move along quickly. Here's what it looks like with the bomb bay dry-fitted in place. I did the other side while I was all fired up. Test-fitting the wings saved me from an awkward time fitting the baomb bay later, but also revealed upcoming obstacles. The fit ain't so hot, and the chord on the starboard ming seems too long for it's rroot. Oh, Woes! Not to fear- I'll let this problem percolate through my chugging cranium. Victory shall be mine!
  • Member since
    June 2007
Posted by squeakie on Saturday, October 27, 2007 8:37 PM
 chukw wrote:

Thanks, guys!  Squeakie, I'm not sure I follow.  Which arbor press are you referring to?  I don't think I own one... Confused [%-)]

Whilw you're waiting for me to get off my duff and chop more plastic, check out mu updated site: http://www.chukw.com 

setting ontop of the cabnet. Leastwise it looks like ne to me

gary

  • Member since
    December 2002
  • From: Whidbey Island, Washington
Oh, I get you...
Posted by chukw on Saturday, October 27, 2007 8:51 PM
...that's my old Dremel drill press stand.   A handy thing, but not exactly high-precision, if you get my drift.  Wink [;)]
jwb
  • Member since
    February 2006
  • From: Parkton, NC
Posted by jwb on Saturday, October 27, 2007 9:22 PM
That is some awesome work, chukw! Very nice detailing. That tubing work is inspiring- you make it look so darn simple. Smile [:)]

Jon Bius

AgapeModels.com- Modeling with a Higher purpose

"For I know the plans I have for you," declares the Lord, "plans to prosper you and not to harm you, plans to give you hope and a future." ~ Jeremiah 29:11

  • Member since
    September 2003
  • From: South Central Wisconsin
Posted by Daywalker on Saturday, October 27, 2007 9:25 PM
Sign - Ditto [#ditto], keep up the good work! Thumbs Up [tup]

Frank 


  • Member since
    December 2005
  • From: Alabama USA
Posted by davew6003 on Saturday, October 27, 2007 9:27 PM

 Daywalker wrote:
Sign - Ditto [#ditto], keep up the good work! Thumbs Up [tup]

yes this is looking great, Im going to have to build one of these one day.

  • Member since
    February 2003
Posted by Jim Barton on Saturday, October 27, 2007 9:40 PM

 chukw wrote:
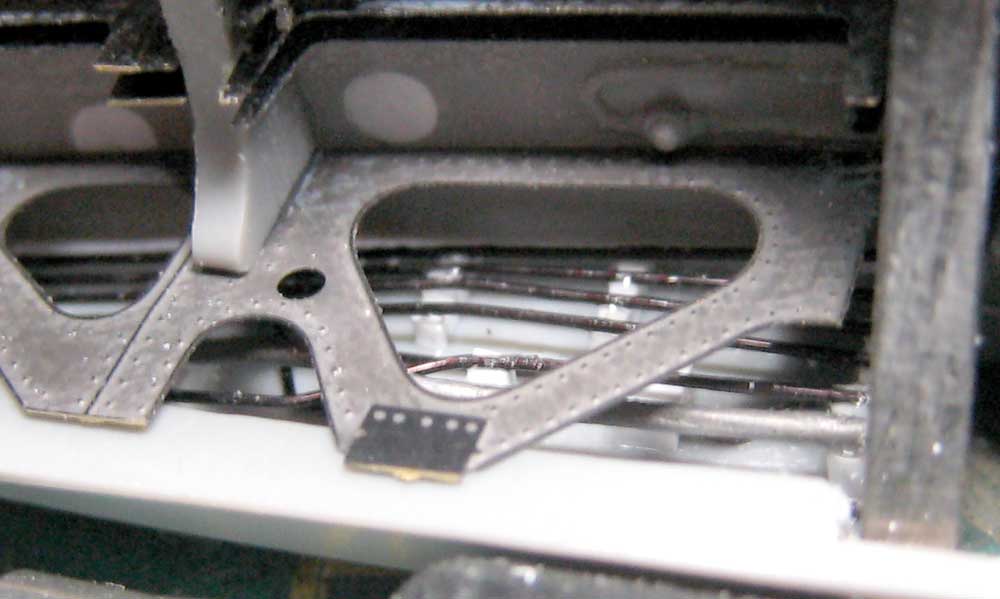
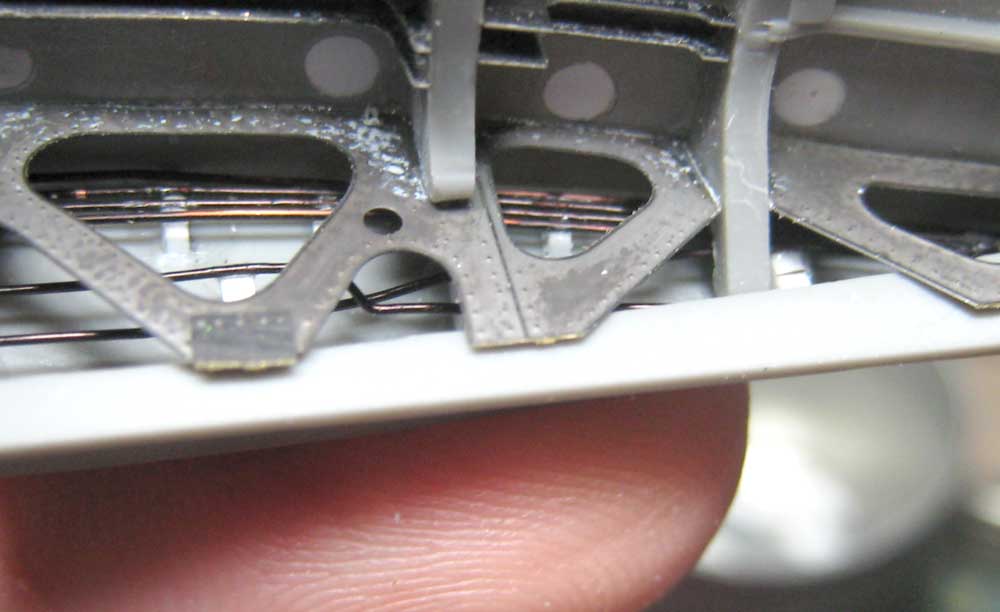
Back from my journeys- and back to that bomb bay! Here's an alert- one thing the good folks at Eduard fail to mention is this little stub spar in the wing root. Chop it out or the PE-enhanced bay won't fit! Here's what it should look like- easy! Before we go any further, here's a tip for straightening wire- even a kinked piece like this can be salvaged. Just lay it on a flat, hard surface- glass will do, but I use the base of my Mission Models Etch-Mate. Simply roll the wire with a flat tool, like the base end of a pair of tweezers. Hey, Presto! The wire is ready to become a simulated hydraulic line. The kit wing roots display some basic engraved detail- these appear to be the continuations of the hydraulic lines in the wheel well. They've got to go- scrape 'em out! Add some spacers from styrene stock and place your first wire- it's basically straight. Here the rest have been added. Using more spacers a second layer of piping has been put in place- not a thicker line form fine solder. I was having fun and this was going a lot faster than I thought it might, so I added a third layer, flush with the hull. Tiny blocks of styrene formed junction boxes which I linked together with neatly-bent lengths of scrap wire form the first two layers. Waste not, want not, move along quickly. Here's what it looks like with the bomb bay dry-fitted in place. I did the other side while I was all fired up. Test-fitting the wings saved me from an awkward time fitting the baomb bay later, but also revealed upcoming obstacles. The fit ain't so hot, and the chord on the starboard ming seems too long for it's rroot. Oh, Woes! Not to fear- I'll let this problem percolate through my chugging cranium. Victory shall be mine!
 

An even quicker way to straighten out bent wire is with a small steel plate and do the same rolling procedure. I first learned it from a member of my local IPMS chapter during a Saturday get-together at his house.

I don't go on the forums here very much but I'll try to keep tabs on the Helldiver. This is going to be a fun build to watch!

"Whaddya mean 'Who's flying the plane?!' Nobody's flying the plane!"

  • Member since
    February 2003
Posted by Jim Barton on Saturday, November 3, 2007 9:54 PM
So, how did the root canal go? Hope everything went okay and you get back to the 'Diver.

"Whaddya mean 'Who's flying the plane?!' Nobody's flying the plane!"

  • Member since
    February 2007
  • From: Bournemouth UK
Posted by Luftwoller on Sunday, November 4, 2007 5:24 AM

This is turning into an amazing build. I cant wait to see whats next. The details in the bomb bay are awesome. What is the interior B/bay colour? Zinc Cromate? I hope your going to get some paint on the wiring before you glue the B/bay sides in, to get all that lovely detail, detailed.

...Guy


..'Your an embarrassment to the human genus, makes me ashamed to call myself Homo'.
JOIN OUR COMMUNITY!

Our community is FREE to join. To participate you must either login or register for an account.

SEARCH FORUMS
FREE NEWSLETTER
By signing up you may also receive reader surveys and occasional special offers. We do not sell, rent or trade our email lists. View our Privacy Policy.