SEARCH FINESCALE.COM

Enter keywords or a search phrase below:

FineScale Modeler WWI Aeroplane Group Build 2013

139886 views
1262 replies
1 rating 2 rating 3 rating 4 rating 5 rating
  • Member since
    April 2006
  • From: ON, Canada
Posted by jgeratic on Thursday, June 20, 2013 5:06 AM

Hi Theuns,

Luckily I've done some reading up on the Oeffag as I too am building an Austrian aircraft.

a.) the stipple type camou was described as being a mustard yellow.  There appears to be at least three types of patterns, but for Brumowski's 153.52 aircraft, illustrations seem to indicate the use of the more intricate spirals.

b.) most 153 series aircraft had the spinner nose caps removed as they had a tendency to fall off during flight, careening into  the airframe and causing damage.  Beginning with the airframe series 153.112, the fuselage nose was built rounded, giving on average an extra 9km/h.

regards,

Jack

  • Member since
    November 2009
  • From: SW Virginia
Posted by Gamera on Thursday, June 20, 2013 7:53 AM

wing_nut

Thanks for the comments and compliments.  

Tim, that's the hairspray once again.

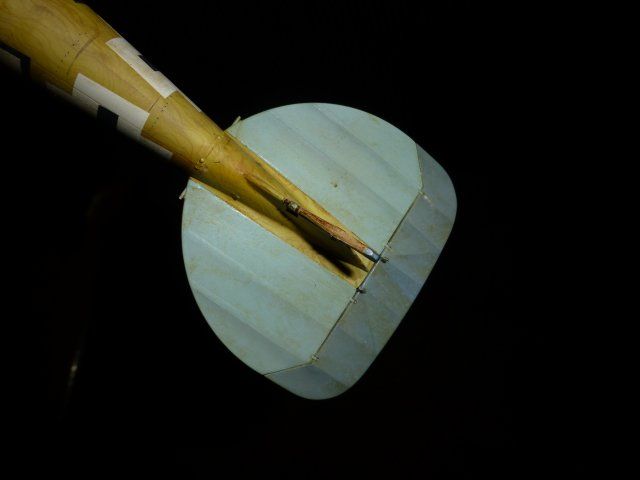
What will keep it off the contest table?  I can't get a photo that shows it but the cable that have one end at the fuselage on the bottom wing... 4 each side... 3 out of 4 each side popped off at least once and a couple several times.  The CA was starting to build up and make little blobs, a couple of seams that needed some attention.. a Modeling 101 basicEmbarrassed.  And a total brain fade on the elevator.   Got it all weathered and the tube frame shaded for some depth (pic below).... but should have painted it blue firstStick out tongue and not noticing until it was pretty firmly glued in place. As for the not unhappy... how thew wood turned out.

Well, it is under the plane, I'd never have seen it until you posted the close -up! I'd be tempted to pull out the pigments and smear a little 'mud' around the wheels and the tail there. Guess it's a cop-out to cover problem areas up but hey, it did get there in use right!?! 

"I dream in fire but work in clay." -Arthur Machen


  • Member since
    March 2013
Posted by Ssasho0 on Thursday, June 20, 2013 8:47 AM

Winh_nut,

you can always "unglue it"- I put Tamiya extra thin on the joint wait few seconds, apply some more Tamiya Extra thin (the trick is to keep it wet with glue) and then just very very carefuly move it up and down and get it out :). Ofcourse this works only if glued with modelling glue. For CA glue you will have just to break it :-P

Best regards,

Sasho

  • Member since
    March 2003
  • From: Towson MD
Posted by gregbale on Thursday, June 20, 2013 9:52 AM

Marc - Never been to a show, never entered a contest, so I can't address those issues, but as far as your lovely Albatros goes, to most of us your "I am not unhappy" should be more like "Bow down and worship me ye lesser mortals...." (Okay, that's a little over the top, but you get the idea.) We all see the faults in our own work more acutely than others do, that's a good thing. But, face it, your work is extraordinary, a pleasure to witness in execution, and a delight to see when achieved. We're not unhappy with it either.

As for a loose cable here and there (been there, done that....), my attitude is, "that's what the squadron fitters and riggers are for." They'll get those turnbuckles tightened up before the next mission, and all will be well.

Chuck, great to hear things are progressing, hope we get to see some good stuff when you're ready.

No pics yet, but I've made a start on the Morane Saulnier Type N. After having fought the Baby tooth and fang at every step along the way, this one is almost literally falling together.

Greg

George Lewis:

"Every time you correct me on my grammar I love you a little fewer."
 
  • Member since
    April 2005
  • From: Piscataway, NJ!
Posted by wing_nut on Thursday, June 20, 2013 10:08 AM

Greg, I can't thank you enough for those very nice things you've said.  

No doubt, we are our own worst critics.  It's an individual thing, but I like entering contests... and I am regularly a judge so I know those bastxxxx er... we look forWhistling  the general rule is don't pick up the model so i might have gotten away with the elevator.  But seams and glue?  That's the stuff those bastxxxx... sorry... we look forWink for the first pass to thin the herd.

If I EVER make a comment implying anyone is a lesser model than me, or anyone else for the matter,  you have permission to smack me around.Big Smile

Marc  

  • Member since
    April 2010
Posted by Theuns on Thursday, June 20, 2013 10:18 AM

Seem to have lost my reply LOL

Thanx Jack, the info helps allot.

Just a question regarding the way the paint (colored dope) was applied at the factory, was it sprayed on or brushed on?

Theuns

  • Member since
    April 2006
  • From: ON, Canada
Posted by jgeratic on Thursday, June 20, 2013 1:55 PM

Theuns, you are welcome.

Regarding doping of aircraft, I've read several entries over at the aerodrome forum.  Best I can figure out is that the initial coat or two of clear dope was applied by  brush to ensure penetration of the fabric (and wood?).  Subsequent layers were then applied with a spray gun (invented circa 1890).  Fabric surfaces would receive another coat or two of clear dope, followed by camou colours if applicable, and finally a varnish to water proof.   Note this was a description for German aircraft, compliments of the late Dan San Abbott.

regards,

Jack

  • Member since
    October 2011
  • From: Lake Villa, Illinois
Posted by Chuck Davis on Thursday, June 20, 2013 2:43 PM

Guys - a general comment here.  I am "chuffed" as our friends across the pond would say with how this Group Build has gone.  I was reluctant to join, but finally caved to Aaron and Tim's arm twisting.  I must say I'm glad I did.  You guys have inspried and informed me, both with constructive comments and beautiful builds.  I've been very impressed with the"chat" and the excellent manners displayed - not always true from what I've seen.  At this point, my biggest fear is that y'all have set the bar impossibly high for any future group build I join...unless of course it's with you guys.  Hmmm.  Maybe an annual get-together?  Maybe in the future they actually figure out how to transport stuff via the internet, and then we can all get a burger from Tim. Big Smile

Anyway, here's where the Tripe sits at the moment - the Skyraider has forced it into a box, but only temporarily (dead lines must be kept after all).  I still am not quite happy with the streaking - I don't think the lighter streaks show up enough, and the over-all hue is darker than I intended.  Still, for a first effort I learned alot.  All that remains - other than final assembly and rigging Stick out tongue - are painting of the guns and struts.  Take care all!

Chuck Davis

  • Member since
    March 2003
  • From: Towson MD
Posted by gregbale on Thursday, June 20, 2013 3:20 PM

Über-nice work there, Chuck! That prop looks a work of art on its own, beautifully "used" weathering. (Is that the kit part, or an AM wood one?) It all looks really good. Look forward to seeing it come together.

Short work on the Morane "bullet." The molding on everything is s-o-o-o much nicer than the first build, and the fit is generally spot-on. Doing it basically OOB, but added paper belts and a perforated Eduard PE seat back in the office.

Had to fiddle with the tailskid mount a bit to clear the rudder (thank you online build reviews), but everything else fit well.

Powerful nine-cylinder engine, most of which will be hidden behind the big schnoz spinner when it.s on:

That's it for now. Already have the wings on, so painting should be right around the corner.

Greg

George Lewis:

"Every time you correct me on my grammar I love you a little fewer."
 
  • Member since
    November 2009
  • From: SW Virginia
Posted by Gamera on Thursday, June 20, 2013 6:44 PM

Chuck & Greg: Those look great guys!!!

I did get the Nieuport painted, I thought about doing some shading but decided to quit while I'm ahead:

"I dream in fire but work in clay." -Arthur Machen


  • Member since
    April 2010
Posted by Theuns on Friday, June 21, 2013 1:16 AM

The way the dope was applied back then is exactly the way I do it on full size today, except we add si

alluminium paste for UV protection.

As for the Oeffag, I am finding it very difficult to work so small and fiddly, but it is a learning experience for the WNW 1/32 SE5 I got in the stash. If there is another WW1 gb I will join with that  :-)

Theuns

Moderator
  • Member since
    September 2011
Posted by Tim Kidwell on Friday, June 21, 2013 8:54 AM

Shooting for new vlog begins ... NOW!

--

Timothy Kidwell
tkidwell@firecrown.com
Editor
Scale Model Brands
Firecrown Media


  • Member since
    November 2003
  • From: Nashville, TN area
Posted by bobbaily on Friday, June 21, 2013 8:56 AM

Greetings all-

Again, the quality of the work here has been outstanding....and that's really not a strong enough word.  Everyone's build has been amazing-quality of work, attention to detail, techniques used...stunning.

Ok-I've broken the Fokker E.V out of the box and done some painting on the wood surfaces....still need to hit the prop with some oil wash and then some Tamiya clear yellow...

I do have a question-what color would 'Sail' be for the interior of the fuselage?  I'm assuming an off-white but I have been wrong before....just ask my wife....

cheers

Bob


  • Member since
    April 2006
  • From: ON, Canada
Posted by jgeratic on Friday, June 21, 2013 11:00 AM

Bob, you got it right, sail colour is in reference to the unbleached linen.  Which ever off white colour you do choose, just keep it flat as  I don't believe the doping process was utilized on the interiors.

Here's an interesting link on interpretations of the various linen colours by country:

http://wwi-cookup.com/sopwith/modelling/cdl.html

Chuck and Greg - nice progress there and both those engines look right on, as does that prop - wow!  The Fokker streaking looks almost there, but as stated could use some lighter sections.  It is a difficult effect to achieve short of resorting to an in scale brush which I figure would be around 4mm wide.

Gamera - looks you achieved a good clean finish with the aluminum.  You can always do some post shading afterwards if you have time.

regards,

Jack

  • Member since
    November 2003
  • From: Nashville, TN area
Posted by bobbaily on Friday, June 21, 2013 11:04 AM

Thank you Jack-the link is very helpful for this project and hopefully others.

Bob


Moderator
  • Member since
    September 2011
Posted by Tim Kidwell on Friday, June 21, 2013 3:37 PM

Hi guys,

The new vlog is up!

Have a great weekend,

Tim

--

Timothy Kidwell
tkidwell@firecrown.com
Editor
Scale Model Brands
Firecrown Media


  • Member since
    March 2003
  • From: Towson MD
Posted by gregbale on Friday, June 21, 2013 4:00 PM

Great vlog, gentlemen.

Aaron -- Bigfoot and I are officially eating our words. (Okay, I'm eating my words, he's foraging for berries and pine nuts.) Well done.

Jack -- nice link on the CDL, hadn't seen that one before. Thanks for sharing.

Gamera -- nice to see the Nieup coming along. Looks like you licked the Alclad problem.

Bob -- Good to see you checking in. What scheme have you got in mind for the E.V?

Greg

George Lewis:

"Every time you correct me on my grammar I love you a little fewer."
 
  • Member since
    November 2003
  • From: Nashville, TN area
Posted by bobbaily on Friday, June 21, 2013 4:45 PM

Thanks Greg-I'll be going with the 'straight out of the box' (Eduard Weekend Edition) yellow/black....failed attempt at lo-vis....

Bob


  • Member since
    April 2006
  • From: ON, Canada
Posted by jgeratic on Saturday, June 22, 2013 6:53 PM

Another great vlog guys, and Aaron, good to see you have some progress to report (and really does look good).  Tim, your prediction on my time table for finishing is safe.  This past week was vacation time, and pretty much every afternoon was spent at the bench.  

Here's something interesting, an old bottle of paint can be a good thing. 

 Testors Leather colour, well over a decade old, was used for the  cockpit padding.  Was having trouble laying down an even coat as it was pretty gooey soon on application, quickly creating a skin on top while underneath, the paint was still drying.  Gave me an idea, by using the backside of an exacto blade, indentations were made on the edges to give it that upholstered look.

All that is left is the prop.  To get that laminated look, I took a stab at making my own mask out of sheet styrene.  Pictured is just one side sprayed, but looks like is just might do the trick.

regards,

Jack

  • Member since
    February 2006
  • From: Smithers, BC, Canada
Posted by ruddratt on Sunday, June 23, 2013 2:24 AM

Chuck - fine job on the streaked camo for the F.1. Looks like the finish line is fast approaching for you. Looking forward to seeing this one done (the tripes have always been favorites of mine).

Greg - excellent progress on the 'bullet'. Looks like a fun kit - may have to grab me one of those.

Cliff - the finish on the Nieuport looks great from where I'm sitting! A little post-shading between the ribs on the wing surfaces would really make that detail pop. Sometimes I'll use Tamiya weathering powders for that effect, as they're a bit easier to control than doing it with an airbrush.

Tim & Aaron - loved the vlog (as always)! Nice to see your builds coming along! Yes

Jack - man, that is some very clever use of paint in getting that stitched leather look to the 'pit combing, not to mention your prop mask. Looks incredible!

Since work finished for me on the E.III, I've jumped back into my WnW D.VII (Alb) entry for Bish's Gift GB, but if it's OK with you fellas I'd like to post the occasional pic of my progress here as well. This is a great GB, and I don't want to leave the party just yet. Wink

Mike

 "We have our own ammunition. It's filled with paint. When we fire it, it makes pretty pictures....scares the hell outta people."


  • Member since
    November 2009
  • From: SW Virginia
Posted by Gamera on Sunday, June 23, 2013 9:41 AM

Jack: Great idea there! The 'leather' looks good, sometimes some of the best results come from fiddling around!

Mike: Thanks!

I was going to try some shading but the other day in a major brain-fart I slapped some of the decals on her. So I guess I'm going to just go ahead and build her as she is. Frankly if I can get the rigging to look decent I'll be more than pleased. I think I've been dragging my feet here due to my fear and apprehension of trying to rig the thing, even though I picked this aircraft mainly due to having the simplest rigging of the 3-4 Great War aircraft in my stash.

"I dream in fire but work in clay." -Arthur Machen


  • Member since
    April 2006
  • From: ON, Canada
Posted by jgeratic on Sunday, June 23, 2013 6:26 PM

I am done.  Again, this is Eduard's 1/48 scale profiPACK  Albatros D.III Oeffag 153.  The crosses and owl emblems are from Pheon's Oeffag set Volume one.


This particular aircraft was flown by Hungarian born Franz Gräser.  He was ranked sixth among the aces of  the Austro-Hungarian air force, with a total of 18 confirmed.  An interesting fact is he never obtained an official pilot's certificate, nor underwent any official flying training.

On to the photos... the last three were shot under natural light.  The rest I had set up  a couple fluorescent lamps at 45 degree angles from the front.  One lamp was brighter and resulted in the pictures having a slight yellow hue from the right side.

regards,

Jack

  • Member since
    April 2003
Posted by shivinigh on Sunday, June 23, 2013 7:33 PM
Dang JG that turned out great.


  • Member since
    November 2009
  • From: SW Virginia
Posted by Gamera on Sunday, June 23, 2013 7:36 PM

Dang Jack, she looks great to me! Love everything about her.

"I dream in fire but work in clay." -Arthur Machen


  • Member since
    September 2012
Posted by GMorrison on Sunday, June 23, 2013 11:44 PM

Nice vlog, men.

Aaron; pathetic.

The broken wing deal turned out ok, and if you look at the post of the tail controls you'll see that the lower wing is back in place.

You had not noticed that I have a second build on the beach. The 1/72 Hansa Brandenburg W.29.

It's the Eastern Express kit and not too accurate, but sometimes a side road allows you to want to get back on the highway....

 Modeling is an excuse to buy books.


  • Member since
    March 2003
  • From: Towson MD
Posted by gregbale on Monday, June 24, 2013 12:06 AM

Jack - Abso-freakin-lutely beautiful! Truly stunning, the color, the ribbing, the rigging, the multiple tones and that lovely metalwork. That closeup with the radiator decal is perfect--if I didn't know what it was, I don't think I would ever have realized it wasn't real screen. And the trick with the coaming stitching is simple but inspired.

I am in awe. Bow Down

Greg

George Lewis:

"Every time you correct me on my grammar I love you a little fewer."
 
  • Member since
    February 2006
  • From: Smithers, BC, Canada
Posted by ruddratt on Monday, June 24, 2013 9:39 AM

Jack - wow!!! You absolutely nailed that one! It was pure joy watching it come together - truly masterclass stuff! Yes

Mike

 "We have our own ammunition. It's filled with paint. When we fire it, it makes pretty pictures....scares the hell outta people."


  • Member since
    October 2010
  • From: Hoodsport, WA
Posted by Dogfish_7 on Monday, June 24, 2013 1:48 PM

Some astonishing builds going on here! Never realized how much detail work goes into these planes. Definitely fun to watch!

Bruce

Moderator
  • Member since
    September 2011
Posted by Tim Kidwell on Monday, June 24, 2013 1:49 PM

jgeratic

Jack, that is incredible. You showed perseverance and I think a technique that some of us might try on future builds. Good stuff! Make sure to get the ribbon.

--

Timothy Kidwell
tkidwell@firecrown.com
Editor
Scale Model Brands
Firecrown Media


Moderator
  • Member since
    September 2011
Posted by Tim Kidwell on Monday, June 24, 2013 1:53 PM

ruddratt
Since work finished for me on the E.III, I've jumped back into my WnW D.VII (Alb) entry for Bish's Gift GB, but if it's OK with you fellas I'd like to post the occasional pic of my progress here as well. This is a great GB, and I don't want to leave the party just yet. Wink

Uh, didn't anyone tell you, you can enter but you can never leave? No, sir, once you're in the WWI Aeroplane GB, you're in until the last day, no matter how many planes you build. 

--

Timothy Kidwell
tkidwell@firecrown.com
Editor
Scale Model Brands
Firecrown Media


JOIN OUR COMMUNITY!

Our community is FREE to join. To participate you must either login or register for an account.

SEARCH FORUMS
FREE NEWSLETTER
By signing up you may also receive reader surveys and occasional special offers. We do not sell, rent or trade our email lists. View our Privacy Policy.