SEARCH FINESCALE.COM

Enter keywords or a search phrase below:

Longest Day GB

265282 views
2863 replies
1 rating 2 rating 3 rating 4 rating 5 rating
  • Member since
    April 2006
  • From: Denver, Colorado
Posted by waynec on Friday, May 9, 2014 8:23 AM

Cody nice looking fw.

Eagle i have not tried the sponge technique. May try it on curent 37mm flak or truck.

Никто не Забыт    (No one is Forgotten)
Ничто не Забыто  (Nothing is Forgotten)


  • Member since
    November 2010
  • From: Florida-West Central
Posted by Eagle90 on Friday, May 9, 2014 9:25 AM

Hey wayne, well I'd be very interested in seeing that used!  Do you have any reference pics from the internet or anything where you have seen it used?

Eagle90


  • Member since
    December 2002
  • From: Bury St Edmunds, Suffolk, England
Posted by Bish on Friday, May 9, 2014 9:33 AM

stikpusher

jgeratic

Greg - good call on the recognition stars, my Canadian Firefly should of had them too, including one for air recognition, but my photo references did not show any.  I think in many instanceces they did not have time to apply them, or were covered up after a few days in the battle zone.

Boy it has been busy in here the past few days... Great stuff all around! Cody, your 190 is tops!Toast Priller's D-Day mount has long been one of my favoritesYes.

As far as air recognition panels go, they are quite similar to the ones in use still today. Floursecent colored fabric panels with tie down straps in the corners to attach them to the vehicle upper surface. The panels are usually two sided and orders from higher will specify which of the colors will be displayed for what time period. Here is an excellent photo from Life of a typical M4 in Summer 1944 where teh air ID panel can be seen tied down over the engine deck stowage... oh yes the M4 not plain OD but also sports the typical 1st Army camo of black over OD for that time period.

I was wondering if they were the same as what we use now, but I had only seen B&W pics and its hard to tell. But that defiantly looks like the ones we used for both AFV's panels and for markings HLS sites. I guess its something you just can't improve.

I am a Norfolk man and i glory in being so


On the bench: Airfix 1/72nd Harrier GR.3/Fujimi 1/72nd Ju 87D-3

  • Member since
    July 2004
  • From: Sonora Desert
Posted by stikpusher on Friday, May 9, 2014 11:17 AM

Eagle, your very welcome. The photo is indeed such a great piece of reference in so many ways. I LOVE the Life archives for the gems that I find in there.

Bish, the panels are defintely a case of "if it ain't broke, don't fix it". Just like the M2 .50 cal. some things need no improvement. Even from back then. From what I have read, they also used colors such as blue and white, in addition to the red and orange ones currently in use. I know from the air that they are tiny,  but they are visible and it's better than nothing.


F is for FIRE, That burns down the whole town!

U is for URANIUM... BOMBS!

N is for NO SURVIVORS...

       - Plankton

LSM


  • Member since
    March 2014
Posted by BarrettDuke on Saturday, May 10, 2014 4:33 PM

I figure it's time for another installment of pictures. I haven't attached the body to the chassis yet. I think it's easier to do the various kinds of work on each section if I keep them separate as long as possible. That's why some pieces are still off. They join the two sections together. I decided to apply the 3 color camo scheme in full color. That way I can do fading and weathering effects based on different kinds of exposures. So, for example, I figure the upper vertical surfaces will be more faded than the lower surfaces just above the tracks because these would be in the shade most of the time. They would be mostly discolored from dirt and contact. I'm glad I'm going to do a lot of fading. Some of the camo is only barely passable.

I feel pretty good about the chassis. All I feel I have left to do there is blow on some dirt and dust, and then put the tracks on.

  • Member since
    April 2006
  • From: Denver, Colorado
Posted by waynec on Saturday, May 10, 2014 5:51 PM

Eagle90

Hey wayne, well I'd be very interested in seeing that used!  Do you have any reference pics from the internet or anything where you have seen it used?

Eagle90

well the green camo on LCVP went south yet again. in the process of stripping it down, again, i may have discovered an interesting technique for blending camo lines and acrylic paint; spray a litthe SIMPLE GREEN and work it with a green scrub pad. so will try it once e again. OTOH the base coats for 4x6 and 37mm FLAK went great. think i will sponge the truck as it is more likely to be parked under trees.

Никто не Забыт    (No one is Forgotten)
Ничто не Забыто  (Nothing is Forgotten)


  • Member since
    November 2009
  • From: SW Virginia
Posted by Gamera on Saturday, May 10, 2014 7:27 PM

BD: The camo looks fine to me, and the suspension system looks great!

"I dream in fire but work in clay." -Arthur Machen


  • Member since
    April 2006
  • From: Denver, Colorado
Posted by waynec on Saturday, May 10, 2014 7:40 PM

you should feel good about the suspension. it turned out really nice.

Никто не Забыт    (No one is Forgotten)
Ничто не Забыто  (Nothing is Forgotten)


  • Member since
    March 2014
Posted by BarrettDuke on Saturday, May 10, 2014 9:36 PM

Thanks, Wayne. I am very pleased with the suspension. I described some of what I did in my reply to Gamera just now. I'm starting to work on the tracks now. I'm making the rigid sections right now. It's a challenge how to glue the rest together, still have them flexible enough in the right places for the bends and sags and also get them painted. I've already hit them with a coat of grey primer and rust while they were on the sprues. I may just have to settle for a couple washes of brown and black and then some light grey and silver highlights. Should be fun--at least if I'm very patient!

  • Member since
    March 2014
Posted by BarrettDuke on Saturday, May 10, 2014 9:45 PM

Gamera, I replied to you earlier, but it doesn't seem to have posted. Thanks for the compliment. I had a lot of fun doing the suspension. I especially like how the wheels turned out. In the end I mixed up some flat dark grey, flat black, rust colored paint, and some AIM rust powder and worked it in on them for a while. It seems to have given them some depth. I like the grease stains around the bolts, too. That's non-diluted black oil paint worked in a little with a cotten swab. Yes, the camo works but I was hoping for more. I'm really surprised how much of an art there is to doing the camo right. A good fading job should eliminate most of the problems. :-)

  • Member since
    April 2006
  • From: Denver, Colorado
Posted by waynec on Saturday, May 10, 2014 9:49 PM

weathering is the fun part after the building. painting and decals not so much. i presume these are indy tracks. karl logan, aka THE DOOG, has a great how to in the armor forum for indy tracks. i will review it when i get ready to do them on my JGSDF TYPE 87 spaa.

on the tracks, unless this thing is a wreck, don't do much rust on the tracks. they just don't get rusty when in use. a little dark red brown with a lot of dark gray what add just a hint of color which i like to do.

i was talking with mark, ipms head judge, at breakfast last week and painting came up. one school of thought, which sounds like cheating but makes sense, is any ww2 german armor start with painting everything under the fenders dirt and muddy. wipe off for where the road wheels rub against the track but don't even bother with a base coat.

Никто не Забыт    (No one is Forgotten)
Ничто не Забыто  (Nothing is Forgotten)


  • Member since
    November 2009
  • From: SW Virginia
Posted by Gamera on Saturday, May 10, 2014 9:53 PM

Thanks for the information on what you used and how, I'm kinda still trying to figure stuff like this out. I really like how the oil stains came out.

Wayne: Lol, Steve Zaloga in a manual I have sprays everything an earth colour under the fenders.

"I dream in fire but work in clay." -Arthur Machen


  • Member since
    December 2002
  • From: Bury St Edmunds, Suffolk, England
Posted by Bish on Sunday, May 11, 2014 5:12 AM

I like that scheme Barrett and nice work on the running gear.

I am a Norfolk man and i glory in being so


On the bench: Airfix 1/72nd Harrier GR.3/Fujimi 1/72nd Ju 87D-3

  • Member since
    March 2014
Posted by BarrettDuke on Sunday, May 11, 2014 5:24 AM

Waynec, Thanks for that info. I have read a bunch of conflicting opinions on the color to paint tracks. In the end, I think they're probably just mostly going to be earth colored. So, it sounds like what the judge said. Now, I just have to get that effect on my tracks that I have already painted rust colored! From now on, I think I'm going to start with a brown black base coat. And then I'll lighten it up with lighter dirt and dust colors and some exposed steel spots. Pretty much as you suggested.

  • Member since
    March 2014
Posted by BarrettDuke on Sunday, May 11, 2014 5:26 AM

Thanks, Bish. I appreciate it. I'm really enjoying this build.

  • Member since
    April 2006
  • From: Denver, Colorado
Posted by waynec on Sunday, May 11, 2014 5:47 AM
BarrettDuke

Waynec, Thanks for that info. I have read a bunch of conflicting opinions on the color to paint tracks. In the end, I think they're probably just mostly going to be earth colored. So, it sounds like what the judge said. Now, I just have to get that effect on my tracks that I have already painted rust colored! From now on, I think I'm going to start with a brown black base coat. And then I'll lighten it up with lighter dirt and dust colors and some exposed steel spots. Pretty much as you suggested.

The tracks will look fine. Sometimes realism gets in the way of artistic display. Im still trying to figure out the best color mix for modern war truck chassis grime, kinda dark grayish with a hint of brown.

Никто не Забыт    (No one is Forgotten)
Ничто не Забыто  (Nothing is Forgotten)


  • Member since
    March 2014
Posted by BarrettDuke on Sunday, May 11, 2014 7:12 AM

Waynec, I know what you mean. I am actually moving more toward combining paint colors but not mixing them together thoroughly so that I can get the natural variation in shading within a single layer without applying multiple layers, which can often look too grainy and superimposed. Probably requires application by daubing rather than by brushing to prevent the colors from mxing too much or creating streaks of color.

  • Member since
    April 2003
Posted by shivinigh on Sunday, May 11, 2014 12:32 PM

nice work on the camo there Barret. The interior work looks great.

Cody- love the 910.

got some work on my 190 done. Got the primer and base camo colours finished


  • Member since
    September 2003
  • From: AandF in the Badger State
Posted by checkmateking02 on Sunday, May 11, 2014 4:18 PM

I haven't posted any progress photos yet, since the going has been slow; but I've looked in at the going's on and there is some excellent work finished already. 

Hope I can get mine done by the deadline!

My contribution is the old Academy B-24H, in the markings of "Aries" from the Zodiac Squadron, 486th Bomb Group, 834th Bomb Squadron, 8th AAF.

I build Academy's B-24D and -J years ago, and forgot how fussy the kits are:  lots of sink holes and ejector pin marks, ill-fitting parts, so things have gone kind of slow.

Academy chose to mold the nose and the rear fuselage in separate pieces, to make it easier to release different versions of the Liberator.  Since I had difficulties lining these up last time I built one, I thought I'd be smart and glue some help tabs in place to help alignment and stabilize the assembly.  The result is below.
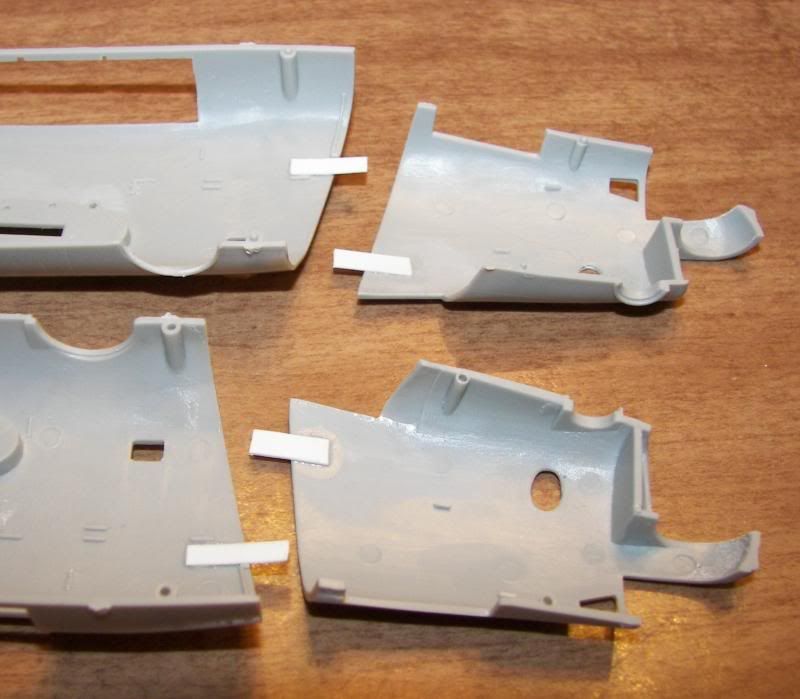
It worked fine until they broke loose when I was fiddling around with test fitting.

I also glued in some tabs to help place a couple of panels in the rear fuselage.  These pieces just drop in place, with nothing to hold them there.  Fortunately, the tabs I put in here didn't fall off.
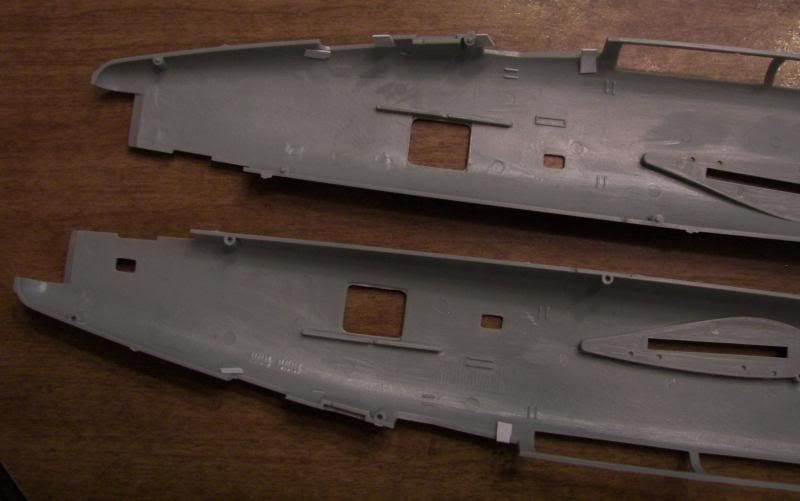
The first assembly step calls for putting together the waist gunners station.  The zinc chromate yellow is WEM Colourcoats interpretation.  It has a nice pleasant, sickly greenish-yellowy cast to it, that doesn't quite come through in the photos.  It is markedly different from the Testors in the little square bottles.
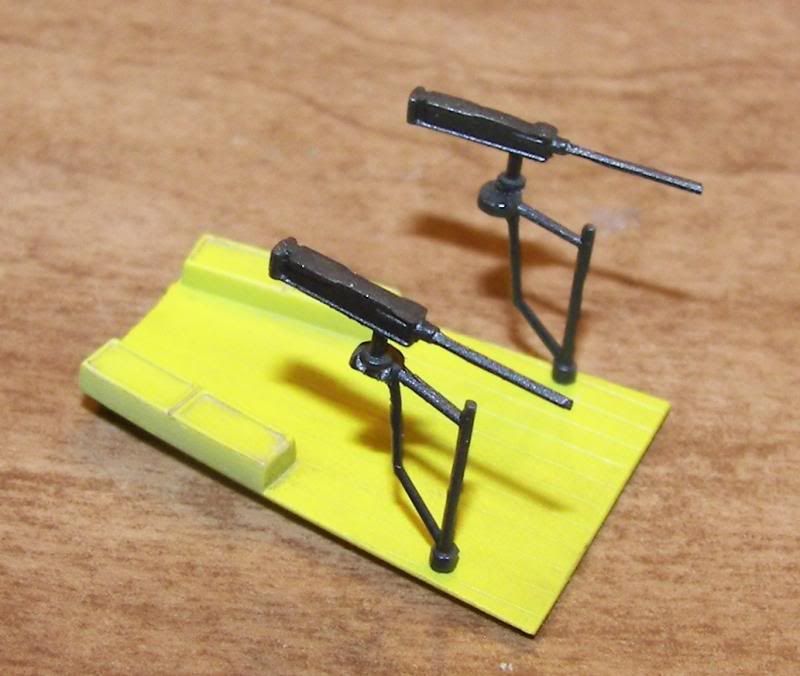
Anyway, they won't be very visible, since I plan on closing up the waist windows anyway. 

Next the instructions want the cockpit assembled.  When I applied the instrument panel decal, it shattered into tiny pieces.  So did the seat belt decals, so I scrounged some from the parts box.  Of course, that means the rest of the decals are undoubtedly bad too.  I'll try coating them with a decal preserver from MicroScale when (if) I get that far.
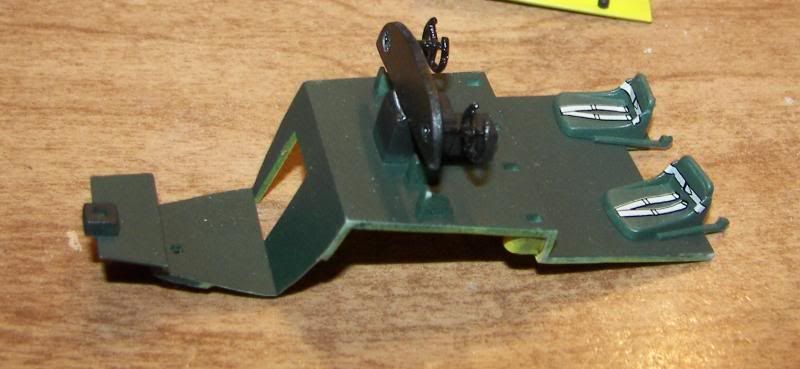
I didn't finish the cockpit, cuz I'm planning to put that into the rear fuselage, then glue the nose pieces around it--and hope everything lines up and hold together.


  • Member since
    September 2003
  • From: AandF in the Badger State
Posted by checkmateking02 on Sunday, May 11, 2014 4:29 PM

While I was tinkering around with some of the other futzy stuff, I did some work on the bomb bay, which I plan on leaving open. 


First, Academy doesn't provide enough bombs to fill it out, so I robbed the part box again until I had twelve bombs.

Then, from previous experience, the way Academy has them attached to the bomb racks makes them very easy to knock off during assembly; I did that on one of the previous builds.  There's just a little slot in the bomb and a shallow tab on the rack.  And of course, you can't get back up into the bay to replace them once they fall off.

So I drilled holes through each of the locations, then cut off a portion of a straight pin.  I glued the straight pin into the bomb rack, and drilled a corresponding hole in the bomb.  Then I superglued the bombs to the racks and hopefully they will stay there.

I forgot to take photos of the bombs and racks before I glued them in, but here's a shot with the fuselage halves test fitted together.

I painted the bomb with Model Master OD, and cut yellow stripes from an old sheet of RAF roundels with yellow surrounds.  I tried to make some yellow circles for the bomb noses, but this defied my efforts.


  • Member since
    March 2014
Posted by BarrettDuke on Sunday, May 11, 2014 6:23 PM

Thanks much, Shiv. Your plane's coming along very nicely, too. Did you use silly putty for the camo masking or some other technique? The lines look nice and sharp.

GAF
  • Member since
    June 2012
  • From: Anniston, AL
Posted by GAF on Sunday, May 11, 2014 6:24 PM

CMK02, Shiv,

Glad to see I'm not the only one racing to the finish line.  Smile    As to bomb rings, I've used a small piece of tubing (such as the ones that come over paint brushes) and dipped them in yellow and carefully (carefully) applied rings on the bomb noses.  Sometimes it works... sometimes it doesn't.  A steady hand helps (wish I knew where I could buy one of those).

As for the C-47, I've got the base colors down and now need to touch up the paint in a few places... well, a LOT of places, actually.  But it's getting there.

I took more photos than this, but I didn't have that "Steady Hand" and they were rather blurry.  Next up, masking off for Invasion Stripes.

Gary

  • Member since
    March 2014
Posted by BarrettDuke on Sunday, May 11, 2014 6:28 PM

Hey, Checkmate. Thanks for posting some pics. Sorry to hear of your troubles. I hope you can hang in there. Gluing on your own guide tabs was a great idea. I need to remember that little trick. That certainly is an interesting yellow. Hard to believe anyone thought their airmen would want to stare at that for hours at a time!

  • Member since
    April 2003
Posted by shivinigh on Sunday, May 11, 2014 6:52 PM

hey Barrret. Yes I used silly putty


  • Member since
    December 2002
  • From: Bury St Edmunds, Suffolk, England
Posted by Bish on Monday, May 12, 2014 4:15 AM

CMK, glad to see you didn't forget us, I know you have been really busy. Nice work on this, always a pleasure seeing your builds. Bomb rings, the eternal dilemma. As to the nose, I have had the same issue with both the Hase kits I have build, 1 D and 1 H. Though I think much of that was down to the Eduard PE, the later D certainly looks better than the H. Your idea is a good one, but maybe a strip running right round the edge rather than the tabs would be more secure.

GAF, nice work there. Looking forward to see it finished.

I am a Norfolk man and i glory in being so


On the bench: Airfix 1/72nd Harrier GR.3/Fujimi 1/72nd Ju 87D-3

  • Member since
    March 2014
Posted by BarrettDuke on Monday, May 12, 2014 4:55 AM

Shiv, the stuff sure comes in handy for masking, doesn't it? Before I got back into models, I never would have thought I would ever buy any silly putty again.

  • Member since
    November 2009
  • From: SW Virginia
Posted by Gamera on Monday, May 12, 2014 7:33 AM

Cody & Gary: Those look great guys!

eah

CMK02: Looks good! I did the same kit some years back and just glued the bombs in- yeah a few have popped lose and fell out over the years. Very good idea on pinning them in place- think I'll steal your idea there!

"I dream in fire but work in clay." -Arthur Machen


  • Member since
    September 2003
  • From: AandF in the Badger State
Posted by checkmateking02 on Monday, May 12, 2014 7:01 PM

Thanks for that suggestion about painting rings, Gary.  I'll have to give it a try.

I checked the Michaels store for some round hole punches; thought I could use them to punch out concentric circles and--thus!--make a ring.

They were out of the round stuff, and only had:  hearts!  Broken Heart


  • Member since
    September 2003
  • From: AandF in the Badger State
Posted by checkmateking02 on Monday, May 12, 2014 7:03 PM

Thanks, Barrett.  It's just a fiddly kit, a kind of attention-seeker in a plasticky sort of way.  The color of zinc chromate yellow wouldn't be my first choice for room décor!


  • Member since
    September 2003
  • From: AandF in the Badger State
Posted by checkmateking02 on Monday, May 12, 2014 7:06 PM

Thanks, Bish.

Yeah, I thought about the location of those tabs, but the problem is a bulkhead for the front nose wheel that takes up about 1/3 of the inside diameter of the fuselage.  Academy didn't leave much space to locate the tabs.

If I hadn't spent so much time on USS Enterprise, I'd be a lot farther on this project.  

Always a pleasure to be in one of your hosted GB's.


JOIN OUR COMMUNITY!

Our community is FREE to join. To participate you must either login or register for an account.

SEARCH FORUMS
FREE NEWSLETTER
By signing up you may also receive reader surveys and occasional special offers. We do not sell, rent or trade our email lists. View our Privacy Policy.