SEARCH FINESCALE.COM

Enter keywords or a search phrase below:

No More Excuses GB....end date extended

108869 views
763 replies
1 rating 2 rating 3 rating 4 rating 5 rating
  • Member since
    April 2008
  • From: Philadelphia PA
Posted by smeagol the vile on Wednesday, February 4, 2009 8:37 AM

Thank you!  As of right now, appart from issues with my GOOD vid card (on my old one) its up and running smoothly

Here are those shots!

Just a heads up, all that was done before I joined this, were the right leg, and the part where the legs and torso all attach togeher (cylinder thing, blue stripe on it, blast points) 

Gun


Body being painted with base white.


pre/post shading 


second coat of white over the black


Panty shot


torso attached, not weathered.


blast shield finished, paint chipped (realisticly, masking tape pulled some of the white up, looks great)

different angle


almost finished!


  • Member since
    September 2004
  • From: Vernon, BC, Canada
Posted by razordws on Tuesday, February 3, 2009 10:28 AM

Mike Sign - Welcome [#welcome]

Smeagol, looking forward to seeing all those pics.  Good luck with your computer.

Dave

  • Member since
    April 2008
  • From: Philadelphia PA
Posted by smeagol the vile on Tuesday, February 3, 2009 8:37 AM
I built, glued, painted, and weathered the legs of my At-Rt just to realise I didnt put the pins in the joints that help it move, heh, so Im sanding them down and sliding them in.  After I do that, all that is left is to put one four little doodads that I waited untill last to do, dullcoate, and then get my computer fixed (HOPEFULLY TODAY, IF ALL GOES WELL!) and put up photos of the wip and the finished product, and I took alot!


  • Member since
    October 2007
  • From: Inland Northwest
Posted by Summit on Monday, February 2, 2009 11:41 PM
Mike - Welcome to the NME, our fearless leader must be on Holiday. Looking forward to seeing the pics of your Panther.
Sean "I've reached nearly fifty years of age with my system." Weekend GB 2008
  • Member since
    January 2003
Posted by dogzilla17 on Monday, February 2, 2009 1:57 PM

You can add me for my Dragon 1/35 Panther A started in July 07  -- having a 2 yr old is great but has seriously slowed down panzer production (wonder if Albert Speer had this problem) -- anyway since time isn't an issue I've been experimenting w/ photo etch that came w/ the kit


Thx

Mike (Dogzilla)

  • Member since
    October 2007
  • From: Inland Northwest
Posted by Summit on Monday, February 2, 2009 8:31 AM

Aaronw- The ambulance looks Vantastic Thumbs Up [tup]  I do remember that movie very well. In fact I remember when all you could find in the auto section of models was Vans - Farra's Foxy Van, California Surfer Van Dead [xx(]  The roof conversion turned out great, and I look forward to seeing more done on the Fire Truck. I have always wanted to build one of the old '50- 60's style myself.

Smeagol - It's Good to see your still making Progress. Quit burning up your PC's from those Henti sites. Wink [;)] Laugh [(-D]  A Motherboard ? I believe I would just go buy another tower myself as I know nothing about 'puters..

Roy - Time to come back from Holiday with the Grass Skirt Girls . The Navy Crew Pirate [oX)] is getting unruley without the Captain aboard. Captain [4:-)]


Sean "I've reached nearly fifty years of age with my system." Weekend GB 2008
  • Member since
    April 2008
  • From: Philadelphia PA
Posted by smeagol the vile on Monday, February 2, 2009 6:32 AM
I have put the Acguy aside for a bit (to much of the same color for one moment) and went to the AT-RT.  I have taken ALOT of wip shots, I get my new motherboard and processor tomarrow, so if all goes well (which im hoping to god it does) Ill have the wips for you tomarrow.  I'm almost done the kit actuially, just have to add a few small parts, and weather the chasis and blast shield.


  • Member since
    September 2015
  • From: The Redwood Empire
Posted by Aaronw on Sunday, February 1, 2009 2:24 PM

Ok, I'll get to the HH-43 but in the meantime I've pulled out two projects that have been collecting dust for a good 2-3 years.

The first is an ambulance inspired by the movie Mother, Jugs & Speed.

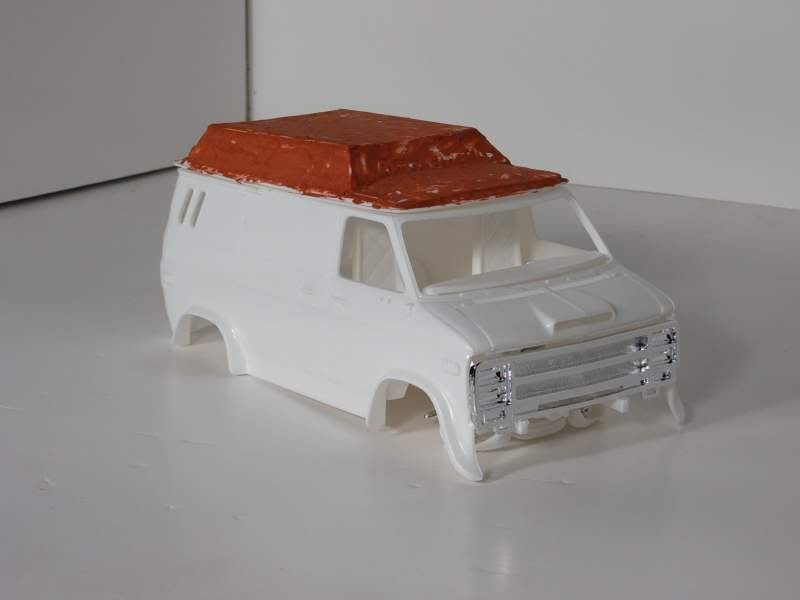
I started with Revell's 70's custom Chevy van, and I added a raised roof.
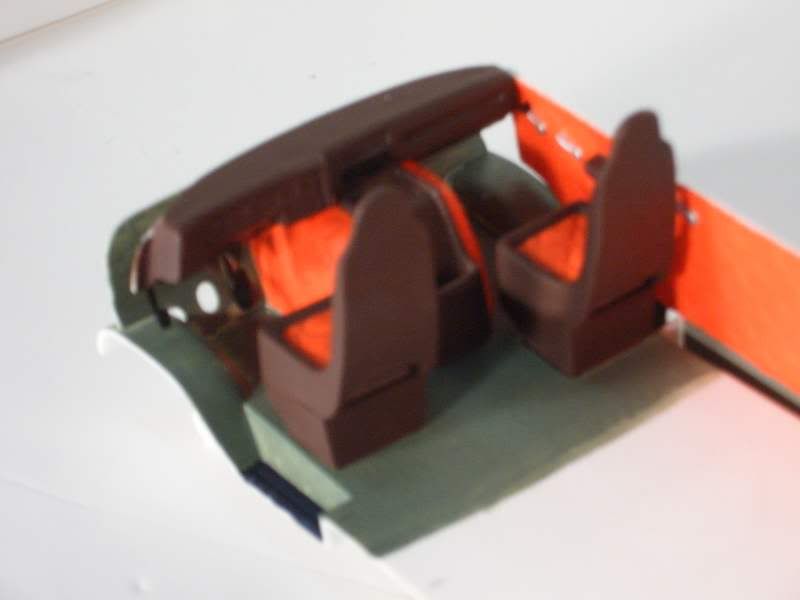
Did up the interior in fabulous 70's style (sadly the real interior colors of a 1-1 ambulance I once worked in Dead [xx(] ).


then primered, this is how it has sat for several years.
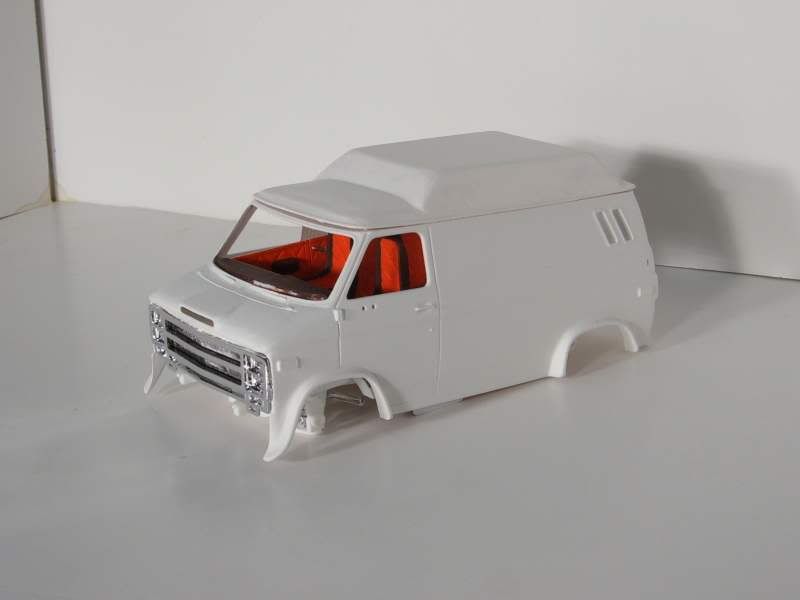
 

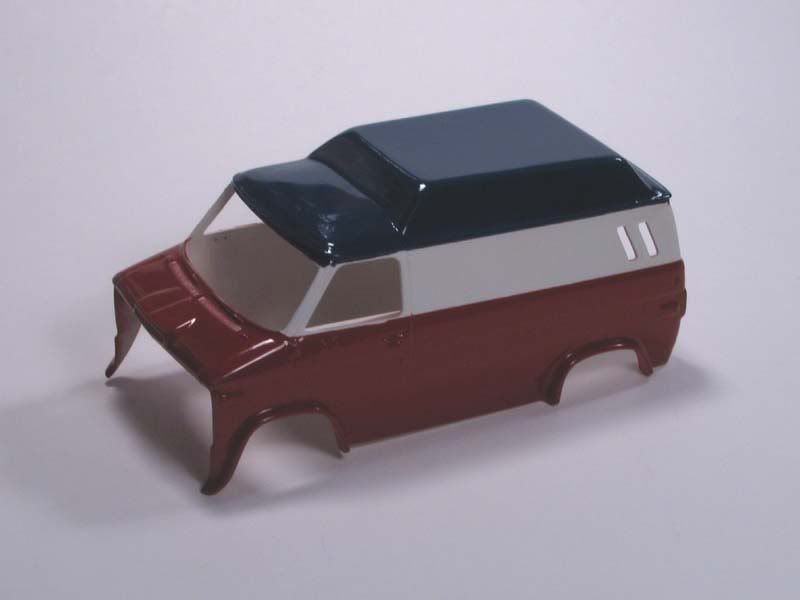
Yesterday I blew off the dust and gave it some color, it is obviously flying some 1970's bicentenial pride.
 

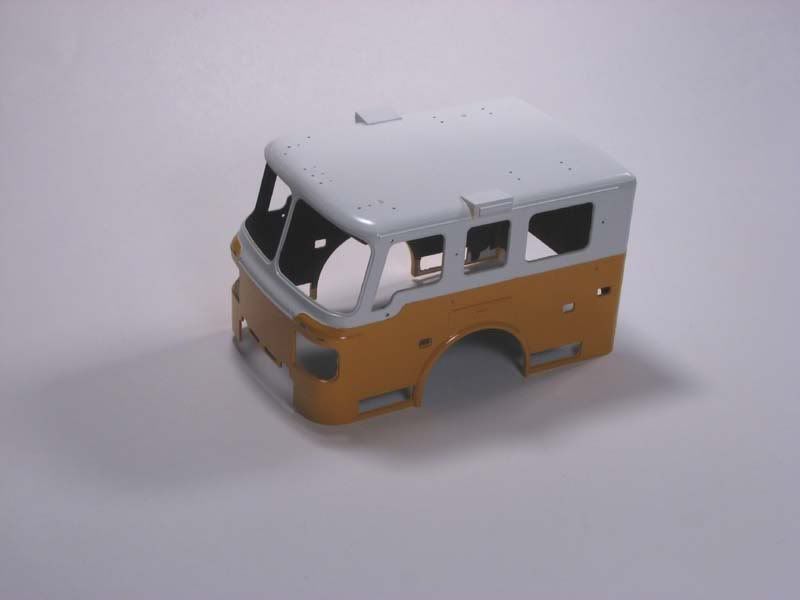
Project #2 is Trumpeters American LaFrance fire engine. I jumped on this the week it was released, detailed the cab interior then promptly lost interest.
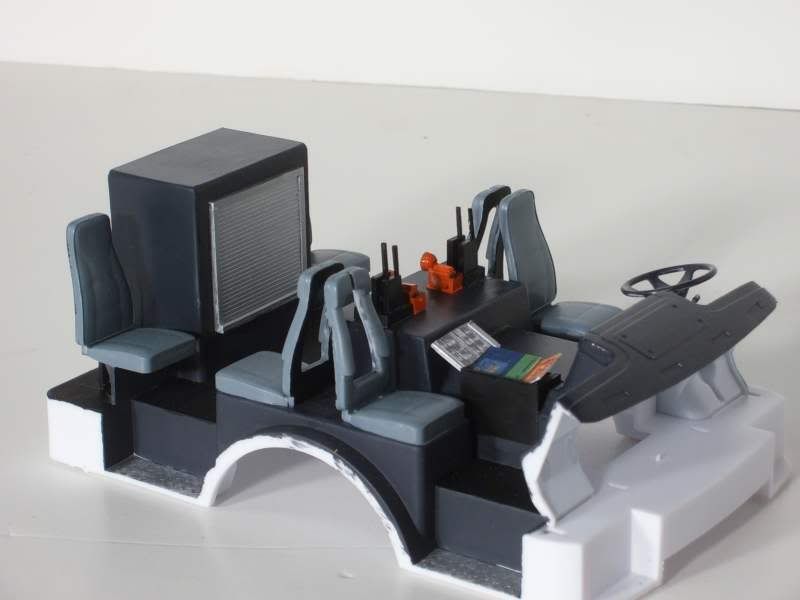
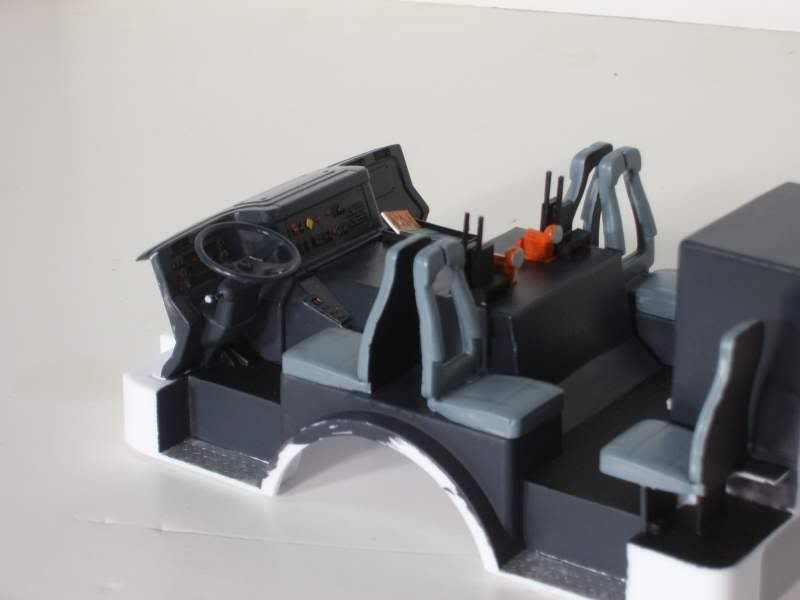
 

Two weeks ago I broke it out and got some paint on it. Unfortunately I lost the instructions when I moved. I've got someone mailing me theirs but I'm going to be stuck for a few days.
 

  • Member since
    May 2008
  • From: Wherever the hunt takes me
Posted by Boba Fett on Friday, January 30, 2009 8:45 PM
I do apologize for dissapearing for so long guys, but school has been a nightmare fun experience *grumbles* and other things have come up. This has also affescted my building, but I have joined the left wing to the fuselage half. To avoid sanding away my rivets, I ponered a solution until I had it, nail-polish remover! I'm using the testors filler, not the best, but it works for me. A q-tip full of the stuff I raided from my mom's drawer claened the plastic without so much a messing up a single rivet. I'm kinda stalled on the project though, as I can't find the other tire. If worst comes to worst, I can cast a new tire. Just an update and apology for dissappearing for so long! Blush [:I]

  • Member since
    September 2003
  • From: Northern hemisphere - most of the time-
Posted by blkhwkmatt on Friday, January 30, 2009 8:17 PM
Small update on my su-27.  Made my first attempt on painting the faded weathered camoflage.  I had testors MM flanker colors on hand and thought that they would work wonderfully.  after completing the upper surface camo (all three colors) I took one look at it and decided that it was totally wrong.  All the colors were too dark. I attempted a lighter color to blend it all in and make it lighter and that failed totally.  All that I could do was strip the entire paint job off the top and start over again.  I could not bring myself to take pictures, but it seems that I am back to square one with the paint.  Banged Head [banghead]Banged Head [banghead]Banged Head [banghead]Banged Head [banghead]

Quidquid latine dictum sit, altum videtur!!! - Anything said in Latin sounds profound!


  • Member since
    April 2008
  • From: Philadelphia PA
Posted by smeagol the vile on Wednesday, January 28, 2009 2:25 PM

The acguy is coming along fast now.  Im giving it a half butted preshading.   Im giving it a coat, then hitting the pannel lines with black, then giving it another coat.

I have one leg finished, one leg half finished, and one arm completly finished.  the torso is halfway there. 


  • Member since
    November 2006
  • From: Coastal Maine
Posted by dupes on Wednesday, January 28, 2009 10:25 AM
 razordws wrote:

Dupes, welcome aboard.  What's that russian looking craft beside the KT?

Razor - somehow I totally whiffed on this post. Sorry man! It's an Eduard La-7 (1/48). 

  • Member since
    September 2004
  • From: Vernon, BC, Canada
Posted by razordws on Tuesday, January 27, 2009 8:09 PM
Sounds good Mike.  Welcome to the procrastinator's group build.  Our head procrastinator is probably lurking around here somewhere.  I'm sure he'll be in tomorrow (or whenever) to welcome you officially.  Wink [;)]

Dave

  • Member since
    April 2005
Posted by Thunderbolt379 on Sunday, January 25, 2009 6:55 PM

Hi all,

I wonder if I might field a subject for this GB? While I always hesitate before committing to more GBs, this one feel doable... Zvezda's 1:35 BTR-70 (ex-early Dragon).

As with so much of Dragon's early output, there are lots of teensy parts and the lower-pressure molding meant larger sprue attachments, therefore lots of cleanup on parts too small to manipulate, and parts that broke at the slightest pressure while removing them from the tree. I got sick of this and boxed the project about two years ago, but when I recently took another look I found it was actually complete all but for the turret-roof grenade launcher and two or three broken grab handles/steps waiting to be replaced with brass. Then it's into the paintshop for acrylic Afghanistan camo, dust, dirt and rust...

Does this one qualify as a No More Excuses entry? Approve [^]

Cheers,

Mike/TB379

http://worldinminiature.blogspot.com/

  • Member since
    April 2008
  • From: Philadelphia PA
Posted by smeagol the vile on Sunday, January 25, 2009 3:21 PM
Simply put, my computer is on the fritz, it wont stay on for more then a few seconds before powering itself down, may be months before I get it fixed...  So no photos.  but the Acguy is coming along really nice, got one of the arms painted already.


  • Member since
    August 2006
  • From: The Great State of Wyoming
Posted by wyoroy on Friday, January 23, 2009 11:54 AM
Sean & Dave, here's the link to Swanny's website dealing with spraying Mr. Surfacer.  I will try spraying that as a primer then the paint.  I think that first I will lightly sand the area.  I'll keep you guys posted.

Roy (Capt. Wyoroy FAAGB/USNFAWGB)

John 3:16

  • Member since
    April 2008
  • From: Philadelphia PA
Posted by smeagol the vile on Friday, January 23, 2009 7:29 AM

I got a bit more work done with my build, though, no pics.  My computer is on the fritz (has me almost to the point of crying, I dont know whats wrong with her) 

Im on the puter at work right now.  I'v made more progress into filling those seams (its a long job with these older kits).  The arms are finished with seams, legs are getting close, and most of the torso is done.  I just have to now think of a paint scheme for him.  Once hes done ill start really working on the AT-RT, I have been fiddling, nothing else.

I have these... sticky removal pads, for removing tape and glue gunk from stuff, they EAT paint.  Took me about 7 of them but I stripped ALL of the paint (like 7 or 8 layers then a few topcoats)completly off, including the 'snap tight pre paint'  from the shield of it (which was where it got misted red).  Im gona keep the one leg as is, I like how it turned out, for the other side I gota start from scratch.  Im gona use intermediate blue as the base, then use the hairspray method with masking tape and white primer and chip off the white on the raised details I want to be colored (it happened on the other side by accident leaked udner the masking tape, looks AMAZIN)


  • Member since
    September 2004
  • From: Vernon, BC, Canada
Posted by razordws on Thursday, January 22, 2009 10:50 PM
Hmmm... I can only get the spray can stuff here, not the bottles.  Go figure!

Dave

  • Member since
    October 2007
  • From: Inland Northwest
Posted by Summit on Thursday, January 22, 2009 8:55 PM
 razordws wrote:


Sean, would Mr. Surfacer do the same thing?

It should work very well if you have a way of spraying it. I only have it in jars and have no clue what to use to thin it down for spraying. I saw where someone had some in a rattle~can once. They dont sell that stuff in my area. I ordered mine from overseas early this fall. 

Sean "I've reached nearly fifty years of age with my system." Weekend GB 2008
  • Member since
    August 2006
  • From: The Great State of Wyoming
Posted by wyoroy on Thursday, January 22, 2009 4:58 PM

have to do somethingConfused [%-)] 

Dave, needless to say I'm not removing the other decals.  I'll just fix the nose and replace that decal.

Roy (Capt. Wyoroy FAAGB/USNFAWGB)

John 3:16

  • Member since
    September 2004
  • From: Vernon, BC, Canada
Posted by razordws on Thursday, January 22, 2009 4:55 PM

Ohh... ouch Roy.  That looks nasty.  Shock [:O]  You'd think with all the difficulties of getting those academy decals to sit down that they wouldn't stick all that well.

Sean, would Mr. Surfacer do the same thing?

Dave

  • Member since
    October 2007
  • From: Inland Northwest
Posted by Summit on Thursday, January 22, 2009 4:44 PM
Roy - you should get you a can of "Sandable Primer" , mask off behind where the paint is good and primer everything forward. Wet sand it to fill in the valley where the paint got scraped out. Repeat if needed and your finish will blend in. Thumbs Up [tup]
Sean "I've reached nearly fifty years of age with my system." Weekend GB 2008
  • Member since
    August 2006
  • From: The Great State of Wyoming
Posted by wyoroy on Thursday, January 22, 2009 4:31 PM

I'am still here.

Dave, I removed the nose decals from my P-40E.  The only thing I found to remove them was acetone without destroying the plastic.

Roy (Capt. Wyoroy FAAGB/USNFAWGB)

John 3:16

  • Member since
    September 2004
  • From: Vernon, BC, Canada
Posted by razordws on Thursday, January 22, 2009 3:07 PM

Smeagol, those are some nasty seams but looks like you got it under control.

Dupes, welcome aboard.  What's that russian looking craft beside the KT?

What happened to our fearless leader?!?!?!  Ain't seen him about these parts for several days?  That last cold snap must have froze his Censored [censored] to the keyboard! Wink [;)]

Dave

  • Member since
    April 2007
  • From: Schroon Lake, NY
Posted by SMJmodeler on Wednesday, January 21, 2009 2:05 PM
dupes: Cool to see that KT in there!...I'll be following along to see how she turns out!  By the way, that picture doesn't do that build justiceBlack Eye [B)]...I remember that one having a real nice finish!

  • Member since
    November 2006
  • From: Coastal Maine
Posted by dupes on Wednesday, January 21, 2009 9:07 AM

Quick update - the status of the three kits I need to FINISH! Grumpy [|(]

Of course, there may be more added to the list...Whistling [:-^]

  • Member since
    April 2008
  • From: Philadelphia PA
Posted by smeagol the vile on Sunday, January 18, 2009 4:25 PM

well, my kit is coming along slowly, but its coming, ALOT of seams and modifications required.

The torso, looking front on, seems like it will be simple, eh'?

Here is the side, say hi to seams

The legs, (back) say hi to more seams and welcome to the wonderful world of modding

Here come da mods!  The joints, which were simple holes that the pegs from the previous pushed into, had to be modded into C joints inorder to paint and remove all the seams.

The arms and hands, more seams!


  • Member since
    October 2004
Posted by MarkDunck on Sunday, January 18, 2009 7:59 AM

Well I got my transport Fruil's track put together. I have to buy batteries for my camera so no pics yet. I will probably have the blacken it on by then. The track went together quick as it was the early Fruil's that crimp together.

Mark

To Thine Ownself be True
  • Member since
    April 2005
  • From: Australia
Posted by taxtp on Sunday, January 18, 2009 2:15 AM

Hi Everyone, Not much to report on my 1/32 komet. I've masked up the upper wings and canopy, ready to do the mottle, and re-sprayed parts of the fuselage that I had reworked. I'm still not happy with the fuselage windows, so it looks like it goes back to the workshop again.... I haven't heard of anyone else having this problem, it must have been me. Hopefully something a bit more substantial next time

Cheers Tony

I'm just taking it one GB at a time.

  • Member since
    August 2006
  • From: The Great State of Wyoming
Posted by wyoroy on Friday, January 16, 2009 1:38 PM
I would also like to Sign - Welcome [#welcome] smeagol the vile to the No more Excuses Group Build.

Roy (Capt. Wyoroy FAAGB/USNFAWGB)

John 3:16

JOIN OUR COMMUNITY!

Our community is FREE to join. To participate you must either login or register for an account.

SEARCH FORUMS
FREE NEWSLETTER
By signing up you may also receive reader surveys and occasional special offers. We do not sell, rent or trade our email lists. View our Privacy Policy.