SEARCH FINESCALE.COM

Enter keywords or a search phrase below:

Regia Aeronautica GB II (06/15/09 to 06/15/10)

261189 views
3232 replies
1 rating 2 rating 3 rating 4 rating 5 rating
  • Member since
    July 2003
  • From: waynesboro va, via Ireland
Posted by sidure on Wednesday, January 21, 2009 11:43 PM

OK, the surgery is over now and it was a success. I used the yellowed decal as a mask but put set and sol on it. Painted the airframe and tonight I removed the decal by applying tamiya tape and ripping it off. Found this method by mistake on an F-4. Dont ask how it came out. I also learned a new chipping or fading method with this.

Some paint did gt underneath it and some spots were stubborn to remove so a bit of touch up paint was required

The scheme I am doing is the smoke rings and I have the Mike Grant decals for that. Cant wait to try them out. Only the wings and tailplanes are underside blue and a little wrap around of the top colour on them.

Steve

  • Member since
    October 2004
  • From: League City, Texas
Posted by sfcmac on Thursday, January 22, 2009 9:47 AM

 Mighty fine work there Steve! Glad you yellow decal created a template for you to get the stripe right! Interesting outcome.... I would have painted some duct tape white and just stuck it on. Turned out very well and better than the decal!. I like the colors and am anxious to see  how those smoke ring decals work!

  Been inspires by Steve's work and SC's new airbrush so much I decided to paint on mine a bit.

Again with the fishnet curse as the canopy also doesn't fit? Shock [:O]Black Eye [B)] Actual pretty far off again? I wonder if it is the same as the 202 and 205 and they are making it work. Like I did?  Hack hack! Saw Saw Cut Cut!  Getting my exercise on this thing.  Got it on and started my painting!  Notice the duct tape masking the white stripe Steve!  You were a true inspiration! Make a Toast [#toast]


  • Member since
    September 2003
  • From: South Central Wisconsin
Posted by Daywalker on Thursday, January 22, 2009 10:02 AM

Looking very good Steve! Thumbs Up [tup]

Aaron- I wouldn't have believed you masked your stripe with duct tape if I didn't see it with my own eyes!!! Shock [:O]  You're killing me!  What next?  Using a pipe wrench as a paint holder? LOL

Frank 


  • Member since
    February 2007
  • From: Bournemouth UK
Posted by Luftwoller on Thursday, January 22, 2009 10:46 AM

Geez Aaron, im shocked Shock [:O] Your like, one of those real modellers and stuff. Your actually modelling and not just assembling. The gaffer tape to mask the fuzz band is just genius. Prepare for a few PM's from me as im sure im going to need it. Arnt these PCM kits fun. Ive read a few reviews of mine and they all say i have to grind away the inside of the fuselage in order to get my pit to fit. Im actually looking forward to it and a sick sado Masochistic way LOL.

I got my struts today as well. Im looking forward to finishing the CR.42

Steve, Your kicking butt as well. Sounds like your going about your modelling the way i do. By doing all the silly little bits while waiting for paint and seams and the like to dry. The builds fly along that way, unless that is unless your doing a PCM kit.

...Guy

..'Your an embarrassment to the human genus, makes me ashamed to call myself Homo'.
  • Member since
    October 2007
  • From: Inland Northwest
Posted by Summit on Thursday, January 22, 2009 10:49 AM
 Daywalker wrote:


Aaron- You're killing me!  What next?  Using a pipe wrench as a paint holder? LOL

Frank - Remember the incident with the TBD and the spilt glue -

Holder I would of Never thought of using a Pipe Wrench , Great Idea you should send it in Thumbs Up [tup] And here I thought the clamp was a good one. Sigh [sigh] Laugh [(-D]

Guy - Fantastic Repair work, great to see you moving forward again.

Aaron - Wow~wee you are a Machine to be doing that much Quality work so quick. Do you have a "Made in Korea" stamp on you somewhere ? I think you should buy yourself one of thos 1.5 gallon shop vacs to get rid of the dust in the cracks and corners of your work area. 

Sean "I've reached nearly fifty years of age with my system." Weekend GB 2008
  • Member since
    December 2005
  • From: back seat of your car with duct tape streched out
Posted by soulcrusher on Thursday, January 22, 2009 11:39 AM

Steve can't wait to see how she looks with the smoke ring decals on.

Aaron i can't believe you have paint on that baby already. Those Wingus and Dingus are really pulling thier weight on this build.

So Guy whats next? Finish the Cr42 or more resin dust?

I'm hoping to find a new airbrush at my door when I arrive home tonight so I can mask and spray my top color tonight.

                                                                                    SoulcrusherPirate [oX)]


  • Member since
    October 2004
  • From: League City, Texas
Posted by sfcmac on Thursday, January 22, 2009 12:28 PM

Paint? SC? that was Future drying cuz I be decaling and weathering!

Your right Sean I really need to wipe off my window seal. Yuck [yuck] I was spraying aluminium paint during the 48 hr GB and a srorm came up, Wind blew back against the fan so hard that I got silver overspray all over the world!  The good part is I can't tell what's paint and whats dirt anymore!

 I have had this same beat up crank table for almost 20 years now. Got it in Germany way back when. It holds up to my abuse pretty well but looks quite camoflauged now.

Edit.. ACK! Seam alert lower wing seam! ACK! Bang fasted dremel in the west! Cowboy [C):-)]

  • Member since
    February 2007
  • From: Bournemouth UK
Posted by Luftwoller on Thursday, January 22, 2009 1:17 PM

Whats this? The worlds gone crazy. Aarons on decalling already!!! I think Wingus and Dingus are spending to much time over there, Mister. I persuaded Wingus to pry open the seam just to hold you up. Shes a good girl LOL.

My next build is deffo to finish the CR.42, then maybe the 1/48 macchi to see how that ciompares to the PCM.

...Guy

..'Your an embarrassment to the human genus, makes me ashamed to call myself Homo'.
  • Member since
    October 2004
  • From: League City, Texas
Posted by sfcmac on Thursday, January 22, 2009 1:53 PM

Hey thanks Guy! I am at that stage now where it is slowing down cuz I got no ther parts to work on.  Finish the decaling and future her up again.  Add the gear and bits and if all goes well have a 1/32 RE 2005 from Pacific coast completed.  Real PITA these limited run kits.  Satisfing as SC said when finished but sometimes I crave a Tamiya quickie!  Touched up my white band just like Steve showed and all is looking well. May have to call in some reenforcements though!

Good news is the decals are sweet! Work very well. Haven't needed any setting solution so can't comment on how they react to it. I ain't tempting fate ya know! Wink [;)]

  • Member since
    September 2004
  • From: Vernon, BC, Canada
Posted by razordws on Thursday, January 22, 2009 2:23 PM

Guy, nice save on the pit wall.  I'm sure you won't be able to tell the difference once it's installed.

Aaron, your a madman, Not only are you building at a feverish pace you still have time to whip off a few Princess Leia's in your clone machine.  (Uh... can I borrow your cloning machine sometime Evil [}:)]Mischief [:-,])  The results look most excellent... of your model... ya, I meant your model. Wink [;)]

Steve, that is an interesting technique on the decal mask.  That's another tip I'll have to file away for future use.

My bench time is nil at the moment and I've got a couple of other builds ahead of the Ca 311 so Iwon't be starting for awhile.

Dave

  • Member since
    October 2004
  • From: League City, Texas
Posted by sfcmac on Thursday, January 22, 2009 3:31 PM

Thanks Dave!

Actually my feverous pace has slowed to a crawl.  Lots of decals and stencils. To be fair these are probably some of the best decals I have come across. The print is very clear. The smaller stencils can be read with the nakid eye on the dark green background and seem to be written in very Italian words. If I spoke Italian? Most are close enough to english words to understand but as always don't ask me about the spelling!

Lots of measuring and marking angles and comparing the instructions. Very thin carrier but all are behaving well. There was some silvering on the large roundrals atop the wings. Almost impossible to eliminate totally on the dark background. I believe it is the adhesive showing through. Hopefully the future overcoat will hide it well enough.  Cup o' java and then back to work!


  • Member since
    September 2003
  • From: South Central Wisconsin
Posted by Daywalker on Thursday, January 22, 2009 4:01 PM

Aaron- OMG!  You are a machine my friend.  I think I started my 1/48 Hasegawa 109 at the same time as you started this one, and I haven't even painted the cockpit yet!  Looks like I better get my tush in gear or I'll be building here on OT. Disapprove [V]

Great work, bet she's finished by the time I get home tonight. Thumbs Up [tup]

Frank 


  • Member since
    October 2004
  • From: League City, Texas
Posted by sfcmac on Thursday, January 22, 2009 5:03 PM

Ah moving at a snails pace Frank. Once I let the decals dry they all look ok but the upper wings? Check out the silvering even with the future? Wow. Broke down and made a series of cuts all through it and let some decal setting solution set on it.  It crinkled( Gasp) then flattened and dried ok.  Still very tiny pin pricks of silvering but nothing like this.

Hard to get cranky because the others all are pretty much trouble free and take all kinds of abuse getting lined up and mirroring the opposite side.

Take a look at some of the detail and clariety on them if the camera cooperates.

What is a portabello radio? Is that like a big mushroom in spagetti?

All in all once I am certain the decal silvering issue is gone then it looks to be a rather dashing aircraft.  Just taking baby steps to get er done! Resisting the urge to rush and make a mistake!

  • Member since
    September 2004
  • From: Vernon, BC, Canada
Posted by razordws on Thursday, January 22, 2009 5:18 PM
Very nice Aaron, I love those Italian unit symbols on the band.  I really like the looks of that bird.  I did a 1/72 RE 2000 (or was it a 2001?) many many years ago and still have it.  Thumbs Up [tup]Thumbs Up [tup]

Dave

  • Member since
    December 2005
  • From: back seat of your car with duct tape streched out
Posted by soulcrusher on Thursday, January 22, 2009 5:34 PM

Looking great there Aaron.After this build you must give Wingus and Dingus a little break. I am going to assume tomorrow you will be posting pics of your completed work.

Guy that Wingus is a love isn't she? Poping that seem open on Aarons build for you just to slow him down a bit. I whish I could get her back from Aaron but he has ignored all of my requests to date. Mabye you have more influence and can pull her away fron under Aarons spell.

No airbrush awaiting me when I arrived home today.Sad [:(]. I might just mask it off and spray it with the old trusty badger 350. We'll have to see how motivated tonight.

                                                                                      SoulcrusherPirate [oX)]


  • Member since
    October 2004
  • From: League City, Texas
Posted by sfcmac on Thursday, January 22, 2009 5:59 PM

 Ah we shall see thanks for the comments and putting up with all the pics. Seems like I notice something in every picture to improve apon. The canopy in the last pic above has given way, It was only tacked on to serve as a mask and get the same paint treatment as the aircraft so it will be fixed. What do you fellows know about the canopy. Did it open like a 109 or slide back like a Hurricane?  Not a lot of pics in real life of these RE 2005's. Confused [%-)] May have to leave it closed up with the fit issues.

 Anyways I gave you the before shot of the silvered wing roundral above. After much tedium and tiny cuts with a new hobby knife I soaked it but good in full blown solveset. Figured if I wrecked them no biggy as they need replaced looking as they were. So here is the end results.

before

and after.

Much better. Probably won't fully dry perfect as it was so bad but a far sight better than it was.

Going to let them dry completely and give it the future sealing treatment. So many small fine stencils to protect against fingers and scratched. It is almost a must do.

When that drys I will begin the weathering process. These were new well cared for fighters. Lots of pride in them looking at all the markings. Not going to kill it with weathering but Another question would be about the exhaust stains. I mean it sorta serves to reason that the same power plant that was in the 109 would have similar stains to the 109?  What do you all think? Question [?]

Hmmmm start asking questions and everyone runs off to dinner or bed! I see what's going on here said the blind man! Blindfold [X-)]Laugh [(-D]

Anyways the decal fix worked out! Hurray!  and now I am back on track waiting for the future to dry!  Story of my life!

oooooooo shiny!Blush [:I]

  • Member since
    July 2003
  • From: waynesboro va, via Ireland
Posted by sidure on Thursday, January 22, 2009 9:23 PM

Aaron, very nice and shiny toooooo. Good save on the decals, it does not always work out that way, looks like you nailed it.

I had to touch up the white band and on the nose tonight so I have to wait for it to dry so I can glosscoat for decals. Looks like it will be tomorrow for that.

Steve

  • Member since
    October 2004
  • From: League City, Texas
Posted by sfcmac on Thursday, January 22, 2009 9:43 PM

Well it isn't so shiny anymore. Kinda reminds me of my Army days! Make it dull! Make it shiney! Make it dull again!  Kinda follows some sort of logic I suppose. Frank explained it to me once. He said you see there are birds and there are bees and what they have in common with us is.....  Well maybe when your older. 

So you see it's clear as mud!

I'm almost outta parts too!  Yes on the MODEL!  Jeeze! Pirate [oX)]

  • Member since
    December 2005
  • From: back seat of your car with duct tape streched out
Posted by soulcrusher on Thursday, January 22, 2009 10:02 PM

Well I decided I could not wait for the new airbrush so I dusted of old reliable. The badger 350 thinned my Tamiya blackgreen and sprayed away. The airbrush behaved nicely and the paint went down smoothly. Unmasking pulled up a small spot on my band mask that need touch up. That seems to be a must in this GB?!

Aaron if I remember corectly the canopy hinged to the right like the Me 109. I think I have photos. Mabye when Guy wakes up you can ask him to look in his new shiny book that he purchased. I would not due much in the way of weathering these planes hardly saw any service before the war ended fot Italy. mabte some exaust staining and some wear on the wing were the pilot walked but not much more.

So here are a couple of pics. The plane depicted is from the 377 Squadregia stationed at Trapani in 1942.

                                                                          SoulcrusherPirate [oX)]


  • Member since
    October 2004
  • From: League City, Texas
Posted by sfcmac on Thursday, January 22, 2009 10:14 PM

 Cool SC! Glad you didn't wait it looks magically delicious!  Really sharp! That is the same Aircraft I am doing with the radial engine. The resemblance to the Early Thunderbolt's and their forrunners is uncanny! Here I thought mine looked like a 109 with Spitfire wings!  Really shows how the engine makes the Aircraft doesn't it?  We got a good representation going of the RE series!

 Looking Great!  Bow [bow] I know what kinda work it takes to get there!  Splendertacious!

  • Member since
    December 2005
  • From: back seat of your car with duct tape streched out
Posted by soulcrusher on Thursday, January 22, 2009 10:35 PM

Thanks Aaron. This has turned out to be a great GB has'nt it? I think we both need to build something else. What do you think. At the rate you crank them out it would probally only take you a week to finish another one. Great subject you chose. These aircraft are always neglected and some actually performed better than thier German counterparts believe it or not. I have read that most Luftwaffe pilots agreed that the 202/205 series out performed the 109 in alomost every aspect. Their were just never enough of them. Lets wake Guy up to show him our pretty models!Big Smile [:D].

                                                                               SoulcrusherPirate [oX)]


  • Member since
    September 2004
  • From: Vernon, BC, Canada
Posted by razordws on Thursday, January 22, 2009 10:49 PM
 soulcrusher wrote:

I have read that most Luftwaffe pilots agreed that the 202/205 series out performed the 109 in alomost every aspect. Their were just never enough of them. Lets wake Guy up to show him our pretty models!Big Smile [:D]

SC, looking good.  I'd use big words to describe just how great it is but I can't spell as good as Aaron does.  

The only problems with the 202/205 series was that they didn't have near enough firepower.  They were still using rifle calibre guns if I remember correctly when everyone else was armed with cannons.

I wouldn't wake up Guy if I were you.   Something to do with hibernation season. Wink [;)]

Dave

  • Member since
    October 2004
  • From: League City, Texas
Posted by sfcmac on Friday, January 23, 2009 12:01 AM

 razordws wrote:

SC, looking good.  I'd use big words to describe just how great it is but I can't spell as good as Aaron does.  

The only problems with the 202/205 series was that they didn't have near enough firepower.  They were still using rifle calibre guns if I remember correctly when everyone else was armed with cannons.

I wouldn't wake up Guy if I were you.   Something to do with hibernation season. Wink [;)]

 Nope plenty of performance and firepower. My plane was armed with 3 20mm cannon and 2 12.7 mm MGs. Equal to the 109 gunships but could fly at near 400mph and maneuver like a Spitfire.

I'll post the read up info on the instructions which show the main issue was the unbelieveably inept Italian Government during the war. Which was good for us. Unofficially there has been stuff written about when some of the seasoned Italian Pilots got there hands on these birds they would fly solo missions. Looking for specific targets for payback. Politics aside war has a way of creating grudges, and when given these types of tools the results were frightening.  My aircraft is from 1943 before the Italian surrender. A 390mph performance with said armament and maneverabilty just was incredible in 1943. The most current G-6 models could not follow without losing a tail so they were pretty fearful fighters if the engines were of good quality.

The more I study the Italians the more I realize that they were much more capable than history shows. I have concluded that the true spirit and talent of that country was not exactly one with Nazi Germany or Mussolini.


Well short of maybe a panel line wash up topside and some exhaust stains I think that's about it!

Tongue [:P]

  • Member since
    September 2003
  • From: South Central Wisconsin
Posted by Daywalker on Friday, January 23, 2009 8:09 AM
Man, there are some seriously good looking Reggaine's around here!  Top notch work fellas.  I detailed the cockpit a little on the '109 last night, and am making seatbelts this morning.  Hope to spray the base color this afternoon so I can start showing some pics too! Tongue [:P]

Frank 


  • Member since
    February 2007
  • From: Bournemouth UK
Posted by Luftwoller on Friday, January 23, 2009 11:17 AM

Wow geewillipers kideroonys. You guys have excelled well beyond the call of duty.

Aaron, are you my 1st completant? or was there someone before you. My poor brain. Fantastic save on the decals. They looked like gonners for sure. Ive salvaged some seriously silvered decals in the past with perseverance....that and loads of sol and a blade LOL. Whats next big boy? Enquiring min ds need to know?

SC, looks like yours is done, all bar the shouting..err decals. The engine looks sweet as in the cowling. Well worth the extra effort.

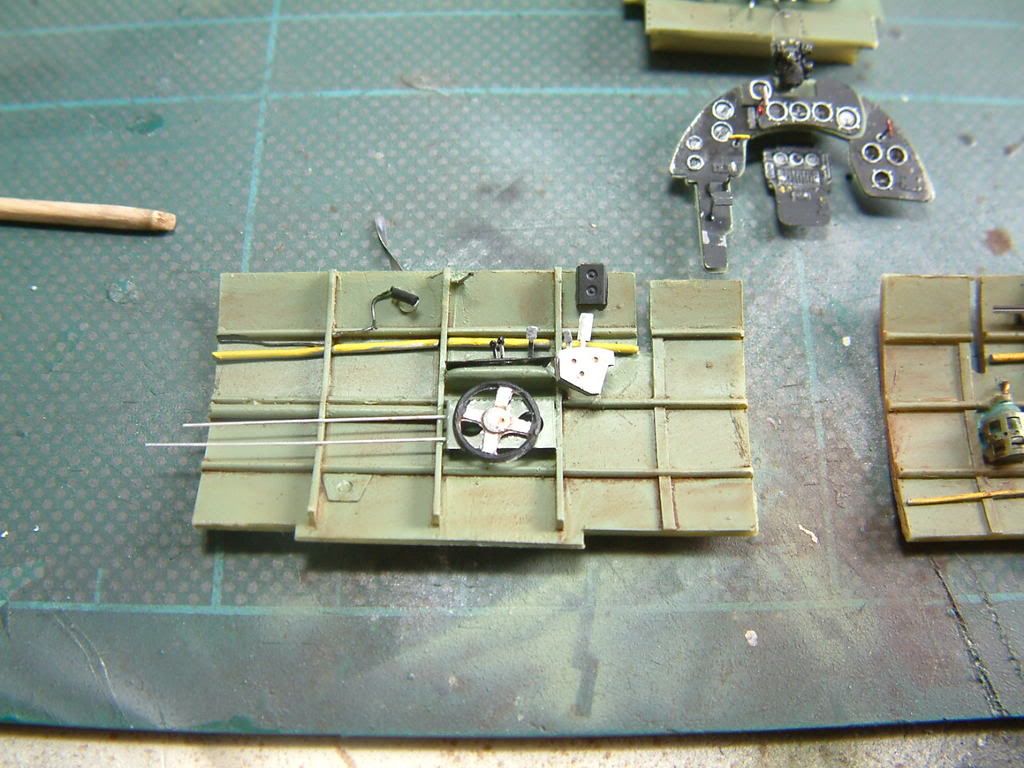
Ive been having real fun and games...The fun was the finishing of the L/H cockpit side (Ex-cracked one) and the games was the the strange instructions in the PCM Kit,

Heres the repaired and detailed sidewall,
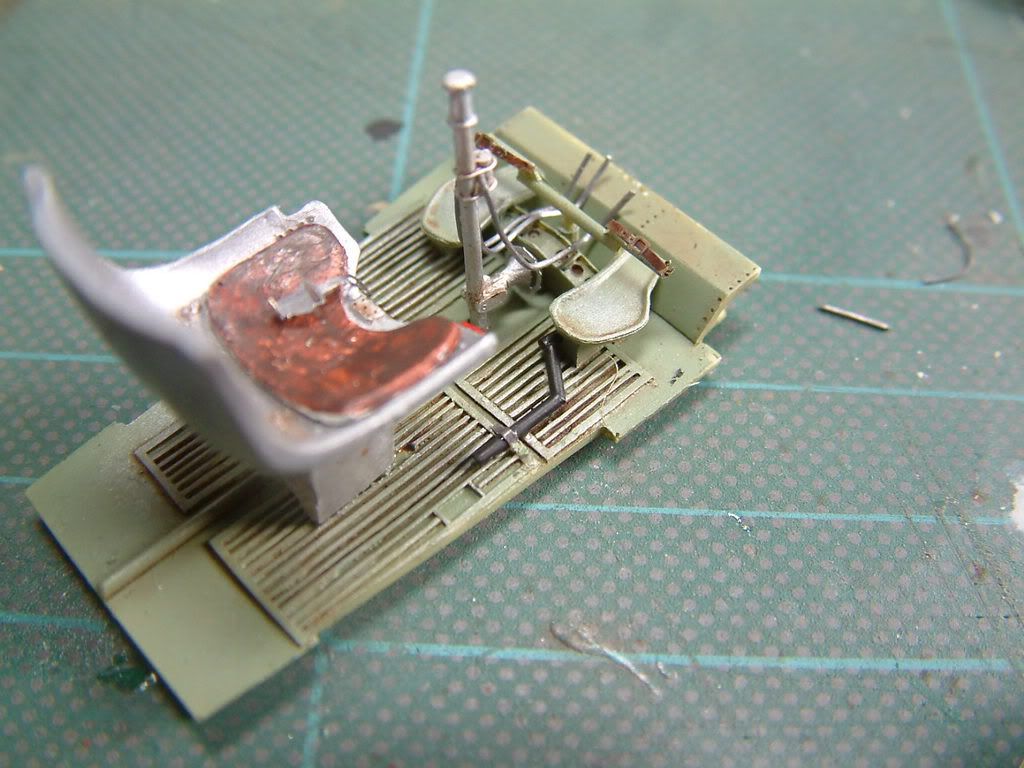
Heres the floorpan with my scratcbuilt starter handle,
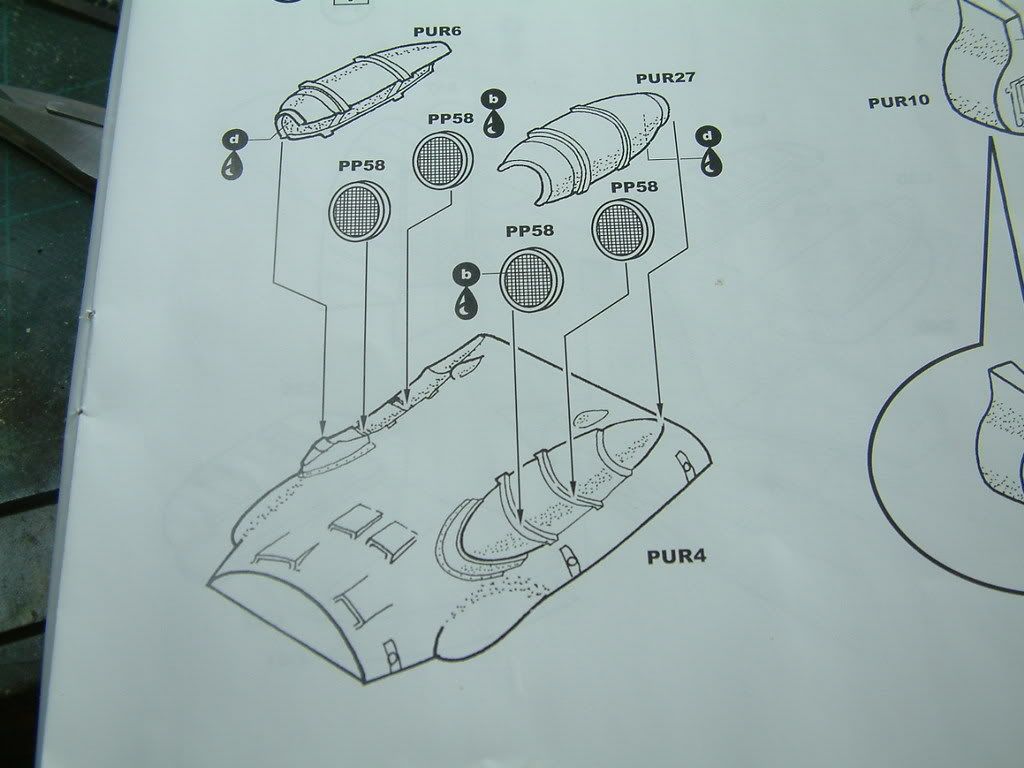
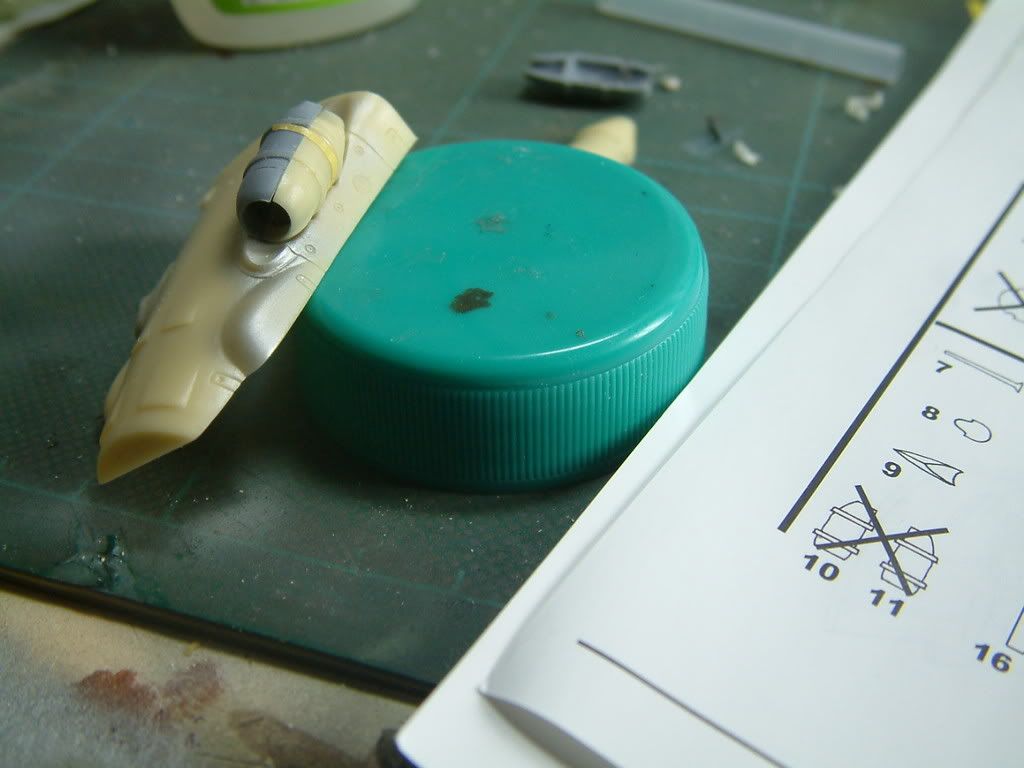
And heres the dodgy instruction malarky, I started on the resin underpanel with the 2 airfilters on. Heres what the instructions say to use. 2 rein 'Halfs' PUR 6 and 27.
Dryfitting to check showed it looking a little strange,
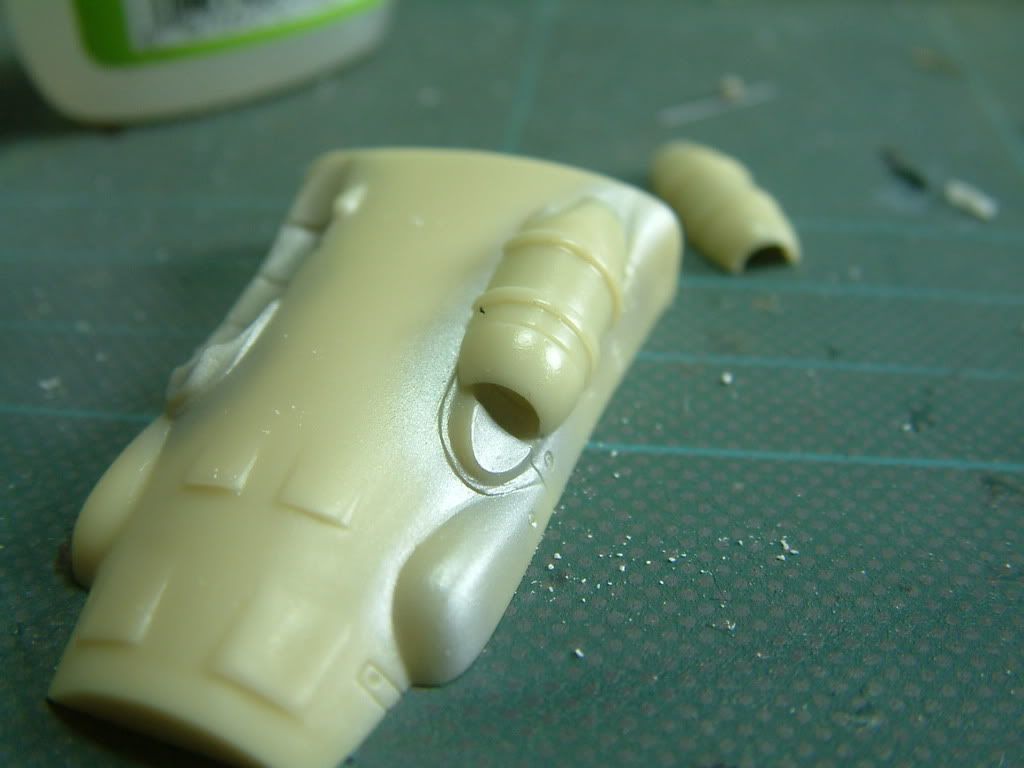
Not looking an awfull lot like the real thing,
in this picture you can see that the distructions say not to use the injection moulded parts, but i plan on using them with the resin pieces. Dont look too shoddy and with a gallon of CA and Mr Surfacer im sure it will look ok,
Keep up the good works all. Aaron and Crusher, at this rate by the time i finish mine youll have another couple done each. You swines!!

Wingus came home last night covered in jam!!! Whats going on!! You play nice, you bad men.

...Guy

..'Your an embarrassment to the human genus, makes me ashamed to call myself Homo'.
  • Member since
    September 2004
  • From: Vernon, BC, Canada
Posted by razordws on Friday, January 23, 2009 11:40 AM
 sfcmac wrote:

 razordws wrote:

The only problems with the 202/205 series was that they didn't have near enough firepower.  They were still using rifle calibre guns if I remember correctly when everyone else was armed with cannons.

 Nope plenty of performance and firepower. My plane was armed with 3 20mm cannon and 2 12.7 mm MGs. Equal to the 109 gunships but could fly at near 400mph and maneuver like a Spitfire.

Aaron, SC was talking about the Macchi 202/205 series and that is what I was referring too as well.  The Macchi 202 in particular had oly two 12.7 and two 7.7 machine guns.  The 205 did upgrade it's 7.7 guns to 20mm cannons but there weren't too many 205's built.

Guy nice save on the broken piece.  I can't even tell anymore.  It should be full speed ahead for you now once you get the jam off of Wingus.

Anyway, My workbench is inaccessible for another week or two so I decided to pull out the Fiat G55 S again for another look and decided I'm going to try to do a quick oob build with it while I'm waiting to get my bench back.  I started clipping sprue, cleaning up all the flash (there's lots) and painting the interior... oh wait... there is no interior.  Not even an IP or a stick.  Just a slab of a seat for the pilot to sit on and the pilot.  The pilot figure looks decent enough so in he goes.  Might try to scratch an IP and slap a decal on it from the spares box but that will be it.  My goal is to finnish this by the end of next weekend which will be around the time I get my bench back (I hope Sad [:(])

Dave

  • Member since
    December 2005
  • From: back seat of your car with duct tape streched out
Posted by soulcrusher on Friday, January 23, 2009 11:52 AM

Thanks for the positive input Dave and Frank. Still have some work to do as the landing gear struts rods are nut supplied in the kit and must be scratch build. The attachment point is a small hole in the bottom of the upper wing. Not exactly sturdy looking so I have to do some top notch fabricating to strengthen it up if I do'nt want it to break.

Guy those instructions are horrible! They really botched that one. Having build the Hasegawa 205 I have a good idea of what they are suppose to look like and the way they show it is not even close. I think they forgot about the other half of the oil cooler! I never trust the instructions on any kits anymore. Research and more research is the only way to go. A poop load of photos is always a big help to! I myself am a peanut butter type of guy so I would check with Aaron about the jam situation with Wingus. I hear he has a sweet tooth. Must have taken some time to clean up all of that jam. It tends to make everything else sticky huh.

                                                                                  SoulcrusherPirate [oX)]


  • Member since
    July 2003
  • From: waynesboro va, via Ireland
Posted by sidure on Friday, January 23, 2009 12:39 PM

SC, wow very nice. You are on the home stretch now buddy. Its really looking good and cant wait to see this one full of decals.

I did manage to get the glosscoat on mine today and would love to be laying down some decals later tonight. Cant wait to try these smoke rings

Steve

  • Member since
    October 2004
  • From: League City, Texas
Posted by sfcmac on Friday, January 23, 2009 12:40 PM

 Dave you know better than to listen to me anyways! Alien [alien] 202 ? 205, 2005? It's all part of the same era and I was wrong! Sleepy and still think it's your fault anyways! Make a Toast [#toast]Laugh [(-D]Mischief [:-,]

Besides SC started it! Black Eye [B)]Smile [:)]

Even if it isn't. We shall blame Guy as he is in charge! Propeller [8-] Shame shame!

 Yeah Guy I pretty much finished last night and waited until daylight to snap pics as usual.

If you see anything wrong it would be Dave's fault which concurrently means it falls on Guy's shoulders so Frank and Steve can beat em with a stick! I'm outta here for coffee and anniversary naggings! Black Eye [B)]Whistling [:-^]

 Got a littl brak fronm th Missus! Guess I am gonna have to take her out ! Jeeze!  Women!  I got models to build and she wants to get all nostalgic? Well what are we to do?

Duct tape..... Evil [}:)]

 A couple comments that I wanna touch on. Just to see if there is a consensus on our weathering techniques.

The Dark Green Italian Olive top has it'a panels highlighted and washed with a very thin light gray. The lower side Italian Sky Gray color was washed with a thin dark gray.  The gray colors are more forgiving and easier to control by adding more or less to the recesses. This to me gives a more realistic effect as panels are not always so clearly outlined and yet lets the details show up.

The cannons were sad. Two sicks that were the quality of stretched sprue. Why they were resin? I dunno. Repaced them with hollow metal tube.

The exhaust stains I tried mixing lighter and darker to get some effect that shows on the dark color.  It is quite heavy but still hard to make out in the pics. Used an airbrush at a distance to blow the layered washes over there natural path on the fuselage. Turned out pretty good.

The landing gear like everything else. Didn't fit right. The tail section was to big to fit at all and took some surgery. Managed to cut it down on areas that don't show.

 Lastly going to replace that weak pitot tube with a metal tube scratched one, and when the clear glue on the canopy is dried I shall smooth it out so it is more of a seal and not so rough.

 Any other suggestions welcome!  Thanks a bunch for the help thus far!Bow [bow]

  • Member since
    September 2003
  • From: South Central Wisconsin
Posted by Daywalker on Friday, January 23, 2009 3:10 PM

VROOOOOM, VROOOOOM!!!  Looks very nice Aaron, still cannotr believe you can crank out such excellent work so quickly!  Well done my friend. Approve [^]

And, Happy Anniversary to you and Dee! Party [party]

Guy- Nice job fixing up that side panel, can't even tell where it broke.  Which one was it again? Confused [%-)]  Great looking work. Thumbs Up [tup]  Looks like they gave you HALF of the needed parts for the coolers.  Combining the kit and resin parts looks to be the answer though.  Well done!

I did some work on the G-4 last night and today, adding a few missing details without going overboard on the details.  On the right sidewall, I added the Oxygen hose, fuel line, and some wires for the fuse box.  On the left, some cables for the throttle.  Also made some seatbelts out of Tamiya tape and fuse wire, and a restraining strap for the cannon breech cover.  I left off the straps from the rudder pedals, and a few other items I sometimes add as I wanted to get through the cockpit rather quickly so the build does not stall out.  There are two of each in the photo as the other is my "new" 109Gb entry, a Bf-109G-10 in 1/48.  The 1/32 was giving me fits (like those Censored [censored] Corsairs!) so it got boxed away for a bit too.  I can hear all of them conspiring from the closet to get me in the end.

Frank 


JOIN OUR COMMUNITY!

Our community is FREE to join. To participate you must either login or register for an account.

SEARCH FORUMS
FREE NEWSLETTER
By signing up you may also receive reader surveys and occasional special offers. We do not sell, rent or trade our email lists. View our Privacy Policy.